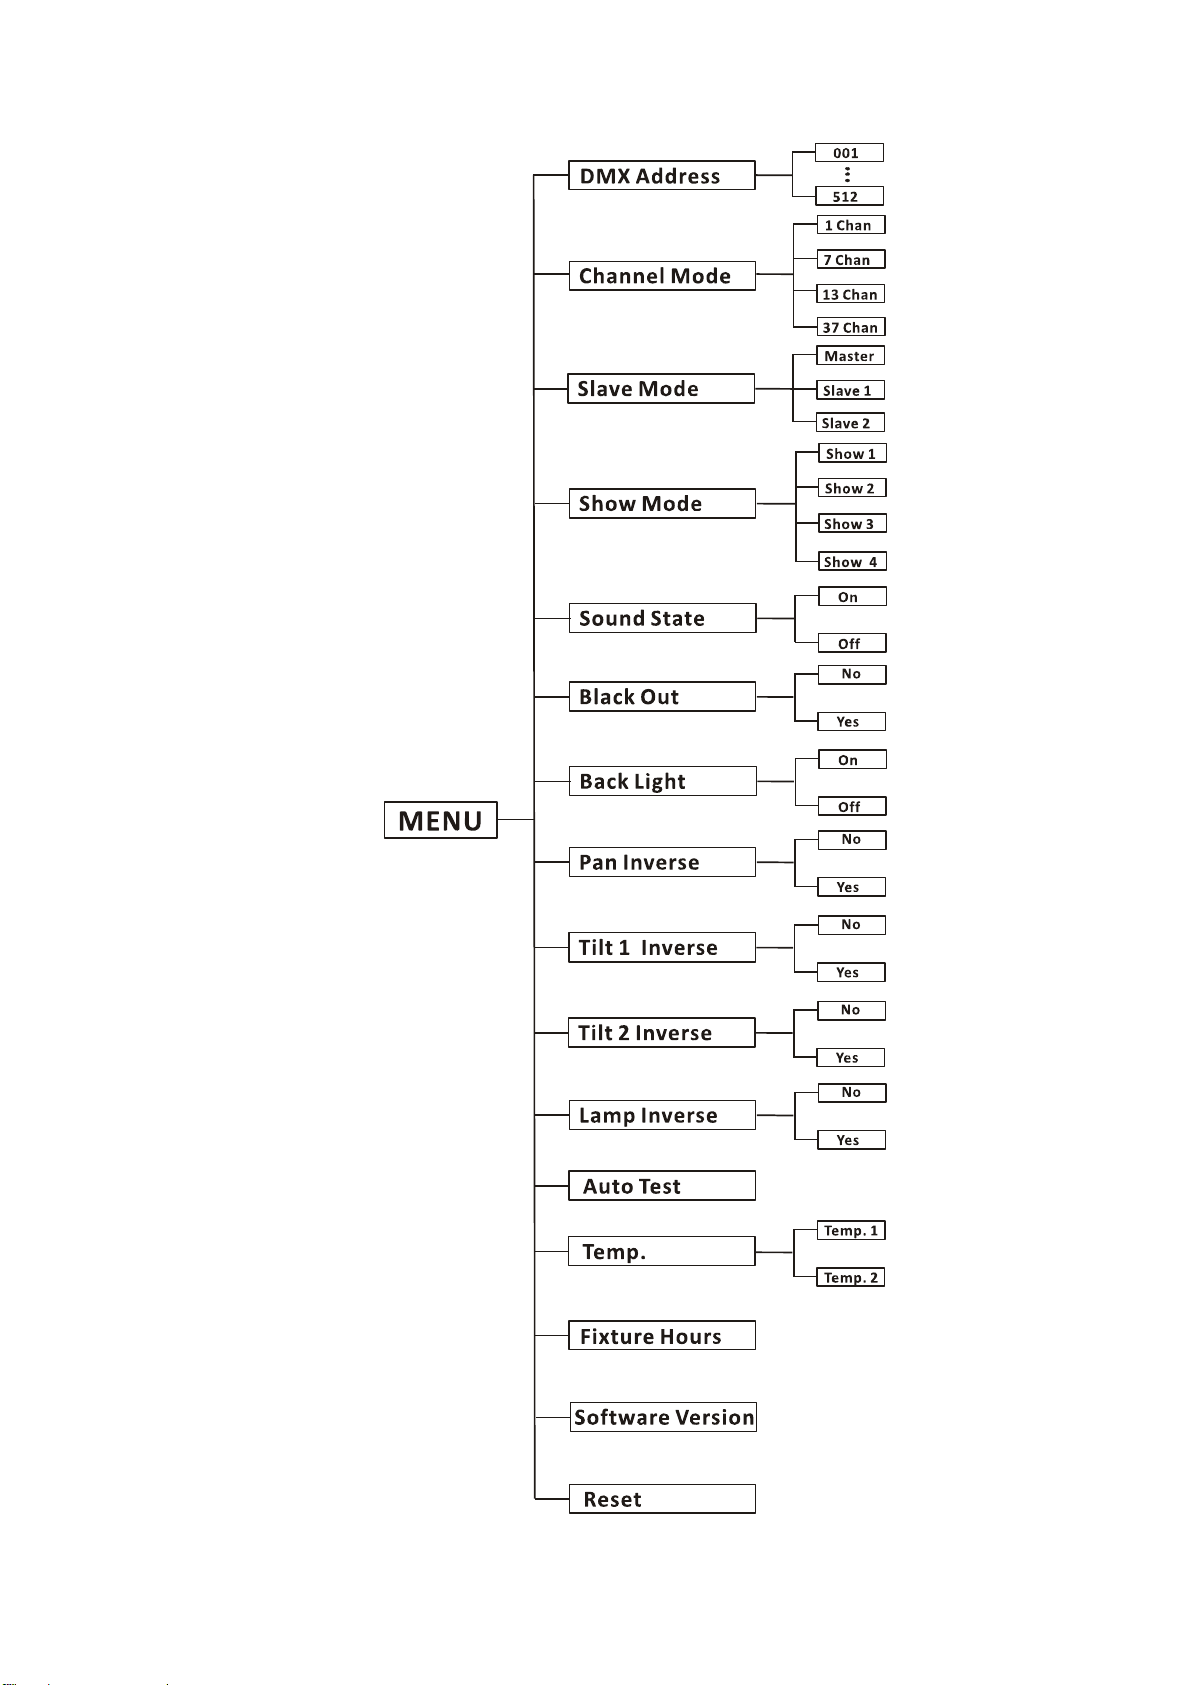
ACME SAMBA Color User manual

LED‐MB8FC
UserManual
Pleasereadtheinstructioncarefullybeforeuse

1A
CONTENTS
1.SafetyInstructions....................................................................................................2
2.TechnicalSpecifications ............................................................................................3
3.HowToSetTheUnit .................................................................................................4
3.1Front&RearPanel..............................................................................................4
3.2MainFunction ....................................................................................................5
4.HowtoControltheUnit .........................................................................................10
4.1Master/SlaveBuiltInPreprogrammedFunction ..............................................10
4.2EasyController..................................................................................................11
4.3DMXAddressSetting ........................................................................................11
5.DMX512Configuration ...........................................................................................12
6.DMXConnection ....................................................................................................16
7.Troubleshooting......................................................................................................17
8.FixtureCleaning......................................................................................................18

2A
1.SafetyInstructions
WARNING
yPLEASEkeepthisUserManualforfutureconsultation.Ifyousellthefixturetoanotheruser,
makesurethattheyalsoreceivethisinstructionbooklet.
yPLEASEunpackandcheckcarefullythereisnotransportationdamagebeforeusingthefixture.
yIt’simportanttogroundtheyellow/greenconductortoearthinordertoavoidelectricshock.
yPLEASEdisconnectmainspowerbeforeservicingandmaintenance.
yMaximumambienttemperatureisTa:40℃.DONOToperateitwherethetemperatureis
higherthanthis.
yUnit’ssurfacetemperaturemayreachupto85℃.DONOTtouchthehousingbare‐handed
duringitsoperation.
yIntheeventofseriousoperatingproblem,stopusingthefixtureimmediately.Nevertryto
repairthefixturebyyourself.Repairscarriedoutbyunskilledpeoplecanleadtodamageor
malfunction.Pleasecontactthenearestauthorizedtechnicalassistancecenter.Alwaysusethe
sametypespareparts.
yDONOTconnectthedevicetoanydimmerpack.
yDONOTtouchanywireduringoperationandtheremightbeahazardofelectricshock.
yThehousingmustbereplacediftheyarevisiblydamaged.
Warning
yTopreventorreducetheriskofelectricalshockorfire,donotexposetheunittorainor
moisture.
yThehousing,thelenses,ortheultravioletfiltermustbereplacediftheyarevisiblydamaged.
For230V50Hzpowersupply,maximumfixturesthatcanbeconnectedtogetherfrom
thesamemainsoutletis8pcs;
For120V60Hzpowersupply,maximumfixturesthatcanbeconnectedtogetherfrom
thesamemainsoutletis5pcs;
Pleasereadtheinstructionscarefullywhichincludesimportantinformation
abouttheinstallation,operationandmaintenance.

3A
Caution:
Therearenouserserviceablepartsinsidetheunit.DONOTopenthehousingorattemptany
repairsyourself.Intheunlikelyeventyourunitmayrequireservice,pleasecontactyournearest
dealer.
Installation:
Theunitshouldbemountedviaitsscrewholesonthebracket.Alwaysensurethattheunitis
firmlyfixedtoavoidvibrationandslippingwhileoperating.Andmakesurethatthestructureto
whichyouareattachingtheunitissecureandisabletosupportaweightof10timesoftheunit’s
weight.Alsoalwaysuseasafetycablethatcanhold12timesoftheweightoftheunitwhen
installingthefixture.
Theequipmentmustbefixedbyprofessionals.Anditmustbefixedataplacewhereisoutofthe
touchofpeopleandhasnoonepassbyorunderit.
2.TechnicalSpecifications
yInnovativemovingheads,deliveringmarvelous,laser‐likeandlong‐throwmulti‐beameffects
yMovingpanwith2movableLEDbars,eachwith4pixelcontrolled8WLEDsforthebestmid‐air
lightingeffects
y3OperationModes:DMX,Mater/Slavemode,SoundActivation.
yDMXChannelmodes:1,7,13and37channels
yGreatbuilt‐inprogramsundermaster/slaveoperationtriggeredbymusic.
yOptionaleasycontrollerCA‐8forinstantlightingshow.
ySmoothdimmingandvariousstrobeeffects.
yPunchpowerfulbeams,coveringwholevenue,perfectforevents,discos,bars,MobileDJsand
more.
yPowerVoltage:AC100~240V,50/60Hz
yPowerConsumption:81W
yLEDSources:8x8WQuad‐color(4in1)LEDs
yWeight:7.8kgs

4A
yDimension:414x153x376mm
3.HowToSetTheUnit
3.1Front&RearPanel
1.FunctionDisplay:Usedtoshowthevariousmenusandtheselectedfunctions.
2.LED:
DMXOnDMXinputpresent
MASTEROnMasterMode
SLAVEOnSlaveMode
SOUNDFlashingSoundactivation

5A
3.Button:
MENUToselecttheprogrammingfunctions
DOWNTogobackwardintheselectedfunctions
UPTogoforwardintheselectedfunctions
ENTERToconfirmtheselectedfunctions
4.POWERIN/OUT:Usedtoconnecttosupplypower;
5.Onlyforremotecontrol:UsedtoconnecttotheoptionalCA‐8tocontroltheunitforStand
by,FunctionandModefunction;
6.Fuse(T3.15A):Usedtoprotecttheunitfromthedamageofover‐current;
7.DMXIN/OUT:ForDMX512links,use3‐pinXLRplugcabletolinktheunittogether;
3.2MainFunction
Toselectanyfunctions,presstheMENUbuttonuntiltherequiredfunctionisshowingonthe
display.SelectthefunctionbypressingtheENTERbuttonandthedisplaywillblink.Usethe
DOWNandUPbuttontochangethemode.Oncetherequiredmodehasbeenselected,pressthe
ENTERbuttontosetuptogobacktothefunctionswithoutanychangespresstheMENUbutton
again.HoldandpresstheMENUbuttonforonesecondorwaitforoneminutetoexitthemenu
mode.
Themainfunctionsareshownbelow:

6A

7A
DMXAddress
ToselecttheDMXAddress,presstheENTERbuttontoshowDMXADDRESSonthedisplay.Use
theDOWN/UPbuttontoadjusttheaddressfrom001to512.Oncetheaddresshasbeenselected,
presstheENTERbuttontosetup,togobacktothefunctionswithoutanychangespresstheMENU
buttonagain.HoldandpresstheMENUbuttonforonesecondorwaitforoneminutetoexitthe
menumode.
ChannelMode
ToselecttheChannelMode,presstheENTERbuttontoshowtheCHANNELMODEonthedisplay.
UsetheDOWN/UPbuttontoselectthe1,7,13,37channelmodes.Oncethemodehasbeen
selected,presstheENTERbuttontosetup,togobacktothefunctionswithoutanychangespress
theMENUbuttonagain.HoldandpresstheMENUbuttonforonesecondorwaitforoneminute
toexitthemenumode.
SlaveMode
ToselecttheSlaveMode,presstheENTERbuttontoshowSLAVEMODEonthedisplay.Usethe
DOWN/UPbuttontoselecttheMaster,Slave1,orSlave2modes.Oncethemodehasbeen
selected,presstheENTERbuttontosetup,togobacktothefunctionswithoutanychangespress
theMENUbuttonagain.HoldandpresstheMENUbuttonforonesecondorwaitforoneminute
toexitthemenumode.
ShowMode
ToselecttheShowMode,presstheENTERbuttontoshowtheSHOWMODEonthedisplay.Use
theDOWN/UPbuttontoselecttheShow1,Show2,Show3orShow4Mode.Oncethemodehas
beenselected,presstheENTERbuttontosetup,togobacktothefunctionswithoutanychanges
presstheMENUbuttonagain.HoldandpresstheMENUbuttonforonesecondorwaitforone
minutetoexitthemenumode.
SoundState
ToselecttheSoundState,presstheENTERbuttontoshowSOUNDSTATEonthedisplay.Usethe
DOWN/UPbuttontoselecttheOn(soundon)orOff(soundoff)mode.Oncethemodehasbeen

8A
selected,presstheENTERbuttontosetup,togobacktothefunctionswithoutanychangespress
theMENUbuttonagain.HoldandpresstheMENUbuttonforonesecondorwaitforoneminute
toexitthemenumode.
BlackOut
ToselecttheBlackOut,presstheENTERbuttontoshowBALCKOUTonthedisplay.Usethe
DOWN/UPbuttontoselecttheYes(blackout)orNo(normal)mode.Oncethemodehasbeen
selected,presstheENTERbuttontosetup,togobacktothefunctionswithoutanychangespress
theMENUbuttonagain.HoldandpresstheMENUbuttonforonesecondorwaitforoneminute
toexitthemenumode.
BackLight
ToselecttheBackLight,presstheENTERbuttontoshowBACKLIGHTonthedisplay.Usethe
DOWN/UPbuttontoselecttheOn(LEDon)orOff(LEDoff)mode.Oncethemodehasbeen
selected,presstheENTERbuttontosetup,togobacktothefunctionswithoutanychangespress
theMENUbuttonagain.HoldandpresstheMENUbuttonforonesecondorwaitforoneminute
toexitthemenumode.
PanInverse
ToselectthePanInverse,presstheENTERbuttontoshowPANINVERSEonthedisplay.Usethe
DOWN/UPbuttontoselecttheYes(paninversion)orNo(normal),presstheENTERbuttonto
setup.BacktothefunctionswithoutanychangepressMENUbutton.
Tilt1Inverse
ToselecttheTilt1Inverse,presstheENTERbuttontoshowTILT1INVERSEonthedisplay.Use
theDOWN/UPbuttontoselecttheYes(tilt1inversion)orNo(normal)mode.Oncethemodehas
beenselected,presstheENTERbuttontosetup,togobacktothefunctionswithoutanychanges
presstheMENUbuttonagain.HoldandpresstheMENUbuttonforonesecondorwaitforone
minutetoexitthemenumode.

9A
Tilt2Inverse
ToselecttheTilt2Inverse,presstheENTERbuttontoshowTILT2INVERSEonthedisplay.Usethe
DOWN/UPbuttontoselecttheYes(tilt2inversion)orNo(normal)mode.Oncethemodehas
beenselected,presstheENTERbuttontosetup,togobacktothefunctionswithoutanychanges
presstheMENUbuttonagain.HoldandpresstheMENUbuttonforonesecondorwaitforone
minutetoexitthemenumode.
LampInverse
ToselecttheLampInverse,presstheENTERbuttontoshowLAMPINVERSEonthedisplay.Use
theDOWN/UPbuttontoselecttheYes(theledswilllightupfromrighttoleft)orNo(normal,the
ledswilllightupfromlefttoright).Oncethemodehasbeenselected,presstheENTERbuttonto
setup,togobacktothefunctionswithoutanychangespresstheMENUbuttonagain.Holdand
presstheMENUbuttonforonesecondorwaitforoneminutetoexitthemenumode.
AutoTest
ToselecttheAutoTest,presstheENTERbuttontoshowAUTOTESTonthedisplayandtheunit
willrunaself‐test.TogobacktothefunctionswithoutanychangespresstheMENUbuttonagain.
HoldandpresstheMENUbuttonforonesecondorwaitforoneminutetoexitthemenumode.
Temp.
ToselecttheTemp.,presstheENTERbuttontoshowTEMP.onthedisplay.UsetheDOWN/UP
buttontoselecttheTemp.1(thetemperatureofmovablebars1)orTemp.2(thetemperatureof
movablesbar2),presstheENTERbutton,andthedisplaywillshowthetemperatureofthe
movablebar.TogobacktothefunctionswithoutanychangespresstheMENUbuttonagain.Hold
andpresstheMENUbuttonforonesecondorwaitforoneminutetoexitthemenumode.
FixtureHours
ToselecttheFixtureHours,presstheENTERbuttontoshowFIXTUREHOURSonthedisplayand
thedisplaywillshowthenumberofworkinghoursoftheunit.Togobacktothefunctionswithout
anychangespresstheMENUbuttonagain.HoldandpresstheMENUbuttonforonesecondor

10A
waitforoneminutetoexitthemenumode.
SoftwareVersion
ToselecttheSoftwareVersion,presstheENTERbuttontoshowSOFTWAREVERSIONonthe
displayandthedisplaywillshowtheversionofsoftwareoftheunit.Togobacktothefunctions
withoutanychangespresstheMENUbuttonagain.HoldandpresstheMENUbuttonforone
secondorwaitforoneminutetoexitthemenumode.
Reset
ToselecttheReset,presstheENTERbuttontoshowRESETonthedisplay.PresstheENTERbutton
andallchannelsoftheunitwillreturntotheirstandardposition.
4.HowtoControltheUnit
Youcanoperatetheunitinthreeways:
1.Bymaster/slavebuilt‐inpreprogramfunction
2.Byeasycontroller
3.ByDMXcontroller
NoneedtoturntheunitoffwhenyouchangetheDMXaddress,asnewDMXaddresssettingwill
beaffectedatonce.Eachtimeyouturntheuniton,itwillshow“MB8FC”onthedisplay.Afterthat
theunitwillbereadytoreceiveDMXsignalorrunthebuiltinprograms.
4.1Master/SlaveBuiltInPreprogrammedFunction
Bylinkingtheunitstogetherinmaster/slave,thefirstunit(themaster)willcontroltheotherunits
(theslave)togiveanautomatic,soundactivated,synchronizedlightshow.Thisfunctionisgood
whenyouwantaninstantshow.
Tosetthefirstunitasamaster,presstheENTERbuttontoshowtheSHOWMODEonthedisplay.
NowusetheDOWNandUPbuttonsuptoselecttheShow1,Show2,Show3orShow4andthe
masterLEDwillbeconstantlylitandthesoundLEDwillflashtothemusic.Tosettheunitasa
slave,presstheENTERbuttontoshowSLAVEMODEonthedisplay.NowusetheDOWNandUP
buttonsuptoselectSlave1(normal)andSlave2(2lightshow)mode,andtheSLAVELEDwillbe

11A
constantlylit.
4.2EasyController
Theeasyremotecontrolisusedonlyinmaster/slavemode.Byconnectingtothe
1/4 ” microphonejackofthefirstunit,youwillfindthattheremotecontrolleronthe
firstunitwillcontrolalltheotherunitsforStandby,FunctionandModeselection.
.
4.3DMXAddressSetting
TosettheDMXaddress,presstheMENUbuttontoshowDMXAddressonthedisplay.Pressthe
ENTERbuttonandthedisplaywillblink.UsetheDOWNandUPbuttontochangetheDMX
address.Oncetheaddresshasbeenselected,presstheENTERbuttontosetup,togobacktothe
functionswithoutanychangepresstheMENUbuttonagain.HoldandpresstheMENUbutton
foronesecondorwaitforoneminutetoexitthemenumode.
PleaserefertothefollowingdiagramtoaddressyourDMX512channelforthefirst4units.
BlackoutBlackouttheunit
Function1.SoundStrobe(FullOn)
2.AutoStrobe(FullOn)
SelectShow
Show1‐4
ModeRandomShow
(LEDOFF)
Show
(LEDON)
ChannelModeUnit1Unit2Unit3Unit4
1channel1234
7channels181522
13channels1142740
37channels13875112

12A
5.DMX512Configuration
1/7 ChannelsMode:

13A
13ChannelsMode:

14A
37ChannelsMode:

15A

16A
6.DMXConnection
1. Connectthefixturetogetherina“daisychain”byXLRplugcablefromtheoutputofthefixture
totheinputofthenextfixture.Thecablecannotbebranchedorsplittoa“Y”cable.
Inadequateordamagedcables,solderedjointsorcorrodedconnectorscaneasilydistortthe
signalandshutdownthesystem
2. TheDMXoutputandinputconnectorsarepass‐throughtomaintaintheDMXcircuitwhenone
oftheunits’powerisdisconnected.
3. Atlastfixture,theDMXcablehastobeterminatedwithaterminatortoreducesignalerrors.
Soldera120‐ohm1/4 W resistorbetweenpin2(DMX‐)andpin3(DMX+)intoa3‐pinXLR‐plug
andplugitintheDMX‐outputofthelastfixture.
4. Eachlightingfixtureneedstohaveanaddresssettoreceivethedatasentbythecontroller.
Theaddressnumberisbetween0‐511(usually0&1areequalto1).
5. 3pinXLRconnectorsaremorepopularthan5pinsXLR.
3pinXLR:Pin1:GND,Pin2:Negativesignal(‐),Pin3:Positivesignal(+)

17A
7.Troubleshooting
Followingareafewcommonproblemsthatmayoccurduringoperation.Herearesome
suggestionsforeasytroubleshooting:
A. Thefixturedoesnotwork,nolight
1. Checktheconnectionofpowerandmainfuse.
2. Measurethemainsvoltageonthemainconnector.
B.NotrespondingtoDMXcontroller
1. DMXLEDshouldbeon.Ifnot,checkDMXconnectors,cablestoseeiflinkproperly.
2. IftheDMXLEDisonandnoresponsetothechannel,checktheaddresssettingsandDMX
polarity.
3. IfyouhaveintermittentDMXsignalproblems,checkthepinsonconnectorsoronPCBofthe
fixtureorthepreviousone.
4. TrytouseanotherDMXcontroller.
5. CheckiftheDMXcablesrunnearorrunalongsidetohighvoltagecablesthatmaycause
damageorinterferencetoDMXinterfacecircuit.
C.Somefixturesdon’trespondtotheeasycontroller
1. YoumayhaveabreakintheDMXcabling.
2. ChecktheLEDfortheresponseofthemaster/slavemodesignal.
D.Noresponsetothesound
1. MakesurethefixturedoesnotreceiveDMXsignal.
2. Checkmicrophonetoseeifitisgoodbytappingthemicrophone.
E.Oneofthechannelsisnotworkingwell
1. ThesteppermotormightbedamagedorthecableconnectedtothePCBisbroken.
2. Themotor’sdriveIConthePCBmightbeoutofcondition.

18A
8.FixtureCleaning
Thecleaningmustbecarriedoutperiodicallytooptimizelightoutput.Cleaningfrequency
dependsontheenvironmentinwhichthefixtureoperates:moist,smokyorparticularlydirty
surroundingcancausegreateraccumulationofdirtonthefixture.
yCleanwithsoftclothusingnormalglasscleaningfluid.
yAlwaysdrythepartscarefully.
yCleantheexternalopticsatleastevery30days.
DeclarationofConformity
Wedeclarethatourproducts(lightingequipments)complywiththefollowing
specificationandbearsCEmarkinaccordancewiththeprovisionofthe
ElectromagneticCompatibility(EMC)Directive89/336/EEC.
EN55103‐1:2009;EN55103‐2:2009;EN62471:2008;
EN61000‐3‐2:2006+A1:2009+A2:2009;EN61000‐3‐3:2008.
&
HarmonizedStandard
EN60598‐1:2008+All:2009;EN60598‐2‐17:1989+A2:1991;EN62471:2008;
EN62493:2010
Safetyofhouseholdandsimilarelectricalappliances
Part1:Generalrequirements
This manual suits for next models
1
Table of contents
Other ACME Dj Equipment manuals

ACME
ACME PAGEANT 300ZR User manual

ACME
ACME TB-1010QW II User manual

ACME
ACME XP-470 BSW User manual

ACME
ACME O2 Oxygen User manual

ACME
ACME ELLIPSOIDAL E-300 User manual

ACME
ACME Dragonfly Quad User manual

ACME
ACME MP-400Z IP User manual

ACME
ACME XP-1200F User manual

ACME
ACME LED WAVE 100 User manual

ACME
ACME Ellipsoidal 10 DMX User manual

ACME
ACME LED-747-1W User manual

ACME
ACME MP-90 RGBW User manual

ACME
ACME LED-MS150 User manual

ACME
ACME Theatre LED Colour Flood User manual

ACME
ACME CA-DD12 II User manual

ACME
ACME LP-TS200 CW User manual

ACME
ACME LED?7TC User manual

ACME
ACME AE-610 BEAM User manual

ACME
ACME MACE User manual

ACME
ACME Color Spot User manual