AGPtek M6S User manual

CONTENT
English
Deutsch
Francais
Italiano
Español
日本語
01/19
20/40
41/61
62/82
83/103
104/123

1
To find out how to use M6S/M16S or if you have a problem, please refer to User Manual.
The color of M6S/M16S sold in other countries/areas may differ from the color shown in this
manual.
Register AGPTEK Forum
Please visit www.agptek.com/forum and register AGPTEK official forum to get better customer
support.
AGPTEK Official AGPTEK Forum

2
Thank you for purchasing the AGPTEK product. Please read this [User Manual] carefully before
using the product, and retain it in for future use.
Note: This [User Manual] can help you understand how to use and troubleshoot the problem
safely.
1) It is recommended to clean the player regularly with a soft, lint-free cloth.
2) Always place the player out of reach of children and it is not allowed to use alone by kids.
3) Do not use the player in a humid environment. This player may not work properly or shorten
its service life because of moisture.
4) The AGPTEK-M6S/M16S uses Micro USB port for charging and data transfer. Connect this
player to cables with different port forcefully may lead to serious damage.
5) Disassemble, squeeze, bend, incinerate, or soak the player may cause a fire or other danger.
6) For disposition of this player, please refer to the local rules for waste disposal first. Please do
not discard the player at will, or it will do harm to others and the environment.
Tips:
1) Use a sound level that prevent yourself from hearing loss while enjoying the music.
2) Do not listen to music by headphones while driving, cycling or operating any large machinery.
This may distract you and cause accidents. In potentially dangerous situations, use
headphones with care while listening to music.
3) Please do not play music loudly in public. This may affect your hearing and people around
you.
4) Long-term exposure, repeated exposure to music or other noisy environments may result in
temporary or permanent noise-induced hearing loss.
5) The symptoms of hearing loss gradually increase with the exposure time. At the beginning,
you may not even be aware of the loss unless it is detected through a hearing test.
6) To protect your hearing, please adjust the volume so that the sound coming out of the
earphones is appropriate. When you can listen to the music clearly, it is recommended to set
a lower volume as much as possible. Studies have shown that when people's ears are in an
environment with a sound level of less than 80 dB for a long time, it will do not harm to
hearing. Therefore, it is safe to listen to music by earphones at this volume.

3
Examples of Typical Approximate Sound Level:
Refrigerator humming
40dB
Normal conversation
60dB
City traffic
80dB
Motorcycles and lawnmowers
90dB #
Rock concerts
110-120dB #
Firearms
120-140dB #

4
For First Use
Before you start using AGPTEK-M6S/M16S, please check the following information.
Computer System Requirements
When you connect AGPTEK-M6S/M16S to your computer, check the system requirements of your
computer ,The system must support the standard USB2.0 port.(Windows®
98/2000/ME/XP/Vista/10/Mac OS/Linux).For other systems, M6S/M16S may not be recognized
properly. Some systems may need to install drivers manually.
How to reset or format the device:
Find Settings > Factory settings/Format device, choose Yes or No to make or cancel the changes.
Note: Format the device will delete all of the data in this player. Before formatting the device,
please backup the files so as not to lose any files.
How to Charge the player:
1. Connect the player to an adapter(5V/500mA ) with a USB cable. Usually, it will need about 2
hours to charge the player.
2. Charge by computer: Connect the device to a running computer via the USB cable included.
USB 2.0 port only. Usually, it will need about 2 hours to charge the player.
Note: If the charging condition doesn't meet the standard, it may cause device malfunction, which
would be regarded as man-made damage.
Charging port/Data transmission port

5
How to transfer data by computer?
1. Connect your player to your computer via USB cable properly.
2. Double click “Computer” on the desktop and find the AGPTEK-M6S/M16S disk, and then
double click to open it.
3. Find the file or file folder you need in the computer, right click it and choose “Copy”, then in
the AGPTEK-M6S/M16S disk window, right click and choose “Paste” and the files will be
transferred to the AGPTEK-M6S/M16S disk. Or you can simply drag the files you need and
drop them in the AGPTEK-M6S/M16S disk window.
Note:
1. During the file transferring process, do not disconnect the player from computer, or it may
cause malfunction and the file being transfer may be damaged.
2. The music files transferred to the player may be arranged in a different order which is
different in your computer.
Directly move the files from your computer to
the folder of AGPTEK-M6S/M16S.
6
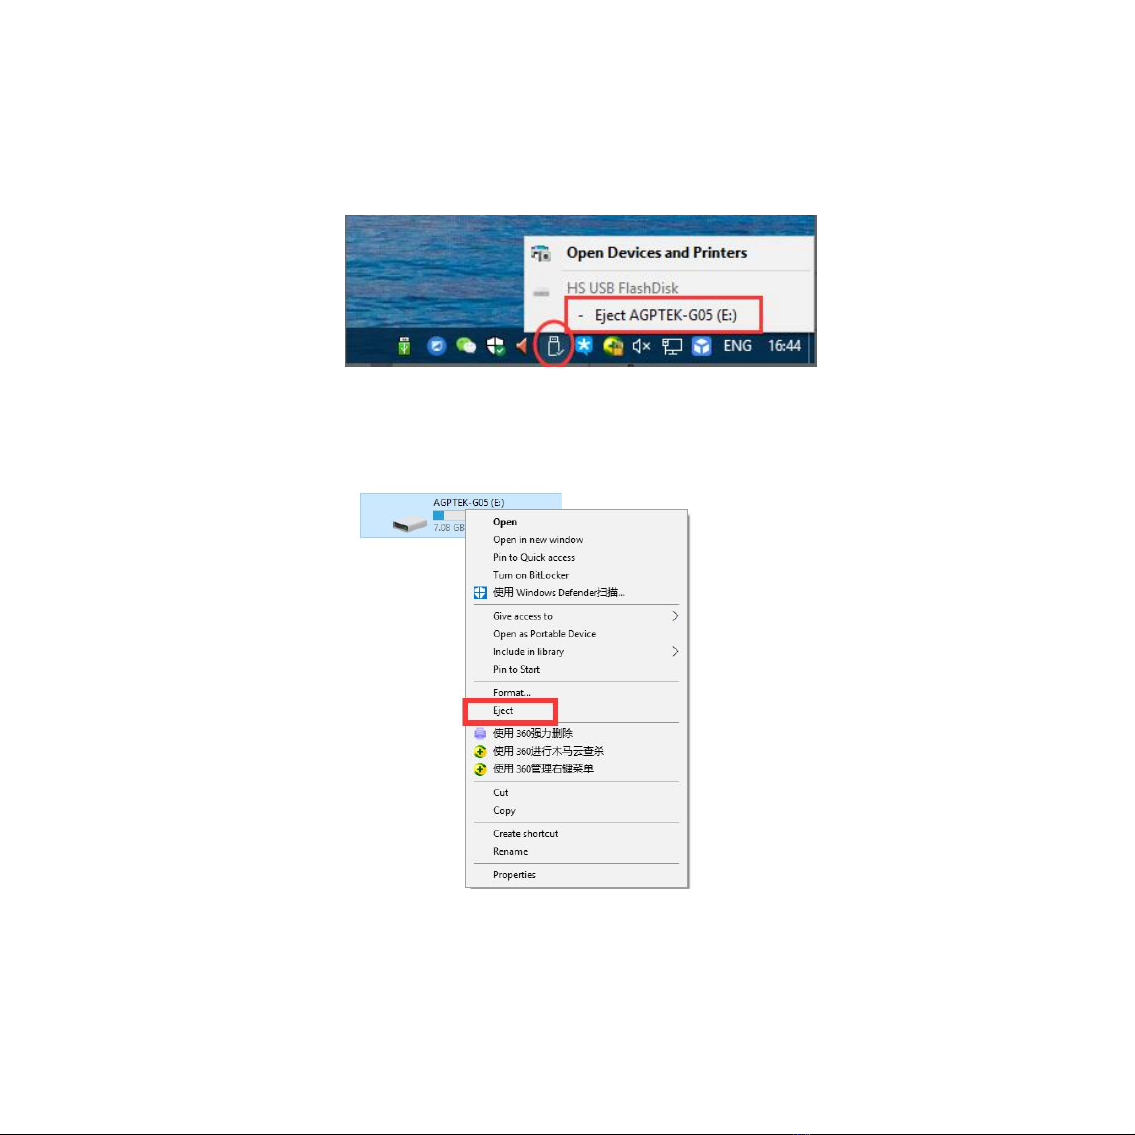
Disconnect from the computer
While you disconnecting it from the computer, please follow the steps below to avoid files and
player being damaged.
Left click on the flash disk icon in the taskbar at the bottom right of your desktop and click
“Eject-AGPTEK-M6S/M16S PLAYER”.
Or you can double click the “Computer” on the desktop and right click AGPTEK-M6S/M16S disk,
then click “Eject” to disconnect your player from the computer.
Note: DO NOT disconnect the player in the following case or it may cause malfunction and the
file being transfer may be damaged.
1. Do not disconnect the player during file transferring process.
2. Do not disconnect the player when there are files in the “AGPTEK-M6S/M16S” disk opened in
the computer.

7
Firmware Update
AGPTEK updates the firmware irregularly, such as adding new features, optimizing functions,
fixing bugs and so on. For better firmware support, it is recommended to download and install the
latest firmware on the AGPTEK website for a better user experience.
Download the latest firmware:
1. Go to AGPTEK website( https://www.agptek.com/blog) and search the firmware you want to
update with keyword like “agptek M6S/M16S”.
2. Click on Download >>, you will download a zip/rar file. Find a PDF file inside it(this is a
step-by-step guide for firmware update).
Reset AGPTEK-M6S/M16S player
If your AGPTEK-M6S/M16S player has stopped responding and does not work, you can reset the
player to fix it.
Please note:
1. Hold the power button for 10 seconds to rest the player.
2. Some models have a reset hole that can be reset by pressing the reset hole. Please refer to the
introduction of "Buttons and Controls" in the manual to see if this model contains a reset hole.
3. Resetting the player will not delete the files or data you saved in the player.
4. Do not reset the player during normal operation or it could cause memory damage.
8
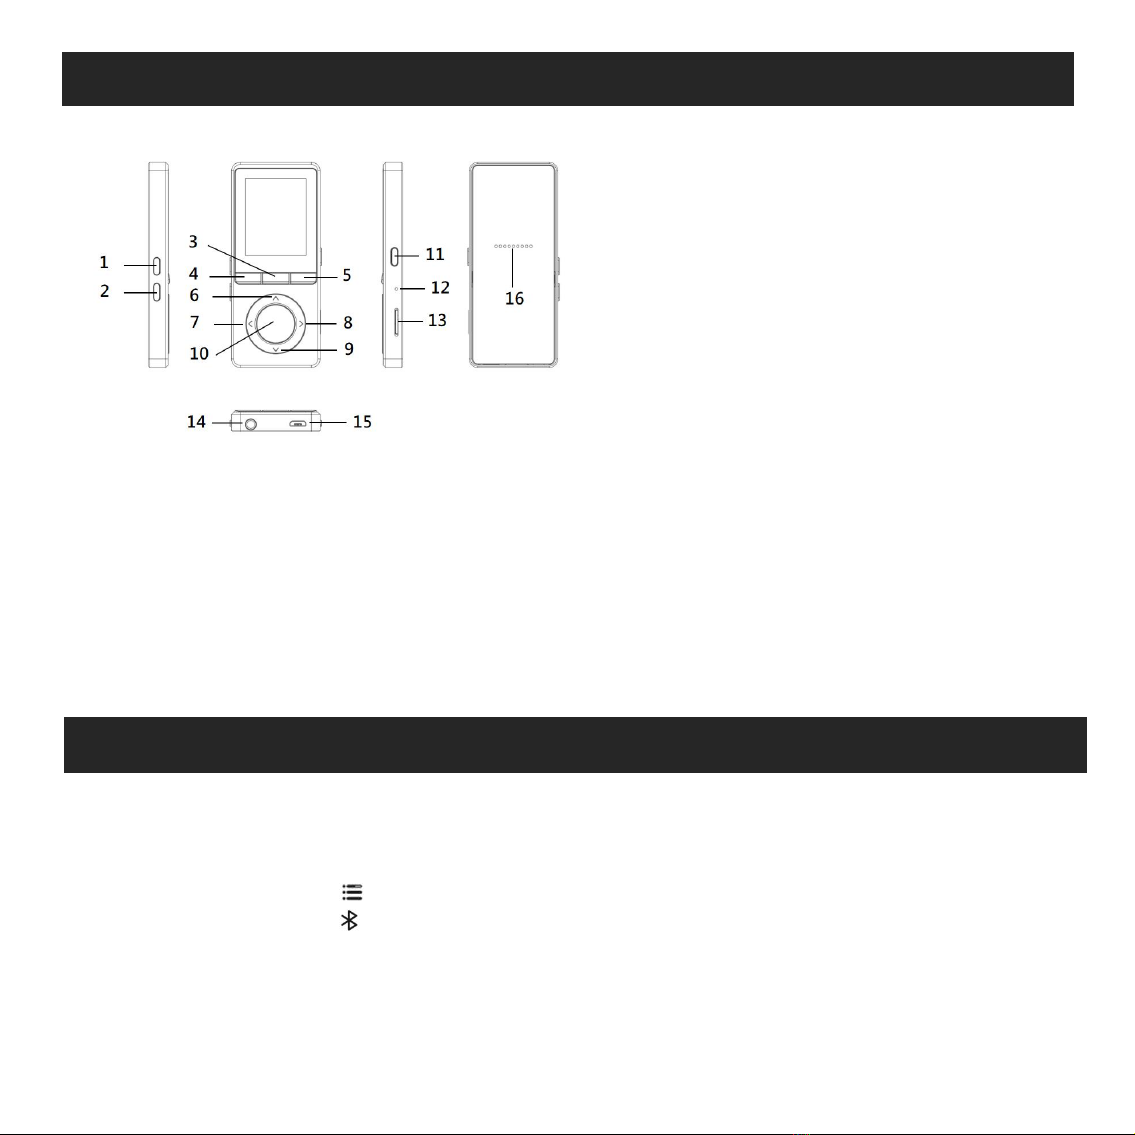
Buttons and Controls
Quick Guide
1. Power On/Off:
Long press the power button for 3 seconds to turn on/off the player.
Short press the power button to turn on/off the screen display.
Hold down the button to lock/unlock the screen.
Short press the button to open the Bluetooth and long press to open the FM radio.
2. Home Menu:
The Home menu is the starting point of each application. There are 9 main functions on the home
menu: Music/Artists/Playlists/Albums/Bluetooth/Folder/FM radio/Settings/Tools.
3. Choose Function:
1. Increase volume
2. Decrease volume
3. Bluetooth/FM radio
4. Return
5. Submenu/Button Lock
6. Move up
7. Previous/Fast rewind
8. Next/Fast forward
9. Move down
10. Enter/Play/Pause
11. Power/Screen Lock
12. MIC/Reset
13. MicroSD card slot
14. Earphone jack
15. Micro USB jack
16. Built-in Speaker
This manual suits for next models
1
Table of contents
Languages:
Other AGPtek MP3 Player manuals


 User manual")


