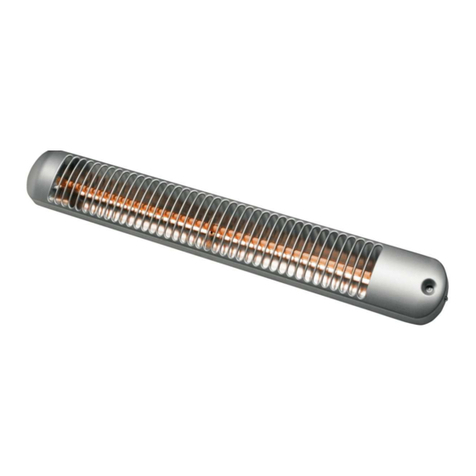
AKO UWS 75 RD/1 User manual

AKO-Terrassen-, Wand- und Deckenstrahler
AKO-Terrace, wall and ceiling radiator
Radiateur mural et plafonnier AKO
Radiatore infrarosso di terrazzo, parete e da soffitto AKO
Radiador de terrazza, de techo y mural - AKO
AKO- Terras, Wand- en Plafondstraler
DMontage- und Bedienungsanleitung S. 3 - 4
GB Assembly and operating instructions P. 4 - 5
FInstructions de montage et d’utilisation P. 6 - 7
IIstruzioni per il montaggio e l’uso P. 7 - 8
EInstrucciones de montaje y de manejo P. 9 - 10
NL Montage- en bedieningshandleiding P. 10 - 11
110602-uws75- ibw
06/2002 220 646/2
UWS 75 RD/1

2
1
3
2
햲
햳
햴
햵
햸
햸
햻
햷
햶
4
햺
햹
26 cm
A
A
B

3
Liebe Kundin, lieber Kunde,
vielen Dank für das Vertrauen, das Sie uns mit dem Kauf dieses Geräts entgegengebracht haben. Sie ha-
ben ein Qualitätsprodukt erworben, welches nach anerkannten sicherheitstechnischen Regeln CE-kon-
form hergestellt wurde.
Weil wir wollen, daß Sie lange Freude an dem Gerät haben und ausreichend für Ihre Sicherheit gesorgt
ist, lesen Sie bitte die Anleitung vor Inbetriebnahme sorgfältig durch. Beachten Sie unbedingt die Si-
cherheitshinweise auf den letzten Seiten. Bewahren Sie die Anleitung griffbereit auf und geben Sie das
Gerät nie ohne Anleitung an andere Personen weiter.
Technische Daten Technische Änderungen vorbehalten
Ihr Strahler erwärmt die angestrahlten Gegenstände oder Personen ohne daß die Raumluft dabei direkt
erwärmt wird. Er enthält zwei Heizstäbe.
Aufbau und Bedienteile (vgl. Abbildungen auf Seite 2)
Das Auspacken des Geräts
- Entfernen Sie das Verpackungsmaterial und die Transportsicherungen, welche die Heizstäbe schützen.
- Überprüfen Sie das Gerät auf sichtbare Beschädigungen. Falls Sie Beschädigungen am Gerät feststel-
len, dürfen Sie es nicht benutzen. Wenden Sie sich dann bitte an Ihren Fachhändler.
- Wir bitten Sie, das Verpackungsmaterial umweltgerecht zu entsorgen.
Die Montage des Geräts (vgl. Abb 1-4)
Beachten Sie die Sicherheitshinweise auf den letzten Seiten.
(Sie benötigen einen 8mm-Schlitz-Schraubendreher und einen Kreuzschlitz-Schraubendreher Größe 2)
Lösen Sie die Schrauben 햷und klappen Sie die Abdeckung 햶nach unten - Bohren Sie zwei Löcher
Ø 6mm in die Wand (vgl. Abb 4). Stellen Sie sicher, daß sich im Bereich der Bohrlöcher keine anderen
Installationen (z.B. Strom, Wasser) befinden - Befestigen Sie die Konsole 햵mit den Schrauben 햹und
den Dübeln 햺an der Wand. Lassen Sie den elektrischen Anschluß durch eine Fachmann entsprechend
Abb. 5-7 vornehmen. Brechen Sie die vorgestanzte Öffnung an der vorgesehenen Kabeldurchführung aus
und drücken Sie die Kabeldurchführungstüllen 햻ein - Klappen Sie die Abdeckung hoch und befestigen
Sie sie mit den beiden Schrauben 햷- Richten Sie das Gerät so aus, daß es die Wärme in die gewünschte
Richtung abstrahlt.
Der Betrieb des Geräts
Schalten Sie das Gerät über den Ausschalter ein/aus. Falls Sie das Gerät über einen Serienschalter an-
geschlossen haben, können Sie zwischen halber und voller Heizleistung wählen.
Zur Reinigung des Geräts
- Schalten Sie die Stromzufuhr über die allpolige Trennvorrichtung (Sicherung) ab und lassen Sie es ab-
kühlen.
- Bei Bedarf reinigen Sie das Gerät mit einem leicht angefeuchteten Tuch.
- Zur Beseitigung von Staub von Reflektor und Heizstäben benutzten Sie am besten einen Pinsel mit lan-
gen, weichen Borsten.
- Bei sehr starker Verschmutzung lassen Sie das Gerät von einem Fachmann reinigen.
Typ UWS 75 RD/1
Nennspannung - siehe Typschild -
Leistung - siehe Typschild -
Schutzklasse ,
Schutzart Spritzwasserschutz
Montageart Festanschluß
Abmessungen ca.(BxHxT) 75 cm x 11 cm x 11 cm
Gewicht ca. 1,8 kg
햲2 Heizstäbe 햷2 Schrauben
햳Reflektor 햸4 Kabeldurchführungen
햴Schutzgitter 햹2 Schrauben (im Beipackbeutel)
햵Befestigungskonsole mit Anschlußklemmen 햺2 Dübel (im Beipackbeutel)
햶Abdeckung 햻2 Kabeldurchführungstüllen (im Beipackbeutel)

4
Eventuelle Störungen am Gerät und mögliche Ursachen
Falls Sie alle oben aufgeführten Ursachen überprüft haben und das Gerät trotzdem nicht funktioniert, wen-
den Sie sich bitte an den Fachhändler oder eine Service-Stelle.
Die Wartung
Das Gerät ist wartungsfrei.
Die Entsorgung
Über die Möglichkeit der Entsorgung Ihres Geräts informieren Sie sich bei Ihrem Fachhändler oder direkt
beim Hersteller.
Störung Ursache Abhilfe
Die Heiz-
stäbe geben
keine Wär-
mestrahlung
ab.
Das Gerät ist ausgeschaltet. Schalten Sie das Gerät ein.
Die Haushaltssicherung oder der FI-
Schutzschalter hat angesprochen.
Überprüfen Sie die Haushaltssicherung und achten
Sie darauf, daß keine weiteren leistungsstarken
Geräte diesselbe Haushaltssicherung belasten.
Dear customer,
Thank you for purchasing this appliance. You have acquired a quality product which has been manufac-
tured in accordance with recognized CE technical safety norms.
Please read the operating instructions carefully before using the appliance for the first time to en-
sure your safety and complete satisfaction for a long time. Please observe strictly the safety instructions
as stated on the last pages. Please keep the operating instructions at hand and do not pass the appliance
on to other persons without the operating instructions.
Technical specifications Technical details subject to change
Your radiator warms the object or person without directly heating up the surrounding air. It contains two
heating elements.
Assembly parts (see diagrams on page 2)
Unpacking the device
- Remove the packaging material and the transport security mechanism which protects the heating ele-
ments.
- Check the appliance for visible damage. If you should notice any damage, do not use the appliance.
Please contact your dealer immediately.
- Please dispose of the packaging in an environmentally-friendly manner.
Assembling the device (see figs. 1-4)
Please observe the safety instructions of the last pages.
(You require an 8mm standard screw driver and a size 2 cross-head screw driver).
Type UWS 75 RD/1
Nominal voltage - see type label -
Power - see type label -
Protection class ,
Protection type splash-proof protection
Type of installation Stationary installation
Approx. Dimensions (W x D x H) 75 cm x 11 cm x 11 cm
Approx. Weight 1.8 kg
햲2 heating elements 햷2 Screws
햳Reflector 햸4 Cable bushings
햴Protection grid 햹2 Screws (in the small bag added)
햵Fixing console with connecting terminals 햺2 Dowels (in the small bag added)
햶Cover 햻2 Cable bushing sockets (in the small bag added)

5
Loosen the screws 햷and turn down the cover 햶- Drill two holes with Ø 6mm into the wall (see figure 4).
Make sure there are no other installations close to the drill holes (e. g. electric wirings, water pipes) – Fix
the console 햵with the screws 햹and the dowels 햺at the wall. Let a specialist make the electric connec-
tions according to figures 5-7. Knock out the prepunched hole at the provided cable bushing and press in
the cable bushing sockets 햻– Turn up the cover and fix its position with the two screws 햷- Place the
appliance that way so the heat is radiated into the desired direction.
Operation of the appliance
Turn on/off the appliance by means of the circuit breaker. If you use the appliance with a series switch,
you can select between the heating levels full and medium.
Cleaning the device
- Disconnect the appliance via the all-polo disconnecting switch (fuse) and let it cool down.
- When needed, wipe the device with a slightly damp cloth.
- To remove dust from the reflector and heating elements you can use a brush with long soft bristles.
- When the device is heavily contaminated, get it cleaned by an expert.
Possible faults and causes
If you have tried all the above and the appliance still does not work, please refer to your dealer or a service
centre.
Maintenance
The device is maintenance-free.
Disposal
For the safe and environmentally-friendly disposal of the appliance, please contact your dealer or the man-
ufacturer.
Fault Cause Remedy
The heating
elements do
not radiate
any heat.
The device is turned off. Turn on the appliance.
The relevant household fuse has blown or
the circuit breaker has been activated.
Check the fuse / circuit breaker and make
sure that no other high power devices share
the same fuse / circuit breaker.

6
Chère cliente, cher client,
Merci pour la confiance que vous nous avez témoignée en faisant l'achat de cet appareil. Vous avez choisi
un produit de qualité, fabriqué en conformité avec les prescriptions de sécurité CE.
Nous souhaitons que cet appareil vous donne satisfaction pendant de longues années et que vous l'utili-
siez dans les meilleures conditions de sécurité possibles. A cet égard, nous vous invitons à lire at-
tentivement ce mode d'emploi avant la première mise en service. Veuillez absolument respecter les
consignes de sécurité se trouvant sur les dernières pages. Conservez ce mode d'emploi à portée de main
et n'omettez pas de le remettre aux utilisateurs suivants si vous cédez l'appareil à des tiers.
Caractéristiques techniques Sous réserve de modifications techniques
Votre radiateur réchauffe les objets et les personnes placés dans son rayon d’action sans réchauffement
direct de l’air ambiant. Il contient deux cartouches chauffantes.
Composants et pièces (voir fig. p. 2)
Déballage de l’appareil
- Retirez l’emballage et les matériaux destinés à protéger les éléments chauffants pendant le transport.
- Vérifiez si l'appareil ne présente pas de traces de dommages visibles. Si vous constatez que l'appareil
a été endommagé, ne l'utilisez pas et avertissez votre détaillant.
- Débarrassez-vous de l'emballage en respectant les règles de protection de l'environnement.
Montage de l’appareil (voir fig. 1-6)
Observez les instructions de sécurité des dernières pages.
(Munissez-vous d’un tournevis plat de 8 mm et d’un tournevis cruciforme n° 2).
Défaire les vis 햷et plier le recouvrement 햶vers le bas - Forez deux trous de Ø 6mm dans le mur (voir
fig.4). Soyez certain que dans le domaine des trous de forage, il n’y ait aucune autre installation (p.ex.
courant, eau) - Fixez la console 햵avec les vis 햹et les chevilles 햺au mur. Faites faire le raccordement
électrique par un électricien selon fig. 5-7. Arrachez l’ouverture préperforée à la traversée de câble prévue
et insérez les passe-câbles 햻- Pliez le recouvrement vers le haut et fixez-le avec les deux vis 햷- Dis-
posez l’appareil de manière à ce que la chaleur rayonne dans la direction souhaitée.
La commande de l’appareil
Enclenchez ou déclenchez l’appareil à l’aide du commutateur marche/arrêt. Si l’appareil a été raccordé
par un commutateur multiple, vous pouvez choisir entre demi ou pleine capacité de chauffage.
Le nettoyage de l’appareil
- Coupez la conduite de courant avec le dispositif de coupage sur tous les pôles (fusible) et laissez re-
froidir l’appareil.
- Au besoin, nettoyez l’appareil à l’aide d’un chiffon humide.
- Pour dépoussiérer le réflecteur et les éléments chauffants, utilisez de préférence un pinceau à poils
souples.
- Si l’appareil est très encrassé, confiez le nettoyage à un technicien.
Type UWS 75 RD/1
Tension nom. - cf. plaquette -
Puissance - cf. plaquette -
Degré de protection ,
Type de protection protection contre les projections
Type de montage Raccord fixe
Dimensions approx. (l x h x p) 75 cm x 11 cm x 11cm
Poids approx. 1,8 kg
햲2 éléments chauffants 햷2 vis de fixation
햳Réflecteur 햸4 traversées de câble
햴Grill de protections 햹2 vis (sachet joint)
햵Console de fixation avec bornes de raccord 햺2 chevilles (sachet joint)
햶Recouvrement 햻2 passe-câbles (sachet joint)

7
Pannes et causes possibles
Veuillez vous adresser à votre revendeur ou à un Point de Dépannage si l’appareil ne fonctionne toujours
pas même après vérification de toutes les causes mentionnées.
Entretien
L'appareil ne nécessite pas d'entretien.
Mise au rebut
Informez-vous auprès de votre détaillant ou directement auprès du fabricant des dispositions prévues
pour la mise au rebut.
Panne Cause Remède
Les élé-
ments ne
dégagent pas
de chaleur
radiante.
L’appareil est déclenché. Mettez l’appareil en marche.
Les fusibles ou le commuta-
teur de sécurité FI ont dis-
joncté.
Vérifiez l'installation et vérifiez qu'il n'y a pas d'autre appa-
reil puissant en service simultanément sur le même fusible.
Cari clienti,
Vi ringraziamo per la fiducia che ci avete dimostrato acquistando il nostro prodotto. Avete acquistato un
prodotto di qualità che è stato prodotto in conformità alle normative CE e alle regole tecniche di sicurezza
riconosciute. Poiché desideriamo che possiate godere a lungo e in completa sicurezza del vostro appa-
recchio, leggete attentamente le istruzioni d’uso prima di proseguire con la messa in funzione. Fac-
cia attenzione a le norme di sicurezza che si trovano nelle pagine posteriori. Conservate le istruzioni per
l’uso a portata di mano e non affidate mai l’apparecchio ad altre persone senza dare loro anche le istru-
zioni per l’uso.
Dati tecnici Con riserva di apportare modifiche tecniche
Il vostro radiatore riscalda tutti gli oggetti o le persone irradiate senza però riscaldare l'aria. Il radiatore
contiene due scaldiglie.
Struttura ed elementi di comando (vedere le illustrazioni a pag. 2)
Il disimballaggio dell'apparecchio
- Rimuovete l'imballaggio e le sicure di trasporto che proteggono le scaldiglie.
- Verificate che l'apparecchio non sia danneggiato. Se notate dei danni all'apparecchio non dovete utiliz-
zarlo. In tal caso rivolgetevi prima al vostro rivenditore specializzato.
- Vi preghiamo di smaltire il materiale di imballaggio in pieno rispetto dell'ambiente.
Il montaggio dell'apparecchio (vedere le illustrazioni 1-4)
Osservi gli avvertimenti di sicurezza delle ultime pagine.
(Avete bisogno di un cacciavite a testa piatta da 8mm. ed un cacciavite a croce di misura 2).
Allenti le viti 햷e ribalti il coperchio 햶verso il basso - trapani due fori di Ø 6 mm nella parete (compari
Tipo UWS 75 RD/1
Tensione nom. - vedere la targhetta del modello -
Potenza - vedere la targhetta del modello -
Classe di protezione ,
Tipo di protezione protezione contro lo spruzzo d’acqua
Tipo di montaggio Allacciamento fisso
Dimensioni ca. (l x a x p) 75 cm x 11 cm x 11 cm
Peso ca. 1,8 kg
햲2 scaldiglie 햷2 vite di fissaggio
햳Riflettore 햸4 passaggi del cavo
햴Griglia protettiva 햹2 vite (in bustina aggiunta)
햵Mensola di fissaggio con morsetti d'attacco 햺2 tasselli (in bustina aggiunta)
햶Copertura 햻2 beccucci di passaggio del cavo

8
l'illustr. 4). Assicuri che nessun'altre installazioni (p.e. corrente, acqua) ne si trovano nell'ambito dei fori di
trivellazione - fissi la mensola 햵con le viti 햹ed i tasselli 햺alla parete. Lasci eseguire la connessione
respettiva da un esperto secondo l'illustrazione 5-7. Cavi l'apertura prestagliata fuori al passaggio del cavo
previsto e prema i tasselli di passaggio del cavo 햻dentro - ribalti la copertura e fissila con le due viti 햷-
allinei l'apparecchio di una maniera che il calore irradia nel senso desiderato.
Uso del apparecchio
Metta in circuito/fuori circuito l'apparecchio mediante il commutatore disgiuntore. In caso que Lei ha con-
nesso l'apparecchio via l'interruttore in serie, Lei può scegliere tra il rendimento di riscaldamento mezzo
e pieno.
Per la pulizia dell'apparecchio
- Disinserire l’adduzione di corrente tramite il dispositivo d’interruzione multipoli (taglia circuito) e lasciare
raffreddare l'apparecchio.
- Se necessario pulite l'apparecchio con un panno leggermente umido.
- Per togliere la polvere dal riflettore e dalle scaldiglie usate un pennello con peli lunghi e morbidi.
- In caso di forte imbrattamento lasciate pulire l'apparecchio da uno specialista.
Eventuali disturbi all'apparecchio e possibili cause
Se avete analizzato tutte le possibili cause sopra descritte e tuttavia l’apparecchio ancora non funziona,
vi preghiamo di rivolgervi al vostro rivenditore specializzato o presso un punto di assistenza.
Manutenzione
L'apparecchio non necessita di alcuna manutenzione.
Smaltimento
Riguardo alle possibilità di smaltimento del vostro apparecchio informatevi presso il vostro rivenditore o
direttamente dal produttore.
Disturbo Causa Rimedio
Le scaldi-
glie non
irradiano
calore.
L’apparecchio è spento. Insera l'apparecchio.
L'interruttore termico del circuito dome-
stico o il fusibile di sicurezza FI è saltato.
Verificate l'interruttore termico domestico e assi-
curatevi che nessun altro apparecchio di potenza
elevata sia in funzione.

9
Estimado/a cliente:
Le agradecemos la confianza que nos ha dispensado mediante la compra de este aparato. Usted ha ad-
quirido un producto de calidad que ha sido fabricado según las reglas técnicas de seguridad reconocidas
y conforme a las normas de la CE.
Porque queremos que disfrute durante mucho tiempo del aparato y que disponga de la suficiente segu-
ridad, sírvase leer atentamente estas instrucciones antes de la puesta en funcionamiento. Respete
estrictamente las normas de seguridad que se encuentran en las últimas páginas. Guarde dichas instruc-
ciones en un lugar accesible y no entregue el aparato a otras personas sin las instrucciones.
Datos técnicos Reservadas todas modificaciones técnicas
Su radiador calienta los objetos o personas irradiados sin calentar directamente el aire circundante. Con-
tiene dos varillas de calefacción eléctrica.
Estructura y elementos de mando del aparato (véase las figuras de la página 2)
Desembalaje del aparato
- Retire el material de embalaje y los seguros de transporte encargados de la protección de las varillas
de calefacción eléctrica.
- Compruebe si el aparato presenta desperfectos visibles. Si se constata la presencia de desperfectos
en el aparato, no debe ser utilizado. Sírvase dirigirse entonces al comercio en donde se ha adquirido
el aparato.
- Les rogamos que desechen correctamente el material de embalaje.
Montaje del aparato (véase las figuras 1-4)
Observe Vd. las instrucciones de seguridad de las últimas páginas.
(se necesita un destornillador de punta plana de 8 mm y un destornillador para tornillos con ranura cru-
zada de tamaño 2).
Destornille los tornillos 햹y gire Vd. la cubierta 햶hacia abajo - Taladre dos agujeros Ø de 6 mm en la
pared (véase fig. 4) Cerciórese de que en la zona de los taladros no se encuentren otras instalaciones
(p.ej. eléctrica, agua) – Fije la consola 햵con los tornillos 햹y las espigas 햺en la pared. Deje hacer la
conexión eléctrica por un especialista conforme a fig. 5-7. Arranque Vd. el agujero preestampado en el
paso previsto para el cable y introduzca Vd. con presión las boquillas de paso para el cable 햻– Gire la
cubierta hacia arriba y fije su posición con los dos tornillos 햷- Ajuste el aparato así que radie calor en la
dirección deseada.
El funcionamiento del aparato
Conecte/desconecte Vd. el aparato mediante el desconectador. Cuando utiliza el aparato mediante un
conmutador múltiple, se puede seleccionar entre el nivel de calefacción medio y entero.
Limpieza del aparato
- Sepárelo previamente por el seccionador para todos los polos (fusible) y deje enfriar el aparato.
- Limpie el aparato en caso necesario con un trapo ligeramente humedecido.
- Utilice preferentemente un pincel de cerdas largas y suaves para eliminar el polvo del reflector y de las
varillas eléctricas.
Tipo UWS 75 RD/1
Tensión nominal - véase placa de características -
Potencia - véase placa de características -
Clase de protección ,
Grado de prot. Protección contra los chorros de agua
Tipo de montaje Montaje fijo
Dimensiones approx. (An.xAl.xFo.) 75 cm x 11 cm x 11 cm
Peso approx. 1,8 kg
햲2 varillas de calefacción eléctrica 햷2 Tornillos
햳Reflector 햸4 Pasos para el cable
햴Rejilla protectora 햹2 Tornillos (en la bolsita añadida)
햵Consola de fijación con bornes de conexión 햺2 Espigas (en la bolsita añadida)
햶Cubierta 햻2 boquillas de paso para el cable
(en la bolsita añadida)

10
- Haga limpiar el aparato por un especialista en caso de gran suciedad.
Fallos eventuales del aparato y posibles causas
En caso de que haya verificado todas las causas anteriormente descritas y que, a pesar de ello, no fun-
cione el aparato, sírvase dirigirse a su comercio especializado o a una delegación post-venta.
Mantenimiento del aparato
El aparato está exento de mantenimiento.
Desecho del aparato
Sírvase dirigirse al comercio donde adquirió el aparato, o directamente al fabricante, para informarse de
las posibilidades de desecho ecológico del mismo.
Fallo Causa Remedio
Las vari-
llas no irra-
dian calor.
El aparato está desconectado. Conecte el aparato.
Se ha disparado el fusible principal doméstico el
interruptor de protección.
Verifique el fusible doméstico y preste
atención a que no haya otros aparatos
potentes que afecten al mismo fusible.
Geachte klant,
Hartelijk dank voor het vertrouwen, dat u met de aankoop van dit toestel in onze onderneming stelt. U
heeft een kwaliteitsproduct aangeschaft, dat werd vervaardigd conform de erkende technische CE-veilig-
heidsvoorschriften. Omdat wij graag willen, dat u lange tijd plezier van uw toestel zult hebben en er vol-
doende voor uw veiligheid wordt gezorgd, raden wij u aan voordat u het toestel in gebruik gaat
nemen de bedieningshandleiding aandachtig door te lezen. Let in elk geval op de veiligheidswenken
op de laatste pagina’s. Bewaar de bedieningshandleiding binnen handbereik en geef het toestel nooit zon-
der de bedieningshandleiding door aan derden.
Technische gegevens Technische wijzigingen voorbehouden
Uw wandstraler verwarmt de bestraalde voorwerpen of personen, zonder dat hierbij de omgevingslucht
direct opgewarmd wordt. Hij bevat twee verwarmingsstaven.
Opbouw en bedieningselementen (zie afbeeldingen op pagina 2)
Uitpakken van het toestel
- Verwijder het verpakkingsmateriaal en de transportbeveiligingen die de verwarmingsstaven bescher-
men.
- Controleer het toestel op zichtbare defecten. Indien u vaststelt dat het toestel is beschadigd, mag u het
niet gebruiken. Neem onmiddellijk contact op met uw verdeler.
- Wij verzoeken u vriendelijk u op een milieuvriendelijke manier van de verpakking te ontdoen.
Monteren van het toestel (zie afb. 1, 2, 3)
Opvolgt U de veiligheidsaanwijzingen van de laatsten bladzijden.
Type UWS 75 RD/1
Netspanning - zie typeplaatje -
Vermogen - zie typeplaatje -
Beschermingsklasse ,
Beschermingssysteem injectiewaterbescherming
Montageaard vaste aansluiting
Afmetingen ca. (B x H x D) 75 cm x 11 cm x 11 cm
Gewicht ca. 1,8 kg
햲2 verwarmingsstaven 햷2 schroeven
햳reflector 햸4 kabeldoorvoeringen
햴beschermrooster 햹2 schroeven (in bijgevoegd zakje)
햵Bevestigingsconsole met aansluitklemmen 햺2 muurpluggen (in bijgevoegd zakje)
햶afdekking 햻2 kabeldoorvoeringsbuisen (in bijgevoegd zakje)

11
(Hiervoor heeft u een platte schroevendraaier van 8 mm en een kruiskopschroevendraaier nr. 2 nodig).
Draait u de schroeven 햷los en klapt u de afdekking 햶naar beneden - Boort u twee gaten Ø 6 mm in de
muur (v.g.l. afb. 4). Verzekert u zich, dat zich gene anderen installaties (b.v. stroom, water) in het bereik
van de boorgaten bevinden. - Maakt u de console 햵met de schroeven 햹en de muurpluggen 햺aan de
muur vast. Laat u de elektrische aansluiting door een vakman overeenkomstig afb. 5-7 voornemen. Breekt
U de voorgeponsde opening aan de voorgeziene kabeldoorvoeringsbuis uit en drukt u de kabeldoorvoe-
ringsbuisen 햻in - klapt u de afdekking op en maakt u ze vast met de twee schroeven 햷- Richt u het
toestel zodanig dat het de warmte in de gewenste richting aftstraalt.
Gebruik van het toestel
Schakelt u het toestel via de afschakelaar in/uit. Indien u het toestel via serieschakelaars hebt aangeslui-
ten, zo kunt u tussen half en vol verwarmingsvermogen keuzen.
Schoonmaken van het toestel
- Schakel de stroomtoevoer via de meerpolige uitschakelinrichting (beveiliging) uit en laat het afkoelen.
- Indien nodig maakt u het toestel schoon met een licht bevochtigde doek.
- Om de reflector en verwarmingsstaven te ontdoen van stof gebruikt u een borstel met lange, zachte
haren.
- Bij zware vervuiling laat u het toestel door een vakman reinigen.
Eventuele storingen, mogelijke oorzaken en oplossingen
Indien u alle hierboven vermelde oorzaken heeft gecontroleerd en het toestel werkt nog steeds niet, neem
dan a.u.b. contact op met uw vakhandelaar of een servicekantoor.
Onderhoud
Het toestel is onderhoudsvrij.
Verwijderen
Voor het definitief verwijderen van uw toestel kunt u voor informatie bij uw vakhandelaar of rechtstreeks
bij de fabrikant terecht.
Storing Oorzaak Oplossing
De verwar-
mingsstaaf
geeft geen
warmte af.
Het toestel is uitgeschakeld. Schakelt u het toestel in.
De huiszekering van het betrokken circuit is
gesprongen.
Controleer de zekering en ga na of er geen
andere krachtige elektrische toestellen op
hetzelfde circuit zijn aangesloten.

12
180cm
20cm
80cm
20cm
30cm
65cm
80cm
25°
60 cm
60 cm
225 cm
Sicherheitshinweise / Safety instructions / Consignes de sécurité /
Avvertenze de sicurezza / Instrucciones de seguridad / Veiligheidsvoorschriften
D
m
F
Gerät waagerecht, in einer Höhe von mindestens 180cm über dem Fußboden montieren - Sicherheitsabstände beachten -
Deckenmontage ist zulässig - Holzdecken können, auch bei Einhaltung der Mindestabstände zur Decke, durch die
Wärmeentwicklung des Geräts nachdunkeln - Es muß sichergestellt sein, daß Personen in der Badewanne, unter der
Dusche oder im Schwimmbecken das Gerät nicht berühren können.
Monter l'appareil horizontalement, à une hauteur d'au moins 180cm au-dessus du sol -
- Un montage mural est autorisé - Des plafonds en bois, même en respectant les distances minimums au
plafond, peuvent foncer, à cause de la chaleur provenant de l'appareil - Il
Montare l'apparecchio orizzontalmente, in un'altezza di almeno 180 cm sopra il pavimento - rispettare le distanze di
sicurezza - il montaggio al soffitto è ammissibilie - i soffitti di legno possono, anche con rispetto alle distanze minime
fino al soffitto, scurirsi mediante la produzione di calore dell'apparecchio - ci si deve accertare che le persone usando la
vasche da bagno, docce o lavandini non possano raggiungere l'apparecchio.
Install the appliance horizontally at a height of at least 180cm above the floor - Strictly observe the safety distances - A
ceiling installation is allowed - Wooden ceilings can turn darker due to the generation of heat of the appliance even if the
minimum distance to the ceiling is observed - It must be ensured that the appliance is out of reach of persons in the
bath, the shower or the swimming pool.
Observer les distances de
sécurité
faut être certain, que des personnes se trouvant
dans la baignoire, sous la douche ou dans le bassin de natation ne touchent pas l'appareil.
El aparato tiene que ser fijado horizontalmente, al menos 180 cm encima del suelo - Observe las distancias mínimas de
seguridad. - El montaje en el techo es permitido. Los techos de madera se oscurecen ulteriormente por la generación de
calor del aparato aun cuando se observe las distancias mínimas. Se debe asegurar que personas que se encuentren en
la bañera, en la ducha o lavabo, no tienen contacto con el aparato.
Het toestel horizontaal, in een hoogte van ten minste 180 cm boven de vloer monteren -veiligheidsafstanden in acht
nemen - plafondmontage is toelaatbaar - houdplafonds kunnen, ook bij opvolging van de minimalen afstanden tot
plafond, door de warmteontwikkeling nadonkeren. Het moet gegarandeerd zijn dat personen in een badkuip, onder de
douche of in een zwembassin het apparaat niet kunnen aanraken.
I
E
q

13
D
m
F
Netzspannung beachten (siehe Typschild).
Observe the stated supply voltage (see type label).
Observer la tension de réseau (voir plaque
signalétique).
Controllate che la tensione di rete indicata sulla
targhetta del modello dell'apparecchio corrisponda a
quella nella vostra installazione.
Tomar en consideración la tensión de la corriente
eléctrica (véase la placa de caracteristicas).
Op de netspanning letten (zie typeplaatje).
I
E
q
D
m
F
Gerät nicht abdecken.
The appliance may not be covered.
Ne pas recouvrir l'appareil.
L'apparecchio non deve venire coperto.
No cubra nunca el aparato.
Het apparaat niet toedekken.
I
E
q
D
m
F
Schutzgitter wird heiß, nicht berühren.
Grille de protection
Protection grid can become hot during operation. Do not
touch it.
chauffe, ne pas toucher.
Griglia protettiva diventa molto calda, non toccarla.
No tocar la parrilla, está muy caliente.
Het beschermend traliewerk wordt heet, niet aanraken.
I
E
q
Sicherheitshinweise / Safety instructions / Consignes de sécurité
Avvertenze de sicurezza / Instrucciones de seguridad / Veiligheidsvoorschriften
D
m
F
Gerät darf nur im Hausbereich oder auf regengeschütztem Balkon bzw. Terrasse und nicht für gewerblichen Einsatz
verwendet werden.
The appliance may only be used in the house and on balconies or terraces which are protected against rain. It may
not be used for industrial purposes.
L'appareil ne peut être utilisé que dans le domaine ménager ou sur un balcon à l'abri de la pluie ou terrasse et non
pour une utilisation commerciale.
I
E
q
L'apparecchio debbe solo essere utilizzato su balcone rispettivamente terrazzo protetto contro la pioggia e non per
un'applicazione industriale.
El aparato só lo debe ser utilizado en la casa y en una terraza o en un balcón protegido contra lluvia. No está
destinado a la aplicación industrial.
Het apparaat mag slechts worden gebruikt in het bereik van het huis of op de balkon met
bescherming tegen de regen resp. op terras en niet voor industrieel inzet.
D
m
F
Es dürfen keine Flüsssigkeiten ins Gerät gelangen.
Make sure that no fluids enter the appliance.
Il faut être certain qu'aucun liquide puisse s'infiltrer dans
l'appareil.
Evitate che nell'apparecchio vi entrino dei liquidi.
No debe entrar ningún tipo de líquido en el aparato.
Er mogen geen vloeistoffen in het apparaat
terechtkomen.
I
E
q

14
N
L3mm
PE
1.
OFF
2.
D
m
F
Das Gerät nur an Leitungsnetze anschließen, die mit
einer allpoligen Trennvorrichtung mit mind. 3mm
Kontaktöffnung ausgestattet sind. Gerät erden!
Nationale Bestimmungen beachten.
Ne raccorder l'appareil qu'à des réseaux de distribution
étant munis d'un dispositif de coupage sur tous les
pôles avec une ouverture de contact de 3 mm min.
Mettre l'appareil à terre! Observer les règles nationales.
The appliance may only be connected to nets with an
all-polo disconnecting switch with a contact gap of at
least 3 mm. Appliance must be grounded! Observe the
national regulations.
Connettere l'apparecchio solo alle reti di distribuzione,
che sono equipaggiate da un dispositivo separatore a
tutti i poli con almeno 3 mm d'apertura di contatto.
Mettere l'apparecchio a terra! Osservare le disposizioni
nazionali.
El aparato sólo debe ser conectado a un red con un
seccionador para todos los polos con una abertura de
contactos de al menos 3 mm. Ponga Vd. el aparato a
tierra. Observe Vd. las normas nacionales.
Het toestel slechts aan leidingnetten aansluiten, die met
een alpolige
scheidingsinrichting met
tenminste 3 mm de
contactgat uitgerust zijn. Het
apparaat aarden! Nationale
bepalingen opvolgen.
I
E
q
D
m
F
Vor der Reinigung Stromzufuhr über allpolige
Trennvorrichtung abschalten - Keine entflammbaren
Reinigungsmittel verwenden wie z.B. Benzin ,Spiritus ...
déclencher l'alimentation en courant
avec dispositif de coupage sur tous les pôles -
Before cleaning disconnect the appliance by means of
the all-polo disconnecting switch. Never use easily
inflammable cleaning agents, such as petrol ethyl
alcohol, methylated spirit etc. for cleaning the appliance.
Avant le nettoyage
Ne pas
utiliser des produits de nettoyage inflammables, comme
p.ex. de l'essence, de l'alcool.
Prima di effettuare la pulizia, disinnestare l'alimentazione
di corrente mediante il dispositivo separatore per tutti i
poli, facendo attenzione a non utilizzare sostanze di
pulizia facilmente infiammabili come la benzina, spirito
eccetera.
Antes de limpiar el aparato, se debe desconectar el
aparato mediante el seccionador para todos los polos.
No utilizar detergentes o líquidos inflamables, p.ej.
gasolina o alcohol etílico.
Voor het reinigen de stroomtoevoer via alpolige
scheidingsinrichting afschakelen. Geen ontvlambare
reinigingsmiddelen gebruiken,
zoals bijv. benzine, spiritus.
I
E
q
D
m
F
Nicht in Räumen mit leicht entzündlichen Gasen
betreiben.
Never use the appliance in locations along with easily
inflammable gases.
Ne pas utiliser l'appareil dans des pièces contenant des
gaz légèrement inflammables.
Non utilizzare l'apparecchio in posti dove si formano dei
vapori o gas facilmente infiammabili.
No colocar el aparato en lugares donde se encuentren
gases inflamables.
Niet in ruimten met licht ontbrandbare gassen
gebruiken.
I
E
q
D
m
F
Das Gerät darf nur vom Fachmann angeschlossen,
geöffnet oder repariert werden.
raccordé,
The appliance may only be connected, opened and
repaired by an expert.
L'appareil ne peut être ouvert ou réparé que par
un spécialiste.
L'apparecchio deve essere connesso, aperto o riparato
solamente da un tecnico specializzato.
El aparato solo debe ser conectado, abierto o reparado
por un especialista.
Het apparaat mag alleen door een vakman worden
aangesloten, geopend of gerepareerd.
I
E
q
Sicherheitshinweise / Safety instructions / Consignes de sécurité /
Avvertenze de sicurezza / Instrucciones de seguridad / Veiligheidsvoorschriften

15
6
5
7
400V,
3N~
230V, 1N~,
230V,
1N~
Max. 6 Gerät in Reihenschaltung
6 appareils max. en installation en série
Max. 6 apparecchi in collegamento in serieI
Max. 6 appliances in series connection
Máx. 6 aparatos
en conexión
en serie
Max. 6 toestels
in
serieschakeling
Max. 2 Geräte über Ausschalter
Max. 2 appliances by means of circuit breaker
2 appareils max. par commutateur
Max. 2 apparecchi via commutatore
disgiuntore
Máx. 2 aparatos mediante un
desconectador
Max. 2 toestels via uitschakelaars
Max. 2 Geräte über Serienschalter
Max. 2 appliances by means of series switch
2 appareils max. par commutateur multiple
Max. 2 apparecchi via interruttore in serie
Máx. 2 aparatos mediante un conmutador
múltiple
Max. 2 toestels via serieschakelaars
L3 L3
1 (4) 2 (5) 3 (6)
L2 L2
L1 L1
NN
230V / 650W
230V / 650W
230V / 650W
230V / 650W
230V / 650W
230V / 650W
L1
12
N
230V / 650W
230V / 650W
230V / 650W
230V / 650W
12
L2
L1
N
230V / 650W
230V / 650W
230V / 650W
230V / 650W
Sicherung 16A Fusibile 16A
Fuse 16 A Fusible 16A
Zekering 16AFusible 16 A
Sicherung 16A Fusibile 16A
Fuse 16 A Fusible 16A
Zekering 16AFusible 16 A
Sicherung 3x16A usibile 3x16A
Fuse 3x16 A Fusible 3x16A
Zekering 3x16A
F
Fusible 3x16 A

GARANTIE
Wir übernehmen für dieses Gerät eine Garantie von 24 Monaten ab Kaufdatum. Die Garantielei-
stung setzt voraus, daß die Rechnung vorgelegt wird und der Garantieanspruch innerhalb der Ga-
rantiefrist erhoben wird. Der Garantieanspruch verfällt, wenn das Gerät beschädigt, nicht
sachgemäß benutzt oder unbefugte Eingriffe vorgenommen wurden. Die Garantie erstreckt sich
nicht auf leicht zerbrechliche Teile wie z.B. Glas.
GUARANTEE
We give a 24 months guarantee on this appliance from the date of purchase. For claims under
guarantee the sales receipt must be produced and the claims must be forwarded within the guar-
antee period. The right to claim under guarantee expires in case that the device has been dam-
aged, used in an inappropriate way or that unauthorized manipulations have been carried out. The
guarantee does not cover fragile parts, like for example parts of glass.
GARANTIE
L’appareil est couvert par une garantie de 24 mois à compter de la date d’achat. Les appels en
garantie doivent être obligatoirement accompagnés de la preuve d’achat et être introduits avant
l’expiration de la période de garantie. La garantie n’est pas valable en cas de dommages causés
à l’appareil, d’usage impropre ou d’interventions non autorisées. La garantie ne couvre pas les
composants fragiles, tels que les éléments en verre, par exemple.
GARANZIA
Per questo apparecchio assumiamo una garanzia di 24 mesi a partire dalla data di acquisto. La
prestazione di garanzia presuppone che venga presentata la fattura e che il diritto di garanzia sca-
de nel caso che l’apparecchio fosse stato danneggiato o non usato nel modo dovuto o che vi fos-
sero stati eseguiti degli interventi non autorizzati. La garanzia non copre i pezzi fragili, come p.e. il
vetro.
GARANTIA
Por el presenta aparato asumimos un período de garantía de 24 meses a partir de la fecha de com-
pra. La prestación de garantía requiere la presentación de la factura y que el derecho de garantía
sea reivindicado dentro del período de garantía. El derecho de garantía vence cuando el aparato
resulte dañado, no se utilice correctamente o sea manipulado de forma no autorizada. La garantía
no incluye las piezas frágiles, como, p. ej. cristal.
GARANTIE
Voor het toestel geldt een garantie van 24 maanden vanaf de datum van aankoop. Om aanspraak
op de garantie te kunnen maken, moet de aankoopfactuur kunnen worden voorgelegd en mag de
garantietermijn niet zijn verlopen. De garantie geldt niet wanneer het toestel is beschadigd, wan-
neer het onoordeelkundig werd gebezigd of door onbevoegde personen werd geopend. De garan-
tie dekt geen gemakkelijk breekbare onderdelen zoals bijvoorbeeld glas.
Service Stellen: Service-kantoren
Deutschland: Schweiz Österreich Niederlande
Glen Dimplex Deutschland GmbH K. Mösch AG Gerhard Sturz Handelmaatschappij Vermolen B.V.
Zentralkundendienst Maschinenhandel
Regbergstraße 2 Hintermättlistr. 11 Merangasse 17 Industrieweg Oost 6
D-96365 Nordhalben CH-5506 Mägenwil A-8010 Graz NL-6662 NE Elst
Tel.: 09267/914-578 Tel.: 062/896 03 83 Tel.: 0316/323 041 Tel.: 0481/36 33 55
Fax: 062/896 03 88 Fax: 0316/382 963 Fax: 0481/36 33 99
Glen Dimplex Deutschland GmbH
Marketing / Vertrieb / Entwicklung
Flachslander Straße 8
D-90431 Nürnberg
Telefon:0911 / 657 19-0
Telefax: 0911 / 657 19-37
Table of contents
Other AKO Heater manuals
Popular Heater manuals by other brands

Technotherm
Technotherm ISP 350 Installation and technical manual

MILL
MILL Invisible Series Assembly and instruction manual

Eterna
Eterna DFHT2KW installation guide

DeLonghi
DeLonghi Electric oil Filled Radiator instructions

Heinner
Heinner HFH-2200 instruction manual

Merriott
Merriott EMMETI ClimaAir CA VS 7-2P manual

veito
veito CH1200 LT user manual

Plein Air
Plein Air ALS1200 instruction manual

Mestek
Mestek TUBULAR GAS FIRED DIRECT SPARK PROPELLER UNIT... Installation instructions and parts identification

Kogan
Kogan SMARTERHOME KAWFHTP20WA user guide

Winterwarm
Winterwarm XR10 instruction manual

JAYLINE
JAYLINE SPITFIRE FS CA 2006 Installation & operation instructions