Amibot Spirit MOTION User manual

EN
Robot vacuum
User manual
Spirit
MOTION

EN
User manual
Thank you for choosing AMIBOT ! We hope you are fully satisfied
using your robot as part of your cleaning routine.
If you should encounter situations that have not been properly
addressed in this User Manual or were to have any queries, do not
hesitate to contact us and a member of our Technical Customer
Service Department will be more than happy to answer your
questions.
For more information, you can visit the official AMIBOT website :
www.amibot.tech
We reserve the right to make technical alterations to the appliance
without prior notice with the objective of continually improving our
products and customer satisfaction.
Please carefully read all instructions in this manual before using this
appliance. AMIBOT will not be liable for damage due to incorrect use.

EN
1
Contents
1
Recommendations........................................................3
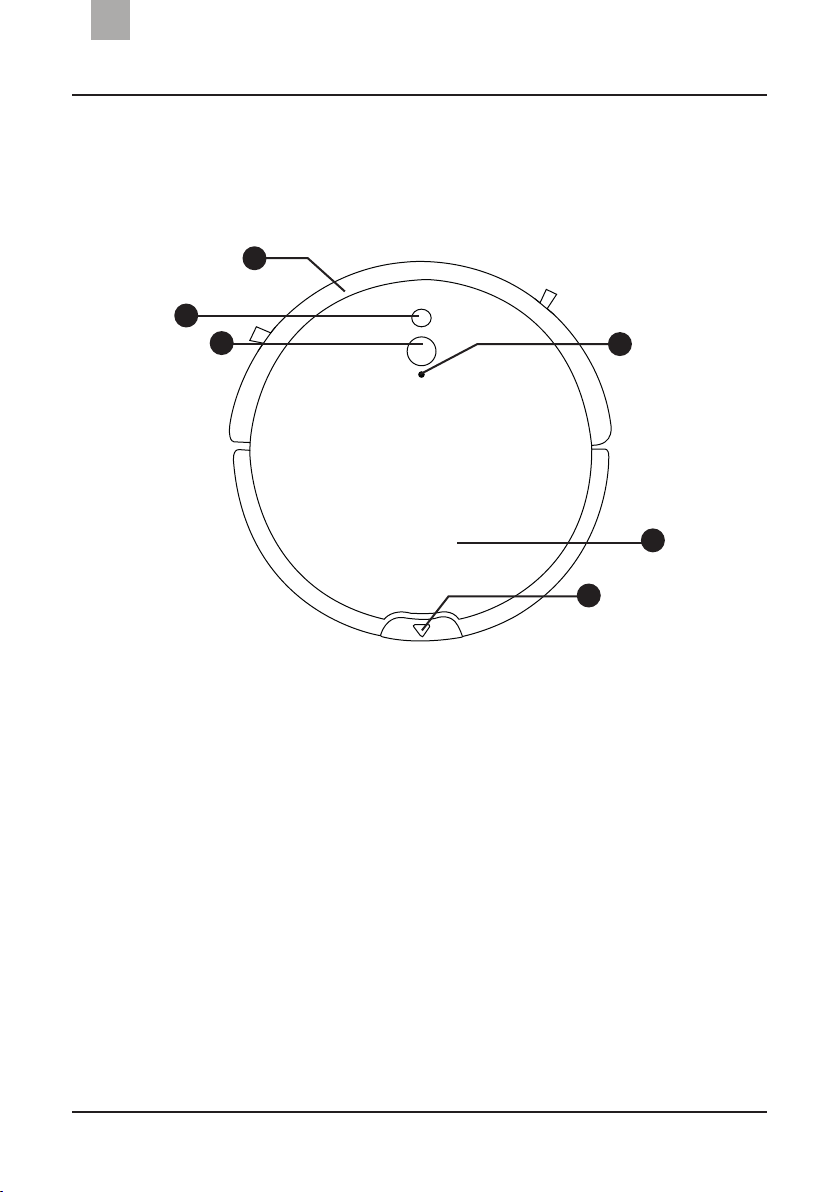
Product overview..........................................................5
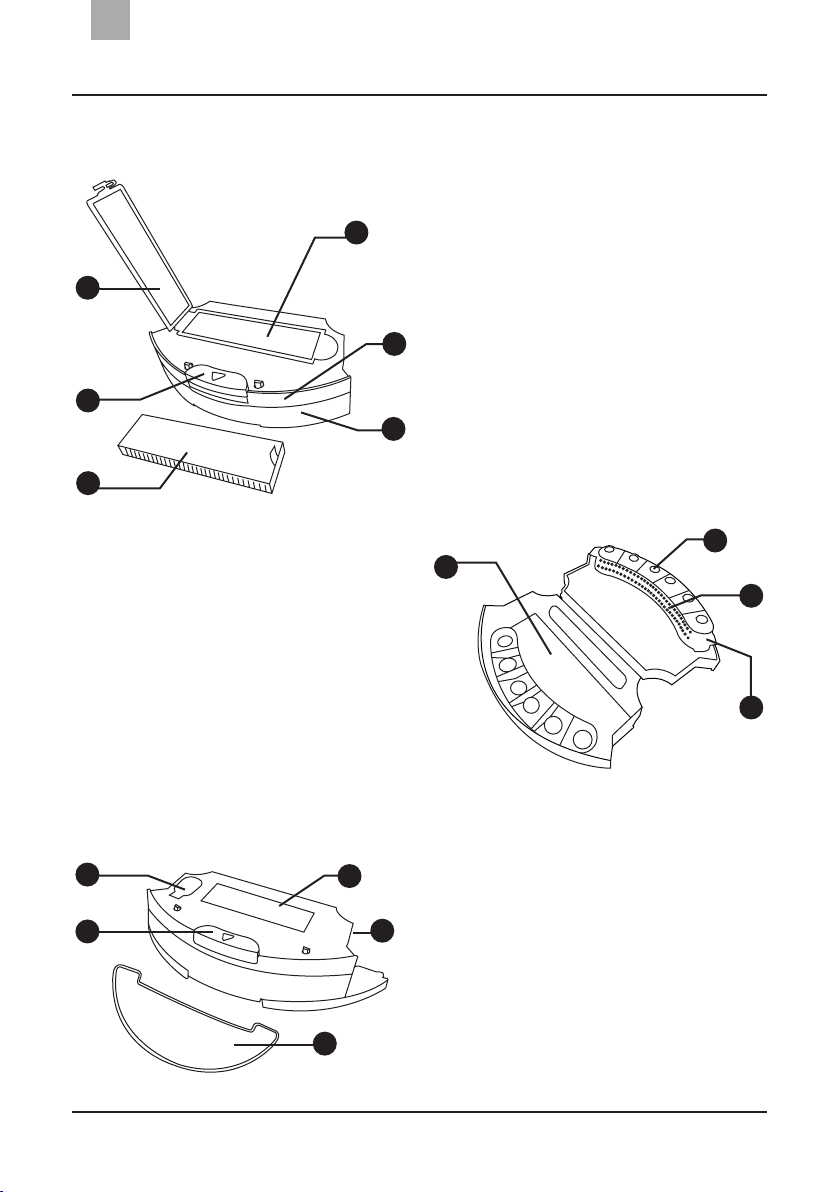
Contents of the box .............................................................................5
Product diagram ...................................................................................6
Operating the appliance .............................................11
Charging................................................................................................11
Vacuum mode (cyclonic dustbin).......................................................13
Mopping mode (vibrating water tank)...............................................13
Starting the appliance .........................................................................16
Scheduling ............................................................................................16
Cleaning modes ...................................................................................19
Pause.....................................................................................................23
Stopping the vacuum ..........................................................................23
Mobile app ....................................................................24
Downloading the app..........................................................................24
Pairing a device ....................................................................................24
Sharing the robot.................................................................................25
Operating the robot.............................................................................25
Maintenance.................................................................26
Side brushes.........................................................................................26
Side wheels and castor .......................................................................26
Central brush .......................................................................................27
Compartments and filters ..................................................................28
Vibrating water tank ............................................................................29
Gap and power sensors......................................................................30
Microfibre cleaning pads ....................................................................30
Indicator lights.............................................................32

EN
2
Contents
Troubleshooting...........................................................33
Tables : Malfunctions and possible causes.......................................33
Warranty and after-sales service...............................38
Technical specifications..............................................39
Safety instructions and precautions .........................40
Operating conditions...........................................................................40
Recycling instructions .................................................42

EN
3
Recommendations
To ensure optimal performance, you are recommended to use
AMIBOT Spirit Motion via a Wi-Fi connection with the AMIBOT Home
mobile app.
However, this robot is fully functional without an Internet connection.
Its main functions can be accessed via the remote control provided.
All the stages indicated in this manual take into account basic use via
the remote control.
• AMIBOT Spirit Motion is a robot vacuum with a Wi-Fi enabled
camera that can be controlled via the AMIBOT Home mobile app.
• AMIBOT Spirit Motion is designed to be used inside.
• The camera lens on the top of the robot is fragile. Never press
against it or splash it with water as you risk damaging it.
• AMIBOT Spirit Motion is designed for a maximum surface area
of 200 m2.
• AMIBOT Spirit Motion is designed for routine cleaning of all floor
types. It is not intended to replace heavy-duty cleaning.
• The cyclonic dustbin can be used to vacuum carpets and rugs or
hard floors.
• The vibrating water tank can only be used on hard floors with a
pH neutral floor cleaner.
• AMIBOT Spirit Motion is not designed to be used on long-pile
carpets, which could cause the robot to freeze or reverse.
• If the robot could come across a gap while cleaning, please secure
the area and check that the gap sensors are clean.
• AMIBOT Spirit Motion needs a headway of at least 8 cm so that it
can go under furniture.
• AMIBOT Spirit Motion cannot go over thresholds over 1.5 cm
thick, otherwise it automatically stops or reverses.
• AMIBOT Spirit Motion is not designed to vacuum water or other
liquid products.
• AMIBOT Spirit Motion must be used on flat surfaces.

EN
4
Recommendations
• When using the vibrating water tank, you are recommended to
fold back rugs to stop the robot from crossing them.
• Do not use the appliance on damp floors.
• Please switch the appliance off before handling it (manually
moving it, maintenance, storing it away).
• The remote control requires 2 x LR03 AAA batteries. They are not
supplied with the robot.
• The virtual wall requires 2 x LR06 AA batteries. They are not
supplied with the robot.

EN
5
Product overview
Contents of the box
1
4
1. AMIBOT Spirit Motion robot
2. Cyclonic dustbin
3. Vibrating water tank
4. 2 x microfibre cleaning pads
5. 4 x HEPA filters
6. 4 x side brushes
7. Home base
8. Power adapter
9. Virtual wall (batteries not
included)
10. Remote control (batteries
not included)
11. Cleaning tool
12. User manual
2
3
5
6
7 8 9
10
11
12

EN
6
Product overview
Product diagram
1. Bumper
2. Camera
3. AUTO / Wi-Fi pairing button
4. Wi-Fi indicator light
5. Integrated gyroscope
6. Compartment space
1
2
3 4
5
6
Robot top view

EN
7
Product overview
1
2
1. Power socket
2. ON/OFF button
Robot bottom view
1. Gap sensors
2. Power sensors
3. Side brushes
4. Battery cover
5. Side wheels
6. Castor
7. Central brush
8. Central brush cover
9. Tank
1
2
3
4
5
6
7
9
8

EN
8
Product overview
Cyclonic dustbin
1. HEPA filter cover
2. Dustbin release button
3. HEPA filter
4. HEPA filter housing
5. Dustbin cover
6. Dustbin
7. Dustbin housing
8. Vacuum cyclones
9. Protection filter
10. Release notches
1
2
3
4
6
5
7
8
9
10
Vibrating water tank
1. Refill cap
2. Vibrating water tank release
button
3. Water pump
4. Water tank sensors
5. Cleaning pad
1
2
3
4
5

EN
9
Product overview
8
6
7
6. Cleaning pad Velcros
7. Drip plugs
8. Vibrating module
Home base
1. Power indicator light
2. Charging contacts
3. Power adapter
4. Power socket
1
3
2
4

EN
10
Product overview
Remote control
1. Screen
a. Scheduled time
b. Real time
2. AUTO Mode
3. Set time
4. SPOT mode
5. Back to home base
6. Directional arrows
7. Schedule time
8. MAX mode
9. WALL mode
1
2
3
4
5
6
7
8
9
1. ON/OFF button
2. Power indicator light
3. Infrared beam
Virtual wall
1
2
3

EN
11
Operating the appliance
Charging
1 m 1 m
2 m
Plug in the home base using the power cable.
Place the home base on a level surface next to a wall, at a right angle
to the floor. Keep a distance of at least 2 m in front of the base and
1 m at either side.
NOTE : When your AMIBOT Spirit Motion robot is on its home base, make sure that
your robot is switched on and the home base power light is on.
Switching the robot on
Turn the power switch to ON. "I" is ON and "O" is OFF. The robot is
ready to be charged.
Assembling the home base

EN
12
Operating the appliance
Charging the robot
Figure 1 Figure 2
The robot must be switched on while it is being charged.
There are two ways to charge the battery:
• Using the home base (Figure 1).
• Using the power adapter (Figure 2).
The robot can take between 250 and 350 minutes to fully charge for
a runtime of 70 to 120 minutes (depending on the suction power).
NOTES :
• Before using the robot for the first time, you must fully charge the appliance.
• The robot switches to standby after a few minutes on the home base. The AUTO
light turns off. Press the AUTO button on the robot or on the remote control to
switch it back on.
• When the robot’s battery is completely flat, the AUTO indicator light turns
steady orange. While charging, the indicator light flashes orange. Once fully
charged, the AUTO indicator light turns steady green. After a few minutes, the
robot switches to standby and the indicator light turns off.
• If the battery is weak while the robot is cleaning, it automatically returns to its
home base. The home base must therefore be switched on.
• Do not place a mirror or other highly reflective object within a distance of at
least 15cm from the home base.

EN
13
Operating the appliance
• If the robot is not used for a long period of time, you are
recommended to fully charge the battery, switch off the robot
and store it in a cool, dry place.
Vacuum mode (cyclonic dustbin)
To use the vacuum mode, attach the cyclonic dustbin to the back of
the appliance.
NOTES :
• The dustbin has a maximum capacity of 450ml. It can be used on all floor types.
• The cyclones inside the dustbin ensure optimum suction power throughout its
cleaning cycle.
Mopping mode (vibrating water tank)
Attaching the cleaning pad
Figure 1 Figure 2

EN
14
Operating the appliance
Attach the cleaning pad
(Figure 1) to the water tank
(Figure 2) using the Velcros
on the underneath (Figure 3).
Figure 3
Preparing the vibrating water tank
Open the water tank's refill
nozzle and carefully pour in
clean water with some pH
neutral, non-abrasive and non-
greasy floor cleaner.
NOTES :
• The vibrating water tank has a maximum capacity of 300 ml. For optimum
performance, it must contain at least 50ml of liquid. It must only be used on
hard floors.
• The water tank vibrates to recreate a scrubbing action to thoroughly clean hard
floors.
• For optimum cleaning, check the dilution ratio indicated on the detergent
bottle.
• Warning: Only use a pH neutral, non-abrasive and non-greasy cleaning product
suitable for hard floors. Use of any other product, such as white vinegar, bleach,
black soap or essential oil could damage the vibrating water tank.

EN
15
Operating the appliance
Inserting the vibrating water tank
The vacuum mode stops when the mopping mode is selected; the
vacuum stops when the robot detects the vibrating water tank.
Clip it to the back of the robot. The robot automatically detects the
water tank thanks to its tank sensor. The robot is ready to start its
cleaning cycle.
The vibrating water tank can only mop hard floors. Its vibrating action
recreates a scrubbing action and removes stains from the floor.
NOTES :
• If the robot is paused and then restarted, during its cleaning cycle, it will reset
its route and will therefore start a new route without taking into account the
areas it has already cleaned.
• MAX mode cannot be used when the robot is in mopping mode.
• Do not use the vibrating water tank on rugs or carpets.
• The water tank must be removed from the robot before it is charged.

EN
16
Operating the appliance
After attaching the cyclonic dustbin or vibrating water tank, switch
the robot on. Wait a few seconds to let it start up, then press the
AUTO button on the robot or on the remote control. The robot starts
its cleaning cycle in AUTO mode.
After attaching the cyclonic dustbin or vibrating water tank, switch
the robot on. Wait a few seconds to let it start up, then press the
AUTO button on the robot or on the remote control. The robot starts
its cleaning cycle in AUTO mode.
NOTES :
• If the robot is in standby mode, press the AUTO button on the robot or the
remote control once to come out of standby.
• The robot's cycle can be interrupted and it can be manually controlled using
the remote control.
Scheduling
With the daily schedule feature, the robot can start a cleaning cycle
at the time you choose every day of the week. You can reset the time
and scheduled times whenever you want via the remote control.
NOTE : All settings are lost when the robot is switched off via the ON/OFF button.
Reset the time and scheduled cleaning time as above.
Starting the appliance

EN
17
Operating the appliance
Setting the time
Figure 1
00:00
00:00 00:00
00:00
Figure 2
07:30
Figure 3
You must be near the robot to set the time. The robot must not
be in standby mode to set the time. Press the AUTO button on
the robot or on the remote control to come out of standby mode.
Then press the Set the time button on the remote control (Figure 1).
The time flashes. Use the up/down arrows to modify the hour and
minutes (Figure 2). Press the Set the time button again to confirm
the time (Figure 3). A quick beep indicates that the time is set.
00:00
00:00
00:00
00:00
07:30
00:00
07:30

EN
18
Operating the appliance
00:00
Setting a schedule
Figure 1
00:00
07:30
07:30
Figure 2
00:00 09:30
07:30
Figure 3
09:30 09:30
07:30
07:30
Figure 4
09:30
07:30 09:30
07:30
00:00
07:30
To set a daily cleaning schedule, press the schedule time button
(Figure 1). The schedule time flashes. Use the arrows to modify the
hour and minutes (Figure 2). Press the schedule time button again to
confirm the schedule time (Figure 3). The robot beeps to confirm and
says “scheduling complete”. To cancel a schedule, set the schedule
time to "00:00" (Figure 4). To do so, follow the same steps as above.
The robot then confirms “Schedule cancelled”.
07:30
Table of contents
Languages:
Other Amibot Vacuum Cleaner manuals

Amibot
Amibot Animal Premium User manual

Amibot
Amibot Spirit ICE User manual

Amibot
Amibot flex Laser User manual

Amibot
Amibot Spirit PREMIUM User manual

Amibot
Amibot Animal Motion User manual

Amibot
Amibot Animal User manual

Amibot
Amibot Animal XL User manual

Amibot
Amibot Prime 2 User manual

Amibot
Amibot Prime User manual

Amibot
Amibot signature JUNGLE User manual

Amibot
Amibot Swift User manual

Amibot
Amibot vision User manual

Amibot
Amibot Pulse User manual

Amibot
Amibot Swip AS70 User manual

Amibot
Amibot Spirit LASER User manual

Amibot
Amibot AG30 User manual

Amibot
Amibot glass AG31 User manual

Amibot
Amibot PURE LASER User manual

Amibot
Amibot Spirit LASER User manual

Amibot
Amibot Swift User manual