Amibot Spirit ICE User manual

EN
Robot vacuum
User manual
Spirit
ICE

1
Contents
ENEN
1
ENEN
User manual
Thank you for choosing AMIBOT! We hope you are fully satisfied
using your robot as part of your cleaning routine.
If you should encounter situations that have not been properly
addressed in this User Manual or were to have any queries, do not
hesitate to contact us and a member of our Technical Customer
Service Department will be more than happy to answer your
questions.
For more information, you can visit the official AMIBOT website:
www.amibot.tech
We reserve the right to make technical alterations to the appliance
without prior notice with the objective of continually improving our
products and customer satisfaction.
Please carefully read all instructions in this manual before using this
appliance. AMIBOT will not be liable for damage due to incorrect use.
Recommendations........................................................3
Product overview..........................................................4
Contents of the box..............................................................................4
Product diagram ...................................................................................5
Operating the appliance .............................................10
Charging................................................................................................10
Vacuum mode (dust bin).....................................................................12
Mopping mode (H2O tank).................................................................13
Starting the appliance .........................................................................14
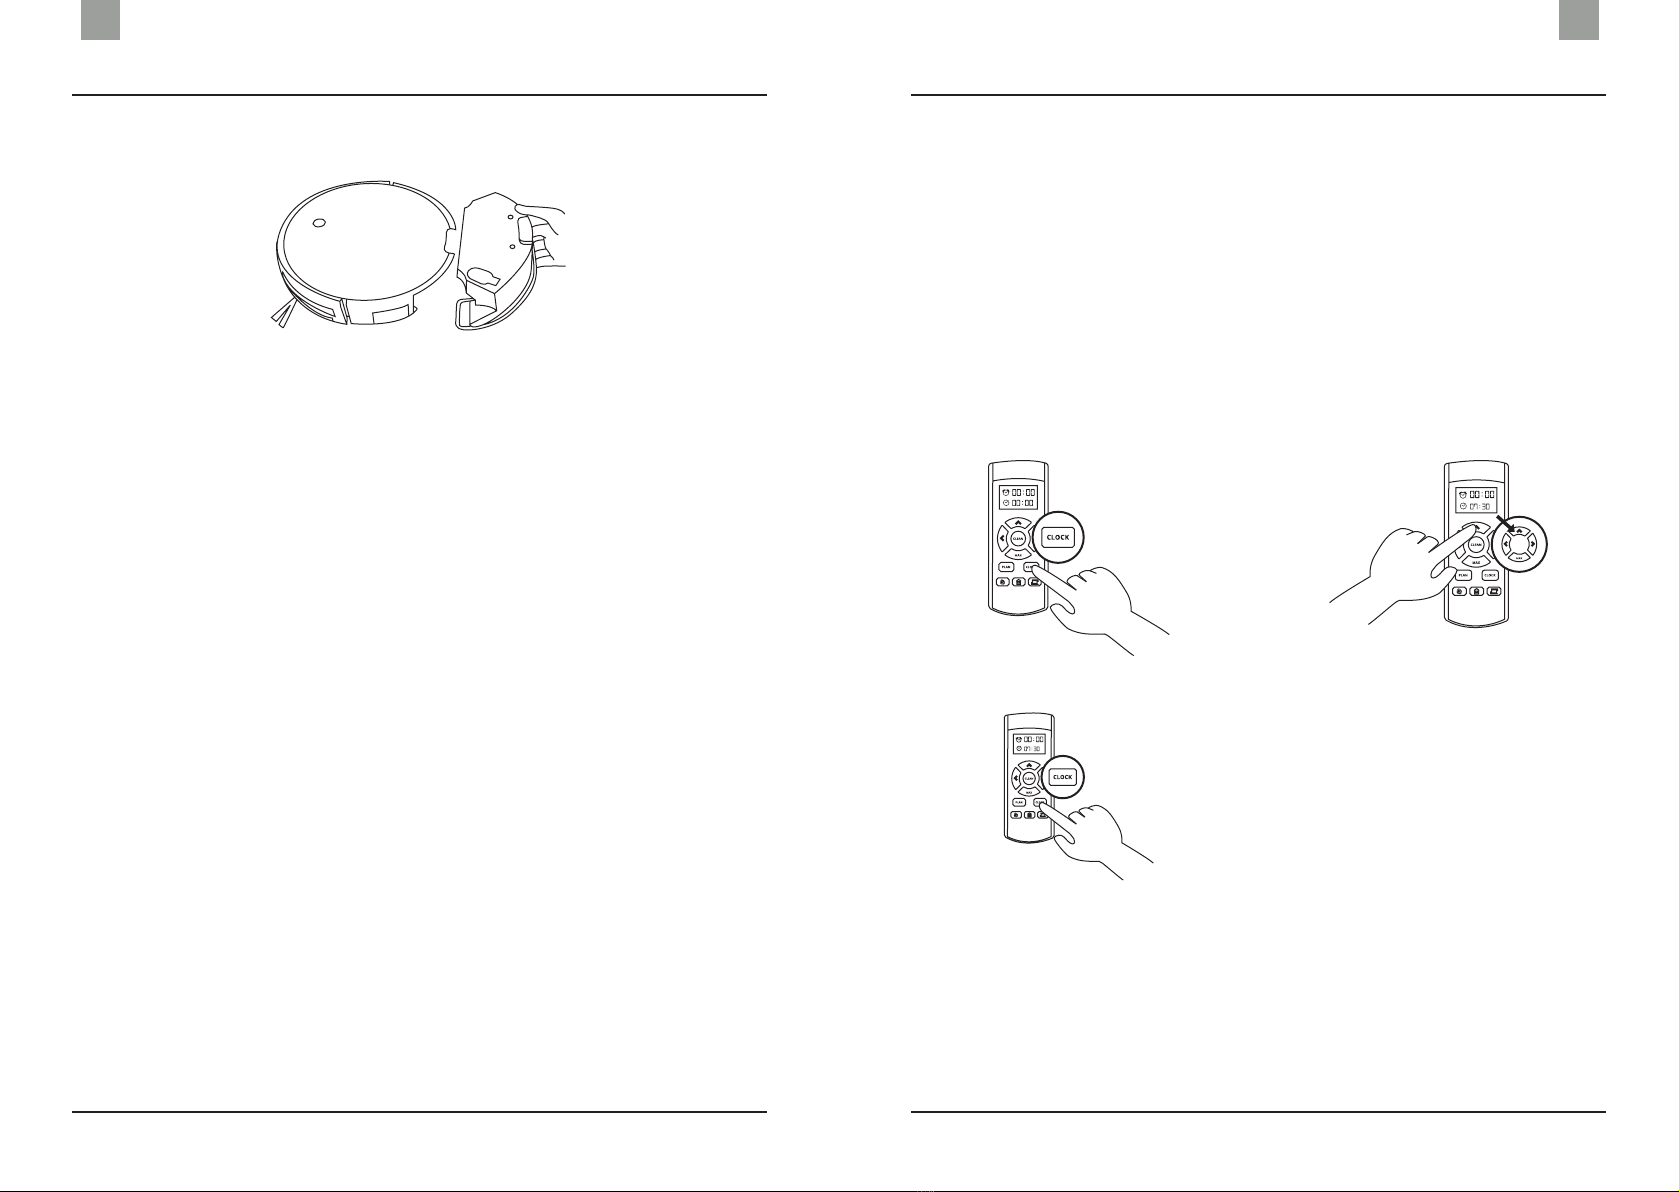
Scheduling ............................................................................................15
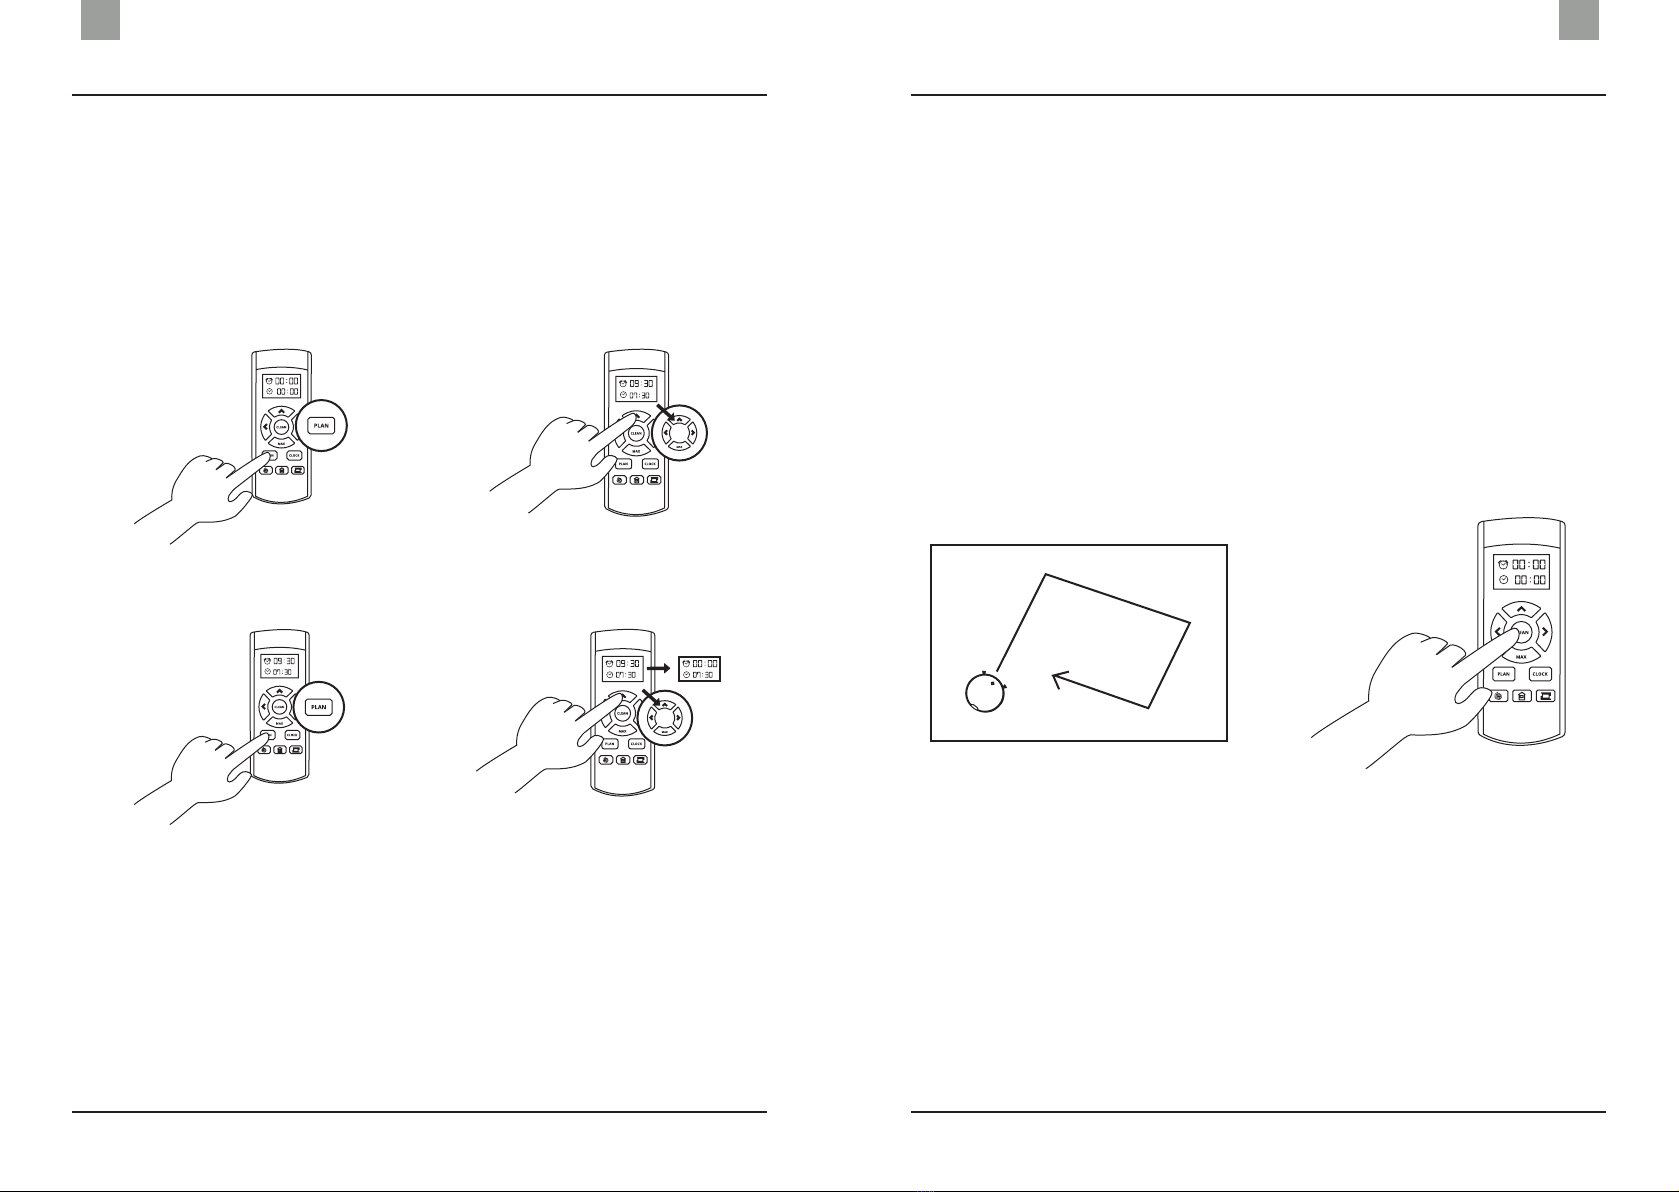
Cleaning routes....................................................................................17
Pause.....................................................................................................21
Stopping the vacuum ..........................................................................21
Maintenance.................................................................22
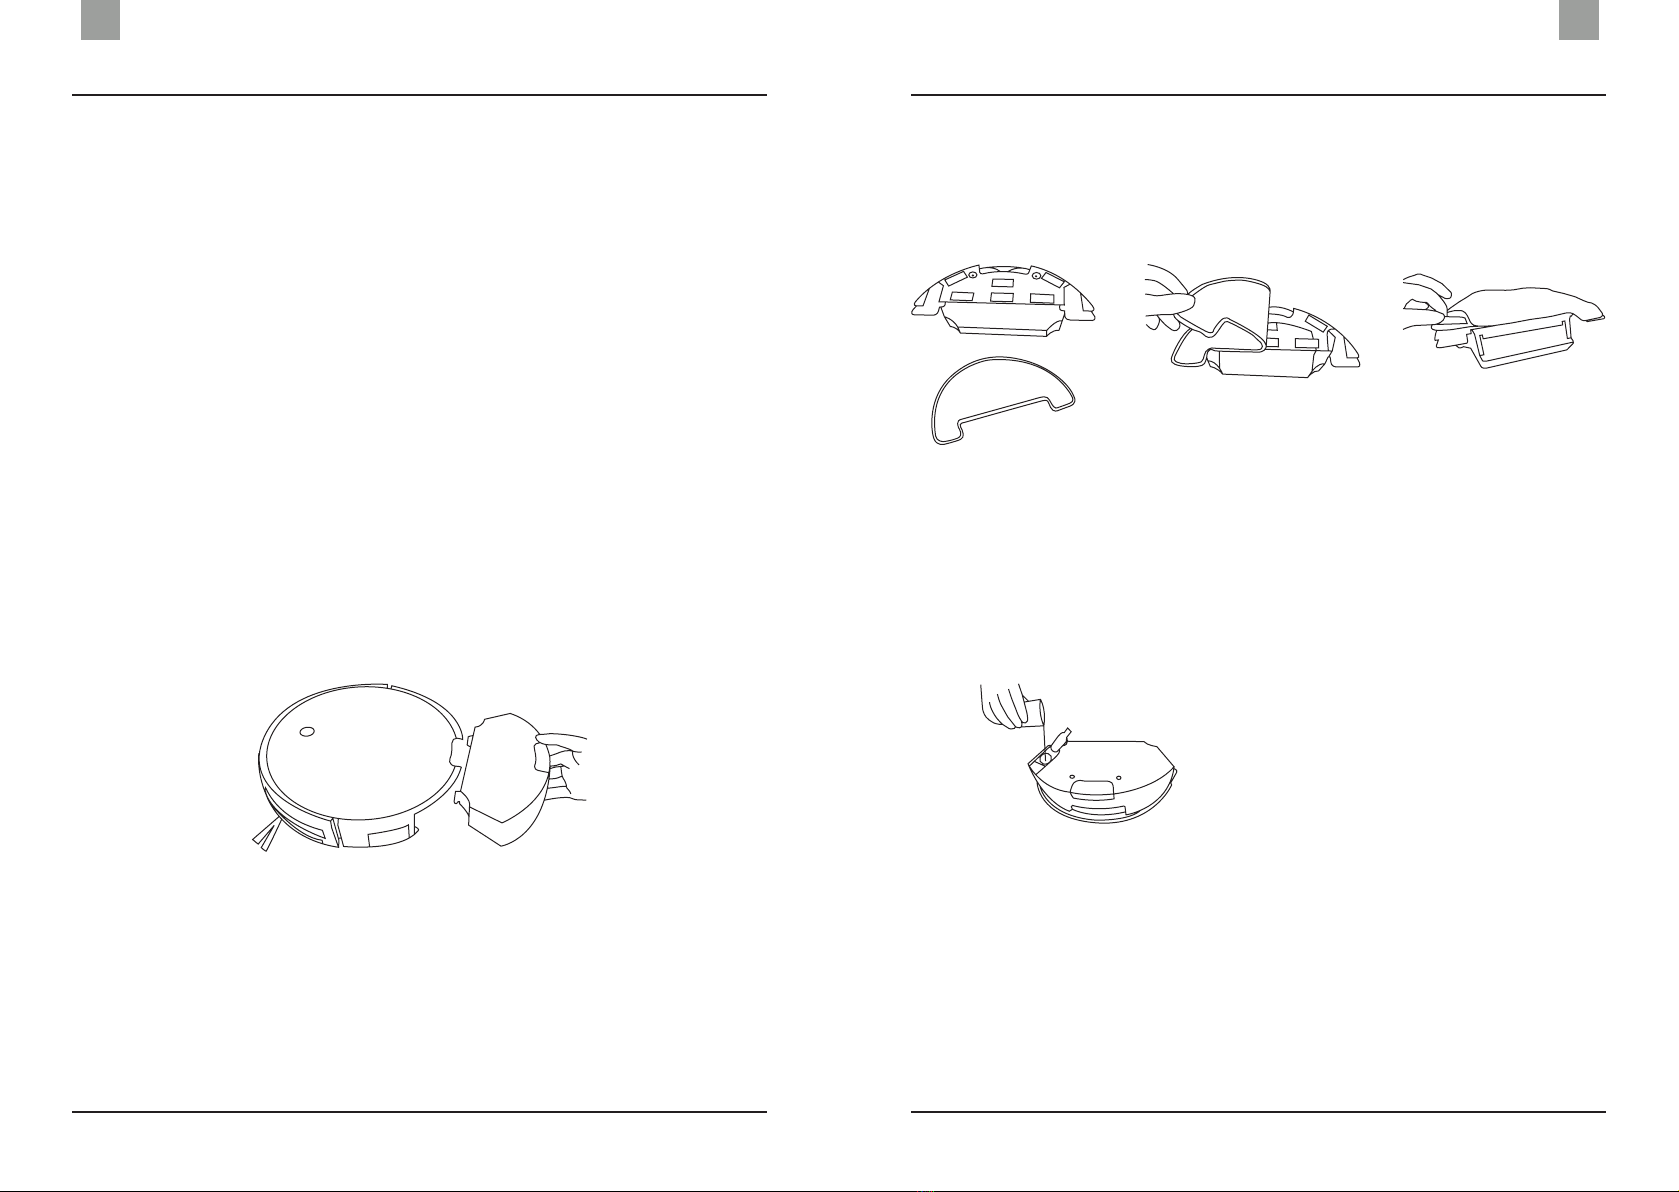
Side brushes.........................................................................................22
Side wheels and castor .......................................................................22
Compartments and filters...................................................................23
Gap and power sensors......................................................................25
Central brush........................................................................................26
Microfibre cleaning pads ...................................................................26
Indicator lights.............................................................27
Troubleshooting...........................................................28
Table: Malfunctions and possible causes .........................................28
Warranty and after-sales service...............................30
Technical specifications..............................................31
Safety instructions and precautions .........................32

2
Contents
EN
3
Recommendations
EN
2
EN
• AMIBOT Spirit Ice is designed to be used inside.
• AMIBOT Spirit Ice is designed for routine floor cleaning. It is not
intended to replace heavy-duty cleaning.
• Before using the robot, ensure that the area to be cleaned is not
cluttered and remove any obstacles that may get in its way during
the cleaning cycle.
• Unplug and remove any power cables and small objects that may
damage or interfere with the robot.
• AMIBOT Spirit Ice cannot go over thresholds over 1 cm thick,
otherwise it automatically stops or reverses.
• AMIBOT Spirit Ice is not designed to be used on long-pile carpets,
which could cause the robot to freeze or reverse.
• AMIBOT Spirit Ice needs a headway of at least 8cm so that it can
go under furniture.
• AMIBOT Spirit Ice must be used on flat surfaces.
• If the robot could come across a gap while cleaning, please secure
the area and check that the gap sensors are clean.
• AMIBOT Spirit Ice is not designed to vacuum water or other liquid
products.
• Do not use the appliance on damp floors.
• Please switch the appliance off before handling it (manually
moving it, maintenance, storing it away).
• The remote control requires 2 x LR03-type batteries (AAA). They
are not supplied with the robot.
Operating conditions...........................................................................32
Recycling instructions .................................................34

5
Product overview
EN
4
Product overview
EN
Contents of the box
1
2
3
6
7
9
8
54
10
11
1. AMIBOT Spirit Ice robot
2. Home base
3. Power adapter
4. Remote control (batteries
not included)
5. Dust bin
6. H2O tank
7. 2 x microfibre cleaning pads
8. 2 x HEPA filters
9. 4 x side brushes
10. Cleaning tool
11. User manual
Product diagram
1
1
2
2
1. AUTO button
2. Bumper
1. ON/OFF button
2. Power socket
Robot side view
Robot top view

6 7
Product overview Product overview
ENEN
1. Gap sensors
2. Power sensors
3. Battery cover
4. Side wheels
2
1 3
5
4
Robot bottom view
5. Castor
6. Side brushes
7. Central brush cover
8. Central brush
Dust bin
1. Dust bin release button
2. Dust bin dirt tube
3. Protection filter
4. HEPA filter
5. Prefilter
1. Refill cap
2. H2O tank release buttons
3. Cleaning pad Velcros
4. Drip nozzles
5. Cleaning pad support
H2O tank
2
1
5
63 4
6. Microfibre cleaning pad
1
2
3
4
5
6
7
8

8 9
Product overview Product overview
ENEN
Home base
1. Power indicator light
2. Charging poles
3. Power adapter
1
1a
1b
2
3
4
5
6
7
8
9
2
3
1. Time
a. PLAN: Scheduled time
b. CLOCK: Current time
2. Directional arrows
3. PLAN button (schedule)
4. SPOT Mode button
5. Home base button
6. CLEAN button
7. MAX Button
a. Decrease hour values
b. Increase suction power
8. CLOCK button (setting the
clock)
9. WALL Mode button
Remote control

11
Operating the appliance
EN
10
Operating the appliance
EN
Charging
Assembling the home base
Plug in the home base using the power cable.
Place it on a level surface next to a wall, perpendicular to the floor.
Keep a distance of at least 2m in front of the base and 1m at either
side.
NOTE: When the AMIBOT robot is on its home base, make sure that it is
switched on and the home base power light is on.
Figure 1 Figure 2
Turn the power switch to ON. "I" is ON and "O" is OFF. The robot is
ready to be charged.
Switching the robot on
Charging the robot
There are two ways to charge the battery:
• Using the home base (Figure 1).
• Using the power adapter (Figure 2).

12 13
Operating the appliance Operating the appliance
ENEN
Vacuum mode (dust bin)
NOTE:
• Before using the robot for the first time, you must charge it for at
least 12 hours. It will only need to be charged for between 250 and
350 minutes thereafter.
• The robot must be switched on while it is being charged.
• The robot is charging when the orange AUTO light flashes slowly.
• If the robot is not in its home base and inactive, it goes into standby
after 10 minutes.
• If the battery is weak while the robot is cleaning, it returns to its home
base. The home base must therefore be switched on.
• If the robot is not used for a long period of time, you are
recommended to fully charge the battery, switch off the robot and
store it in a cool, dry place.
Preparing the H2O tank
Mopping mode (H2O tank)
Attaching the cleaning pad
Figure 1
Figure 2 Figure 3
NOTES:
• The H2O tank has a maximum capacity of 300ml. For optimum performance, it
must have at least 50ml of liquid.
• For optimum cleaning, check the dilution ratio indicated on the detergent bottle.
• Only use floor cleaner products. Prolonged use of any other product, such as
white vinegar, black soap or bleach, could damage the H2O tank.
To use the vacuum mode, attach the dust bin to the back of the
appliance.
Attach the cleaning pad (Figure 1) to the H2O tank using the Velcros
on the underneath (Figure 2) then attach each side to the cleaning
pad supports (Figure 3).
Open the H2O tank's refill nozzle
and carefully pour in clean water
with some floor cleaner.

14 15
Operating the appliance Operating the appliance
ENEN
Inserting the H2O tank
Starting the appliance
Figure 1
After attaching the dust bin or H2O tank, switch the robot on. Press
the AUTO button on the robot or the CLEAN button on the remote
control. The robot starts its cleaning cycle.
With the schedule feature, the robot can start a cleaning cycle at the
time you choose every day of the week. The time and scheduled time
can be reset at any time via the remote control.
Scheduling
Setting the time
The vacuum mode stops when the cleaning mode is selected; the
vacuum stops when the robot detects the water tank.
Clip it to the back of the robot. The robot automatically detects the
water tank thanks to its tank sensor. The robot is ready to start its
cleaning cycle.
NOTES:
• Do not use the H2O tank to clean rugs or carpets.
• The water tank must be removed from the robot before it is charged.
• The dust remaining on the floor is picked up in the part of the tank intended for
the purpose as the central brush rotates.
• To allow vacuum mode to work, please refer to Vacuum Mode (page 12).
NOTES:
• When the robot leaves the home base, it beeps 5 times. The AUTO button
indicator light is steady green.
• If the robot is on standby, press the AUTO button on the robot or the CLEAN
button on the remote control to start a cleaning cycle.
Figure 2
Figure 3
• The robot's cycle can be interrupted and it can be manually controlled using
the remote control. When you reactivate automatic cleaning, the robot starts
a new path.

16 17
Operating the appliance Operating the appliance
ENEN
Press the PLAN button on the remote control (Figure 1). The schedule
timeflashes;usethedirectionalarrowstoadjustthehourandminutes
(Figure 2). Press PLAN to validate the scheduled clean time (Figure 3).
Setting a schedule
Press the CLOCK button on the remote control (Figure 1). The time
flashes; use the arrows to adjust the hour and minutes (Figure 2).
Press CLOCK again to validate the time (Figure 3). A quick beep
indicates that the time is set.
Figure 1 Figure 2
Figure 3 Figure 4
Cleaning routes
The robot has five cleaning routes. These routes can be selected
using the remote control. AUTO and Random modes can also be
selected on the top of the robot.
AUTO Mode
To cancel a schedule, reset the scheduled PLAN time to 0 (Figure 4).
To do so, follow the same steps as above.
NOTE: Scheduled cleaning and the remote control times are cancelled when the
batteries are changed. Reset the time and scheduled cleaning time as above.
Click on the CLEAN button on the remote control or the AUTO button
on the appliance. This cleaning mode is recommended for clear
spaces. The robot makes forward movements.

18 19
Operating the appliance Operating the appliance
ENEN
SPOT mode WALL Mode
This mode is the most effective when cleaning a particularly dirty area.
With the SPOT mode, the robot will move in a spiral to concentrate
vacuuming over the required area. At the same time, it activates its
MAX vacuum power to vacuum the dust from the floor more easily.
Once the area is clean, the robot returns to its starting point and
stops its cycle.
Press the WALL Mode button on the robot or on the Remote Control.
This mode is ideal for cleaning along walls and in corners. The robot
moves in straight lines along walls and furniture in the room.

20 21
Operating the appliance Operating the appliance
ENEN
ROOM Mode
This mode is only used if the robot has to clean a single uncluttered
room. Press the AUTO button on the robot twice or the CLEAN button
on the remote control.
NOTE: All the doors must be closed to allow the robot to perform its cycle.
MAX Mode
The MAX mode is useful for floors that are extremely dusty. Press
the MAX button to increase the robot's vacuum power.
Pause
Pause the robot by pressing the CLEAN button on the robot or the
CLEAN button on the remote control.
NOTE: The robot automatically switches to standby after a few minutes. It can be
switched back on at any time by pressing the AUTO or CLEAN buttons. Press the
button a second time to reactivate its cycle.
Stopping the vacuum
When the robot finishes its cleaning cycle, it goes back to home
base. To manually stop the robot, press the AUTO button on the
robot or ON/OFF on the remote control.
NOTE: When the robot is not cleaning, it is advisable to let it charge in its base with
the switch in the ON position.
Switching off the robot
Turn the ON/OFF power button to "O". The robot is switched off.

23
Maintenance
EN
22
Maintenance
EN
You can use the cleaning tool to clean different
parts of the robot. It will remove small particles
and dust using its soft teeth.
The side brushes can be unscrewed, then washed
with clean water. Dry before reuse. The left
brush is marked with an "L" and the right brush
is marked with an "R". The letters engraved on
the side brushes and the robot will guide you.
NOTE: Side brushes must be replaced if you notice that their original shape has
changed.
Cleaning tool
Side brushes
Side wheels and castor
Wipe the side wheels with a dry cloth to
remove built up dust.
Use a slotted screwdriver to remove the
castor from its frame and wipe it clean.
Remove the hair and other debris caught
around the axle.
Compartments and filters
You should empty the dust bin every time the robot completes a
cleaning cycle. Remove the robot's dust bin by pressing the release
button and empty it by opening it in two (Figure 1).
Then check that there is no dirt obstructing the robot's vacuum
system.
Dust bin
Figure 1

24 25
Maintenance Maintenance
ENEN
H2O tank
Empty the dust collected during the cleaning cycle and remaining
water from the H2O tank and then rinse it with clean water. Wait
until it is dry before using it again.
Regularly check that the H2O tank's two drip nozzles are not
obstructed by debris or limescale. Clean them with a soft cloth.
Filters
Access the filters directly from the dust bin. Once the prefilter has
opened in two, gently pull on the prefilter’s two handles.
1. The prefilter may contain dust, shake it to clean it. Run under
clean water to remove any remaining dust that has built up. Wait
until it is fully dry before putting it back.
2. The HEPA filter cannot be cleaned, otherwise it would become
damaged. To extend the filter's life, gently shake it outside to
remove any small dust particles that could accumulate. If the
HEPA filter is damaged, you are recommended to replace it to
ensure that your robot's filter performance is maintained.
3. The protection filter must be cleaned with clean water to remove
all the built up dust. Wait until it is fully dry before putting it back.
1
2
3
Gap and power sensors
The gap and power sensors on
the bottom of the robot and on
the home base must be regularly
cleaned with a soft cloth. Never
let the sensors get wet.

26
Maintenance
EN
27
Indicator lights
EN
Unclip the central brush's cover underneath the robot and remove
it. Clean the cavity using a soft cloth and remove human and pet
hair caught around the brush. Run under clean water for optimum
cleaning.
Wait until it is fully dry before putting it back.
Microfibre cleaning pads
The microfibre cleaning pads are machine washable at 30° maximum
or may be handwashed with clean water and your usual washing
detergent.
NOTE: Accessories need to be replaced in accordance with how frequently the robot
is used and the amount and type of debris that it picks up.
Central brush Robot status Indicator lights
Charging Flashing orange LED
Charging finished Green LED which stays on
Selected mode Flashing green LED
Malfunction Red LED which stays on
Weak battery Orange LED which stays on
CLEAN Mode selected Green LED which stays on

29
Troubleshooting
EN
28
Troubleshooting
EN
Please contact AMIBOT technical department in the following cases:
• If the appliance has been dropped, damaged or come into
contact with water.
• If the power cable is damaged.
• If the battery is defective.
Table: Malfunctions and possible causes
To avoid breakdowns/malfunctioning, regularly check and clean the
appliance accessories.
No. Malfunction Cause Solution
01
The appliance
does not switch
on.
1. The appliance is
not switched on.
2. The appliance
has run out of
battery.
1. Switch the power button to
ON.
2. Charge the robot using its
home base or plug it in to
the power cable.
02
The robot does
not move cor-
rectly
1. The floor is wet.
2. The dust bin is
not attached
correctly.
3. The central brush
is not inserted
correctly.
1. Dry the floor.
2. Remove and reinsert the
dust bin.
3. Remove and reinsert the
brush in its cavity.
If none of the above-mentioned steps provide a solution for your
problem, please contact the AMIBOT after-sales department.
03 Appliance
suction lost
1. The dust bin is
full.
2. The central
brush or the
side brushes are
blocked.
1. Empty the dust bin, clean
the motor and the filters.
2. Remove any hair and
debris from the brushes.
Check that there is no dirt
obstructing the robot.
04
The appliance
is hard to
manoeuvre.
1. The wheels are
jammed.
1. Clean the vacuum wheels
and remove the hair and
other debris caught up
around them.
05
The remote
control does
not work
1. The batteries
are not inserted
or need to be
replaced.
2. The remote
control is broken.
1. Change the batteries.
2. Replace the remote control
for a new one.

31
Technical specifications
EN
30
Warranty and after-sales service
EN
Customer service in France
Our AMIBOT customer service department is ready to help you:
NOTE: The warranty does not cover damage caused by rusting, a collision or misuse.
Accessories are not covered by the warranty.
Classification Specification Value
Dimensions
Diameter 310 mm
Height 76 mm
Weight 2.5 kg
Electrical
specifications
Voltage 14.4 V
Power 20 Watts
Battery type Lithium ion 2600mAH
Noise level 50 dB
Dust bin capacity 450 ml
Water tank capacity (optional) 300 ml
Charge type Automatic and manual
Cleaning
Cleaning modes AUTO, SPOT, EDGE, SINGLE ROOM,
MAX
Charge time <300 min
Cleaning time 120-200 min
Accessories HEPA filter, side brushes, cleaning
tool, cleaning pads, H2O tank
NOTE: These specifications could be modified with the objective of continual
improvement.

33
Safety instructions and precautions
EN
32
Safety instructions and precautions
EN
Operating conditions
When using an electrical appliance, basic precautions
should always be followed, which include:
• Thisapplianceisnot intended to beusedbychildrenor any person
with reduced physical, sensory or mental capacities, unless they
have been given supervision or instruction concerning use of the
device from a person responsible for their safety.
• Do not allow children to play with the appliance.
• Children should not clean or perform maintenance on the
appliance without supervision.
• The appliance must be kept out of children's reach while switched
on.
• The appliance must not be used if it has suffered a fall or presents
visible signs of damage.
• Do not use the appliance in extremely hot or cold environments
(below -10˚C, above 50˚C).
• To reduce the risk of electrical shock, do not place the appliance
near water or other liquids apart from when using the robot's
water tank.
• Do not touch the power plug or the appliance with wet hands.
• For household use only.
• Only use accessories recommended or supplied by the
manufacturer.
• Please make sure your power supply voltage matches the power
voltage marked on the power adapter.
• Store the appliance away from heat and flammable materials.
• Do not pull on the appliance's power cable to avoid causing
possible damage.
• Keep the power cable away from sources of heat.
• Do not use the appliance if the power cable or plug are damaged.
• Warning: Only use the home base and the power cable supplied
by the manufacturer to charge the battery.
• The robot batteries must only be replaced by qualified persons.
• Only use AMIBOT Spirit Ice as described in this manual.

35
Recycling instructions
EN
34
Recycling instructions
EN
For EU countries
Robot
Do not incinerate the appliance, even if it is severely damaged. The
batteries can explode in a fire.
Do not dispose of this product with other household waste to
prevent possible harm to the environment or human health. Recycle
the appliance responsibly to promote sustainable reuse of material
resources. To recycle your used appliance, please use the return
and collection systems or contact the retailer where the product was
purchased. They can safely recycle this product.
Battery
The battery must be removed and discarded according to local
laws and regulations.
Batteries
Used batteries must be removed from the appliance and discarded
in an appropriate manner.
Packaging
Packaging is necessary, it protects our appliances against possible
damage during transportation. If you need to return your robot to
the AMIBOT after-sales department or customer service department,
the original packaging is the best protection against damages.
If you wish to dispose of your AMIBOT packaging, you can do so after
the withdrawal period has expired.
AMIBOT packaging is recyclable and should be recycled correctly.

FR
Robot aspirateur
Manuel d’utilisation
Spirit
ICE
Table of contents
Languages:
Other Amibot Vacuum Cleaner manuals

Amibot
Amibot AG30 User manual

Amibot
Amibot Swip AS70 User manual

Amibot
Amibot Prime 2 User manual

Amibot
Amibot Swift User manual

Amibot
Amibot PURE LASER User manual

Amibot
Amibot signature JUNGLE User manual

Amibot
Amibot Spirit LASER User manual

Amibot
Amibot flex Laser User manual

Amibot
Amibot Spirit LASER User manual

Amibot
Amibot Animal Premium User manual

Amibot
Amibot vision User manual

Amibot
Amibot Animal Motion User manual

Amibot
Amibot Swift User manual

Amibot
Amibot Prime User manual

Amibot
Amibot Animal User manual

Amibot
Amibot glass AG31 User manual

Amibot
Amibot Spirit MOTION User manual

Amibot
Amibot Spirit PREMIUM User manual

Amibot
Amibot Pulse User manual

Amibot
Amibot Animal XL User manual