Aquos SHV39 Installation guide

BasicManual
CellphoneandPHSoperatorscollectandrecycleunused
telephones,batteriesandbatterychargersatstoresbearing
thelogoregardlessofbrandandmanufacturertoprotect
theenvironmentandreusevaluableresources.
濡れた状態での充電は、
異常な発熱・焼 損などの
原因となり大変危険です。
(tollfree)
CustomerServiceCenter
Forinquiries,call:
Forgeneralinformation,charges,andoperationassistance
Fromfixed-linephones:Fromaucellphones:
areacodenotrequired
areacodenotrequired
Fromfixed-linephones:Fromaucellphones:
Forservicecancelationprocedureincaseoflossortheft
(tollfree)
onyouraucellphone.
RepairandDeliveryServiceCenter
Forloss,theftordamage(tollfree)
Fromfixed-linephones/aucellphones:
Businesshours:9:00to20:00(7daysaweek)
Businesshours:24hours(7daysaweek)
0120-925-919
Incaseabovenumbersarenotavailable,calltoll-free:
0120-977-033(exceptOkinawa)
0120-977-699(Okinawa)
Incaseabovenumbersarenotavailable,calltoll-free:
0120-925-314
The company names and product names appearing in this manual are
trademarks or registered trademarks of their respective holders.
For exemptions, refer to “Notes on Usage” available on the au homepage.
July2017,1stEdition
Soldby:KDDICORPORATION,
OKINAWACELLULARTELEPHONECOMPANY
Manufacturedby:SHARPCORPORATION
SHV39

Preface
Thank you for buying the “AQUOS R SHV39” (simply called the “SHV39” or the
“product” from here on).
Before using the product, be sure to read the “Basic Manual” (this manual)
and “Notes on Usage”/“Setting Guide” available on the au homepage to
ensure correct use. After you have finished reading the manuals, be sure to
keep them accessible and store the printed manuals (“取扱説明書” (Basic
Manual), “ご利用にあたっての注意事項” (Notes on Usage) and “設定ガイド”
(Setting Guide)) (Accessories) in safe places so that you can refer to them
whenever you need them.
List of Packaged Items
Before you start using the product, make sure that you have all the following
packaged items with the product.
SHV39*1 ROBOQUL (SHV39PUA)
SHARP TV antenna cable
02 (02SHHSA)
*2 SIM eject tool (sample)*3
•取扱説明書 (Basic Manual) (Japanese)
•ご利用にあたっての注意事項 (Notes on Usage) (Japanese)
•設定ガイド (Setting Guide) (Japanese)
*1 Only the product has waterproof and dustproof.
*2 Connection required for watching TV on the product. Do not misplace (zP.5).
*3 Use to attach/remove an au Nano IC Card 04 and microSD memory card.
The following items are not included in the package.
•au Nano IC Card 04
•microSD memory card
•AC adapter
•Earphone
•USB Type-C™ cable
•Purchase a specified charger (sold separately).
◎The battery is built into the product.
◎Illustrations of cell phones in this manual are only for reference. They may
look different from the actual product.
Instruction Manual
■“Basic Manual” and “Setting Guide”
The “Basic Manual” (this manual) and “Setting Guide” available on the au
homepage describe basic operations of major functions.
■“Instruction Manual Application” (Japanese/English
Version)
You can use the “Instruction Manual application” (Japanese version) on the
product to check detailed operational procedures.
Also, you can activate intended functions from an explanation screen
depending on the functions.
On the home screen →“App list screen” →[サポート] (Support) →[ 取扱説明書]
(Instruction Manual).
Also, you can use the “Instruction Manual application” (English version) on the
product to check operational procedures.
On the home screen →“App list screen” →[サポート] (Support) →[ Basic Manual]
after switching the display language to English (zP.12).
•To use the application for the first time, you need to download and install it
by following on-screen instructions.
1

■“Full Instruction Manual” (Japanese)
You can check “取扱説明書 詳細版” (Full Instruction Manual) (Japanese) that
describes detailed of various functions on the au homepage.
(https://www.au.com/support/service/mobile/guide/manual/)
Illustrations and Descriptions in This
Manual
■Note on Key Illustrations
In this manual, the key illustrations are simplified as shown below.
■Description of Operations for Selecting Item/Icon/Key
etc.
In this manual, operation procedures are described as below.
Description Explanation
On the home screen →
“App list screen” →
[Phone] →Enter “141”
→[CALL].
On the AQUOS Home screen, swipe/flick up the
Hot Sheet at the bottom of the screen to switch
to the App list screen, and then tap “ Phone”.
Continue by tapping “ ”, “ ”, and
“ ”, and finally “ ”.
f(hold down for at
least 2 seconds).
Hold fdown for at least 2 seconds.
* Tapping is to select a key or icon displayed on the screen by lightly tapping it with
your finger.
■Notes on Illustrations/Screenshots
Screenshots and operations in this maul are based on attaching an au Nano
IC Card 04 to the product.
Illustrations and screenshots may differ from actual screen. Portions of the
screen are sometimes omitted.
Actual screen
In this manual, part of the
screen such as icons are
omitted.
In this manual
◎Explanations of this manual are based on the case when the color of the
main unit is “Mercury Black” as an example.
◎Explanations of this manual are based on the case when the product is
held vertically. If you hold it horizontally, menu items/icons/on-screen keys
etc. may be different.
◎Descriptions in this manual are based on operation in AQUOS Home.
Operations may be different if home applications have been changed (by
using “Home applications”, etc.).
◎Menu items, layers and icons described in this manual may be different
according to functions being used and conditions.
◎In this manual, “au Nano IC Card 04” are abbreviated as “au IC Card”.
2

◎In this manual, “microSD™ memory card (commercially available)”,
“microSDHC™ memory card (commercially available)” and
“microSDXC™ memory card (commercially available)” are abbreviated
as “microSD memory card” or “microSD”.
◎All of the indicated amounts exclude tax unless otherwise specified.
◎The company names and product names appearing in this manual are
trademarks or registered trademarks of their respective holders. Also, ™
and ® marks are sometimes omitted.
Cell Phone Etiquette
■Use of cell phones is not allowed in the following
places!
•Do not listen to music or watch videos/TV while driving a car or riding a
motorbike or bicycle. Use of a cell phone while driving a car or riding a
motorbike is prohibited by law. (Use of a cell phone while riding a bicycle
may be punishable by some regulations.) Be attentive to traffic around you
while walking. Not being able to hear surroundings or looking only at the
display may cause a traffic accident. Be careful especially at train crossings,
on station platforms, and at crosswalks.
•Since using the product on airplanes is restricted, follow the instructions
given by the respective airlines.
■Be considerate of people around you
•Do not make calls in theaters, museums, libraries, and other similar places.
Turn power off or turn on manner mode so as not to disturb others around
you with your ringtones.
•Do not use the cell phone outside in town where you might hinder other
pedestrians.
•Viewing a cell phone screen while walking is a serious hazard. Do not
suddenly stop to talk on/operate the cell phone or do so while walking.
•Move to areas where you will not inconvenience others on bullet trains, in
hotel lobbies, etc.
•Refrain from talking in a loud voice.
•Check whether sound from earphones, etc. is audible when near others on a
train.
•Obtain the permission of other people before you take their photos with the
cell phone's camera.
•Keep general morals when you use the camera function.
•Some people close to you in crowded places such as packed trains may be
using a cardiac pacemaker. Turn on “Airplane mode” or turn the cell phone
off in such places.
•Abide by the rules of hospitals and other medical institutions where it is
forbidden to use or carry cell phones.
Names and Functions of Parts
■Front/Left Side/Right Side
A
au IC Card/microSD memory card tray
B
In camera lens
C
Proximity sensor/Light sensor
Proximity sensor prevents inadvertent operations of the touch panel during
a call.
Light sensor detects the ambient brightness and adjusts the brightness of
display.
D
Earpiece (Receiver)
3

E
udVolume up/down key
Adjust the volume.
Hold down don the lock screen to set/disable the manner mode.
F
f Power key
Turn the screen on/off.
Hold it down to turn on/off the power, restart the product, etc.
G
Display (Touch panel)
The display surface is covered by the protective film. Remove it when you
use the commercially available one.
H
Fingerprint sensor
Use to unlock the lock screen etc. by fingerprint authentication. Also, set it
to use as the home key.
I
Charging/Incoming indicator
While charging, it illuminates in red/green according to the battery level.
While receiving a mail and new notification, it flashes according to the
setting.
■Back/Top and Bottom
J
Wi-Fi®/Bluetooth®antennas
K
& mark
Hold it over a reader/writer when using Osaifu-Keitai®/NFC.
L
Internal antenna
M
Out camera lens
N
Mobile light
O
GPS/Internal antennas
P
Wi-Fi®antenna
Q
Sub microphone
R
Earphone/Microphone jack
When you use (watch/record) TV, connect SHARP TV antenna cable 02 to
the earphone/microphone jack of the product (zP.5).
S
Mouthpiece (Microphone)
T
External connection jack
Use when connecting ROBOQUL, TypeC Common AC Adapter 01 (sold
separately), USB Type-C cable (commercially available), USB cable for
peripherals (commercially available), etc. to the product.
When you connect ROBOQUL, TypeC Common AC Adapter 01 (sold
separately), USB Type-C cable (commercially available), etc. to the
product, the geomagnetic sensor of the product is affected by the
magnetism of connected devices and it may not function properly. When
you use functions and applications using the geomagnetic sensor, remove
the cable.
U
Speaker
◎The back cover of the product cannot be removed. Removing it forcibly
may cause damage or a fault.
◎The battery is built into the product, and cannot be removed by the
customer. To force the power off, refer to “Turning the Power Off Forcibly”
(zP.10).
au IC Card/microSD memory card tray
◎Note that pulling or applying excessive force on an au IC Card/microSD
memory card tray may cause damage.
Proximity sensor/Light sensor, earpiece (receiver), mouthpiece
(microphone), speaker, sub microphone
◎Placing stickers, etc. over the proximity sensor/light sensor may prevent
the product from operating properly.
◎Covering the earpiece (receiver), mouthpiece (microphone), speaker or
sub microphone with stickers, fingers, etc. may hinder product
performance.
4

Internal antenna, Wi-Fi®/Bluetooth®antennas, GPS/Internal antennas,
Wi-Fi®antenna
◎Antennas are built into the product. Do not cover with hand during calls
or data communication. Doing so may affect call/communication quality.
Earphone/Microphone jack
◎An earphone/microphone with the switch or depending on the type of the
earphone/microphone, it may not be available with the product.
IMEI plate
◎A plate with the sticker which the IMEI number (International Mobile
Equipment Identifier), CE mark, etc. are printed is stowed near the au IC
Card/microSD memory card tray. Except when the IMEI number is
required such as requesting servicing or repairs, do not pull out the plate
or remove the sticker.
◎When pulling out the IMEI plate, use the included SIM eject tool (sample).
If you use a tool other than the SIM eject tool, may cause damage or a
fault.
◎Note that pulling out the IMEI plate forcibly or adding forces on it may
damage the plate.
◎If you accidentally pull out the IMEI plate, slowly return the IMEI plate to
the original position while taking care not to insert it too deep.
◎You can also operate the product to confirm the IMEI.
On the home screen, “App list screen” →[Settings] →[About phone] →
[Status] →[SIM status] and confirm the IMEI field.
Connecting a SHARP TV Antenna Cable 02
When you use (watch/record) TV, connect with SHARP TV antenna cable 02.
A Insert the plug of a SHARP TV antenna cable 02 in the
earphone/microphone jack.
Earphone/
Microphone jack
Connector
Plug
SHARP TV antenna cable 02
Using the au IC Card
au IC Card
The au IC Card records your personal information such as phone numbers.
This product supports au Nano IC Card 04.
au Nano IC Card 04
IC (metal) part
Front Back
◎Note the followings since using the au IC Card may cause a fault or
damage easily.
•Do not touch the IC (metal) part of the au IC Card.
•Confirm the orientation for inserting.
•Do not attach or remove it forcibly.
◎When the au IC Card is not attached properly or any trouble is found,
error messages are displayed.
◎Do not misplace the au IC Card once it is removed.
◎Do not insert the au IC Card attached with a conversion adapter. May
cause a fault.
◎Make sure to unplug the USB Type-C plug such as TypeC Common AC
Adapter 01 (sold separately) from the product when attaching or
removing the au IC Card.
◎The included SIM eject tool (sample) is required to attach/remove the au
IC Card.
5

Attaching the au IC Card
Before attaching the au IC Card, turn the product off.
Also, attach it with the display side turned up.
A Insert the tip of SIM eject tool (sample) into the au IC Card/
microSD memory card tray eject hole.
Insert it horizontally until the card tray comes out.
If you do not insert it horizontally, may cause a fault or damage.
B Pull out the au IC Card/microSD memory card tray.
C Put the au IC Card to the au IC Card/microSD memory card
tray with the IC (metal) side turned down.
Check the direction of the au IC Card and put it securely.
Not to let the au IC Card lift up from the card tray.
If the au IC Card does not fit the card tray, may cause a fault.
Notches
IC (metal)
D Insert the au IC Card/microSD memory card tray all the
way to the product horizontally.
Push the Aareas securely and make sure there is no space between the
product and the card tray.
Attaching or removing the au IC Card/microSD memory card tray
◎Take care not to lose or damage the removed au IC Card/microSD
memory card tray.
◎When pulling out the card tray from the product, pull it slowly and
horizontally with the display side turned up.
•Pulling out the card tray forcefully or obliquely may cause damage.
•When pulling out the card tray with the display side turned down or the
product stood upright, the au IC Card or microSD memory card being
attached to the card tray may be off and cause loss.
6

◎When attaching the card tray, insert it slowly with the display side turned
up and make sure there is no space between the product and the card
tray.
•Do not insert the card tray the other way around. Failure to do so may
cause damage it.
•Inserting the card tray not deeply enough may cause impairment of the
waterproof/dustproof property or prevent the product from functioning
properly.
•For details on closing the card tray, refer to “Closing the au IC Card/
microSD memory card tray” on the “Notes on Usage”.
Removing the au IC Card
Before removing the au IC Card, make sure to turn the product off.
Also, remove it with the display side turned up.
•For details on attaching or removing the au IC Card/microSD memory card
tray, refer to “Attaching the au IC Card” (zP.6).
A Pull out the au IC Card/microSD memory card tray using
the SIM eject tool (sample).
B Removing the au IC Card from the au IC Card/microSD
memory card tray.
C Insert the au IC Card/microSD memory card tray all the
way to the product horizontally.
Using a microSD Memory Card
Attaching a microSD Memory Card
Before attaching a microSD memory card, make sure to turn the product off.
Also, attach it with the display side turned up.
•For details on attaching or removing the au IC Card/microSD memory card
tray, refer to “Attaching the au IC Card” (zP.6).
A Pull out the au IC Card/microSD memory card tray using
the SIM eject tool (sample).
B Put the microSD memory card to the au IC Card/microSD
memory card tray with the terminal (metal) side of the
memory card turned down.
Check the direction of the au IC Card and put it securely.
Not to let the microSD memory card lift up from the card tray.
If the microSD memory card does not fit the card tray, may cause a fault.
C Insert the au IC Card/microSD memory card tray all the
way to the product horizontally.
◎Make sure that the top/bottom and front/rear of the microSD memory card
are facing correctly.
Attaching it forcibly may cause damage.
◎Do not touch the terminal part of a microSD memory card.
7

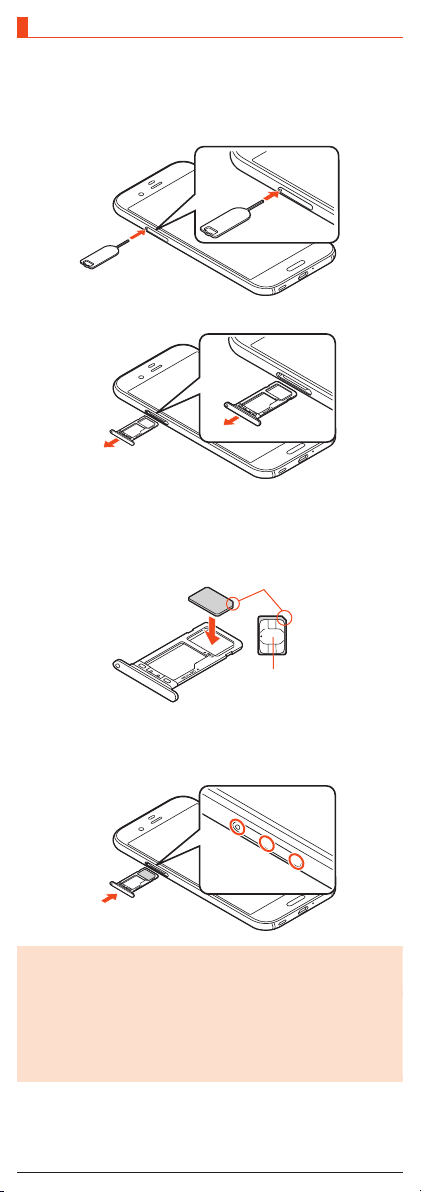
Removing the microSD Memory Card
Before removing a microSD memory, make sure to turn the product off.
Also, remove it with the display side turned up.
•For details on attaching or removing the au IC Card/microSD memory card
tray, refer to “Attaching the au IC Card” (zP.6).
A Pull out the au IC Card/microSD memory card tray using
the SIM eject tool (sample).
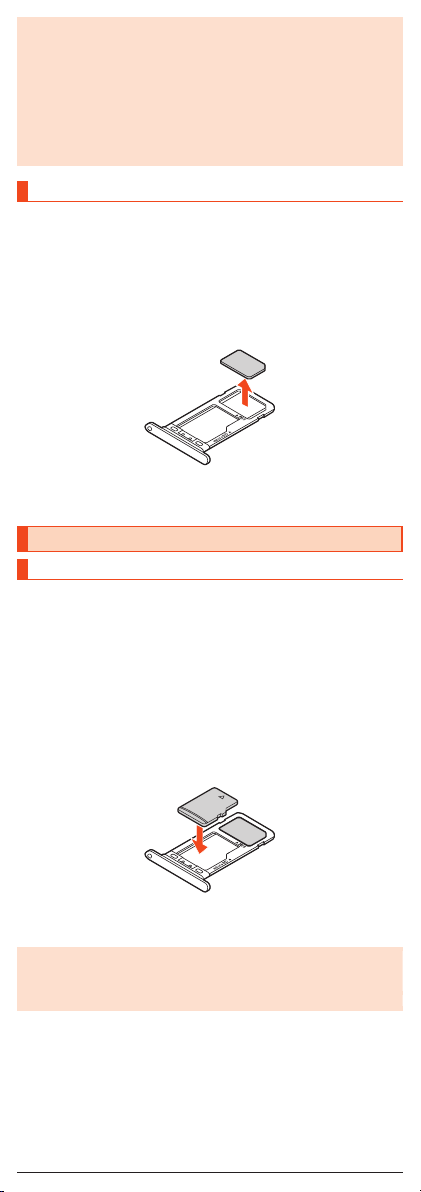
B Removing the microSD memory card from the au IC Card/
microSD memory card tray.
C Insert the au IC Card/microSD memory card tray all the
way to the product horizontally.
◎The microSD memory card may become warm after a long time use, but
this is not a fault.
Charging
Charging
When you purchase the product, the internal battery is not fully charged. Be
sure to charge the internal battery before use.
•If the performance of the battery does not recover (e.g. the usable time after
each charge has become extremely short), the internal battery may be at the
end of service life. On the home screen →“App list screen” →[Settings] →
[About phone] →[Status] →[Battery status] to check the charging
performance of the internal battery.
•While charging, the charging/incoming indicator illuminates in red, and the
battery icon is displayed with superimposed. When the battery is charged
to approximately 95%, the charging/incoming indicator illuminates in green.
When charging is finished, the charging/incoming indicator goes out.
◎The product may become warm while charging, but this is normal.
◎Depending on the operation procedure and usage environment, the
temperature inside the product may get high and the product may even
get heated. In such case, charging may stop for security reasons.
◎Charging the internal battery while using the camera function etc. may
lengthen the charging time.
◎If you perform various operations with a specified charger (sold
separately) connected to the product, charging/discharging may take
place repeatedly in a short time. Frequently charging the internal battery
shortens its service life.
◎If you charge the internal battery when the battery has run out, the
charging/incoming indicator may not illuminate soon. However, charging
is in progress.
◎If the charging/incoming indicator flashes in red, force the power off
(zP.10) and turn the product on again. If the indicator continues to
flash, stop charging the internal battery and contact an au shop or the
Repair and Delivery Service Center.
◎If you stop charging while the charging/incoming indicator still illuminates
during charging, the cell phone may be left not fully charged even if is
displayed on it. In such case, the usage times shorten.
8

Charging with the Specified AC Adapter (Sold
Separately)
The followings are the explanation of how to connect TypeC Common AC
Adapter 01 (sold separately) to charge. For details on the specified AC
adapter (sold separately), refer to “Peripheral Devices” (zP.22).
A Insert the power plug of TypeC Common AC Adapter 01
(sold separately) into a 100V AC outlet.
B Insert the USB Type-C plug of TypeC Common AC Adapter
01 (sold separately) to the external connection jack of the
product in the direction of the arrow.
TypeC Common AC Adapter
01 (sold separately)
100V AC
outlet
USB Type-C plug
Exter
nal
connection jack
C When charging is finished, pull out the USB Type-C plug of
TypeC Common AC Adapter 01 (sold separately) straight
from the external connection jack of the product.
D Unplug the power plug of TypeC Common AC Adapter 01
(sold separately) from the outlet.
◎Although you can charge the internal battery while the power is turned
on, charging time lengthens.
Charging with ROBOQUL
The followings are the explanation of how to charge with ROBOQUL and
TypeC Common AC Adapter 01 (sold separately). For details on the specified
AC adapter (sold separately), refer to “Peripheral Devices” (zP.22).
When connecting the product to ROBOQUL, ROBOQUL rotates and turns to
you according to the time when the screen is turned on and charging starts,
incoming calls, alarms, etc. Also, EMOPA talks to you according to the
situation. ROBOQUL links to EMOPA, so it faces and talks to you while EMOPA
is activated.
•If you set EMOPA to ON, ROBOQUL links to EMOPA and activates much
more situation.
* If you keep ROBOQUL activated after charging is complete, do not conduct the
following operations Dand E.
A Insert the power plug of TypeC Common AC Adapter 01
(sold separately) into a 100V AC outlet.
B Insert the USB Type-C plug of TypeC Common AC Adapter
01 (sold separately) to the power connection jack of
ROBOQUL straightly.
Power
connection jack
USB Type-C plug
9

C Insert the external connection jack of the product all the
way into the charger's plug of ROBOQUL straightly and
attach the product.
When inserting it, be careful not to damage the product.
Tilt the product to back and confirm stability. When moving the charger's
plug part, be careful not to apply excessive force on it.
TypeC Common AC Adapter 01
(sold separately)
100V AC outlet
Charger's plug
D After charging, hold ROBOQUL and straightly lift the
product upwards and remove the product.
E Pull out the USB Type-C plug of TypeC Common AC
Adapter 01 (sold separately) from ROBOQUL straightly and
unplug the power plug from the outlet.
◎When using ROBOQUL, connect a specified charger (sold separately).
Do not connect a charger other than specified one such as a PC or
portable charger to ROBOQUL. Doing so may cause a fault.
◎Although you can charge the internal battery while the power is turned
on, charging time lengthens.
◎For details on operations or settings of ROBOQUL, refer to the
“Instruction Manual application” (Japanese version) or “Full Instruction
Manual” (Japanese) on the au homepage.
For the latest information on ROBOQUL, refer to the website below.
(http://k-tai.sharp.co.jp/dash/roboqul/index.html)
Turning the Power On/Off
■Turning the Power On
A f(hold down for at least 3 seconds) while the product
is turned off.
◎
The initial setting of the touch panel will be executed until “AQUOS”
disappears from the screen after the power is turned on. Do not touch the
screen, otherwise touch panel operations may not be performed properly.
◎
When you turn the power on for the first time after purchasing the product,
the initial setting screen is displayed automatically. For details on the initial
setting, refer to “Setting Guide” available on the au homepage.
■Turning the Power Off
A f(hold down for at least 2 seconds).
B [Power off].
■Restarting the Product
You can restart the product after turning it off.
A f(hold down for at least 2 seconds).
B [Restart].
■Turning the Power Off Forcibly
You can force the product to turn off if the screen freezes or you are unable to
turn the product off.
A f(hold down for at least 8 seconds).
Release your finger after the product vibrates to turn the power off.
◎If the power is turned off forcibly, unsaved data will be deleted. Do not
turn the power off forcibly unless you cannot operate the product.
10

■Booting in Safe Mode
Turn the product off then boot it in a state close to that at time of purchase.
If operation of the product is unstable, it may be due to applications installed
after purchasing the product. If symptoms improve when booted in safe mode,
uninstalling the applications you installed may remedy symptoms.
A f(hold down for at least 2 seconds).
B Long touch “Power off” →[OK].
“Safe mode” is displayed at the bottom of the screen.
To end safe mode, restart the product.
◎When the product is turned off, you can boot it in safe mode by f(hold
down for at least 3 seconds) to turn it on, and then holding down d
until the lock screen is displayed after the SHARP logo appears.
◎It is recommended that you back up your data on the product before
booting in safe mode.
◎Widgets that you yourself created may be deleted.
◎Safe mode is not a normal state for the product to be booted in. End safe
mode before normal use.
Turning the Screen On/Off
If you press for no operation is made for a specified time, the screen is
turned off.
■Turning the Screen On
A fwhile the screen is turned off.
◎When you put the product in your pocket, bag, etc., turn the screen off.
Not doing so may cause inadvertent operations.
■Turning the Screen On by Holding
If “Turn screen on by holding” is set, lift the product and keep it stationary to
turn the screen on. (This function is enabled when you purchase the product.)
◎In the following cases etc., the screen may not be turned on.
•When you are moving with the product held (while walking, getting in a
car, etc.)
•When you keep the product moving before or after lifting it
•When you lift the product vertically or horizontally
11

Lock Screen
The lock screen is displayed if you turn the screen on.
If you register your fingerprint, you can unlock the screen just by touching the
fingerprint sensor.
《
Lock screen
》
A
Wallpaper
B
Notifications area
Notifications for missed calls, new e-mail/SMS, etc. appear as a pop-up.
Double-tap notification for corresponding screen.
Drag notifications area down for list of notifications. Tap notifications for
corresponding screen.
C
Activate voice search
Slide “ ” to top of screen to activate Google voice search™.
D
Clock area
E
EMOPA area
When “エモパー” (EMOPA) is set to ON, various information delivered by
EMOPA is displayed.
F
Screen lock
Slide “ ” to top of screen to unlock the screen.
•If a password, etc. is set in “Screen lock”, it is displayed as .
G
Activate camera
Slide “ ” to top of screen to activate “Camera” application.
Switching the Display Language to English
You can switch the display language for function names and other items to
English.
A On the home screen →“App list screen”
B [設定] (Settings).
C [言語と入力] (Languages & input).
D [言語] (Languages).
E [言語を追加] (Add a language).
F [English].
G Long touch “English (United States)” and drag it to the top
of the list.
12

Using the AQUOS Home
AQUOS Home is a home app that consists of the home screen (Desktop
Sheet/Hot Sheet) and App list screen.
On the Desktop Sheet of the home screen, you can register shortcuts for
applications/functions and widgets, while on the Hot Sheet of the home
screen, you can register shortcuts for applications/functions. On the App list
screen, installed applications are displayed.
■Viewing the AQUOS Home
Swipe/flick up the Hot Sheet of the home screen to switch to the App list
screen.
Swipe/flick down the top of the App list screen to switch to the home screen.
《Home screen》《App list screen》
A
Status bar
B
Desktop Sheet
Flick it to the left or right to switch pages.
C
App
D
Page Indicator
When switching pages on the Desktop Sheet, indicates the present display
position.
E
Hot Sheet
You can register a shortcut for the favorite applications and functions to
start quickly.
F
Navigation Bar
G
Search
Use quick search box.
H
Widget
I
Folder
Tap a folder →select a folder name to change the name. “Unnamed
Folder” is displayed on the folder without setting the name.
When the indicator is displayed by tapping the folder, flick it to the left or
right to switch pages.
J
Display the App list screen
Tap it to switch to the App list screen.
13

Using the Status Bar
Icons
The notification icons to notify you of a missed call, a new mail message, a
running operation, etc. are displayed on the left side of the status bar, while
the status icons to show the status of the product are on the right side.
■Main Notification Icons
Icon Description
Missed call
New E-mail message
New SMS message
New PC-mail message
New Gmail™ message
Making a call, talking, receiving a call
Call on hold
Talking in high quality sound with a model supporting VoLTE
provided by au.
Answering memo information
Available space on the internal memory being run out
Update available
Installation completion of application
Software update available
Icons collected
■Main Status Icons
Icon Description
Time
~Battery level
~: Battery level display : No battery
•While charging, the battery icon is displayed with
superimposed.
•Percentage of the remaining battery level appears on the left
side of the battery icon.
Airplane mode set
~Signal strength (Receiving electric field)
~: Level display : Out of service area
•The icon indicating network is displayed at the upper left.
: LTE/WiMAX 2+ available*
•During a communication, the icon is displayed with
superimposed.
Roaming
Manner mode status
: Standard manner mode : Total silence mode
: Alarms only mode : Priority only mode
During a call using hands-free
Microphone set to “Mute” during a call
Answering memo set
: No Answering memo
: Answering memo (one to nine entries)
: Answering memo (ten entries)
* Both “LTE” and “WiMAX 2+” networks are available. “4G” is displayed for either
network. Your cell phone connects to the network deemed to be the least congested
according to the network traffic.
Using the Notification/Status Panel
In the notification/status panel, you can check the details on notification icons
and status icons or activate an application corresponding to the icon.
You can also set the manner mode, Airplane mode, etc.
■Displaying the notification panel
A Slide the status bar down.
■Displaying the status panel
A Drag the status bar down with your two fingers.
14

■Viewing the Notification/Status Panel
《Notification panel》
《Status panel》
A
Function buttons
Change settings of the frequently used function. Operations are different
depending on the functions.
•In the status panel, flick it to the left or right to switch pages.
B
Notification
Check the status of the product and notifications. Tap notifications to
activate corresponding application.
•Flick notifications to the left or right to delete them. Some notifications
cannot be deleted.
•Slide the displayed area up to view hidden notifications.
•Slide notifications up or down using two fingers or pinch in/pinch out to
switch between detailed and simple views. In the detailed view, reply
messages etc. from the displayed menu directly.
•Long touch notification to make notification settings for the application.
C
Settings
Tap it to make various settings for the product.
D
Switching button
Tap it to switch the notification panel and status panel.
E
Clear all
Tap it to clear all the notifications. You may not be able to delete a
notification depending on the notification.
F
Brightness adjusting bar
Slide the bar to set the brightness.
G
Edit
Change or rearrange the displayed function buttons.
◎Slide the screen up/down to switch the notification panel/status panel.
Setting the Manner Mode
Set not to disturb others around you in public.
A Display the status panel →Tap “Manner mode” in function
buttons.
《Manner mode setting screen》
A
Type of manner mode
B
Explanation of operations
C
Duration until disabling manner mode
D
More settings
E
ON/OFF setting
Tap it to disable the manner mode.
F
Done
Finish the manner mode setting.
15

Setting App Permissions
When you activate applications/functions to access to the function or
information of the product for the first time, the confirmation screen for
requesting the permission of access authority is displayed.
Example: Activating Album
A On the confirmation screen of “First things first” →[NEXT].
B [DENY]/[ALLOW].
In general, tap “ALLOW” and allow the application to use the functions.
If there are multiple functions to use, operate in the same way.
■Setting Functions to Use
You can make settings for the functions to use by following steps below as
well.
■Setting functions to use by application
A On the home screen →“App list screen” →[Settings] →
[Apps].
B Select an application →[Permissions].
C Select a function.
■Setting applications to use by function
A On the home screen →“App list screen” →[Settings] →
[Apps] →[ ] →[App permissions].
B Select a function.
C Select an application.
◎If you deny the permission, the application/function may not be activated
or the use of function may be restricted.
◎The explanation screen for permissions may be displayed depending on
the applications/functions. Also, multiple confirmation screens may be
displayed or the displayed contents may differ. Check the displayed
contents carefully and follow the on-screen instructions.
◎In this manual, some description of the confirmation screens may be
omitted.
Switching Input Methods
You can switch input methods for character entry.
* Following operation explanations use “Japanese S-Shoin”.
A On the character entry screen, [ ] →[Japanese S-Shoin].
Switching Software Keyboards
* Following operation explanations use “Japanese S-Shoin”.
A On the character entry screen, [ ] →[Input UI] →
[QWERTY keyboard]/[12 keyboard].
Checking Your Own Phone Number
A On the home screen →“App list screen” →[Settings] →
[Profile].
Setting Airplane mode
A On the home screen →“App list screen” →[Settings] →
[More] →[Airplane mode].
Product's Storage
You can save data on the internal memory and the microSD memory card.
Internal memory Save application, data on each application, media files
such as images shot by screenshot.
microSD memory
card
Save media files etc.
16

Updating Software
The product supports the software update.
The software update function can also be used for operating system updates.
An operating system update is a software update which also includes
updating of the product's operating system.
A On the home screen →“App list screen” →[Settings] →
[About phone] →[System updates].
Start to check whether software update is necessary or not. Tap “Check
for update” to check it. When it is necessary, you can download and
install data for software update.
•Slide the status bar down, tap the notification and follow the on-screen
when appears in the status bar.
B [DOWNLOAD] →[RESTART & INSTALL].
■Notes on Software Update
•You are charged for data communication when connecting to the Internet
from the product by using data communication. Large-volume data
communication occurs in particular for operating system updates. Use of
Wi-Fi®is recommended.
•When software update is necessary, you will be informed on au homepage,
etc. For details, contact an au shop or Customer Service Center (call toll-free
157). In addition, users of the SHV39 will receive a notice from au, when
software update is necessary to improve the functionality of the SHV39.
•It is recommended to back up your data before updating software.
•If the software update is performed, the product will restart before and after
the update.
•If the software update has failed or stopped, perform the same procedures
again.
•If the software update fails, it may become impossible to operate the
product. If this happens, bring it to an au shop or PiPit (not accepted by
some shops).
•Charge the battery sufficiently before starting update. If the battery level is
insufficient or the battery runs out during the update, the software update will
fail.
•Check out the signal reception status. The software update may fail if the
product is in a place with bad signal reception status.
•Various data registered on the product (address books, mails, still pictures,
music data, etc.) and information of settings will not be changed even after
software is updated. However, note that data may not be protected
depending on the state of the product (fault, damage, getting wet with water,
etc.).
•During international roaming, the software update function may not be
available in some places.
•After you have updated the operating system, you cannot return it to the
previous version.
Do not conduct the following operations during the software update
•Do not move during software update.
The following operations are not available during the software update
•Operations are not available during software update. Making a call to 110
(Police), 119 (Fire and Ambulance), 118 (Regional Coast Guard
Headquarters) or 157 (Customer Service Center) is not available either. Also,
the alarm etc. does not function.
Troubleshooting
Before you assume that the product is malfunctioning, check the following and
carry out “トラブル診断” (Trouble diagnostics):
On the home screen →“App list screen” →[Support] →[故障紛失サポー
ト] (Repair and Delivery Service) →[トラブル診断] (Trouble diagnostics)
Trouble Detail
Battery usage time
is short.
•Make sure you do not often use the product in
places where (out of service area) is displayed.
(zP.14)
•Make sure the internal battery does not approach
the end of its service life. Check the battery status.
(zP.8)
•Is the internal battery charged enough? (zP.8)
•Suspend the functions not being used. (zP.14)
Cannot make calls.
•Is a correct au IC Card inserted? (zP.5)
•Make sure “Airplane mode” is not set. (zP.16)
•Is the power turned on? (zP.10)
17

Trouble Detail
Cannot receive calls.
•Is reception good enough? (zP.14)
•Is the product within the service area? (zP.14)
•Make sure “Airplane mode” is not set. (zP.16)
•Is the power turned on? (zP.10)
•Is a correct au IC Card inserted? (zP.5)
Cannot hear the
other party.
•Make sure you are not covering the earpiece with
your ear.
Place the earpiece over your earhole.
Cannot recognize a
microSD memory
card/Cannot find
target data.
•Is a microSD memory card inserted properly?
(zP.7)
•Make sure data is not saved on the internal
memory. Data can be saved on the internal
memory besides a microSD memory card.
Cannot operate the
keys/touch panel.
•Turn off the power and then turn it on.
•Is the power turned on? (zP.10)
Cannot charge the
battery.
•Is the power plug of the specified charger (sold
separately) securely plugged into an outlet?
(zP.9)
Cannot turn on the
power.
•Is the internal battery charged? (zP.8)
•Did you hold fdown? (zP.10)
Cannot operate/The
screen does not
respond/Cannot turn
off the power.
•You can force the power off by holding down f
for at least 8 seconds and releasing your finger
after the product vibrates. Turn the product on
again after a while. (zP.10)
Cannot operate the
touch panel as
intended.
•Make sure you are not operating with the tip of a
fingernail or with foreign object between the screen
and your fingers.
•Restart the product. (zP.10)
Screen response is
slow when you tap
on the screen/press
the keys.
•Screen response may be slowed down when a
large amount of data is stored in the product or
being transmitted between the internal memory
and a microSD memory card.
An error of the au IC
Card (UIM) or a
message indicating
that the card is not
inserted is displayed.
•Is a correct au IC Card inserted? (zP.5)
The power is turned
off automatically.
•Make sure the battery has not run out. (zP.8)
The power is turned
off while the
wake-up logo is
displayed.
•Make sure the battery has not run out. (zP.8)
(out of service
area icon) is
displayed.
•Is reception good enough? (zP.14)
•Is the product within the service area? (zP.14)
•Is your hand off the area around the internal
antenna? (zP.4)
•Is a correct au IC Card inserted? (zP.5)
The display or
charging/incoming
indicator illuminates/
flashes, but the
ringtone does not
ring.
•Make sure the manner mode is not set. (zP.15)
A message indicating
that charging is
necessary is
displayed.
•The battery is almost empty. (zP.8)
When making a call,
a beeping sound is
heard from the
earpiece and a
connection cannot
be established.
•Is reception good enough? (zP.14)
•Is the product within the service area? (zP.14)
•The wireless line is busy or the other party is on
another line. Try again later.
If symptoms do not improve after checking each of the above, check
symptoms through “トラブル診断” (Trouble diagnostics) on the au homepage
below.
(https://www.au.com/trouble-check/)
18

After-Sales Service
■When Asking for Repair
For repair, contact Repair and Delivery Service Center.
During the
warranty period
Repairs will be done based on the Company's terms of
services of the free-of-charge repair warranty.
Outside the
warranty period
We shall repair the product for a charge as requested by
the customer if repair renders it usable.
* The warranty period is 1 year from the date of newly purchase.
◎Before handing in the product for repair, make a backup of the contents
of memory since they may disappear during repair. Note that the
Company shall not be liable for any damages and loss of income should
the contents of memory be altered or lost.
◎Recycled parts that meet the Company's quality standards are
sometimes used for repair.
◎au cell phones collected by Replacement mobile phone delivery service
which you used before are recycled to cell phones for replacement after
repairs. Also parts replaced by au after-sales service are collected and
recycled by the Company. They are not returned to customers.
◎Instances where the product has been changed, modified, or analyzed
(including software modification or analysis (including rooting, etc.)
reverse-engineered, reverse-compiled, or reverse-assembled) or has
been repaired at a location other than an authorized repair location
designated by the company may not be covered by warranty or may
prevent the product from being accepted for repairs.
◎The internal battery on the product is not covered by the free-of-charge
repair warranty unless phenomena by defects of battery materials or
manufacturing occur.
■Performance Parts for Repair
The Company retains performance parts for repair of the SHV39 main unit and
its peripheral devices for 4 years after discontinuation of production.
“Performance parts for repair” refers to parts required for maintaining the
functions of the product.
■Terms of services of the free-of-charge repair warranty
1. When applying for repairs, the serial number (IMEI number) is required.
You can check it on the main unit or sticker pasted on outer box.
2. If malfunctions occur even though you have properly operated following
notes on the instruction manual during the warranty period, you are not
charged a repair fee.
3. In the following cases, you are charged a repair fee even during the
warranty period. (Or repairs may not be possible.)
A
When you have not properly operated following instruction manuals.
B
When malfunctions or damages have caused by unwarranted repairs
or modifications.
C
When the product has been repaired at a location other than an
authorized repair location designated by the company.
D
When you have made mistaken operation while handling or
malfunctions or damages have caused by accidents. Also, the product
has traces of being dropped, water intrusion, humidity, etc.
E
When malfunctions or damages have arisen from earthquakes, storms,
floods or other natural disasters, as well as fires, salt damages,
abnormal voltage, etc.
4. Repairs may not be possible depending on the damage state.
5. The Company does not compensate any damages/losses arising from
product faults.
6. The Company assumes no responsibility for any accidents that might be
caused by connecting the product to the device other than specified one.
7. Visiting repairs are not possible.
8. This warranty is valid only in Japan.
* This warranty is liable for the free-of-charge repair subject to the above-mentioned
period and condition. Therefore, it does not restrict your legal authority for assurance
parties and other operators.
19
Other manuals for SHV39
1
Table of contents
Other Aquos Cell Phone manuals

Aquos
Aquos SHF33 Installation guide

Aquos
Aquos Sense3 basic User manual

Aquos
Aquos sense5G Quick start guide

Aquos
Aquos Ever SH-04G User manual

Aquos
Aquos zero2 User manual

Aquos
Aquos SHG06 User manual

Aquos
Aquos sense5G SHG03 User manual

Aquos
Aquos IS13SH Installation guide

Aquos
Aquos R8 pro User manual

Aquos
Aquos SHV39 Quick start guide

Aquos
Aquos xx3 mini User manual

Aquos
Aquos Keitai 3 User manual

Aquos
Aquos SHOT SH010 User manual

Aquos
Aquos R3 User manual

Aquos
Aquos shl22 series User manual

Aquos
Aquos Crystal X User manual

Aquos
Aquos Keitai 2 User manual

Aquos
Aquos xx3 mini User manual

Aquos
Aquos R2 SHV42 Installation guide

Aquos
Aquos SH-07E User manual