ARIETE 1598/1 User manual

1598/1
Impastatore
Kitchen machine
Cuisine Machine
Küchenmaschine
Robot de cocina
Máquina da cozinha
Kitchen machine
Questo manuale d’istruzione è fornito da trovaprezzi.it. Scopri tutte le offerte per Ariete 1598/1 Pastamatic
Gourmet o cerca il tuo prodotto tra le migliori offerte di Robot da Cucina

Fig. 1
Fig. 2 Fig. 3
H
A
B
C
D
E
F
G
I
L
M
N

- 1 -
Fig. 4 Fig. 5
Fig. 6 Fig. 7
Fig. 8 Fig. 9
Fig. 10

IT
- 2 -
AVVERTENZE IMPORTANTI
LEGGERE QUESTE ISTRUZIONI PRIMA DELL’USO.
Usando apparecchi elettrici è necessario prendere le opportune precauzioni, tra le
quali:
Assicurarsi che il voltaggio elettrico dell’apparecchio corrisponda a quello della1.
vostra rete elettrica.
Non lasciare l’apparecchio incustodito quando collegato alla rete elettrica;2.
disinserirlo dopo ogni uso.
Non mettere l’apparecchio sopra o vicino a fonti di calore.3.
Durante l’utilizzo posizionare l’apparecchio su di un piano orizzontale, stabile e4.
ben illuminato.
Non lasciare l’apparecchio esposto ad agenti atmosferici (pioggia, sole,5.
ecc...).
Fare attenzione che il cavo elettrico non venga a contatto con superfici calde.6.
Questo apparecchio non deve essere utilizzato da persone (compresi i bambi-7.
ni) con capacità fisiche, sensoriali o mentali ridotte; da persone che manchino
di esperienza e conoscenza dell’apparecchio, a meno che siano attentamente
sorvegliate o ben istruite relativamente all’utilizzo dell’apparecchio stesso da
parte di una persona responsabile della loro sicurezza.
Assicurarsi che i bambini non giochino con l’apparecchio.8.
Non immergere mai il corpo del prodotto, la spina ed il cavo elettrico in acqua9.
o altri liquidi, usare un panno umido per la loro pulizia.
Anche quando l’apparecchio non è in funzione, staccare la spina dalla presa di10.
corrente elettrica prima di inserire o togliere le singole parti o prima di eseguire
la pulizia.
Assicurarsi di avere sempre le mani ben asciutte prima di utilizzare o di11.
regolare gli interruttori posti sull’apparecchio o prima di toccare la spina e i
collegamenti di alimentazione.
Per staccare la spina, afferrarla direttamente e staccarla dalla presa a parete.12.
Non staccarla mai tirandola per il cavo.
Non usare l’apparecchio se il cavo elettrico o la spina risultano danneggiati,13.
o se l’apparecchio stesso risulta difettoso; tutte le riparazioni, compresa la
sostituzione del cavo di alimentazione, devono essere eseguite solamente dal
centro assistenza Ariete o da tecnici autorizzati Ariete, in modo da prevenire
ogni rischio.

IT
- 3 -
In caso di utilizzo di prolunghe elettriche, quest’ultime devono essere adegua-14.
te alla potenza dell’apparecchio, onde evitare pericoli all’operatore e per la
sicurezza dell’ambiente dove si opera. Le prolunghe non adeguate possono
provocare anomalie di funzionamento.
Non lasciar pendere il cavo in un luogo dove potrebbe essere afferrato da un15.
bambino.
Per non compromettere la sicurezza dell’apparecchio, utilizzare solo parti di16.
ricambio e accessori originali, approvati dal costruttore.
L’apparecchio è concepito per il SOLO USO DOMESTICO e non deve essere17.
adibito ad uso commerciale o industriale.
Questo apparecchio è conforme alla direttiva 2006/95/EC e EMC 2004/108/18.
EC, ed al regolamento (EC) No. 1935/2004 del 27/10/2004 sui materiali in
contatto con alimenti.
Eventuali modifiche a questo prodotto, non espressamente autorizzate dal pro-19.
duttore, possono comportare il decadimento della sicurezza e della garanzia del
suo utilizzo da parte dell’utente.
Allorchè si decida di smaltire come rifiuto questo apparecchio, si raccomanda20.
di renderlo inoperante tagliandone il cavo di alimentazione. Si raccomanda
inoltre di rendere innocue quelle parti dell’apparecchio suscettibili di costituire
un pericolo, specialmente per i bambini che potrebbero servirsi dell’apparec-
chio per i propri giochi.
Gli elementi dell’imballaggio non devono essere lasciati alla portata dei bam-21.
bini in quanto potenziali fonti di pericolo.
Non toccare mai le parti in movimento.22.
Non fate funzionare l’apparecchio a vuoto.23.
Per evitare infortuni e danni all’apparecchio, tenere sempre le mani e gli uten-24.
sili da cucina lontano dalle parti in movimento.
Non introdurre mai gli alimenti con le mani durante il funzionamento; utilizzare25.
sempre le apposite fessure.
Non rimuovere gli alimenti dalle pareti della ciotola mentre l’apparecchio è in26.
funzione. Spengere l’apparecchio, scollegare la spina di alimentazione dalla
presa ed utilizzare sempre la spatola in dotazione.
Non usare l’apparecchio se la lama è danneggiata.27.
Non utilizzare l’apparecchio per tritare alimenti aventi un’eccessiva consisten-28.
za (esempio: cubetti di ghiaccio o carne con ossa).
PREPARARE LA TAZZA DEL FRULLATORE CON GLI ALIMENTI DA29.

IT
- 4 -
FRULLARE E MONTARLA SUL CORPO MOTORE PRIMA DI COLLEGARE
LA SPINA ALLA PRESA DI CORRENTE.
Non trasportare l’apparecchio tramite la tazza montata, ovvero, la maniglia30.
della tazza non deve servire per trasportare l’apparecchio.
Per evitare infortuni e danni all’apparecchio, tenere sempre le mani e gli uten-31.
sili da cucina lontano da lame e dischi in movimento.
IL PRODOTTO E’ STATO PROGETTATO IN MODO CHE SIA FUNZIONANTE32.
SOLO SE IL COPERCHIO E LA TAZZA DEL FRULLATORE SONO STATI
MONTATI CORRETTAMENTE. QUALORA QUESTO NON SI VERIFICASSE,
PORTARE IL PRODOTTO AD UN CENTRO ASSISTENZA AUTORIZZATO.
PRIMA DI TOGLIERE IL COPERCHIO ATTENDERE CHE LA LAMA SIA33.
COMPLETAMENTE FERMA E STACCARE LA SPINA DALLA PRESA DI
CORRENTE.
34. Per il corretto smaltimento del prodotto ai sensi della Direttiva Europea
2012/19/CE si prega leggere l’apposito foglietto allegato al prodotto.
CONSERVARE QUESTE ISTRUZIONI
DESCRIZIONE DELL’APPARECCHIO (Fig. 1)
A Braccio
B Pulsante inclinazione braccio
C Manopola regolazione velocità
D Frusta per mescolare
E Frusta per montare
F Frusta per impastare
G Corpo dell’apparecchio
H Ciotola
I Frullatore
L Coperchio frullatore
M Tappo coperchio frullatore
N Coperchio paraschizzi

IT
- 5 -
ISTRUZIONI PER L’USO
CAPACITà E VELOCITà MASSIME CONSENTITE
1,3 KgCapacità massima di farina da non superare in nessun caso
2 KgCapacità massima assoluta da non superare in nessuno caso
(per maggiori dettagli riferirsi al paragrafo RICETTE)
velocità 3Velocità massima consentita con la frusta per impastare (F)
velocità 4Velocità massima consentita con la frusta per mescolare (D)
velocità 6Velocità massima consentita con la frusta per montare (E)
AVVERTENZA: Dopo aver tolto l’apparecchio dalla confezione, al primo uso lavare accurata-
mente con acqua e sapone neutro tutte le parti che vengono in contatto con alimenti.
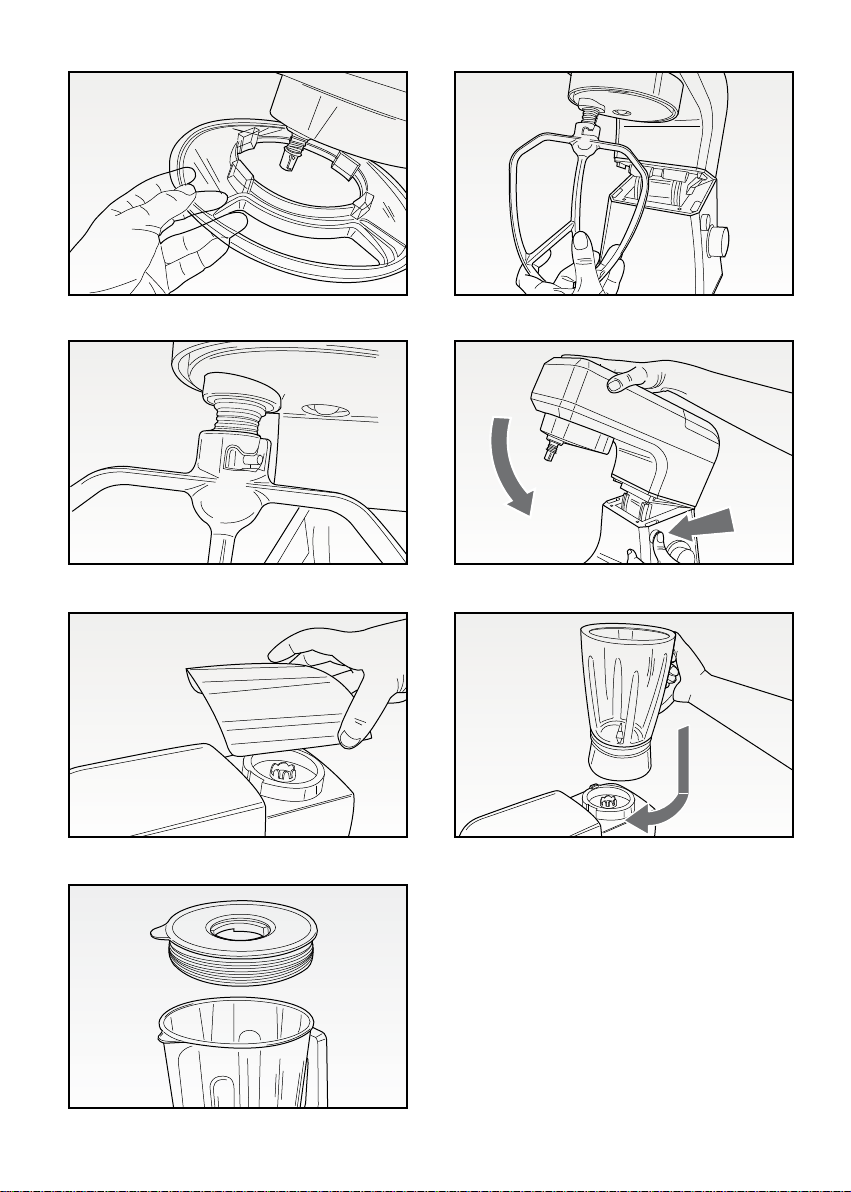
- Premere il pulsante (B) e contemporaneamente sollevare il braccio (A) fino a sentire uno scatto di
bloccaggio (Fig. 2).
- Inserire la ciotola (H) sulla base del corpo dell’apparecchio (G) e ruotarla in senso orario per
bloccarla (Fig. 3).
- Inserire il coperchio paraschizzi (N), contro la fuoriuscita di liquidi, sul braccio (A), ruotandolo fino al
completo bloccaggio (Fig. 4).
- In base al tipo di alimento da lavorare, inserire la frusta sull’asse motore del corpo dell’apparecchio
(G) (Fig. 5), e ruotarla in senso antiorario per bloccarla in modo che il perno ricavato sull’asse
motore si alloggi perfettamente nell’apposita asola sull’attacco della frusta (Fig. 6).
L’apparecchio dispone di tre tipologie di fruste:
Frusta per montare (E): per montare uova, panna, pastelle, pan di spagna senza grassi, meringhe,
cheesecake, mousse e soufflé. Non utilizzare il frullino nel caso di miscele dense come burro e
zucchero, potrebbero danneggiarla.
Frusta per impastare (F): per impasti lievitati come pane e pizza.
Frusta per mescolare (D): per preparare torte, biscotti, pasta frolla e simili, glassa, ripieni, bigné e
purea di patate.
- Sempre con il braccio (A) sollevato, versare gli ingredienti nella ciotola (H).
- Abbassare nuovamente la leva (B) e contemporaneamente il braccio (A) (Fig. 7).
-
Inserire la spina nella presa di corrente ed accendere l’apparecchio ruotando la manopola (C) sulla velo-
cità “1”. Aumentare la velocità poi in base alla necessità o secondo quanto riportato nella ricetta specifica.
L’apparecchio è dotato anche del funzionamento ad impulsi ruotando la manopola (C) in senso antiorario
sulla posizione “P”. L’utilizzo ottimale avviene premendo per un brevissimo tempo (2/3 sec.).
- Per ottenere un risultato più omogeneo, spegnere l’apparecchio, staccare la spina dalla presa di
corrente e sollevare il braccio (A) come descritto in precedenza. Con l’aiuto di un’apposita spatola
portare verso il centro gli alimenti depositati sulle pareti della ciotola (H).
- A lavorazioni concluse o nel caso si decidesse di cambiare il tipo di frusta, spegnere l’apparecchio
ruotando la manopola (C) sulla posizione “0” e staccare la spina dalla presa di corrente; alzare
il braccio (A) come descritto in precedenza e rimuovere la frusta estraendola con cautela verso
l’esterno, dopo averla sbloccata ruotandola in senso orario.
- Rimuovere la ciotola (H) ruotandola in senso antiorario.

IT
- 6 -
ATTENZIONE:
Prima di utilizzare l’apparecchio, assicurarsi di aver collocato correttamente tutti gli acces-
sori.
Se si usano le fruste per impastare (F) e per mescolare (D), non far funzionare l’apparecchio
per più di 5 minuti consecutivamente; poi lasciare raffreddare per almeno 20 minuti.
Se si usa la frusta per montare (E), non far funzionare l’apparecchio per più di 10 minuti con-
secutivamente; poi lasciare raffreddare per almeno 20 minuti
La non osservanza di queste norme può comportare un danno al prodotto non coperto dalla
garanzia.
Se durante il funzionamento, si rendesse necessario aggiungere ulteriori ingredienti all’inter-
no della ciotola (H), spegnere prima l’apparecchio ruotando la manopola (C) su “0” e versare
gli ingredienti all’interno della ciotola stessa.
Per evitare infortuni e danni all’apparecchio, tenere sempre le mani e gli utensili da cucina
lontano da parti in movimento.
Istruzioni per l’uso del frullatore
- Rimuovere dal corpo dell’apparecchio (G) il coperchietto dell’alloggiamento del frullatore (Fig. 8).
- Inserire il frullatore (I) sul corpo dell’apparecchio (G) e ruotarlo in senso orario fino a bloccarlo (Fig.
9).
- Montare il coperchio (L) sul frullatore (I), e premerlo leggermente verso il basso fino al completo
inserimento (Fig. 10).
- Inserire gli alimenti preparati in precedenza dal foro presente sul coperchio (L), senza superare il
livello massimo indicato sul frullatore (I), e quindi inserire il tappo (M) sul coperchio (L) premendolo
leggermente verso il basso e ruotandolo in senso orario per bloccarlo.
- Accendere l’apparecchio ruotando la manopola (C) sulla velocità “1”. Aumentare la velocità poi
in base alla necessità. L’apparecchio è dotato anche del funzionamento ad impulsi ruotando la
manopola (C) in senso antiorario sulla posizione “P”. L’utilizzo ottimale avviene premendo per un
brevissimo tempo (2/3 sec.).
Nota: Per la frutta e la verdura più tenere (ad es. banane) iniziare a bassa velocità e successiva-
mente aumentare la velocità secondo necessità. Per la frutta e la verdura di maggiore consistenza
(ad es. carote) usare la velocità massima.
- Per ottenere un risultato più omogeneo, spegnere l’apparecchio, scollegare la spina dall presa di
corrente, rimuovere il coperchio (L) e, con l’aiuto di un’apposita spatola, portare verso il centro gli
alimenti depositati sulle pareti del frullatore (I).
- Ripetere le suddette operazioni per trattare altri carichi di cibo.
Nota: Non inserire nel frullatore più di 300 g alla volta di frutta o verdura a pasta dura.
Nota: Per evitare fuoriuscite di liquido non usare il frullatore con più di 1000 ml di minestre, passate
e altri liquidi.

IT
- 7 -
ATTENZIONE:
Le lame sono taglienti, maneggiarle con attenzione.
Non far funzionare l’accessorio frullatore per più di 30 secondi consecutivamente.
Assicurarsi di aver bloccato saldamente il frullatore (I) ed il relativo coperchio (L) prima di
mettere in funzione l’apparecchio.
Non far funzionare il frullatore per più di 30 secondi consecutivamente. Attendere almeno 2
minuti prima di procedere con un nuovo utilizzo.
Non rimuovere gli alimenti dalle pareti della ciotola (H) o del frullatore (I) mentre l’apparecchio
è in funzione. Spegnere prima l’apparecchio e scollegare la spina di alimentazione.
Per evitare infortuni e danni all’apparecchio, tenere sempre le mani e gli utensili da cucina
lontano da lame e dischi in movimento.
Applicare sempre il coperchio (L) prima di azionare il frullatore.
Prima di frullare liquidi tiepidi rimuovere sempre il tappo coperchio frullatore (M). Non inserire
mai liquidi caldi nel frullatore.
CONSIGLI UTILI
- Si consiglia di montare le uova a temperatura ambiente per un miglior risultato.
- Prima di montare le chiare d’uovo, verificare l’assenza di grasso o tuorlo d’uovo sulla frusta per
montare o nella ciotola.
- Per la pasta frolla usare ingredienti freddi, a meno che non sia specificato diversamente nella
ricetta.
- Se sentite che l’apparecchio lavora sotto sforzo durante l’uso, spegnerlo, togliere la spina dalla
presa di corrente e ridurre la quantità da impastare.
- L’impasto ottimale degli ingredienti si ottiene aggiungendoli prima del liquido.
PULIZIA E MANUTENZIONE
- Rimuovere tutti gli accessori utilizzati, operando in senso inverso a quanto descritto in precedenza
per l’assemblaggio.
- La ciotola (H), il coperchio (N) e la frusta per montare (E) possono essere lavate in lavastoviglie;
la frusta per mescolare (D) e quella per impastare (F) devono essere lavate a mano con acqua
calda e detergente neutro.
- Tutti i componenti del frullatore possono essere lavati in lavastoviglie nel cestello superiore ad una
temperatura max di 50°C/ 122°F.
- Per la pulizia del corpo dell’apparecchio (G) utilizzare un panno leggermente umido.
- Pulizia del frullatore (I): riempire il frullatore con acqua tiepida e sapone; montare il coperchio (L)

IT
- 8 -
con il tappo (M); azionare il frullatore alla velocità massima per 30 secondi. Risciacquare e se
necessario ripetere l’operazione.
ATTENZIONE:
Dopo la pulizia, far asciugare ogni parte perfettamente prima di rimontarla.
CAPACITà MASSIME
Pasta frolla 1,3 Kg di farina
Pan di spagna 2 Kg di miscela totale
Impasto per pane 1,3 Kg di farina
Meringa (albumi + zucchero) 8
Pasta all’uovo 850 g di farina
RICETTE
RICETTA BASE PER IL PANE – 1,1 KG.
400 ml d’acqua tiepida
30 g di lievito fresco oppure 14 g di lievito secco
2 cucchiaini di zucchero
1 cucchiaino di sale
30 g d’olio
300 g di farina 00
300 g di semola rimacinata di grano duro
- Miscelare nella ciotola il lievito con l’acqua e lo zucchero. Lasciar riposare per 15 minuti.
- Aggiungere al liquido il sale e l’olio.
- Usando il gancio, impastare a velocità “1” aggiungendo gradualmente le farine.
- Proseguire a velocità “1” sino a 2 minuti dall’inizio.
- Passare a velocità “2” ed impastare ancora per 4 minuti.
- Trasferire l’impasto in una ciotola leggermente unta e coprirlo con pellicola, ungendo anch’essa.
- Lasciar lievitare a temperatura ambiente lontano da correnti per 1 ora o fino a che raddoppia in
volume.
- Su di un piano infarinato dare le forme che si desidera.
- Porle su placche da forno unte d’olio o rivestite di carta oleata, coprire con un canovaccio e lasciar
lievitare ancora 30 minuti.
- Cuocere in forno preriscaldato a 220° C per 25-35 minuti a seconda dei formati o fino a che bat-
tendo la base del pane questo produca un suono sordo, di vuoto.
RICETTA BASE PER PASTA FRESCA ALL’UOVO – 800 GR.
500 g di farina “00”
4 uova da 65/70 g
50 ml d’acqua fredda
5 g d’olio

IT
- 9 -
- Inserire nella ciotola tutti gli ingredienti.
- Usando il gancio, impastare a velocità “2” per 5 minuti.
- Trasferire l’impasto in una ciotola infarinata e coprirlo con pellicola. Lasciar riposare per 30 minuti
in luogo tiepido.
- Tirare la pasta a mano o a macchina e tagliarla secondo la ricetta.
- Cuocere in acqua bollente salata dai 5 agli 8 minuti a seconda del formato.
RICETTA BASE PER PASTA FROLLA – 1,2 KG.
600 g di farina “00”
300 g di burro freddo a pezzetti
180 g di zucchero
3 tuorli
75 ml d’acqua fredda
un pizzico di sale
aromi (vaniglia, scorza di limone, scorza d’arancia, etc…)
- Inserire nella ciotola tutti gli ingredienti.
- Usando la frusta (F), impastare a velocità “2” per 5 minuti.
- Trasferire l’impasto sul piano di lavoro e formare velocemente una palla.
- Avvolgere con pellicola e porre in frigo per almeno 20 minuti o fino a che si sarà leggermente
indurito.
- Stendere la pasta su un piano infarinato all’altezza e nelle dimensioni desiderate.
- Cuocere in forno preriscaldato a 170/180° C dai 15 ai 25 minuti a seconda della ricetta
RICETTA BASE PER CAKE (TORTA PARADISO) – 1,2 KG.
300 g di burro a temperatura ambiente
300 g di zucchero
4 uova da 65/70 gr.
8 tuorli (circa 160 gr.)
200 g di farina 0
130 g di fecola di patate
1 bustina di lievito in polvere per dolci
1 pizzico di sale
aromi (essenza di vaniglia, mandorla o scorze di limone, arancia, etc…)
- Inserire nella ciotola il burro, lo zucchero, il sale e gli aromi.
- Usando la frusta a fili, montare a velocità “7” per 5 minuti.
- Passare a velocità “8” e montare ancora per 5 minuti.
- Continuando a montare, aggiungere un uovo intero o 2 tuorli alla volta, ad intervalli di un minuto
circa o fino a che l’uovo non sia ben incorporato.
- Aggiungere la farina, la fecola ed il lievito e amalgamare a velocità “6” per 2 minuti.
- Versare il composto in stampi imburrati e poco infarinati.
- Cuocere in forno preriscaldato a 170° C per circa 35/45 minuti.
- Sfornare e lasciar riposare 5 minuti nello stampo.
- Sformare su una griglia e lasciar ben raffreddare prima di utilizzarla.

IT
- 10 -
RICETTA BASE PER MERINGA – 900 GR (8 ALBUMI )
300 g di albumi (7/8 albumi)
300 g di zucchero semolato
300 g di zucchero a velo
1 pizzico di sale
- Inserire nella ciotola gli albumi a temperatura ambiente e il sale.
- Usando la frusta a fili, montare a neve a velocità “9” per 5 minuti.
- Passare a velocità “10” ed aggiungere poco alla volta lo zucchero semolato.
- Continuare a montare ancora per 5 minuti dal termine dell’ultima aggiunta.
- Spegnere l’apparecchio ed estrarre la ciotola.
- Con una spatola e con movimenti dall’alto verso il basso, incorporare lo zucchero a velo fatto
passare per un setaccio.
- Con l’aiuto di una sacca da pasticceria o con due cucchiai, formate le meringhe su placche da
forno rivestite di carta oleata o imburrate pochissimo.
- Cuocere in forno preriscaldato a 40/50° C per alcune ore, lasciando lo sportello socchiuso per un
paio di centimetri, per permettere all’umidità di uscire ed alle meringhe di seccare bene.
- Potranno occorrere 3-4 ore per i pezzi più piccoli e sottili sino a 8-10 ore per le meringhe più
grandi.

EN
- 11 -
IMPORTANT SAFEGUARDS
READ THESE INSTRUCTIONS BEFORE USE
The necessary precautions must be taken when using electrical appliances, and
these include the following:
Make sure that the voltage on the appliance rating plate corresponds to that1.
of the mains electricity.
Never leave the appliance unattended when connected to the power supply;2.
unplug it after every use.
Never place the appliance on or close to sources of heat.3.
Always place the appliance on a flat, level surface during use.4.
Never leave the appliance exposed to the elements (rain, sun, etc....).5.
Make sure that the power cord does not come into contact with hot surfaces.6.
This appliance must not be used by people (including children) with reduced7.
physical or mental capabilities or by people without the relevant experience or
knowledge of the appliance, unless they are carefully supervised or properly
trained in its use by a person responsible for their safety.
Make sure that children cannot play with the appliance.8.
Never place the appliance body, plug or power cord in water or other liquids;9.
always wipe clean with a damp cloth.
Always unplug the power cord from the electricity mains before fitting or10.
removing single attachments or before cleaning the appliance.
Always make sure that your hands are thoroughly dry before using or adjust-11.
ing the switches on the appliance, or before touching the power plug or power
connections.
To unplug the appliance, grip the plug and remove it directly from the power12.
socket. Never pull the power cord to unplug the appliance.
Do not use the appliance if the power cord or plug are damaged or if the appli-13.
ance itself is faulty; all repairs, including substitution of power cord, must be
carried out exclusively by an Ariete assistance centre or by authorized Ariete
technicians in order to avoid all risks.
In case of using extension leads, these must be suitable for the appliance14.
power to avoid danger to the operator and for the safety of the environment in
which the appliance is being used. Extension leads, if not suitable, can cause
operating anomalies.
Never allow the cord to dangle in places where it may be grabbed by a child.15.

EN
- 12 -
Do not threaten the safety of the appliance by using parts that are not original16.
or which have not been approved by the manufacturer.
This appliance is designed for HOME USE ONLY and may not be used for17.
commercial or industrial purposes.
This appliance conforms to the directives 2006/95/EC and EMC 2004/108/EC,18.
and to the regulations (EC) No. 1935/2004 of 27/10/2004 regarding material
in contact with foods.
Any changes to this product that have not been expressly authorised by the19.
manufacturer may lead to the user’s guarantee being rendered null and void.
In the event that you decide to dispose of the appliance, we advise you to20.
make it inoperative by cutting off the power cord. We also recommend that
any parts that could be dangerous be rendered harmless, especially for chil-
dren, who may play with the appliance or its parts.
Packaging must never be left within the reach of children since it is potentially21.
dangerous.
Never touch moving parts.22.
Never operate the appliance when empty.23.
To avoid injury and damage to appliance, always keep hands and kitchen24.
utensils out of reach of moving parts.
Never use hands to insert food while the appliance is working; always insert25.
food through the relevant openings.
Never remove foods from the sides of the bowl while the appliance is operat-26.
ing. Switch off the appliance, unplug it from the mains power, and always use
the spatula supplied.
Do not use the appliance in case of damaged blade.27.
Do not use the appliance to mince overly hard food (such as ice cubes or meat28.
with bone).
PUT FOOD INTO THE BLENDER CONTAINER WITH FOOD AND PLACE29.
THE LATTER ON THE MOTOR BODYBEFORE PLUGGING THEAPPLIANCE
IN.
Do not move the appliance through the mounted container as it is not suitable30.
to handle the appliance.
To prevent personal injuries and appliance damages, always keep hands and31.
kitchenware out of operating blades and discs.
THE PRODUCT WAS DESIGNED TO WORK ONLY WHEN THE LID AND THE32.
CONTAINER OF THE BLENDER ARE ASSEMBLED PROPERLY. IN CASE IT

EN
- 13 -
DOES NOT OCCUR, CONTACT AN AUTHORIZED SERVICE CENTRE.
BEFORE REMOVING THE LID, WAIT FOR THE BLADE TO STOP33.
COMPLETELY AND UNPLUG THE APPLIANCE.
34. To dispose of product correctly according to European Directive 2012/19/
CE, please refer to and read the provided leaflet enclosed with the product.
DO NOT THROW AWAY THESE
INSTRUCTIONS
DESCRIPTION OF THE APPLIANCE (Fig. 1)
A Arm
B Tilt-back head button
C Speed regulation dial
D Beater
E Whisk
F Dough hook
G Appliance body
H Bowl
I Blender
L Blender lid
M Blender lid plug
N Splash guard lid
INSTRUCTIONS FOR USE
MAXIMUM ALLOWED AMOUNTS AND SPEED
1,3 KgMaximum amount of flour which must not be exceeded in any case
2 KgMaximum absolute amount which must not be exceeded in any case (for
further details, refer to the paragraph RECIPES)
speed 3Maximum allowed speed with the dough hook (F)
speed 4Maximum allowed speed with the beater (D)
speed 6Maximum allowed speed with the whisk (E)
WARNING: After removing appliance from packaging and before using appliance for the first
time, wash thoroughly all those appliance parts that will come into contact with food using
water and mild detergent.
- Press button (B) and, at the same time, lift the arm (A) until it locks in place (Fig. 2).
- Insert the bowl (H) onto the appliance body (G) and rotate it clockwise until it locks (Fig. 3).

EN
- 14 -
- Insert the appropriate splash guard lid (N) onto the arm (A), by rotating it until it locks in place (Fig.
4) to prevent liquid food from spilling out.
- According to the type of ingredient to be processed, insert the beater onto the motor shaft on the
appliance body (G), Fig. 5, turning it counter-clockwise to fasten it so that the pivot located on the
motor shaft fits perfectly into the appropriate seat located on the beater fitting (Fig. 6).
The appliance has three kinds of mixing attachments:
Whisk (E): to whisk eggs, whipped cream, batters, cakes without shortening, meringues, cheese-
cakes, mousse, and soufflés. Do not use the beater for thick doughs, such as butter and sugar, to
avoid damages.
Dough hook (F): for leavened mixes, such as bread and pizza.
Beater (D): for preparing cakes, biscuits, short pastry and similar, icing, fillings, cream puffs, and
mashed potatoes.
- With the arm (A) raised, pour the ingredients into the bowl (H).
- Lower the lever (B) once more and, at the same time, the arm (A), Fig. 7).
- Plug in appliance and switch the appliance on by rotating the dial (C) to speed “1”. Increase speed
according to need or to specific recipe. The appliance is also equipped with pulse mode by rotating
dial (C) counter-clockwise to position “P”. For best results, keep pressed for a very short period
(2/3 seconds).
- For smoother results, switch appliance off, disconnect plug from mains outlet and raise the arm (A)
as described above. Bring food stuck on the sides of the bowl (H) towards the centre by means of
an appropriate spatula.
- At the end of processing, or to change the type of whisk, switch off the appliance by turning the
dial (C) to “0” and unplugging it from the power socket; lift the arm (A) as described above and
remove the whisk by pulling it out with care, after having released it by turning it clockwise.
- Remove the bowl (H) by rotating it counter-clockwise.
WARNING:
Before using appliance, ensure that all accessories have been assembled properly.
When using the dough hook (F) and the beater (D), do not operate the appliance for more than
5 consecutive minutes; subsequently, allow to cool down for at least 20 minutes.
When using the whisk (E), do not operate the appliance for more than 10 consecutive min-
utes; subsequently, allow to cool down for at least 20 minutes.
The failure to comply with these rules may damage the product not covered by the war-
ranty.
If more ingredients have to be added to bowl (H) during use, first turn dial (C) to position “0”
to switch appliance off and then pour ingredients into bowl.
To avoid injury and damage to appliance, always keep hands and kitchen utensils out of reach
of moving parts.

EN
- 15 -
Instructions for using the blender
- Remove the lid of the blender housing (Fig. 8) from the appliance body (G).
- Insert the blender (I) onto the appliance body (G) and rotate it clockwise until it locks (Fig. 9).
- Mount the lid (L) onto the blender (I) and press it slightly downwards up to the complete insertion
(Fig. 10).
- Insert food previously prepared through the lid hole (L), without exceeding the max. level indicated
on the blender (I), and then place the plug (M) onto the lid (L), by pressing it slightly downwards
and rotating it clockwise until it locks.
- Switch the appliance on by rotating the dial (C) to speed “1”. Increase the speed according to
requirements. The appliance is also equipped with pulse mode by rotating dial (C) counter-
clockwise to position “P”. For best results, keep pressed for a very short period (2/3 seconds).
Note: In case of softer fruit and vegetable (e.g. bananas), start with the low speed and subsequently
increase it as per requirements. Use the highest speed for harder fruit and vegetable (e.g. carrots).
- To obtain a more homogenous result, switch the appliance off, unplug it, remove the lid (L) and
take food stuck on the blender sides (I) towards the centre by means of the appropriate spatula.
- Repeat the above procedure when adding other food.
Note: Do not put more than 300 g hard fruit or vegetable at a time into the blender.
Note: Do not use the blender with more than 1000 ml soup or other liquids to prevent liquid from
spilling out.
WARNING:
Blades are sharp, handle them with care.
Do not operate the blender attachment continuously for more than 30 seconds.
Before switching appliance on, make sure the blender (I) and the relevant lid (L) are tightly
placed.
Do not operate the blender for more than continuous 30 seconds. Await at least 2 minutes
before proceeding with a new use.
Do not remove food from bowl sides (H) or from blender (I) while the appliance is operating.
Switch the appliance off and then unplug it.
To prevent personal injuries and appliance damages, always keep hands and kitchenware out
of operating blades and discs.
Always put the lid (L) before activating the blender.
Always remove the blender lid plug (M) before mixing warm liquids. Never pour hot liquids
into the blender.

EN
- 16 -
USEFUL TIPS
- For the best results, always whisk eggs at room temperature.
- Before whisking egg whites, make sure that there is no grease or egg yolk on the whisk attachment
or in the bowl.
- Always use cold ingredients for short crust pastry, unless otherwise specified in the recipe.
- If appliance seems to be over-working, switch off, disconnect plug from mains outlet and reduce
quantity of ingredients to process.
- For optimum mixing, always add liquids first.
CLEANING AND MAINTENANCE
- Remove all of the attachments used, working in the opposite order to the way they were fitted.
- The bowl (H), the lid (N), and the whisk (E) are machine washable; the beater (D) and the dough
hook (F) must be washed by hand in hot water with mild detergent.
- All blender components may be washed in the top part of the dishwasher at a max. temperature
of 50°C/ 122°F.
- Use a slightly wet cloth for cleaning the appliance body (G).
- Blender cleaning (I): fill the blender with warm water and soap; place the lid (L) with the plug (M);
start the blender at the highest speed for 30 seconds. Rinse and repeat the procedure, if neces-
sary.
WARNING:
After cleaning, dry all parts thoroughly and refit them.
MAXIMUM CAPACITY
Short crust pastry 1.3 kg flour
Sponge cake 2 kg total mix
Bread dough 1.3 kg flour
Meringue (egg whites+ sugar) 8
Fresh egg pasta. 850 g flour
RECIPES
BASIC BREAD DOUGH – 1.1 KG
400 ml lukewarm water
30 g fresh yeast or 14 g dried yeast
2 teaspoons sugar
1 teaspoon salt
30 g oil
300 g 00 flour
300 g reground durum wheat semolina
- Mix the yeast with in the bowl with the water and sugar. Leave to rest for 15 minutes.
- Add the salt and oil to the mix.
- Use the dough hooks at speed “1” and gradually adding flour.

EN
- 17 -
- Proceed at speed “1”, 2 minutes from the start of mixing.
- Pass on to speed “2” and mix for 4 more minutes.
- Transfer the mix to a lightly greased bowl and cover with lightly greased cooking film.
- Leave the dough to prove at room temperature and away from draughts for 1 hour or until it is twice
its original size.
- On a floured top, shape the dough as required.
- Place the dough shapes on baking sheets, either lightly greased or covered with greaseproof
paper; cover the dough with a cloth and leave to rise for 30 minutes.
- Bake in an oven preheated to 220° C for 25-35, according to the shape and size and until knocking
on the base of the bread produces a hollow sound.
BASIC RECIPE FOR FRESH EGG PASTA – 800 GR
500 g “00” flour
4 eggs (65/70 g each)
50 ml cold water
5 g oil
- Add the ingredients to the bowl.
- Use the hook to mix at speed “2” for 5 minutes.
- Transfer the mix to a floured bowl and cover with cling film. Leave to rest in a warm place for 30
minutes.
- Roll out the sheets of pasta by hand or machine, and cut as required by the recipe.
- Cook in boiling salted water for 5-8 minutes according to shape and size.
BASIC RECIPE FOR SHORTCRUST PASTRY – 1.2 KG
600 g “00” flour
300 g cold butter, cut into pieces
180 g sugar
4 egg yolks
75 ml cold water
Pinch of salt
Flavourings (vanilla, lemon or orange zest, etc…)
- Add all of the ingredients to the bowl.
- Use the dough hook (F), and mix at speed “2” for 5 minutes.
- Transfer the mix to a work surface and roll it quickly into a ball.
- Wrap the pastry in cling film and place in the refrigerator for at least 20 minutes or until it has
slightly hardened.
- Roll out the pastry to the required size and thickness on a floured board.
- Cook in a preheated oven at 170/180° C for 15 to 25 minutes according to the recipe
BASIC CAKE RECIPE (SPONGE) – 1.2 KG
300 g butter at room temperature
300 g sugar
4 eggs (65/70 g each)

EN
- 18 -
8 yolks (approx. 160 g)
200 g 0 flour
130 g potato starch
1 sachet powdered raising agent for cakes
1 pinch salt
Flavourings (vanilla or almond essence or lemon or orange zest, etc…)
- Add the butter, sugar, salt and flavourings to the bowl.
- Use the wire whisk to beat at speed “7” for 5 minutes.
- Pass to speed “8” and beat for 5 minutes more.
- Continue to beat the mix, adding one whole egg or 2 yolks at a time, at intervals of one minute or
until each egg is thoroughly incorporated into the mix.
- Add the flour, potato starch and raising agent, and mix at speed “6” for 2 minutes.
- Pour the mix into greased and lightly floured baking tins.
- Bake in an oven preheated to 170° C for 35/45 minutes.
- Remove from the oven and leave in the tin for 5 minutes.
- Turn out onto a wire rack and leave to cool thoroughly before use.
BASIC MERINGUE RECIPE – 900 G (8 EGG WHITES)
300 g egg whites (7/8)
300 g granulated sugar
300 g icing sugar
1 pinch salt
- Add the whites (room temperature) and the salt to the bowl.
- Use the whisk to beat the whites at speed “9” for 5 minutes.
- Pass to speed “10” and add the granulated sugar a little at a time.
- Continue to beat the egg whites for 5 more minutes.
- Switch off the appliance and take out the bowl.
- Using a spatula, incorporate the previously sifted icing sugar with a folding movement from bottom
to top.
- Use an icing bag or two spoons to form meringues onto baking sheets covered with lightly greased
baking paper.
- Bake in an oven preheated to 40/50° C for a few hours, leaving the oven door slightly open (a
couple of centimetres) to allow the moisture to escape and the meringues to dry thoroughly.
- Smaller meringues may need 3-4 hours and larger ones, up to 8-10 hours.
Table of contents
Languages:
Other ARIETE Kitchen Appliance manuals

ARIETE
ARIETE 0616 B-DRY User manual

ARIETE
ARIETE 2945 User manual

ARIETE
ARIETE 909 User manual

ARIETE
ARIETE 2957 User manual

ARIETE
ARIETE Party Time 0076/00 User manual

ARIETE
ARIETE 740 User manual

ARIETE
ARIETE 440 User manual

ARIETE
ARIETE POPCORN POPPER XL User manual

ARIETE
ARIETE grati PROFESSIONAL User manual

ARIETE
ARIETE 2941 User manual

ARIETE
ARIETE B-DRY User manual

ARIETE
ARIETE Gourmet professional metal User manual

ARIETE
ARIETE 977 User manual

ARIETE
ARIETE Grati top 443/3 User manual

ARIETE
ARIETE 1589 User manual

ARIETE
ARIETE GRATI User manual

ARIETE
ARIETE 440 User manual

ARIETE
ARIETE Cualdissima 1377 User manual

ARIETE
ARIETE 908 User manual

ARIETE
ARIETE 909 User manual