Asus HZ-3A User manual

USB 3.0 HZ-3A Docking Station
E10203 / First Edition / March 2015
User Guide
English
English

English
English
Table of contents
English................................................................................................................................3
繁體中文................................................................................................................................................................21
簡体中文................................................................................................................................................................39
Français ........................................................................................................................... 57
Deutsch............................................................................................................................ 75
Italiano ............................................................................................................................ 93
Español.......................................................................................................................... 111
Português...................................................................................................................... 129
日本語........................................................................................................................... 147
Русский ....................................................................................................................... 165

English
English
Conventions used in this guide
To ensure that you perform certain tasks properly, take note of the following symbols used
throughout this manual.
DANGER/WARNING:Information to prevent injury to yourself when trying to
complete a task.
CAUTION: Information to prevent damage to the components when trying to
complete a task.
NOTE: Tips and additional information to help you complete a task.
IMPORTANT: Instructions that you MUST follow to complete a task.
Where to nd more information
Refer to the following sources for additional information and for product and software updates.
ASUS websites
The ASUS website provides updated information on ASUS hardware and software products.
Refer to the ASUS website www.asus.com.
ASUS Local Technical Support
Visit ASUS website at http://support.asus.com/contact for the contact information of local
Technical Support Engineer.

4
USB 3.0 HZ-3A Docking Station User Guide
English
English
Package contents
a. ASUS USB 3.0 HZ-3A Docking Station x1
b. 120W Power adapter x1
c. Support CD x1
d. USB 3.0 cable x1
e. Quick Start Guide x1
f. Detachable Stand x2
g. DVI-I to VGA adapter x1
h.
Changeable connector tips x 4
i.
Docking DC-OUT cable x 1
j.
Adapter power cord x 1
System Requirements
• 32-bitor64-bitMicrosoftWindows®7 / Windows®8 / Windows®8.1
• USBport(USB3.0isrecommended)
• Intel®2.0GHz Core™2 Duo, AMD®Athlon II X2, or faster CPU
• 2GBDRAMsystemmemory
If any of the items is damaged or missing, contact your retailer.
Knowing your USB 3.0 HZ-3A docking station
• Windows®Media Player is recommended for video playback.
• Connect to your computer's USB 3.0 port for the best video playback performance.

5
USB 3.0 HZ-3A Docking Station User Guide
English
English
Specications summary
Self-Powered Mode
Power Adapter
Input:AC100-240V,50~60Hz
Output:19V/6.32A120W
Maximum power support for notebook charging: 19V/4.73A
90W
Bus-Powered Mode
Bus-powered: 200mA
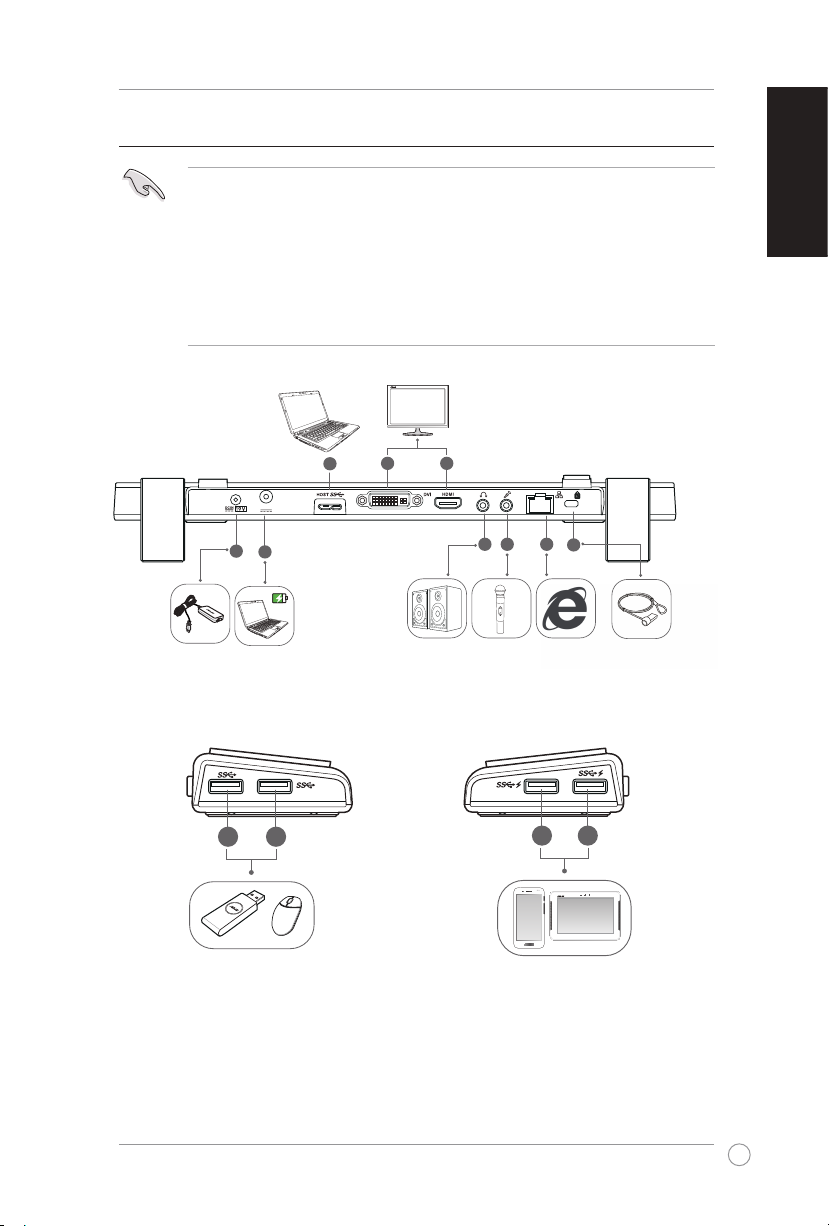
Support Standard Keyboard x1, Mouse x1, Flash Drive x1,
Card Reader x1
Video
HDMI Port
DVI-I Port
Resolutions and Color Depth Aspect Ratio Resolution Color Depth
Wide Screen Display
16:9 2048 x 1152 16,32bits
16:10 1920 x 1200 16,32bits
16:9 1920 x 1080 16,32bits
16:10 1680x1050 16,32bits
16:9 1600x900 16,32bits
16:10 1440 x 900 16,32bits
16:9 1360x768 16,32bits
16:10 1280 x 800 16,32bits
15:9 1280x768 16,32bits
16:9 1280 x 720 16,32bits
Standard Display
4:3 1600x1200 16,32bits
4:3 1400 x 1050 16,32bits
5:4 1280 x 1024 16,32bits
4:3 1280x960 16,32bits
4:3 1152x864 16,32bits
4:3 1024x768 16,32bits
4:3 800x600 16,32bits
Audio
3.5mm Stereo Audio Out
3.5 mm Microphone In

6
USB 3.0 HZ-3A Docking Station User Guide
English
English
• Specicationsaresubjecttochangewithoutpriornotice.
• Usethebundledpoweradapterincaseofpowershortagewhenconnectingseveralperipherals
such as an external HDD or external ODD.
• Thesoftware'sperformancedependsontheprocessingpower'savailability,aswellasthe
operating system in use. More system capability provides better performance.
Ethernet
10/100/1000 Base-T Ethernet Port
Security
Kensington Security Lock
Hub
USB 3.0 Micro-B Upstream HOST Port
USB 3.0 Downstream Port x 4
Physical Specications
Dimensions Mainbody:335x65.65x24.09mm(LxWxH)
Stand:75.27x23x49.06mm(LxWxH)
Weight 290 g

7
USB 3.0 HZ-3A Docking Station User Guide
English
English
Hardware features
Back
Right Left
• InstallthedrivercompletelybeforeconnectingtheUSBcabletoyourcomputer.
• RunthesetupprogramasanAdministratortoensureproperinstallation.
• Uninstallthecurrentdriverbeforeinstallingthenewversion.
• ConnectaDVI-IandHDMIcabletotheDockingStation'svideoportbeforeconnectingtheUSB
cable to your computer.
• TheDockingstationcanbeusedtochargeyourlaptop.
DCOUT
34 5
16 7 8 9
2
12 13
10 11

8
USB 3.0 HZ-3A Docking Station User Guide
English
English
1 DC IN port
Insert the power adapter into this port to supply power to your docking station and the
devices connected to it.
2 DC OUT port
Insert one end of the bundled power cord into this port and the other end to the DC IN
port on your notebook to charge the device.
* Choose the appropriate connector tips for your devices. Please refer to ASUS website www.asus.com
for detailed information.
** The Docking Station supports charging output up to 19V 90W.
3 USB 3.0 upstream port
Connects and passes data to your computer.
4 DVI port
Connects to an DVI monitor or other DVI compatible devices.
5 HDMI port
Connects to a HDMI monitor or other HDMI compatible devices.
6 Headphone port
Connects to a pair of headphones or a speaker.
7 Microphone port
Connects to a microphone.
8 10/100/1000Mbps LAN (RJ-45) port
Connectstoacable/DSLmodemoralocalareanetwork(LAN).
9 Security lock hole
Secure your docking station to an immovable object using a security lock.
10 Standard USB 3.0 downstream port
Connects to a USB 3.0 device such as a phone and tablet PC.
11
12 Standard USB 3.0 downstream port with charging function
Connects to a USB 3.0 device such as a phone and tablet PC. These ports allow data
transfer and battery charging at the same time.
• UsethebundledUSB3.0cabletochargeyourdevicetopreventthedockingstation
from malfunctioning.
• Themaximumoutputrangesfrom5V1A~1.5Aperport.
13

9
USB 3.0 HZ-3A Docking Station User Guide
English
English
Installing your USB 3.0 HZ-3A docking station
Installing the driver
1. Place the driver CD into your computer's optical drive.
2. In the AutoPlay dialog box, click Run Setup.exe.
3. From the driver CD main screen, click Install Docking Utility Driver.
Ensure that the USB cable is unplugged from your computer before installing the driver.
If Autorun is NOT enabled in your computer, click Computer and double-click the optical drive icon.
Double-click Setup.exe located on the optical drive to install the program.
4. The InstallShield Wizard appears. Click Next.
5. Read and understand the license agreement. Check I accept the terms of the license
agreement and click Next.

10
USB 3.0 HZ-3A Docking Station User Guide
English
English
Uninstalling the driver
Unplug the docking station from your computer before uninstalling the driver.
1. Go to Control Panel > Programs > Programs and Features. Right-click ASUS USB3.0
DOCKING-STATION xx.xx.xxxx.xxxx and click Uninstall/Change.
6. Waituntiltheinstallationprocessiscompleted.SelectYes, I want to restart my computer now
and click Finish.
After a successful driver installation, the icon appears on the taskbar.
• Itisnormalifyourcomputerscreengoesblackorashestemporarilyduringthedriver
installation process.
• Ensurethatyouinstallthedriverbeforeconnectingthedockingstationtoyourcomputer.
2. Click OKontheconrmationmessagetouninstallthedriver.
3. Wait until the uninstallation process is completed. Select Yes, I want to restart my computer
now and click Finish.

11
USB 3.0 HZ-3A Docking Station User Guide
English
English
Connecting to PC
Use only the bundled power adapter. Using other power adapters may damage your device.
• ConnectaDVI-IandHDMIcabletotheDockingStation'svideoportbeforeconnectingtheUSB
cable to your computer.
• TheDockingsupportsdualvideooutputfunction.
3
4
2
1
1. Connect one end of the bundled power adapter to the DC IN port on your docking station and
the other end to a 100-240V AC power outlet.
2. Connect one end of the bundled USB 3.0 cable to the USB 3.0 upstream port on your docking
station and the other end to your computer's USB 3.0 port.
3. Connect one end of the bundled power cable to the DC OUT port on the docking station and
the other end to the DC IN port on your notebook.
4. Connect the monitor, USB device or other devices to the docking station.

12
USB 3.0 HZ-3A Docking Station User Guide
English
English
Connecting to the Internet
UseanRJ-45cabletoconnectyourdockingstationtoalocalareanetwork(LAN)(A)oraDSL/cable
modem(B).
The green LED on the LAN port lights up when there is an Internet connection. The yellow LED
lights up when there is Internet activity.
• IfyoufailtoconnecttotheInternetusingthedockingstationatyouroce,checkwiththe
network administrator if the MAC address of the docking station is blocked by your
company'srewall.
• CheckthebottomofyourdockingstationforitsMACaddress.Youmayalsoobtainthe
MAC address through the following ways:
1. From the Windows®desktop, click Start >All Programs >Accessories > Command
Prompt.
2. At the command prompt, key in ipcong/all and then Press <Enter>.
3. Locate ASIX AX88179 USB3.0 to Gigabit Ethernet Adapter.
• TheRJ-45cableispurchasedseparately.
Modem
A
B
RJ-45
RJ-45

13
USB 3.0 HZ-3A Docking Station User Guide
English
English
Setting up the displays
Follow the steps below to set up the displays.
1. Do any of the following to open the Screen
Resolution setting screen:
a) FromtheControl Panel, click
Adjust screen resolution under
Appearance and Personalization.
b) Right click anywhere on your
desktop. When the pop-up menu
appears, click Personalize > Display
> Change display settings.
2. Click Identify to display a large number on each of your monitors. This shows which monitor
corresponds with each icon.
3. Select the display mode from the Multiple displays: drop-down list.
• Duplicate these displays: Select this option to use the additional monitor as a duplicate of
your main display.
• Extend these displays: Select this option to use the additional monitor as an extension
display. This increases your desktop space.
• Show desktop only on 1 / 2: Select this option to show desktop only on monitor 1 or
monitor 2.
4. Click Apply or OK. Click Keep Changesontheconrmationmessage.
Youcanalsousethesetuputilitytosetupthedisplays.SeesectionUsing the setup utility for
details.
Using your USB 3.0 HZ-3A docking station

14
USB 3.0 HZ-3A Docking Station User Guide
English
English
Setting up the audio output
Microsoft’s audio system restricts the audio function to one output at a time. Hence, when using the
USB HDMI display device, only one output will receive audio.
The following explains how to set up and change the default audio output from the display device
connected with your docking station.
1. Go to Control Panel > Hardware and Sound
> Change system sounds. The Sound screen
appears.
2. Click the Palyback tab. Right-click in the
screen and click Show Disabled Devices.
3. Right click the device you want to use as your
default audio output, and select Enable.
4. Highlight that device and click Set Default.
5. Click Apply or OK to save the changes.

15
USB 3.0 HZ-3A Docking Station User Guide
English
English
Using the setup utility
Launching the setup utility
From the taskbar, click to launch the setup utility.
Using the setup utility
Display ID
Smart display device ID detection
ThisutilityshowsthedisplaydeviceIDofaVESA-denedDDC/EDIDmonitorwhenitisconnected
to the docking station.
For non-EDID display devices, the device ID shows as Generic Monitor.
This utility shows two display device ID when two monitors are connected to the docking station.
There is no display device ID on utility when no monitor is connected to the dacking station.

16
USB 3.0 HZ-3A Docking Station User Guide
English
English
Display Resolution
Click to select the screen resolution.
Display Orientation
Click to select the rotation setting, which is
useful for some rotatable display devices.
There are four options available on the
extended monitor and main monitor:
• Landscape
• Portrait(Flipped)
• Landscape(Flipped)
• Portrait

17
USB 3.0 HZ-3A Docking Station User Guide
English
English
Extend Desktop To
Click to extend your Windows desktop
to your extended monitor depending
on their positions: Right, Left, Top, or
Bottom.
Display Modes
• ExtendDesktop(Default)
This is the default setting. Click to extend your
Windows desktop to the extended monitor.
• DuplicateDesktop
Click to reproduce an exact replica of your
main display to your extended monitor.
Display rotation function is disabled
automatically.
• MakeThisMyMainDisplay
Click to set the screen as the main display.
Disconnect This Display
Click to disable the display.

18
USB 3.0 HZ-3A Docking Station User Guide
English
English
Playback Devices
ClicktoopentheWindowsSoundconguration
screen. See section Setting up the audio output
for more details.
Screen Resolution
Click to open the Windows Screen Resolution
screen. See section Setting up the displays for
more details.
To change the display mode using the
keyboard, press <Windows key + P>.
About
Click to view the current driver version.

19
USB 3.0 HZ-3A Docking Station User Guide
English
English
Disconnecting your USB 3.0 HZ-3A docking station
• DO NOT disconnect the docking station while data is being transferred between your
computer and the docking station. Wait until data transfer has completed.
• DO NOT disconnect the docking station while you are connecting to the Internet via its LAN
port.DisconnecttheInternetconnectionrst.
To disconnect your USB 3.0 docking station:
• UsetheSafelyremovehardwarefeaturefromthetaskbartoejecttheconnecteddevicessuchas
aUSBashdriveandUSBharddiskdrive.
• Unplugthedockingstationfromyourcomputerandthepoweroutlet.
Youcanconnectanddisconnectthedockingstationwhileyourcomputerisrunning.

20
USB 3.0 HZ-3A Docking Station User Guide
English
English
Table of contents
Other Asus Docking Station manuals

Asus
Asus T100 Series User manual

Asus
Asus DC300 User manual

Asus
Asus USB2.0_HZ-1 DOCKING-STATION User manual

Asus
Asus DC200 User manual

Asus
Asus USB 3.9 HZ-2 User manual

Asus
Asus HZ-1 User manual

Asus
Asus ASUSPRO Ultra User manual

Asus
Asus PadFone Station User manual

Asus
Asus Padfone Infinity Station User manual

Asus
Asus WiGig Dock User manual