AVGear AVG-SCU41-MV User manual
AVG-SCU41-MV
Features
▪4 HDMI inputs, 1 HDMI output.
▪Supports 4K@30Hz 4:4:4, HDCP
2.2.
▪Seamless switch between 4 input
ports.
▪Auto Scaler in each source input.
▪Supports audio embedding and
mixing.
▪Supports audio de-embedding.
▪Auto-switching at single window.
▪Cycles through the windows from A
to D by swap button.
▪Base on FPGA Technology, layout
and size of the windows can be
customized.
▪Resizes the windows in 3 different
sizes.
▪16 pre-defined layouts for multi-
view.
▪Multiple control methods, including
an assignable front panel, IR
remote, web GUI and RS232 port.
The 4K Multi-view switcher is seamless video scaler
designed to enable a true 4K display. The switcher
features four HDMI inputs and one HDMI output which
allows you to display four video sources on one display.
It also provides a line input, 1 mix input, 1 SPDIF output
and 1 analog output for audio processing.
Control is quick and comprehensive, whether you are
using the front panel, the remote control, RS232
commands, or the fully featured web GUI.

AVG-SCU41-MV
PLEASE READ THIS PRODUCT MANUAL CAREFULLY
BEFORE USING THIS PRODUCT.
This manual is only for operational instruction only,
and not to be used for maintenance. The functions
described in this version are current as at October
2019. Any changes of functions and operational
parameters will be updated in future manual versions.
Please refer to your dealer for the latest product
details.
Version 1.0 15/03/21

AVG-SCU41-MV
SAFETY OPERATION GUIDE
To guarantee the reliable operation of the equipment and safety of the user,
please abide by the following procedures in installation, use and maintenance:
1. The system must be earthed properly. Please do not use two blade plugs
and ensure the alternating power supply ranges from 100v to 240v and from
50Hz to 60Hz.
2. Do not install the switcher in an environment where it will be exposed to
extreme hot or cold temperatures.
3. This unit will generate heat during operation, please ensure that you allow
adequate ventilation to ensure reliable operation.
4. Please disconnect the unit from mains power if it will be left unused for a
long time.
5. Please DO NOT try to open the casing of the equipment, DO NOT attempt to
repair the unit. Opening the unit will void the warranty. There are high
voltage components in the unit and attempting to repair the unit could result
in serious injury.
6. Do not allow the unit to come into contact with any liquid as that could result
in personal injury and product failure.

AVG-SCU41-MV
TABLE OF CONTENTS
Introduction ..............................................................................................................1
Production Introduction........................................................................................1.1
Features .............................................................................................................. 1.2
What’s in the Box.................................................................................................1.3
Panel Description.....................................................................................................2
Front Panel .......................................................................................................... 2.1
Rear Panel...........................................................................................................2.2
System Connection..................................................................................................3
Usage Precautions .............................................................................................. 3.1
System Diagram ..................................................................................................3.2
Front Panel Control..................................................................................................4
Multi-views Selection ........................................................................................... 4.1
Video Signal Switching ........................................................................................4.2
Video Switching Status Inquiry ............................................................................4.3
Audio Select ........................................................................................................ 4.4
Config Button.......................................................................................................4.5
IR Remote Control....................................................................................................5
GUI Control ...............................................................................................................6
Multiview Tab.......................................................................................................6.1
Audio Tab ............................................................................................................6.2
Resolution Tab ....................................................................................................6.3
RS232 Tab .......................................................................................................... 6.4
CEC Tab..............................................................................................................6.5
EDID Tab.............................................................................................................6.6
Network Tab ........................................................................................................ 6.7
Tags Tab .............................................................................................................6.8
Security Tab ........................................................................................................ 6.9
GUI Update........................................................................................................6.10
RS232 Control ..........................................................................................................7
RS232 Control Software ......................................................................................7.1
RS232 Control Commands.................................................................................. 7.2
System Control.............................................................................................. 7.2.1
Signal Switching............................................................................................ 7.2.2
Audio Switching............................................................................................. 7.2.3
Function Setting ............................................................................................ 7.2.4
CEC Commands ........................................................................................... 7.2.5
Special Commands ....................................................................................... 7.2.6
Firmware Upgrade....................................................................................................8
Panel Drawing ..........................................................................................................9
Specification...........................................................................................................10
Troubleshooting & Maintenance........................................................................... 11

AVG-SCU41-MV
1. Introduction
1.1. Production Introduction
The 4K Multi-view switcher is seamless video scaler designed to enable a true 4K
display. The switcher features four HDMI inputs and one HDMI output which allows
you to display four video sources on one display. It also provides a line input, 1 mix
input, 1 SPDIF output and 1 analog output for audio processing.
Control is quick and comprehensive, whether you are using the front panel, the
remote control, RS232 commands, or the fully featured web GUI.
1.2. Features
▪4 HDMI inputs, 1 HDMI output.
▪Supports 4K@30Hz 4:4:4, HDCP 2.2.
▪Seamless switch between 4 input ports.
▪Auto Scaler in each source input.
▪Supports audio embedding and mixing.
▪Supports audio de-embedding.
▪Auto-switching at single window.
▪Cycles through the windows from A to D by swap button.
▪Base on FPGA Technology, layout and size of the windows can be
customized.
▪Resizes the windows in 3 different sizes.
▪16 pre-defined layouts for multi-view.
▪Multiple control methods, including an assignable front panel, IR remote, web
GUI and RS232 port

AVG-SCU41-MV
1.3. What’s in the Box
▪1x AVG-MV41 4k 4x1 Seamless Switcher.
▪2x Mounting Ears
▪4x Mounting Screws
▪4x Plastic Cushions
▪1x IR Remote
▪2x 3-pin Terminal Block
▪1x RS232 Cable (3-pin terminal block to DB9)
▪1x Power Adapter (24V DC 1.25A)
▪1x User Manual
Note: Please confirm if the product and the accessories are all included, if not,
please contact with the dealers.

AVG-SCU41-MV
2. Panel Description
2.1. Front Panel
①POWER LED: The LED illuminates green when it is working, and the LED
illuminates red when it is standby.
②IR LED: Built-in IR sensor, receive IR signal sent from IR remote.
③FOUR INPUT LEDS/AUDIO SELECTS: Press the buttons to selected
corresponding HDMI input, its LED illuminates yellow when there is a video
signal, it will illuminates blue when the video signal is chosen as input source.
AUTO LED: Press the button to Auto Switching or Manual Switching exchange
mode, its LED illuminates blue in auto-switching mode, and it will be off when exit
the auto-switching mode.
④FOUR SELECT/FULL SCREENS: Press the buttons to select corresponding
input source as Full Screen, its LED illuminates blue when it is selected.
⑤CONFIG: Press SWAP button to select window display screen anti-clockwise
direction. its LED illuminates blue when it is selected. Press the RESIZE button to
readjust the windows size, its LED illuminates blue when it is pressed.
⑥THREE MULTI-VIEWS: Press the buttons to choose different available Multi-view
modes, its LED illuminates blue when it is selected.
AVG-SCU41-MV
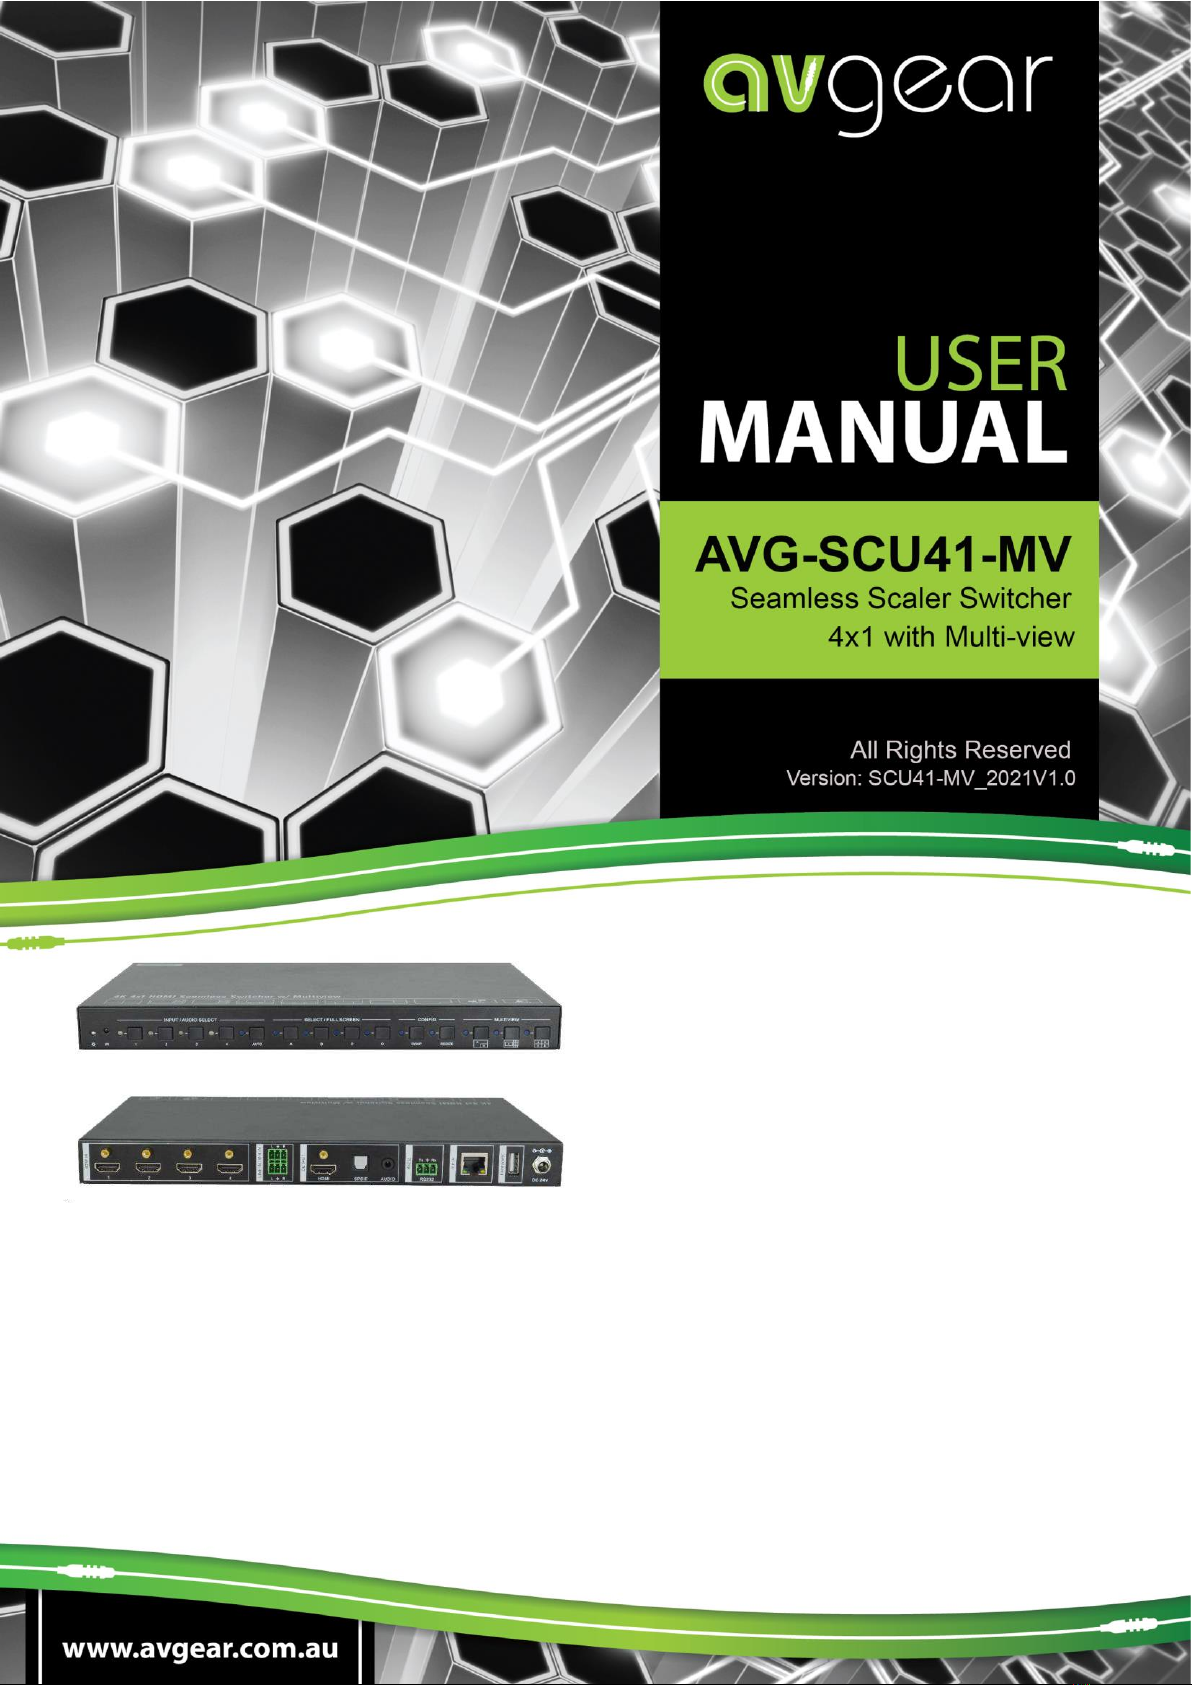
2.2. Rear Panel
①HDMI IN: Four type-A female HDMI input ports to connect HDMI source devices.
②LINE IN: 3-pin terminal block to connect audio source device like mobile phone or
computer to embed in HDMI audio sources.
MIX IN: 3-pin terminal block to connect audio source device like mobile phone or
computer to mix HDMI audio sources.
③HDMI OUTPUT: Type-A female HDMI output port to connect display device.
SPDIF OUTPUT: Toslink for audio de-embedding from HDMI output.
AUDIO OUTPUT: 3.5mm mini jack for audio de-embedding from HDMI output.
④RS232: 3-pin terminal block to connect the RS232 control device (e.g. PC) or a
third-party device to be controlled by RS232 commands.
⑤TCP/IP: RJ45 port to connect the control device (e.g. PC) to control the switcher
by GUI.
⑥FIREWARE: Type-A USB port for firmware upgrade.
⑦DC 24V: DC connector for power adapter connection.

AVG-SCU41-MV
3. System Connection
3.1. Usage Precautions
▪Make sure all components and accessories included before installation.
▪System should be installed in a clean environment with proper temperature and
humidity.
▪All of the power switches, plugs, sockets, and power cords should be insulated
and safe.
▪All devices should be connected before power on.
3.2. System Diagram
FIRMWARE
HDMI IN
OUTPUT
HDMI SP DIF AUDIO
LINE IN / MIX IN
RL
RL
Tx Rx
RS2321 2 3 4
RS232
TCP/IP
DC 24 V
1
2
3
4
Laptop
Laptop
Laptop
Laptop
Audio Player
Layout
4K TV
HDMI:
Audio:
RS232:
Ethernet:
Laptop
Central Control System
Amplifier

AVG-SCU41-MV
4. Front Panel Control
4.1. Multi-views Selection
Factory default is four quarter views, and factory default input and output
corresponding relation is input1 -> window A, input2 -> window B, input3 -> window
C, input 4-> window D. Press one of the other two multi-view buttons to change
layout. And its multi-view mode and corresponding windows LEDs illuminate blue.
Full Screen mode: Press Windows A~D button to select the corresponding window
to display in full-screen. Meanwhile, the corresponding input source button LED and
window button A LED illuminate blue, other window buttons and previous multi-view
mode button LED goes out
4.2. Video Signal Switching
▪In the Multi-view mode
Operation: Inputs# + Windows#
Example: Switch Input 1 to Windows B:
Press INPUT 1(The input 1 LED illuminates blue, the windows A-D LEDs flash.)
Press Windows B (The windows A, C and D LEDs go out, then input 1 and windows
B LED flash three times, last, input 1 LED goes out and windows A-D LEDs
illuminate blue.)
▪In the Full Screen mode
1) Manual Switching
Operation: Inputs# + Windows#
Example: Switch Input 2 to Windows A:
Press INPUT 2 (The input 2 LED illuminates blue.) Press Windows A (The
input 2 and windows A LEDs illuminate blue).
2) Auto Switching
Press AUTO button to enter auto-switching mode, and the corresponding LED
illuminate blue.
When in the AUTO mode, signal switching complies with the following principles:
AVG-SCU41-MV
1) Four input sources priority: HDMI 1 > HDMI 2 > HDMI 3 > HDMI 4. When input
source and output window are connected, the corresponding LEDs illuminate
blue.
2) Once detecting a new input signal, the switcher will switch to this new signal
automatically.
3) The switcher will memorize last input source when power off
4) Manual switching is enabled in the auto switching mode and does not exit it.
5) When full screen mode changes into multi-view mode, the AUTO mode will not
exit.
4.3. Video Switching Status Inquiry
In the Multi-view mode (Window A, B, C or D LED illuminate blue).
Operation: Windows#
Example: Long press Windows B button for more than 3s (Window A, C and D
LEDs go out, and then corresponding input source LED will illuminate blue). After 3
seconds, Window A, B, C and D LEDs illuminate blue.
4.4. Audio Select
Factory default is HDMI IN1 audio source. In the Multi-view mode, long press any
INPUT buttons for more than 3s to replace all output audios with corresponding input
audio source, meanwhile, the input LED illuminates blue. No operation within 3s, the
input LED will go out.
Long press AUTO button for 3s to replace all output audios with LINE IN audio
source.
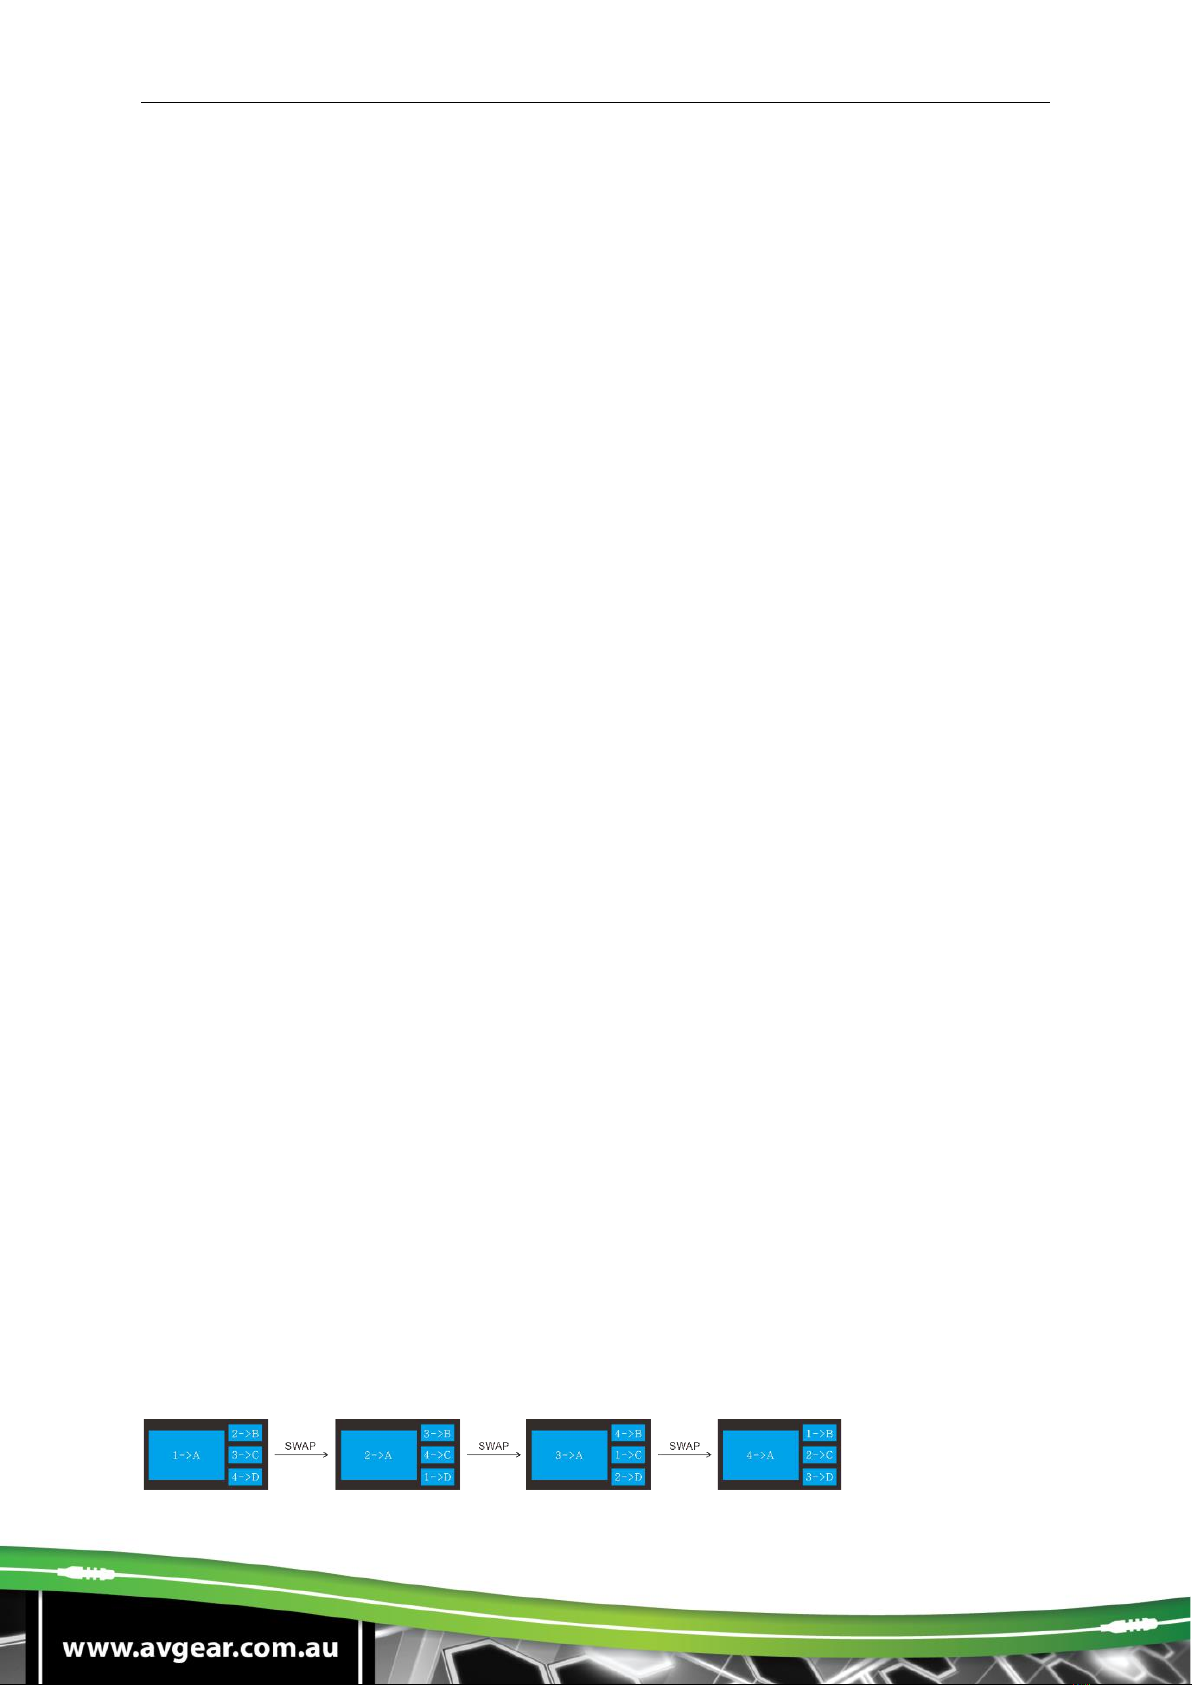
4.5. Config Button
SWAP: Press Swap button to select window display screen anti-clockwise direction,
the SWAP LED lights once when press its button once.
Example: In the Multi-view mode
AVG-SCU41-MV
Example: In the Full Screen mode
RESIZE: Press RESIZE button to readjust the windows size. Please refer the GUI
Multi-view Tab on page 12 for more details.
Example: In the PIP mode
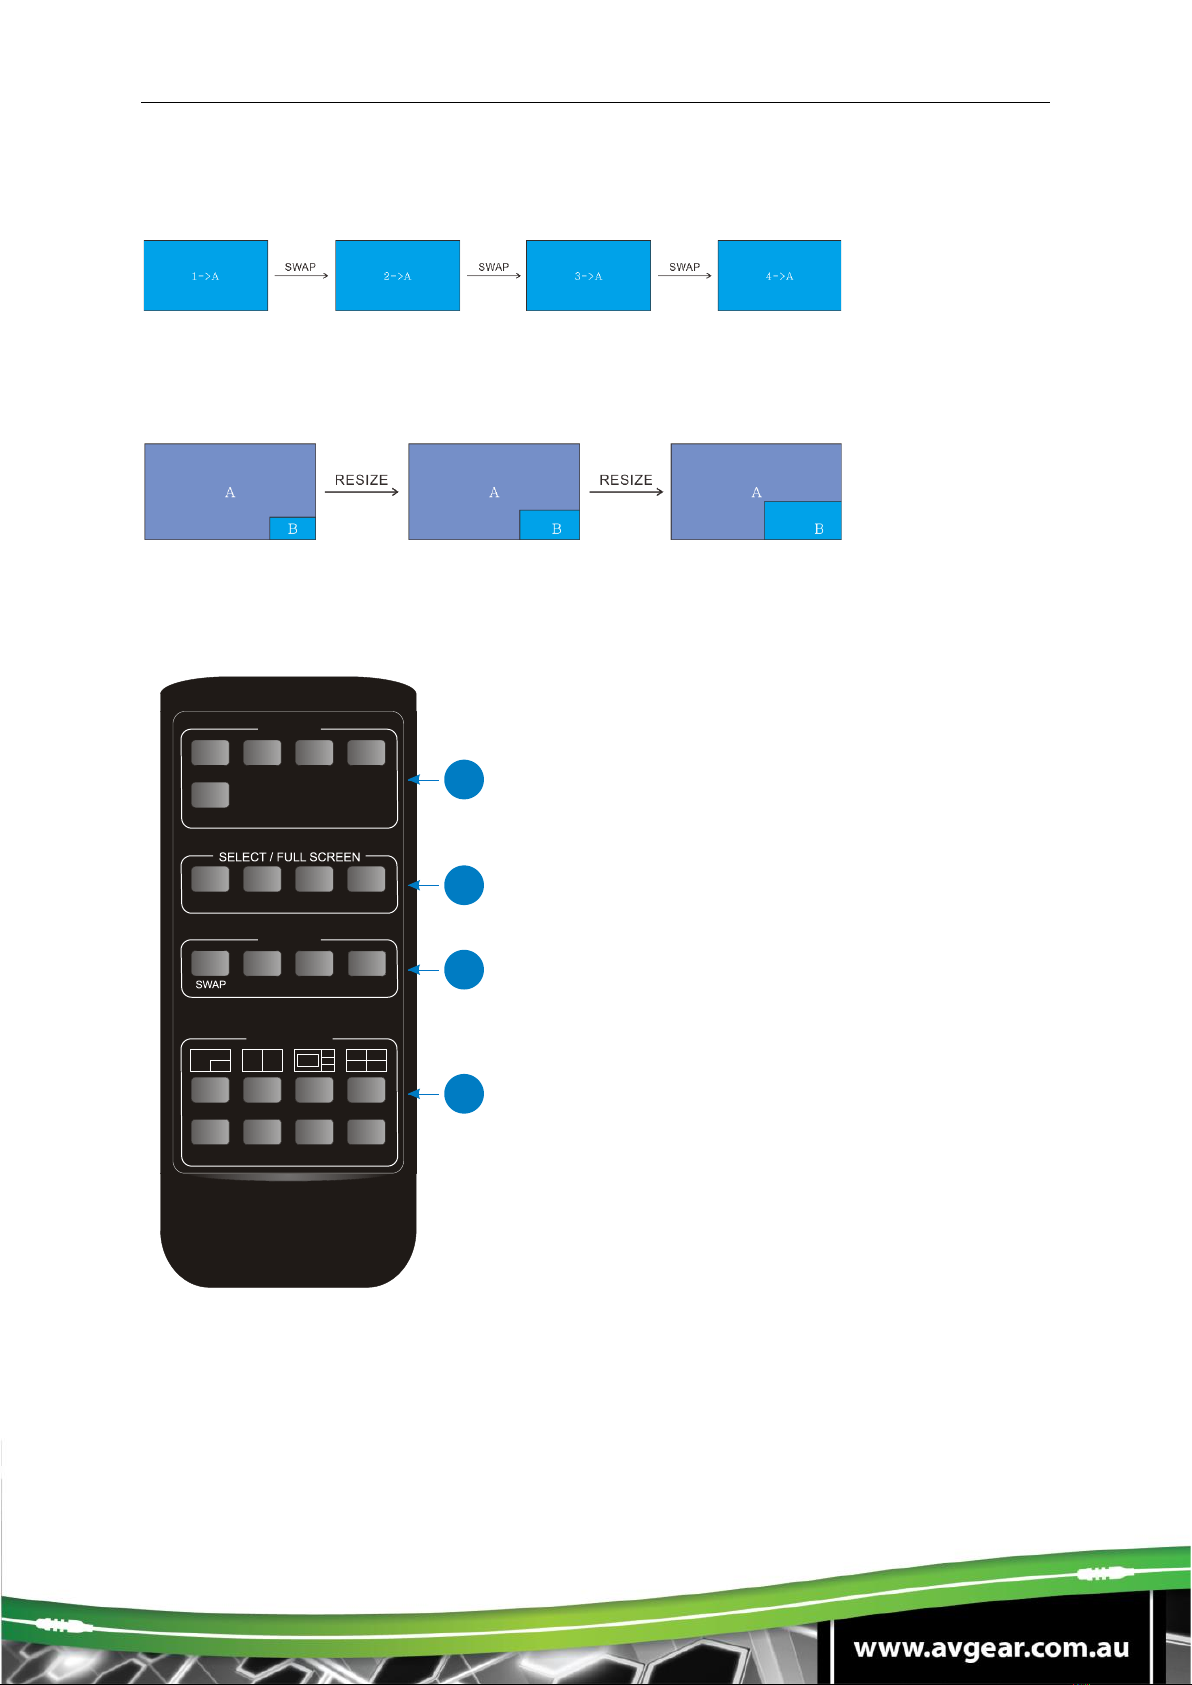
5. IR Remote Control
①INPUTS: Press 1-4 button to select the input
sources. Press AUTO button to automatically
detect the input sources.
②SELECT/FULL SCREEN: Press A-D button
to display corresponding input as full-screen
mode.
③CONFIG: Press SWAP button to select
window display screen anti-clockwise
direction. Press the RESIZE button to adjust
the windows size. Press MUTE button to
control the basic function, such as adjusting
volume, pause, play and switch and so on.
Press RES button to adjust the output
resolution.
④MULTIVIEW: The MULTIVIEW includes eight
buttons, the first four buttons to choose
different multi-views mode, and USER1-4
button to enter user-defined multi-views mode
via GUI control.
AUTO
A B C D
RESIZE MUTE RES
INPUTS
CONFIG
1 2 3 4
MULTIVIEW
C
B
D
A
B
AB
A
C D
A B
USER 1 USER 2 USER3 USER 4
Multiview Switcher
1
2
3
4

AVG-SCU41-MV
Note: There is no long pressing function on this IR remote, and its button functions
are the same as the front panel buttons.
AVG-SCU41-MV
6. GUI Control
The switcher can be controlled via TCP/IP. The default IP settings are:
IP Address:
192.168.0.178
Subnet Mask:
255.255.255.0
Type 192.168.0.178 in the internet browser, it will enter the below log-in webpage:
Username: admin
Password: admin
Type the user name and password, and then click Login to enter the section for
video switching.

AVG-SCU41-MV
6.1. Multiview Tab
Type the default user name and password, and then click Login to enter the
Multiview Tab shown as below:
①Pre-defined
▪Pre-defined:
✓Click the corresponding button (Layout1~16) to select video input view and
mode.
✓Click the Layout2, Layout5~Layout8, Layout9~Layout12 buttons to enable
the Resize function.
✓Press SWAP button to select window display screen anti-clockwise direction.
✓Click Confirm button complete the selection.
Note: Only layout2, layout5~8 and layout9~12, 9 layouts in total, can be resized.

AVG-SCU41-MV
✓Click Setting button to enter Window Select, and select any one of input
sources and corresponding output shown windows.
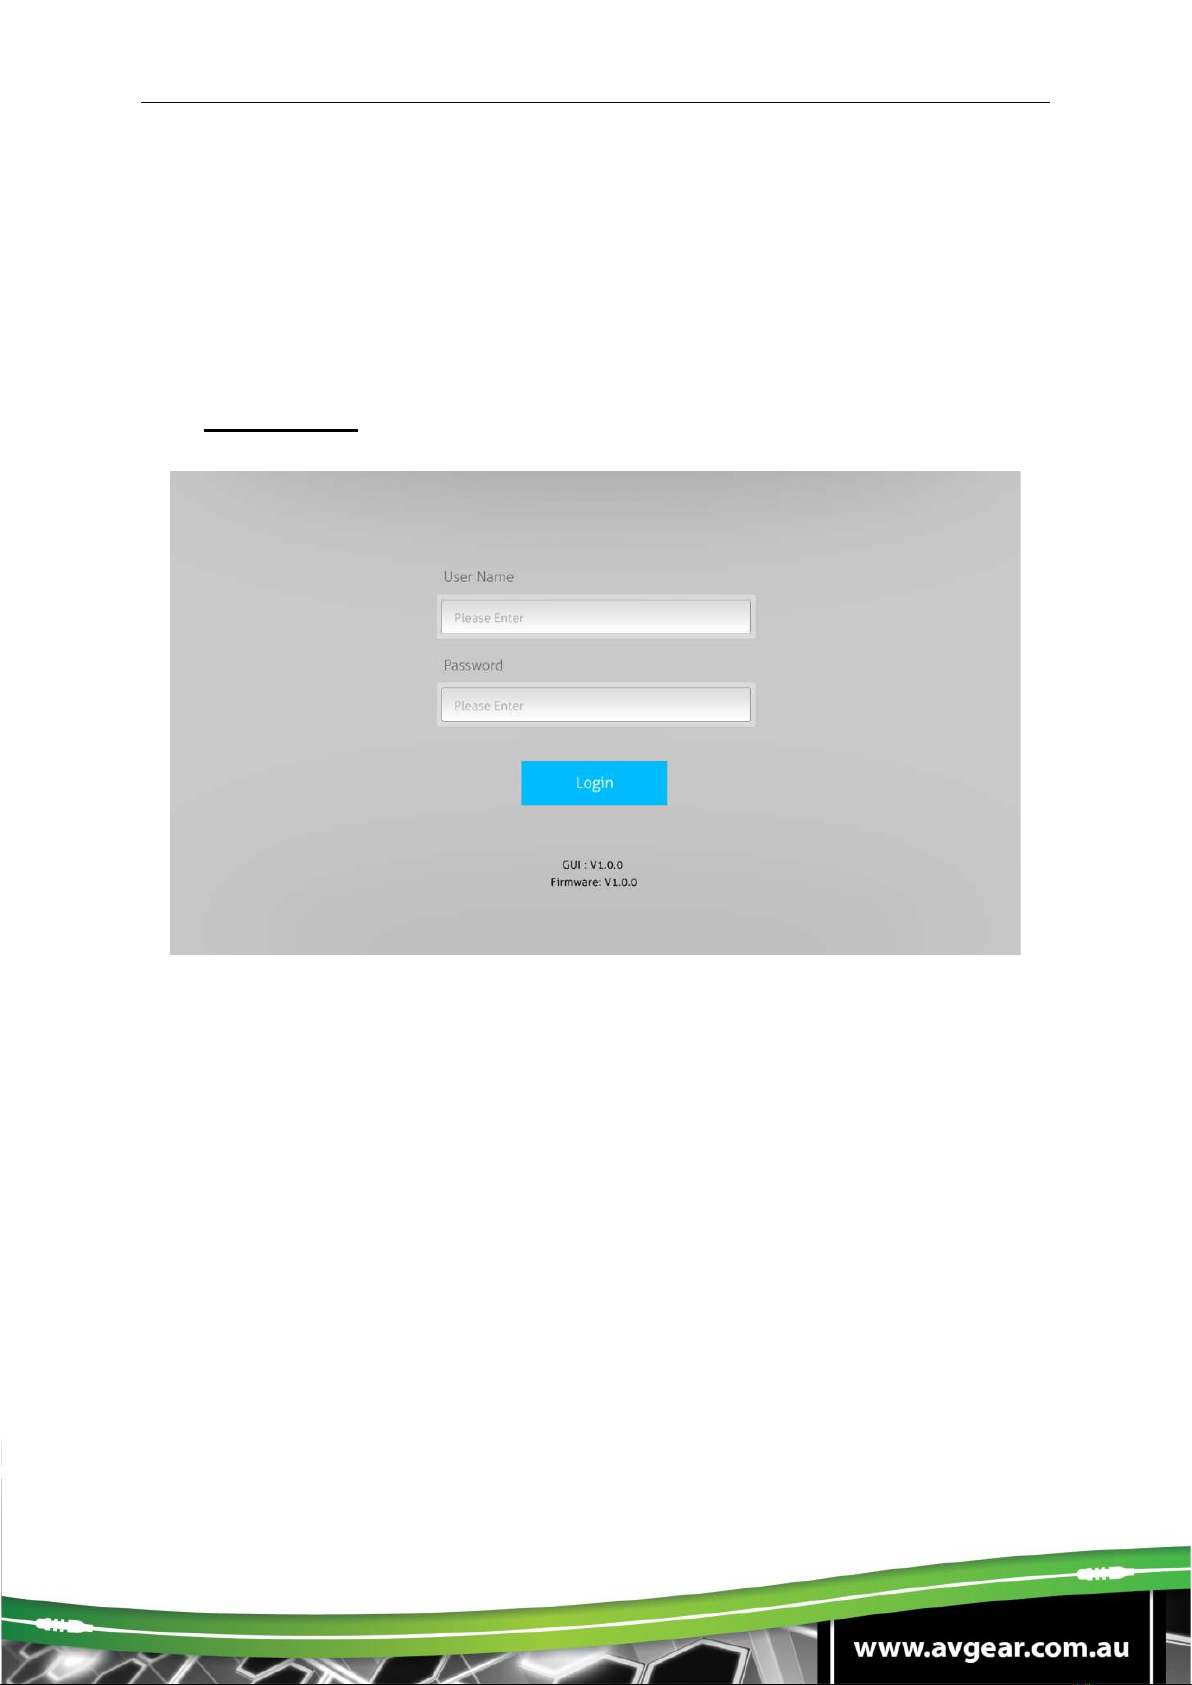
②User-defined
✓Click 1, 2, 3, or 4 button to choose User Layout.
✓Select the corresponding input, set the size and position for each window
that you want to display on the layout.
✓Click Save button to present the results above selected.
AVG-SCU41-MV
✓Click OK button to exit the current interface and reselect User-defined if the
Bandwidth limit exceeded.
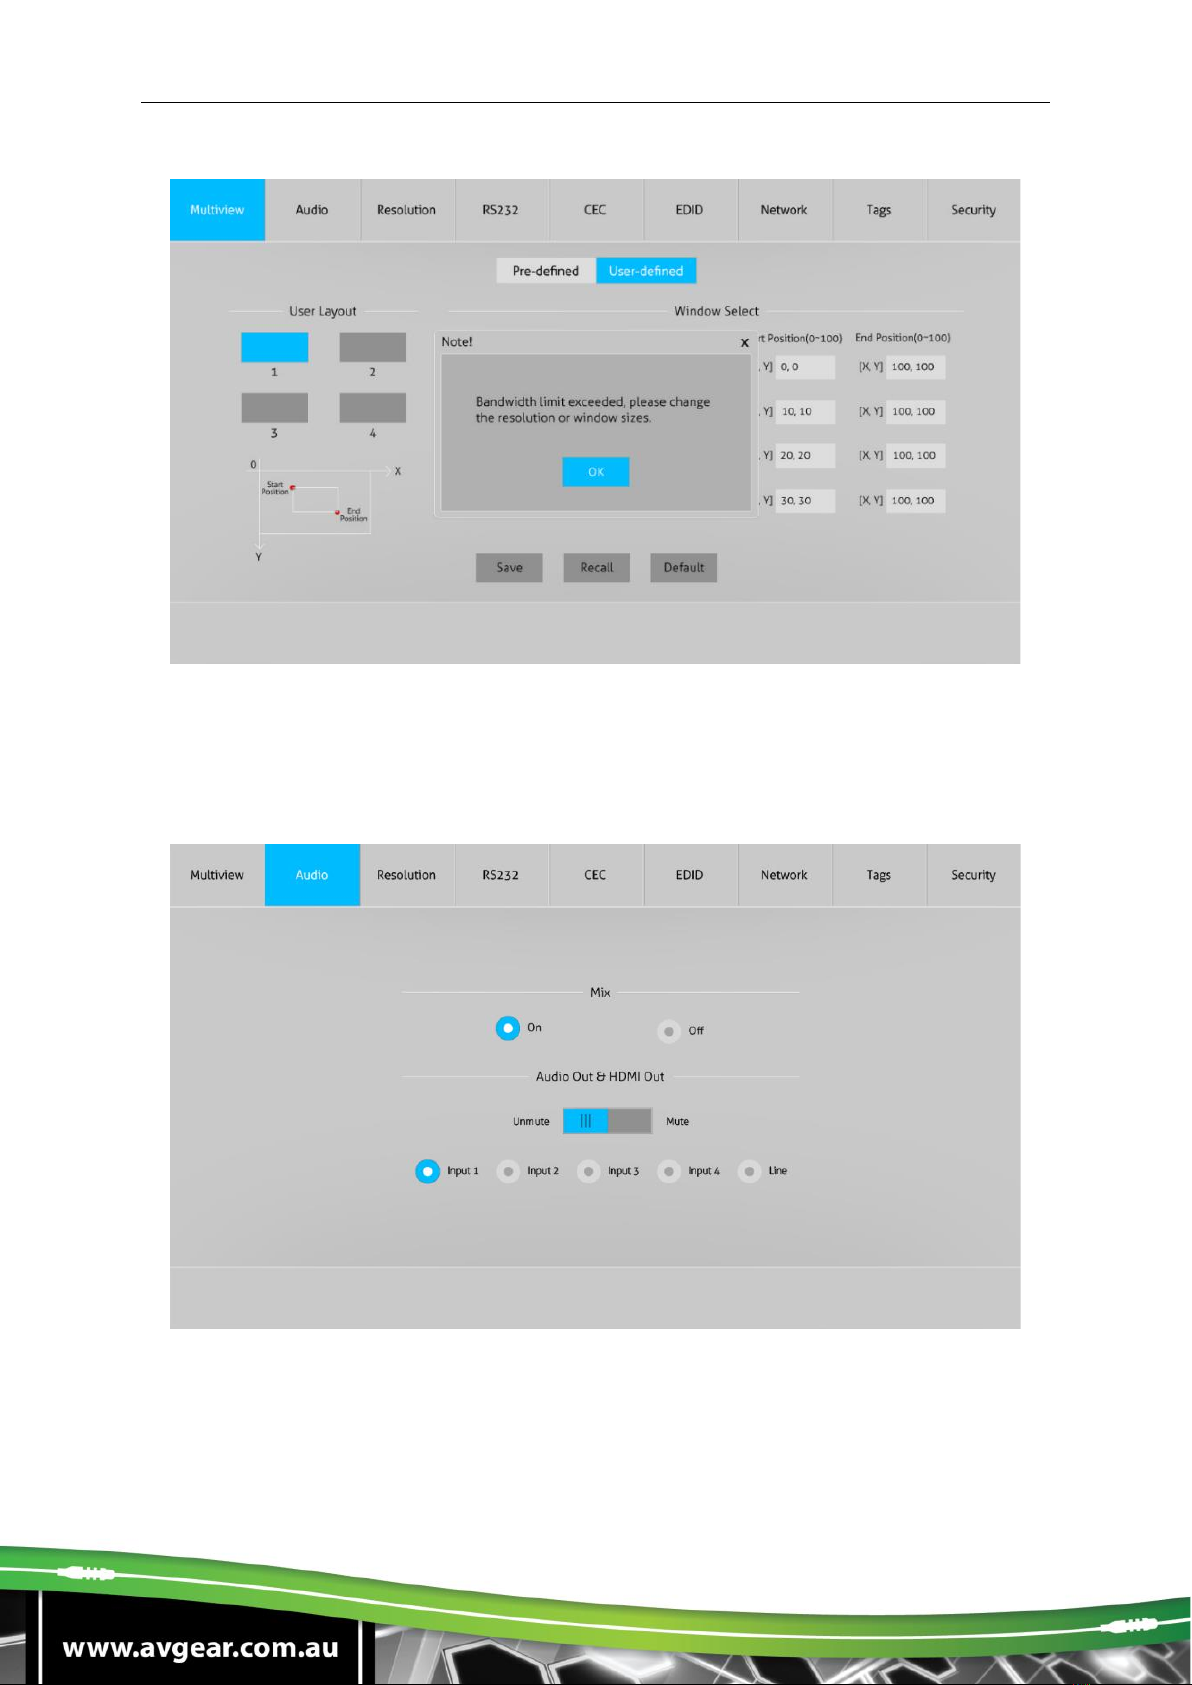
6.2. Audio Tab
✓Click On button to enter Mix mode, Click Off button to exit Mix mode.
✓Click Unmute or Mute button to control Audio Output.
✓Select one audio input among input 1-4 and line audio to set as output audio.

AVG-SCU41-MV
6.3. Resolution Tab
✓Click any one of built-in resolutions for the selected input source device, click
Auto button to show the resolution from third-party display device
automatically.
✓Click Confirm button when the selection is completed.
6.4. RS232 Tab
✓ASCII or HEX command format can be selected.
✓Baud Rate: Supports 2400, 4800, 9600, 19200, 38400, 57600 or 115200.
✓Command Ending: NULL, CR, LF or CR+LF can be chosen.
✓Command: Type the command in this box to control the third-party device
which is connected to the RS232 port of the switcher.
✓Display On: Send the Display ON via RS232 command.
✓Display Off: Send the Display OFF via RS232 command.

AVG-SCU41-MV
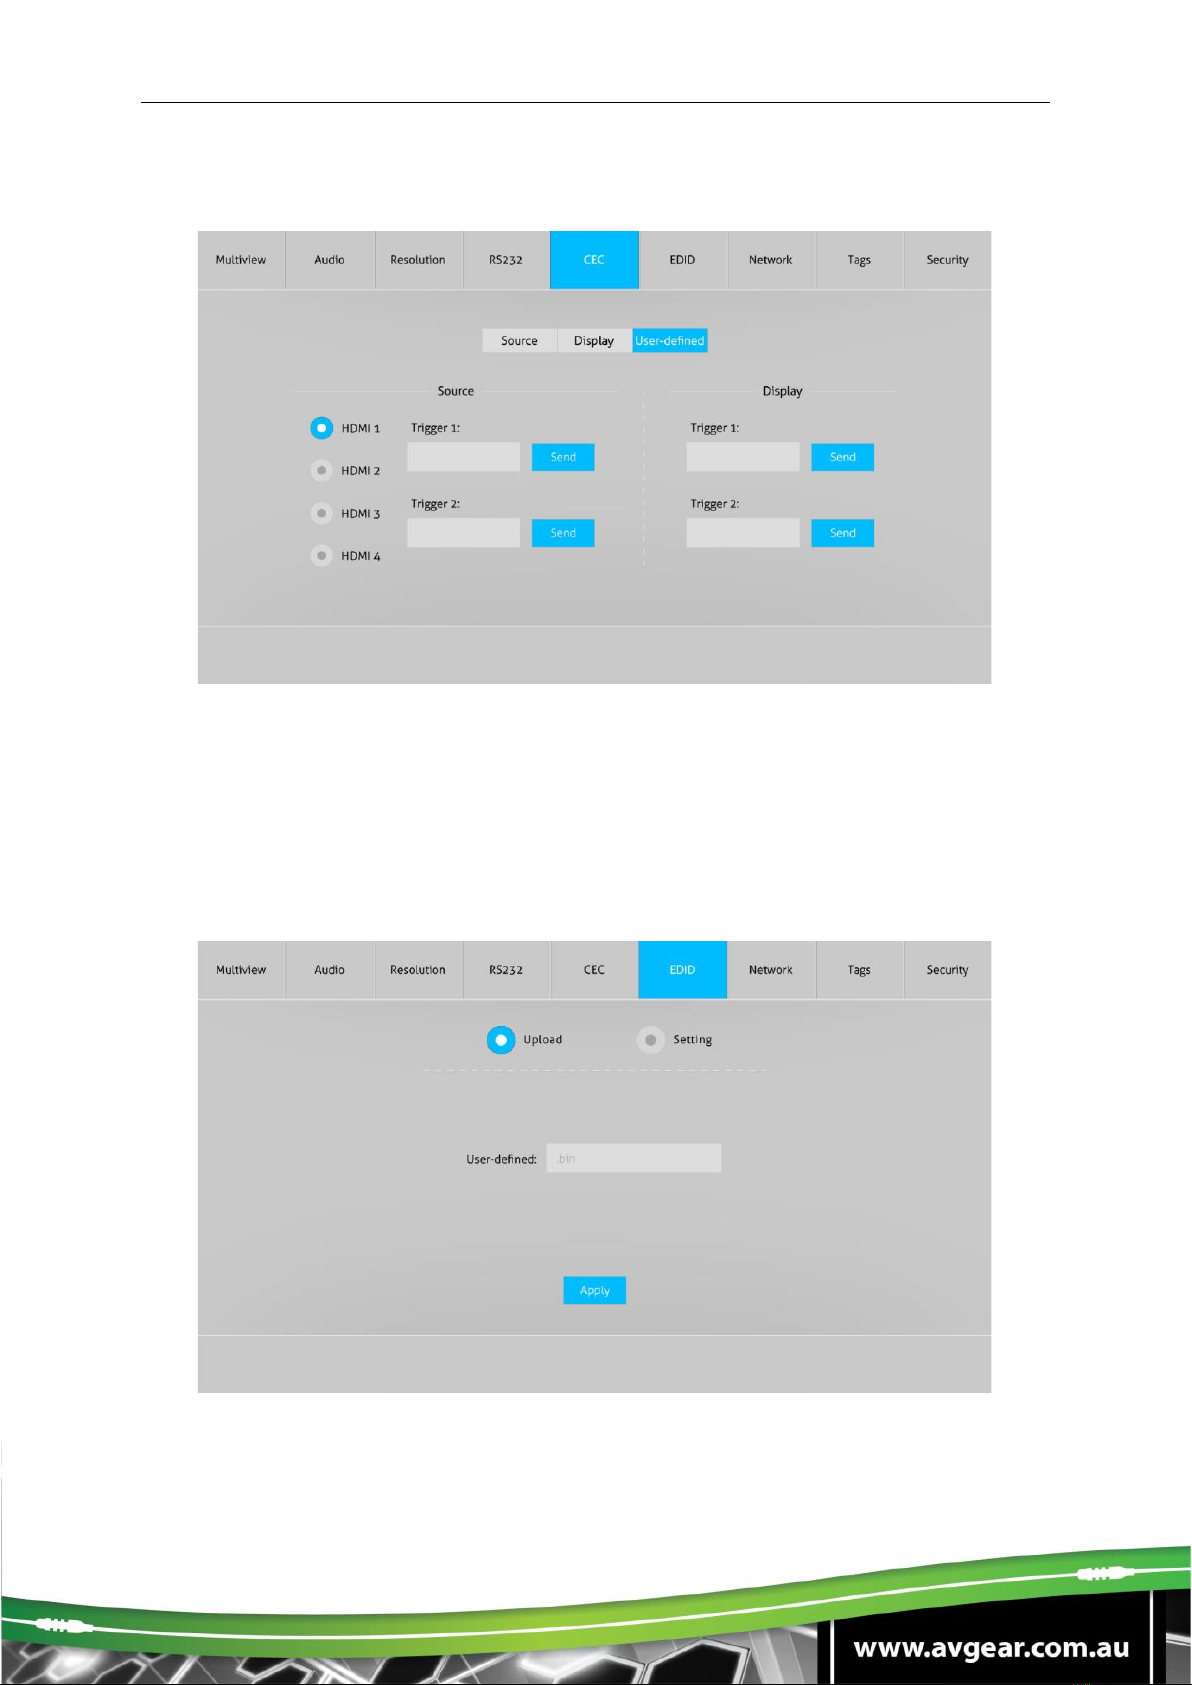
6.5. CEC Tab
①Source
✓Click Source button to select HDMI input source, and click Function to enter
the basic control.
②Display
✓Click Display buttons to control the third-party display devices.
AVG-SCU41-MV
③User-defined
✓Select corresponding input source devices and display devices to control via
CEC commands.
6.6. EDID Tab
①Upload
✓User-defined EDID can be customized by the below steps:
Step 1: Prepare the EDID file (.bin) on the control PC.
This manual suits for next models
1
Table of contents
Other AVGear Switch manuals

AVGear
AVGear AVG-SC42T User manual

AVGear
AVGear AVG-SM-2.0 User manual

AVGear
AVGear AVG-UHS41 DA User manual

AVGear
AVGear AVG-UHS41 DA User manual

AVGear
AVGear AVG-SC51T User manual

AVGear
AVGear AVG-SC51D User manual

AVGear
AVGear AVG-UDA24-HD70 User manual

AVGear
AVGear AVG-MS88-HDBT User manual

AVGear
AVGear AVG-SC121D-TN User manual

AVGear
AVGear AVG-SC91T User manual


