Batca FUSION 4 FZ-1 User manual

www.batcatness.com Fusion 4 Upper Body Station
May 2021
Serial Number Here
Date of Purchase
FZ-1 Fusion 4 Upper Body Unit

Batca Fitness Systems 2Fusion 4 Upper Body Station
Page
Instructions 2
Hardware Blister Packs 3-7
Main Frame Assembly 8-12
Cable Routing 13-16
Upholstery 17
Cable Arms Option 18
Cable Arms Cable Routing 19-20
Page
Cable Comparison 21
Cable Tension and Adjustments 22
Final Assembly and Troubleshooting 23
Maintenance 24
Warranty 25
Floor plan Layout 26
Congratulations on the purchase of your new Batca Fusion 4 Upper Body Unit. This gym
will provide you with a lifetime of enjoyment to meet your strength training needs. Batca
Fitness Systems strives to build the best quality gyms and to package these gyms in such a way
to avoid any damage during shipping.
In order to get started with your assembly you should rst familiarize yourself with this
manual. It is recommended that you read through each step thoroughly before you begin.
Begin by opening your boxes and separating all of your parts. Verify that all parts are accounted
for and have no damage. When all parts are accounted for, you may begin your assembly.
Some items may have been pre-assembled for your convenience. Please note that hardware
quantities shown reect total quantities for your gym and may not reect actual quantities in
each bag. Assemble your gym on a solid level surface. This will ensure the best possible
performance, function, and safety for the gym and your workout.
Assemble your gym according to the step by step instructions found in this manual. Failure
to do so will void your warranty and may result in personal injury. After assembly, you should
check each station to ensure correct operation. If a problem arises, recheck your assembly with
these instructions to verify correct assembly. If you are unable to correct a problem or have
questions with your assembly please contact your authorized Batca dealer.
Batca Fitness Systems has built this gym to give you a safe, effective and enjoyable
workout. However, there is a risk assumed by individuals who use this type of equipment. It is
very important that all warnings and instructions are read and followed before beginning any
exercise program.
It is also very important to read and follow the preventative maintenance schedule
described in this manual. If any of the warning labels or stickers are worn, faded, torn,
scratched or missing they should be replaced immediately.
WARNING: There is a risk assumed by individuals who use this type of equipment. To
minimize risk always follow these rules.
1)It is essential that you consult with your physician before beginning any exercise program.
2)Inspect equipment before each use for loose, worn, or frayed parts (including cables, nuts
and bolts). Replace parts at rst signs of wear (use only genuine BATCA replacement parts).
Use of equipment that is damaged, worn, frayed or not completely assembled on a solid,
level surface may result in injury.
3)Make sure all adjustment pins are fully engaged before using equipment.
4)Keep all parts of the body and clothing outside the path of any moving parts of the gym. Be
alert to the possibility of injury. Do not be careless.
5)Minors and children should not be allowed to play on or around this gym.
6)If you have any questions on proper use or maintenance of this gym, do not hesitate to call
your local BATCA FITNESS SYSTEMS distributor or BATCA FITNESS SYSTEMS at (919) 255-
1233. www.batcatness.com
Table of Contents
Instructions
Warning

www.batcatness.com 3Fusion 4 Upper Body Station
Tools Required
• 9/16” Wrench/Ratchet
• 1/2” Wrench/Rachet
• Metric Allen Wrench Set (M10, M8, M6,
M4)
• Utility Knife
• 3/4” Wrench
• Tape Measure
• Snap Ring Pliers
Hardware Blister Packs

Batca Fitness Systems 4Fusion 4 Upper Body Station
Hardware Blister Packs

www.batcatness.com 5Fusion 4 Upper Body Station
Hardware Blister Packs

Batca Fitness Systems 6Fusion 4 Upper Body Station
Hardware Blister Packs

www.batcatness.com 7Fusion 4 Upper Body Station
FZ-2 Functional Arms Hardware Blister Packs

Batca Fitness Systems 8Fusion 4 Upper Body Station
These parts are
pre-assembled
Item # Part # Description Qty
44 BFH-50149 3/8” Jam Nut 2
45 BFP-52394 SHCS 3/8”-16 x 2 1/2” 1
46 BFP-551799 SHCS 3/8”-16 x 5” 1
47 BFP-51756 SHCS 3/8”-16 x 5 1/4” 6
48 BFH-50146 3/8” Flat Washer 15
49 BFH-50147 3/8” Lock Washer 1
50 BFH-50157 3/8” Nylock 7
Item # Part # Description Qty
1BFM-10566 Right Vertical Support 1
2BFM-10593 Rear Base 1
3BFM-10753 Middle Frame Assembly 1
4BFM-10770 Front Base Support 1
5BFM-10583 Top Swivel Pulley Holder 1
30 BFL-50197 Middle Frame Connector Plate 2
41 BFH-50253 Beveled Leveler 2
42 BFH-50337 Wavy Washer 1
43 BFH-50165 1” Snap Ring 2
Note: Each Guide Rod
must be properly Lubed
with a Silicone Based Teon
Gel to ensure smooth
operation and optimal
Step 1:
Note: Please Position Hardware in the same direction as shown in the figure. This will
make future steps easier to assemble
PLEASE READ AND FOLLOW ALL DIRECTIONS VERY CAREFULLY FOR PROPER INSTALLATION.
All Flat Washers and Nylocks are 3/8” unless otherwise noted. Anywhere a washer is against the
round side of a tube there is to be a 3/8” CURVED WASHER instead of a 3/8” FLAT WASHER.
DO NOT TIGHTEN BOLTS UNTIL STEP 3

www.batcatness.com 9Fusion 4 Upper Body Station
NOTE: It is important to install the
front shroud BEFORE installing
the weight stack on the machine. The
Front Shroud has the Fusion Logo
decal on it. THERE IS NO OTHER WAY
to install the front shroud once the
weight stack has been put on the
machine.
Item # Part # Description Qty
5BFM-10583 Top Swivel Pulley Holder 1
6BFM-10567 Left Vertical Support 1
7BFM-10299 Top Weight Plate 1
8BFM-51082 Shroud 2
89 BFM-52410 Front Shroud with Logo 1
9BFM-51487 Guide Rod Holder 1
10 BFM-51051 Guide Rod 2
11 BFM-50256 Weight Stack Plate 19
12 BFM-50529 Rubber Donut 2
31 BFM-51173 Weight Stack Pull Pin 1
42 BFH-50337 Wavy Washer 1
43 BFH-50165 1” Snap Ring 2
45 BFP-52394 SHCS 3/8”-16 x 2 1/2” 1
46 BFP-51799 SHCS 3/8”-16 x 5” 3
48 BFH-50146 3/8” Flat Washer 13
Item # Part # Description Qty
49 BFH-50147 3/8” Lock Washer 7
50 BFH-50157 3/8” Nylock 3
51 BFP-52340 SHCS 3/8”-16 x 3/4” 2
52 BFP-52401 BHSCS 3/8”-16 x 1/2” 4
53 BFH-50144 FHSCS 3/8”-16 x 3/4” 2
This 3/8” Nylock and Flat
Washer are from step 1.
DO NOT remove the nylock or
install the Left Vertical Support
until the Weight Stack and the
Shrouds have been completely
assembled.
Assemble Last
(see note below)
BHSCS
3/8” X 1/2”
(Qty=4)
All Flat Washers and Nylocks are 3/8” unless otherwise noted.
Step 2: DO NOT TIGHTEN BOLTS UNTIL STEP 3

Batca Fitness Systems 10 Fusion 4 Upper Body Station
Press Arm Lock*
(Optional)
The Press Arm Lock is an *optional
component that allows the user to connect
both press arms so they are engaged at the
same time. If the user would rather have each
press arm operate independently then do not
install the Press Arm Lock.
It is crucial to make sure the Small Beveled
Levelers behind the press arms are adjusted
equally so there is the same amount of
thread showing on each side. This ensures
the starting position of each press arm is
exactly the same. This will help prolong the
life of the cables and machine when adjusted
properly
Item # Part # Description Qty
13 BFM-10733 Right Swing Arm Assembly 1
14 BFM-10737 Left Swing Arm Assembly 1
15 BFM-10735 Right Press Arm Assembly 1
16 BFM-10736 Left Press Arm Assembly 1
17 BFM-51148 1” Arm Shaft 1
18 BFM-51080 Spacer 1
32 BFM-10771 Press Arm Lock (Optional) 1
42 BFH-50337 Wavy Washer 2
90 BFH-50620 BHSCS 3/8” x 1” 2
54 BFH-50220 Shaft Collar 2
91 BFM-52421 1 1/2” Aluminum Cap 2
All Flat Washers and Nylocks are 3/8” unless otherwise noted.
Step 3: Make Sure All Bolts Are Tightened Before Moving On

www.batcatness.com 11 Fusion 4 Upper Body Station
Item # Part # Description Qty
34 BFP-52141 Bottom Pad 1
19 BFM-10741 Seat Frame Assembly 1
20 BFM-10580 Back Chrome Adjustment 1
21 BFM-10577 8” Adjustment Sleeve 1
22 BFM-10579 10” Chrome Adjustment 1
23 BFM-50931 Threaded Axle 1
48 BFH-50146 3/8” Flat Washer 2
49 BFH-50147 3/8” Lock Washer 2
55 BFP-52400 SHCS 1/2”-13 x 4 1/4” 1
56 BFH-51201 SHCS1/2”-13 x 3 1/2 ” 1
57 BFP-52397 SHCS 3/8”-16 x 3” 2
58 BFH-50251 1/2” Flat Washer 2
50 BFH-50157 3/8” Nylock 2
74 BFH-50136 SHCS 1/2”-13 x 3” 1
Note: Make sure the
Bottom Pad is bolted
on before the Seat Frame
Assembly is installed.
All Flat Washers and Nylocks are 3/8” unless otherwise noted.
Step 4: Make Sure All Bolts Are Tightened Before Moving On

Batca Fitness Systems 12 Fusion 4 Upper Body Station
Item # Part # Description Qty
24 BFM-10755 Press Arm Cable Lockout 1
48 BFM-50146 3/8” Flat Washer 4
50 BFM-50157 3/8” Nylock 2
60 BFP-51653 SHCS 3/8”-16 x 1 1/4” 2
All Flat Washers and Nylocks are 3/8” unless otherwise noted.
Step 5: If FZ-2 Functional Arm Option is Purchased, Skip this Step

www.batcatness.com 13 Fusion 4 Upper Body Station
Item # Part # Description Qty
25 BFM-10611 Criss-Cross Free Floater 1
38 CAB-13022 Weight Stack to Cable Tie Out 1
48 BFH-50146 3/8” Flat Washer 6
50 BFH-50157 3/8” Nylock 3
61 BFH-50173 3 1/2” Pulley 2
62 BFH-50174 4 1/2” Pulley 1
63 BFH-50250 1 1/4” Shoulder Bolt 1
64 BFH-50267 5/16” Nylock 1
65 BFP-51752 SHCS 3/8”-16 x 2 1/4” 3
71 5/8”
Cable Routing
Note: Each Cable with a threaded bolt
on either end must be threaded at
least 1/2” into its attachment.
Step 6:
All Flat Washers and Nylocks are 3/8” unless otherwise noted.

Batca Fitness Systems 14 Fusion 4 Upper Body Station
Item # Part # Description Qty
26 BFM-10133 Free Floater 2
27 BFM-50345 4 1/2” Pulley Cover 2
39 CAB-13030 Fusion Floating Pulley Cable 1
45 BFP-51653 SHCS 3/8”-16 x 2 1/4” 3
48 BFH-50146 3/8” Flat Washer 8
50 BFH-50157 3/8” Nylock 4
62 BFH-50174 4 1/2” Pulley 5
73 BFP-52398 SHCS 3/8”-16 x 7” 1
96 9/16”
CAB-13030
All Flat Washers and Nylocks are 3/8” unless otherwise noted.
Step 7: Make Sure All Bolts Are Tightened Before Moving On

www.batcatness.com 15 Fusion 4 Upper Body Station
Figure 12
Item # Part # Description Qty
40 CAB-13031
Fusion Lat Pull to Cable
Lockout 1
28 BFM-51022 1 1/4” Pulley Spacer 3
29 BFM-50505 3 1/2” Pulley Cover 4
48 BFH-50146 3/8” Flat Washer 10
50 BFH-50157 3/8” Nylock 9
61 BFH-50173 3 1/2” Pulley 7
63 BFH-50250 1 1/4” Shoulder Bolt 1
Item # Part # Description Qty
64 BFH-50267 5/16” Nylock 1
66 BFH-50204 3/8” Curved Washer 2
67 BFH-50203 3/8” Curved Pulley Spacer 4
68 BFP-51759 SHCS 3/8”-16 x 2” 2
69 BFP-51750 SHCS 3/8”-16 x 2 3/4” 3
65 BFP-51752 SHCS 3/8”-16 x 2 1/4” 1
70 BFP-51753 SHCS 3/8”-16 x 4 3/4” 3
94 BFM-52345 5/16” x 2 1/2” Shoulder Bolt 1
It is important to make sure that the cable is
tight and there is even tension on both of the
Cab-13031 cables that will be installed during this
step. If these two cables do not have the same
tension this could cause problems that may effect the
operation of the machine. A list of all the available
cable adjustment locations are on pages 22 as a guide
to properly adjust the cable tension throughout the
machine.
163 13/16”
All Flat Washers and Nylocks are 3/8” unless otherwise noted.
Step 8: If Cable Arms Are Purchased, Skip This Step And Continue To Step 10 On Page 17
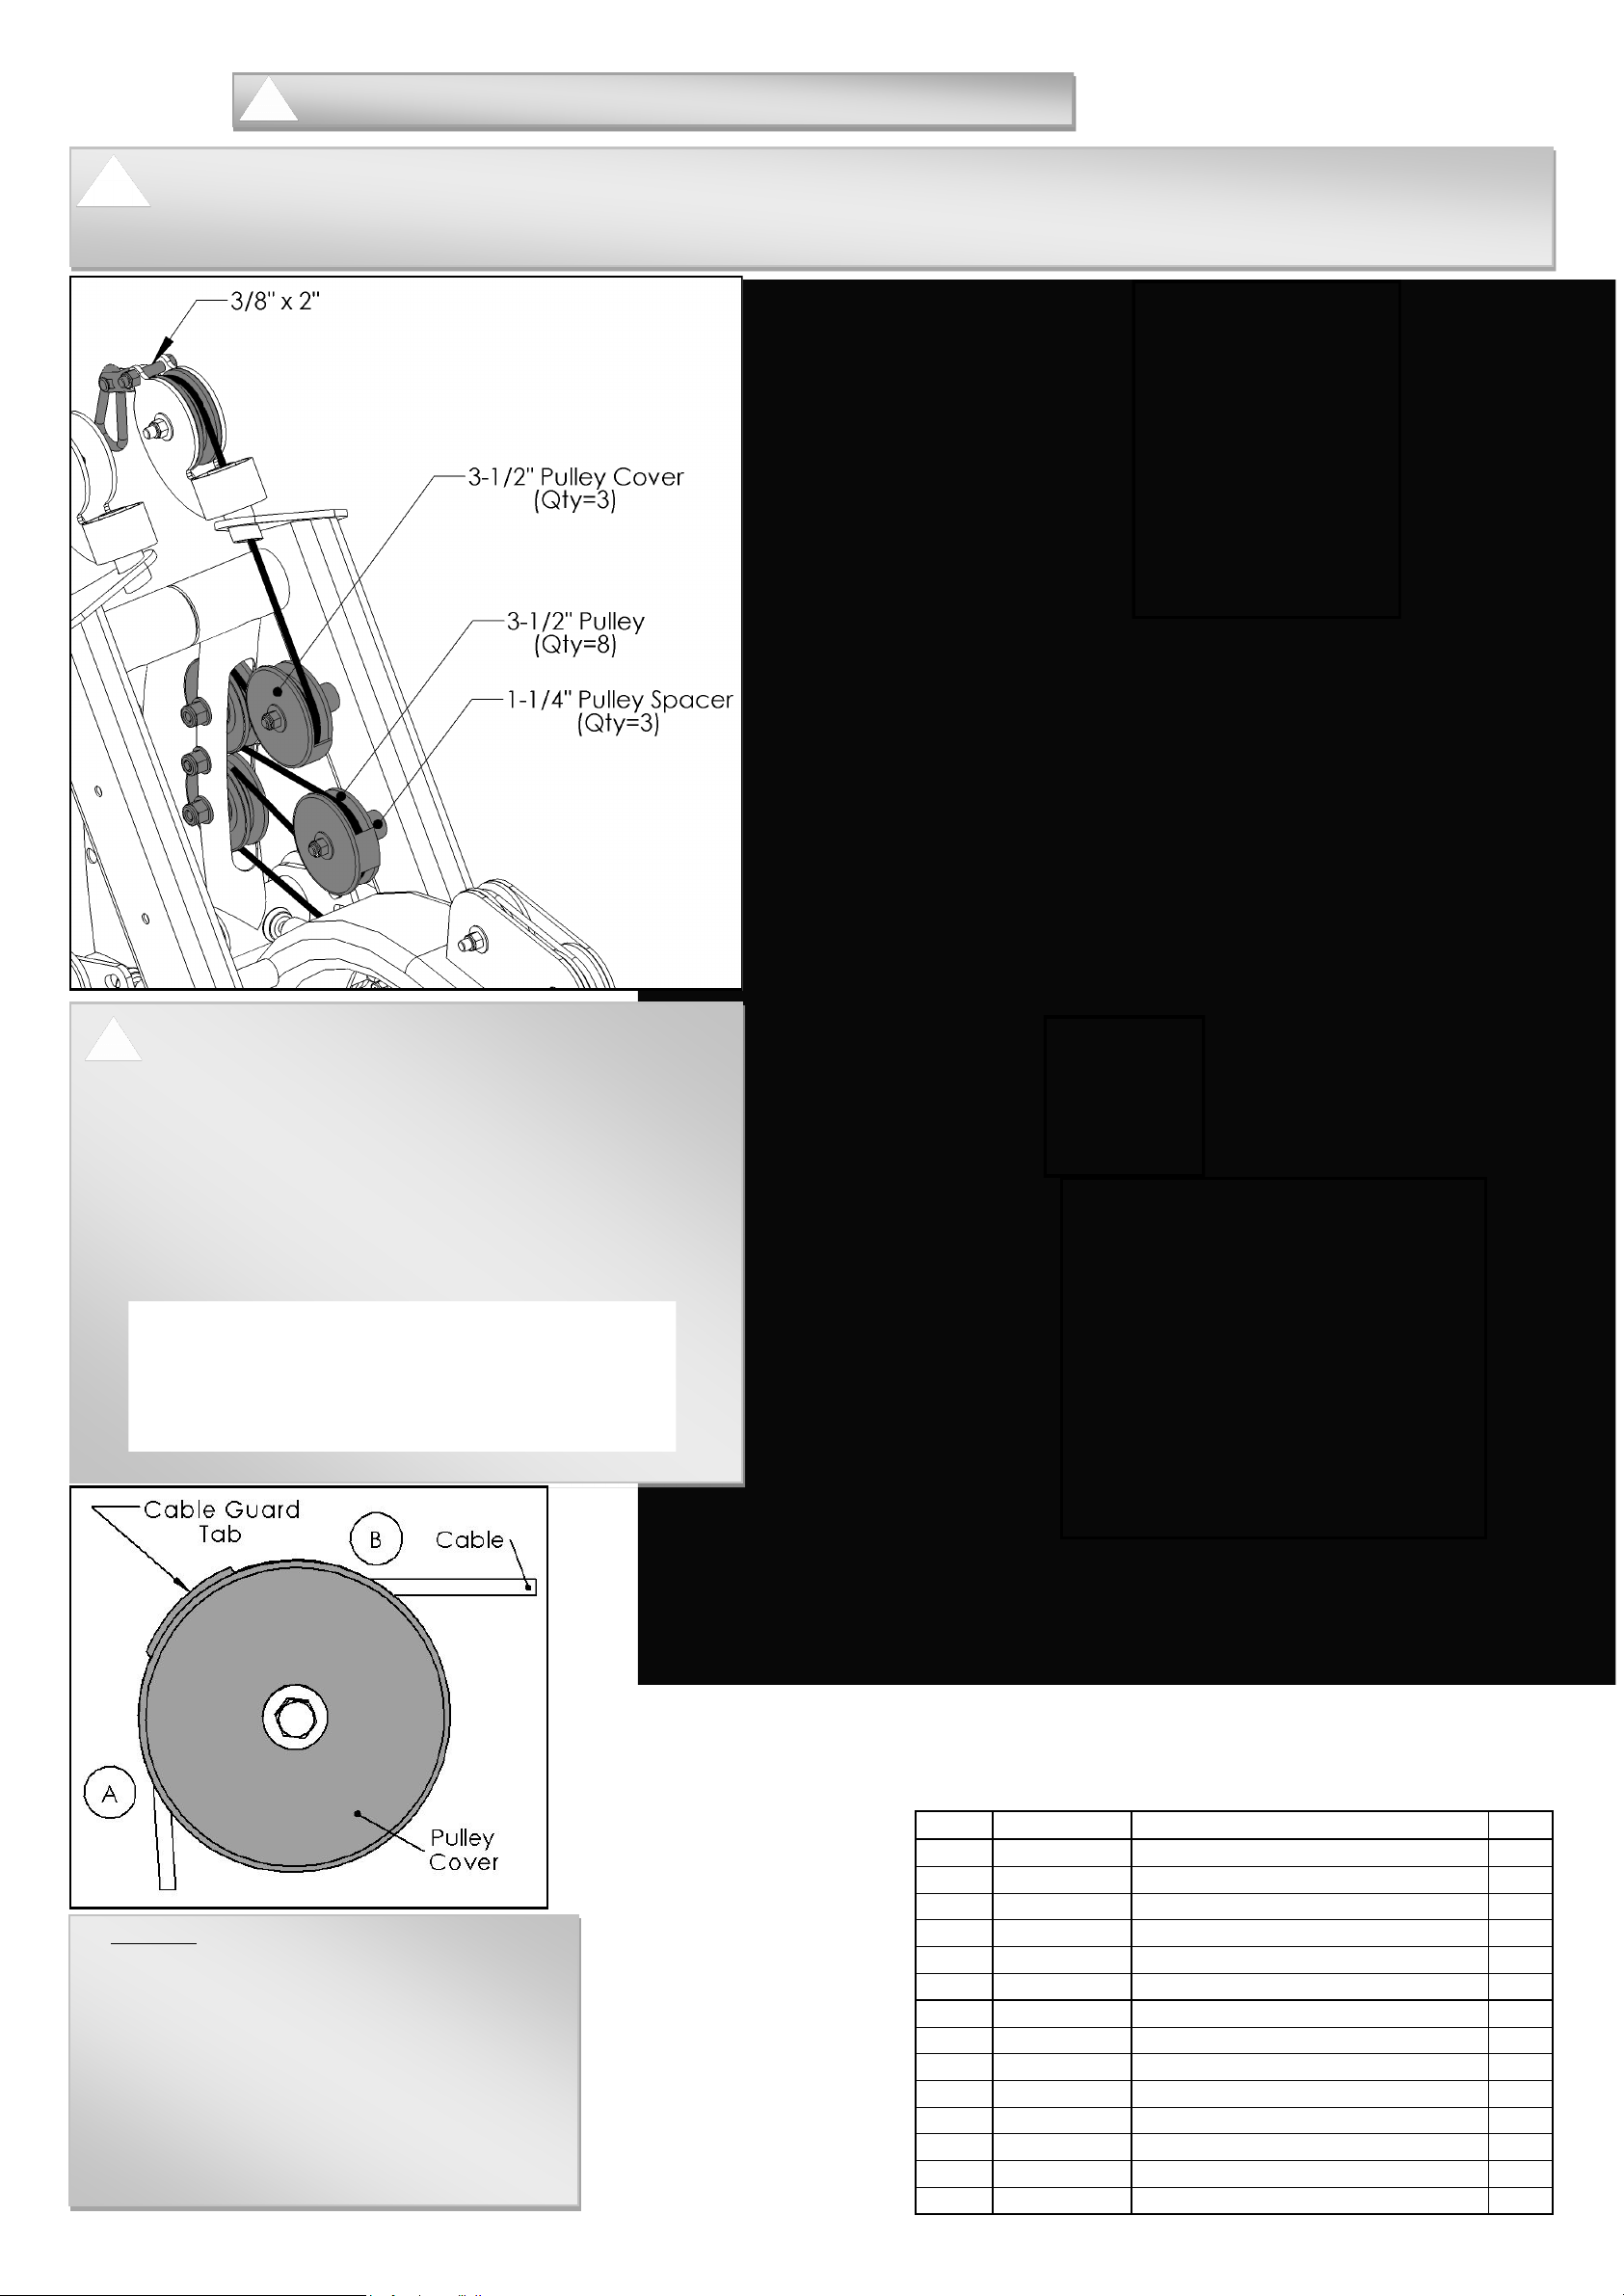
• Position the cable guard tab on the Pulley Cover so that the tab
prevents the cable from coming out of it’s track on the 3 1/2”
Pulley. An example of this positioning can be seen in the gure
to the right. The cable guard tab should be positioned so that it
is in the middle of the cable wrap on the 3 1/2” Pulley, between
points “A” and “B”. This will allow better protection and prevent
the cable from rubbing the cable guard tab.
Batca Fitness Systems 16 Fusion 4 Upper Body Station
A B C
Step 9: Repeat for alternate side of Fusion. Use same Bill of Materials from Step 8 for Step 9. Use CAB-13031, Fusion Lat
Pull to Cable Lockout.
3/8” Shoulder Bolt with
5/16” Nylock
Assembly Tip: It is important in order to prevent any cable twisting the cable is routed around each pulley
individually and pulled all the way through before routing around the next pulley in the cable routing sequence. If this
is not done properly damage and twisting to the cable can occur. Also, remove cable end before routing.
Start
Here
5/16” x 2 1/2” Shoulder Bolt
with 3/8” Curved Washer
(Qty=2)
All Flat Washers and Nylocks are 3/8” unless otherwise noted.
Step 8 Continued: Make Sure All Bolts Are Tightened Before Moving On
A B C

www.batcatness.com 17 Fusion 4 Upper Body Station
Item # Part # Description Qty
33 BFC-10103 Strap Handle 2
35 BFP52137 Head Pad 1
36 BFP-52136 Back Pad With Lumbar 1
37 BFU-10121 7” Upholstery Roller 2
48 BFH-50146 3/8” Flat Washer 4
49 BFH-50147 3/8” Lock Washer 4
60 BFP-51653 SHCS 3/8”-16 x 1 1/4” 2
69 BFP-51750 SHCS 3/8”-16 x 2 3/4” 2
71 BFH-50622 Roller End Cap 2
72 BFH-50620 BHSCS 3/8”-16 x 3/4” 2
All Flat Washers and Nylocks are 3/8” unless otherwise noted.
Step 10: Make Sure All Bolts Are Tightened Before Moving On

Batca Fitness Systems 18 Fusion 4 Upper Body Station
Item # Part # Description Qty
74 BFM-10573 Functional Arm Mount 1
75 BFM-10571 User Right Functional Arm 1
76 BFM-10572 User Left Functional Arm 1
77 BFM-10582 Functional Arm Swivel Pulley 2
48 BFH-50146 3/8” Flat Washer 8
50 BFH-50157 3/8” Nylock 4
60 BFP-51653 SHCS 3/8”-16 x 1 1/4” 2
65 BFH-51752 SHCS 3/8” x 2 1/4” 2
92 BFM-52416 Swivel Pulley Counter Weight 2
Cable Arm Option
Step 6:
All Flat Washers and Nylocks are 3/8” unless otherwise noted.
www.batcatness.com 19 Fusion 4 Upper Body Station
Figure 12
Item # Part # Description Qty
28 BFM-51022 1 1/4” Spacer 3
29 BFM-50505 3 1/2" Pulley Cover 4
33 BFC-10103 Strap Handle 2
86 CAB-13032 Fusion Lat Pull to Cable Arm 1
48 BFH-50146 3/8" Flat Washer 18
50 BFH-50157 3/8" Nylock 16
61 BFH-50173 3 1/2" Pulley 11
65 BFP-51752 SHCS 3/8"-16 X 2 1/4" 5
66 BFH-50204 3/8" Curved Washer 2
67 BFH-50203 1/2" Curved Pulley Spacer 4
68 BFP-51759 SHCS 3/8"-16 X 2" 5
69 BFP-51750 SHCS-3/8”-16 x 2-3/4” 3
70 BFP-51753 SHCS 3/8"-16 X 4 3/4" 3
94 BFM-52345 5/16” x 2 1/2” Shoulder Bolt 1
It is important to make sure that the cable is
tight and there is even tension on both of the
Cab-13032 cables that will be installed during this
step. If these two cables do not have the same
tension this could cause problems that may effect the
operation of the machine. A list of all the available
cable adjustment locations are on pages 22 as a guide
to properly adjust the cable tension throughout the
machine.
CAB-13032
Assembly Tip: It is important in order to prevent any cable twisting the cable is routed around each pulley
individually and pulled all the way through before routing around the next pulley in the cable routing sequence. If this
is not done properly damage and twisting to the cable can occur. Also, remove cable end before routing.
Step 12: Make Sure All Bolts Are Tightened Before Moving On
200”
• Position the cable guard tab on the Pulley
Cover so that the tab prevents the cable
from coming out of it’s track on the 3 1/2”
Pulley. An example of this positioning can
be seen in the gure to the right. The cable
guard tab should be positioned so that it is
in the middle of the cable wrap on the 3 1/2”
Pulley, between points “A” and “B”. This will
allow better protection and prevent the cable
from rubbing the cable guard tab.

Batca Fitness Systems 20 Fusion 4 Upper Body Station
3/8” x 2”
(Qty=3)
No Washers
3/8” x 2 1/4”
(Qty=4)
3 1/2” Pulley
(QTY=4)
Step 12 Continued: Make Sure All Bolts Are Tightened Before Moving On
A B C
Step 13: Repeat for alternate side of Fusion. Use same Bill of Materials from Step 12 for Step 13. Use CAB-13032, Fusion
Lat Pull to Cable Arm.
Start
Here
5/16” x 2 1/2” Shoulder Bolt
with 3/8” Curved Washer
(Qty=2)
All Flat Washers and Nylocks are 3/8” unless otherwise noted.
A B C
D
D
Table of contents
Other Batca Fitness Equipment manuals


Batca
Batca FUSION 4 FZ-3 User manual

Batca
Batca LD-2 User manual

Batca
Batca Link User manual

Batca
Batca LINK LD-1 User manual

Batca
Batca X3 User manual

Batca
Batca LINK DUAL FUNCTION LD-9 User manual

Batca
Batca Fusion FZ-12 User manual

Batca
Batca fusion 4 User manual

Batca
Batca Link LD-6 User manual

Batca
Batca C-6 User manual


