Batca LD-3 User manual

www.batcafitness.com LD-3 Owner’s Manual
October 2011
Revision 2
Serial Number Here
Date of Purchase
Owner’s Manual
Leg Press/Calf Raise
LD-3
1207 New Hope Road, Raleigh, NC - 919.255.1233 - www.batcafitness.com

Batca Fitness Systems 2LD-3 Owner's Manual
__________ Page
Instructions 2
Parts Listing 3
Hardware Comparison 4-7
Main Assembly 8-18
Upholstery 17
Cable Routing 14-16
Batca Fitness Systems has built this gym to give you a safe, effective and enjoyable
workout. However, there is a risk assumed by individuals who use this type of equipment. It is
very important that all warnings and instructions are read and followed before beginning any
exercise program.
It is also very important to read and follow the preventative maintenance schedule
described in this manual. If any of the warning labels or stickers are worn, faded, torn,
scratched or missing they should be replaced immediately.
WARNING: There is a risk assumed by individuals who use this type of equipment. To minimize
risk always follow these rules.
1) It is essential that you consult with your physician before beginning any exercise program.
2) Inspect equipment before each use for loose, worn, or frayed parts (including cables, nuts
and bolts). Replace parts at first signs of wear (use only genuine BATCA replacement
parts). Use of equipment that is damaged, worn, frayed or not completely assembled on a
solid, level surface may result in injury.
3) Make sure all adjustment pins are fully engaged before using equipment.
4) Keep all parts of the body and clothing outside the path of any moving parts of the gym. Be
alert to the possibility of injury. Do not be careless.
5) Minors and children should not be allowed to play on or around this gym.
__________ Page
Final Assembly and Troubleshooting 19
Cable Tension and Adjustments 20
Maintenance 21
Warranty 22
Floor Plan Layout 23
Table of Contents
Instructions
Warning
Congratulations on the purchase of your new Batca LD-3. This gym will provide you with a lifetime of
enjoyment to meet your strength training needs. Batca Fitness Systems strives to build the best quality gyms
and to package these gyms in such a way to avoid any damage during shipping.
In order to get started with your assembly you should first familiarize yourself with this manual. It is
recommended that you read through each step thoroughly before you begin. Begin by opening your boxes and
separating all of your parts. Verify that all parts are accounted for and have no damage. When all parts are
accounted for, you may begin your assembly. Some items may have been pre-assembled for your convenience.
Please note that hardware quantities shown reflect total quantities for your gym and may not reflect actual
quantities in each bag. Assemble your gym on a solid level surface. This will ensure the best possible perfor-
mance, function, and safety for the gym and your workout.
Assemble your gym according to the step by step instructions found in this manual. Failure to do so
will void your warranty and may result in personal injury. After assembly, you should check each station to
ensure correct operation. If a problem arises, recheck your assembly with these instructions to verify cor-
rect assembly. If you are unable to correct a problem or have questions with your assembly please contact
your authorized Batca dealer.

www.batcafitness.com 3LD-3 Owner’s Manual
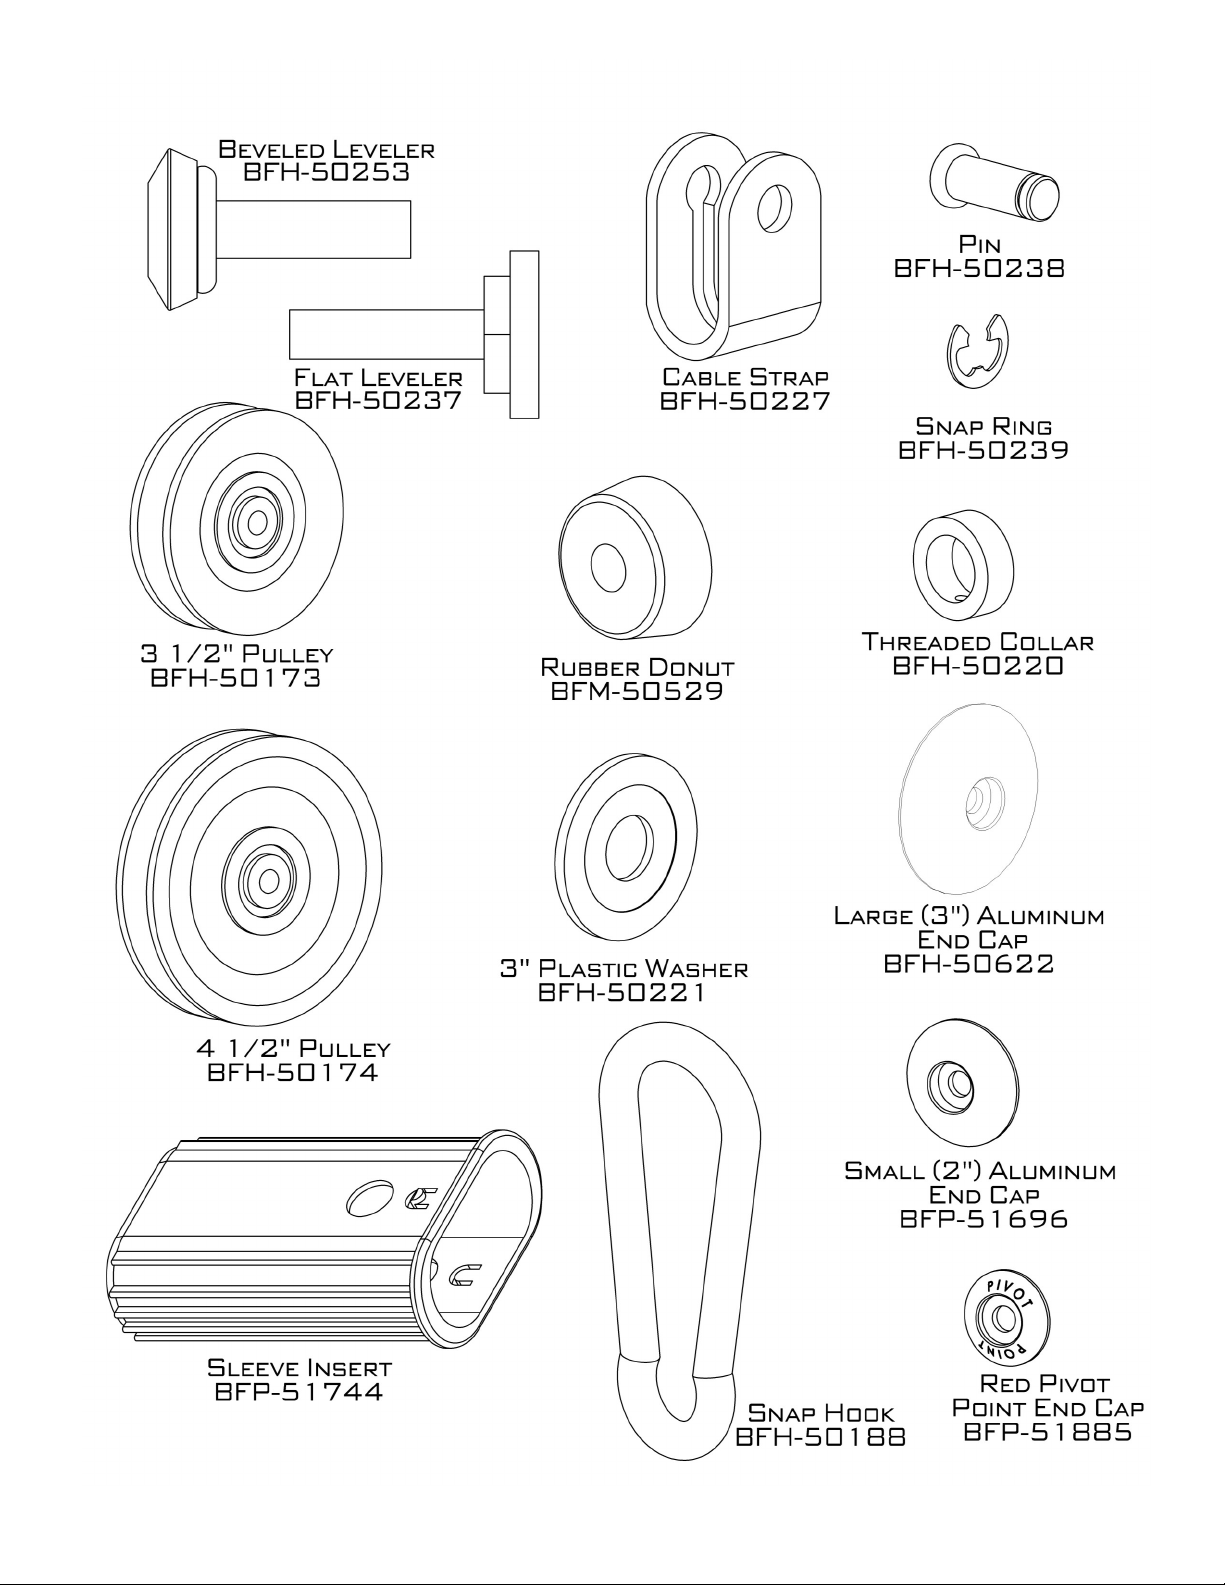
Frame Components Accessories
Upholstery
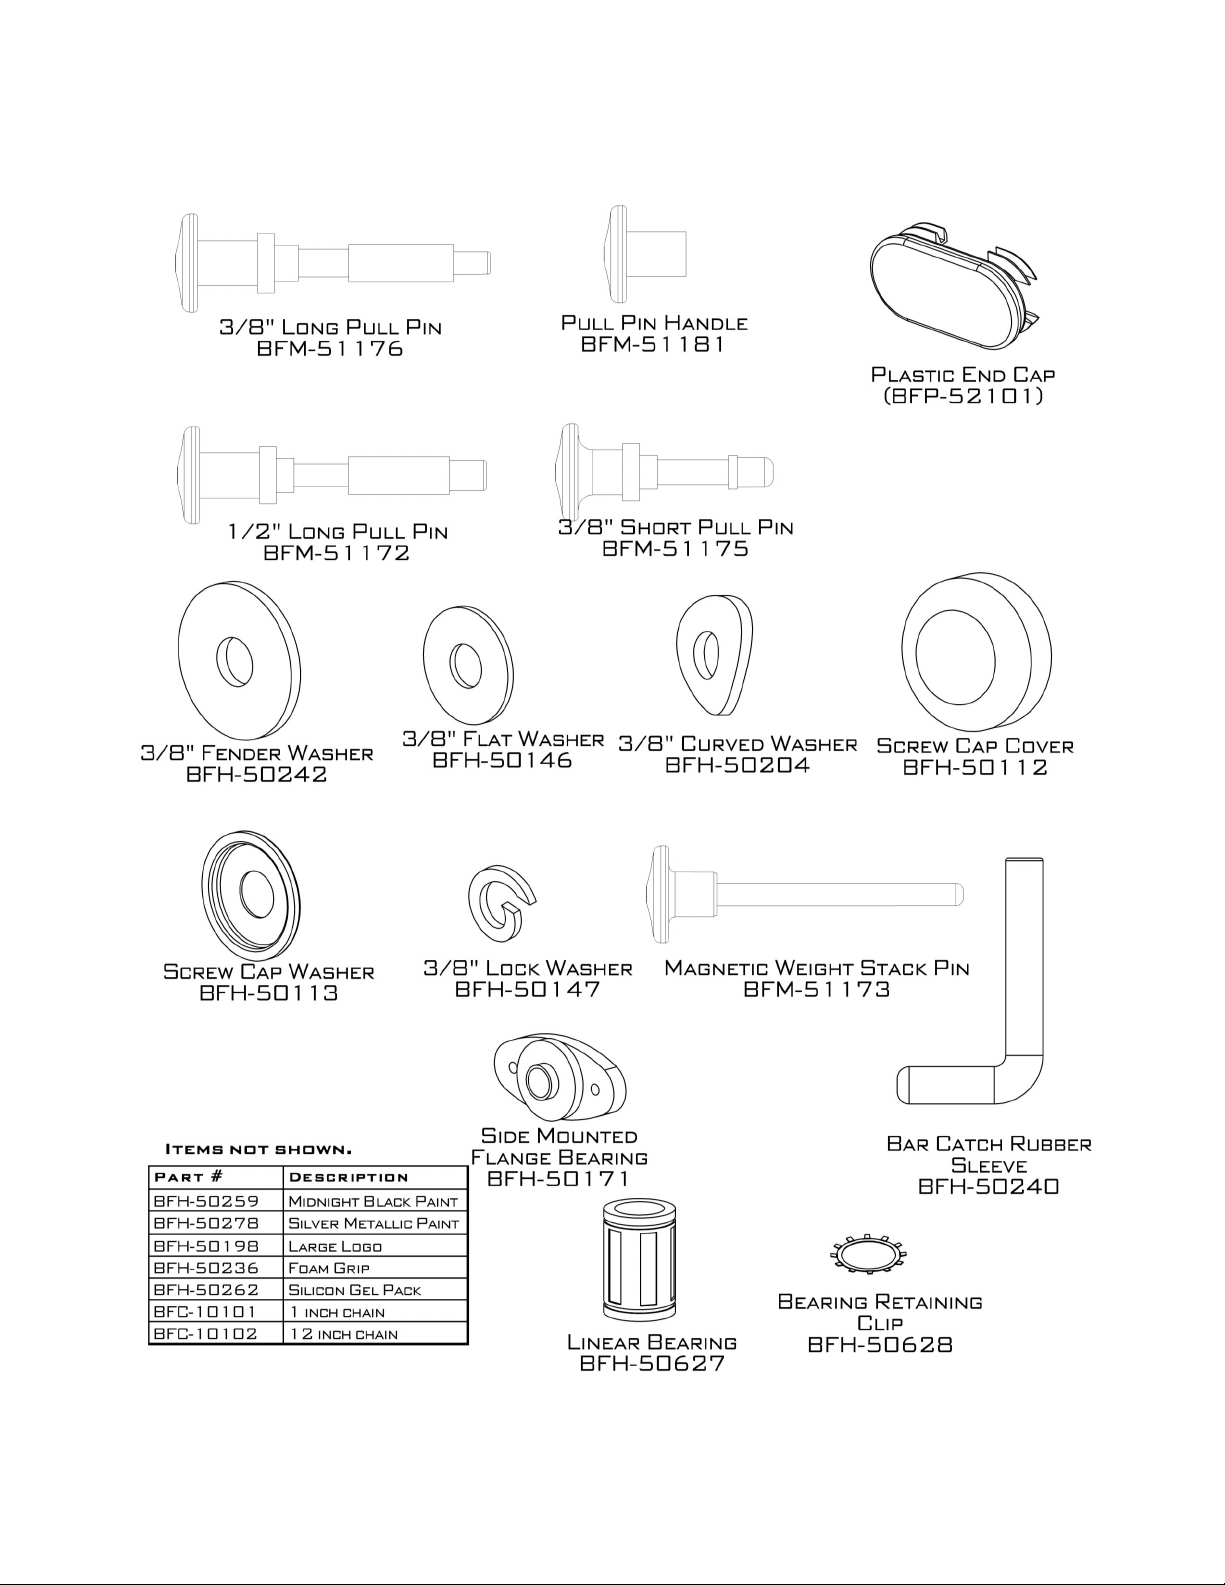
Hardware
Cables
Tools Required
9/16” Wrench
9/16” Ratchet
Allen Wrench Set
Tape Measure
ITEM
NO.
PART NUMBER DESCRIPTION QTY.
1 BFP-10855 LD-3 Cage 1
2 BFP-10854 Base Assembly 1
3 BFP-10850 Leg Press Frame 1
4 BFP-51842 Anti-Deflection Plate 1
5 BFP-10859 Rear Elbow Support 1
6 BFP-10858 Front Elbow Support 1
7 BFP-51834 Anti-Deflection Plate 2
8 BFP-51836 Curved Anti-Deflection Plate 1
9 BFP-10839 Cable Lockout Plate 1
10 BFP-10827 Guide Rod Plate 1
11 BFP-53259 Guide Rod Sleeve 2
12 BFP-51827 Guide Rod 2
13 BFM-10413 Top Weight Plate 1
14 BFM-50632 Weight Stack Plate 19
15 BFM-50529 Rubber Donut 2
16 BFP-10857 Back Support Tube 1
17 BFP-52149 Support Plate 1
18 BFP-10856 Chrome Adjustment Tube 1
19 BFP-10861 Left Handle 1
20 BFP-10860 Right Handle 1
21 BFP-10852 Pivot Arm 1
22 BFP-10853 Leg Press Plate 1
23 BFP-10851 Fourbar 2
24 BFP-51843 Fore-Bar Spacer 1
25 BFP-51846 3/4” Axle 2
26 BFP-51844 1” Axle 2
27 BFP-10838 Free Floater 1
28 BFM-50345 Pulley Cover 1
29 BFP-51740 Rear Weight Stack Shroud 1
30 BFP-51741 Left Front Weight Stack Shroud 1
31 BFP-51742 Right Front Weight Stack Shroud 1
32 BFP-51711 Placard Plate 1
61 BFP-11020 Cable Lockout Spacer 1
ITEM NO. PART NUMBER DESCRIPTION QTY
.
39 BFH-50174 4 1/2” Pulley 6
40 BFH-50530 5” Pulley 1
41 BFP-51746 1/2” Pulley Spacer 4
42 BFP-51696 Small (2”) Aluminum End Cap 4
43 BFP-52372 5/16” x 1/2” 2
44 BFH-50254 HCS 3/8” x 3/4” 2
45 BFP-52340 BHSCS 3/8” x 3/4” 4
46 BFH-50620 BHSCS 3/8” x 1” 8
47 BFH-50351 1 3/8” Shoulder Bolt 2
48 BFP-51759 SHCS 3/8” x 2” 1
49 BFP-51752 SHCS 3/8” x 2 1/4” 3
50 BFP-51750 SHCS 3/8” x 2 3/4” 8
51 BFP-52374 FHSCS 3/8” x 2 3/4” 2
52 BFP-51747 SHCS 3/8” x 3” 6
53 BFP-51748 SHCS 3/8” x 3 1/4” 4
54 BFP-51760 SHCS 3/8” x 3 1/2” 2
55 BFP-51799 SHCS 3/8” x 5” 6
56 BFH-50147 3/8” Lock Washer 7
57 BFH-50267 5/16” Nylock 2
58 BFH-50204 3/8” Curved Washer 10
59 BFH-50146 3/8” Flat Washer 50
60 BFH-50157 3/8” Nylock 26
ITEM
NO.
PART NUMBER DESCRIPTION QTY.
36 BFP-52137 Head Pad 1
37 BFP-52136 Back Pad With Lumbar 1
38 BFP-52130 Large Bottom Pad 1
ITEM
NO.
PART NUMBER DESCRIPTION QTY.
33 CAB-15010 Weight Stack to Cable Lockout
Cable
1
34 CAB-15004 Free Floater to Leg Press
Cable
1
ITEM NO. PART NUMBER DESCRIPTION QTY.
35 BFM-51173 Weight Stack Pull Pin 1

Batca Fitness Systems 4LD-3 Owner's Manual
Bolt Length
Note: Bolt length is measured
from the underside of the head
of the bolt.
www.batcafitness.com 5LD-3 Owner’s Manual

Batca Fitness Systems 6LD-3 Owner's Manual
www.batcafitness.com 7LD-3 Owner’s Manual
Batca Fitness Systems 8LD-3 Owner's Manual
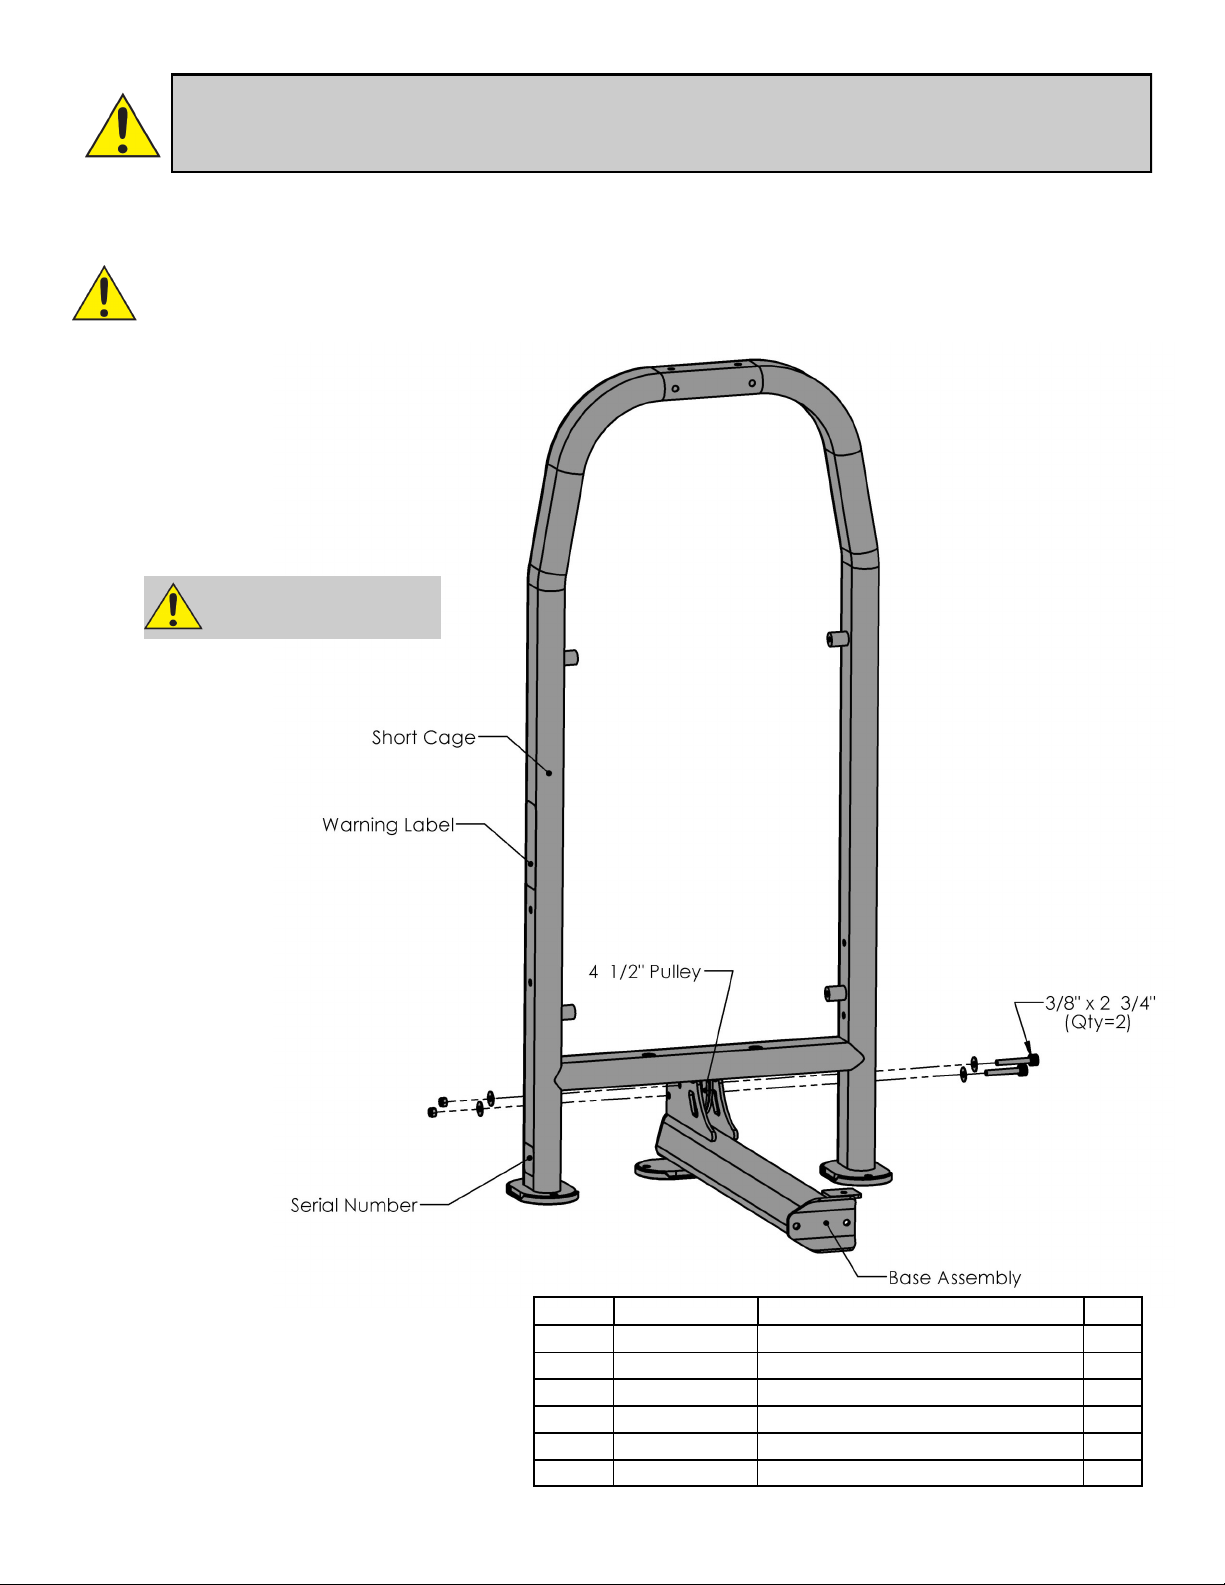
Step 1:
Note: For a more consistent appearance, position all bolts in the direction
shown in each figure
.
PLEASE FOLLOW ALL DIRECTIONS VERY
CAREFULLY FOR PROPER INSTALLATION.
All Flat Washers and Nylocks are
3/8” unless otherwise noted.
Anywhere a washer is against the round
side of a tube there is to be a
3/8”
CURVED WASHER
instead of a
3/8”
FLAT WASHER.
Figure 1
Item # Part # Description Qty
1 BFP-10855 LD-3 Cage 1
2 BFP-10854 Base Assembly 1
39 BFH-50174 4 1/2” Pulley 1
50 BFP-51750 SHCS 3/8” x 2 3/4” 2
59 BFH-50146 3/8” Flat Washer 4
60 BFH-50157 3/8” Nylock 2
DO NOT TIGHTEN
BOLTS UNTIL STEP 4

www.batcafitness.com 9LD-3 Owner’s Manual
Figure 2
Step 2:
Item # Part # Description Qty
3 BFP-10850 Leg Press Frame 1
4 BFP-51842 Anti-Deflection Plate 1
53 BFP-51748 SHCS 3/8” 3 1/4” 2
59 BFH-50146 3/8” Flat Washer 4
60 BFH-50157 3/8” Nylock 2
DO NOT TIGHTEN
BOLTS UNTIL STEP 4
All Flat Washers and Nylocks are 3/8” unless
otherwise noted.

Batca Fitness Systems 10 LD-3 Owner's Manual
Step 3:
Figure 3
All Flat Washers and Nylocks are 3/8”
unless otherwise noted. Anywhere a
washer is against the round side of a
tube there is to be a
3/8” CURVED
WASHER
instead of a
3/8” FLAT
WASHER.
Item # Part # Description Qty
5 BFP-10859 Rear Elbow Support 1
6 BFP-10858 Front Elbow Support 1
7 BFP-51834 Anti-Deflection Plate 2
8 BFP-51836 Curved Anti-Deflection Plate 1
50 BFP-51750 SHCS 3/8” x 2 3/4” 2
52 BFP-51747 SHCS 3/8” x 3” 4
55 BFP-51799 SHCS 3/8” x 5” 2
58 BFH-50204 3/8” Curved Washer 4
59 BFH-50146 3/8” Flat Washer 12
60 BFH-50156 3/8” Nylock 8
DO NOT TIGHTEN
BOLTS UNTIL STEP 4

www.batcafitness.com 11 LD-3 Owner’s Manual
Figure 4
Step 4:
All Flat Washers and Nylocks are 3/8” unless
otherwise noted. Anywhere a washer is
against the round side of a tube there is to be
a
3/8” CURVED WASHER
instead of a
3/8”
FLAT WASHER.
Make sure all bolts are
tightened before moving
on
Item # Part # Description Qty
9 BFP-10839 Cable Lockout Plate 1
10 BFP-10827 Guide Rod Plate 1
11 BFP-53259 Guide Rod Sleeve 2
12 BFP-51827 Guide Rod 2
13 BFM-10413 Top Weight Plate 1
14 BFM-50632 Weight Stack Plate 19
15 BFM-50529 Rubber Donut 2
35 BFM-51173 Weight Stack Pull Pin 1
54 BFP-51760 SHCS 3/8” x 3 1/2” 2
55 BFP-51799 SHCS 3/8” x 5” 2
58 BFH-50204 3/8” Curved Washer 2
59 BFH-50146 3/8” Flat Washer 6
60 BFH-50157 3/8” Nylock 4
Make sure the
screw in the
Guide Rod Sleeves is
facing towards the
front of the weight
stack and the sleeve
is pushed up against
the rubber grommet
of the Guide Rod
Plate. Once it is in
place tighten the
screw to keep it in
place.
Batca Fitness Systems 12 LD-3 Owner's Manual
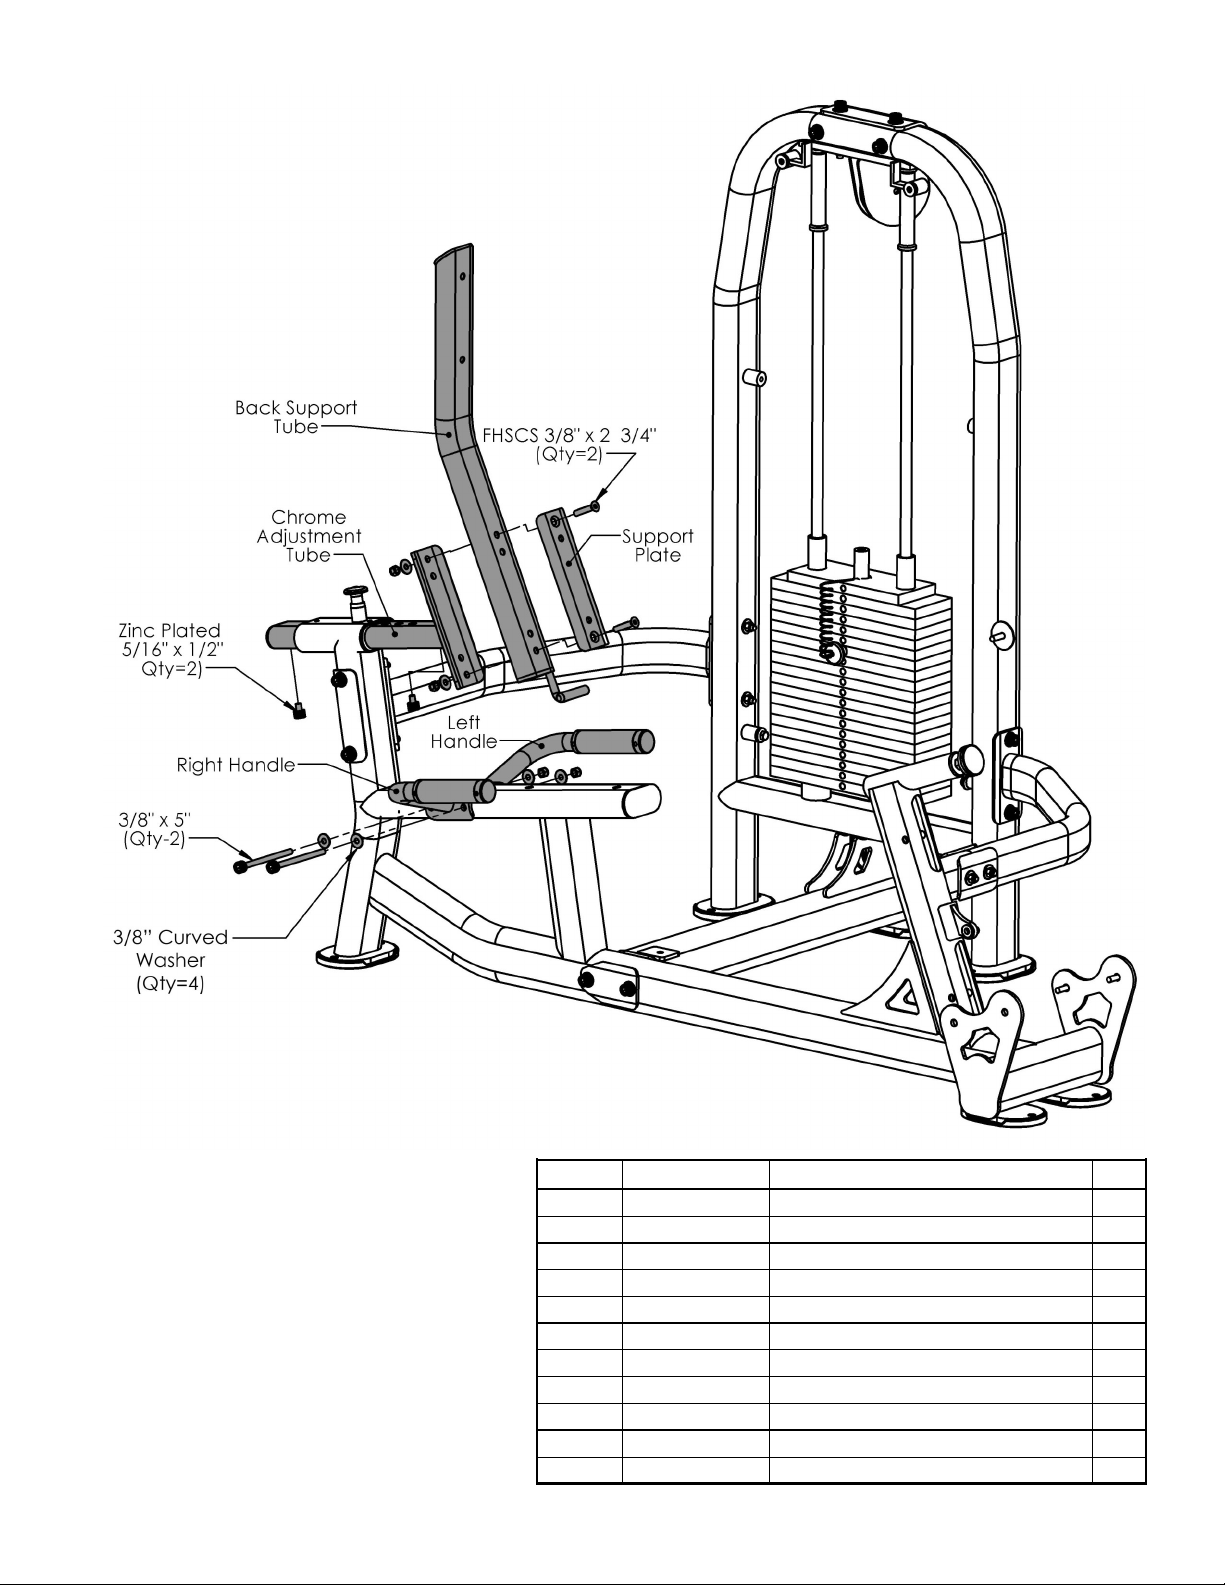
Step 5:
All Flat Washers and Nylocks are 3/8”
unless otherwise noted. Anywhere a
washer is against the round side of a tube
there is to be a
3/8” CURVED WASHER
instead of a
3/8” FLAT WASHER.
Item # Part # Description Qty
16 BFP-10857 Back Support Tube 1
17 BFP-52149 Support Plate 1
18 BFP-10856 Chrome Adjustment Tube 1
19 BFP-10861 Left Handle 1
20 BFP-10860 Right Handle 1
43 BFP-52372 5/16” x 1/2” 2
51 BFP-52374 FHSCS 3/8” x 2 3/4” 2
55 BFP-51799 SHCS 3/8” x 5” 2
58 BFH-50204 3/8” Curved Washer 4
59 BFH-50146 3/8” Flat Washer 2
60 BFH-50157 3/8” Nylock 4
Figure 5
www.batcafitness.com 13 LD-3 Owner’s Manual
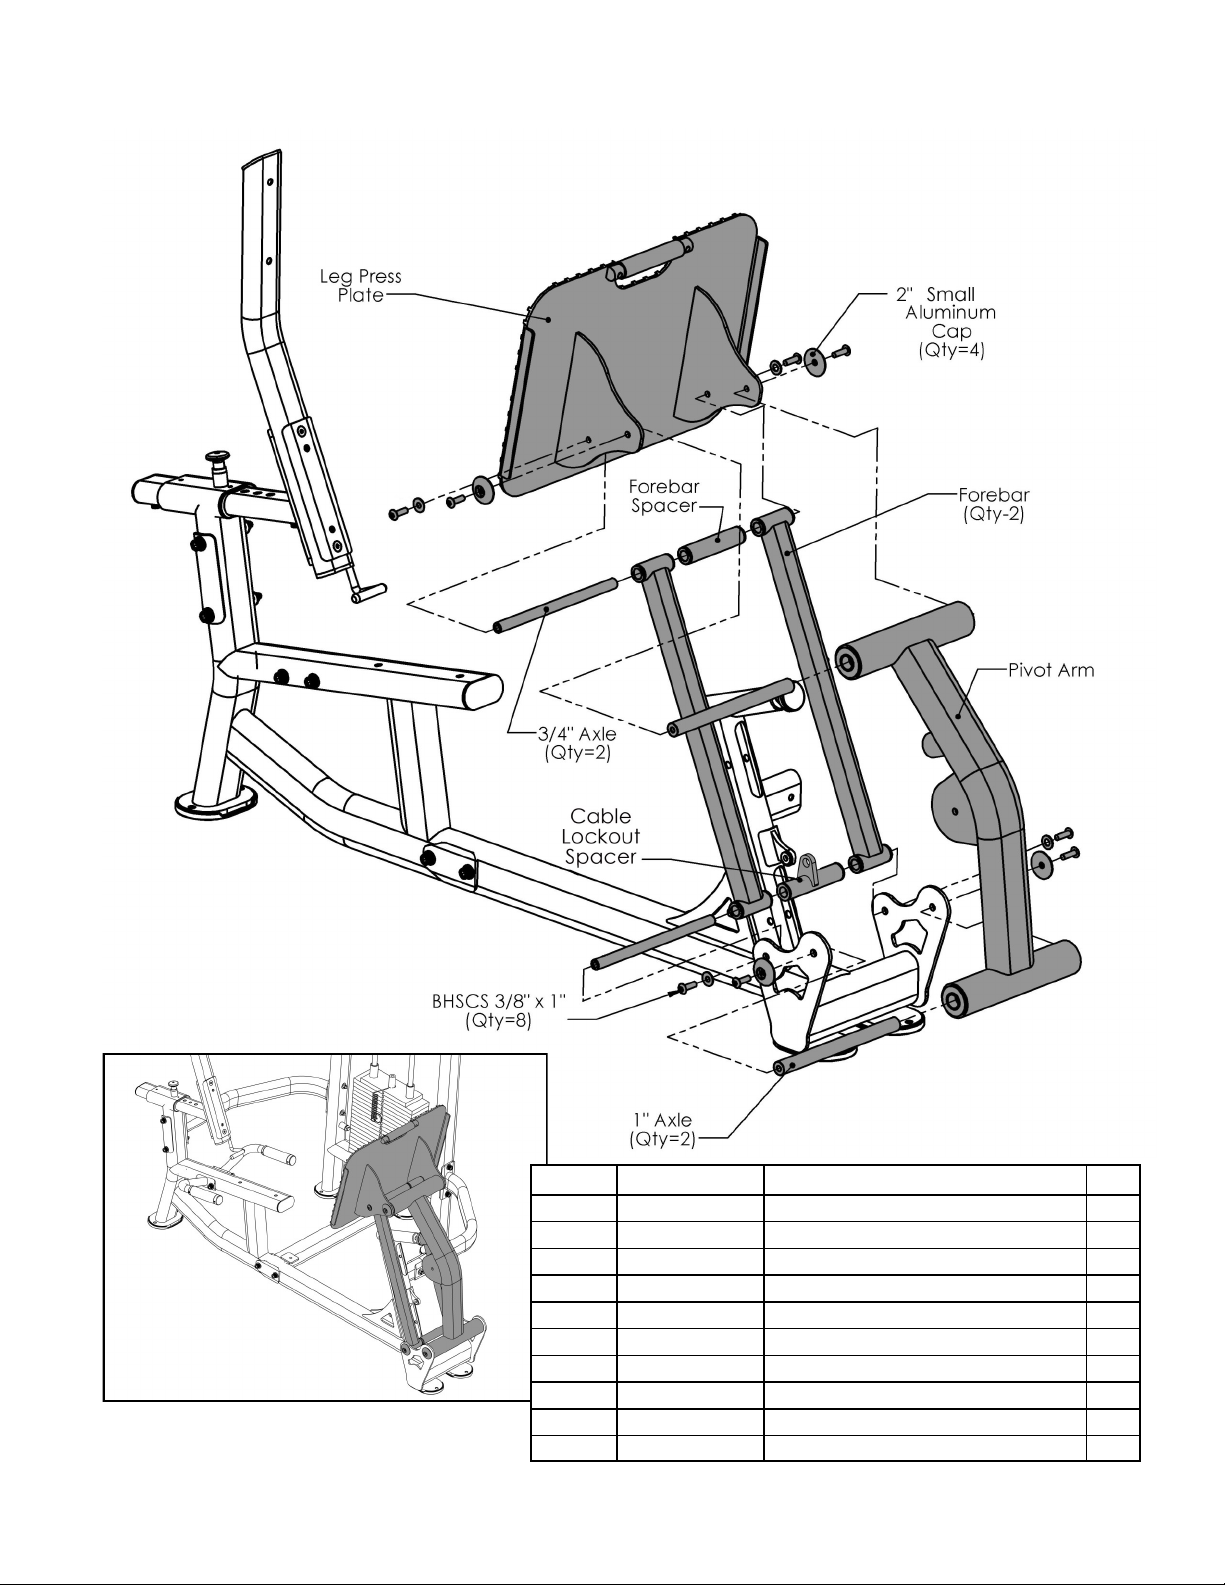
Step 6:
Figure 6
All Flat Washers and Nylocks are 3/8”
unless otherwise noted.
Item # Part # Description Qty
21 BFP-10852 Pivot Arm 1
22 BFP-10853 Leg Press Plate 1
23 BFP-10851 Forebar 2
24 BFP-51843 Four-Bar Spacer 1
61 BFP-11020 Cable Lockout Spacer 1
25 BFP-51846 3/4” Axle 2
26 BFP-51844 1” Axle 2
42 BFP-51696 Small (2”) Aluminum End Cap 4
46 BFH-50620 BHSCS 3/8” x 1” 8
59 BFH-50146 3/8” Flat Washer 4

Batca Fitness Systems 14 LD-3 Owner's Manual
Item # Part # Description Qty
33 CAB-15010 Weight Stack to Cable Lockout Cable 1
27 BFP-10838 Free Floater 1
39 BFH-50174 4 1/2” Pulley 1
40 BFH-50530 5” Pulley 1
47 BFH-50351 1 3/8” Shoulder Bolt 1
49 BFP-51752 SHCS 3/8” x 2 1/4” 2
57 BFH-50267 5/16” Nylock 1
59 BFH-50146 3/8” Flat Washer 4
60 BFH-50157 3/8” Nylock 2
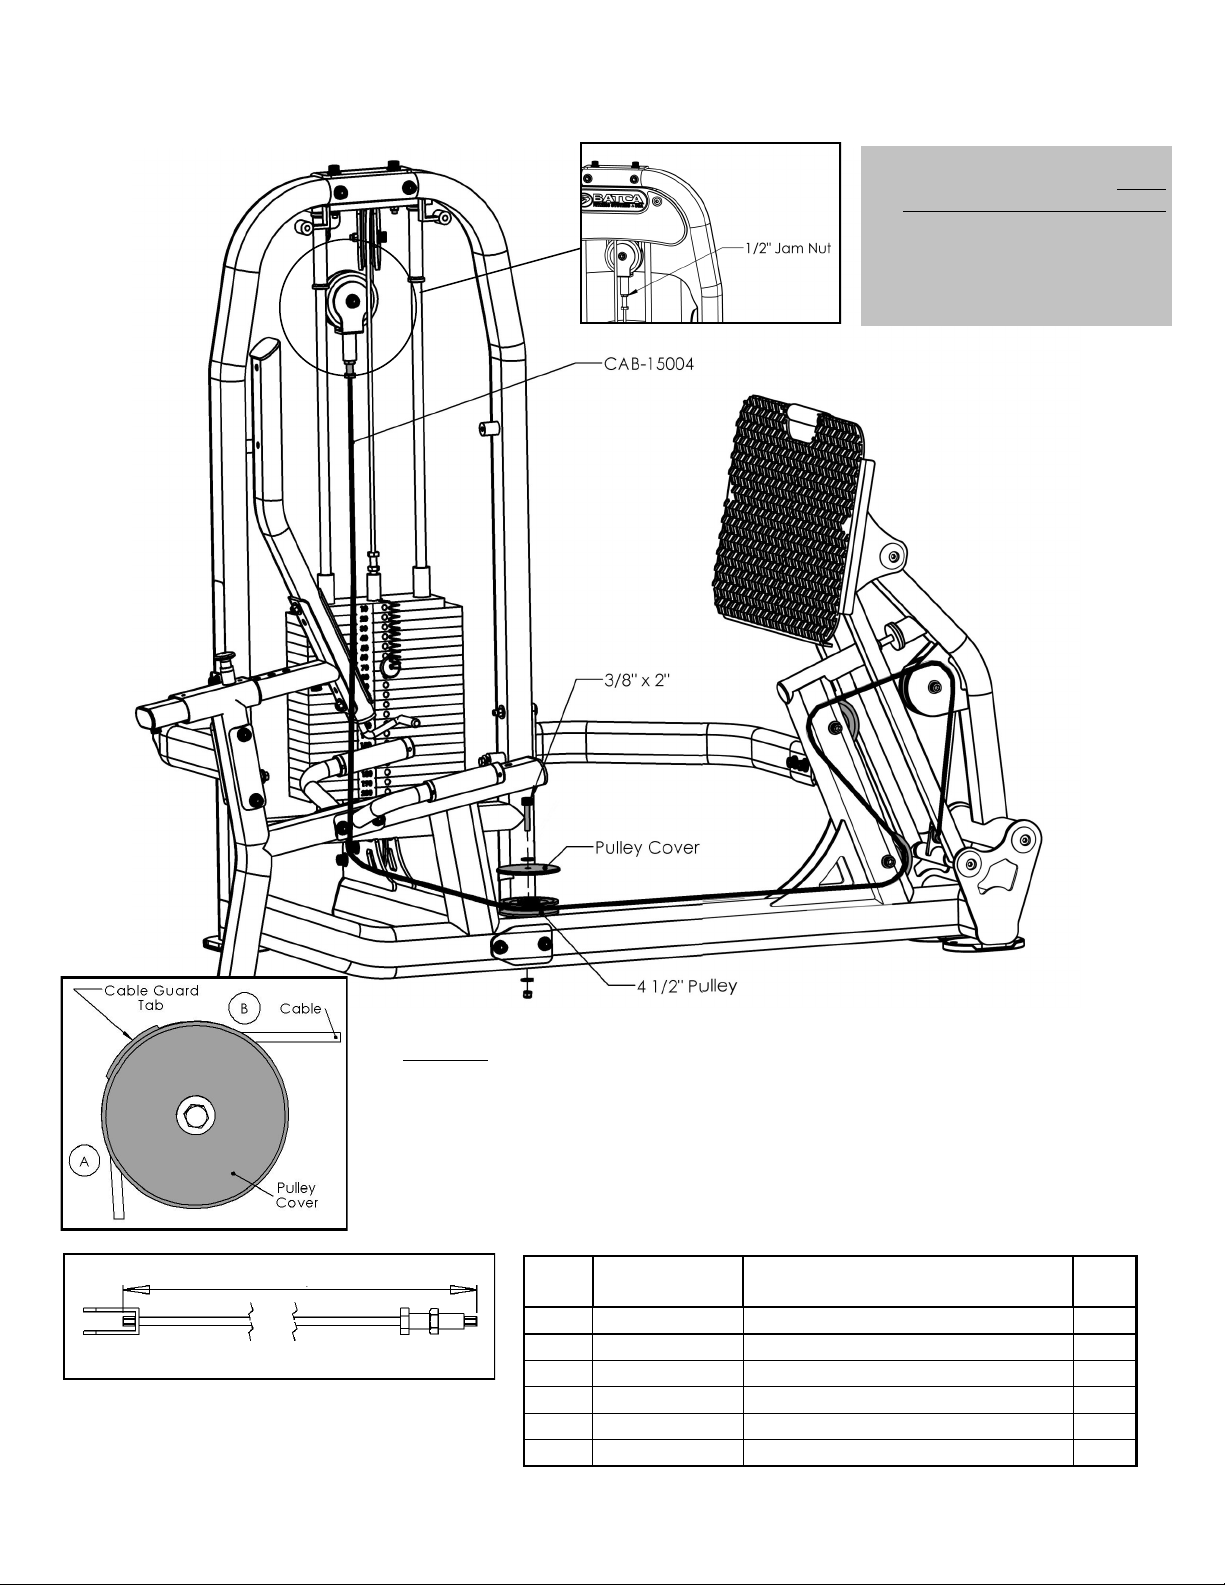
Step 7:
Figure 7
Note: The threaded bolt on
the end of the cable must
be threaded at least 1/2”
the Top Plate of the
weight stack. The bolt
must also be secured with
a 1/2” Jam Nut to ensure a
s a f e a n d p r o p e r
connection.
CAB-15010
50”
1 3/8” Shoulder Bolt
www.batcafitness.com 15 LD-3 Owner’s Manual
All Flat Washers and Nylocks are 3/8” unless
otherwise noted.
Step 8: This Step continued on next page
Item # Part # Description Qty
34 CAB-15004 Free Floater to Leg Press Cable 1
28 BFM-50345 Pulley Cover 1
39 BFH-50174 4 1/2” Pulley 1
48 BFP-51759 SHCS 3/8” x 2” 1
59 BFH-50146 3/8” Flat Washer 2
60 BFH-50157 3/8” Nylock 1
Figure 8
Note: The threaded bolt on
the end of the cable must
be threaded at least 1/2”
in the Free Floater. The
bolt must also be secured
with a 1/2” Jam Nut to
ensure a safe and proper
connection.
CAB-15004
141 1/4”
Position the cable guard tab on the Pulley Cover so
that the tab prevents the cable from coming out of
it’s track on the 4 1/2” Pulley. An example of this
positioning can be seen in the figure to the left. The
cable guard tab should be positioned so that it is in
the middle of the cable wrap on the 4 1/2” Pulley,
between points “A” and “B”. This will allow better
protection and prevent the cable from rubbing the
cable guard tab. Refer to Step 7 and 7a.
Pulley Cover
BFM-50345
Batca Fitness Systems 16 LD-3 Owner's Manual
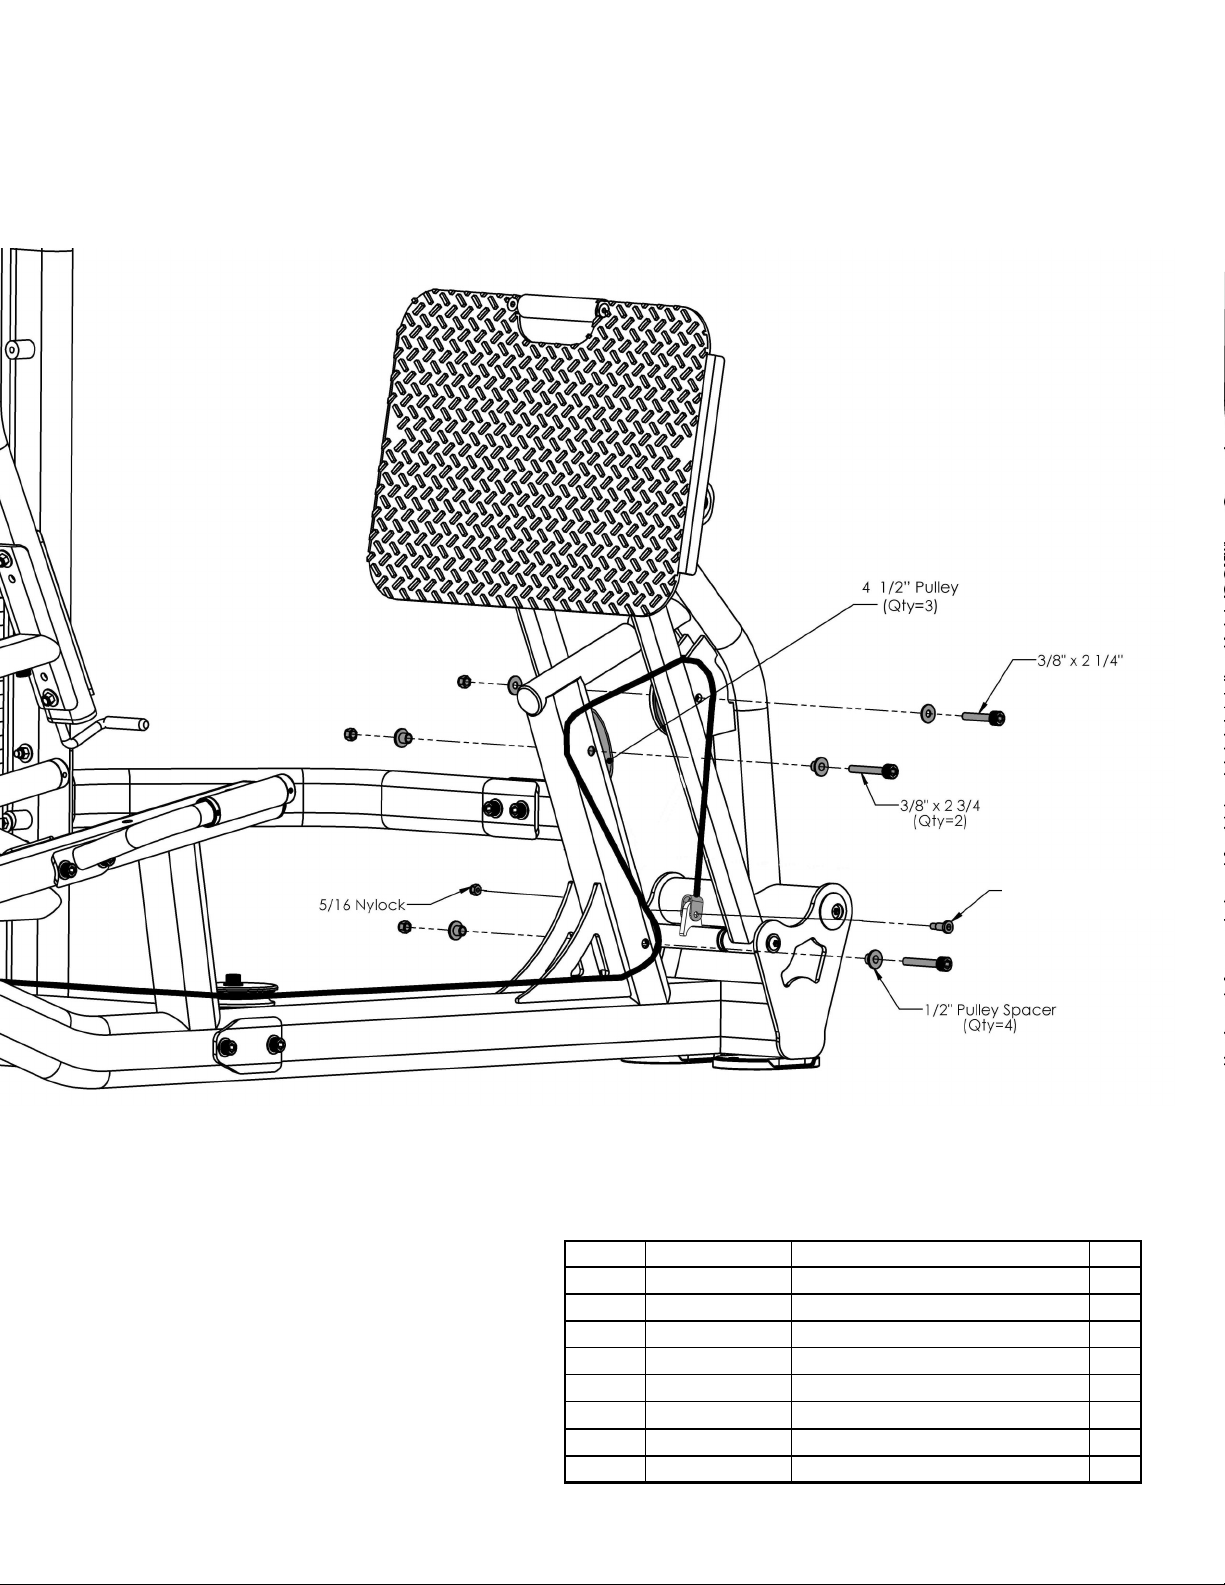
Item # Part # Description Qty
39 BFH-50174 4 1/2” Pulley 3
41 BFP-51746 1/2” Pulley Spacer 4
47 BFH-50351 1 3/8” Shoulder Bolt 1
49 BFP-51752 SHCS 3/8” x 2 1/4” 1
50 BFP-51750 SHCS 3/8” x 2 3/4” 2
57 BFH-50267 5/16” Nylock 1
59 BFH-50146 3/8” Flat Washer 2
60 BFH-50157 3/8” Nylock 3
All Flat Washers and Nylocks are 3/8” unless
otherwise noted.
Step 8: Continued
Figure 8a
1 3/8” Shoulder Bolt

www.batcafitness.com 17 LD-3 Owner’s Manual
All Flat Washers and Nylocks are 3/8” unless
otherwise noted.
Step 9:
Figure 9
Do not tighten the
four bolts on the
shroud until next step.
Item # Part # Description Qty
29 BFP-51740 Rear Weight Stack Shroud 1
36 BFP-52137 Head Pad 1
37 BFP-52136 Back Pad With Lumbar 1
38 BFP-52130 Large Bottom Pad 1
44 BFH-50254 HCS 3/8” x 3/4” 2
45 BFP-52340 BHSCS 3/8” x 3/4” 2
50 BFP-51750 SHCS 3/8” X 2 3/4” 2
52 BFP-51747 SHCS 3/8” X 3” 2
53 BFP-51748 SHCS 3/8” X 3 1/4” 2
56 BFH-50147 3/8” Lock Washer 6
59 BFH-50146 3/8” Flat Washer 10
1 3/8” Shoulder Bolt

Batca Fitness Systems 18 LD-3 Owner's Manual
Item # Part # Description Qty
30 BFP-51741 Left Front Weight Stack Shroud 1
31 BFP-51742 Right Front Weight Stack Shroud 1
32 BFP-51711 Placard Plate 1
45 BFP-52340 BHSCS 3/8” x 3/4” 2
Step 10:
Figure 11
Make sure all bolts are
tightened

www.batcafitness.com 19 LD-3 Owner’s Manual
Final Assembly and Troubleshooting
Position the cable guard tab on the
Pulley Cover so that the tab
prevents the cable from coming out
of it’s track on the 4 1/2” Pulley. An
example of this positioning can be
seen in the figure to the left. The
cable guard tab should be positioned
so that it is in the middle of the cable
wrap on the 4 1/2” Pulley, between
points “A” and “B”. This will allow
better protection and prevent the
cable from rubbing the cable guard
tab. Refer to Step 7 and 7a.
Top Plate
200lb Stack (Standard)
Weight Stack Decals:
IMPORTANT - Check These Components Before Using Gym:
Each Cable with a threaded bolt on either end must be
threaded at least 1/2” into its attachment, whether it be a
Free Floater, Lockout Free Floater, or the Top Plate of the
weight stack. Each must also be secured with a 1/2” Jam Nut
to ensure a safe and proper connection.
Record your serial number on the front of this manual
and keep for your records. The serial number can be
found on the side of the cage as seen in the figure to the
left.
Guide Rod
Lubrication:
Clean guide rods with a lint-free cloth and apply a thin layer of silicone lubricant (Part # BFH-
50262) to each guide rod. This will ensure a glass smooth performance from your weight stack.
Free Floater
Pulley Cover
BFM-50345
Batca Fitness Systems 20 LD-3 Owner's Manual
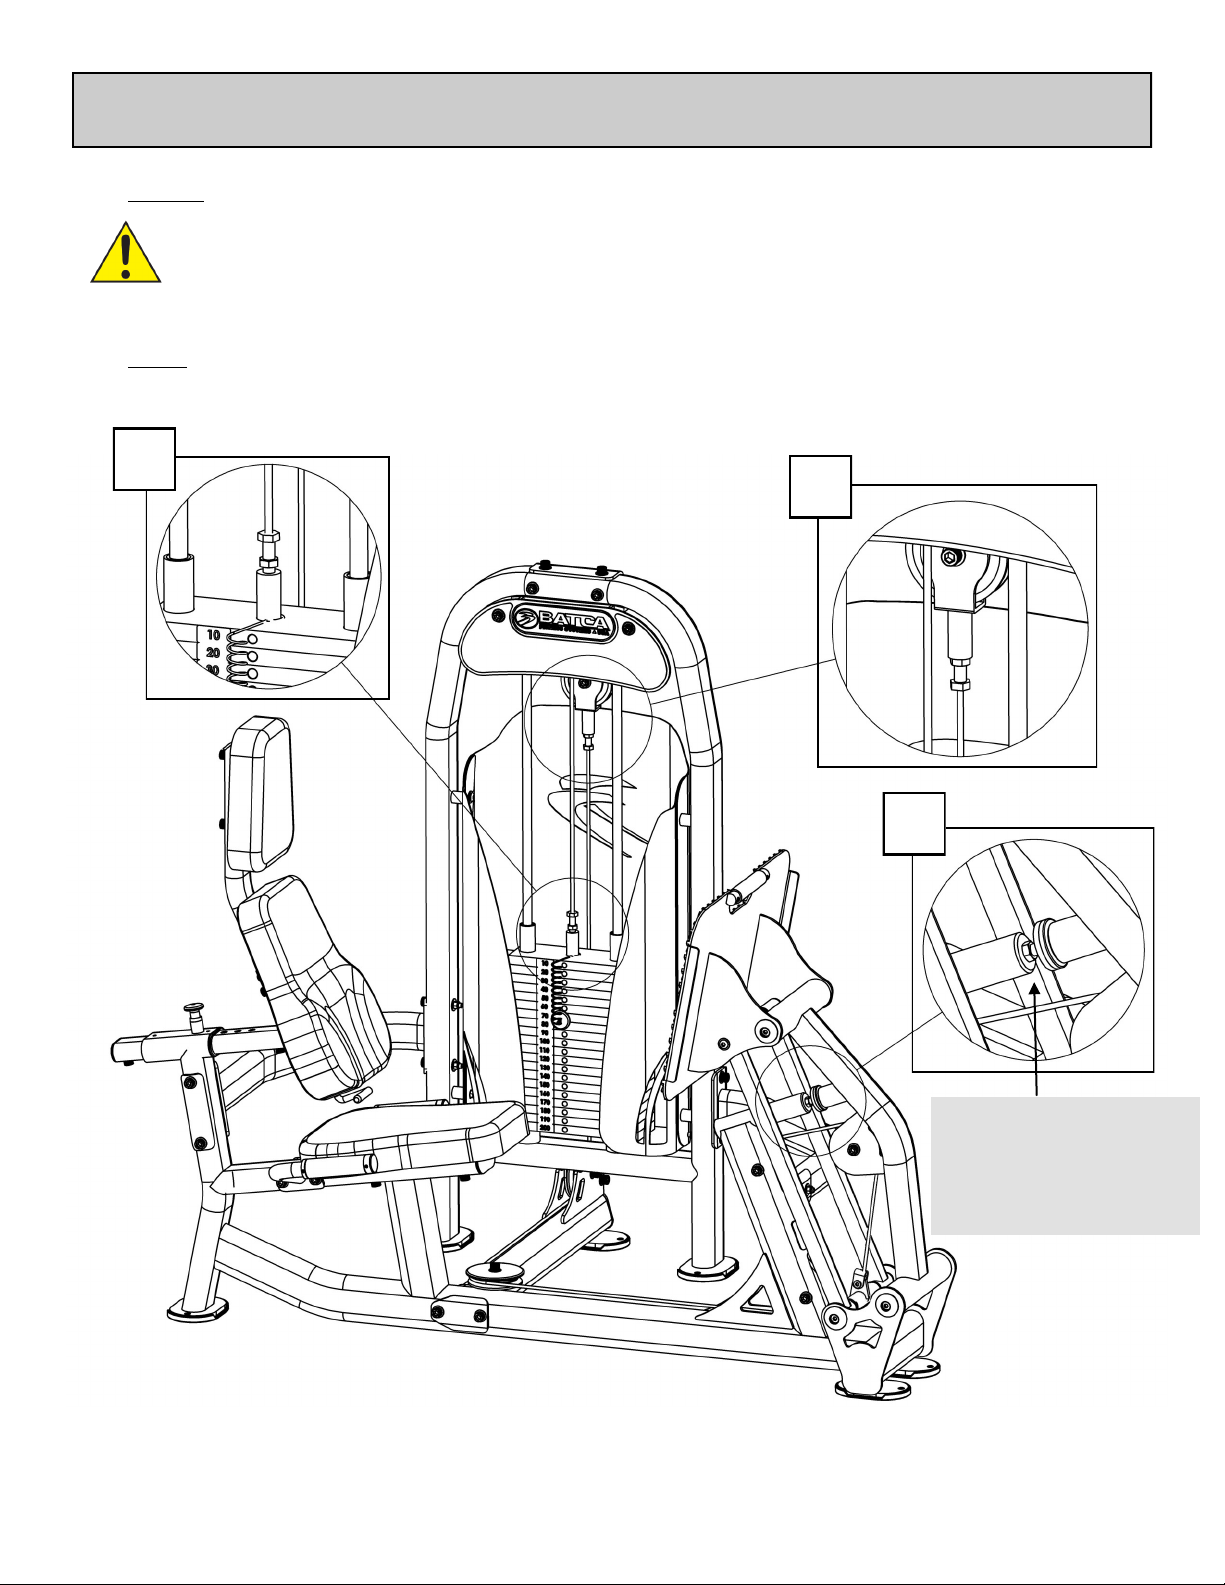
Adjust cables to proper tension from any of the locations shown below.
Note: All cables with threaded adjustable ends must have at least 1/2” of the threads
threaded in to its counterpart. It is very important that the 1/2” Jam Nut be wrench tight-
ened to the counterpart to ensure that the threaded adjustable end of the cable does not
back out of its counterpart.
Note: If the top plate raises off of the second plate in the weight stack, then the cable ten-
sion is too tight. You will need to take some of the tension out to lower the Top plate flush
with the second plate.
z
Cable Adjustments
2
Fine Adjustments to the
cable can be made here.
It is very important to
tighten the jam nut after
adjustments have been
made
1
3
Table of contents
Other Batca Fitness Equipment manuals

Batca
Batca FUSION FZ-6 User manual

Batca
Batca B-1 User manual

Batca
Batca X4 User manual

Batca
Batca Fusion 3 User manual

Batca
Batca C-2 User manual

Batca
Batca C-6 User manual

Batca
Batca FUSION FZ-9 User manual

Batca
Batca LINK DUAL FUNCTION LD-9 User manual

Batca
Batca LINK LD-4 User manual

Batca
Batca Fusion 2 User manual


Popular Fitness Equipment manuals by other brands


G-FITNESS
G-FITNESS AIR ROWER user manual

CAPITAL SPORTS
CAPITAL SPORTS Dominate Edition 10028796 manual

Martin System
Martin System TT4FK user guide

CIRCLE FITNESS
CIRCLE FITNESS E7 owner's manual

G-FITNESS
G-FITNESS TZ-6017 user manual

Accelerated Care Plus
Accelerated Care Plus OMNISTIM FX2 CYCLE/WALK user manual


