manuals.online logo
Brands
  1. Home
  2. •
  3. Brands
  4. •
  5. BEGA
  6. •
  7. Outdoor Light
  8. •
  9. BEGA 84 730 User manual

BEGA 84 730 User manual

BEGA Gantenbrink-Leuchten KG · Postfach 31 60 · 58689 Menden · info@bega.com · www.bega.com 1 / 3
44.20 · Technische Änderungen vorbehalten · Technical amendments reserved · Modications techniques réservées
!
Lichtbauelementrohr
Light building element tube
Tube de prolé lumineux
84 730
43004300
10001000
8×8
50×15050×150500500
Ø 220Ø 220
300
×
85
300
×
85
350350
Gebrauchsanweisung Instructions for use Fiche d’utilisation
Anwendung
Lichtbauelementrohr ø220mm mit Leimholz
und Aluminium mit Erdstück.
Für die Verwendung in Kombination mit einem
Lichtbauelementkopf.
Application
Light building element tube ø220mm with
laminated wood and aluminium with anchorage
unit.
For use in combination with a light building
element head.
Application
Tube de prolé lumineux ø220mm avec
bois lamellé-collé et aluminium avec partie à
enterrer.
Pour une utilisation en association avec une
tête de prolé lumineux.
Produktbeschreibung
Lichtbauelementrohr mit Leimholz nach
DINEN14080 und Aluminium
Leimholz aus keilgezinkten Kieferholzlamellen
Metallteile pulverbeschichtet und lackiert
Beschichtungstechnologie BEGA Unidure®
Erdstücklänge 1000 mm
2 gegenüberliegende Kabeleinführungen
150 x 50 mm
Anschraubbare Grundplatte ca. 250 x 250 mm
Mit eingesetzter Tür aus Aluminiumdruckguss
Vierkant-Türverschluss (SW8)
Anschlusskasten 71 084
zur Durchverdrahtung für 2 Kabel bis 7×6@
Klemmenbelegung L1· L2 · L3 · N · PE
2 Anschlussklemmen zum Anschluss
von DALI Steuerleitungen
Sicherungsklemme mit Feinsicherung
6,3 A träge ø 5 ×20 mm
c 0780– Konformitätszeichen
Windangriffsäche:0,95m²
Product description
Light building element tube with laminated
wood in accordance with DINEN14080 and
aluminium
Laminated wood made of nger-jointed pine
slats
Metal components are powder coated and
painted
BEGA Unidure® coating technology
Anchorage section length 1000 mm
2 opposing cable entries
150 x 50 mm
Screw-on base plate approx. 250 x 250 mm
With inserted door made of die cast aluminium
Square door latch (wrench size8)
Connection box 71 084
for through-wiring for 2 cables up to 7×6@
Terminal connection L1· L2 · L3 · N · PE
2 connecting terminals for connecting DALI
control cables
Fuse terminal with micro fuse
6,3 A slow ø 5 ×20 mm
c 0780– Conformity mark
Wind catching area:0.95m²
Description du produit
Tubo dell’elemento luminoso avec bois lamellé-
collé conforme DIN EN 14080 et aluminium
Bois lamellé-collé en lamelles de pin aboutées
Pièces métalliques poudrées et laquées
Technologie de revêtement BEGA Unidure®
Pièce enterrée 1000 mm
2 entrées de câble opposées 150 x 50 mm
Plaque de stabilisation à visser d’environ
250 x 250 mm
Avec porte fabriquée en fonderie d'aluminium
injecté
Fermeture à vis à quatre pans (SW8)
Boîte de connexion 71 084 pour branchement
en dérivation pour 2 câbles max. 7×6@
Disposition de bornes L1· L2 · L3 · N · PE
2 bornes pour le raccordement de câbles de
commande DALI
Porte fusible avec fusible à l n
6,3 A lent ø 5 ×20 mm
c 0780– Sigle de conformité
Prise au vent :0,95m²
BEGA Gantenbrink-Leuchten KG · Postfach 31 60 · 58689 Menden · info@bega.com · www.bega.com
2 / 3
Produkteigenschaften
Widerstand gegen horizontale Lasten:
vref,0 = 32 m/s
Geländekategorie: 1
nach DIN EN 1991-1-4
Leuchten mit einem Gewicht bis 60kg
und einer Windangriffsäche max. 0,82m²
Verformungsklasse: 1 – Sicherheitsklasse: A
nach DIN EN 40-3-3
Verhalten bei Fahrzeuganprall nach
DIN EN 12767 (passive Sicherheit): Klasse 0
Product characteristics
Resistance against horizontal loads
vref,0 = 32 m/s
Terrain category: 1
in accordance with DIN EN 1991-1-4
Luminaires with a maximum weight of 60kg
for a wind catching area max. 0.82m²
Deformation class: 1 – Safety class: A
in accordance with DIN EN 40-3-3
Properties in case of vehicle impact
(passive safety): class 0 in accordance with
DIN EN 12767
Caractéristiques de produits
Résistance aux charges horizontales:
vref,0 = 32 m/s
Catégorie de terrain: 1
selon DIN EN 1991-1-4
Luminaires avec un poids jusqu'à: 60kg
et une surface de prise au vent: 0,82m²
Classe de déformation 1 –
Classe de sécurité A selon DIN EN 40-3-3
Performance en cas d’impact d’un véhicule
(sécurité passive): Classe 0
Sicherheit
Für die Installation und für den Betrieb dieses
Lichtbauelementrohres sind die nationalen
Sicherheitsvorschriften zu beachten.
Der Hersteller übernimmt keine Haftung für
Schäden, die durch unsachgemäßen Einsatz
oder Montage entstehen.
Werden nachträglich Änderungen an dem
Lichtbauelementrohr vorgenommen, so gilt
derjenige als Hersteller, der diese Änderungen
vornimmt.
Safety
National safety regulations must be observed
when installing and operating this light building
element tube.
The manufacturer accepts no liability for
damage caused by improper use or installation.
If subsequent modications are made to the
light building element tube, the party who
makes these modications is deemed to be the
manufacturer.
Sécurité
Pour l’installation et l’utilisation de ce tube
de prolé lumineux, respecter les normes de
sécurité nationales.
Le fabricant décline toute responsabilité pour
les dommages résultant d’une utilisation ou
d’une installation inappropriée du produit.
Si des modications sont ultérieurement
apportées à ce tube de prolé lumineux,
l’intervenant qui les aura effectuées est alors
considéré comme le fabricant.
Bodenbeschaffenheit
Das Lichtbauelement darf nicht dauerhaft mit
aggressiven Medien in Kontakt kommen.
Aggressive Medien können durch Wasser
aus dem Boden gewaschen werden, und das
Lichtbauelement zerstören.
Bei unbekannter Zusammensetzung des
Bodens ist daher vor der Montage eine
Bodenanalyse vorzunehmen.
Aggressive Medien können auch von der
Oberäche ausgehend auf das Lichtbauelement
einwirken, daher ist ein übermäßiger Einsatz
von Taumitteln im Umfeld zu vermeiden.
Von außen eintretende Streuströme können
Korrosionsschäden verursachen. Es sind
geeignete Gegenmaßnahmen durchzuführen.
Soil conditions
The light building element must not have
sustained contact with aggressive media.
Aggressive media may be washed out of the
ground and may corrode the light building
element.
If the composition of the ground is unknown,
a ground analysis should be performed before
installation.
Aggressive media from the surface may also
affect the light building element. The overuse
of de-icing agents in the surroundings should
therefore be avoided. Stray currents entering
from outside may cause corrosion damage.
Suitable countermeasures should be put in
place.
Nature du sol
Le prolé lumineux ne doit pas être
durablement en contact avec des matériaux
corrosifs.
L’eau peut entraîner les matériaux corrosifs du
sol et endommager le prolé.
Si la composition du sol n’est pas connue, il
est nécessaire d’en faire une analyse avant
l’installation de l’appareil.
Certains matériaux corrosifs pouvant également
attaquer le prolé depuis la surface, il convient
de limiter l’utilisation de produits de salage aux
abords de l’appareil. Des courants vagabonds
venant de l’extérieur peuvent provoquer de la
corrosion. De ce fait, les mesures de prévention
appropriées doivent être prises.
1000 × 10001000 × 1000
10001000
900900
befestigte Oberfläche
Paved surface
Surface consolidée
verdichteter Boden
Compacted soil
Sol damé
Erdreich · Soil · Terre
Sauberkeitsschicht
Sub-base
Couche d’assainissement
Drainage · Drainage · Drainage
Beton · Concrete · Béton
BEGA Gantenbrink-Leuchten KG · Postfach 31 60 · 58689 Menden · info@bega.com · www.bega.com 3 / 3
Montage
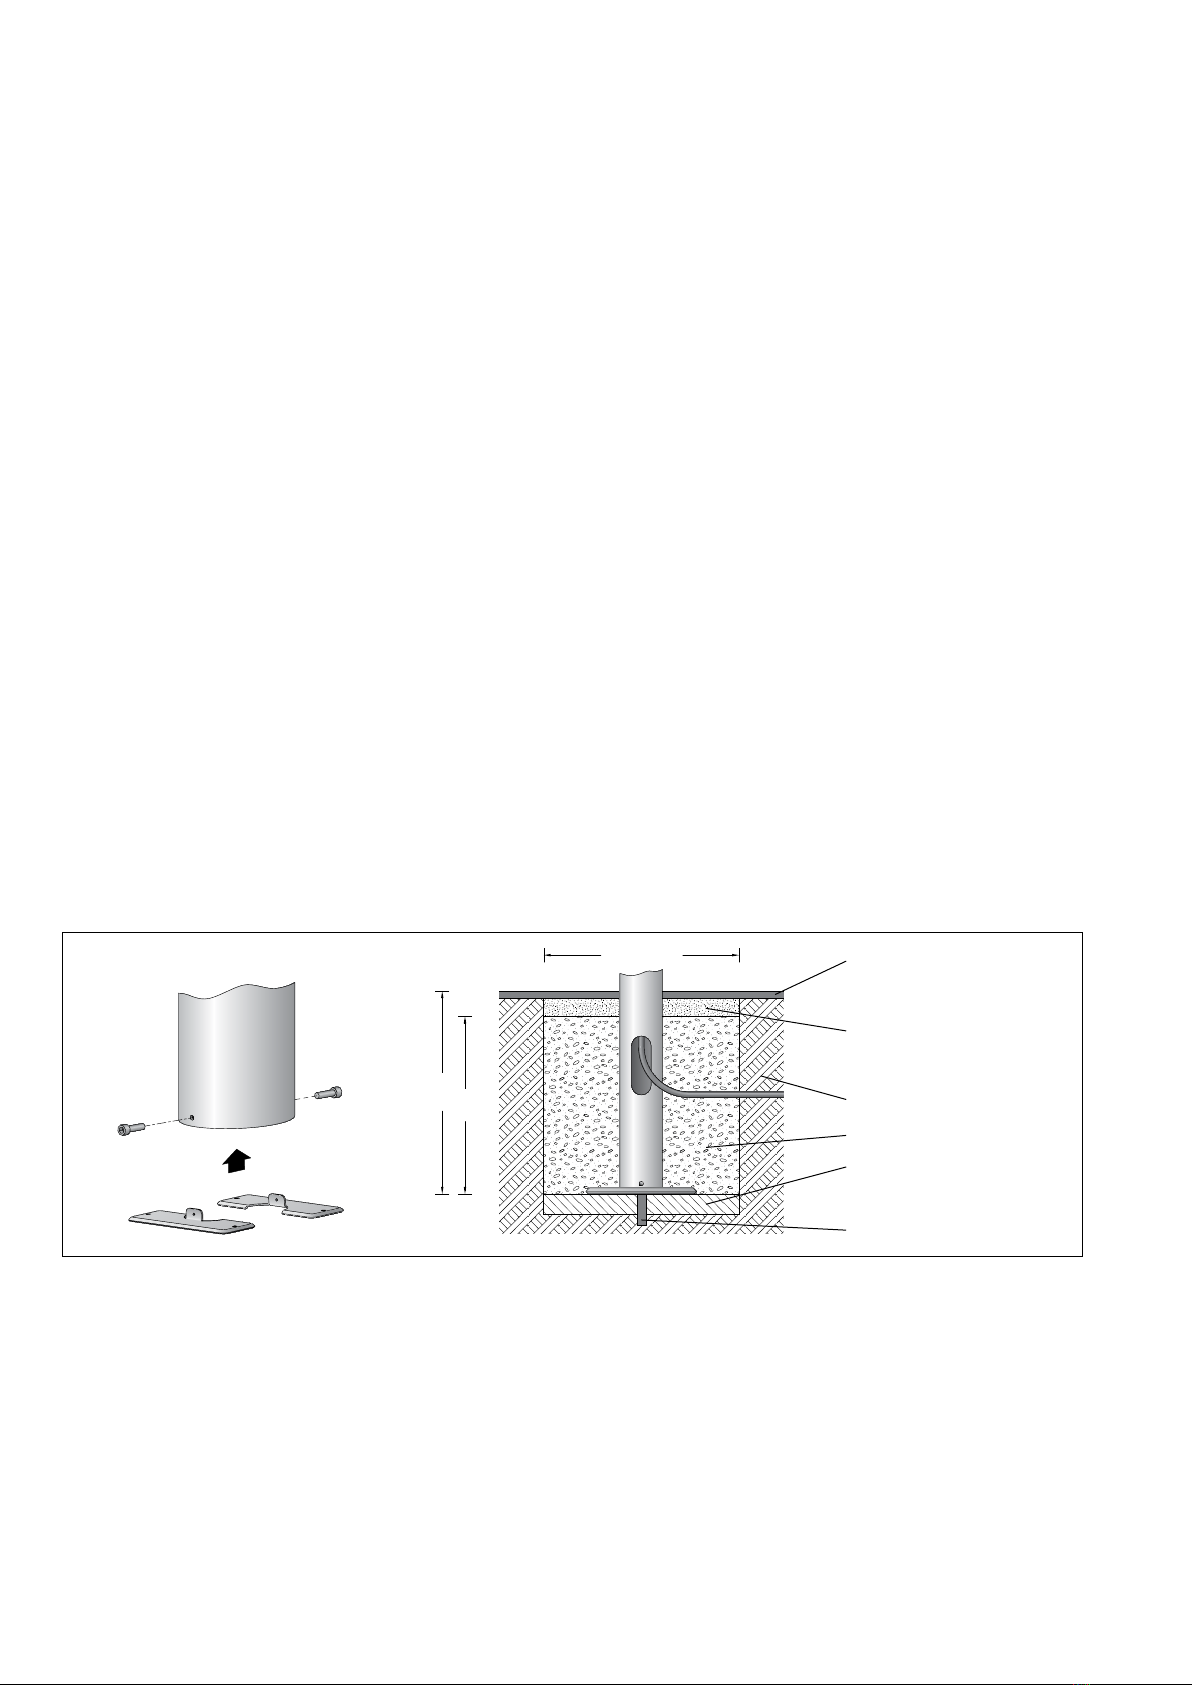
Das Lichtbauelementrohr ist je nach Einsatzart,
Leuchtengröße und Gewicht standsicher zu
gründen.
Die Fundamentgröße ist abhängig von der
Topographie, Bodenbeschaffenheit und
Windbelastung und muss jeweils bauseits
bestimmt werden.
Dazu gilt die Norm DIN1045.
Die obige beispielhafte Fundamentempfehlung
gilt nur für einen tragfähigen Baugrund.
Für den elektrischen Anschluss ist eine
Kabellänge von ca.1 m über Oberkante
Bodenbelag vorzusehen.
Tür mit beiliegendem Vierkantschlüssel öffnen
und entnehmen.
Zweiteilige Grundplatte aus dem
Lichtbauelementrohr entnehmen und
befestigen.
Erdkabel durch die seitliche Kabeleinführung in
das Lichtbauelementrohr führen.
Das Lichtbauelementrohr standsicher gründen.
Die Schutzschicht im Bereich des Erdstückes
darf nicht beschädigt werden.
Installation
The light building element tube requires a stable
foundation appropriate to its intended use and
the size and weight of the luminaire.
The size of the foundation depends on the
topography, soil composition and wind load,
and is to be specied by the customer.
DIN1045 applies.
The example foundation recommended above
applies only for load-bearing soil.
A cable length of approx.1 m above the upper
edge of the oor covering must be provided for
the electrical connection.
Open and remove the door using the square
spanner provided.
Remove the two-part base plate from the light
building element tube and secure it in place.
Thread the underground cable into the light
building element tube via the lateral cable entry.
Anchor the light building element tube securely.
The protective coating around the anchorage
unit must not be damaged.
Installation
Le tube de prolé lumineux doit être implanté
de manière stable en fonction du type
d’utilisation, de la taille du luminaire et de son
poids.
Les dimensions du massif de fondation
dépendent de la topographie, de la constitution
du sol et de la charge du vent, et doivent être
déterminées par le client.
La norme DIN1045 est alors applicable.
Les fondations recommandées ci-dessus à
titre d’exemple ne sont valables que sur un sol
porteur résistant.
Pour le raccordement électrique, un câble
dépassant d’env.1 m du bord supérieur du
revêtement de sol est à prévoir.
Ouvrir la porte avec la clé carrée fournie et la
retirer.
Retirer la plaque d’assise en deux parties
du tube du prolé lumineux et procéder à sa
xation.
Introduire le câble souterrain dans le tube du
prolé lumineux par l’entrée de câble latérale.
Implanter le tube du prolé lumineux de
manière à ce qu’il soit stable.
La couche de protection de la partie à enterrer
ne doit pas être endommagée.
Montage und elektrischen Anschluss
des ausgewählten Lichtbauelementkopfs
vornehmen.
Bitte hierzu die entsprechende
Gebrauchsanweisung beachten.
Anschlusskasten öffnen.
Erdkabel und Leuchtenanschlussleitung durch
die Leitungseinführung in den Anschlusskasten
führen.
Schutzleiterverbindung herstellen und
elektrischen Anschluss vornehmen.
Auf richtige Belegung der Anschlussleitung
achten. Den Netzanschluss an der braunen
(L), blauen (N) und grün-gelben Ader (1)
vornehmen.
Der Anschluss der Steuerleitungen erfolgt über
die beiden mit DALI gekennzeichneten Adern.
Bei Nichtbelegung dieser Adern wird die
Leuchte mit voller Lichtleistung betrieben.
Anschlusskasten schließen.
Tür einsetzen und verriegeln.
Install and establish the electrical connection
for the selected light building element head.
Please refer to the corresponding instructions
for use.
Open the connection box.
Lead the luminaire wiring and mains supply
cable through the cable entry into the
connection box.
Make the earth conductor connection and the
electrical connection.
Note correct conguration of the mains supply
cable. Make mains supply connection at the
brown (L), blue (N) and green-yellow lead (1).
The connection of the control cables is
achieved by means of the both leads marked
with DALI.
In case these leads are not used the luminaire
will be operated at full light output.
Close the connection box.
Install the door and lock it.
Procéder à l’installation et au raccordement
électrique de la tête de prolé lumineux choisie.
Pour ce faire, veuillez vous référer à la che
d’utilisation correspondante.
Ouvrir la boîte de connexion.
Introduire le câble souterrain et le câble du
luminaire dans la boîte de connexion par
l’entrée de câble.
Mettre à la terre et procéder au raccordement
électrique.
Veiller au bon adressage du câble de
raccordement. Effectuer le raccordement
électrique au l marron (L), bleu (N) et vert-
jaune (1).
Le raccordement des câbles de la commande
est effectué avec les ls marqués DALI.
Si ces ls ne sont pas raccordés le luminaire
fonctionne sur la puissance maximale.
Fermer la boîte de connexion.
Installer et fermer la porte.
Reinigung · Pege
Lichtbauelementrohr regelmäßig mit
lösungsmittelfreien Reinigungsmitteln von
Schmutz und Ablagerungen säubern.
Dafür keinen Hochdruckreiniger verwenden.
Zur Pege des Holzes reichen in der Regel eine
Bürste und etwas Wasser aus.
Sollte es nach vielen Jahren der Nutzung oder
durch eine Beschädigung notwendig sein, das
Holz aufzuarbeiten oder die Oberäche neu zu
beschichten, bietet unser Partner Aubrilam dies
als Dienstleistung an.
AUBRILAMCARE
Tel.+33(0)4 73 31 86 86
[email protected]
Cleaning · Maintenance
Clean light building element tube regularly with
solvent-free cleansers from dirt and deposits.
Do not use high pressure cleaners.
As a rule, a brush and a little water are all you
need to maintain the wood.
If, after many years of use or due to unforeseen
damage, the wood needs reconditioning or
re-coating, our partner Aubrilam offers these
services.
AUBRILAMCARE
Phone+33(0)4 73 31 86 86
[email protected]
Nettoyage · Entretien
Nettoyer le tube de prolé lumineux
régulièrement avec des produits de nettoyage
ne contenant pas de solvants et le débarrasser
des dépôts et des souillures.
Ne pas utiliser de nettoyeur haute pression.
En général, une brosse et un peu d’eau
sufsent à l’entretien du bois.
S’il est toutefois nécessaire, après des années
d’utilisation ou en raison de dégradations, de
retraiter le bois ou de renouveler la nition,
notre partenaire Aubrilam propose ces
prestations de service.
AUBRILAMCARE
Tél.+33(0)4 73 31 86 86
[email protected]
Ersatzteile
Tür grat 22 002 699 L3
Tür silber 22 002 699 L5
Anschlusskasten 75 003 570
Spares
Door graphite 22 002 699 L3
Door silver 22 002 699 L5
Connection box 75 003 570
Pièces de rechange
Porte graphite 22 002 699 L3
Porte argent 22 002 699 L5
Boîte de connexion 75 003 570

Other BEGA Outdoor Light manuals

BEGA 84415 Manual

BEGA

BEGA 84415 Manual

BEGA 33 165 User manual

BEGA

BEGA 33 165 User manual

BEGA 99 326 User manual

BEGA

BEGA 99 326 User manual

BEGA 99 658 Manual

BEGA

BEGA 99 658 Manual

BEGA 24 110 Manual

BEGA

BEGA 24 110 Manual

BEGA 84 218 Manual

BEGA

BEGA 84 218 Manual

BEGA 77 247 User manual

BEGA

BEGA 77 247 User manual

BEGA 84 061 Manual

BEGA

BEGA 84 061 Manual

BEGA 24 314 User manual

BEGA

BEGA 24 314 User manual

BEGA 84 699 User manual

BEGA

BEGA 84 699 User manual

BEGA Strassburg User manual

BEGA

BEGA Strassburg User manual

BEGA 33 200 Manual

BEGA

BEGA 33 200 Manual

BEGA 33 592 User manual

BEGA

BEGA 33 592 User manual

BEGA 84 607 User manual

BEGA

BEGA 84 607 User manual

BEGA 88 977 User manual

BEGA

BEGA 88 977 User manual

BEGA 84 240 Manual

BEGA

BEGA 84 240 Manual

BEGA Kopenhagen User manual

BEGA

BEGA Kopenhagen User manual

BEGA 88 415 User manual

BEGA

BEGA 88 415 User manual

BEGA 67 541.3 User manual

BEGA

BEGA 67 541.3 User manual

BEGA 24 103 Manual

BEGA

BEGA 24 103 Manual

BEGA 84 429 Manual

BEGA

BEGA 84 429 Manual

BEGA 22 230 User manual

BEGA

BEGA 22 230 User manual

BEGA 99 558 Manual

BEGA

BEGA 99 558 Manual

BEGA 84 300 Manual

BEGA

BEGA 84 300 Manual

Popular Outdoor Light manuals by other brands

Renkforce 1400484 operating instructions

Renkforce

Renkforce 1400484 operating instructions

Unilamp PLUTO Slim Ramp installation manual

Unilamp

Unilamp PLUTO Slim Ramp installation manual

Cooper Lighting HALO AL4850LPC Series instruction manual

Cooper Lighting

Cooper Lighting HALO AL4850LPC Series instruction manual

SLV 232065 instruction manual

SLV

SLV 232065 instruction manual

XINDAO P326.713 manual

XINDAO

XINDAO P326.713 manual

LIGMAN VANCOUVER 46 installation manual

LIGMAN

LIGMAN VANCOUVER 46 installation manual

STEINEL L 560 S Information

STEINEL

STEINEL L 560 S Information

LIGMAN LADOR 15 LD-20013 installation manual

LIGMAN

LIGMAN LADOR 15 LD-20013 installation manual

Saxby Lighting 75270 Instruction leaflet

Saxby Lighting

Saxby Lighting 75270 Instruction leaflet

WHITECROFT LIGHTING KOLO BOLLARD Installation instruction

WHITECROFT LIGHTING

WHITECROFT LIGHTING KOLO BOLLARD Installation instruction

Philips Symmetry Series Assembly, installation and operating instructions

Philips

Philips Symmetry Series Assembly, installation and operating instructions

Hornbach 10599963 quick start guide

Hornbach

Hornbach 10599963 quick start guide

TaoTronics TT-CL016 user guide

TaoTronics

TaoTronics TT-CL016 user guide

Sulion LOBY 400086 manual

Sulion

Sulion LOBY 400086 manual

LF allen+roth LB2885 Care and maintenance

LF

LF allen+roth LB2885 Care and maintenance

Inspire Lakko Assembly, Use, Maintenance Manual

Inspire

Inspire Lakko Assembly, Use, Maintenance Manual

Sulion CANADIAN 100764 manual

Sulion

Sulion CANADIAN 100764 manual

SIGNIFY LUMEC ROADFOCUS RFS installation instructions

SIGNIFY

SIGNIFY LUMEC ROADFOCUS RFS installation instructions

manuals.online logo
manuals.online logoBrands
  • About & Mission
  • Contact us
  • Privacy Policy
  • Terms and Conditions

Copyright 2025 Manuals.Online. All Rights Reserved.