manuals.online logo
Brands
  1. Home
  2. •
  3. Brands
  4. •
  5. BEGA
  6. •
  7. Outdoor Light
  8. •
  9. BEGA 88 490 User manual

BEGA 88 490 User manual

BEGA Gantenbrink-Leuchten KG · Postfach 31 60 · 58689 Menden · info@bega.com · www.bega.com
39.17 · Technische Änderungen vorbehalten · Technical amendments reserved · Modications techniques réservées
IP 55
!
Garten- und Wegeleuchte
Garden and pathway luminaire
Luminaire de jardin et d'allée
88 490
800
110
135
Ø 70
3
x
1
2
0
°
Montageplatte
Mounting plate
Contre-plaque
Gebrauchsanweisung Instructions for use Fiche d’utilisation
Anwendung
Garten- und Wegeleuchte mit freistrahlendem
Licht für die Beleuchtung von Wegen,
Hauseingängen und Terrassen.
Für gestreutes Licht aus geringer
Lichtpunkthöhe.
Application
Unshielded garden and path luminaire for
lighting of paths, house entrances and terraces.
For broad spread light from a low mounting
height.
Utilisation
Luminaire de jardin et d’allée à diffusion libre
pour l’éclairage d'allées, d’entrées de bâtiment
ou de terrasses.
Pour un éclairage diffus à partir d'une faible
hauteur de feu.
Produktbeschreibung
Leuchte besteht aus Aluminiumguss,
Aluminium und Edelstahl
Kristallglas innen mattiert mit Gewinde
Leuchte mit Montageplatte zum Aufschrauben
auf ein Fundament oder auf ein Erdstück
Montageplatte mit 3 Langlöchern,
Breite 7 mm, Teilkreis ø 70 mm
Leuchte auf Montageplatte 360° ausrichtbar
Montagebügel mit Anschlusskasten und
3-poliger Klemme 4@
zum Anschluss der Kabel max. 3 ×2,5@
Fassung E 27
Schutzklasse I
Schutzart IP 55
Staubgeschützt und Schutz gegen
Strahlwasser
c – Konformitätszeichen
Gewicht: 2,8 kg
Product description
Luminaire made of aluminium alloy,
aluminium and stainless steel
Matt crystal glass with screw neck
Luminaire with mounting plate for bolting onto a
foundation or an anchorage unit
Mounting plate with 3 elongated holes,
Width 7 mm, Pitch circle ø 70 mm
Luminaire can be aligned on the mounting plate
around 360°
Mounting bracket with connection box and
3-pole terminal 4@for connection of
mains supply cable max. 3 ×2.5@
Lampholder E 27
Safety class I
Protection class IP 55
Dust-tight and protected against water jets
c – Conformity mark
Weight: 2.8 kg
Description du produit
Luminaire fabriqué en fonderie d'aluminium,
aluminium et acier inoxydable
Verre clair intérieur mat avec pas de vis
Luminaire avec contre-plaque pour xation
sur un massif de fondation ou sur une pièce à
enterrer
Contre-plaque avec 3 trous oblongs, largeur
7 mm sur un cercle de ø 70 mm
Luminaire orientable sur 360º sur la
contre-plaque
Etrier de montage avec boîte de connexion
et bornier tri-polaire 4@pour le raccordement
des câbles max. 3 ×2,5@
Douille E 27
Classe de protection I
Degré de protection IP 55
Protection contre la poussière et les jets d’eau
c – Sigle de conformité
Poids: 2,8 kg
Sicherheit
Für die Installation und für den Betrieb
dieser Leuchte sind die nationalen
Sicherheitsvorschriften zu beachten.
Der Hersteller übernimmt keine Haftung für
Schäden, die durch unsachgemäßen Einsatz
oder Montage entstehen.
Werden nachträglich Änderungen an der
Leuchte vorgenommen, so gilt derjenige als
Hersteller, der diese Änderungen vornimmt.
Safety indices
The installation and operation of this luminaire
are subject to national safety regulations.
The manufacturer is then discharged from
liability when damage is caused by improper
use or installation.
If any luminaire is subsequently modied, the
persons responsible for the modication shall
be considered as manufacturer.
Sécurité
Pour l’installation et l’utilisation de ce luminaire,
respecter les normes de sécurité nationales.
Le fabricant décline toute responsabilité
résultant d'une mise en œuvre ou d'une
installation inappropriée du produit.
Toutes les modications apportées au luminaire
se feront sous la responsabilité exclusive de
celui qui les effectuera.
BEGA Gantenbrink-Leuchten KG · Postfach 31 60 · 58689 Menden · info@bega.com · www.bega.com
Leuchtmittel
Leuchte mit Sockel E 27
Lampenleistung max. 60W
Für diese Leuchte empfehlen wir folgende
BEGA LED-Leuchtmittel:
13 510 LED 7 W · 805 lm · 2700 K
13 548 LED 7 W · 805 lm · 2700 K
dimmbar
Funkgesteuerte Ausführung (Zigbee 3.0):
13 555 LED 9 W · 805 lm · 2700 K
dimmbar
13 556 LED 9 W · 805 lm · 2700- 6500 K
dimmbar · Tunable White
13 557 LED 9,5 W · 805 lm · 2700- 6500 K
dimmbar · Tunable White · RGBW
Lamps
Luminaire with lampholder E 27
Lamp output max. 60W
For this luminaire we recommend the following
BEGA LED lamps:
13 510 LED 7 W · 805 lm · 2700 K
13 548 LED 7 W · 805 lm · 2700 K
dimmable
Radio-controlled version (Zigbee 3.0):
13 555 LED 9 W · 805 lm · 2700 K
dimmable
13 556 LED 9 W · 805 lm · 2700- 6500 K
dimmable · tunable white
13 557 LED 9.5 W · 805 lm · 2700- 6500 K
dimmable · tunable white · RGBW
Source lumineuse
Luminaire avec culot E 27
Puissance de lampe max. 60W
Pour ces luminaires nous conseillons les
sources lumineuses LED BEGA suivantes:
13 510 LED 7W · 805lm · 2700K
13 548 LED 7W · 805lm · 2700K
pour variation
Version radiocommandée (Zigbee 3.0) :
13 555 LED 9W · 805lm · 2700K
pour variation
13 556 LED 9W · 805lm · 2700-6500K
pour variation · Tunable White
13 557 LED 9,5W · 805lm · 2700-6500K
pour variation ·Tunable White · RGBW
Ausführliche technische und lichttechnische
Daten zu den Leuchtmitteln entnehmen Sie
bitte den Datenblättern auf unserer Website.
Detailed technical and lighting data for the
lamps can be found in the data sheets on our
website.
Les données photométriques détaillées de
toutes les lampes gurent dans les descriptifs
techniques sur notre site.
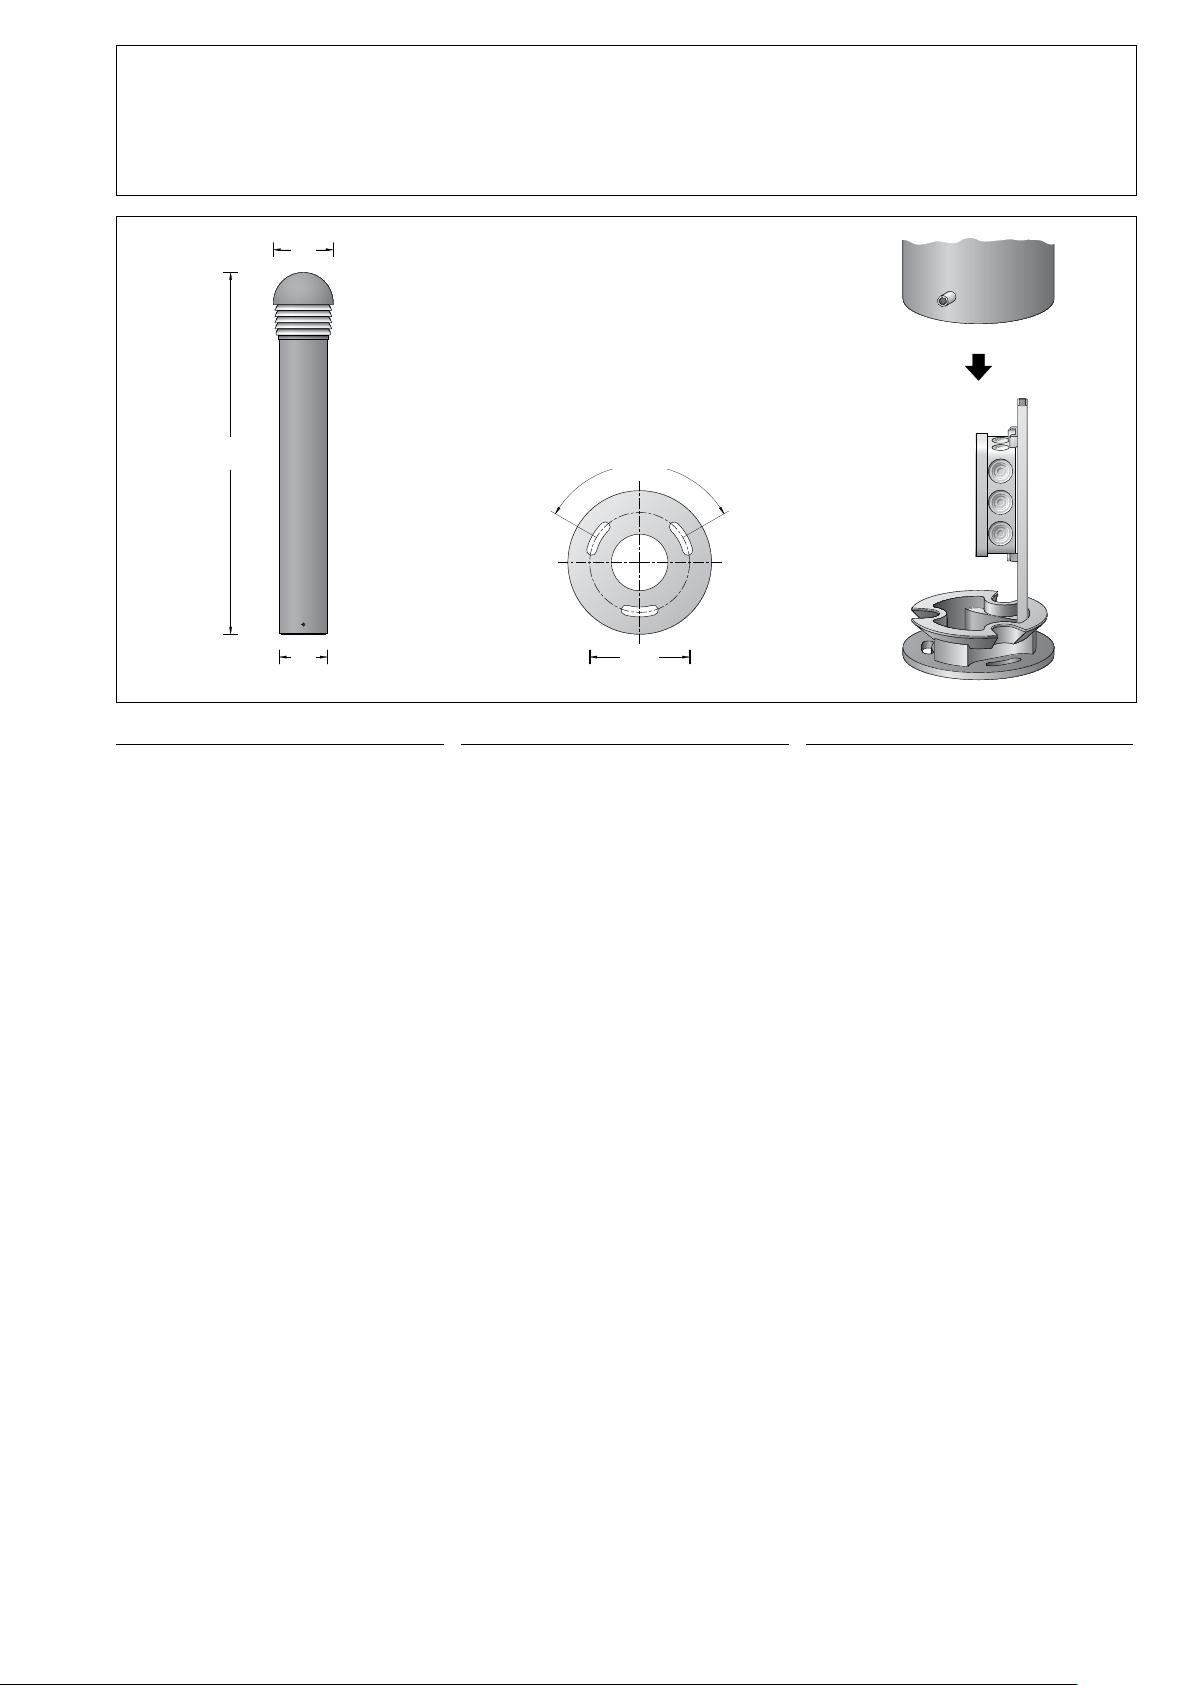
Montage
Der Fußpunkt der Leuchte darf nicht tiefer
als die Oberkante des Bodenbelags liegen.
Für den elektrischen Anschluss der Leuchte
ist eine Kabellänge von etwa 500mm über
Befestigungsgrund ausreichend.
Schraube am Fußpunkt lösen.
Montageplatte drehen und entnehmen.
Montageplatte mit beiliegendem oder
anderem geeigneten Befestigungsmaterial
auf ein Fundament oder Erdstück 70 894
anschrauben.
Bei Montage auf einem Fundament bitte
beachten: Feuchter Beton kann stark alkalisch
sein und darf nicht dauerhaft mit der Leuchte in
Kontakt kommen.
Wir empfehlen den Montagebereich zu
drainieren und mit Isolieranstrich zu versehen.
Anschlusskasten öffnen.
Schutzleiterverbindung herstellen.
Elektrischen Anschluss von Erdkabel und
Leuchtenanschlussleitung vornehmen.
Lampe einsetzen.
Glasdichtung auf das Standrohr schieben.
Leuchtenglas rechtsherum in das Standrohr
gegen die Dichtung einschrauben.
Auf richtigen Sitz der Dichtung achten.
Installation
The luminaire foot must not be below the upper
edge of the oor covering. Approximately
500mm of cable above the mounting surface
will sufce for connecting the luminaire to the
power supply.
Undo the screw at the base.
Rotate and remove the mounting plate.
Using the provided mounting materials or
other suitable mounting materials, screw-t the
mounting plate to a foundation or anchorage
unit 70 894.
In case of an installation on a foundation please
observe the following:
Wet concrete can be very alkaline and must not
get into contact with the luminaire permanently.
We recommend to drain the mounting area and
to provide it with insulating paint.
Open the connection box.
Make earth conductor connection.
Connect mains supply cable and luminaire
connection cable in the connection box.
Insert lamp.
Place glass gasket on post.
Screw glassclockwise towards the gasket into
the post.
Make sure that gasket is positioned correctly.
Installation
Le pied du luminaire ne doit pas se trouver en
dessous du bord supérieur de la couche de
nition du sol. Pour le raccordement électrique
du luminaire, une longueur de câble d’environ
500 mm au dessus du sol est sufsante.
Desserrer la vis du pied de la balise.
Tourner puis retirer la contre-plaque.
Visser la contre-plaque avec le matériel de
xation fourni ou tout autre matériel approprié
sur un massif de fondation ou sur une pièce à
enterrer 70 894.
Attention: En cas d'installation sur un massif
de fondation: La laitance du béton peut être
fortement alcaline et ne doit pas être en
contact durable avec le luminaire. La surface
où le luminaire est installé doit être draînée et
protégée par une matière isolante.
Ouvrir la boîte de connexion.
Mettre à la terre.
Raccorder le câble réseau et le câble
d'alimentation dans la boîte de connexion.
Installer la lampe.
Installer le joint du verre sur le fût de la balise.
Visser le verre contre le joint dans le fût de la
balise.
Veiller au bon emplacement du joint.
Lampenwechsel · Wartung
Anlage spannungsfrei schalten.
Leuchte öffnen und reinigen.
Nur lösungsmittelfreie Reinigungsmittel
verwenden. Lampe auswechseln.
Dichtung überprüfen, ggf. ersetzen.
Leuchte schließen.
Für Reinigungsarbeiten dürfen keine
Hochdruckreiniger verwendet werden.
Relamping · Maintenance
Disconnect the electrical installation.
Open the luminaire and clean.
Use only solvent-free cleaning agents. Change
the lamp.
Check the gasket and replace, if necessary.
Close the luminaire.
For cleaning, do not use high pressure
cleaners.
Changement de lampe · Entretien
Débrancher l’alimentation.
Ouvrir le luminaire et le nettoyer.
N’utiliser que des produits d’entretien ne
contenant pas de solvant.Changer la lampe.
Vérier et remplacer les joints d’étanchéité le
cas échéant.
Fermer le luminaire.
Ne pas utiliser de nettoyeur haute pression
pour le nettoyage.
Ergänzungsteil
70 894 Erdstück
Erdstück mit Befestigungsansch aus
feuerverzinktem Stahl. Gesamtlänge 400 mm.
3 Befestigungsschrauben M 6 aus Edelstahl.
Teilkreis ø 70 mm.
Accessory
70 894 Anchorage unit
Anchorage unit with mounting ange made
of galvanised steel. Total length 400 mm.
3 stainless steel xing screws M 6.
Pitch circle ø 70 mm.
Accessoire
70 894 Pièce à enterrer
Pièce à enterrer avec asque de xation en
acier galvanisé. Longueur totale 400 mm.
3 vis de xation M 6 en acier inoxydable
sur un cercle de ø 70 mm.
Es gibt dazu eine gesonderte
Gebrauchsanweisung.
See the separate instructions for use. Une che d’utilisation pour ces accessoires est
disponible.
Ersatzteile
Ersatzglas 11002279S2
Montageplatte 22002967L
Fassung 63000105
Dichtung 83000491.1
Spares
Spare glass 11002279S2
Mounting plate 22002967L
Lampholder 63000105
Gasket 83000491.1
Pièces de rechange
Verre de rechange 11002279S2
Contre-plaque 22002967L
Douille 63000105
Joint 83000491.1

Other BEGA Outdoor Light manuals

BEGA 88 309 Manual

BEGA

BEGA 88 309 Manual

BEGA 7723 User manual

BEGA

BEGA 7723 User manual

BEGA 22 228 Manual

BEGA

BEGA 22 228 Manual

BEGA 84 422 User manual

BEGA

BEGA 84 422 User manual

BEGA 33 242 User manual

BEGA

BEGA 33 242 User manual

BEGA 7264 User manual

BEGA

BEGA 7264 User manual

BEGA 24 063 Manual

BEGA

BEGA 24 063 Manual

BEGA 84 240 Manual

BEGA

BEGA 84 240 Manual

BEGA 88 863 Manual

BEGA

BEGA 88 863 Manual

BEGA 84 875 Manual

BEGA

BEGA 84 875 Manual

BEGA 33 165 User manual

BEGA

BEGA 33 165 User manual

BEGA 77 127 User manual

BEGA

BEGA 77 127 User manual

BEGA 77 138 User manual

BEGA

BEGA 77 138 User manual

BEGA 24 110 Manual

BEGA

BEGA 24 110 Manual

BEGA 84 289 Manual

BEGA

BEGA 84 289 Manual

BEGA 24 326 User manual

BEGA

BEGA 24 326 User manual

BEGA 84 666 User manual

BEGA

BEGA 84 666 User manual

BEGA 33 160 Series User manual

BEGA

BEGA 33 160 Series User manual

BEGA 77 911 Manual

BEGA

BEGA 77 911 Manual

BEGA 84 168 User manual

BEGA

BEGA 84 168 User manual

BEGA 84 320 User manual

BEGA

BEGA 84 320 User manual

BEGA 22 203 Manual

BEGA

BEGA 22 203 Manual

BEGA 84 021 User manual

BEGA

BEGA 84 021 User manual

BEGA 71 126 Manual

BEGA

BEGA 71 126 Manual

Popular Outdoor Light manuals by other brands

Maretti STRETTO 14.1806 Installation

Maretti

Maretti STRETTO 14.1806 Installation

anko 43089062 user manual

anko

anko 43089062 user manual

BEL LIGHTING Atlantic G quick start guide

BEL LIGHTING

BEL LIGHTING Atlantic G quick start guide

DoorHan LAMP installation manual

DoorHan

DoorHan LAMP installation manual

Allen + Roth LB4466 Quick reference guide

Allen + Roth

Allen + Roth LB4466 Quick reference guide

ADEO Services OS2602 WHITE instruction manual

ADEO Services

ADEO Services OS2602 WHITE instruction manual

LIGMAN BA-10643 installation manual

LIGMAN

LIGMAN BA-10643 installation manual

LIGMAN FORREY 5 installation manual

LIGMAN

LIGMAN FORREY 5 installation manual

SUN AMEX BORNEO 30 RGB Instructions for use

SUN AMEX

SUN AMEX BORNEO 30 RGB Instructions for use

LIGMAN VANCOUVER 43 installation manual

LIGMAN

LIGMAN VANCOUVER 43 installation manual

RAB Design RAY8S-LED installation instructions

RAB Design

RAB Design RAY8S-LED installation instructions

Harris ALLED3 Series installation guide

Harris

Harris ALLED3 Series installation guide

urban ambiance UQL1156 installation instructions

urban ambiance

urban ambiance UQL1156 installation instructions

Royal Botania TRS045 manual

Royal Botania

Royal Botania TRS045 manual

Quoizel LNG8407CHB Assembly instruction sheet

Quoizel

Quoizel LNG8407CHB Assembly instruction sheet

Vaxcel T0620 Assembly and installation instructions

Vaxcel

Vaxcel T0620 Assembly and installation instructions

RH BECKMAN SCONCE 21 installation instructions

RH

RH BECKMAN SCONCE 21 installation instructions

e-conolight E-DD1L66CU installation instructions

e-conolight

e-conolight E-DD1L66CU installation instructions

manuals.online logo
manuals.online logoBrands
  • About & Mission
  • Contact us
  • Privacy Policy
  • Terms and Conditions

Copyright 2025 Manuals.Online. All Rights Reserved.