manuals.online logo
Brands
  1. Home
  2. •
  3. Brands
  4. •
  5. Benthin
  6. •
  7. Window Blind
  8. •
  9. Benthin P1634 Parts list manual

Benthin P1634 Parts list manual

Operation Installation – Operation – Care
Mounting information
Model
P1634, P1635, P1636, P1637, P1650, P1662, P1663, P1001,
P1043, P1044, P1082, P1086vv
P1662
P1663 P1636
P1637
P1634
P1635
P1001
P1043
P1044
P1082
P1086
P1650
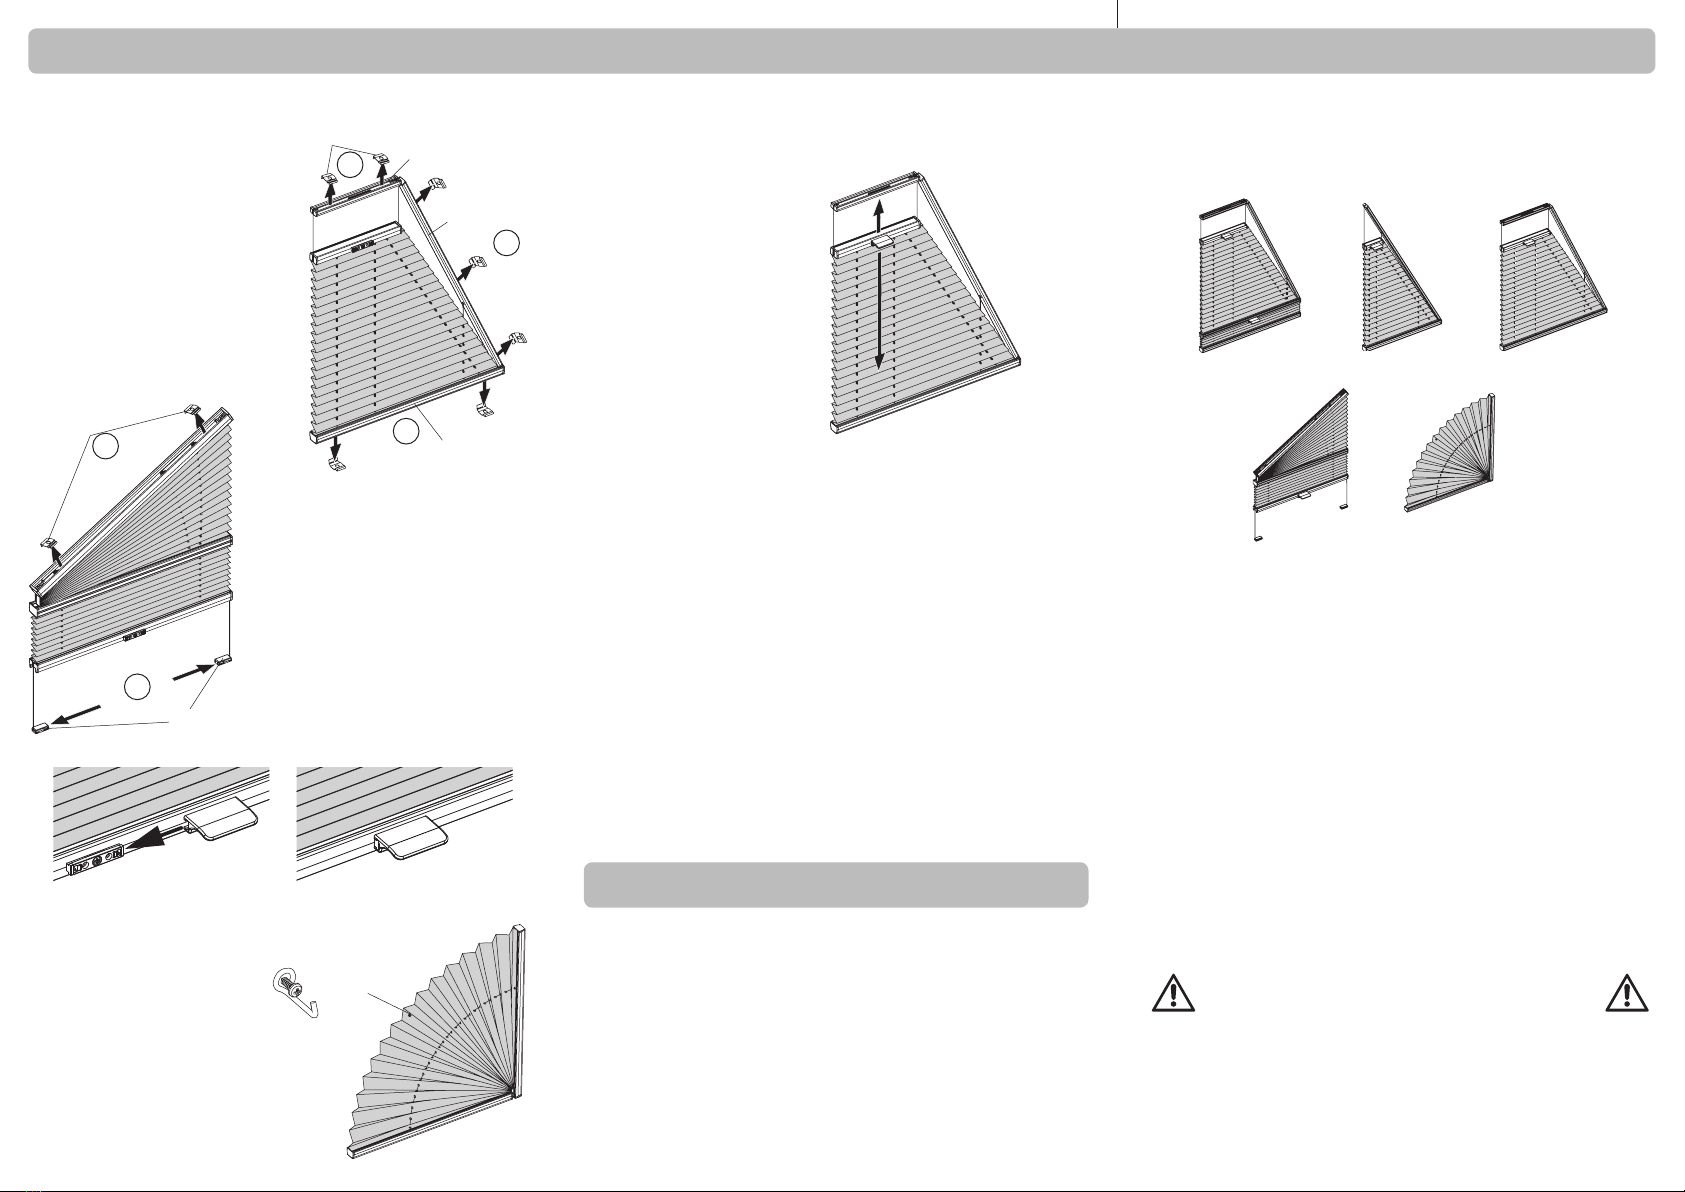
For all special models with a fixed
bottom profile:
1. Mount the bottom clips and click
the bottom profile in place.
2. Mount the top clips and click the
top profile in place.
3. Mount the clips for side profile
and click the side profile in place.
4. Mount the operating handle.
1
2
3
For model P1650:
1. Mount the top clips and click the top
profile in place.
2. Fix the retaining brackets as
already described.
3. Mount the operating handle.
1
2
Clip
Tension cord bracket
Stationary models
Fit the clips and click in the profiles.
Fit additional hooks behind the
position of the fabric rivets and
insert the fabric.
Hook
Tensioned models Operation Model P1634, P1635, P1636, P1637,
P1650, P1662, P1663
Tensioned pleated blind is
closed and opened by moving
the operating handle.
Operation Model P1001, P1043, P1044, P1082, P1086
These pleated blind models are stationary and cannot be operated.
Please read this intructions carefully
before fitting the blind
Blinds must be fitted by skilled personnel.
Wrong installation may result in accidents.
Installation work in the 230 V range
must only be carried out by authorized specialist.
Alterations of the blind must be approved by the blind manufacturer.
No screws for fixing are enclosed.
Always use appropriate screws and plugs suited for the wall or ceiling
material where the blind is fitted!
Dear Customer,
this dimensionally accurate pleated blind was produced especially
according to your requirements. High qualilty materials and a design that is
perfect in function and elegance guarantee a long service lifetime and thus
ensure great pleasure in the purchased product.
Your pleated blind Manufacturer
© 2016 Benthin® .Misprints, errors and changes excepted .Version 26-05-2016 .97000171
Care
Thanks to a special manufacturing process, our fabric qualities are
furnished with an antistatic finish and are therefore resistant to
dust and dirt. Occasional brushing with a soft brush or a feather
duster is usually sufficient.
When cleaning glass and the window frame, make sure that no
water or caustic cleaning agents come into contact with the plea-
ted blind fabric.
No guarantee can be offered for damage to fabrics that is
attributable to condesate, cleaning agents or soiling by insects.
Closing profile
Top profile
Clip
Side profile
Operating
handle
50 mm
22
16
50 mm
max. 600 mm
Clip mounting Mounting possibilities Mounting possibilities
Mount the clips 50 mm respectively from the end
of the headrail, and with a distance
of max. 600 mm.
Standard profile
Clip
Attention: It is recommended to mount the clip
with the flap forward (into the room). The clip can
only be mounted with the flap toward the window
or the pane respectively, in case the distance to
the rail is min. 7 mm.
>7 mm
Recommendation: DIN 7982 Ø 3,9 x 13 mm
(for wooden and synthetic frames)
Clip
Place the profile in the back edge of the clip and push the front of
the profile upwards (till it clicks in).
When dismounting, push the flap of the clip upwards to be able to
take the profile out of the clip.
Recommendation: DIN 7981 Ø 3,9 x 16 mm
(for wooden and synthetic frames)
Ceiling mounting with clip
Recommendation: DIN 7981 Ø 2,9 x 9,5 mm
(for wooden and synthetic frames)
!1.
2.
Profile
“Click”
Flap
Wall installation with mounting bracket and clip
Wall installation with fixed or adjustable wall mount and clip
Installing the window moulding with moulding locking strip and clip
All dimensions in millimetre! Dismantle mounting bracket
Alternative mounting
Recommendation: DIN 7981 Ø 2,9 x 9,5 mm
(for wooden and synthetic frames)
Max. length of the screw = window moulding depth!
Recommendation: DIN 7982 Ø 3,9 x 13 mm
(for wooden and synthetic frames)
Let down the blind and mark the
position for the clamping shoe (always
the outer edge of the blind). Screw on
holding brackets, mounting bracket or
window moulding.
Pull out and extend the tension cord
bracket.
For fixing plates
use mounting template (red)
see separate sheet.
1
2
Mounting bracketHolding brackets Window moulding
11
Anti-twist device
Tension cord bracket
2
Outer edge of the blind
Mounting of tension cord bracket (Typ P1650)

This manual suits for next models

12

Other Benthin Window Blind manuals

Benthin RM10 User manual

Benthin

Benthin RM10 User manual

Benthin RM07 User manual

Benthin

Benthin RM07 User manual

Benthin RL01 User manual

Benthin

Benthin RL01 User manual

Benthin RM16-Duo-Akkudesign User manual

Benthin

Benthin RM16-Duo-Akkudesign User manual

Benthin RM01-Metall User manual

Benthin

Benthin RM01-Metall User manual

Benthin RM01 User manual

Benthin

Benthin RM01 User manual

Benthin RR36 User manual

Benthin

Benthin RR36 User manual

Benthin RS01 User manual

Benthin

Benthin RS01 User manual

Benthin RS02 User manual

Benthin

Benthin RS02 User manual

Benthin RM11-Duo User manual

Benthin

Benthin RM11-Duo User manual

Benthin P1614 User manual

Benthin

Benthin P1614 User manual

Benthin RM11-Duo-Design User manual

Benthin

Benthin RM11-Duo-Design User manual

Benthin IQ2-Motor RTS Reference guide

Benthin

Benthin IQ2-Motor RTS Reference guide

Benthin M4000 User manual

Benthin

Benthin M4000 User manual

Benthin DF16 User manual

Benthin

Benthin DF16 User manual

Benthin RL11 User manual

Benthin

Benthin RL11 User manual

Benthin Vertical Blinds Parts list manual

Benthin

Benthin Vertical Blinds Parts list manual

Benthin P8700 User manual

Benthin

Benthin P8700 User manual

Benthin M3000 User manual

Benthin

Benthin M3000 User manual

Benthin P1753 Parts list manual

Benthin

Benthin P1753 Parts list manual

Benthin RL61 User manual

Benthin

Benthin RL61 User manual

Benthin ROMAN User manual

Benthin

Benthin ROMAN User manual

Benthin P2600 Parts list manual

Benthin

Benthin P2600 Parts list manual

Popular Window Blind manuals by other brands

Current E-WAND Installation manual and user's guide

Current

Current E-WAND Installation manual and user's guide

MDT KNX Smart 55 BE-JTA5504.01 Technical manual

MDT

MDT KNX Smart 55 BE-JTA5504.01 Technical manual

Velux SML instructions

Velux

Velux SML instructions

Isotra VS 2 KL Assembly manual

Isotra

Isotra VS 2 KL Assembly manual

Hella Outdoor Blinds Installation instructions and instructions for use

Hella

Hella Outdoor Blinds Installation instructions and instructions for use

Roma MODULO.P Assembly instruction

Roma

Roma MODULO.P Assembly instruction

domicet flexSet 25/28 mm Mounting instructions

domicet

domicet flexSet 25/28 mm Mounting instructions

PENTAGON DefendaGuard Manual operation

PENTAGON

PENTAGON DefendaGuard Manual operation

Altron MaxiBlackOut MS80 installation guide

Altron

Altron MaxiBlackOut MS80 installation guide

Project Source 94932 manual

Project Source

Project Source 94932 manual

RollEase Skyline Installation

RollEase

RollEase Skyline Installation

Cosiflor DF 20 manual

Cosiflor

Cosiflor DF 20 manual

CHICOLOGY SNAP-N'-GLIDE quick start guide

CHICOLOGY

CHICOLOGY SNAP-N'-GLIDE quick start guide

G-RAIL 7400-E quick reference

G-RAIL

G-RAIL 7400-E quick reference

Renson Slidefix user manual

Renson

Renson Slidefix user manual

Victoria M Kantrea Original assembly instructions

Victoria M

Victoria M Kantrea Original assembly instructions

Deco LUX installation manual

Deco

Deco LUX installation manual

VENETA 65101-11752-D How to install

VENETA

VENETA 65101-11752-D How to install

manuals.online logo
manuals.online logoBrands
  • About & Mission
  • Contact us
  • Privacy Policy
  • Terms and Conditions

Copyright 2025 Manuals.Online. All Rights Reserved.