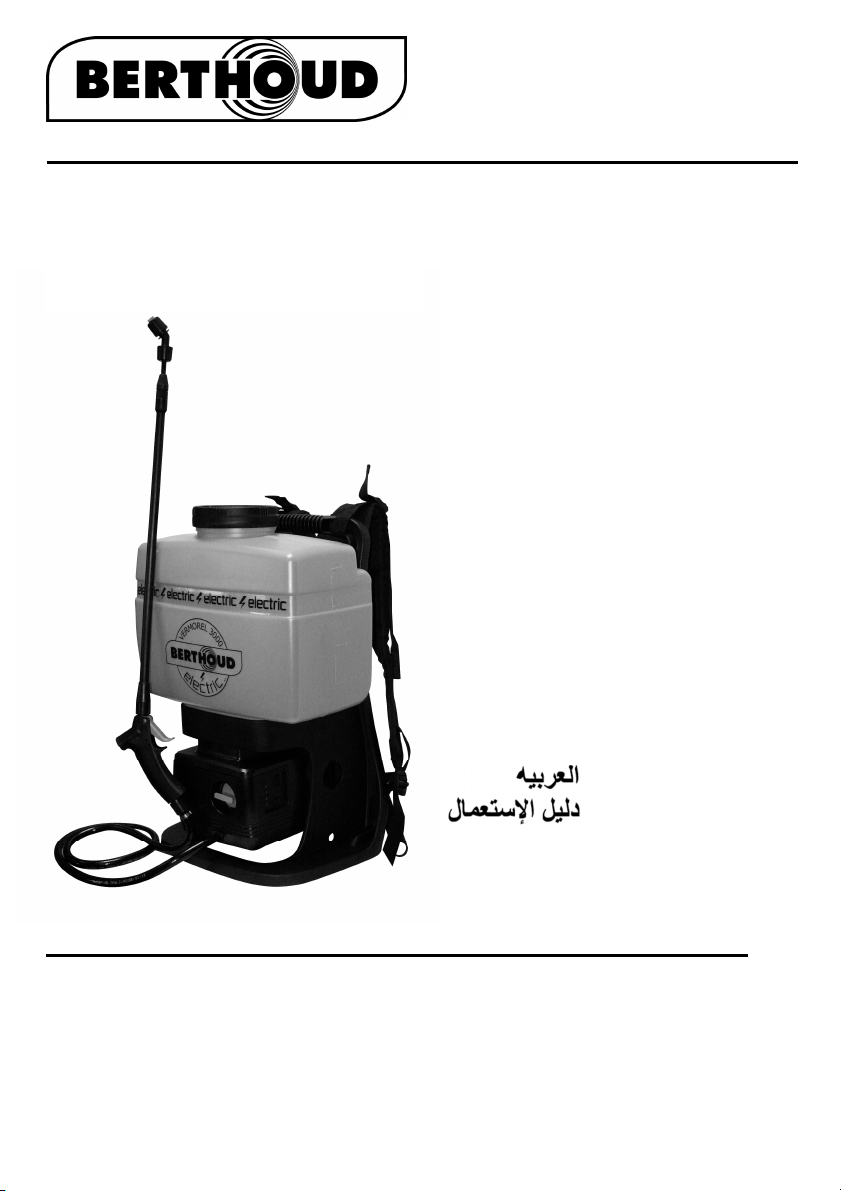
Berthoud VERMOREL 3000 ELECTRIC User manual
HOZELOCK
-
EXEL
B.P. 30424
F-69653 VILLEFRANCHE-SUR-SAÔNE CEDEX
++ / 33 / (0) 4 74 62 48 48
++ / 33 / (0) 4 74 62 37 51
e.mail : hozelock-exel@hozelock-exel.com Réf. : 585105 08/17
Vermorel 3000
Electric
Réf : 102139
FRANÇAIS
Notice d’utilisation
-----------------------------------------------------------
ENGLISH
Instructions
-----------------------------------------------------------
DEUTSCH
Bedienungsanleitung
-----------------------------------------------------------
NEDERLANDS
Gebruikshandleiding
-----------------------------------------------------------
ESPAÑOL
Manual de instrucciones
-----------------------------------------------------------
ITALIANO
Istruzioni per l'uso
-----------------------------------------------------------
DANSK
Instrukcja obsługi
-----------------------------------------------------------
-----------------------------------------------------------
-----------------------------------------------------------
1
4
9
6
7
8
5
A
2
3

Portage
santé

FRANCAIS
1 – DOMAINE D'APPLICATION
2 – CARACTERISTIQUES TECHNIQUES
3 – MISE EN SERVICE
4 – UTILISATION
5 – NETTOYAGE / ENTRETIEN
6 – REMISE EN SERVICE APRES HIVERNAGE
7 – REMPLACEMENT OU DEMONTAGE DES
BUSES EN COURS D UTILISATION
8 – BUSES UTILISABLES
9 – POUR VOTRE SECURITE
10 – PRECAUTIONS D'EMPLOI /
CONTROLES A EFFECTUER
11 – ANOMALIES DE FONCTIONNEMENT
12 – SYMBOLES UTILISES
13 – VUE ECLATEE / PIECES DETACHEES
Lire la notice avant la première
utilisation.
Attention : Pour des raisons de
sécurité, les personnes n ayant pas lu
et compris les indications données sur
cette notice, ne doivent pas utiliser le
Vermorel 3000. Les enfants et jeunes de
moins de 16 ans ne doivent pas utiliser
le Vermorel 3000 et doivent être tenus
éloignés de celui-ci lorsqu il est utilisé.
Les enfants ne doivent pas jouer avec
le Vermorel 3000. Le nettoyage et
l entretien ne doivent pas être faits par
des enfants sans supervision. Cet
appareil ne doit pas être utilisé par des
personnes (y compris des enfants)
présentant des aptitudes physiques,
sensorielles ou mentales réduites, ou
manquant de connaissances et
d expérience, à moins qu une personne
chargée de leur sécurité ne les encadre
et leur donne les instrutions suivre pour
utiliser l appareil.
1 - DOMAINE D'APPLICATION
Cet appareil est spécialement conçu pour
l'application des produits PHYTOSANITAIRES
JAR IN (fongicides, herbicides, insecticides). Ce
pulvérisateur NE CONVIENT PAS pour l'application
des produits de désinfection des locaux d'élevage
ainsi que tous les produits "Industriels" (Produits
Lessiviels (Alcalins), Soude Caustique, Eau de
Javel, etc...). Pour toute autre application il est
IMPERATIF de consulter le CONSTRUCTEUR.
Ce pulvérisateur doit être utilisé uniquement avec
des produits de protection des cultures approuvés
par les autorités locales/nationales de
réglementation pour les produits de protection des
cultures destinés aux pulvérisateurs à dos. Cet
appareil ne doit en aucun cas être utilisé pour
pulvériser des produits inflammables ou
potentiellement inflammables.
2 - CARACTERISTIQUES TECHNIQUES
Pulvérisateur portable à dos, à PRESSION
CONSTANTE et réglable, fonctionnant sur batterie
RECHARGEABLE :
- Poids à vide : 6,2 kg. (24,2 kg rempli d’eau)
- Réservoir en polyéthylène soufflé.
- Niveau visible par transparence.
- Jauge extérieure graduée.
- Capacité totale : 18 litres.
- Bretelles de portage réglables, renforcées.
- ossière souple et ventrière ajustable.
- Armature de portage ergonomique avec poignée
de portage intégrée.
- Pompe électrique à 2 membranes.
- Pression de service de 1, 1.5 et 3 bars
- Contrôle électronique régulant la pression
- Poignée avec joint résistant (matière FKM).
- Lance télescopique composite équipée d'un porte
buse; livré avec un jeu complet de buses (pastille,
pinceau et miroir).
- Filtre de réservoir
- Batterie 12 Volt technologie Lithium-ion.

FRANCAIS
- Chargeur de batterie 12 Volt spécifique.
- Cet appareil ne doit pas être utilisé à une
température inférieure à 5°C et supérieure à 40°C.
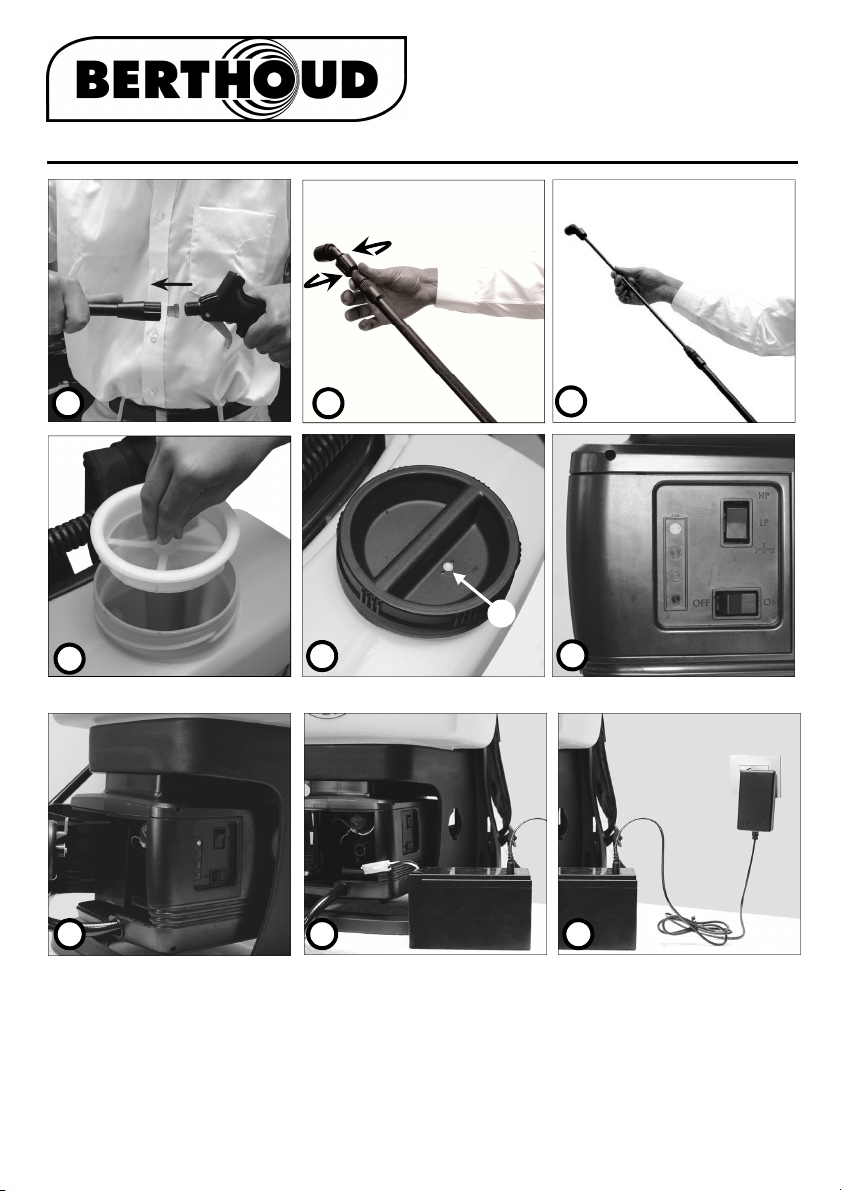
3 - MISE EN SERVICE
1. Visser la lance télescopique sur la poignée de
lance. Vérifier la présence du joint d'étanchéité
(fig. 01).
2. Sortez la batterie du pulvérisateur
3. ébranchez ou non la batterie.
4. Relier le chargeur à votre batterie par la prise
de recharge, puis brancher le chargeur au
secteur. (fig. 08).
Utiliser uniquement le chargeur fourni
avec l’appareil pour recharger la batterie
a. Le voyant ROUGE du
chargeur s'allume, indiquant que la batterie est
en cours de charge. (fig. 03).
b. Lorsque la charge est terminée, le voyant
ROUGE devient vert, indiquant que votre
appareil est prêt à l'utilisation (ou au
rangement).
5. éplier la lance télescopique
6. Mettre le pulvérisateur sur le dos et ajuster le
portage suivant les 4 photos
(fig. Portage santé)
La lance télescopique est conseillée pour un
traitement en hauteur et la lance fibre de verre pour
un traitement au sol notament avec des rampes de
traitement.
4 - UTILISATION
1. Préparation de la solution à pulvériser :
a.Produit en poudre (soluble ou mouillable)
Préparer la solution dans un seau avant de la
transvaser dans le réservoir par l’orifice de
remplissage, en se servant de la jauge
repérée « ELECTRIC ».
b.Produit à base liquide
Mettre 1 à 2 litres d’eau dans le réservoir,
verser la dose de produit liquide puis
compléter en eau à la quantité désirée, en se
servant de la jauge repérée « ELECTRIC ».
2. Visser manuellement le bouchon de
remplissage sur le réservoir
3. éplier entièrement la lance
télescopique. Purgez l'air en orientant
votre lance vers le haut et en actionnant
la gâchette durant quelque seconde, ceci
afin d'avoir un bon fonctionnement du système
anti-goutte et du régulateur de pression. (fig. 3)
4. Basculer l’interrupteur en position ON (fig. 6)
5. Sélectionnez la pression recommandée selon
votre buse et votre utilisation (paragraphe 7)
6. Actionner la gâchette pendant quelques
secondes. Votre appareil va calibrer la pompe
en fonction de la buse et de la pression
sélectionnée.
7. Régler ensuite la lance télescopique à la
longueur désirée.
8. La pulvérisation s'obtient par action sur la
gâchette. Lorsque vous relâchez la gâchette le
moteur s’arrête.
9. Le taux de charge de la batterie est indiqué par
4 LE s (fig. 6). Chaque LE représente 25% de
charge.
NOTA :
En cours de traitement si votre moteur stoppe et que
le voyant rouge du boitier clignote, cela indique que
vous devez recharger votre batterie.
5 - NETTOYAGE / ENTRETIEN
Après chaque utilisation :
1. Récupérer le mélange EXCE ENTAIRE
pouvant subsister dans le réservoir.
2. Rincer le réservoir.
3. Nettoyer le filtre de remplissage du réservoir.
4. Nettoyer le filtre d'aspiration situé dans le fond
du réservoir après avoir bien vidé l eau de
rinçage. Celui-ci se démonte en tirant vers le
haut. Ne jamais démonter en dévissant. (voir
paragraphe 11)
5. Le rinçage du filtre se fait en introduisant l'eau
par l’intérieur (Rincer sous le robinet).
6. Le remontage s'effectue par simple
emboîtement, sans visser.

FRANCAIS
7. Rincer le circuit en pulvérisant 2 à 3 litres d'eau
propre
8. Mettre en charge le pulvérisateur avant de le
ranger.
NOTA : Le pulvérisateur doit toujours être stocké
vide de tout eau ou produit de traitement à une
température supérieure à 5°C et vérifier tous les
ans.
Lors du transport, le pulvérisateur doit être
solidement arrimé afin d’éviter tout risque de chute,
de collision ou de blessure.
6 - REMISE EN SERVICE APRES HIVERNAGE
1. Recharger la batterie du pulvérisateur.
2. Rincer le circuit en pulvérisant 2 à 3 litres d'eau
propre en vérifiant qu’il n’y ait aucune fuite au
niveau des différentes jonctions.
3. Le pulvérisateur est prêt à être utilisé. Voir
chapitre 4.
7 - REMPLACEMENT OU DEMONTAGE DES
BUSES EN COURS D UTILISATION
1. Lors du démontage des buses, l’utilisateur doit
impérativement conserver ses équipements
individuels de protection (gants, lunettes…).
2. évisser la buse du porte-buse et la rincer
immédiatement.
3. Attention, le liquide contenu dans le tube de
lance risque de s’écouler. Ne pas actionner la
gâchette.
4. Visser la nouvelle buse ou la buse nettoyée.
5. Utiliser uniquement des buses de la marque
Berthoud (voir tableau ci-après).
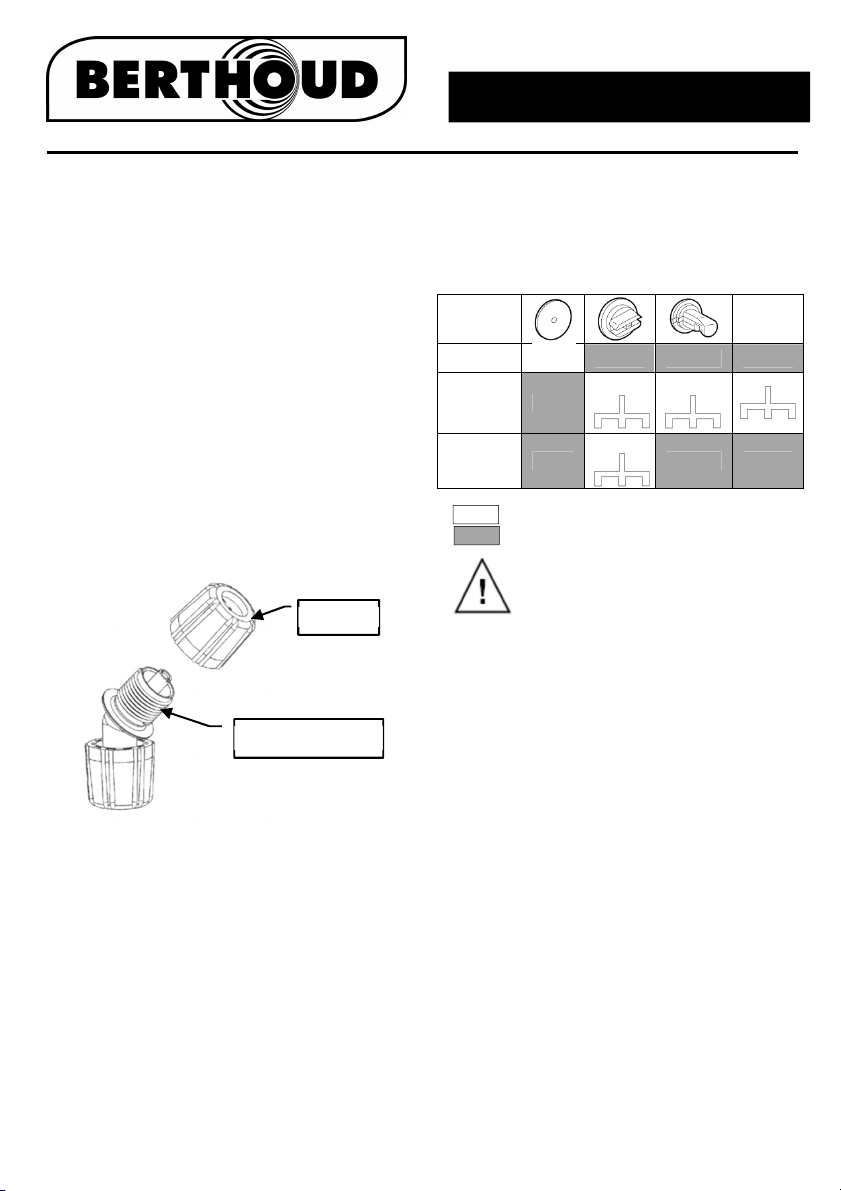
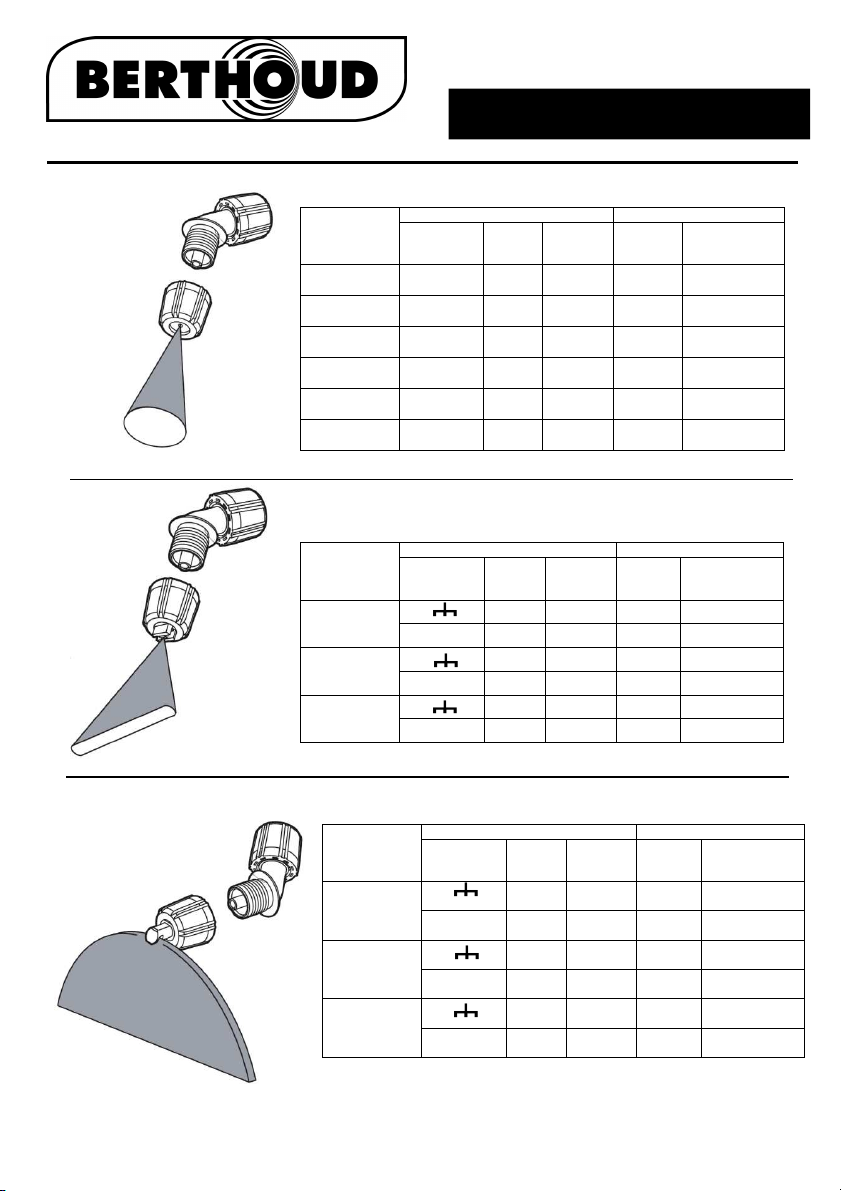
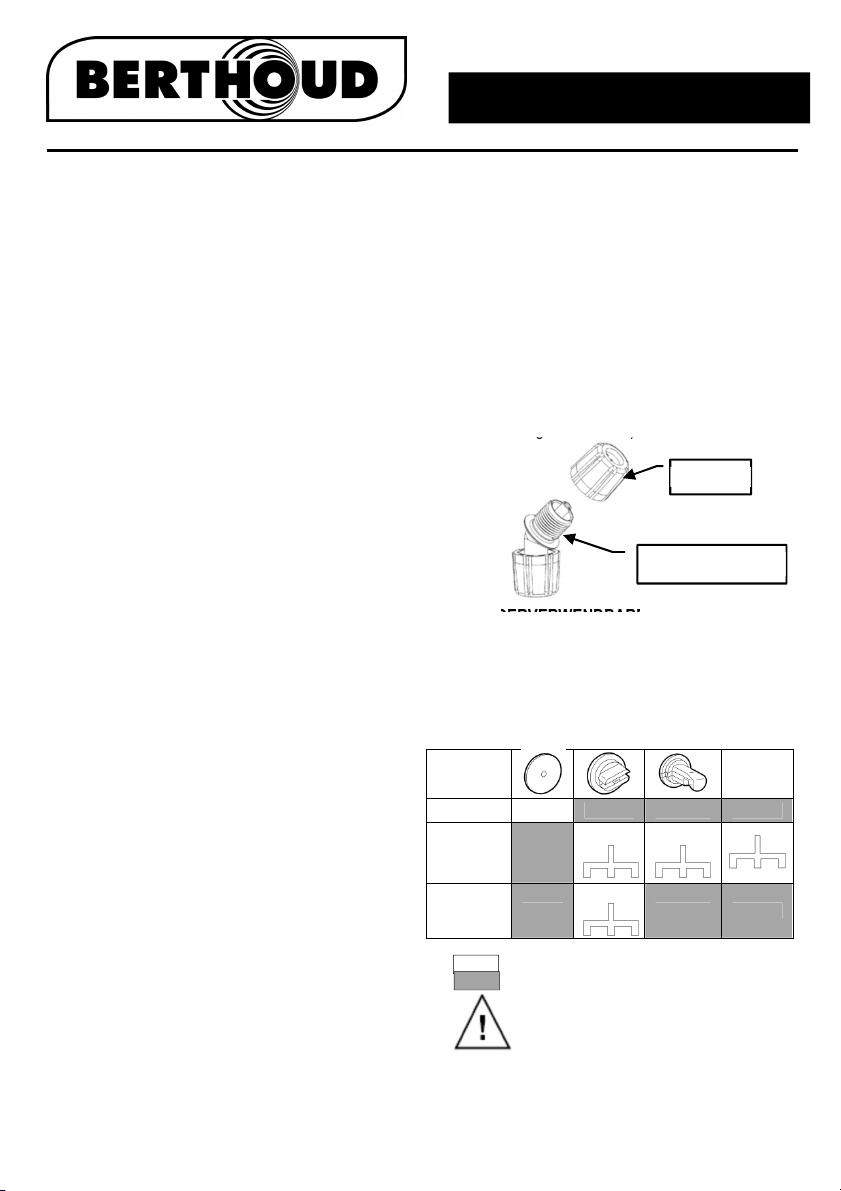
8 - BUSES UTILISABLES
Le VERMOREL 3000 "ELECTRIC" se caractérisant
par un fonctionnement à PRESSION CONSTANTE,
et ce quel que soit le niveau de décharge de la
batterie. Le choix des valeurs de EBIT et
PRESSION se fait EXCLUSIVEMENT par le bouton
sélecteur (fig. 6).
RAMPE
Fongicide
Insecticide HP
Herbicide
non
sélectif
LP LP
Herbicide
sélectif
LP
Recommandé
Impossible
A chaque changement de buse, vous
devez éteindre puis rallumer votre
appareil afin de permettre à votre
appareil de se re-calibrer.
Buse
Porte-buse

FRANCAIS
PASTILLES
(Ø)
Caractéristiques AUTONOMIES
Sélecteur
de pression DEBIT
(L/min) Pression
(bar) LITRES RESERVOIRS
(10/10)
Réf : 410552
HP 0.36 3 108 6
(12/10)
Réf : 410553
HP 0.47 3 141 7
(15/10)
Réf : 410554
HP 0.66 3 198 11
(18/10)
Réf : 410552
HP 0.80 3 240 13
(20/10)
Réf : 410553
HP 0.87 3 261 14
(25/10)
Réf : 410554
HP 1.16 3 348 19
BUSE
PINCEAU
Caractéristiques AUTONOMIES
Sélecteur
de pression DEBIT
(L/min) Pression
(bar) LITRES RESERVOIRS
Jaune 02-80
Réf : 764436
0.56 1 168 9
LP 0.60 1.5 180 10
Bleu 03-80
Réf : 764437
0.69 1 207 11.5
LP 0.83 1.5 249 13
Rouge 04-110
Réf : 764438
1.12 1 336 18
LP 1.20 1.5 360 20
BUSE
MIROIR
Caractéristiques AUTONOMIES
Sélecteur
de pression DEBIT
(L/min) Pression
(bar) LITRES RESERVOIRS
Jaune DT 1,0
Réf : 712197
0.46 1 138 7.5
LP 0.57 1.5 171 9.5
Marron DT 2,5
Réf : 710984
1.15 1 345 19
LP 1.41 1.5 450 25
Grise DT 3,0
Réf : 711584
1.39 1 300 16.5
LP 1.70 1.5 450 25

FRANCAIS
9 - POUR VOTRE SECURITE
- Ne jamais mettre en charge votre pulvérisateur
dans un environnement humide.
- Ne jamais brancher (ou débrancher) le chargeur
sur le réseau les mains mouillées.
- Vérifier le voltage indiqué sur la plaque du
chargeur.
- Recharger la batterie du pulvérisateur
uniquement avec le chargeur fourni avec
celui-ci.
- Recharger la batterie du pulvérisateur uniquement
à l’intérieur. Symbole (1) (voir paragraphe 11).
- Ne pas utiliser le chargeur lorsque celui-ci est
endommagé, dans ce cas contacter le service
après-vente Berthoud.
- Ne pas utiliser la batterie lorsque celle-ci est
endommagée ; remplacez-la au plus vite.
- Ne tentez pas de recharger des batteries autres
que celles fournies avec l’appareil.
- L’utilisateur de ce produit doit avoir suivi une
formation adéquate pour l’utilisation en sureté de cet
appareil.
- Cet appareil ne doit pas être utilisé en cas de
fatigue, maladie, sous l’emprise de l’alcool, drogue
ou autre médicament.
- Il est recommandé d’utiliser cet appareil sous le
vent par rapport à l’opérateur.
- Porter GANTS, LUNETTES et MASQUE de
protection ou tout autre équipement de protection
individuelle demandé par la réglementation locale à
chaque phase d’utilisation du pulvérisateur :
remplissage de la cuve, pulvérisation, réglages,
vidange, nettoyage, changement de produit
chimique, entretien.
- Cet appareil est équipé d’un interrupteur
permettant de couper l’alimentation du produit dès
qu’il n’est plus utilisé.
10 - PRECAUTIONS D'EMPLOI / CONTROLES A
EFFECTUER
AVANT EMPLOI
- S'assurer du bon fonctionnement de l'appareil en
vérifiant les étanchéités, en mettant quelques litres
d'eau dans le réservoir.
- Vérifier la présence et l'état du clapet (A) du
couvercle. (fig. 10).
- Ne traiter que par temps calme. (Sans Vent).
- Porter des vêtements couvrant la totalité du corps
ou mettre une Tenue de Protection.
- Respecter les instructions du fabricant de produits
de traitement (dosages, mode d'application,
rinçage).
- Ce pulvérisateur ne peut être utilisé qu'avec la
pompe qui l'équipe.
PENDANT EMPLOI
- Porter GANTS, LUNETTES et MASQUE de
protection ou tout autre équipement de protection
individuelle demandé par la réglementation locale.
- Ne pas FUMER, BOIRE ou MANGER.
- Ne pas Pulvériser en direction des PERSONNES
ou ANIMAUX OMESTIQUES.
- Préserver l'environnement, ne PULVERISER que
les arbres ou arbustes à traiter.
APRES EMPLOI
- Récupérer l'éventuel excédent de produit ; rincer le
réservoir à l'eau claire, en laissant le filtre monté.
- Nettoyer le filtre de remplissage du réservoir
(fig. 4).
- Avant de procéder au démontage du filtre
d ASPIRATION, bien vider complètement le
réservoir de son eau de RINÇAGE.
- Nettoyer le filtre d'aspiration situé dans le fond du
réservoir. Celui-ci se démonte en tirant vers le haut
(fig. 12). Ne jamais démonter en dévissant.
Le rinçage se fait en introduisant l'eau par l'intérieur
(rincer sous le robinet). Le remontage s'effectue par
simple emboîtement, sans visser.
- Rincer le circuit en pulvérisant 2 à 3 litres d’eau.
- Eviter les risques de pollution en récupérant le
produit non utilisé, ainsi que son emballage.
- Se LAVER les mains et le visage apres traitement.
- Ne jamais se servir du Pulvérisateur comme
moyen de stockage du produit à appliquer.
- RANGER le pulvérisateur HORS E PORTEE
ES ENFANTS.

FRANCAIS
11 - ANOMALIES DE FONCTIONNEMENT / SOLUTIONS
ANOMALIES CONSTATEES
POINTS A
VERIFIER
ACTIONS A MENER
Fuite entre la poignée et le tube
de lance.
Présence et bon état du joint.
Remettre en place ou remplacer.
Après arrêt, la lance continue à
couler.
e l’air est bloqué dans la lance
télescopique.
éplier complètement la lance
télescopique.
Pulvériser 10 s avec la lance
dépliée et orienter vers le haut
afin de chasser l’air bloqué dans
la lance.
La batterie semble ne pas
prendre la charge.
a) Vérifier le bon fonctionnement
du chargeur (voyants).
b) La batterie est ancienne.
c) La batterie est récente
a) Remplacer en cas de non
fonctionnement.
b) Remplacer la batterie.
c) Contacter le SAV.
La batterie semble ne pas avoir
son autonomie normale.
a) La batterie est ancienne.
b) La batterie est récente.
a) Remplacer la batterie.
b) Contacter le SAV.
Le moteur tourne, mais l’appareil
pulvérise faiblement
Propreté du filtre d’aspiration au
fond du réservoir.
Nettoyage du filtre.
Le moteur tourne, mais l’appareil
ne pulvérise pas.
a) La buse est
bouchée.
b) La buse est propre.
a) Nettoyer la buse.
b) Ne pas chercher à intervenir.
Contacter le SAV.
Le moteur ne tourne pas.
a) La batterie n’est pas branch
ée
b) Le témoin de charge batterie
rouge clignote.
c) le témoin de charge batterie est
allumé et ne clignote pas.
a) Brancher la batterie sur votre
Vermorel
b) Recharger votre batterie
c) Contacter le SAV Berthoud.
Mauvaise pulvérisation
a) Vérifier les positions
recommandées pour chaque buse.
b) Calibrage de la buse non
optimisé.
c) Présence d’air dans la lance.
a)
Utiliser
les positions
recommandé pour chaque buse.
b) Arrêter et redémarrer votre
pulvérisateur.
c) se reporter au paragraphe 4.3
Fuite d’eau au bas de l’appareil.
Vérifier les branchements et l’état
des tuyaux d’alimentation pompe et
amorçage.
Resserrer si besoin.
Remplacer si percé.
Eventuellement contacter le SAV.
FRANCAIS
12 - SYMBOLES UTILISES
1. Utilisation du chargeur en INTÉRIEUR
exclusivement
2. Ne pas mettre avec les ordures ménagères
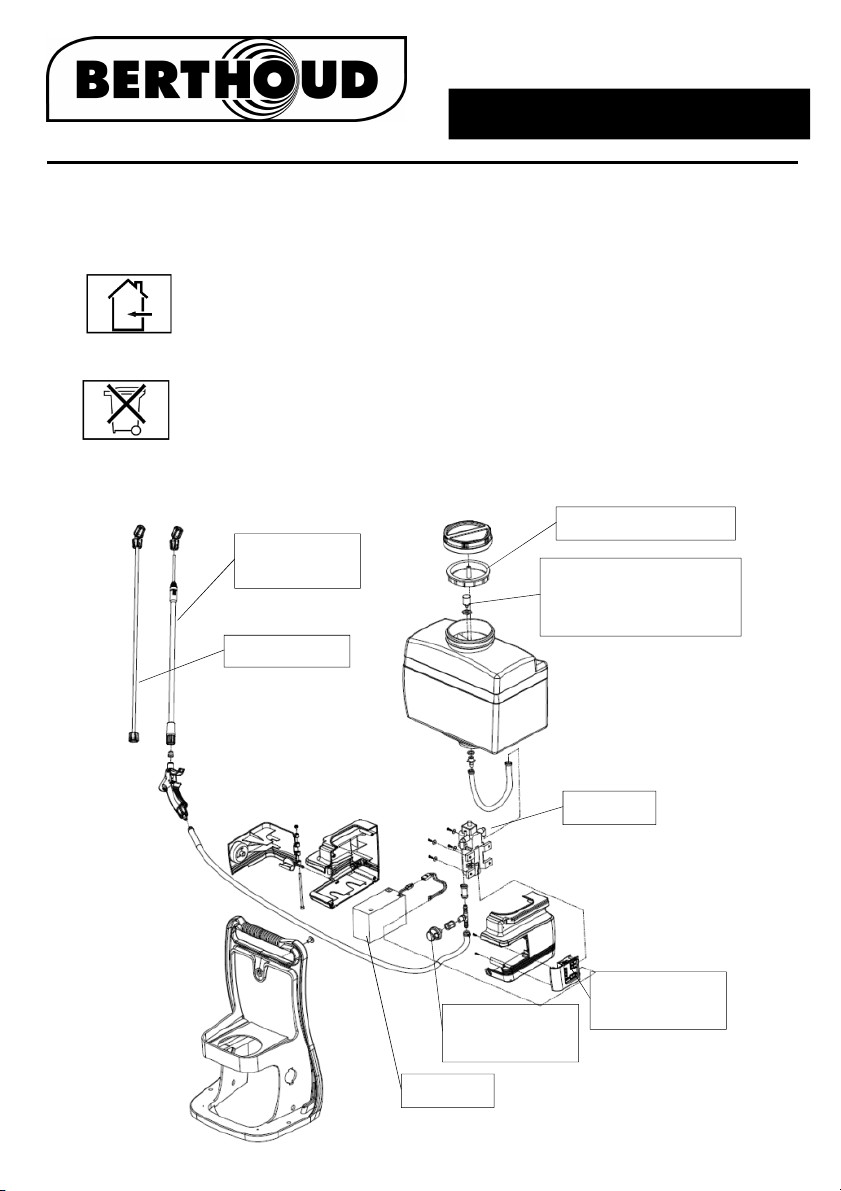
13 - VUE ECLATEE / PIECES DETACHEES
Pompe
Batterie
Capteur de
pression
Carte
électronique
Lance
télescopique
Filtre d’aspiration
imension de la maille :
160µmx160µm
Filtre de remplissage
Lance

ENGLISH
1 – SCOPE OF APPLICATION
2 – TECHNICAL SPECIFICATIONS
3 – COMMISSIONING
4 – USE
5 – CLEANING / MAINTENANCE
6 – RESTARTING AFTER WINTERING
7 – NOZZLE REPLACEMENT OR
DISASSEMBLING DURING SPRAYER USE
8 – USABLE NOZZLES
9 – FOR YOUR SAFETY
10 – PRECAUTIONS FOR USE / CHECKS TO BE
PERFORMED
11 – MALFUNCTIONS
12 – SYMBOLS USED
13 – EXPLODED VIEW / SPARE PARTS
Please read the manual before
first use.
Caution! For safety purposes, do not
use the Vermorel 3000 device without
having thoroughly read and understood
these instructions.
Children and teenagers below the age
of 16 should not use the Vermorel 3000
and must stand away when it is in use.
Children shall not play with the
appliance. Cleaning and user
maintenance shall not be made by
children without supervision. This
product should not be used by parsons
(including children) with impaired
physical, sensory or mental abilities, or
lacking knowledge and experience,
without supervision by a person in
charge of their safety, instructing them
on how to use the device.
1 - SCOPE OF APPLICATION
This machine is specially designed for the
application of GAR EN PLANT PROTECTION
products (fungicides, herbicides, insecticides). This
sprayer IS NOT SUITABLE for the application of
products for disinfecting livestock facilities and of all
"Industrial" products (laundry products (alkaline),
caustic soda, bleach, etc.). For any other application,
you MUST consult the MANUFACTURER.
This sprayer must be used only with crop protection
products approved by local/national regulatory
authorities for crop protection products intended for
backpack sprayers. This machine must not in any
circumstance be used to spray flammable or
potentially flammable products.
2 - TECHNICAL SPECIFICATIONS
Backpack sprayer, with CONSTANT and adjustable
PRESSURE, operating on a
RECHARGEABLE battery:
- Empty weight: 6.2 kg. (24.2 kg filled with water)
- Blown polyethylene tank.
- Visible liquid level.
- Graduated external gauge.
- Total capacity: 18 litres.
- Adjustable, padded carrying straps.
- Flexible back pad and adjustable belly strap.
- Ergonomic carrying frame, with built-in carrying
handle.
- Electric double diaphragm pump.
- Operating pressure of 1, 1.5 and 3 bar
- Electronic control for adjusting pressure
- Handle with resistant seal (material: FKM).
- Composite telescopic lance equipped with a nozzle
holder; supplied with a complete set of nozzles
(swirl, flat fan and anvil nozzles).
- Tank filter
- 12 Volt lithium-ion battery.
- edicated 12 volt battery charger.
- This machine must not be used at a temperature
lower than 5°C and higher than 40°C.

ENGLISH
3 - COMMISSIONING
4. Screw the telescopic lance onto the lance
handle. Check that the seal is present (Fig. 1).
5. Remove the battery from the sprayer.
6. isconnect the battery if necessary.
7. Connect the charger to your battery via the
charging socket, and then connect the charger
to the mains socket. (Fig. 8).
Use only the charger supplied with the
machine to charge the battery
a. The charger's RE indicator
turns on, indicating that the battery is being
charged. (Fig. 3).
b. When the charging is complete, the RE
indicator turns green, indicating that your
machine is ready for use (or storage).
8. Unfold the telescopic lance
9. Place the sprayer on your back and adjust the
harness as shown in the 4 photos
(Fig. Safety harness)
4 - USE
1. Preparing the solution to be sprayed:
a. Product in powder form (soluble or
wettable)
Prepare the solution in a bucket before
transferring it to the tank through the filler
opening, using the gauge marked
"ELECTRIC".
b. Liquid-based product
Put 1 to 2 litres of water into the tank, pour the
dose of liquid product and then top up with
water to the desired quantity, using the gauge
marked "ELECTRIC".
2. Screw the filler plug by hand on the tank.
3. Fully unfold the telescopic
lance. Purge the air by pointing your
lance up and by pressing on the trigger
for a few seconds; this ensures the
proper operation of the anti-drip system and the
pressure regulator. (Fig. 3).
4. Flip the switch to ON position (Fig. 6)
5. Select the recommended pressure depending
on your nozzle and your use (Section 7)
6. Press on the trigger for a few seconds. Your
machine will calibrate the pump depending on
the nozzle and the selected pressure.
7. Then adjust the telescopic lance to the desired
length.
8. Press on the trigger to spray. When you release
the trigger, the motor stops.
9. The battery charge level is indicated by 4 LE s
(Fig. 6). Each LE represents 25% of charge.
NOTE:
If your motor stops and the red indicator on the unit
flashes during application, it means that you must
recharge your battery.
5 - CLEANING / MAINTENANCE
After every use:
1. Collect the EXCESS mixture that may remain in
the tank.
2. Rinse the tank.
3. Clean the tank's filler filter.
4. Clean the suction filter located on the base of
the tank after fully draining the rinsing water.
You can remove this filter by pulling it up. Never
remove it by unscrewing. (see Section 11)
5. Rinse the filter by running water through the
inside (Rinse under a tap).
6. Refit it by simply snapping it on, without
screwing.
7. Rinse the circuit by spraying 2 to 3 litres of clean
water.
8. Charge the sprayer before storing it.
NOTE: The sprayer must always be stored without
water or treatment product at a temperature higher
than 5°C and must be checked every year.
uring transport, the sprayer must be secured tightly
to avoid any risk of fall, collision or injury.
ENGLISH
6 - RESTARTING AFTER WINTERING:
1. Recharge the sprayer battery.
2. Rinse the circuit by spraying 2 to 3 liters of clean
water, check that there are no leak at each
junction.
3. The sprayer is ready for use. See chapter 4.
7 - NOZZLE REPLACEMENT OR
DISASSEMBLING DURING SPRAYER USE:
1. uring nozzle disassembling, the user shall
imperatively keep his personal safety equipment
(gloves, goggles…).
2. Unscrew the nozzle of the nozzle support and
rinse the nozzle immediately.
3. Be careful, the liquid contained in the tube could
spill. on’t press the trigger.
4. Screw the new nozzle or the clean nozzle.
5. Use only the Berthoud nozzle (see the figure).
8 - USABLE NOZZLES
VERMOREL 3000 "ELECTRIC" is characterised by
an operation at CONSTANT PRESSURE,
regardless of the battery charge level. The FLOW
RATE and PRESSURE values are selected
EXCLUSIVELY using the Selector button (Fig. 6).
BOOM
Fungicide
Insecticide HP
Non-
selective
herbicide LP LP
Selective
herbicide LP
Recommended
Impossible
Every time the nozzle is changed, you
must switch your machine off and then
on again so that it recalibrates itself.
Nozzle
Nozzle support
ENGLISH
SWIRL (Ø)
Specifications BATTERY LIFE
Pressure
selector FLOW
RATE
(L/min)
Pressure
(bar) LITRES TANKS
(10/10)
Ref: 410552
HP 0.36 3 108 6
(12/10)
Ref: 410553
HP 0.47 3 141 7
(15/10)
Ref: 410554
HP 0.66 3 198 11
(18/10)
Ref: 410552
HP 0.80 3 240 13
(20/10)
Ref: 410553
HP 0.87 3 261 14
(25/10)
Ref: 410554
HP 1.16 3 348 19
FLAT FAN
NOZZLE
Specifications BATTERY LIFE
Pressure
selector FLOW
RATE
(L/min)
Pressure
(bar) LITRES TANKS
Yellow 02-80
Ref: 764436
0.56 1 168 9
LP 0.60 1.5 180 10
Blue 03-80
Ref: 764437
0.69 1 207 11.5
LP 0.83 1.5 249 13
Red 04-110
Ref: 764438
1.12 1 336 18
LP 1.20 1.5 360 20
ANVIL
NOZZLE
Specifications BATTERY LIFE
Pressure
selector FLOW
RATE
(L/min)
Pressure
(bar) LITRES TANKS
Yellow DT 1.0
Ref: 712197
0.46 1 138 7.5
LP 0.57 1.5 171 9.5
Brown DT 2.5
Ref: 710984
1.15 1 345 19
LP 1.41 1.5 450 25
Grey DT 3.0
Ref: 711584
1.39 1 300 16.5
LP 1.70 1.5 450 25

ENGLISH
9 - FOR YOUR SAFETY:
- Never charge your sprayer in humid conditions.
- Never connect (or disconnect) the charger to (or
from) the mains supply with wet hands.
- Check the voltage indicated on the charger's
nameplate.
- Only recharge the sprayer battery with
the charger supplied with it.
- Only recharge the sprayer battery
indoors. Symbol (1) (see Section 11).
- o not use the charger if it is damaged; in this
case, please contact the Berthoud customer service.
- o not use the battery if it is damaged; replace it
immediately.
- o not attempt to recharge batteries other than
those supplied with the machine.
- The user of this product must have been suitably
trained to use this machine in complete safety.
- This machine must not be used in case of fatigue,
illness, or under the influence of alcohol, drugs or
any other medication.
- It is recommended to use this machine downwind
of the operator.
- Wear protective GLOVES, GOGGLES and MASK
or any other personal protective equipment required
by local regulations for each phase in the use of the
sprayer: filling the tank, spraying, settings, draining,
cleaning, changing the chemical product,
maintenance.
- This machine is equipped with a switch for cutting
off supply of the product when it is no longer used.
10 - PRECAUTIONS FOR USE / CHECKS TO BE
PERFORMED
BEFORE USE
- Check the seals to ensure the proper operation of
the machine by pouring a few litres of water into the
tank.
- Check the presence and condition of the flap (A) on
the lid. (Fig. 10).
- Spray only during calm weather. (with no wind).
- Wear clothes covering the entire body or put on
protective clothing.
- Follow the instructions of the treatment product
manufacturer (dose, method of application, rinsing).
- This sprayer can be used only with the pump that
comes with it.
DURING USE
- Wear protective GLOVES, GOGGLES and MASK
or any other personal protective equipment required
by local regulations.
- o not SMOKE, RINK or EAT.
- o not spray on PEOPLE or PETS.
- To protect the environment, SPRAY only the trees
or shrubs to be treated.
AFTER USE
- Collect the excess product, if any; rinse the tank
with clean water, leaving the filter in place.
- Clean the tank's filler filter.
(Fig. 4).
- Before removing the SUCTION filter, completely
drain the RINSING water from the tank.
- Clean the suction filter on the base of the tank.
Remove this filter by pulling it up (Fig. 12). Never
remove it by unscrewing.
Rinse it by running water through the inside (rinse
under a tap). Refit it by simply snapping it on,
without screwing.
- Rinse the circuit by spraying 2 to 3 litres of water.
- Avoid pollution risks by collecting the unused
product and its packaging.
- WASH your hands and face after spraying.
- Never use the sprayer as storage for the product to
be applied.
- KEEP the sprayer OUT OF THE REACH
OF CHIL REN.

ENGLISH
11 - MALFUNCTIONS / SOLUTIONS
MALFUNCTIONS OBSERVED
POINTS TO CHECK
ACTION NEEDED
Leak between the handle and
the lance tube. Seal is present and in good
condition. Put it back in place or replace.
Once the machine is stopped,
the lance continues to flow. Air is blocked inside the
telescopic lance. Fully unfold the telescopic
lance.
Spray for 10 seconds with the
lance unfolded and point it
up to expel the air blocked in
the lance.
The battery does not seem to
charge. a) Check that the charger is
working properly (indicators).
b) The battery is old.
c) The battery is relatively new.
a) Replace if it is not
working.
b) Replace the battery.
c) Contact the Customer
Service.
The battery does not seem to
have its normal lifespan. a) The battery is old.
b) The battery is relatively new. a) Replace the battery.
b) Contact the Customer
Service.
The motor runs, but the machine
sprays weakly Cleanliness of the suction filter
on the base of the tank. Clean the filter.
The motor runs, but the machine
does not spray. a) The nozzle is clogged.
b) The nozzle is clean. a) Clean the nozzle.
b) Do not attempt to repair.
Contact the Customer Service.
The motor does not run. a) The battery is not connected
b) The red battery charge
indicator flashes.
c) The red battery charge
indicator lit up and does not
flash.
a) Connect the battery to your
Vermorel
b) Recharge your battery
c) Contact the Berthoud
Customer Service.
Poor spraying a) Check the recommended
positions for each nozzle.
b) Nozzle calibration not
optimised.
c) Presence of air in the lance.
a) Use the recommended
positions for each nozzle.
b) Stop and restart your
sprayer.
c) Refer to Section 4.3
Leakage of water at the base of
the machine. Check the connections and
condition of the pump and
priming feed tubes.
Tighten if necessary.
Replace if pierced.
If necessary, contact the
Customer Service.
ENGLISH
12 - SYMBOLS USED
1. Use the charger IN OORS only
2. o not dispose of with household waste
13 - EXPLODED VIEW / SPARE PARTS
Pump
Battery
Pressure
sensor
Electronic board
Telescopic
lance
Suction filter
Mesh width:
160µmx160µm
Filler filter
Lance

DEUTSCH
1 – ANWENDUNGSBEREICH
2 – TECHNISCHE MERKMALE
3 – INBETRIEBNAHME
4 – VERWENDUNG
5 – REINIGUNG / PFLEGE
6 – WIEDERINBETRIEBNAHME NACH DEM
ÜBERWINTERN
7 – AUSTAUSCH ODER ABMONTIEREN DER
DÜSEN WÄHREND DER VERWENDUNG
8 – VERWENDBARE DÜSEN
9 – ZU IHRER SICHERHEIT
10 – VORSICHTSMASSNAHMEN /
DURCHZUFÜHRENDE KONTROLLEN
11 – FUNKTIONSFEHLER
12 – VERWENDETE SYMBOLE
13 – EXPLOSIONSZEICHNUNG / ERSATZTEILE
Vor dem ersten Gebrauch die
Betriebsanleitung aufmerksam
lesen.
Achtung: Aus Sicherheitsgründen
dürfen die Personen, die die Angaben
vorliegender Bedienungsanleitung nicht
gelesen und verstanden haben, den
Vermorel 3000 nicht verwenden.
Kinder und Jugendliche unter 16 Jahren
dürfen Vermorel 3000 nicht benutzen
und müssen sich bei dessen Betrieb
fern vom Gerät halten.
Dieses Gerät darf nicht von Personen
(inklusive Kinder) verwendet werden,
die körperlich, sensorisch oder geistig
behindert sind, oder nicht über
genügend Kenntnisse und Erfahrung
verfügen, es sei denn, eine mit ihrer
Sicherheit beauftragte Person betreut
sie und gibt ihnen die notwendigen
Anweisungen für den Einsatz des
Gerätes.
1 - ANWENDUNGSBEREICH
ieses Gerät wurde spezifisch für die Anwendung
von PFLANZENSCHUTZMITTELN IM GARTEN
(Fungizide, Herbizide, Insektizide) entwickelt. ieses
Spritzgerät ARF AUF KEINEN FALL für die
Anwendung von esinfektionsmitteln in Ställen
sowie jegliche Art von "industriellen" Substanzen
(Waschmittel (Alkalisch), Natronlauge, Bleichmittel
(Chlor) etc.) verwendet werden. Für jeglichen
anderen Gebrauch muss zuvor ZWINGEN
AUSKUNFT BEIM HERSTELLER eingeholt werden.
ieses Spritzgerät darf nur mit
Pflanzenschutzmitteln verwendet werden, die von
den lokal/national zuständigen Behörden und Stellen
für die Zulassung von Pflanzenschutzmitteln für die
Anwendung mit Rückenpumpen genehmigt wurden.
ieses Gerät darf unter keinen Umständen für das
Sprühen von entzündbaren oder potenziell
entzündbaren Substanzen verwendet werden.
2 - TECHNISCHE MERKMALE
Tragbare Rückenpumpe mit KONSTANTEM und
EINSTELLBAREM RUCK, Betrieb mit einem
wieder aufladbaren Akku.
- Leergewicht: 6,2 kg. (24,2 kg mit Wasserfüllung)
- Tank aus geblasenem Polyethylen.
- Pflanzenschutzmittelstand sichtbar durch
Transparenz.
- Pegelstab mit Einteilung außen.
- Gesamtfassungsvermögen: 18 Liter
- Verstellbare, verstärkte Träger.
- Weiches Rückenteil, anpassbarer Bauchgurt.
- Ergonomisches Tragegerüst mit integriertem
Tragegriff.
- Elektrische Pumpe mit 2 Membranen.
- Betriebsdruck 1, 1,5 und 3 Bar
- Elektronische ruckregulierung
- Griff mit widerstandsfähiger ichtung (aus FKM).
- Verbund-Teleskoplanze mit üsenhalter; ein
vollständiger Satz üsen ist im Lieferumfang
enthalten (Pastille, Pinsel und Spiegel).

DEUTSCH
- Tankfilter
- 12-Volt-Akku, Technologie Lithium-Ion.
- Spezifisches Ladegerät 12-Volt-Akku.
- ieses Gerät darf nicht bei Temperaturen unter
5°C und über 40°C verwendet werden.
3 - INBETRIEBNAHME
1. Schrauben Sie die Teleskoplanze an den
Lanzengriff. Vergewissern Sie sich, dass die
ichtung vorhanden ist (Abb. 01).
2. Nehmen Sie den Akku aus dem Spritzgerät.
3. er Akku kann angeschlossen bleiben oder
getrennt werden.
4. Verbinden Sie das Ladegerät über den
Ladestecker mit dem Akku und schließen Sie
dann das Ladegerät an eine Steckdose an.
(Abb. 08).
Verwenden Sie zum Laden des Akkus
ausschließlich das mit dem Gerät
gelieferte Ladegerät.
a. ie ROTE LE des Ladegeräts schaltet
sich ein und zeigt an, dass der Akku
geladen wird. (Abb. 03).
b. Nach Abschluss des Ladevorgangs schaltet
die ROTE LE auf GRÜN und zeigt an,
dass Ihr Gerät nun verwendet (oder
verstaut) werden kann.
5. ie Teleskoplanze ausziehen
6. Nehmen Sie das Spritzgerät auf den Rücken
und passen Sie es, wie auf den 4 Fotos gezeigt,
Ihrem Körper an.
(Abb. gesund tragen)
4 - VERWENDUNG
1. Zubereitung der zu sprühenden Lösung:
a. Pulverförmiges (lösliches oder benetzbares)
Produkt
Bereiten Sie die Lösung in einem Eimer vor
und füllen Sie sie anschließend über die
Einfüllöffnung in den Tank; verwenden Sie
dabei den Messstab mit der Markierung
"ELECTRIC".
b. Produkt auf flüssiger Basis
Füllen Sie 1 bis 2 Liter Wasser in den Tank,
geben Sie die erforderlich osis des flüssigen
Mittels dazu und füllen Sie die gewünschte
Wassermenge nach; verwenden Sie dabei
den Messstab mit der Markierung
"ELECTRIC".
2. Schrauben Sie den eckel der Einfüllöffnung
auf den Tank.
3. ie Teleskoplanze vollständig
ausziehen. Lassen Sie die Luft aus,
indem Sie die Lanze nach oben richten
und den Auslöser einige Sekunden lang
betätigen; dies gewährleistet den normalen
Betrieb des Tropfschutzsystems und des
ruckreglers. (Abb. 3)
4. en Schalter in die EIN-Position setzen (Abb. 6)
5. Wählen Sie den empfohlenen ruck
entsprechend der gewählten üse und des
geplanten Gebrauchs (Paragraph 7).
6. Betätigen Sie den Auslöser einige Sekunden
lang. Ihr Gerät wird die Pumpe entsprechend
der üse und des gewählten rucks kalibrieren.
7. Stellen Sie anschließend die gewünschte Länge
der Lanze ein.
8. rücken Sie zum Spritzen den Auslöser. er
Motor hält an, wenn Sie den Auslöser loslassen.
9. er Ladestand des Akkus wird durch 4 LE s
angezeigt (Abb. 6). Jede LE steht für 25 %
Akkuladung.
HINWEIS:
Wenn sich der Motor während des Spritzens
ausschaltet und die rote LE des Gehäuses zu
blinken beginnt, muss der Akku geladen werden.
5 - REINIGUNG / PFLEGE
Nach jeder Verwendung:
1. ie ÜBRIG GEBLIEBENE Mischung auffangen,
die ggf. noch im Tank ist.
2. en Tank ausspülen.
3. en Einfüllfilter des Tanks reinigen.
4. en Ansaugfilter im unteren Tankbereich
reinigen, nachdem das Spülwasser geleert
wurde. en Filter zum emontieren nach oben
DEUTSCH
ziehen. Zur emontage niemals versuchen, ihn
herauszuschrauben. (siehe Paragraph 11)
5. er Filter wird ausgespült, indem Wasser in das
Innere gelassen wird (unter einem Wasserhahn
ausspülen).
6. en Filter ohne zu schrauben einfach wieder
einstecken.
7. en Kreislauf durch Sprühen von 2 bis 3 Litern
sauberem Wasser durchspülen.
8. as Sprühgerät vor dem Lagern laden.
HINWEIS: as Spritzgerät muss vollständig entleert
bei einer Temperatur von mehr als 5°C gelagert und
jährlich überprüft werden.
Während des Transports muss das Spritzgerät
sicher befestigt sein, um jegliches Sturz-, Stoß- oder
Verletzungsrisiko zu vermeiden.
6 - WIEDERINBETRIEBNAHME NACH DEM
ÜBERWINTERN
1. Akku des Sprühgeräts wieder aufladen.
2. Kreislauf durchspülen, dazu 2 bis 3 Liter
sauberes Wasser sprühen und prüfen, ob kein
Wasser an den verschiedenen
Verbindungsstellen austritt.
3. as Sprühgerät ist betriebsbereit. Siehe Kapitel
4.
7 - AUSTAUSCH ODER ABMONTIEREN DER
DÜSEN WÄHREND DER VERWENDUNG
1. Beim Abmontieren der üsen muss der
Benutzer unbedingt seine persönlichen
Schutzausrüstungen (Handschuhe, Schutzbrille
…) anbehalten.
2. üse vom üsenhalter abschrauben und sofort
spülen.
3. Achtung, die im Spritzrohr enthaltene Flüssigkeit
kann ausfließen. Abzug nicht betätigen.
4. Neue oder gereinigte üse aufschrauben.
5. Nur üsen der Marke Berthoud verwenden
(siehe folgende Tabelle).
8 - WIEDERVERWENDBARE DÜSEN
as VERMOREL 3000 "ELECTRIC" zeichnet sich
durch einen vom Ladestand des Akkus
unabhängigen Betrieb bei KONSTANTEM RUCK
aus. ie URCHSATZ- und RUCKWERTE werden
AUSSCHLIESSCHLICH durch den Wahlschalter
eingestellt (Abb. 6).
RAMPE
Fungizid
Insektizid
HP
Unspezifische
s Herbizid
LP LP
Spezifisches
Herbizid
LP
Empfohlen
Unmöglich
Bei jedem Düsenwechsel muss das
Spritzgerät aus- und wieder eingeschaltet
werden, damit sich das Gerät erneut
kalibrieren kann.
üse
üsenhalter
Other manuals for VERMOREL 3000 ELECTRIC
1
Table of contents
Languages:
Other Berthoud Paint Sprayer manuals

Berthoud
Berthoud COSMOS 18 PRO User manual

Berthoud
Berthoud RAPTOR 2540 User manual

Berthoud
Berthoud ULV User manual

Berthoud
Berthoud HERMES 800 User manual

Berthoud
Berthoud VERMOREL 3000 ELECTRIC User manual

Berthoud
Berthoud ELYTE 2 VITON User manual

Berthoud
Berthoud PULVASOL 200 User manual

Berthoud
Berthoud ALTO 300 User manual

Berthoud
Berthoud WIN'AIR 600 User manual

Berthoud
Berthoud MAXAIR 240 User manual


