Btwin R500E User manual

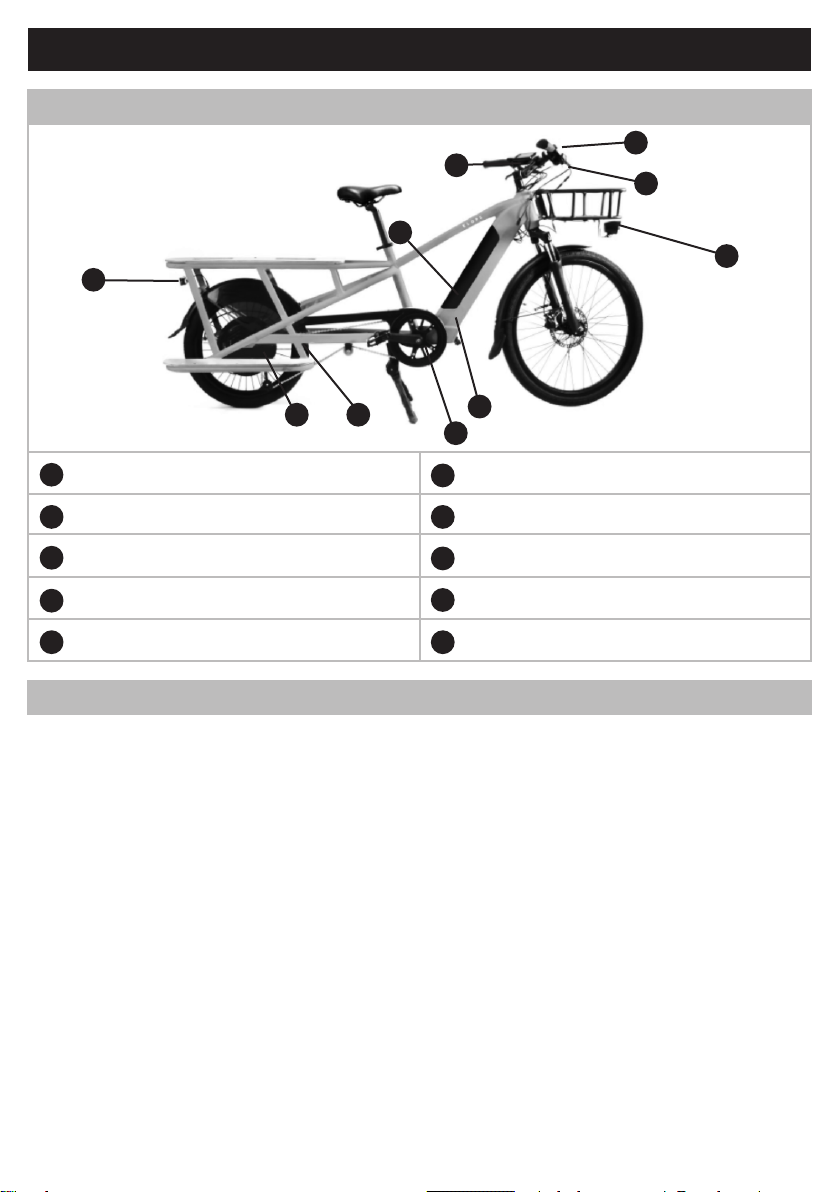
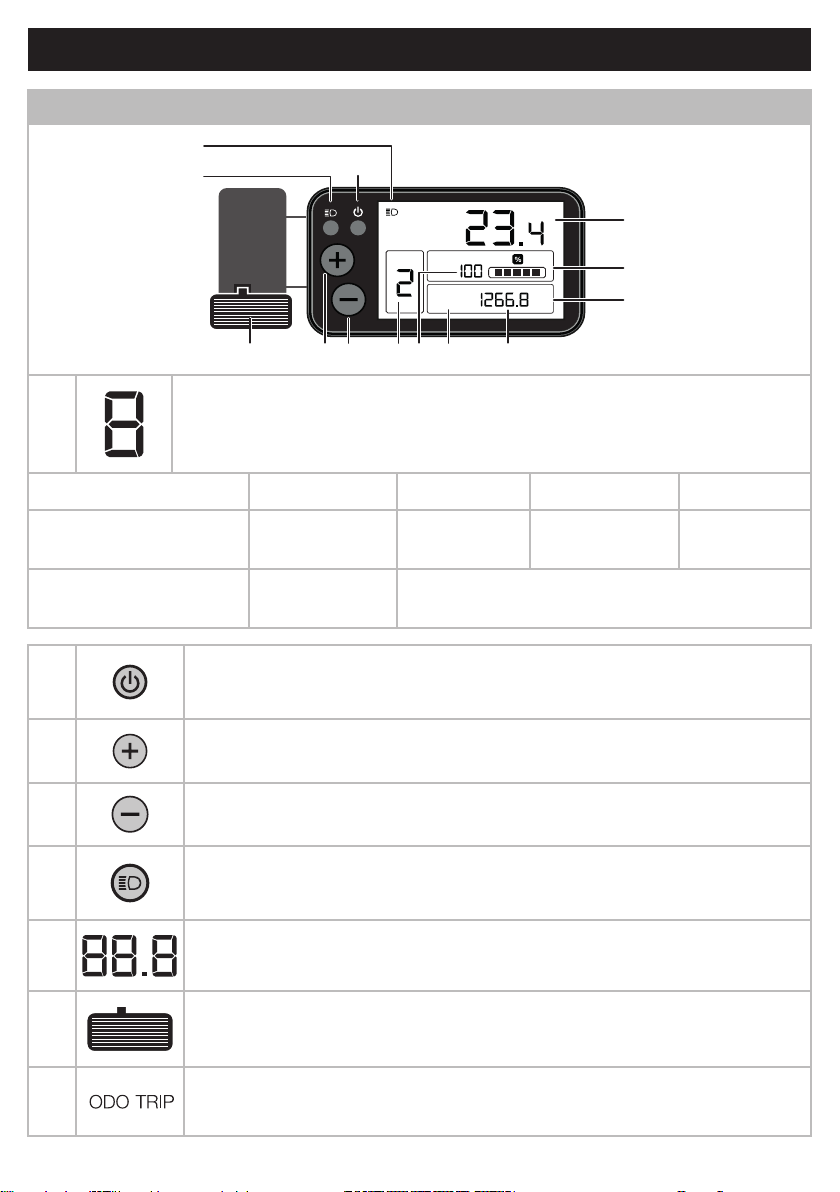
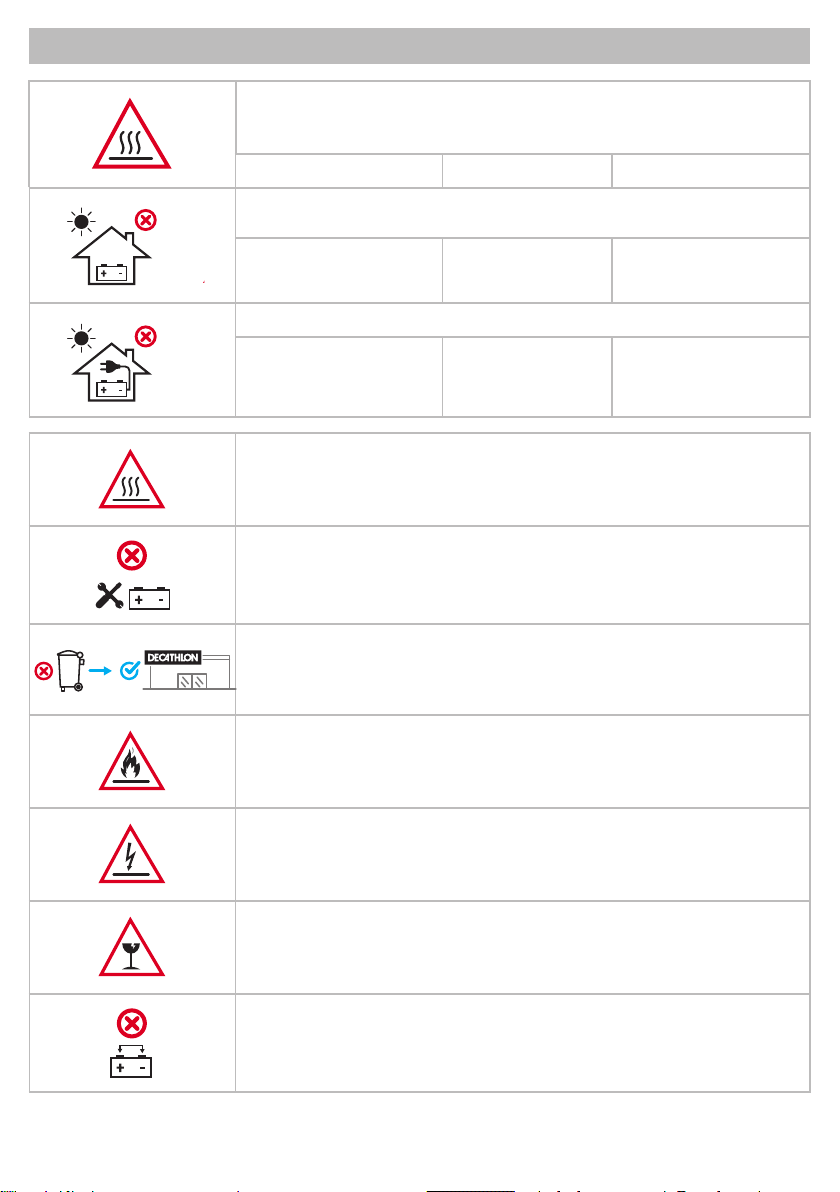
EN - User manual - B’TWIN Cargo Bike R500E.......................................................................................2
FR - Notice d’utilisation - B’TWIN Velocargo R500E............................................................................26
ES - Inrucciones de uso - B’TWIN Bicicleta de carga R500E...........................................................50
DE - Bedienungsanleitung - B’TWIN Cargobike R500E .......................................................................74
IT - Manuale d’iruzioni - B’TWIN Velocargo R500E...........................................................................98
NL - Gebruikershandleiding - B’TWIN Velocargo R500E...................................................................122
PT - Inruções de utilização - Bicicleta de carga B’TWIN R500E .................................................... 146
PL - Inrukcja obsługi - B’TWIN Velocargo R500E............................................................................ 170
HU - Használati útmutató - B’TWIN Velocargo R500E .......................................................................194
RO - Inrucțiuni de utilizare - B’TWIN Velocargo R500E ...........................................................................218
SK - Používateľská príručka - B’TWIN Velocargo R500E...................................................................242
CS - Uživatelská příručka - B’TWIN Velocargo R500E .......................................................................266
SV - Bruksanvisning - B’TWIN Velocargo R500E ...............................................................................290
HR - Korisnički priručnik - B’TWIN Velocargo R500E........................................................................314
SL - Uporabniški priročnik - B’TWIN Velocargo R500E .....................................................................338
TR - Kullanım talimatları - B’TWIN E-FOLD 500..................................................................................362
LT - Naudotojo vadovas - B’TWIN Velocargo R500E .........................................................................386
SR - Uputvo za korišćenje - B’TWIN Velocargo R500E................................................................... 410
EL - Εγχειρίδιο χρήστη - B’TWIN Velocargo R500E........................................................................... 434
BG - Потребителско ръководство - B’TWIN Velocargo R500E...................................................... 458

EN - USER MANUAL
B’TWIN CARGO BIKE R500E


Dear Cuomers,
Thank you for purchasing a B’TWIN electrically-assied bike.
Please read the inruction manual to make the mo of your B’TWIN Cargo Bike R500E.
Never forget that an electrically-assied bike is not a moped. It needs your help to go further,
faer and longer.
We sugge that you learn how to use your electrically-assied bike in an open area in order
to get used to the feel of the motor kicking in and thus ensure optimum control of your bicycle.
An electrically assied bicycle is heavier than a conventional bicycle (unladen weight of the
B’TWIN Cargo Bike R500E is 38 kg). Without assiance, pedalling can be more dicult.
You mu always make sure you are capable of riding the entire journey without assiance,
in case your battery runs at.
Here are the be practices for getting the mo out of your electrically assied B’TWIN Cargo
Bike R500E.
Important, this inruction manual only applies to the electrical characteriics of
your bicycle.
You should refer to the B’TWIN user manuals common to all our bicycles that ac-
company this document and are also available on our website www.supportdecath-
lon.com or on reque in our DECATHLON ores.

10 be practices for getting the mo out of your electrically-assied bicycle.
A
B
1. You need to pedal to go further
3,5 - 5 bar
2. In order to improve battery life and eciency, pump the
tyres to between 3.5 and 5 bar
< 3,5 bar
3. Under-inated tyres are more prone to punctures
A
B
A
B
+/- 20° +/- 5°
4. cold weather reduces battery life
A
B
A
B
5. Overloading the bicycle will reduce the battery life
A
B
A
B
6. Battery life will drop when cycling uphill
< 3 months
7. The battery mu be fully charged at lea once every
3 months
> mode 1 < mode 1
8. It is advisable to reduce the power assiance mode
when the battery charge is low
9. the battery level indicator is more accurate when the
bike is at a complete op
!
10. Remove the battery before conducting any mainte-
nance work

TABLE OF CONTENTS
PRODUCT DESCRIPTION ............................................................................... 6
Electrically-assied bike technical features ..................................................................... 6
General operation of the electrical assiance .................................................................. 6
SCREEN AND CONTROL ELEMENTS ........................................................... 7
Screen data and function ..................................................................................................... 7
MOTOR ............................................................................................................. 8
BATTERY AND CHARGER .............................................................................. 8
Precautions for use ..............................................................................................................9
Inalling and removing the battery .................................................................................. 11
Recharging the Battery ...................................................................................................... 12
Maintenance and lifetime (warranty conditions) ............................................................. 12
Battery self-diagnoic ....................................................................................................... 13
Putting the battery into hibernation mode ....................................................................... 14
Additional precautions for use ..................................................................... 15
Maintenance ................................................................................................... 16
H500UH (10-60V) Error Codes ...................................................................... 18
Appendix 1: Component tightening torque ................................................ 19
Contents of the commercial warranty for your electrically-assied bike21

PRODUCT DESCRIPTION
Electrically-assied bike technical features
A
Rear LED light
F
Front LED light
B
Battery
G
Motor wiring harness
C
Beam + connectors: brakes / control screen
H
Controller
D
Control screen
I
Pedalling detector
E
Braking detector
J
Motor
General operation of the electrical assiance
The electric-assied bicycle can be used with or without assiance by pressing the ON/OFF button and playing with the ECO - NORMAL -
POWER modes. The ECO - NORMAL - POWER assiance modes selectable on the «D» screen allow you to choose a level of electrical assian-
ce in addition to the eort provided. The electric power assi will only work if you pedal with the display on. The assiance is switched o when
the speed is higher than 25km/h. In the event of intensive use and exceptional weather conditions, the assiance may be cut o to preserve the
entire syem. The power supplied is calculated by the controller «B» according to the selected mode. Depending on the mode selected, the «B»
controller sends more or less current to the «H» motor to provide you with the desired assiance.
Power assiance does not kick in or shuts down in the following situations:
- The speed is above 25km/h
- You’re not pedalling
- The remaining battery charge is not sucient
- When the control screen is o or disconnected
- In case of intensive use and in exceptional climatic conditions, power assiance may be cut o to safeguard the whole syem
- When you brake
A
B
C
D
E
F
GJ H
I

SCREEN AND CONTROL ELEMENTS
Screen data and function
11
52
KM / HPOWER
TRIP
to GO
ODO
NORMAL
KM
ECO
713 8 9
143
6
12
10
1Power assiance mode (0-1-2-3):
«0» no assiance is the default mode.
Each mode corresponds to the maximum assiance levels dened below:
Mode 0 - o 1 - eco 2 - normal 3 - Power
Maximum assiance
level** No assiance +90% assiance +180% assiance +300% assiance
Average autonomous
range*** /50 - 90 km
2ON/OFF button:
Switch the electrically-assied bicycle on and o by holding the button down for a few seconds.
Scroll through the route information (TRIP, ODO, TRIPtoGO) with a short press.
3«+» button:
Step up to the higher power assiance mode by briey pressing the button
4«-» button:
Step down to the lower assiance mode
5Lighting button
The lighting on the bicycle can be switched on and o by briey pressing the button
Go to the settings by holding the button down for a few seconds
6Speed indicator**
7Trigger for «Pederian» mode and arting aid:
For walking beside the bicycle in walk assi mode, up to 6 km/h, without pedalling.
Please note that the trigger only works when the assiance is in mode 1, 2 or 3
8
ODO: Records the total diance travelled. It cannot be reset to zero.
TRIP: Records the partial diance travelled.
TRIPtoGO: Remaining diance that may be covered with the power assiance mode.

MOTOR
The A-weighted emission sound pressure level at the driver ears is less than 70 dB(A).
BATTERY AND CHARGER
All our electric bike batteries use lithium-ion technology and are not subject to the memory eect.
Recharging the battery after each use is recommended.
Charge the battery to 100% prior to its r use.
Battery Charger
Battery 48 V / 14.5 Ah * Input: 200-240 V
Output: 54.6 V
* At the time of purchase, your 48 V battery is inactive. Plug in your charger to activate it.
Your battery is guaranteed for up to 500 charging and discharging cycles (1 cycle = 1 charge and discharge) subject to compliance with the condi-
tions of correct usage and orage.
It is important to follow the inruction on the label of the battery charger.
9Diance indicator
10 Units:
kilometres or miles
11 Lighting indicator:
Appears on the screen when the lights are on
12 Five battery levels.
When the battery level is low, the indicator arts to ash.
13
Additional battery and syem information:
Indicates the battery charge level as a percentage
https://support.decathlon.fr/languages
Settings:
Hold the «Lighting» button down for a few seconds to enter or quit the settings
Press briey on the «Lights» button to change the setting
Short press on the «+» or «-» buttons to select the desired setting.
SET 1: Choice of units (km/h or mph)
SET 2:
* Check your battery charge display when you op; you may notice a big reduction in charge level when using high pedal-assi mode
** Speed display accuracy is +/-2%.
*** Under te protocol conditions, for a rider weighing 75 kg with tyre pressure of 4 bar and following the 10 top tips.

Precautions for use
Do not expose to temperatures exceeding 50°C.
< +10°C +10°C / +50°C > +50°C
+10°C
+25°C
Storage conditions: It is essential to ore the battery charged and in a dry, cool place (between +10°C
and +25°C), out of sunlight.
< +10°C +10°C / +25°C > +25°C
+10°C
+40°C
Charge your battery in a dry environment at a temperature of between +10°C and 40°C.
< +10°C +10°C / +40°C > +40°C
Important: Under certain exceptional conditions, the controller may reach high temperatures.
Never dismantle it.
Do not dispose of the battery in non-suitable containers. Return the used battery to your Decathlon
ore for recycling.
Risk of re.
Risk of electrocution.
To be handled with care.
Product is sensitive to impacts.
Never short-circuit the battery by connecting the positive and negative terminals.

Never permit children to play with or handle the battery.
Do not immerse in water.
Do not clean using a high-pressure washer.
Rain resiant.
x500
Your battery can be completely charged and drained 500 times.
Hereafter, the capacity and autonomy of the battery is reduced.
=
V / Hz
Always make sure that the battery and charger are compatible.
=
+200 V / +240 V
Always ensure the charger is compatible with the local electrical grid:
Voltage: 200 V, 240 V maximum.
+50 Hz / +60 Hz
Frequency: 50 Hz minimum, 60 Hz maximum.
Only charge the battery indoors.
Transport by aeroplane is prohibited.
Any failure to comply with the precautions for use will void the manufacturer warranty.

Inalling and removing the battery
Insertion:
a
b
!
Before inserting your battery into its housing, check that there are no
foreign bodies or objects on the connectors.
Removal:
a
b
Prior to removing your battery from its slot, unlock it using the key.
Keep the key turned and pull on the battery to remove it.
Important notes:
!
Do not attempt to insert or remove your battery when the lock is locked (horizontal position): This may break the security lock on your battery.

Recharging the Battery
5H
The LED is red as charging arts.
Green LED when charging is complete. LED ashes red, charging problem,
contact the after-sales service.
Maintenance and lifetime (warranty conditions)
Do not ore the discharged battery to prevent deep discharge that may cause malfunction.
3 months
Charge the battery fully at lea once every 3 months.
Zzzz
When oring the bicycle for a prolonged period, put the battery in extended andby mode (see
details p. 14)

Battery self-diagnoic
11% - 20%
21% - 40%
41% - 60%
61% - 80%
81% - 100%
LED o LED on LED ashing

Putting the battery into hibernation mode
Zzzz
The battery may turn where ored for a long period (maximum 1 year) without charging
required and without alteration of the battery’s capacities
Zzzz
10’’
Press for 10 seconds on the button of the battery until the battery LEDs go out.
The battery is now in hibernation mode.
Charge the battery with its charger at a power socket to awaken it.

ADDITIONAL PRECAUTIONS FOR USE
!
Always carry out maintenance operations in sucient light.
!
Warning, in the event of wheel removal, you mu ensure the direction of rotation of your wheel
is correct.
!
Before each use you mu make sure that your brakes and electric syem are working properly
KW
2020 Km/h
The weight, power, manufacturing year and maximum speed are indicated on your bicycle’s
frame.
As the weight of your bike with electric assiance exceeds 15kg, we recommend that 2 persons
transport it.
!
Always wear a helmet when riding your bike.
14+
<L_EN>These e-bikes are designed for riders aged 14 years and over.</L_EN>
Maximum permissible total weight (cycli+bike+accessories) = 208 kg
Weight of the bike = 38 Kg
Maximum front load = 10 kg
Maximum rear load = 80 kg
!
Caution: in rain, fro, or snow, you may have less tyre traction.

!
P
The bicycle mu be parked with its kickand on at, able ground or using a parking device.
Please note: This bike is designed for city use.
The following uses are inappropriate and should be avoided:
Mountain sports - Trekking use
Never modify the bike’s components or electrical syem! Any change is dangerous and
prohibited by law.
If a modied bike breaks down or is damaged, Decathlon will in no case take care of repairs
(warranty cancelled)). You will also be legally responsible for any accident that arises with the
bike.
Do not and on the footres.
Do not sit on the protective bars and do not hang bags on them.
MAINTENANCE
Warning - the maintenance of electrical components requires special skills and is not carried in
ores but in Decathlon regional workshops and can take several days.
!
All cleaning and electrical or mechanical maintenance mu be carried out with the power
switched o and the battery removed from the bike!
Maintenance operations specic to the electric syem mu be performed by trained, qualied
a. If the chain comes o, turn the power o before attempting any repairs.
Do not transport on a bicycle rack.
We advise you to bring your electrically-assied bike back to your DECATHLON ore for its
6-month service.

Prohibited: cleaning using a high-pressure jet.
Not recommended: cleaning under running water.
Recommended: cleaning using a damp sponge.
The rims are subject to wear which mu be checked to ensure they are intact.
The motorised wheel is also subject to higher ress than a andard bike wheel, and although it
is reinforced, it is possible that spokes may break. If a spoke breaks, contact your DECATHLON
ore.
If the bike or battery suers a fall, check that your battery is intact.
Caution: the watertightness of your battery is no longer guaranteed following a fall.
In case of puncture to the rear wheel, remember to disconnect the motor cable before removing
the wheel from the bike to perform the repair.

H500UH (10-60V) ERROR CODES
HMI error code Fault ates Solutions
41
Over Current Error Reduce the load on the motor by pushing ronger on the pedal or by reducing
the assi level.
10
Under Voltage Error Charge the battery pack using the battery charger.
11
Over Voltage Error Check battery. Switch o the syem completely. If the problem persis, contact
your Decathlon workshop.
42
Angle Sensor Error Switch o the syem completely. If the problem persis, contact your Decath-
lon workshop.
80
Motor Phase Loss Error Switch o the syem completely. If the problem persis, contact your Decath-
lon workshop.
86
Throttle Error Check throttle is in position. If the problem persis, contact your Decathlon
workshop.
70
Torque Sensor Error Switch o the syem completely. If the problem persis, contact your Decath-
lon workshop.
76
Brake Error Check Brake is in position. Switch o the syem completely. If the problem
persis, contact your Decathlon workshop.
46
Motor Blocked Switch o the syem completely. If the problem persis, contact your Decath-
lon workshop.

APPENDIX 1: COMPONENT TIGHTENING TORQUE
Component Tightening torque (N.m)
Front plateform 6-9
Front light 6-9
mudguard -fork 6-9
mudguard ay - fork Immobile
Front disc 5-7
Rear disc 5-7
Front wheel 30-40
Front brake caliper 6-9
Rear brake caliper 6-9
Cover left and right 5
Crank set 35-40
Bottom bracket 40-66
Kickand 30-35
Pedal Immobile
Chain tensionner 6-9
Foot pads 6-9
Rear wheel 40-45
Derailleur 8-10
Freewheel 30-35
Motor 40-45
Rear mudguard Immobile
Rear light Immobile
Rear kids bar xation 5-7
Parejupe Immobile
Wood plate Immobile
Front kids bar xation 5-7
Saddle 10-12
Seat clamp The opening force is more than 50N, after closing, less
than 200N
Chainguard Immobile
This manual suits for next models
1
Table of contents
Languages:
Other Btwin Bicycle manuals

Btwin
Btwin TILT 500E User manual

Btwin
Btwin ELOPS R500 E User manual

Btwin
Btwin Bicycle User manual

Btwin
Btwin ELOPS 920E User manual

Btwin
Btwin FOLD 560 User manual

Btwin
Btwin E-LD500 User manual

Btwin
Btwin ELOPS 900E User manual

Btwin
Btwin FOLD 500 User manual

Btwin
Btwin ORIGINAL 900E User manual

Btwin
Btwin ROCKRIDER E-ST500 User manual

Btwin
Btwin Bicycle User manual

Btwin
Btwin HOPTOWN 500E User manual

Btwin
Btwin ELOPS 900E User manual

Btwin
Btwin B'ebike 9 User manual

Btwin
Btwin E-FOLD 500 User manual

Btwin
Btwin SPEED 900E User manual

Btwin
Btwin Bicycle User manual

Btwin
Btwin Original 7E User manual

Btwin
Btwin ELOPS 900E User manual

Btwin
Btwin ELOPS 920E User manual