Cembre B540NDK-BV User manual

1
BATTERY OPERATED HYDRAULIC
CRIMPING TOOL
ENGLISH
ĞƌƟĮĞĚŶǀŝƌŽŶŵĞŶƚĂů
DĂŶĂŐĞŵĞŶƚ^LJƐƚĞŵ
ĞƌƟĮĞĚKĐĐƵƉĂƟŽŶĂů
,ĞĂůƚŚΘ^ĂĨĞƚLJ
DĂŶĂŐĞŵĞŶƚ^LJƐƚĞŵ
ĞƌƟĮĞĚYƵĂůŝƚLJ
DĂŶĂŐĞŵĞŶƚ^LJƐƚĞŵ
OPERATION AND MAINTENANCE MANUAL
17 M 254 U
B540ND-BVA B540NDK-BV B540NDW-BV

2
FIG. 1b
B540NDK-BV
Makita battery
FIG. 1c
B540NDW-BV
FIG. 1a
B540ND-BVA
Metabo battery
8
8
Milwaukee battery
8
FIG. 2
"W" style crimping dies
FIG. 3
6
red lines
11
11

3
FIG. 4 FIG. 5 12
FIG. 6
Tool components in configuration B540ND-BVA

4
1
2
3
4
5
6
7
9
1
2
3
4
5
6
7
9
1
3
4
5
6
7
8
9
8
10
2
8
FIG. 7
1
JAWS SUPPORT
2
RUBBER GRIP
3
OPERATING BUTTON
4
HANDLE
5
BATTERY
6
JAW LOCKING PIN
7
LED WORKLIGHT
8
BATTERY RELEASE
9
WRIST STRAP
10
PRESSURE RELEASE BUTTON
B540NDK-BV
B540NDW-BV
B540ND-BVA

5
Use and Care of rechargeable batteries
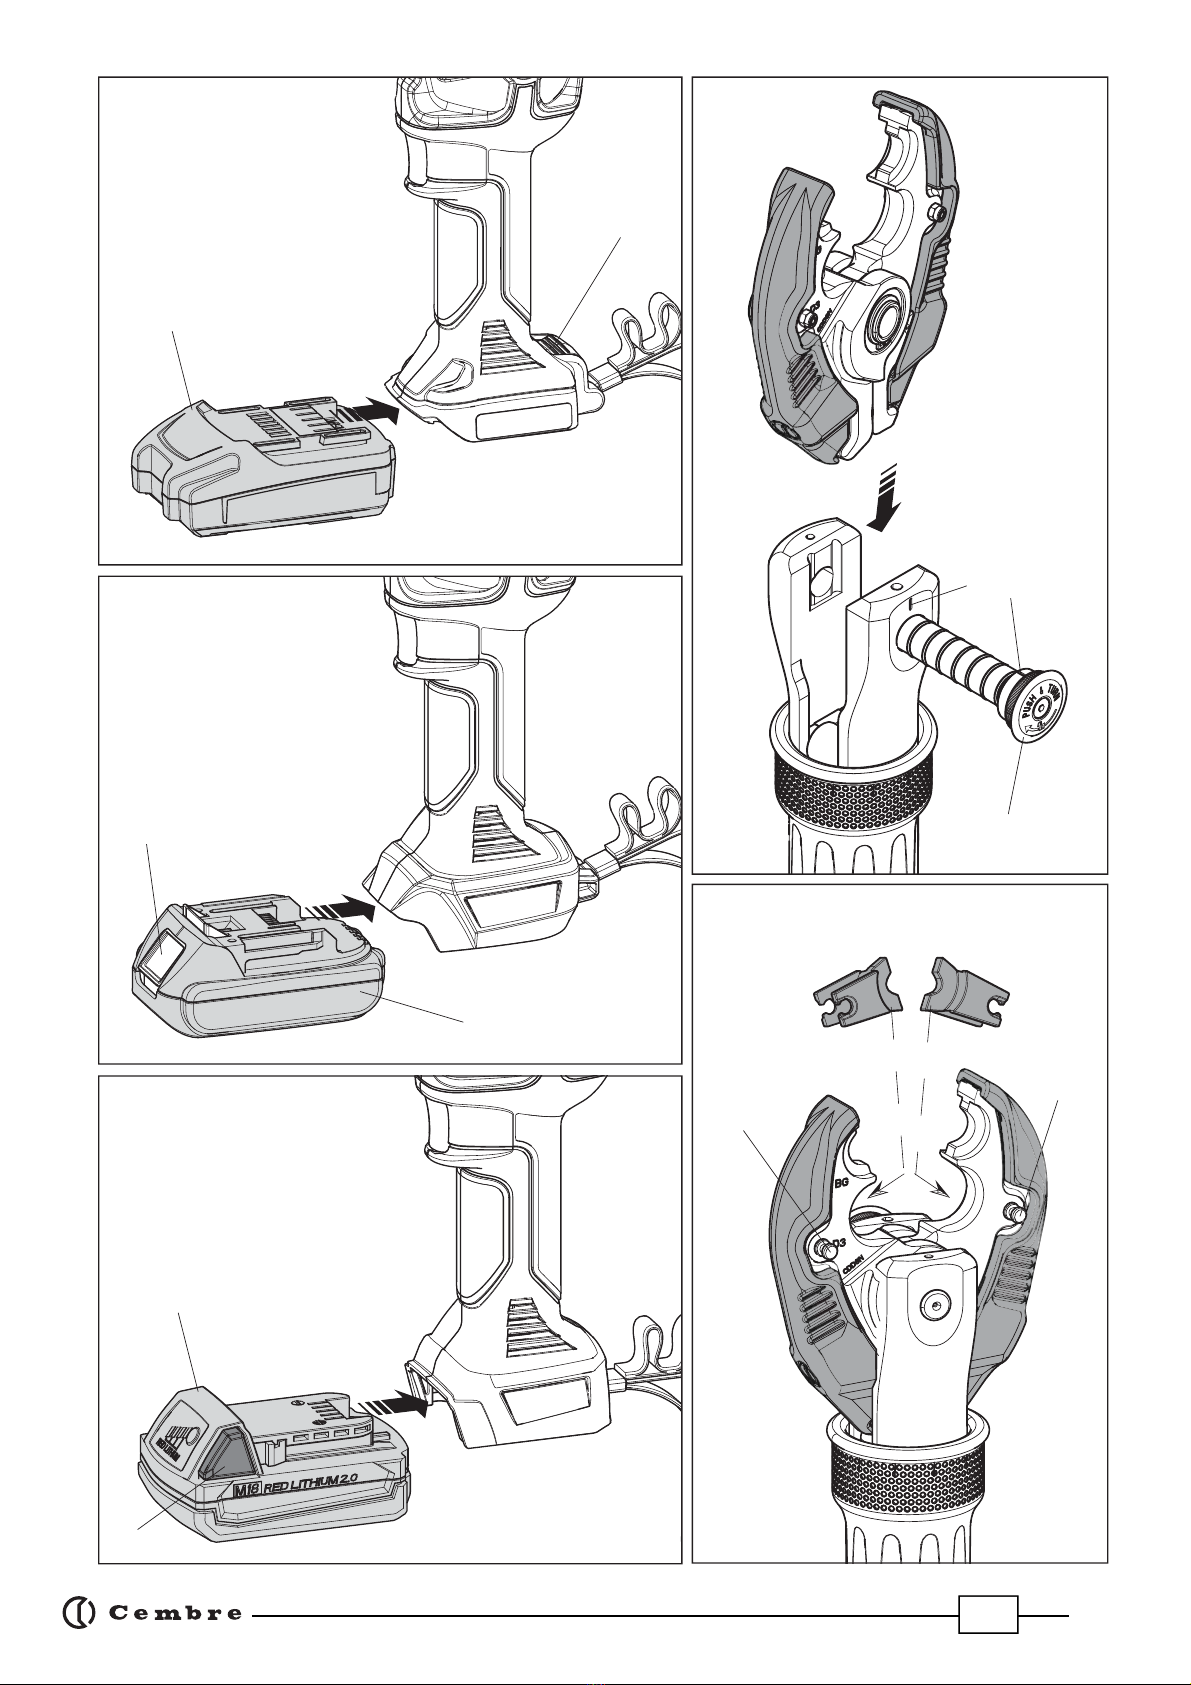
Recharge the supplied battery using the specific manufacturer’s charger only.
A charger intended for a specific type of battery may become a fire hazard if used with other types
of battery.
Use the tool with the specific intended battery pack only. The use of any other type of battery may
lead to a risk of injury or fire.
When the battery is not in use, store it away from other metal objects, such as paperclips, coins,
keys, nails, screws or other small metal objects that can create a connection between two terminals.
Keep batteries out of reach of children.
Short-circuiting the battery terminals can cause burns or fire.
If in very poor condition, a battery can leak liquid. Avoid contact with the eyes.
In the case of accidental contact, rinse immediately under running water.
If the liquid comes into contact with the eyes, seek medical assistance immediately. Battery liquid
can cause irritation or burns.
Keep batteries dry!
Keep batteries away from fire!
Never throw batteries into fire or water.
Always recycle batteries after use.
Never dispose of batteries with household waste. They must be deposited at the dedicated
collection points for disposal.
Transporting Li-Ion batteries
Lithium-Ion rechargeable batteries are subject to the legal requirements on hazardous goods. In the
event of road transport by the user, no further precautions are necessary.
In the event of third-party transport (e.g. transported by airplane or courier), transportation must
comply with the special requirements concerning packaging and labelling. We recommend that
you consult an expert.
Rechargeable batteries can only be transported if undamaged.
The packaging must prevent the batteries from moving around and exposed contacts must be
covered with adhesive tape.
Beforeusingthetool,care-
fully read the instructions
contained in this manual.
SAVE THESE INSTRUC-
TIONS: this manual
contains important sa-
fety and operating in-
structions for the tool.
When operating
the pump, keep
hands away from
the danger zone.
WARNING SYMBOLS
User information
(Directives 2011/65/
UEand2012/19/UE),
see page 14.
Always wear safety
gloves when ope-
rating the equip-
ment.

6
Before starting work on electrical equipment, please ensure that either there are no live parts in
the immediate working area or that precautions are taken for working near live parts in accord-
ance with EN50110-1.
Do not use this tool on, or near, live conductors without proper personal protective equipment.
Failure to observe this warning could result in severe injury or death.
Do not use the tool for purposes other than those intended by Cembre.
The operator should concentrate on the work being performed and be careful to maintain a
balanced working position.
Avoid dirty surfaces as dust and sand are a danger to any electro-hydraulic equipment.
Protect the tool and accessories from rain and moisture. Water will damage the tool and bat-
tery. Electro-hydraulic tools should not be operated in pouring rain.
Work in a clean, uncluttered area and keep persons away from immediate work area.
Before each use, verify the integrity of the tool. Replace any worn, possibly damaged or missing
parts with original Cembrespares.
Inspect the blades before each use. Do not use damaged blades.
Damaged blades can break and cause injury or damage to the tool.
Wear eye protection as metal chips can fly from blades when cutting.
Pay attention when cutting short, free pieces of steel rod or rope as they may fly off dangerously,
causing injury to the operator or persons nearby.
Do not cut live cables or conductors.
The tool is unsuitable for continuous use and should be allowed to cool down following uninter-
rupted,successiveoperations.Forexample,havingexhaustedafullychargedbatteryinonesession,
delay battery replacement for a few minutes.
WARNINGS

7
B540ND-BVA B540NDK-BV
B540NDW-BV
Application range suitable for installing electrical compression
connectors for conductors up to 150 mm
2
(300 MCM)
and for cutting Copper, Aluminium, ACSR and Steel
conductors, ropes and rods
Type of acceptable jaws:
(Ref. to table page 12)
Crimping
Cutting
CDD6N - CDD6-6N - CDD6-8N
CMB4N - CMB5N - CMB6N
Crimping force
kN (US sh. ton)
54 (6)
Operating pressure
bar (psi) 600 (8702)
Dimensions
(Ref. to FIG. 8 page 13)
mm (inches) 403 x 104 x 87
(15.9 x 4.1 x 3.4)
413 x 108 x 87
(16.3 x 4.2 x 3.4)
412 x 95 x 87
(16.2 x 3.7 x 3.4)
Weight with battery only
(no jaws)
kg (lbs) 2,9 (6.4) 3,1 (6.8) 2,9 (6.4)
Motor V DC 18
Operating temperature °C (°F) -15 to +50 (+5 to +122)
Recommended oil TOTAL DIEKAN 1640 or equivalents.
Safety maximum pressure valve
Rechargeable battery type METABO
CB1820L
MAKITA
BL1840B
MILWAUKEE
M18 48-11-1820
V / Ah (Wh) 18 / 2.0 (36) 18 / 4.0 (72) 18 / 2.0 (36)
Weight kg (lbs) 0,4 (0.9) 0,6 (1.3) 0,4 (0.9)
Acoustic noise
(1)
dB L
pA
67,7 (A) L
pCPeak
89,2 (C) L
WA
74,2 (A)
Vibrations
(2)
m/s
2
a
hv
0,724
Battery charger
Input
type
V
METABO ASC30-36 MAKITA DC18RC MILWAUKEE M18
120 AC
(1) Directive 2006/42/EC, annexe 1, point 1.7.4.2 letter u
LpA
= weighted continuous acoustic pressure level equivalent.
LpCPeak
= maximum value of the weighted acoustic displacement pressure at the work place.
LWA
= acoustic power level emitted by the machine.
(2) Directive 2006/42/EC, annexe 1, point 2.2.1.1
Weighted root mean square in frequency of the acceleration the upper limbs are exposed to for each biodynamic
reference axis. Tests carried out in compliance with the indications contained in EN ISO 5349-1/2 Standard and
under operating conditions much more severe than those normally found.
1. GENERAL CHARACTERISTICS

8
2. INSTRUCTIONS FOR USE
The interchangeable crimping jaws have plastic covers on the outside edges.
The part reference “B540ND-BV” includes the following:
– Hydraulic tool fitted with Metabo, Makita or Milwaukee battery.
– Spare battery.
– Battery charger (model depends on the tool version).
– Canvas bag.
– Shoulder strap.
– USB cable (Ref. to section 5 page 11).
The tool can be easily carried using either the main handle (4) or the shoulder strap attached
to the two eyelets of the wrist strap (9) (see FIG. 7).
The tool can be held in one hand while positioning the conductor with the other.
Before starting any work, check the battery charge and recharge it if necessary following
the instructions in the battery charger user manual.
To replace the battery, grip the tool as illustrated in the FIG. 1a, 1b and 1c.
Press the release button (8) and slide the battery out unlocking it.
2.1) Crimping mode
With the tool in the rest position (the ram fully retracted), proceed as follows:
Insert the crimping jaws into the tool (see section 3.1).
If necessary, select the appropriate die set for the connector to be crimped and insert the
dies into the jaws (see section 3.2).
Insert the conductor into the connector and position the connector between the groove or
die set (see FIG. 4). Ensure the correct location of the crimp.
Position the connector in the die groove and ensure the correct location of the crimp.
NOTE: when more than one
compressionis required,proceed
according to the sequence and
direction indicated in the figure
opposite, uniformly spacing the
compressions.
Press operating button (3) to activate the motor-pump and advance the ram.
To halt the advancement, release the operating button and the motor will cut out.
terminal
connector
123
12
1
3
2
3
conductor
conductor

9
Make sure the dies are exactly positioned on the desired
crimp point otherwise re-open dies by pressing the release
button (10) and reposition the connector.
By keeping the operating button (3) pressed, the motor continues
to operate and the ram will gradually move forward until the two
jaws touch. It is recommended to keep operating until the
maximum pressure valve is activated and a "click" is heard.
To perform a full compression, press and hold the operating
button (3) until the maximum pressure valve is activated
and a "click" is heard.
2.1.1) Release of crimping jaws
By operating the pressure release button (10), the ram will retract
and open the jaws.
2.2) Cutting mode
With the tool in the rest position (the ram fully retracted), proceed as follows:
Insert the cutting jaws into the tool (see section 3.1).
Insert the conductor between the blades, up to the desired cutting point (see FIG. 5).
To cut short pieces of steel or ACSR ropes, it is suggested to tie or wrap rope with adhesive
or duct tape around the area to be cut and at its end, so to limit the projection of steel
fragments which could cause damage or injure the operator.
Press the operating button (3) to activate the motor. The ram will gradually move forward
until the blades (12) touch the conductor.
Make sure the blades are exactly positioned on the desired cutting point otherwise
re-open by pressing the release button (10) and reposition the conductor.
To halt the advancement, release the operating button (3) and the motor will cut out.
Firmly hold the tool and press the operating button (3) to gradually advance the blades (12),
until the cutting operation is complete.
2.2.1) Release of cutting jaws
By operating the pressure release button (10), the ram will retract and open the blades.
3
10

10
2.3) LED Worklights
Whilst the tool is in operation, the working area is illuminated by four high luminosity LED Work-
lights that switch off automatically at the end of the cycle.
2.4) Head rotation
For ease of operation, the tool head can rotate through 180°, allowing the operator to work in the
most comfortable position.
Do not attempt to rotate the head when the hydraulic circuit is pressurised.
2.5) Battery status
Batteries are equipped with LED indicators that indicate the remaining battery life at any time
by pressing the adjacent button.
Whenthebatteryvoltagehasdroppedbelowaminimumsafetythreshold,thetoolwillnot
start and it is necessary to recharge or replace the battery.
Worklights (7) illuminated combined with an audible alarm when the operating button
(3) is pressed, indicate that the battery voltage has dropped below a minimum safety
threshold. Under these conditions the tool will not start, and it is necessary to recharge
or replace the battery.
2.6) Using the battery charger
Carefully follow the instructions in the battery charger user manual.
3. DIE AND JAW ASSEMBLY
When introducing or changing jaws or dies, the battery must first be removed from the tool.
3.1) Jaw assembly
Press the locking pin (6) and turn it to the right to release it into the fully open position (see FIG. 2).
Insert the jaws into the support head until the hole is aligned with the locking pin.
Push the pin (6) right in and turn it to the left to lock it (see FIG. 2) until the red lines are aligned.
3.2) Crimping die assembly
Use of ”W” style crimping dies into the CDD6N, CDD6-6N, CDD6-8N jaws
Press pins (11) and insert “W” dies into their seats (see FIG. 3).
To disassemble, simply press the pins (11) and slide them from the jaws.
It is recommended to use the tool only with product to be crimped inserted.

11
4. MAINTENANCE
The tool is robust, completely sealed, and requires very little daily maintenance. Compliance with
the following points, should help to maintain its optimum performance:
4.1) Thorough cleaning
Dust, sand and dirt are a danger for any hydraulic device.
Every day, after use, the tool must be wiped with a clean cloth taking care to remove any residue,
especially close to pivots and moveable parts.
Do not use hydrocarbons to clean the rubber parts.
4.2) Canvas bag
To protect the tool from accidental damage and dust, it should be stored with its accessories in
the special canvas bag provided and sealed well.
Canvas bag type 033: Size 740x215x200 mm (29.1x8.5x7.9 inches), weight 1,7 kg (3.7 lbs).
4.3) Routine maintenance
When the tool reaches the predetermined number of hours worked, it will signal that routine
maintenance is recommended.
The tool will continue to work however, 15 sec. after use an alarm comprising 3 beeps
combined with illumination of the worklights will signal that its return to Cembrefor
service is recommended (see section 6).
5. CONNECTION TO COMPUTER
The memory card integrated in the tool records operating data for transfer via the USB cable supplied.
To view and manage this data, go to www.cembre.com and register in the dedicated area, then
download the free Cembre software CEM_SWBT01.
Keeping the Firmware of the tool updated, via free of charge download, will optimise the tool's
performance.
B540NDK-BV B540NDW-BVB540ND-BVA
USB port
USB port USB port

12
6. RETURN TO Cembre FOR OVERHAUL
In the case of a breakdown contact our Area Agent who will advise you on the problem and give
you the necessary instructions on how to dispatch the tool to our nearest service Centre; if pos-
sible, attach a copy of the Test Certificate supplied by Cembretogether with the tool or fill in and
attach the form available in the “ASSISTANCE” section of the Cembre website.
INTERCHANGEABLE CRIMPING JAWS
CAT. No CRIMPING DIE COMPATIBILITY
CDD6N With "D3" groove to
accept all "W" style
crimping dies + "BG"
fixed groove.
FCI Burndy
Greenlee
Ilsco
Huskie
Panduit
W, X Series
KD6 Series
ND Series
HT-58 Series
CD-2001 Series
CDD6-6N With "D3" groove to
accept all "W" style
crimping dies.
FCI Burndy
Greenlee
Ilsco
Huskie
Panduit
W, X Series
KD6 Series
ND Series
HT-58 Series
CD-2001 Series
CDD6-8N With "D3" groove to
accept all "W" style
crimping dies + "O"
fixed groove.
FCI Burndy
Greenlee
Ilsco
Huskie
Panduit
W, X Series
KD6 Series
ND Series
HT-58 Series
CD-2001 Series
INTERCHANGEABLE CUTTING JAWS
CAT. No CUTTING COMPATIBILITY
CMB4N Cutting jaws for underground:
Aluminum & Copper stranded cables.
Max opening 1-1/4.
CMB5N Cutting jaws for OHL:
ACSR up to 556 and tree wire.
CMB6N Cutting jaws for guy wires:
Up to 7/16 EHS guy wire.
JAWS TABLES

13
87 (3.4) 104 (4.1)
403 (15.9)
87 (3.4) 108 (4.2)
413 (16.3)
87 (3.4) 95 (3.7)
412 (16.2)
B540ND-BVA
B540NDK-BV
B540NDW-BV
Dimensions mm (inch)
FIG. 8

14
Following information applies to member states of the European Union:
USER INFORMATION in accordance with “Directives 2011/65/EU and 2012/19/EU.
The ‘Not in the bin’ symbol above when shown on equipment or packaging means that the equipment
must, at the end of its life, be disposed of separately from other waste.
The separate waste collection of such equipment is organised and managed by the manufacturer.
Users wishing to dispose of such equipment must contact the manufacturer and follow the prescribed
guidelines for its separate collection. Appropriate waste separation, collection, environmentally compat-
ible treatment and disposal is intended to reduce harmful environmental effects and promote the reuse
and recycling of materials contained in the equipment. Unlawful disposal of such equipment will be
subject to the application of administrative sanctions provided by current legislation.
NOTE
...............................................................................................................................................
...............................................................................................................................................
...............................................................................................................................................
...............................................................................................................................................
...............................................................................................................................................
...............................................................................................................................................
...............................................................................................................................................
...............................................................................................................................................
...............................................................................................................................................
...............................................................................................................................................
...............................................................................................................................................

15

16
cod. 6261467
1
6
cod.
6
2
6
14
6
7
www.cembre.com
Cembre Ltd.
Dunton Park
Kingsbury Road, Curdworth - Sutton Coldfield
West Midlands B76 9EB (UK)
Tel.: 01675 470440 - Fax: 01675 470220
E-mail: [email protected]
www.cembre.co.uk
Cembre S.a.r.l.
22 Avenue Ferdinand de Lesseps
91420 Morangis (France)
Tél.: 01 60 49 11 90 - Fax: 01 60 49 29
CS 92014 - 91423 Morangis Cédex
E-mail: [email protected]
www.cembre.fr
Cembre España S.L.U.
Calle Verano 6 y 8
28850 Torrejón de Ardoz - Madrid (España)
Teléfono: 91 4852580
Telefax: 91 4852581
E-mail: [email protected]
www.cembre.es
Cembre GmbH
Heidemannstraße 166
80939 München (Deutschland)
Telefon: 089 3580676
Telefax: 089 35806777
E-mail: [email protected]
www.cembre.de
Cembre Inc.
Raritan Center Business Park
181 Fieldcrest Avenue
Edison, New Jersey 08837 (USA)
Tel.: (732) 225-7415 - Fax: (732) 225-7414
E-mail: [email protected]
www.cembreinc.com
Cembre S.p.A.
Via Serenissima, 9
25135 Brescia (Italia)
Telefono: 030 36921
Telefax: 030 3365766
E-mail: [email protected]
www.cembre.com
This manual is the property of
Cembre
:
any reproduction is forbidden without written permission.
This manual suits for next models
2
Table of contents
Other Cembre Power Tools manuals

Cembre
Cembre NR-25B User manual

Cembre
Cembre BTEPE2.DET10 User manual

Cembre
Cembre B35-TC025 User manual

Cembre
Cembre HT120 User manual

Cembre
Cembre B600 User manual

Cembre
Cembre B15D User manual

Cembre
Cembre B550 User manual

Cembre
Cembre HT81-U User manual

Cembre
Cembre B500ND User manual

Cembre
Cembre B-TD270 User manual

Cembre
Cembre B54MD-D6 User manual

Cembre
Cembre B1350-C-KV Installation guide

Cembre
Cembre B135-UC User manual

Cembre
Cembre B54M-D6A User manual

Cembre
Cembre CMB2 Parts list manual

Cembre
Cembre B500 User manual

Cembre
Cembre B135-C-KV User manual

Cembre
Cembre B51 User manual

Cembre
Cembre BTEPE2.DET12 User manual

Cembre
Cembre B15MD User manual