Chino TP-S Easy Thermo User manual

Please store this instruction
manual in a designated place for
future reference.
INST.No.TPS-02
TP-S
Instruction Manual
CHINO

■Introduction
Thank you for purchasing the Model TP-S Easy Thermo. In order to use this product safely,
please read this instruction manual completely before use and confirm the correct handling and
instructions. In addition, please retain this instruction manual for future reference.
■Before using
Please confirm the contents of packing. If something is missing, please contact to your nearest distributor.
· The batteries are not loaded in this product with shipment. Referring to [Loading/replacing of
battery (P.2)], load 2 pieces of AA (UM-3) alkaline battery and use this product.
· The supplied batteries are for operation check. We are no guarantee of their life.
· The eneloop® batteries are recommended to use this product.
□
Easy Thermo
□
Instruction Manual: 1 copy
□
AA (UM-3) alkaline battery, 2 pieces (For operation check)
□Strap (Attached to this product)

■
About this instruction manual
· Under absolutely no circumstances may the contents of this instruction manual, in part or in
whole, be transcribed or copied without permission.
· The contents in this instruction manual are subject to change without notice in future.
· The figures in this instruction manual may be emphasized, simplified or omitted.
· Every effort has been made to ensure that the details of this manual are accurate. However,
should any errors be found or important information be omitted, please inform your nearest
distributor.
· The eneloop® is the registered trademark of SANYO Electric Co., Ltd. of Panasonic Group.
· The company names and brand names used in this manual are the trademarks or registered
trademarks of respective companies.
About exemption from responsibility
・Unless otherwise specified in the guarantee clauses, we do not offer any guarantee about this
product.
・We shall not be liable to a customer or a third party for any damages or indirect damages by
using this product or by unpredictable defects of the product.

■
Safety precautions
●The safety precautions shown in this manual indicate the important contents about safety. Please
be sure to understand and follow these precautions.
●In this manual, in order to use this product safely, the precautions are described with the
following indications and marks.
This indicates a potentially hazardous
situation that, if not avoided, will result in
death or serious injury.
This indicates a potentially hazardous
situation that, if not avoided, may result in
minor or moderate injury or cause property
damage.
[Safety precautions]
●
Do not operate this product in a place where flammable gas or explosive gas exists.
It is extremely dangerous to use this product under such environment.
●Stop using this product immediately, turn off the power source and contact to your
nearest distributor if it is broken or there is smoke/abnormal odor from this product.
Otherwise, it may cause fire.
●Do not repair or modify this product. If it is modified, operation of this product will not be
guaranteed. It may also cause fire/electric shock.
●When this product is strongly shocked such as fall, it may cause injury by broken and
scattering of the sensor, etc. Do not drop it or have strong shocks on this product.
●
Avoid the use of this product in the following places.
A place where ambient temperature varies widely
A place where humidity is high
A place where rain/water is splashed
A place where there are dusts like sand or dirt
A place where it is subjected to exposed in scorching heat or direct sunlight
A place where it s subjected to radiation
A place where strong electric circuit exists beside this product
A place where there is any inductive interference
A place where there is mechanical vibration/shock
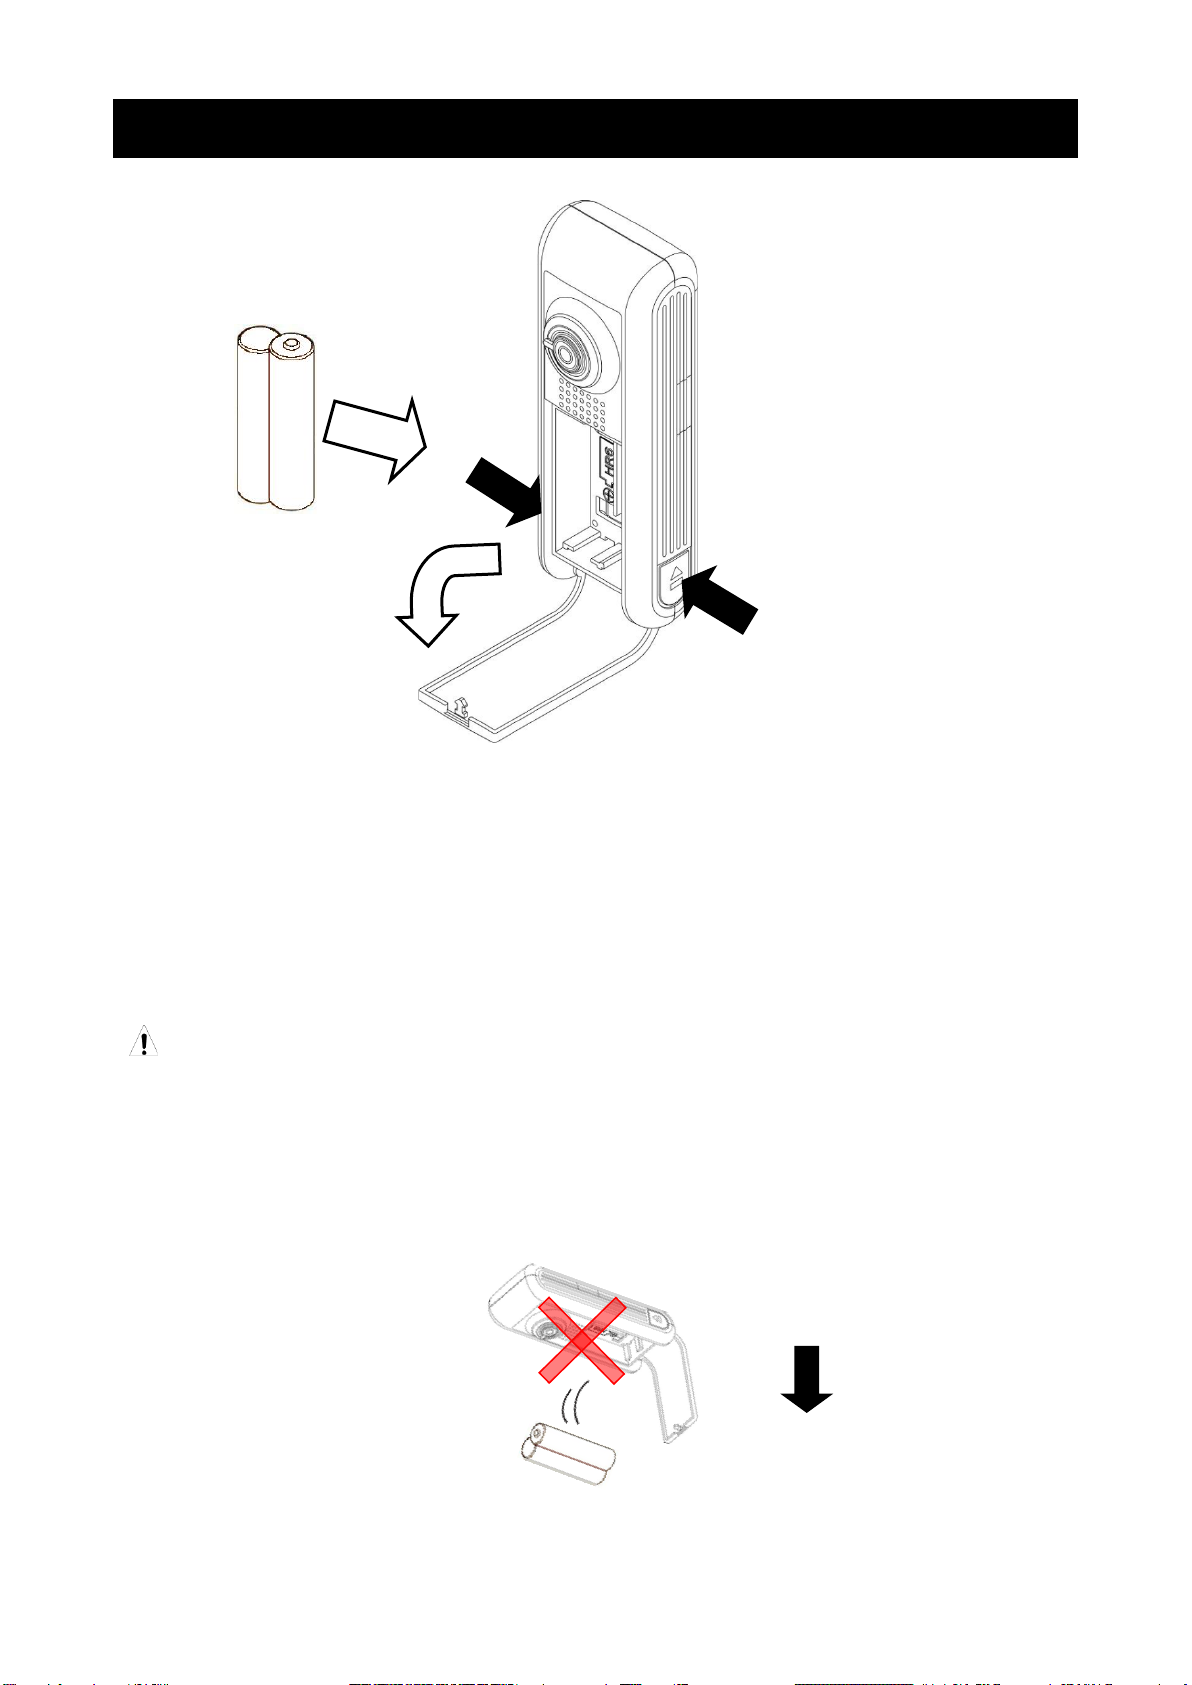
●Do not use any batteries other than the specified battery. It
may cause trouble on this
product by liquid spill or explosion of the batteries.
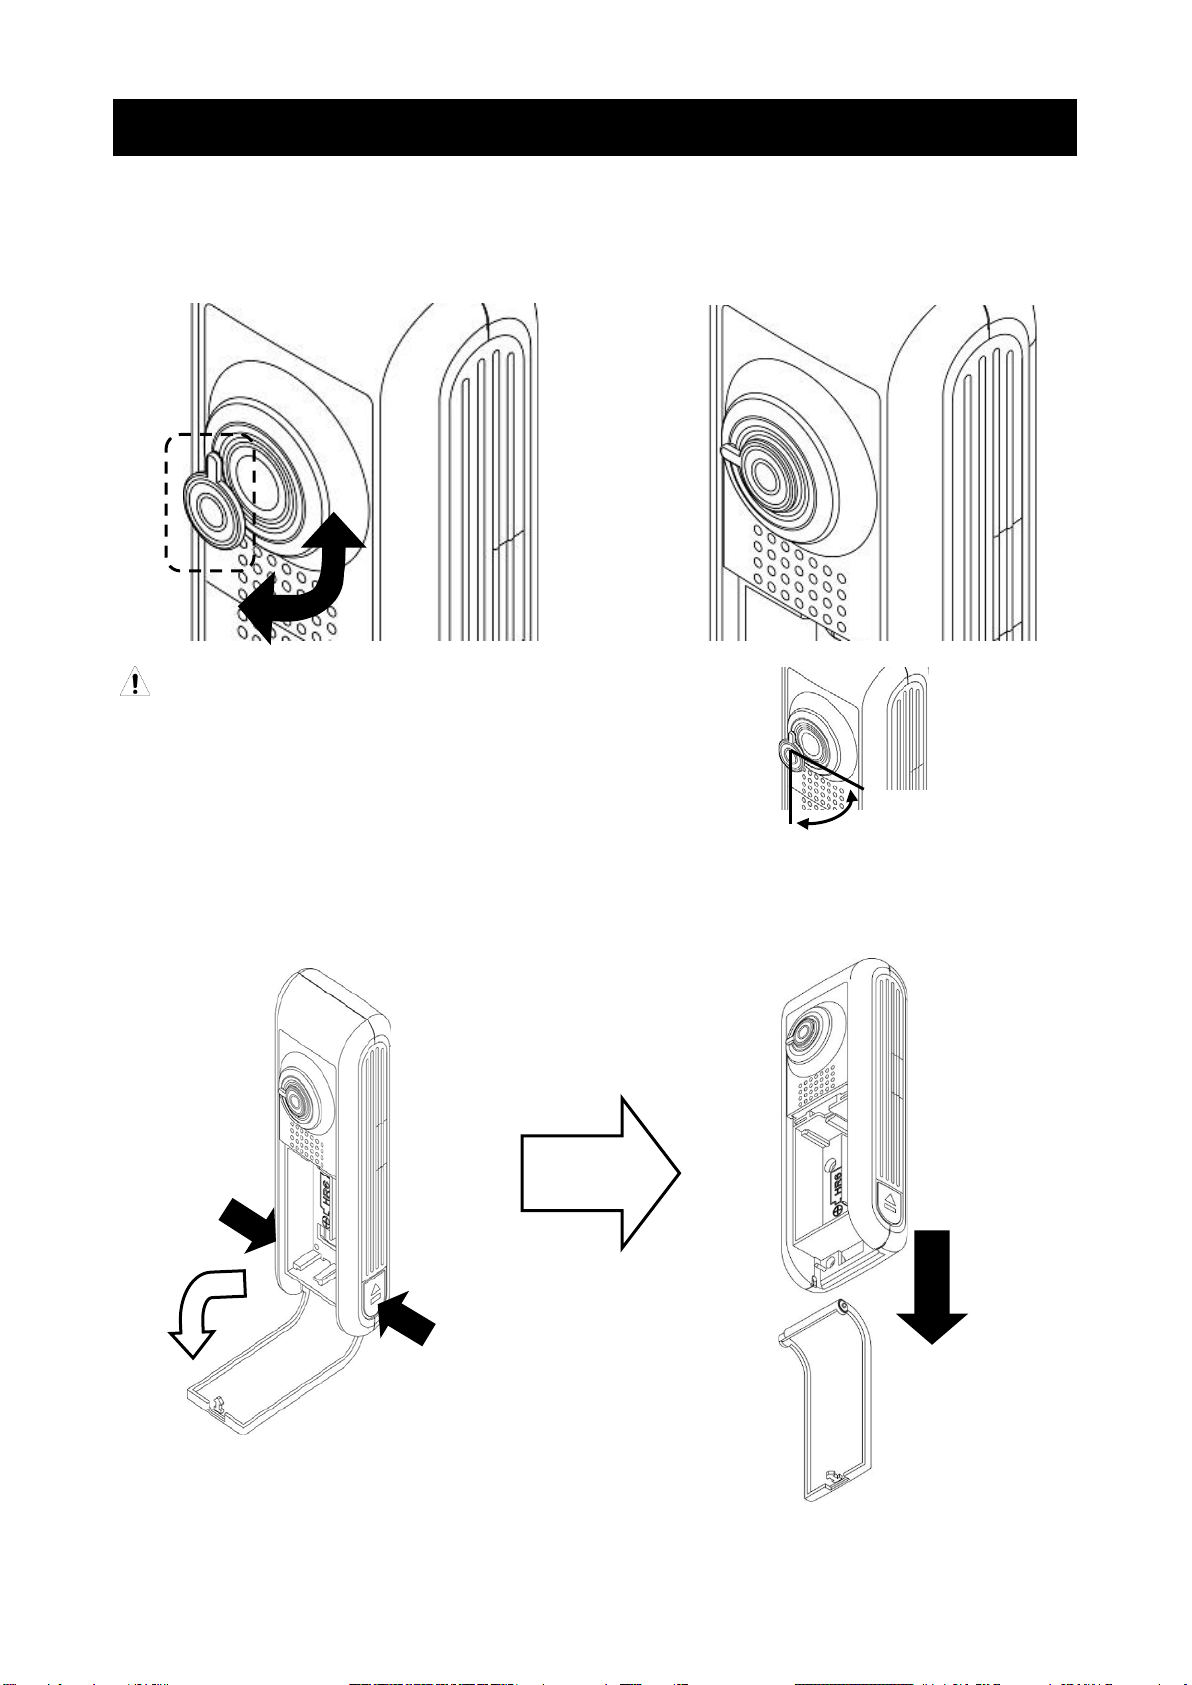
●Do not aim the sensor to a high temperature object like sun, or the imaging element
may be damaged and it may cause trouble on this product.
●In order to use this product safely, refer to "requirements" and handling methods
mentioned in this manual or it may cause damage or malfunction to this product or cause
damage also to other equipments.
●Optical components have special coating. Be careful that these parts become easily dirty
when they are dew-condensed. In addition, the infrared transmission is deteriorated under
the dew condensation and a clear image is not provided.
Warning
Caution
Warning
Caution

When you use accessories connected to this product, follow the instructions relating to
regarding the safety in this manual. If you do not follow these instructions, safety of this
product and the system will not be guaranteed.
Your extra consideration is required when this product is used in an application that may
subject to life threatening to human or property damage. Pay extra attention to safety
measures, avoid usage under extreme environment and build a fail-proof system.
Precautions for use
●This product is a precision instrument. Do not drop it or have strong shock on this product.
●This product is not waterproofed construction. Do not use this product in the environment where
water is poured.
●Keep this product away from equipments generating strong static electricity and electromagnetic
waves including TVs, microwave ovens and wireless applications, or it may cause malfunction or
trouble on this product.
●Keep this product away from equipment generating strong high frequency or surge voltage, or it
may cause malfunction or trouble on this product.
●Do not make it absolute to grasp only a strap and to brandish a product. It causes an accident and
an injury, the damage of household effects, the trouble.
●For cleaning this product except the lens, use neutral detergent and wipe it off lightly by rubbing
with the cloth squeezed firmly. Do not use chemicals or bleaches including benzene, thinner and
alcohol.
●For cleaning the lens, wipe off dust and dirt with a blower. Do not wash the lens with water nor
wipe it off by clothes. It may cause breakage of the lens.
●Do not use this product in the following places.
A place where ambient temperature becomes lower than 0°C or higher than 50°C
A place where dew is condensed
A place where ambient humidity becomes lower than 10%RH or higher than 80%RH
●Do not use or place this product in a place subjected to direct sunshine, dusty, high
temperature/high humidity or corrosive atmosphere.
●Remove batteries from the instrument, if the instrument is not in use for a long period or is put in
storage.
●When you discard this unit,unload the batteries first and discard this unit under the waste
disposal and public cleaning law by your local government.
●This instrument uses battery with Perchlorate Material.
Special handling may apply, see
www.dtsc.ca.gov/hazardouswaste/perchlorate
●When any service including repairs is required, contact to your nearest distributor.

Contents
■Introduction ...................................................... Ⅰ
■Safety precautions ................................................ Ⅲ
■Precautions for use ............................................... Ⅳ
■Names and functions .............................................. 1
■Loading/replacing of batteries ....................................... 2
■Function of shutter/Passing of strap ................................. 3
■How to operate keys
1. POWER key ............................................. 5
2. Measure key ............................................. 5
■Contents displayed ................................................ 6
■For accurate measurement ......................................... 8
■Setting of emissivity ............................................... 8
□Setting Emissivity (Reference) ............................. 9
■Setting of color palette ............................................. 10
■Switching the temperature unit ...................................... 11
■Connection of external power source ................................ 11
■Specifications .................................................... 12
■Precautions (For maintaining of measurement accuracy)............... 13
■Troubleshooting ................................................... 14
■External dimensions ............................................... 14

1
■Names and functions
Micro
USB port
Shutter
Batter cover
releasing
switch
Batter cover
Batter cover
releasing
switch
Display
MEASURE
key
POWER key

2
■Loading/replacing of batteries
【
Loading of batteries
】
①Push the battery cover releasing switches at both sides simultaneously. The battery cover will
open.
②On the inner surface of the back side of this product, there is the stamp indicating the battery
loading direction. Load 2 pieces of the AA (UM-3) batteries following this direction.
③Close the battery cover by pressing until it clicks.
※Batteries for use
We recommend using the eneloop® for this product.
Cautions
・
For replacing the batteries, be careful that water drops, etc. do not get in the inside of this product.
・
For opening the battery cover, make sure the battery cover is not facing down. If not, the batteries
may jump out of this product. (Refer to the figure shown below.)
・
Don't mix and use a new dry cell, an old dry cell, and the dry cell by which a kind is different.
・
When replacing batteries, do replace 2 batteries at the same time.
・
Make sure to close the battery cover following the above procedure.
Push the battery cover releasing switches
at both sides.
Batteries jumping out
Under

3
■
Function of shutter/Passing of strap
■
Function of shutter
For using this product, open the shutter by sliding it downward.
Close the shutter for protection of the lens if this product is not used.
Cautions
■
Passing of strap
Replace or take of the strap following the procedure shown below.
Push the battery cover releasing switches at both sides.
Pull the battery cover downward and take of the battery cover from
this product.
Movable range of shutter
About 90
°
・
Do not move the shutter forcedly, it may cause
breakage of the shutter. Move the shutter referring
to the movable range shown in the right figure.

4
①Push the battery cover releasing switches at both sides simultaneously. The battery cover
will open.
②Pull the battery cover downward and take of the battery cover from this product.
③Set the cord of the strap to the pin placed at the lower left of the battery housing portion.
④Return the battery cover to this product.
⑤Close the battery cover by pressing until it clicks.
Cautions
・
Do not take of the battery cover forcedly, it may cause breakage of this product.
・
Do not pull the strap rapidly. The strap may come off.
・
Do not lift the product by grasping the battery cover. There are cases where the battery
cover is removed from the product, and falls.
Set the cord of the strap to
the pin.
Close the battery cover.
Return the battery cover to this product.

5
■
How to operate keys
1. POWER key
For turning power on, press the POWER key on condition that power is not turned on. The logo of
[CHINO] will appear on the display when power is turned on.
For turning the power supply off, press and hold the POWER key on condition that power is
turned on.
Cautions
・
Do not press with a sharp object and nail the POWER key.
There are cases where the internal switch may be damaged.
2. MEASURE key
By pressing the MEASURE key on condition that power is turned on, the measurement will start
and the measured temperature will be updated.
With the MEASURE key being pressed, the measurement will be continuously executed. By
releasing the MEASURE key, the measured value will be held.
Furthermore, in the hold condition, by pressing the MEASURE key to target a new measuring
object, the temperature of the new object will be measured and its temperature will be held by
releasing the MEASURE key.
Cautions
・
Do not press with a sharp object and nail the MEASURE key.
There are cases where the internal switch may be damaged.
■Auto power off
Power is turned off by the auto-power-off function if this product is not operated for 5 minutes.
When power is turned off, press the POWER key again to turn power on.
Holding conditionMeasuring condition
Display
MEASURE key
POWER key

6
■Contents displayed
■Display in measuring and holding conditions
電池残量インジケータ
測定点
(中央固定)
測定値表示
Holding condition
・
By releasing the MEASURE key, the mode becomes the holding
condition.
・
The display will be held with the measured image and the
measured value when the MEASURE key is released.
・On the holding condition, a frame border
will be appeared on the
measured value indication portion.
Battery power indicator
Measurement point
(
Fixed at center)
Measured value indication
Measuring condition
・With the MEASURE key being pressed,
the mode becomes the
measuring condition.
・On the measuring condition, a
frame border on the measured
value indication portion will be disappeared and the measured
temperature will be updated constantly.
・On the measuring condition, the unit (°C) will blink.

7
■
Battery power indicator
The battery power indicator is prepared on the upper right of the display.
Replace the batteries referring to the table shown below.
Display
Battery power
Replace the batteries
Connected to an external power source
※The changing speed of the battery power indication will largely affected by the kind of
batteries being used and ambient temperature.
Fully
c
harged
Fully
discharged
Battery power indicator
Blinking

8
■
For accurate measurement
For accurate measurement, refer to the figure shown below and make sure that a measuring object
is imaged at the center of the display as large as possible. Larger measuring area needs longer
distance.
Ensure a sufficient measuring area for accurate measurement.
For accurate measurement, 4 x 4 pixels or more are needed for a target area.
■Setting of emissivity
The emissivity setting can be changed by 3 digits (Nos. 6, 7 and 8 in the figure shown above) of the
8-digit slide switch placed on the bottom edge portion of the battery housing. The factory default
emissivity is 0.95.
5 kinds of the emissivity can be set from 0.80 to 1.00 with 0.05 increments.
Set the emissivity referring to the setting mode of the slide switch shown on the battery cover or the
table sown below.
No. 6
No. 7
No. 8
Emissivity
OFF
OFF
OFF
ε=0.95
OFF
OFF
ON
ε=0.90
OFF
ON
OFF
ε=0.85
OFF
ON
ON
ε=0.80
ON
OFF
OFF
ε=1.00
About 12mm
Measuring view angle
About
37mm
■33.3°×33.3°
■
D (Viewing width) =
0.6×L (Measuring distance)
Field of view
Example of emissivity setting
8
-digit slide switch

9
Caution
・Do not change any digits other than the digits specified. If not, it may cause abnormal operation.
・When operating the 8-digit slide switch, please use a precision screwdriver.
If not, the 8-digit slide switch might be damaged.
□
Setting Emissivity (Reference)
Quantity of infrared radiation irradiated from objects depends on the objects’ material, surface
conditions, measuring temperatures and so on. The table below shows emissivity of some
objects. Please note that these values are just for reference.
◆Emissivity of Objects
Material Emissivity
Water, Ice
0.98
Soil
0.92~0.96
Concrete (wet)
0.96~0.98
Concrete (dry)
0.91~0.95
Ceramics
0.85~0.95
Stone, Asbestos
0.92
Plastics
0.90~0.95
Rubber (black)
0.95
Wood
0.98
Paper
0.92
Cloth, Fabric (colored)
0.95
Leather, Far
0.96
Human Skin
0.99
Vegetable, Fruit
0.98
Dough
0.98
Meat
0.98
Painted Surface
0.8
Tile
0.8

10
■
Setting of color palette
The color palette can be selected from 4 kinds of Iron/Rainbow/Gradation.
The factory default color palette is Iron.
The color palette can be changed by 2 digits (Nos. 2 and 3 in the figure shown above) of the 8-digit
slide switch placed on the bottom edge portion of the battery housing.
Change the color palette by referring to the settings of the slide switch shown in the table below.
No. 2
No. 3
Color palette
Drawing No.
OFF
OFF
Iron
①
ON
OFF
Rainbow
②
OFF
ON
Gradation
③
ON
ON
Gray
④
Caution
・
Do not change any digits other than the digits specified. If not, it may cause abnormal operation.
・
When operating the 8-digit slide switch, please use a precision screwdriver.
If not, the 8-digit slide switch might be damaged.
②【Rainbow】
①【Iron】
③【Gradation】
④【Gray】
Example of
color palette setting
8
-digit slide switch
Setting:
Iron

11
■
Switching the temperature unit
The temperature unit is changed.
The factory default temperature unit is °C.
The temperature unit can be changed by 1 digit (Nos. 5 in the figure shown above) of the 8-digit
slide switch placed on the bottom edge portion of the battery housing.
Change the temperature unit by referring to the settings of the slide switch shown in the table below.
Caution
・
Do not change any digits other than the digits specified. If not, it may cause abnormal operation.
・
When operating the 8-digit slide switch, please use a precision screwdriver.
If not, the 8-digit slide switch might be damaged.
■
Connection of external power source
Through . Power can be supplied to this product.
By connecting a battery pack to the micro USB port located on the side of this product, power can
be supplied.
When a battery pack is connected, the indication of the battery power indicator (Refer to [Display].)
is changed to the mark.
Cautions
No. 5
Temperature unit
OFF
°C
ON
°F
・The micro USB port is used for power supply only.
The charging function through the micro USB port to any rechargeable batteries
is not
available.
【
°C
】
【
°F
】
Example of
temperature unit
Setting:
°
C
8
-digit slide switch

12
■Specifications
Items Specifications
Model
TP-S
Detecting element
Thermopile array
2000 pixels
Measurement wavelength Center wavelength 10µm
Measurement view angle
33.3° x 33.3°
Temperature measurement
range
-10°C to 180°C
Temperature resolution
0.5°C (at 100°C black body)
Accuracy ratings ±2% of measured value or ±3
°C, whichever is greater
(Ambient temperature 25 ± 2°C)
Focus
Fixed focus
Radius resolution
12mrad
Repeatability 0.3°C
Response time
0.5 second (95% response)
Emissivity setting
0.80 to 1.00 (0.05 increments) Default: 0.95
The emissivity value is changed by the slide switch placed on the
bottom edge portion of the battery housing.
Color palette
Iron/Rainbow/Gradation/Gray
Default: Iron
The color palette
is changed by the slide switch placed on the
bottom edge portion of the battery housing.
Auto power off Power is turned off if this product is not operated for 5 minutes.
Monitor
1.5-inch color organic EL display
Display size: 28mm x 28mm
Measurement indication
function
Spot temperature indication 1-point (Fixed at center)
Function keys
POWER key
・・・
Turning power on/off (Press and hold to turn
off.)
MEASURE key・・・
Pressing the key starts measurement and
releasing the key holds the measured
value.
Working temperature range 0°C to 50°C
Working humidity range 10 to 80%RH (no dew condensation)
Storage temperature range
-20°C to 55°C(no dew condensation)
(Note) For storage of this product in long term, unload the batteries.
Storage humidity range 5 to 85%RH(no dew condensation)
Housing Not available
External dimensions
W50 x H138 x D39mm
(The values are maximum for each direction. The lens portion is
included.)
Weight About 174g (including batteries)
Material
ABS (Antibacterial specification)
Conforming standard
CE (EN61326-1:2013)
In EMC environment: ±5% of range (-10 to 180°C) Ambient
temperature 25°C
(In case that power is supplied through the micro USB port, this
specification is not applied.)
General specifications
Measurement specifications
Function specifications
Display/settingspecifications

13
Power supply
AA (UM-3) battery, 2 pieces (The eneloop® is recommended.)
Or power is supplied from . (5V, more than 2A)
The micro USB port is used for power supply only.
The charging function from the micro USB port to any
rechargeable batteries is not available.
Battery life
About 2 hours
Environmental condition: Ambient temperature 25°C
(when the
eneloop® standard batteries are used.)
Precautions (For maintaining of measurement accuracy)
Pay attention to the followings for maintaining the measurement accuracy.
Vibration and shock
Vibration and shock causes not only a damage to the thermal image sensor in a long term but
in stability of the measurement
Light path
Select a measurement place where water drops, dirt, dust, smoke, steam, or other foreign
substances are not existed between the thermal image sensor and a measuring object.
Disturbances causing higher temperature indication
Avoid places where high temperature heat source such as sunlight, light/flame of
incandescent electric lamps is not reflecting on a measurement surface and the thermal
image sensor. If such condition is present, cover the area with an opaque object.

14
■Troubleshooting
If you are experiencing difficulties with the sensor or noticing an abnormality on its operation, refer
to the followings. If the difficulties or abnormality is still present, contact to your nearest distributor.
Symptoms Causes Measures
Power is not turned
on.
The batteries are fully
discharged or loaded
incorrectly.
Replace the batteries or load them correctly
again.
Battery life is short.
This product is used in low
temperature. Confirm the recommended temperature range
of use for the batteries.
Manganese batteries are used. Use the eneloop® or alkaline batteries.
Image/temperature
value abnormally
fluctuates.
Strong statistic electricity,
electromagnetic wave or high
frequency may be present
around the sensor.
Keep this product away from an
equipment generating strong static
electricity or electromagnetic wave.
Area of the measuring object is
too small. Confirm the measuring diameter and measure
the object with sufficiently-large area.
Measured value is
not stable. This product is affected by rapid
temperature change. For measurement, leave this product for a while
until the temperature of this product stabilizes.
■External dimensions
Table of contents
Other Chino Thermometer manuals

Chino
Chino IR-BAT Series User manual

Chino
Chino IR-CAK User manual

Chino
Chino IR-E Series User manual

Chino
Chino IR-CA series User manual

Chino
Chino IR-BZ Series User manual

Chino
Chino IR-FA Series User manual

Chino
Chino IR-H Series User manual

Chino
Chino IR-AH Series User manual

Chino
Chino IR-CZ Series User manual

Chino
Chino IR-SA Series User manual