manuals.online logo
Brands
  1. Home
  2. •
  3. Brands
  4. •
  5. Cisco
  6. •
  7. IP Phone
  8. •
  9. Cisco 7841 Guide

Cisco 7841 Guide

Using Your Cisco IP Phone 7841
Adjust the Volume of Your Ring
1. Press the Volume buon while on hook.
Adjust the Volume of the Handset, Speaker, or Headset
1. Press the Volume buon during a call using the Handset,
Speakerphone and/or Headset.
Adjust the Phone Screen Contrast
1. Press the Applicaons buon and press 2 to select Preferences.
2. Press 2 to select Contrast.
3. Press an arrow buon on the Navigaon Cluster and Select buon to
adjust to the desired brightness.
4. Press the Save sokey.
5. Press the Applicaons buon to return to the main phone
screen.
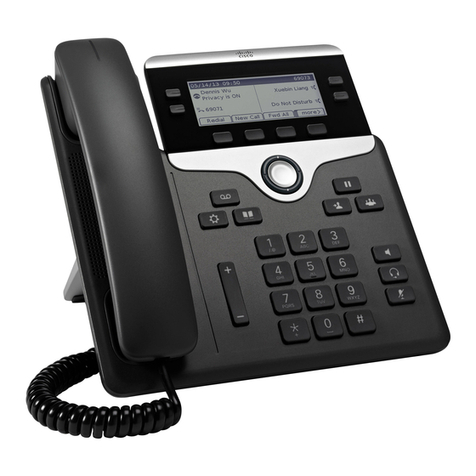
4Navigaon cluster
and Select buon Use to scroll through menus, highlight items and select the highlighted item.
5
Hold/Resume
Transfer
Conference
Hold/Resume places an acve call on hold and resumes the held call.
Transfer transfers the acve call to another party or voice mail extension.
Conference creates a conference call.
6
Speakerphone
Headset
Mute
Speakerphone toggles the speakerphone on and o. The buon illuminates in green when the speakerphone is on.
Headset toggles the headset on and o. The buon illuminates in green when the heatset is on.
Mute toggles the microphone on and o. The buon illuminates in red when the microphone is muted.
7
Messages
Applicaons
Directory
Messages auto-dials your voice message service.
Applicaons accesses Call History, User Preferences, and Phone Sengs and Informaon.
Directory accesses the Corporate Directory and your Personal Directory.
8Volume buon Adjusts the volume of the ringtone, handset, headset, and speakerphone.
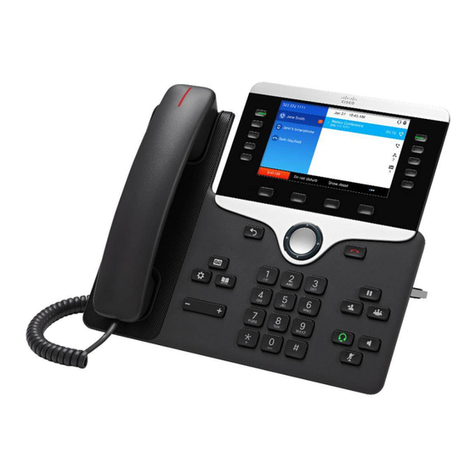
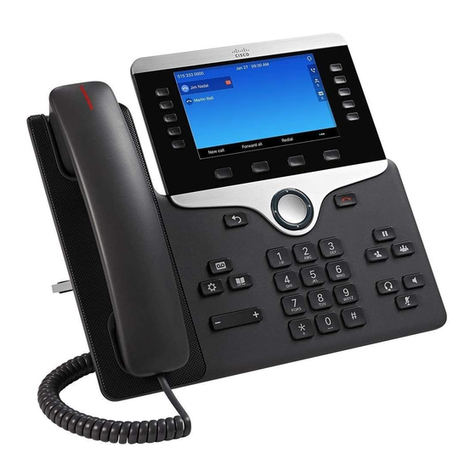
1Handset light strip Indicates an incoming call (ashing red) or
new voice message (steady red).
2Line and Feature
buons
Access your phone lines, features, and call
sessions.
Line buons are used to answer a call or
resume a held call.
Feature buons are used to view calls on a
line or access features such as Speed Dial.
3Sokey buons
Context sensive buons with labels above
that indicate the funcon of the sokey
based upon the call state. For example, so-
keys are Redial, New Call, Fwd All, and Re-
cents when your phone is on hook. When on
a connected call, the sokeys are Hold, De-
tails, End Call, and … (more)
An Overview of Your Phone
Using Your Cisco IP Phone 7841
...Using the Handset
1. Pick up the handset and dial the number or extension
or
Dial the number or extension and pick up the handset.
Dial 9 for an outside line and 1 if the number is long distance.
2. Return the handset to the cradle to end the call.
... Using the Speakerphone
1. Press the Speakerphone buon and dial the number or exten-
sion.
or
Dial the number or extension and press the Speakerphone buon.
Dial 9 for an outside line and 1 if the number is long distance.
2. Press the Speakerphone buon to end the call.
… Using the New Call Sokey
1. Press the New Call sokey and dial the number or extension.
Dial 9 for an outside line and 1 if the number is long distance.
Pressing NewCall invokes the speakerphone if the handset is in the cradle
and the default audio path has not been changed.
path has not been changed.
2. Press the End Call sokey to end the call.
...Using Redial
1. Press the Redial sokey.
Pressing Redial invokes the speakerphone if the handset is in the cradle
and the default audio path has not been changed.
2. Press the End Call sokey to end the call.
... Using the Headset
1. Press the Headset buon and dial the number or extension
or
Dial the number or extension and press the Headset buon.
Dial 9 for an outside line and 1 if the number is long distance.
2. Press the Headset buon to end the call.
...Set Default Audio Preference to Headset
1. To set the default audio preference to headset, press the Headset
buon followed by the Cancel sokey.
A headset icon in the phone screen header line indicates the headset is the
default audio path.
2. Use the sokeys exclusively such as New Call, Redial, and Answer to invoke
the headset automacally.
To reset the default audio path back to speaker phone, press the speaker
buon followed by the Cancel sokey.
1. Press the Mute buon.
The Mute buon illuminates in red when the microphone is muted.
When Mute is on, the audio is disabled for the handset, headset, and speaker-
phone and external microphone. You can hear other pares but they cannot
hear you.
2. Press the Mute buon (when illuminated) to turn Mute o.
...Using the Handset
1. Pick up the handset.
...Using the Line Buon
1. Press the ashing amber Line buon.
You will invoke the default audio preference.
See Set the Default Audio Path on this page for instrucons.
... Using the Speakerphone
1. Press the Speakerphone buon.
If the default audio preference is set to speakerphone, you can also press the
Answer sokey, or the amber ashing Line buon.
... Using the Headset
1. Press the Headset buon.
If the default audio preference is set to headset, you can also press the Answer
sokey or the amber ashing Line buon.
... Using the Answer Sokey
1. Press the Answer sokey.
You will invoke the default audio preference.
See Set the Default Audio Path on this page for instrucons.
Answer a Second Inbound Call
1. Press the amber ashing Line buon.
The rst call is placed on hold.
You will hear a call waing tone when you receive an inbound call while on a
connected call. Your call stack is set to 4 calls with a busy trigger of 2.
2. Press the ...more sokey then press the Swap sokey to switch between calls
or press the EndCall sokey to end the connected call then press the Resume
sokey to connect with the call on hold.
Switch Between Calls
1. To resume the call on hold, press the ashing green Line buon.
The second call is placed on hold and its line buon ashes green.
The line buon for the connected call is solid green.
Press the ashing Line buons to switch
between the calls or use the Navigaon Cluster and Select
buon to select the call and then press Resume .
Send a Ringing Call Directly to Your Voice Mail
1. Press the Decline sokey.
The call is transferred to your voice mail. If you are on a connected call, use the
Navigaon Cluster and Select buon to select the inbound call and then press
the Divert sokey.
1. Press the Hold buon to place a call on hold.
The line buon ashes green.
2. Press the Hold buon, the ashing green Line buon, or the
Resume sokey to resume the call.
You cannot end a call that is on hold; therefore resume the call then press the
End Call sokey.
...Place a Call While on a Connected Call
1. Press the Hold buon then press the New Call sokey and dial the num-
ber.
2. Press the ...more sokey then press the Swap sokey to switch between calls
or press the EndCall sokey to end the connected call then press the Resume
sokey to connect with the call on hold.
2
Using Your Cisco IP Phone 7841 3
1. During a connected call, press the … (more) sokey then press the Park
sokey. The call is placed on hold on a call park extension.
Call Park extensions are 17060 – 17099.
2. Make note of the call park extension that displays next to the blinking line
buon.
This number is required to retrieve the parked call from another phone.
If the parked call is not retrieved within a specic me period (determined by
your system administrator) the call rings back to the extension that parked it.
Retrieve a Parked Call
1. On any phone, go o hook using the handset, speakerphone, or headset.
2. Enter the call park extension into the keypad.
If the parked call is not retrieved within a specic me period (determined by
your system administrator) the call rings back to the extension that parked it.
 The handset light strip is solid red when you have new voice mail.
Listen to Messages
1. Press the Messages buon.
2. Enter your voice mail password 13579 and follow the prompts.
Personalize Your Voice Mail
1. Press the Messages buon.
2. Enter your voice mail password and follow the prompts.
Check Voice Mail From Another Extension
1. Press the Messages buon followed by the * (star) key.
2. Enter your extension (user id).
3. Enter your password and follow the prompts.
Check Voice Mail From an External Phone
1. Call (216) 957-8900 from any phone.
2. Enter your extension (user id).
3. Enter your password and follow the prompts.
Send a Ringing Call Directly to Your Voice Mail
1. Press the Decline sokey.
The call is transferred to your voice mail. If you are on a connected call, use
the Navigaon Cluster and Select buon to select the inbound call and then
press the Divert sokey.
Forward All Calls to Your Voice Mail
1. Press the Fwd All sokey followed by the Messages buon.
The phone screen will say “To Voicemail.”
2. Press the Fwd O sokey to cancel call forwarding.
Transfer a Connected Call to Someone’s Voice Mail
1. Press the Transfer buon followed by the * (star) key.
2. Enter the recipient’s extension and press the Transfer sokey.
1. Press the Directory buon.
2. Press 2 to select Corporate Directory.
3. Use the keypad to spell the rst few leers of the rst name or press the
down arrow on the Navigaon Cluster and Select buon to select Last
Name: and spell the rst few leers of the last name.
Press each key on the keypad repeatedly unl the correct leer is selected.
Press the Backspace sokey to erase characters to the le.
4. Press the Search sokey.
5. Use the Navigaon Cluster and Select buon to highlight the lisng and
press the Dial sokey.
Press the Directory buon to the main phone screen.
Dial from the Directory While on a Connected Call
1. Complete steps 1 through 5 above.
2. The rst caller is automacally placed on hold.
3. Press the ashing green Line buon (represenng the call that is
on hold) to resume the rst call or use the Navigaon Cluster and Select
buon and press the Resume sokey.
1. Press the Applicaons buon and press 1 to select Recents or
press the Recents sokey.
Recents inially displays All calls.
2. If mulple lines exist, select All Lines or the required line.
3. Press the Missed Calls sokey to display only Missed Calls.
The icons enable you to determine if calls were placed or received.
3. Use the Navigaon Cluster and Select buon to select the call and press
the Call sokey.
If the call is from an external party, press the … (more) sokey followed by
the EditDial sokey and type any required prexes such as 9 and/or 1.
Clear Call History
1. Press the Applicaons buon and press 1 to select Recents.
2. Press the … (more) sokey.
3. Press the Clear sokey then press the Delete sokey.
4. Press the Applicaons buon to return to the main phone
screen.
Delete a Call from Call History
1. Press the Applicaons buon and press 1 to select Recents.
2. If mulple lines exist, select All Lines or the required line.
3. Use the Navigaon Cluster and Select buon to select the call.
4. Press the … (more) sokey twice and press the Delete sokey.
5. Press the Delete sokey again to conrm.
6. Press the Applicaons buon to return to the main phone
screen.
Using Your Cisco IP Phone 7841
4
Create a Conference Call (Call each Parcipant)
1. Call your rst parcipant.
2. Inform the parcipant that you are placing them on hold and press the
Conference buon.
Your rst parcipant is placed on hold.
3. Call the next parcipant and wait for the party to answer.
Your rst parcipant is on hold; therefore you can have a private conversaon
with the second parcipant before you join him/her into the conference call.
4. Press the Conference buon to add the parcipant to your con-
ference call.
5. To add addional parcipants, repeat steps 2 through 4 above.
Each me you press the Conference buon, the current conference parci-
pants are placed on hold; therefore you can speak privately with each parci-
pant before you join them into the conference call.
You can have a maximum of 8 parcipants on a conference call.
Create a Conference Call (Join Acve Calls)
1. Start with two acve calls; one connected and the other on hold.
3. Press the Conference Buon, then press the pulsing green Ses-
sion buon (the line buon of the call that is on hold).
View a list of Conference Call Parcipants
1. During a conference call, press the ...more sokey then press the Details
sokey.
 Parcipants are listed in the order in which they joined the conference with
the most recent parcipants on top.
 The iniator of the conference appears at the boom of the list with an
asterisk next to his/her name.
 You can have a maximum of 8 parcipants on a conference call.
2. Press the Update sokey to determine if any parcipants are no longer
on the conference call.
3. Press the Back buon to return to the main phone screen.
Remove a Parcipant From a Conference Call
1. During a conference call, press the ...more sokey then press the Details
sokey.
2. Use the Navigaon Cluster and Select buon to select the parcipant and
press the Remove sokey.
 You must iniate a conference call in order to remove parcipants.
 Anyone on a conference call can hang up at any me without disrupng the
connecon of the remaining pares.
 You can have a maximum of 8 parcipants on a conference call.
 You can press the Swap sokey to toggle between conference call and the
other connected call before you add a parcipant.
Forward All Calls to Your Voice Mail
1. Press the Fwd All sokey followed by the Messages buon.
The phone screen will say “Forwarded to Voicemail.”
2. Press the Fwd O sokey to cancel.
Forward All Calls to Another Extension or Number
1. Press the Fwd All sokey and dial the number or extension.
 Enter the number exactly as you would dial it.
 For example, enter 9 and 1 followed by the area code and number if the
number is external and long distance.
 The phone screen will say “To followed by the number.”
 Your primary line buon will display a call forward icon.
Cancel Call Forwarding
1. Press the Forward O sokey.
Blind Transfer
1. Inform the caller that you are placing them on hold, then press the
Transfer buon.
The caller is placed on hold and may hear hold music.
2. Dial the transfer recipient’s number or extension and press the Transfer
buon again to complete the transfer.
Consult Transfer
1. Inform the caller that you are placing them on hold, then press the
Transfer buon.
The caller is placed on hold and may hear hold music.
2. Dial the target number or extension and wait for the transfer recipient to
answer.
3. If the transfer recipient accepts the call, press the Transfer buon
again to complete the transfer.
Or
If the transfer recipient does not accept the call, wait for the transfer
recipient to hang up and press the Resume sokey to reconnect with the
caller.
Transfer a Connected Call to Someone’s Voice Mail
1. Press the Transfer buon followed by the * (star) key.
2. Enter the recipient’s extension and press the Transfer buon.
Set the Ring Tone
1. Press the Applicaons buon and press 2 to select Preferences.
2. Press 1 to select Ringtone.
3. Press an arrow buon on the Navigaon Cluster and Select buon to
highlight a ringtone and press the Play sokey to hear the ringtone.
4. Repeat steps 3 above unl you nd the desired ringtone.
5. Press the Set sokey.
6. Press the Applicaons buon to return to the main phone
screen.

Other manuals for 7841

17

Other Cisco IP Phone manuals

Cisco SPA92X User manual

Cisco

Cisco SPA92X User manual

Cisco 7941G-GE - IP Phone VoIP User manual

Cisco

Cisco 7941G-GE - IP Phone VoIP User manual

Cisco Unified 7905G User manual

Cisco

Cisco Unified 7905G User manual

Cisco 7910G - IP Phone VoIP User manual

Cisco

Cisco 7910G - IP Phone VoIP User manual

Cisco 6945 Series User manual

Cisco

Cisco 6945 Series User manual

Cisco 7940G User manual

Cisco

Cisco 7940G User manual

Cisco Cisco 7960 User manual

Cisco

Cisco Cisco 7960 User manual

Cisco SPA-500 Series User manual

Cisco

Cisco SPA-500 Series User manual

Cisco 8800 Series User manual

Cisco

Cisco 8800 Series User manual

Cisco Small Business Pro SPA 504G User manual

Cisco

Cisco Small Business Pro SPA 504G User manual

Cisco SPA525G - Small Business Pro IP Phone VoIP User manual

Cisco

Cisco SPA525G - Small Business Pro IP Phone VoIP User manual

Cisco 7925G - Unified Wireless IP Phone VoIP User manual

Cisco

Cisco 7925G - Unified Wireless IP Phone VoIP User manual

Cisco 7942G - Unified IP Phone VoIP User manual

Cisco

Cisco 7942G - Unified IP Phone VoIP User manual

Cisco IP Phone 8800 Series User manual

Cisco

Cisco IP Phone 8800 Series User manual

Cisco 7965 User manual

Cisco

Cisco 7965 User manual

Cisco SPA 303 Series User manual

Cisco

Cisco SPA 303 Series User manual

Cisco 7945G - Unified IP Phone VoIP User manual

Cisco

Cisco 7945G - Unified IP Phone VoIP User manual

Cisco 8945 Video User manual

Cisco

Cisco 8945 Video User manual

Cisco 7945G - Unified IP Phone VoIP User manual

Cisco

Cisco 7945G - Unified IP Phone VoIP User manual

Cisco 7945 Series User manual

Cisco

Cisco 7945 Series User manual

Cisco SPA 303 Series User manual

Cisco

Cisco SPA 303 Series User manual

Cisco 6941 - Unified IP Phone Slimline VoIP User manual

Cisco

Cisco 6941 - Unified IP Phone Slimline VoIP User manual

Cisco 7821 How to use

Cisco

Cisco 7821 How to use

Cisco IP Phone 6851 Instruction Manual

Cisco

Cisco IP Phone 6851 Instruction Manual

Popular IP Phone manuals by other brands

Yealink T41S user guide

Yealink

Yealink T41S user guide

AT&T Synapse SB67020 user guide

AT&T

AT&T Synapse SB67020 user guide

Auerswald COMfortel 1200 Operation guide

Auerswald

Auerswald COMfortel 1200 Operation guide

ESENE ES380 user manual

ESENE

ESENE ES380 user manual

Escene HS108-PS Quick operator's guide

Escene

Escene HS108-PS Quick operator's guide

Karel IP111 user guide

Karel

Karel IP111 user guide

Dynamix IP Phone user manual

Dynamix

Dynamix IP Phone user manual

EchoLife ET655 user manual

EchoLife

EchoLife ET655 user manual

Avaya one-X 9611G quick start guide

Avaya

Avaya one-X 9611G quick start guide

Grandstream Networks GXP-1100 quick start guide

Grandstream Networks

Grandstream Networks GXP-1100 quick start guide

Topcom SOLOGIC B921 Short user guide

Topcom

Topcom SOLOGIC B921 Short user guide

Yealink SIP-T27P quick start guide

Yealink

Yealink SIP-T27P quick start guide

Splicecom PCS 520 Quick reference guide

Splicecom

Splicecom PCS 520 Quick reference guide

Ultrative UTT-800 Product user manual

Ultrative

Ultrative UTT-800 Product user manual

101VOICE IP1060G Quick user guide

101VOICE

101VOICE IP1060G Quick user guide

ESI IP Series user guide

ESI

ESI IP Series user guide

Vertical MBX IP user guide

Vertical

Vertical MBX IP user guide

Yealink T46 Quick reference guide

Yealink

Yealink T46 Quick reference guide

manuals.online logo
manuals.online logoBrands
  • About & Mission
  • Contact us
  • Privacy Policy
  • Terms and Conditions

Copyright 2025 Manuals.Online. All Rights Reserved.