manuals.online logo
Brands
  1. Home
  2. •
  3. Brands
  4. •
  5. Cisco
  6. •
  7. IP Phone
  8. •
  9. Cisco 7945 Series User manual

Cisco 7945 Series User manual

S
Se
et
tt
ti
in
ng
g
U
Up
p
V
Vo
oi
ic
ce
e
M
Ma
ai
il
l
You must set up your voicemail before you
will be able to listen to NEW messages.
Follow these steps to set up your Voicemail:
Step 1Press the Messages button.
Step 2When prompted, enter the default
password: 11223344 #
Step 3You will be guided through the mailbox
set up. Complete the requests until
you hear that you have successfully
completed enrollment.
V
Vo
oi
ic
ce
e
M
Ma
ai
il
l
C
Co
om
mm
ma
an
nd
ds
s
During the Message After the Message
1 Restart Message
1 Replay message
2 Save
2 Save
3 Delete
3 Delete
4 Slow playback
4 Reply
5
5 Forward
message
6 Fast playback
6
7 Rewind
message
7 Rewind
message
8 Pause/Resume
8
9 Fast-forward
9 Play message
properties
# Fast-forward
# Save as is
## Skip message,
save as is
S
Sh
ho
or
rt
t
C
Cu
ut
ts
s
A
Af
ft
te
er
r
L
Lo
og
g-
-I
In
n
41 Change greetings
412 Turn on/off alternate greeting
423 Choose full or brief menus
431 Change phone password
432 Change recorded name
Press #during a co-workers mailbox greeting to
bypass the greeting and get to the tone to record
a message.
Dial *plus any office extension to leave a
message in a co-workers mailbox, without calling
their telephone!
F
Fo
or
rw
wa
ar
rd
d
C
Ca
al
ll
ls
s
t
to
o
V
Vo
oi
ic
ce
e
M
Ma
ai
il
l
Step 1Press the CFwdALL soft key.
Step 2Press the Messages key. All incoming
calls will now go to Voicemail.
To cancel, press the CFwdALL soft key
again.
E
Ex
xt
te
er
rn
na
al
l
A
Ac
cc
ce
es
ss
s
t
to
o
V
Vo
oi
ic
ce
e
M
Ma
ai
il
l
Dial 301-228-4900
Step 1 Upon hearing the Unity attendant
greet you, press the ‘*’key.
Step 2Enter your extension, # and then
password, and then # key again.
U
Un
ni
if
fi
ie
ed
d
M
Me
es
ss
sa
ag
gi
in
ng
g
For the traveling employee, the ability to open
their laptop and retrieve both email and
voicemail from Outlook is a time saver. Voice
mail now resides in Outlook with a voicemail
relay. Each employee will have 2 methods to
retrieve voice mail ~ through the phone or
computer. If one retrieves the voice mail from the
phone and deletes it, the voicemail remains in
Outlook. If one uses the PC for retrieval direct
from Outlook, the phone message waiting light
remains on after the voice mail is listened to
E
Ex
xt
te
en
ns
si
io
on
n
M
Mo
ob
bi
il
li
it
ty
y
This feature allows users to share a phone by
logging into the phone with a unique ID. This
features requires setup on a per user basis. To
request this feature contact the NCI-F Helpdesk
Step 1 Press the Services button
Step 2 Using the keypad, enter your network
login credential at the name prompt
Step 3 Enter 11223344 as the pin
The telephone will reset and become your device
U
Us
se
er
r
W
We
eb
b
P
Pa
ag
ge
es
s
Users have access to change functions like:
*call forwarding
*building a personal directory list
*building a personal speed dial list
*changing your phone PIN (separate from
voicemail PIN)
Login by going to the following URL:
https://ciscovoip/ccmuser
Accept any security warnings launch the page.
Use your computer network credentials to login.
To change your Voicemail password use the
following URL and login as stated above:
https://ciscovoipmail/ciscopca
Accept any security warnings. Navigate to Web
Inbox and then Settings tab/Passwords.
C
Ci
is
sc
co
o
7
79
94
45
5/
/7
79
96
65
5
I
IP
P
P
Ph
ho
on
ne
e
a
an
nd
d
V
Vo
oi
ic
ce
e
M
Ma
ai
il
l
U
Us
se
er
r
G
Gu
ui
id
de
e
T
Te
ec
ch
hn
ni
ic
ca
al
l
S
Su
up
pp
po
or
rt
t:
:
e
ex
xt
t.
.
5
51
11
15
5
N
NC
CI
I
a
at
t
F
Fr
re
ed
de
er
ri
ic
ck
k
H
He
el
lp
pd
de
es
sk
k
NOTE: Formal training is available upon request after phone deployments by contacting the NCI at Frederick Helpdesk at x.5115 or email FredH[email protected]
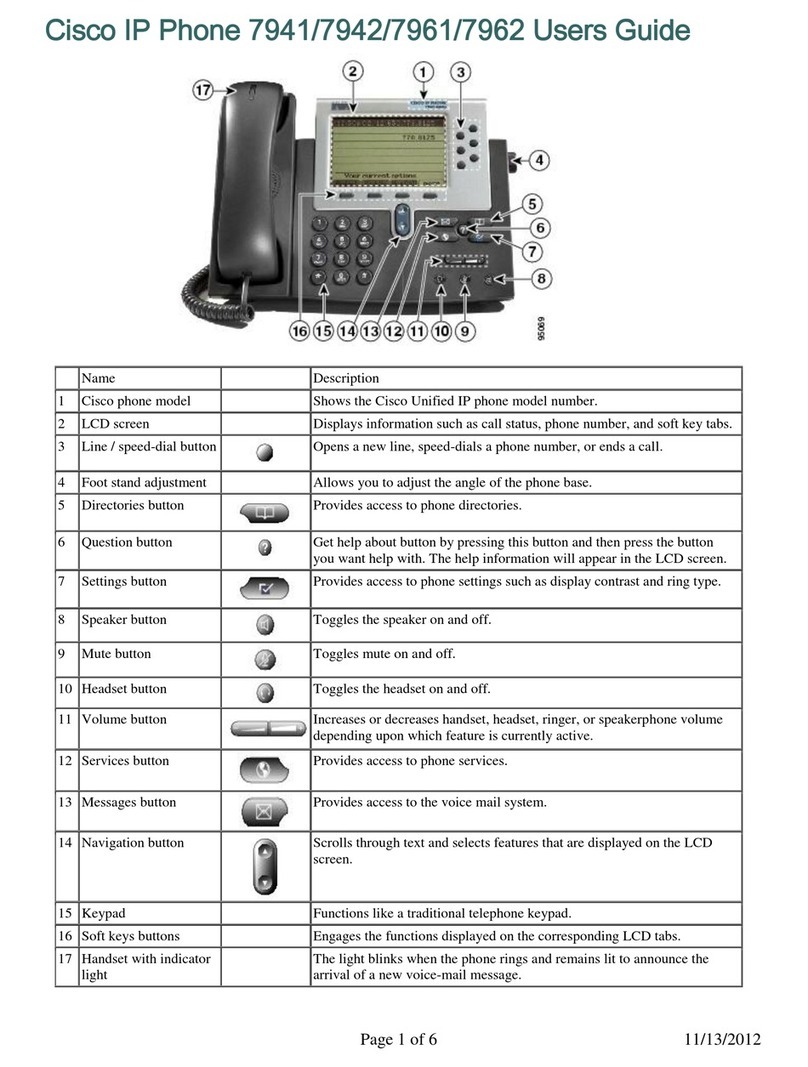
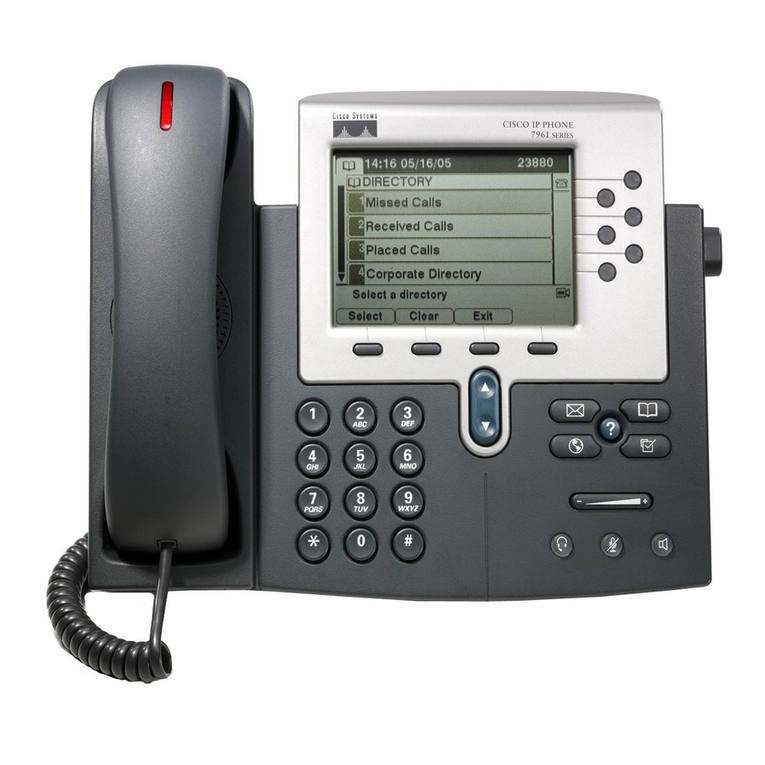
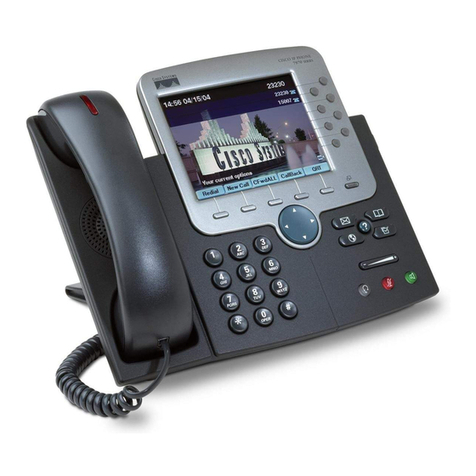
1
Line or
speed dial
buttons
Opens a new line, speed
dials the number on the LCD
screen or ends a call
2
Foot stand
adjust
Adjusts the angle of the
phone base
3
Display
button
Awakens the phone screen
from sleep mode
4
Messages
button
Provides access to message
system
5
Directories
button
Displays missed, placed
received calls & corporate
directory
6
Help
button
Displays help on your LCD
screen for a phone key or
function
7
Settings
button
Provides access to phone
settings such as contrast
and ring tones
8
Services
button
Provides access to phone
services such as extension
mobility
9
Volume
button
Increases/decreases volume
of handset, headset, ring or
speakerphone
10
Speaker
button
Toggles the speaker on or
off
11
Mute
button
Toggles the mute on or off
12
Headset
button
Toggles the headset on or
off
13
Navigation
wheel
Enables you to scroll
through text and menus and
select features displayed on
the LCD screen
14
Dial pad
Works exactly like the dial
pad on a traditional
telephone
15
Soft Keys
Enables you to select any of
the functions displayed on
the corresponding LCD tabs
16
Light
Message waiting indicator
17
LCD
Screen
Displays features such as
the time, date, your phone
number, caller ID, line/call
status and soft key tabs
F
Fo
oo
ot
t
S
St
ta
an
nd
d
Be sure to hold the foot stand while
pressing the adjust button on the
right side of the phone Failing to do
so may result in damage to the
phone.
H
He
el
lp
p
M
Me
en
nu
u
You can learn how to use features
using the ‘?’ key. At any time, you
may press the ‘?’ key followed by any
key you wish to know more about.
P
Ph
ho
on
ne
e
I
Ic
co
on
ns
s
Call Forwarding Enabled
Call on Hold
Connected Call
Off-Hook
On-Hook
Incoming Call
Shared Line in Use
Incoming Call (flashing amber)
Line is Active (steady green)
Call on Hold (flashing green)
Shared Line in Use (steady red)
H
Ha
an
nd
dl
li
in
ng
g
M
Mu
ul
lt
ti
ip
pl
le
e
C
Ca
al
ll
ls
s
Each line button can support multiple
calls. When you are on one call and
another call rings in on the same line,
press the Answer soft key. Your
original caller will automatically be
put on hold.
Pressing the I-Divert soft key will
immediately send the new call to your voice
mailbox.
To re-display the information on a particular
call you’ve answered, press the ‘line button’
for that active call. It will not disconnect the
call.
H
Ho
ol
ld
d/
/R
Re
es
su
um
me
e
Press the Hold soft key. The held call shows the
flashing hold icon. To resume a held call, use
the arrows on the “Navigation Wheel” to highlight
the call you wish to resume then press the
Resume soft key. The active call shows the
Active Line icon. You cannot hang up on, or
transfer a held call. The call must be resumed
before you can hang up or transfer.
C
Ca
al
ll
l
F
Fo
or
rw
wa
ar
rd
d
Step 1 With the handset down, press the
CFwdALL soft key. You should hear two
beeps.
Step 2 Enter the number to which you want to
forward all of your calls, or press the
Messages button if you want to forward
all calls directly to Voicemail
Note: Be sure to enter the number exactly as
you would if you were placing a call to
that number. For example, enter an
access code such as 9 or the area code,
if necessary. On some phones the call
forwarding feature may be restricted to
numbers within NCI at Frederick
Step 3To cancel call forwarding, press the
CFwdALL soft key.
T
Tr
ra
an
ns
sf
fe
er
r
Step 1 During a call, press the Transfer soft key.
This puts the call on hold.
Step 2 Dial the number or office extension to
which you want to transfer the call.
Step 3 When it rings on the other end, press
Transfer again. Or, when the party
answers, announce the call and then
press Transfer.
Step 4 If you are using a handset, hang up. If the
party declines the call, press the Resume
soft key to return to the original call.
Note: To transfer a call to someone’s voicemail
box, follow the steps above, but insert “*”
in front of the 4 digit extension.
C
Co
on
nf
fe
er
re
en
nc
ce
e
(
(6
6
p
pa
ar
rt
ti
ie
es
s)
)
Step 1During a call, press the More soft key
and then the Confrn soft key.
Step 2Place a call to another number or
extension.
Step 3When the call connects, press Confrn
again to add the new party to the
conference call. Continue these
instructions to add more parties.
C
Ca
al
ll
l
P
Pa
ar
rk
k
Step 1 While on a call, press the More soft key,
then the Park soft key. Hang up.
Step 2 Take note of the park number in the
phone display.
Step 3 Retrieve the call from any Cisco phone by
dialing the park number.
Note: The call will ring back to the phone that
parked it if no one retrieves the call in 2
minutes.
J
Jo
oi
in
n
The Join soft key allows a user to connect two
separate calls on the phone
Step 1 Highlight the call on hold.
Step 2 Press the Join soft key
D
Do
o
N
No
ot
t
D
Di
is
st
tu
ur
rb
b
The DND feature silences the ringer on the
telephone. The phone will beep once to indicate
an incoming call and display the caller ID
information on the screen but will not ring.
To toggle the DND feature on/off press the More
soft key then the DND soft key.
C
Ch
ha
an
ng
ge
e
D
Di
is
sp
pl
la
ay
y
B
Br
ri
ig
gh
ht
tn
ne
es
ss
s
Step 1 Press Settings button
Step 2 Scroll down to Brightness
Step 3 Press Select soft key
Step 4 Adjust the brightness with the ‘up/down’
soft keys
Step 5 Press Save soft key
Step 6 Press the Settings button to close menu
Other manuals for 7945 Series

15

This manual suits for next models

1

Other Cisco IP Phone manuals

Cisco 7925G - Unified Wireless IP Phone VoIP Instruction Manual

Cisco

Cisco 7925G - Unified Wireless IP Phone VoIP Instruction Manual

Cisco 7800 Series User manual

Cisco

Cisco 7800 Series User manual

Cisco 7841 User manual

Cisco

Cisco 7841 User manual

Cisco 7900 Series User manual

Cisco

Cisco 7900 Series User manual

Cisco MCS 7800 Series Instruction Manual

Cisco

Cisco MCS 7800 Series Instruction Manual

Cisco 7961 User manual

Cisco

Cisco 7961 User manual

Cisco DX650 User manual

Cisco

Cisco DX650 User manual

Cisco 7940 - IP Phone VoIP User manual

Cisco

Cisco 7940 - IP Phone VoIP User manual

Cisco 8811 Instruction Manual

Cisco

Cisco 8811 Instruction Manual

Cisco 6961 - Unified IP Phone Standard VoIP User manual

Cisco

Cisco 6961 - Unified IP Phone Standard VoIP User manual

Cisco 8831 User manual

Cisco

Cisco 8831 User manual

Cisco 7975G - Unified IP Phone VoIP Instruction Manual

Cisco

Cisco 7975G - Unified IP Phone VoIP Instruction Manual

Cisco UNIFIED 9971 User manual

Cisco

Cisco UNIFIED 9971 User manual

Cisco Unified 6921 Instruction manual

Cisco

Cisco Unified 6921 Instruction manual

Cisco 6901 Standard User manual

Cisco

Cisco 6901 Standard User manual

Cisco 7975G - Unified IP Phone VoIP User manual

Cisco

Cisco 7975G - Unified IP Phone VoIP User manual

Cisco 7965G - Unified IP Phone VoIP User manual

Cisco

Cisco 7965G - Unified IP Phone VoIP User manual

Cisco Cisco 7940 User manual

Cisco

Cisco Cisco 7940 User manual

Cisco 7962G - Unified IP Phone VoIP User manual

Cisco

Cisco 7962G - Unified IP Phone VoIP User manual

Cisco 7945G - Unified IP Phone VoIP User manual

Cisco

Cisco 7945G - Unified IP Phone VoIP User manual

Cisco 7941G - Unified IP Phone VoIP Guide

Cisco

Cisco 7941G - Unified IP Phone VoIP Guide

Cisco SPA-500 Series User manual

Cisco

Cisco SPA-500 Series User manual

Cisco 6800 Series Instruction Manual

Cisco

Cisco 6800 Series Instruction Manual

Cisco 3905 User manual

Cisco

Cisco 3905 User manual

Popular IP Phone manuals by other brands

Polycom SoundPoint IP 550 Configuring

Polycom

Polycom SoundPoint IP 550 Configuring

BT Yealink SIP-T40 user guide

BT

BT Yealink SIP-T40 user guide

Zultys ZIP 37G Quick reference guide

Zultys

Zultys ZIP 37G Quick reference guide

NEC MH110 Administration guide

NEC

NEC MH110 Administration guide

Epygi SwissVoice IP10S user guide

Epygi

Epygi SwissVoice IP10S user guide

Nortel M5316 user guide

Nortel

Nortel M5316 user guide

Polycom Soundpoint IP 301 user guide

Polycom

Polycom Soundpoint IP 301 user guide

Aastra Clearspan 6731i Quick reference guide

Aastra

Aastra Clearspan 6731i Quick reference guide

Mitel MiVoice 5360 Quick referenc guide

Mitel

Mitel MiVoice 5360 Quick referenc guide

Grandstream Networks Grandstream GXP-2000 user manual

Grandstream Networks

Grandstream Networks Grandstream GXP-2000 user manual

Philips SJA9190/17 user manual

Philips

Philips SJA9190/17 user manual

ZyXEL Communications V310 quick start guide

ZyXEL Communications

ZyXEL Communications V310 quick start guide

Avaya IP Office 5402 user guide

Avaya

Avaya IP Office 5402 user guide

Avaya 4400 Series user guide

Avaya

Avaya 4400 Series user guide

Genesys 400 Series Administrator's guide

Genesys

Genesys 400 Series Administrator's guide

Polycom SoundPoint IP 300 Administrator's guide

Polycom

Polycom SoundPoint IP 300 Administrator's guide

ORANGE 8002 user manual

ORANGE

ORANGE 8002 user manual

Aastra Clearspan 6731i user guide

Aastra

Aastra Clearspan 6731i user guide

manuals.online logo
manuals.online logoBrands
  • About & Mission
  • Contact us
  • Privacy Policy
  • Terms and Conditions

Copyright 2025 Manuals.Online. All Rights Reserved.