manuals.online logo
Brands
  1. Home
  2. •
  3. Brands
  4. •
  5. Cisco
  6. •
  7. IP Phone
  8. •
  9. Cisco SPA525G - Small Business Pro IP Phone VoIP User manual

Cisco SPA525G - Small Business Pro IP Phone VoIP User manual

© 2016 Genusys Inc. All rights reserved| gTalk PBX, www.gtalkpbx.com | Support no: (214) 593-1004
1
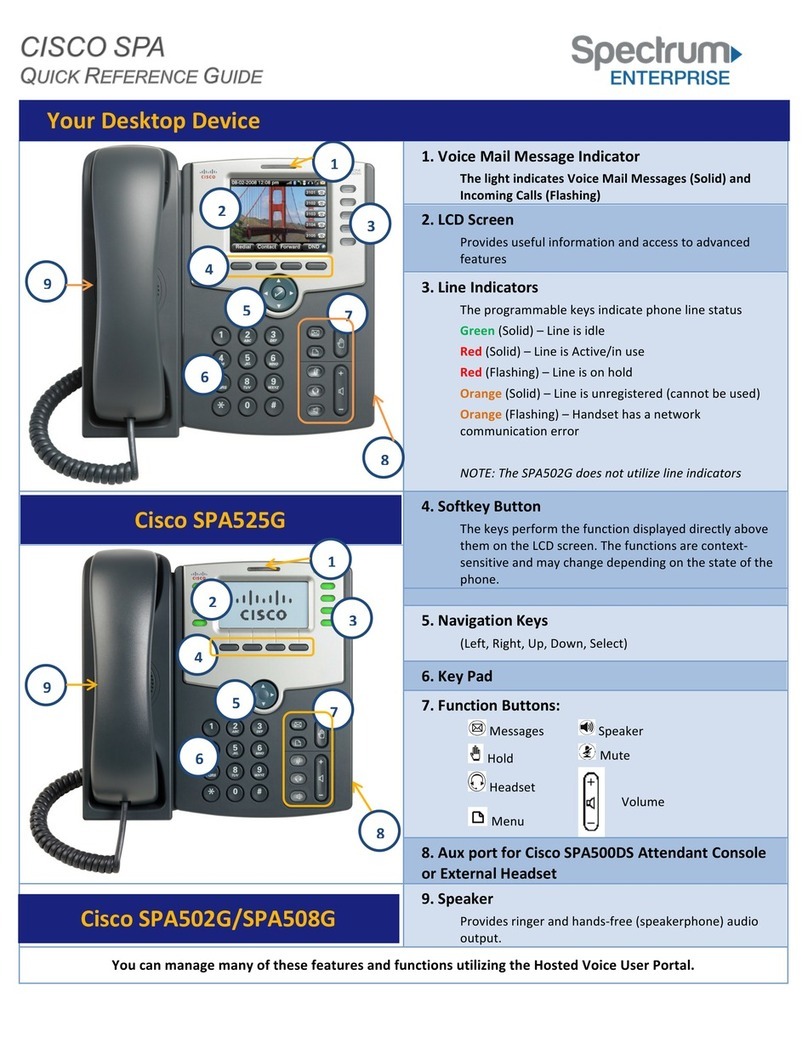
How to Use Cisco SPA 525G IP Phone
No
Features
Description
1.
Handset
Pick up to place or answer a call.
2.
Speaker
Speaker for phone.
3.
Message Waiting Indicator
Displays solid red when you have a new voice mail
message. Flashes red during an incoming call.
4.
LCD Screen
Displays date and time, phone station name, line
extensions, and soft-key options.
5.
Line keys
Indicates phone line status. When lit:
Green: Line is idle.
Red (steady): Line is active or in use.
Red (blinking): Line is on hold.
Orange: Line is unregistered and cannot be used.
6.
Soft-key buttons
Press a soft-key button to perform the action shown
on the label on the LCD screen above.
7.
Navigation button
Press an arrow to scroll left, right, up, or down through
items shown on the LCD screen.
8.
Center Select button
Press this button to select the option or menu that is
highlighted on the LCD screen.
gTalk® PBX USER GUIDE
© 2016 Genusys Inc. All rights reserved| gTalk PBX, www.gtalkpbx.com | Support no: (214) 593-1004
2
9.
Messages button
Press to access voice mail.
10.
Hold button
Press to place a call on hold.
11.
Setup button
Press to access a menu to configure features and
preferences (such as your directory and speed dials),
access your call history, and set up functions (such as
call forwarding).
12.
Mute button
Press to mute or unmute the phone. When phone is
muted, the button glows red. A flashing mute button
indicates the network connection cannot be found.
13.
Volume button
Press + to increase the volume and - to lower the
volume of the handset, headset, speaker (when the
handset is off the phone), or ringer volume (when the
handset is on the phone).
14.
Headset button
Push to turn the headset on or off. When the headset
is on, the button glows green.
15.
Speaker button
Push to turn the speaker on or off. When the speaker
is on, the button glows green.
16.
Keypad
Use to dial outbound calls, enter letters, and choose
menu items.
Placing or Answering a Call
Basic techniques to answer a call:
• Pick up the handset.
• Press the Speaker button.
• Press the Headset button.
• Press a green line button to place a call or a red flashing line button to answer a call.
Techniques to place a call without dialing a number:
• Press the ‘Redial’soft-key, then move up or down by soft-key to reach and ‘Dial’the last number.
Placing Internal (Intercom) Calls
Basic techniques to call extension:
• Pick up the handset and then dial extension number using keypad.
• Press the Speaker button and then dial extension number using keypad.
Placing Outbound Calls
You can make outbound calls by simply dialing the destination telephone number. For those who have a
10 digit US/Canada number in addition to 4 digit extension number their selection (pressing) of ‘green’
line button next to the extension number will display company’s business telephone number to the call
recipient. On the other hand selection (pressing) of ‘green’ line button next to the 10 digit number will
display that number to the call recipient
© 2016 Genusys Inc. All rights reserved| gTalk PBX, www.gtalkpbx.com | Support no: (214) 593-1004
3
Ending a Call
To end a call:
• If you are using the handset, just hang up.
• If you are using the speakerphone, press the Speaker button.
• If you are using a headset, either press the Headset button (wired) or replace the receiver (when using
certain wireless models).
Ignoring an Incoming Call:
• When call lands press ‘Ignore’soft-key button.
,
Transferring a Call
You can perform following types of transfers:
• Attended Transfer—You call the person to whom you are transferring the call and either:
- transfer the call while the phone is ringing.
- wait for the person to answer before transferring the call.
• Blind Transfer—You transfer the call without speaking to the other party to which you are transferring
the call.
Performing an Attended Transfer
STEP 1 - During an active call, press ‘Transfer’soft-key. The call is placed on hold and a new line is
opened to dial the number where the call in intended to be transferred.
STEP 2 Either:
• Enter the number to which you want to transfer the call, then press the ‘Dial’soft-key or wait a few
seconds.
• Press the ‘Directory’soft-key and either choose a number from the personal directory or select the
Corporate Directory, then press the ‘Dial’soft-key.
STEP 3 - Press the ‘Transfer’ soft-key after the phone begins to ring, or at any time after the phone is
answered.
Performing an Unattended (Blind) Transfer
STEP 1- During an active call, press the ‘Transfer’ soft-key.
© 2016 Genusys Inc. All rights reserved| gTalk PBX, www.gtalkpbx.com | Support no: (214) 593-1004
4
STEP 2- Enter the number to which you want to transfer the call and press the ‘Dial’ soft-key. The call is
transferred with no further action required on your part.
Redialing a Number
To redial the last number called, press the ‘Redial’soft-key and then ‘Dial’ soft-key.
To redial another number press the ‘Redial’soft-key, then navigate to the desired number and then
press the ‘Dial’ soft-key.
Viewing and Returning Missed Calls
The LCD screen on your IP phone will notify you if a call came but was unanswered.
To return a missed call:
• If the LCD screen shows a missed call, press the ‘Call Rtn’soft-key to return the last missed call.
• If the LCD screen does not show the ‘Call Rtn’or ‘miss’soft-keys, you can return a call from the Missed
Call list:
STEP 1- Press the Setup button.
STEP 2- Scroll to Call History and press the ‘select’soft-key.
STEP 3- Scroll to Missed Calls and press the ‘select’soft-key.
STEP 4- Choose the call you want to return and press the ‘Dial’soft-key.
Placing a Three-Way Conference Call
To initiate a conference call:
STEP 1 - During an active call, press the ‘Conf’soft-key. The first call is placed on hold, a second line is
opened, and you hear a dial tone.
STEP 2 - Dial the second person’s telephone number.
STEP 3 - When the second person answers, press the ‘Conf’soft-key again. All three parties are
connected in the conference call. (You can cancel the conference by pressing the ‘EndCall‘soft-key
before connecting the calls, then press the ‘Resume’soft-key to resume the original call.) NOTE When
you hang up, the other two parties are disconnected too.
Setting Do Not Disturb
Use the Do Not Disturb feature to prevent incoming calls ringing your phone. The screen indicates that a
call is incoming, but the phone does not ring. The unanswered call is handled according to your normal
settings.
• To activate Do Not Disturb feature, press the ‘DND’soft-key. The LCD screen indicates that Do Not
Disturb is turned on for your phone.
© 2016 Genusys Inc. All rights reserved| gTalk PBX, www.gtalkpbx.com | Support no: (214) 593-1004
5
• To deactivate Do Not Disturb, press the ‘Clr DND’soft-key.
Accessing Voice mail
To access voice mail, press the Messages button on your phone. Your phone administrator should
configure your phone with the correct voice mail number so that pressing the Messages button
automatically dials your voice mail system.
• To hear the voice mail press 1.
• To hear the old voice mail press 2.
• To delete voice mail press 3.
Transfer to Voice mail
This feature allows you to transfer someone (either a caller or a called person) to leave a voice mail to a
specific extension.
• To transfer to specific extension to leave voice mail: Press ‘Transfer’soft-key button, then dial *6<ext.
number>, and after that immediately press the ‘Transfer’soft-key button again.
• To leave a voice mail to a specific extension: Dial *6<ext. number>.
Call Forward
Activating Call Forwarding: Activate Call Forwarding feature whenever you want your calls to be
forwarded to another phone. Once activated, all incoming calls will be forwarded to the number you
specified.
• Dial *41 + Number + # - To forward incoming calls to a specific telephone number for any reason.
• Dial *42 + Number + # - To forward incoming calls to a specific telephone number when unreachable.
• Dial *43 + Number + # - To forward incoming calls to a specific telephone number after Ring-Timeout.
Deactivating Call Forwarding:
• Dial *44# - To cancel call Forwarding .
Note: You may also configure your Call Forwarding feature by login to your account panel.
Block Caller ID
This feature allows you to block your phone number along with your name i.e. CNAM information
associated with your phone number.
To set Block Caller ID: *31#
© 2016 Genusys Inc. All rights reserved| gTalk PBX, www.gtalkpbx.com | Support no: (214) 593-1004
6
To remove: *32#
Note: You may also configure your Block Caller ID feature by login to your account panel.
Anonymous Call Block
With Anonymous Call Block, all incoming calls from unknown callers will hear a busy tone. So you may
no longer want to receive calls from the caller's phone numbers.
Dial *33# -- To block anonymous calls.
Dial *34# -- To cancel anonymous call block.
Note: Also you may enable this feature by login on to your account panel.
Selective Call Blocking
This feature allows you to block incoming calls that you have placed on a list of phone numbers you wish
to be blocked.
Dial *35 + number# -- To add a specific telephone number to block list.
Dial *36 + number# -- To delete a specific telephone number from block list.
Note: Also you may configure this feature by login to your account panel. You may Add/Edit/Delete any
number which you want to block/unblock.
Speed Dial
A speed dial number is a numeric number to which a destination telephone number is pre-set by a
caller. This allows the caller to avoid dialing the full destination number. gTalk PBX providing 99 (1-99)
speed dial facility.
gTalk PBX provides 99 (1-99) Speed Dial facility. To set speed dial
01. Login to your gTalk PBX account
02. Go to Speed Dial under User Menu
Follow onscreen instructions to Add/Edit/Delete Speed Dial number.
Benefits of BLF keys
BLF is the convenient way to view status of other extensions.
• Each key represents status of designated extension.
For example If the key is green, it indicates the extension is idle. Red indicates busy and Red blinks
means the extension is ringing.
BLF Keys allow user to pick up calls, dial extensions, and transfer calls easily.
© 2016 Genusys Inc. All rights reserved| gTalk PBX, www.gtalkpbx.com | Support no: (214) 593-1004
7
How to install gTalk PBX Mobile App
With every Extension gTalk PBX offers a feature rich App compatible with Android and iPhone sets.
Android: To install gTalk PBX App for Android sets, download the App on your smart phone by
browsing the Google Play Store. Search for gTalk PBX, and then press Install. Once installed
enter Account ID, Extension and password to login gTalk PBX App.
iPhone: To install gTalk PBX App for iPhone sets download the App on your smart phone by
visiting the Apple Store, search for gTalk PBX, and then press Install. Once installed enter
Account ID, Extension and password to login gTalk PBX App.
Use of gTalk PBX Mobile App
Use of the gTalk mobile App is user friendly and intuitive.
Most of the functions of your gTalk IP Phone sets may be
performed by using gTalk Mobile App. Some of the
important functions are: Make or receive calls, check
voice mail or missed calls, set call receive preferences,
line preference, see extension directory and make direct
calls, make call using speed dial etc.

Other manuals for SPA525G - Small Business Pro IP Phone VoIP

30

Other Cisco IP Phone manuals

Cisco SPA 303 Series User manual

Cisco

Cisco SPA 303 Series User manual

Cisco 7962G - Unified IP Phone VoIP User manual

Cisco

Cisco 7962G - Unified IP Phone VoIP User manual

Cisco CP-7962G User manual

Cisco

Cisco CP-7962G User manual

Cisco Cisco 7960 User manual

Cisco

Cisco Cisco 7960 User manual

Cisco 8831 User manual

Cisco

Cisco 8831 User manual

Cisco 7940 - IP Phone VoIP User manual

Cisco

Cisco 7940 - IP Phone VoIP User manual

Cisco 793X User manual

Cisco

Cisco 793X User manual

Cisco 7961G - IP Phone VoIP User manual

Cisco

Cisco 7961G - IP Phone VoIP User manual

Cisco 7961 User manual

Cisco

Cisco 7961 User manual

Cisco 6941 - Unified IP Phone Slimline VoIP User manual

Cisco

Cisco 6941 - Unified IP Phone Slimline VoIP User manual

Cisco 8800 Series User manual

Cisco

Cisco 8800 Series User manual

Cisco 8865 AT&T User manual

Cisco

Cisco 8865 AT&T User manual

Cisco Ooma office User manual

Cisco

Cisco Ooma office User manual

Cisco Small Business Pro SPA 504G User manual

Cisco

Cisco Small Business Pro SPA 504G User manual

Cisco Small Business SPA514G Instruction manual

Cisco

Cisco Small Business SPA514G Instruction manual

Cisco 8811 User manual

Cisco

Cisco 8811 User manual

Cisco 7965G - Unified IP Phone VoIP User manual

Cisco

Cisco 7965G - Unified IP Phone VoIP User manual

Cisco SPA50X User manual

Cisco

Cisco SPA50X User manual

Cisco SPA 501G User manual

Cisco

Cisco SPA 501G User manual

Cisco OL-18696-01 User manual

Cisco

Cisco OL-18696-01 User manual

Cisco 7945G - Unified IP Phone VoIP User manual

Cisco

Cisco 7945G - Unified IP Phone VoIP User manual

Cisco IP Phones Operator's manual

Cisco

Cisco IP Phones Operator's manual

Cisco Unified 7912G User manual

Cisco

Cisco Unified 7912G User manual

Cisco 8811 User manual

Cisco

Cisco 8811 User manual

Popular IP Phone manuals by other brands

Aastra 6737i Quick reference guide

Aastra

Aastra 6737i Quick reference guide

Yealink T42S user guide

Yealink

Yealink T42S user guide

switel DPF951 operating instructions

switel

switel DPF951 operating instructions

ATCOM AT800 Series user manual

ATCOM

ATCOM AT800 Series user manual

Grandstream Networks BudgeTone 200 user manual

Grandstream Networks

Grandstream Networks BudgeTone 200 user manual

Stentofon A100K10788 Installation &  configuration guide

Stentofon

Stentofon A100K10788 Installation & configuration guide

3Com 35 series Quick reference guide

3Com

3Com 35 series Quick reference guide

Avaya J179 Using instruction

Avaya

Avaya J179 Using instruction

Yealink T53W quick start guide

Yealink

Yealink T53W quick start guide

VoIPon VP-2009 user manual

VoIPon

VoIPon VP-2009 user manual

Aastra VentureIP 480i Release notes

Aastra

Aastra VentureIP 480i Release notes

Grandstream Networks GXV3275 Setup guide

Grandstream Networks

Grandstream Networks GXV3275 Setup guide

Splicecom PCS 520 Quick reference guide

Splicecom

Splicecom PCS 520 Quick reference guide

Cortelco C58 user manual

Cortelco

Cortelco C58 user manual

Siemens HiPath DX user guide

Siemens

Siemens HiPath DX user guide

101VOICE IP1060G Quick user guide

101VOICE

101VOICE IP1060G Quick user guide

Samsung SMT-i5264 Settings guide

Samsung

Samsung SMT-i5264 Settings guide

Teledex SIP DECT Series Specifications

Teledex

Teledex SIP DECT Series Specifications

manuals.online logo
manuals.online logoBrands
  • About & Mission
  • Contact us
  • Privacy Policy
  • Terms and Conditions

Copyright 2025 Manuals.Online. All Rights Reserved.