Coccolle Arrra User manual

RO scaun auto, grupa I,II,III
EN car seat, group I,II,III
Manual de instructiuni / User’s manual /
Hasznalati utmutato
R
HU autosules, csoport I,II,III

EN: The images shown in this instructions manual have illustrative
purpose. The product purchased by you may look different. / The proper
functioning of this product is strictly dependent on its well maintenance.
RO: imaginile din acest manual au scop ilustrativ. Produsul achizitionat
de dvs poate sa difere. / Functionarea in parametri normali a acestui
produs depinde de mentinerea acestuia in conditii de igiena propice.
HU: Az útmutatóban bemutatott képek szemléletes célt szolgálnak. Az Ön
által megvásárolt termék eltérő lehet. / A termék helyese müködéséhez
kötelezö hogy a tisztitási és karbantartási utasitást is betartsa.

15.
20.
18.
16.
5.
4.
1.
8.
17.
9.
11.
10.
19.
12.
6.
7.
13.
14.
2.
3.

1
23
top hole
lower
hole
5

234
1
567
1
2
3
4
5
6
8

Fig.1 Fig.2
Fig.3 Fig.4
12
3
4
58
7
1
2
with
backrest
12
3
without
backrest

Grupa 1/2/3 : 9 kg - 36 kg
Pentru utilizarea in categorie universala . Acest scaun auto este aprobat prin
standardul de siguranta ECE 44/04 si este destinat majoritatii autovehiculelor,
dar nu tuturor. O potrivire corecta este posibila daca producatorul
Atentie!
· Grupa 2: 15-25 kg
Instructiuni de utilizare
NU FOLOSITI scaunul auto pe un scaun al pasagerului ce are un airbag frontal
activ. Acesta poate cauza vatamari
Scaun auto Coccolle Arra
corporale grave copilului dvs.
ASIGURATI-VA ca centurile care asigura fixarea scaunului sunt stranse corect.
Fiecare centura de siguranta a scaunului auto trebuie reglata conform
proportiilor corpului copilului. Evitati orice rasucire a hamurilor sau centurilor.
NU UTILIZATI un scaun auto pentru copii daca acesta a fost implicat intr-un
accident auto. Pot aparea defectiuni ale scaunului auto care nu se pot observa
in amanunt.
· Grupa 3: 22-36 kg
EVITATI expunerea scaunului auto la soare daca nu este protejat de o husa
textila, scaunul neacoperit se poate
autovehiculului a declarat in manual sau ca vehiculul este capabil sa accepte un
sistem de siguranta "universal" pentru aceasta grupa de varsta. Acest sistem de
siguranta pentru copii a fost clasificat ca fiind "universal" in conditii mai stricte
decat modelele anterioare care nu poarta aceasta descriere.Este adecvat numai
daca vehiculele aprobate sunt echipate cu centura de siguranta in 3 puncte
aprobate conform Regulamentului ECE R44/04 sau a altor standarde
echivalente. Acest scaun auto este potrivit pentru urmatoarele grupe de
greutate:
incinge si provoca arsuri copilului. Nu lasati copilul nesupravegheat in scaunul
auto nici macar pentru perioade
· Grupa 1: 9-18 kg
Este adecvat numai daca vehiculele aprobate sunt echipate cu centura de
siguranta in 3 puncte aprobate conform Regulamentului ECE R44/04 sau a altor
standarde echivalente.
Partile rigide si cele din plastic ale scaunului auto trebuie sa fie asezate si
instalate astfel incat in timpul utilizarii in autovehicul, acestea sa nu fie prinse la
scaunul pasagerului sau in usa autovehiculului.
scurte de timp.
Nu transportati bagaje in jurul scaunului auto. In eventualitatea unui accident,
deplasarea acestora poate cauza vatamari corporale copilului.
Catarama centurii trebuie stransa corespunzator, copilul nu trebuie lasat sa se
joace cu aceasta.
Daca este pentru prima data cand instalati un scaun auto pentru copii, va rugam
sa cititi cu atentie instructiunile de utilizare si sa pastrati acest manual. Daca
aceste instructiuni nu sunt urmate, siguranta copilului poate fi prejudiciata.
Asigurati-va ca scaunul auto pentru copii este corect montat inainte de a face o
calatorie, nu aduceti modificari in timpul mersului.
RO

Utilizarea si intretinerea corecta a scaunului auto pentru copii vor asigura o
perioada indelungata de folosinta si fara probleme. Daca scaunul auto pentru
copii va fi folosit de alte persoane, este important sa comunicati modalitatea de
instalare si folosire corecta a acestuia.
Asigurati-va ca centura orizontala este jos astfel incat pelvisul sa fie securizat,
centurile nu trebuie sa fie rasucite.
corporale grave copilului dvs.
NU FOLOSITI scaunul auto pe un scaun al pasagerului ce are un airbag frontal.
Acesta poate cauza vatamari
Scaunele din spate sunt cele mai porivite pentru copiii sub 12 ani. Consultati
manualul autovehiculului referitor la pozitiile pe scaunele pasagerilor unde poate
fi asezat scaunul auto pentru copii.
Indepartati tetiera scaunului auto pentru pasager, daca din aceasta cauza nu
poate fi montat scaunul auto pentru copii.
Lista pieselor de schimb
1. buton ajustare tetiera
2. slot centura de umeri
14. tetiera
17. Protectie centura umeri
6. conector yoke
Asamblarea inainte de utilizare
8. ghidaj centura diagonala
9. ham umeri
3. slot centura de umeri
19. protector pentru zona cataramei
7. piesa metalica de legatura
10. ham de mijloc
12. buton central pentru ajustare
13. centura de ajustare
Asezati cele 2 carlige care sunt situate in partea de jos a spatarului peste
manerele care sunt situate pe inaltator. Introduceti carligele de plastic in
componenta relevanta de pe inaltator si ridicati usor ca sa fixati spatarul in
pozitie dreapta precum ilustreaza fig.B.
11. ham lombar
4. buzunar manual
5. inaltator
18. catarama centurii de siguranta
Pentru a monta scaunul auto pentru copii, inlaturati toate ambalajele si asezati-l
pe o suprafata plana. Acesta este format din partea inferioara de inaltare si
spatar. Piesele trebuie pozitionate cu fata in sus intinse ca in fig.A.
15. reductor reversibil pentru tetiera
Reglajele centurilor de umeri
1.Apasati cu o mana pe butonul de reglare al cataramei, iar cu cealalta mana
trageti ambele centuri de umeri in sus ca sa le puteti regla.
16. spatar
20. reductor reversibil
RO

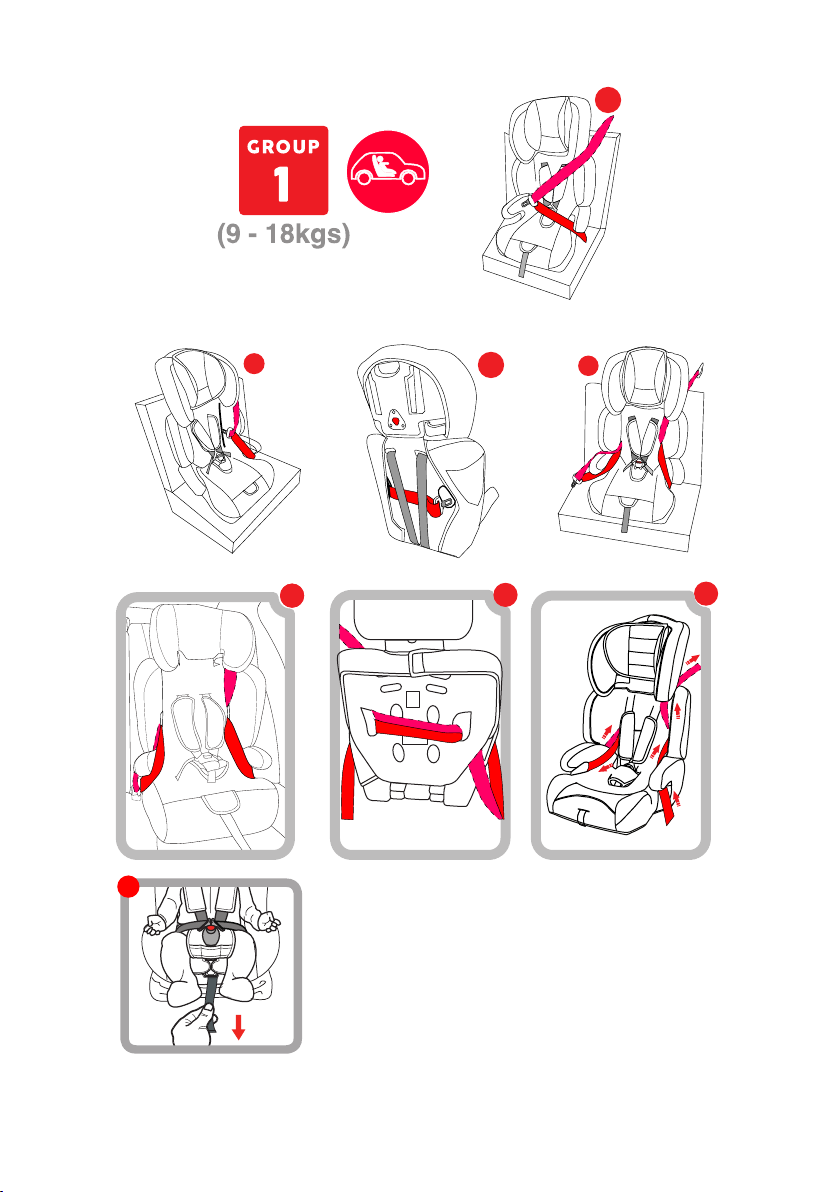
2. Scoateti cele doua centuri de umar din conectorul YOKE.
8. Asezati copilul in scaunul auto pentru copii si strangeti centurile scaunului
cum a fost descris anterior.
5. Introduceti catarama in locasul potrivit al autovehiculului.
3.Trageti centurile hamului prin orificiile acestora, din partea de sezut a
scaunului. Treceti conectorii metalice prin sloturile de la baza scaunului
(Fg.3Fg.4)
3. Scoateti centurile de umar din conector, introduceti-le in fantele
corespunzatoare, apoi reatasati-le conectorul YOKE.
1.Apasati butonul rosu pentru a deschide catarama centurii. Pozitionati copilul in
scaunul auto cu spatele spre spatar. Asigurati-va ca nu sunt obiecte puse pe
scaunul auto.
2.Apropiati cele doua sectiuni ale cataramei pentru a le suprapune.
3. Acestea se introduc in catarama scaunului auto. Daca sunt corect introduse
se va auzi sunetul click.
Asezarea copilului in scaunul auto
4. Trageti hamurile de umeri, iar ca urmare centura de mijloc se va strange, apoi
trageti hamul aflat intre picioare pentru ajustarea finala.
Pentru siguranta copilului dvs verificati daca centurile de umeri sunt stranse
corespunzator, dar in acelasi timp sa fie confortabile, sa nu fie rasucite si
catarama sa fie blocata.
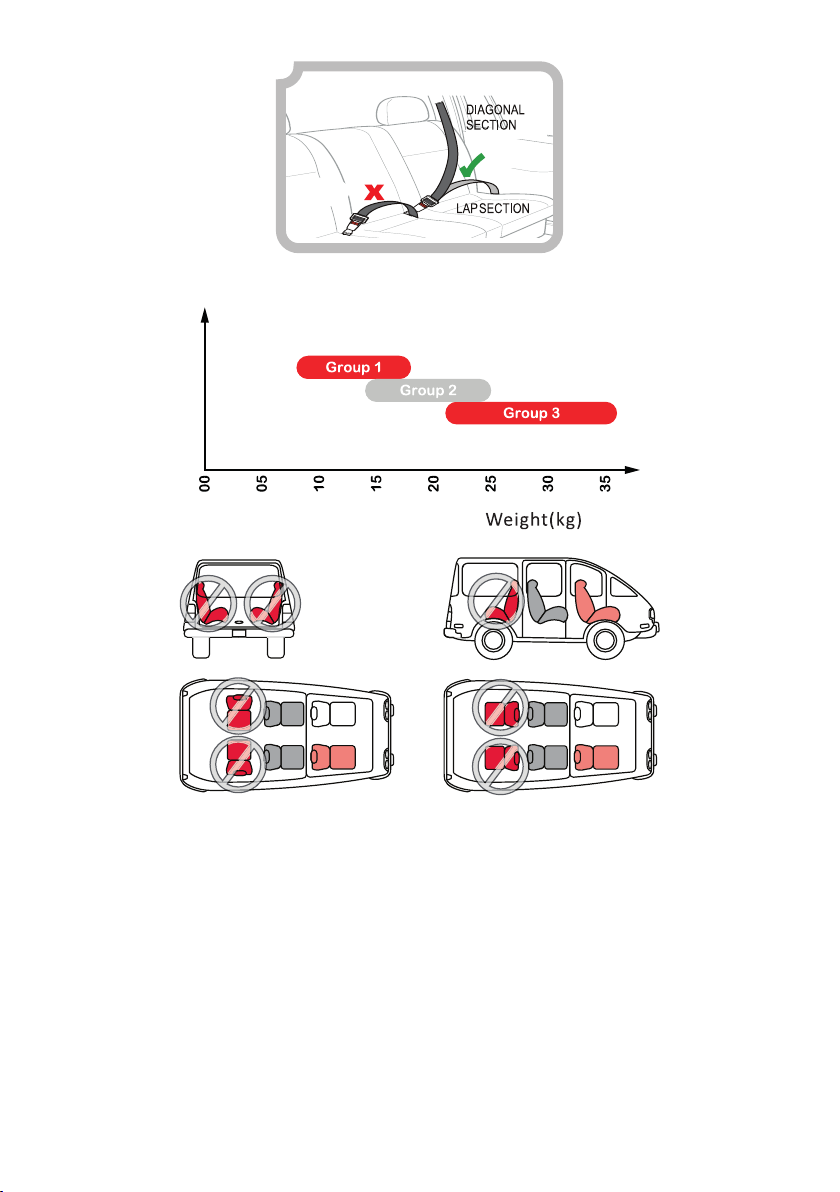
Pentru Grupa I (9-18 kg)
2.Introduceti catarama in orificiul din partea inferioara a spatarului.
3. Intoarceti scaunul cu spatele, treceti limba cataramei prin orificiul lateral si
scoateti-l in partea opusa.
4. Treceti centura laterala deasupra suportului de brat.
6. Asigurati-va ca centura nu este rasucita.
7. Urmariti ordinea si directia locurilor marcate si trageti de centura
autovehiculului pentru a fi corect stransa.
1. Asezati scaunul auto pentru copii pe bancheta autovehiculului, asigurati-va ca
este cat mai aroape de spatar si trageti centura autovehiculului cat mai mult
posibil.
Pentru Grupa II – III (15-36 kg) cu spatar
1.Daca greutatea copilului dvs este 15-25 kg, Grupa II, scaunul auto se va
utiliza fara perna reductoare si fara perna tetierei.
2.Scoateti centurile scaunului auto, acestea trebuie eliberate din partea metalica
aflata in spate.
4. Inaltimea tetierei se poate ajusta prin apasarea butonului de pe tetiera si
apasarea in jos, in timp ce marirea inaltimii prin eliberarea butonului si ridicarea
acesteia.
5. Asezati scaunul auto pentru copii pe bancheta autovehiculului, asigurati-va ca
este cat mai aroape de spatar si trageti centura autovehiculului cat mai mult
posibil.
6.Asezati centura autovehiculului in mod normal pe copilul dvs, introduceti
catarama acesteia in locul prevazut din locasul banchetei.
RO

7.Verificati centura sa nu fie rasucita si sa fie pozitionata sub cotierele scaunului
auto pentru copii.
8.Reglati partea superioara a centurii, astfel incat ghidajul centurii sa fie la cea
mai joasa pozitie a tetierei.
Grupa III (22-36 kg) fara spatar
2.Asezati inaltatorul pe bancheta autovehiculului cu fata spre sensul de mers.
Dupa ce asezati copilul in inaltator asezati centura de siguranta in locul potrivit
fara a fi rasucita.
Inspectati periodic scaunul auto al copilului dumneavoastra si asigurati-va ca nu
sunt parti distruse sau rupte. Daca exista, nu folositi scaunul auto.
1.Asigurati-va ca centurile hamului si pernele scaunului auto sunt scoase,
scoateti scaunul si pozitionati pe o suprafata plana. Scoateti usor spatarul si
lasati doar partea inferioara a scaunului auto, inaltatorul.
Intretinere si mentenanta
3.Partea inferioara a centurii trebuie pozitionata astfel incat sa nu fie deranjanta
pentru copil si totodata sa fie stransa pentru a proteja corpul.
Husele detasabile pot fi curatate folosind apa calduta sub 30ᵒ si un produs de
curatat neutru (detergent lichid). Clatiti si uscati bine. Nu folositi scaunul auto
fara husa originala sau cea aprobata de producator.
Mancarea,lichidele, sau alte resturi se pot bloca in catarama hamului care poate
afecta functionarea corecta a acesteia. Dupa curatare asigurati-va ca
functioneaza corespunzator.
RO

NOTICE
Children from 9-18kgs (Group 1 with the integral harness)
"Only suitable if the approved vehicles are fitted with 3 point with retractor
safety-belts, approved to UN/ECE Regulation No. 16 or other equivalent
standards."
Scaun auto Coccolle Arra
Group 1/2/3 : 9 kg - 36 kg
Congratulations on the purchase of your Coccolle Arra Car Seat. You have
made an excellent choice, every product has been tested to exceed the required
safety standards and Is manufactured using high quality materials and
components.
- If in doubt, consult either the child restraint manufacturer or the retailer.
The child restraint system can be installed in vehicles on any seat suitable for
use in the listed vehicles fitted with 3 point with retract or safety - belts,
approved to ECE Regulation No. 16 or other equivalent standards. (Fig. 2) And
MUST NOT at any time be fitted using only a 2 point lap belt. (Fig. 3). more
safety for your child.
A correct fit is likely if the vehicle manufacturer has declared in the vehicle hand
book that the vehicle is capable of accepting a “universal” child restraint for this
age group.
The child restraint system is suitable for:
Children from 15-25kgs (Group 2 with the backrest)
General safety instructions
Children from 22-36kgs (Group 3 without the backrest)
If it's the first time using the child restraint system, Please read the entire
instruction manual thoroughly before installation. In any case improper
installation can endanger the life of your child.
Airbags can cause injury. Do not use this child seat on a passenger seat fitted
with an active frontal airbag installed.
- This child restraint has been classified as “universal” under more stringent
conditions than those which applied to earlier design swhich do not carry this
notice.
Make sure the child restraint system is properly installed with your child, prior to
the trip. Do not attempt to make any adjustments during driving.
- This is a “universal” child restraint . It is approved to Regulation No.44.04
series of amendments, for general use in vehicle and it will fit most, but not all
vehicle seats .
The rigid items and plastic parts of a child restraint must be so located and
installed that they are not liable, during everyday use of the vehicle, to become
trapped by a movable seat or in a door of the vehicle;
EN

The child restraint system should be changed when it has been subject to
violent stresses in an accident; Do not making any alterations or additions to the
device without the approval of the competent authority, and a danger of not
following closely the installation instructions provided by the child restraint
manufacturer;
It is important to ensure that the lap strap is wom low down as this secures the
pelvis.
Remove the headrest of the vehicle seat being used if it causes an obstruction
for proper installation of the seat, but do not forget to refit the headrest after use
The safety belt buckle is not fully tamper proof and therefore your child should
be taught to never play with it.
Never leave your child unattended in the child restraint system.
COULD BE DANGEROUS
The correct use and maintenance of your car seat will ensure it gives long and
trouble free use. When somebody else is using your car seat, ensure they also
know how to use it, especially the correct way to adjust it.
It is very important of ensuring that any lap strap is worn low down, so that the
pelvis is firmly engaged, shall be stressed;
PLEASE READ THOROUGHLY BEFORE COMMENCING INSTALLATION. AS
AN INCORRECT INSTALLATION
Any luggage or other objects liable to cause injuries in the event of a collision
shall be properly secured.
The rigid items and plastic parts of a child restraint must be located and installed
so that they are not liable during everyday use of the vehicle by becoming
trapped by a movable seat or in a door of the vehicle.
Any straps holding the restraint to the vehicle should be , that a tight ny straps
restraining the child should be adjusted to the child's body,and that straps
should not be twisted;
The vehicle seat buckle should not be positioned on or in front of the specifed
(labelled) belt guide of the child restraint system.
There shall be a text or a diagram indicating how a user can identify an
unsatisfactory position of the adult safety-belt buckle relative to the main load
bearing contact points on the restraint. The user shall be advised to contact the
child restraint manufacturer if in doubt about this point.
When the child restraint system is not provided with a textile cover, it shall be
recommended that the chair should be kept away from sunlight, otherwise it
may be too hot for the child's skin;
The rigid part of vehicle buckle must be lower than the main bear point. No
interference is not allowed.
EN

DO NOT place a car seat on the front seat with an air bag unless at deactivated
Part list:
3. lower slot of shoulder belt
state.
DEATH or SERIOUS INJURY can occur. See your vehicle owners manual for
car seat positioning Instructions.
This car seat must only be used in forward facing vehicle seats.
The back seat is the safest place for children 12 years and under.
Side facing or rear facing seats CAN NOT be used.
For questions about positioning the car seat consult the vehicle owners manual.
Some vehicles have no seating positions which are capable with the car seat or
any other child seat.
1. headrest button
2. top slot of shoulder belt
4. instruction pocket
5. booster seat
6. metal york
7. 8 shape metal
8. diagonal belt guide
9. shoulder belt
13. adjuster belt
14. headrest
10. waist belt
15. reversible head cushion
17. shoulder pad
11. crotch belt
19. crotch pad
20. reversible liner cushion
12. central adjuster (under cover)
Assembly before use
18. buckle
To set up your car seat, remove all packaging and set down on a flat surface.
Your child seat consists of 2 parts, the booster seat and backrest. Ensure that
both pieces are lying flat and facing upwards before assembly.(Fig A)
Place the 2 hooks that are located at the bottom of the backrest over the bars
that are located on the booster seat section ensure they are correctly aligned
16. backrest
WARNING: DO NOT FORCE THE BACKREST INTO THE UPRIGHT
POSITION UNTIL IT IS ALIGNED OR DAMAGE MAY OCCUR
Place one hand over the join where the hooks rest over the bars and hold firmly
in place At the same time with your other hand slowly lift the backrest into the
upright position. (Fig B)
EN

CORRECT FITTING POSITION OF THE SHOULDER STRAPS:
3 Insert them into the buckle with an audible click. Once inserted, pull the
shoulder straps tight.
8. Finally let your child to seat into seat and secure by harness system as
described in previous chapter.
3.pull out the shoulder belt then insert to th suitable slots then attached to the
york metal again.
1. Press the red button to open the belt buckle. Put your child comfortably with
their back against the shell. Make sure that there are no toys or other hard
objects in the shell .
2.Release the shoulder belts end from york metal.
The shoulder straps of the car seat are comfortable but fix securely around your
child.
4. Pull the buckle tongue out and ensure the lap section under armrest and the
diagonal section on the top of armrest.
The buckle tongues are engaged the harness buckle.
Caution! Do not twist or interchange the shoulder straps.
2. Slide buckle tongue sections together.
7. Follow the order of number marked and the arrow direction pull the adult belt
make sure it as tight as possible.
CAUTION: Pull the straps straight towards you, not upwards or downwards.
SECURING YOUR CHILD IN THE HARNESS
ADJUSTING THE hight of shoulder belts.
pull both shoulder belt upward can pelax the harness.
TIGHTENING THE SHOULDER STRAPS
4. To tighten the shoulder straps you must pull down on the adjuster strap
(Fig.5) until achieving the fit and tension required. The harness should be
adjusted as tightly as possible without causing discomfort to your child.
For the safety of your child, please check that:
The shoulder straps are adjusted correctly.
The shoulder straps are not twist.
Group 1 (9-18 kgs)
1. Put the car seat on the vehicle seat, ensure that the seat is upright and as
close as possible to the vehicle seat backrest. Then pull out the adult belt as
long as possible.
3. Turn the car seat and show the back surface, through the buckle tongue into
the other side hole and go out at front surface.
6. Adjuste the adult belt to ensure there is no twist.
2. Insert the buckle tongue into the hole at inner side of backrest.
1.One hand press on the button of the center adjuster, mean while the other
hand
5. Insert the buckle tongue into the vehicle buckle.
EN

6. Let the adult belt arround your child and insert the buckle tongue into the
vehicle buckle.
3.Then pass the harness through the slots in the seat backrest. To remove the
safety harness lap straps go to the base of the seat. Turn the harness metal
retainers on their narrowest end and feed them through the slots in the base of
the seat (Fg.3Fg.4)
Group 3 (22-36 kgs) without backrest
3.Thread the diagonal belt above the armrest. then fix the belt into the buckle as
normal.follow the order of number marked and the arrow direction pull the adult
belt make sure it as tight as possible.(Fig D)
Group 2, 3 (15-36 kgs) with backrest
2. To remove the safety harness shoulder straps, slide both harness straps from
the metal slider plate.(Fig. 1/Fig. 2)
4. We can adjuste the hight of headrest by push down the red button at the rear
of headrest meanwhile pull up and down the headrest then release the button.
1. Ensure that all harnesses and pads have been removed, Remove the
backrest by placing the base on a flat surface,and pushing the backrest down
until the seat is completely flat. You should then be able to lift the backrest off
the booster seat.(fig A.B).
1. When your child is between 15-25kg and ready for Group 2. we need remove
the harness system,head cushion and liner cushion.
5. Put the car seat on the vehicle seat,ensure that the seat is upright and as
close as possible to the vehicle seat backrest. Then pull out the adult belt as
long as possible.
7. Adjuste the adult belt to ensure there is no twist.Ang the lab section both
under armrest. The shoulder belt section is under the armrest on the buckle
side.
8. Adjuste the top of shoulder belt make sure it throuth the belt guide which is
locate at lowest position of headrest.
9. Follow the order of number marked and the arrow direction pull the adult belt
make sure it as tight as possible.
2. Place the booster seat onto vehicle seat in a forward facing position. Once
your child is seated on the cushion. thread the adult belt under both armrests
and over your childs lap, making sure that the seatbelt is not twisted.(Fig D)
Washing and maintenance
Fabric: Fabric can be washed in temperatures less than 30°C. They should be
left to dry naturally.
Belt and plastic: Wash belt with warm water and mild soap, do not use any
solvents or high-potency soap.
Do not remove, move or change the fabric and original fabric or any part of the
harness.
Check if there is any part of the car seat that is missing or broken, if this is the
case do not use the seat again.
Buckle: Always check that there is no food debris or other such matter in the
harness buckle. This may affect the correct function of the buckle please clean it
with warm water. You can hear a “click” when the buckle function is performing
normally.
EN

Coccolle Arra autósülés
Ez az autósülés univerzális rendszer szerint lett tervezve. Az ECE 04/44
biztonsági szabvány lett jováhagyva és találni fog minden járműben amelyekben
szabad gyerek autósülést szerelni.
Fontos informácio!
- Általános biztonsági utasítások
A termék csak olyan járművekben lesz használható amelyek ellátva vannak 3
pontos automatikus visszahuzás biztonsági övvel.
Tovabbi információért kérjük forduljon a gyerek ülés gyártóhaz.
1/2/3 csoport: 9 kg - 36 kg
Ahoz hogy legyenek biztosak hogy a járműben lehet gyerek autósülést szerelni
kérjük ellenőrizze a jármű utmutatoban azt hogy a járműben lehet univerzális
ülést felszerelni a helyes kór osztály szerint.
A gyerek ülést felszerelni lehet bármilyen jármű helyen amely 3 pontos
biztonsági övvel van felszerelve. Tilos a gyerek ülés rőgzitése 2 pontos
biztonsági övvel.
A gyerek ülés alkalmas a következö súly osztályoknak:
- Gyerekek 9 és 18 kg között (az 1-es kór osztály, a gyereket az ülés 5 pontos
biztonsági övével kell rőgziteni)
- Gyerekek 15 és 25 kg között (a 2-es kór osztály, a gyereket a jármű 3 pontos
biztonsági övével kell rőgziteni)
- Gyerekek 22 és 36 kg között (a 3-as kór osztály, a gyerek ülést már háttámla
nélkül lehet használi és rőgziteni a jármű biztonsági övevel)
Hogy ha ez az első gyerek ülést amelyet használja, kérjük figyelmesen olvassa
el az utmutatot a használás és felszerelés előtt.
Kérjük távolitsa el a nehéz vagy kemény tárgyakot amelyek az ülés és üllö rész
között beszorulhatnak. Minden tárgy amely nincs helyesen rőgzitve mozgás
közben megütheti a gyereket.
Az összes övek amelyek a gyerek autósülés rőgzitéséhez segitenek szorosan
kell tartsák a terméket és tilos az övek használása összecsavarodva. Fontos az
is hogy a derék öv a legalsóbb részen legyen rőgzitve hogy a gyerek dereka
biztonságosan legyen rőgzitve.
Tilos a gyerek ülést huzat nélkül használni. A huzat hozzájárul a tökéletes
biztonság alkalmazásához. Kérjük ne tartsa az autósülést a direkt napsütésben.
A felforosodt felület napégést okozhat a gyereknek.
A légzsák sérülési kockázat okozhat. Soha ne használja az autósülést egy
olyan helyen ahol a légzsák aktiv.
Ne hagyja gyerekét sok ideig az autósülésben. Soha ne hagyja gyerekét
egyedül a járműben az autósülésben rőgzitve. Használja az autósülést csak
azokon az üléseken amelyekre szabad gyerek biztonsági ülést szerelni
(általában a helyek amelyek menetirányal megegyezve vannak állitva).
A gyermekbiztonsági rendszert akkor kell megváltoztatni ha járműben volt egy
baleset alatt. Ne csináljón átalakításokat vagy kiegészítéseket mivel amugy is a
biztonsági hatás már nem érvényes.
HU

Léteznie kell egy szövegnek vagy diagramnak amely jelzi hogy a felhasználónak
hogy letezik egy nem kielégítő poziciót amelyben a jármű övvel nem
használható. Kérjük ellenőrizze ezt.
A jármű csatjának merev részének alacsonyabbnak kell lennie, mint a rőgzitési
fő pontja. A beavatkozás nem megengedett.
A jármű biztonsági öv csatja a övvezetőn át kell tenni.
Az alkatrész lista
Az autóülés helyes használata és karbantartása biztosítja, hogy az hosszú és
problémamentes használatot nyújtson. Amikor valaki más használja az
autóülésedet, győződjön meg róla, hogy tudja, hogyan kell használni, különösen
annak helyes beállításának módját.
Tilos az ülést használni oldalsó vagy meneirányal elentétes.
2. biztonsági öv felső rés
Kérjük vegye le a jármű ülés fejtámláját mielőtt az ülés felszerelését elkezdje és
tegye vissza amiutan ezt a lépést megtette.
HALÁL vagy súlyos SÉRÜLÉS fordulhat elő. Az autósülések elhelyezésére
vonatkozó utasításokat a jármű használati útmutatójában találja.
A legbiztonságosabb ülés a gyerekülés elhelyezésére a hátsó ülés, a szélső
részen.
3. biztonsági öv also rés
4. utmutató tartó zseb
Ellenőrizze azt hogy a tárgyak amelyek mozoghatnak a járműben jól rőgzitve
vannak az utazás előtt. Menetközben ezek a tárgyak elmozdulnak és
serüléseket okozhatnak a gyereknek. Ezen kivül, kisebb tárgyak elakadhatnak
az ülés forgó mekanizmusban.
Kérjük vegye számban azt is hogy léteznek olyan járművek is amelyekben nem
lehet autósülést szerelni.
5. ülésmagasitó
TILOS autósülést használni egy olyan jármű ülésen ahol a légzsák
A biztonsági öv csatja nem teljesen szabotázsbiztos, ezért gyermekét meg kell
tanítani arra, hogy soha ne játsszon ezzel. Fontos biztosítani, hogy a biztonsági
öv alacsonyan legyen hordva mivel ez rögzíti a gyerek medencéjét. A termék
kemény alkatrészeit messze kell tartani a jármű mozgó részeitöl (jármű ajtó,
első ülés).
Az autósülést csak a menetirányal megegyezve lehet használni.
1. fejtámla beállitási gomb
6. Yoke konektor
7. fém alkatrész
HU

11. ágyék öv
8. átlós bizonsági övvezetö
9. válpánt
10. derék öv
Akassza a 2 horgot a háttámla amelyek a háttámla alsó részén található a
megfelelő alkatrészben amely az ülésmagasitó hátánál található. Ellenőrizze azt
hogy teljesen beakadtak és hogy a háttámla egyenes pozicióban van (B).
Ahoz hogy a terméket sikeresen használhassa, egy általános felszerelés
szükséges. Az ülés két részböl rendelkezik, az ülésmagasitó és a háttámla.
Előre tegye mintkét alkatrészt egy lapos felüleltre (A).
Kérjük, ne erőltesse a háttámlát egyenes pozicióban ameddig a két horog nincs
helyesen beakasztva. Az alkatrész eltörhet!
14. fejtámla
Figyelem! A válpántokat feléje kell huzni, nem lefelé vagy felfelé.
Figyelem! Tilos az összecsavarodott pántokot összetenni.
20. megforditható redukáló párna
3. Huzza ki a válpántot a már nem megfelelő pozicióbol, majd illessze be abban
a pozicióban amely tökéletes a gyereke részére.
A válpántok rőgzitésse
Használás előtt felszerelés
A biztonsági öv csat használása
A válpántok megfelelő beállitása
3. Illessze be a nyelveket a csatban ameddig a klick hang halható. Amiutan
megtette, huzza lazán a válpántokat.
15. megforditható redukaló fejtámla párna
A válpántok hosszuságát könnyen lehet beállitani a megfelelő pontban.
2. Vegye ki a két válpántot a yoke konektorbol.
19. ágyékpárna
1. Egy kézzel nyomja meg a beállitási gombot és egyidejűleg, a másik kézzel
huzza meg mint két válpántot.
13. beállitó öv
1. Nyomja meg a piros gombot ahoz hogy a biztosági öv csat nyiljon ki. Ültesse
a gyereket az ülésben. Ellenőrizze azt hogy ne legyenek játékok vagy más
eszközök a gyerek és a biztonségi öv között.
17. válpánt vedő
16. háttámla
18. csat
2. Hozza a biztonsági öv két válpánt nyelveit együtt.
12. fő beállító gomb
HU

A gyerek biztonsága érdekében, ellenőrizze a következöket:
- A teljes biztonsági öv rendszer szorosan de kényelmesen ál a gyerek testén.
- A válpántok nincsenek összecsavarodva.
4. Huzza meg a beállitási övet ameddig a megfelelő szoroságban van a
biztonsági öv. A biztonsági öv szoros, de nem kényelmetlen kell legyen a gyerek
testéhez (5 kép).
- A válpántok a helyes magaságra vannak beállitva.
- A biztonsági öv nyelvei megfelelően vannak beillesztve a csatban.
A 2,3-as csoportnak való rőgzités (15-36 kg) háttámlával
1. Tegye be az autósülést a járműben, győződjön meg arról hogy a háttámla
teljesen egyenes és a legközelebb pozicióban a jármű ülés háttámlájához.
Ezutan huzza ki teljesen a jármű biztonsági övet.
8. Ezutan, a gyereket belehet ültetni a termékben és rőgziteni a gyerek ülés
biztonsági övével ahogy korabban lett mutatva.
2. A biztonsági öv ki lehet venni a képek szerint.
7. Ellenőrizze hogy a biztonsági öv ne legyen összecsavarodva.
5. Illessze be a csatot.
2. Illessze be a jármű biztonsági öv nyelvét az ülés belső részén.
7. A 7-es kép szerint, huzza meg az övet hogy ellenőrizze a helyes rőgzitést.
4. Tegye be a biztonsági övet a csatban éz ellenőrizze hogy a rőgzités helyes
legyen. A biztonsági öv átlós része a kartartó tetején kell legyen.
1. Amikor a gyerek már 15 kg-nál nagyobb, az ágyekpárnát és a biztonsági övet
ki kell venni.
Az 1-es csoportnak való rőgzités (9-18 kg)
3. Ezután vezesse át az övet az ülés háttámla nyílásain. A biztonsági öv pántok
eltávolításához kezdje a bázis közepében. Fordítsa az öv fémtartóit a
legszűkebb végükre és tegye át az ülésen lévő réseken keresztül (kép.3 és 4).
4. Állitsa be a fejtámlát a megfelelő magasságban.
5. Tegye be az autósülést a járműben, győződjön meg arról hogy a háttámla
teljesen egyenes és a legközelebb pozicióban a jármű ülés háttámlájához.
Ezutan huzza ki teljesen a jármű biztonsági övet.
3. Huzza át a biztonsági övet a gyerek ülés hátsó részén és majd illesze kifele a
másik oldalon levö lyukon.
6. Állitsa be a biztonsági övet és ellenőrizze hogy legyen összecsavarodva.
6. Tegye a biztonsági övet a gyereken keresztül és csatolja be.
8. Igazitsa meg a válpántot ovatosan, az öv az övvezetőn át kell legyen.
9. Igazitsa meg a biztonsági övet a képen bemutatott számok szerint.
HU

Mosás: az ülés huzatot szabad 30 fokon kézzel mosni. Probálja száritani
természetesen a naptol messze.
A biztonsági övet és a műanyag részeket nedves törlövel lehet tisztitani.
3. Ellenőrizze hogy a biztonsági öv ne legyen összecsavarodva.
1. Vegye ki a biztonsági öv összes részeit, vegye ki az ülés háttámláját.
2. Tegye be az ülésmagasitót a jármű ülésére a menetirányal megegyezve.
Amiutan a gyereke beült, huzza át a jármű biztonsági övét pont mint egy felnőtt
számára.
A 2,3-as csoportnak való rőgzités (15-36 kg) háttámla nélkül
4. Ellenőrizze hogy a biztonsági öv szoros, de ne kényelmetlen legyen a gyerek
testéhez.
Takaritás és karbantartás
Kérjük ne használja tovabb az ülést hogy törött vagy hianyzó alkatrészei
vannak.
A biztonsági öv csat tisztitása: amikor morzsa és mocsok beilleszkedik a
biztonsági öv csatban, akkor a csat nem fog helyesen müködni. Ebben a
helyzetben, a csatot szabad kimosni langyos viz folyás alatt, majd teljesen kell
száritani amielött ujra lehessen használni.
HU
Table of contents
Languages:
Other Coccolle Car Seat manuals

Coccolle
Coccolle Argo User manual

Coccolle
Coccolle Elona User manual

Coccolle
Coccolle Velsa User manual

Coccolle
Coccolle Cressida User manual

Coccolle
Coccolle Nerio User manual

Coccolle
Coccolle Vigo User manual

Coccolle
Coccolle Eris User manual

Coccolle
Coccolle Astana User manual

Coccolle
Coccolle Mydo User manual

Coccolle
Coccolle Atira User manual