COOK MEDICAL INCORPORATED
P.O. Box 4195, Bloomington, IN 47402-4195 U.S.A.
Phone: 812.339.2235, Toll Free: 800.457.4500, Toll Free Fax: 800.554.8335
COOK (CANADA) INC.
111 Sandiford Drive, Stouffville, Ontario, L4A 7X5 CANADA
Phone: 905.640.7110, Toll Free: 800.668.0300
WILLIAM A. COOK AUSTRALIA PTY. LTD.
Brisbane Technology Park, 12 Electronics Street, Eight Mile Plains
Brisbane, QLD 4113 AUSTRALIA, Phone: +61 7 38 41 11 88
WILLIAM COOK EUROPE ApS
Sandet 6, DK-4632, Bjaeverskov, DENMARK, Phone: +45 56 86 86 86
©COOK 2008 PI-BM-BNFMP-EN-200807
AORTIC INTERVENTION CARDIOLOGY CRITICAL CARE ENDOSCOPY PERIPHERAL INTERVENTION SURGERY UROLOGY WOMEN’S HEALTH
www.cookmedical.com
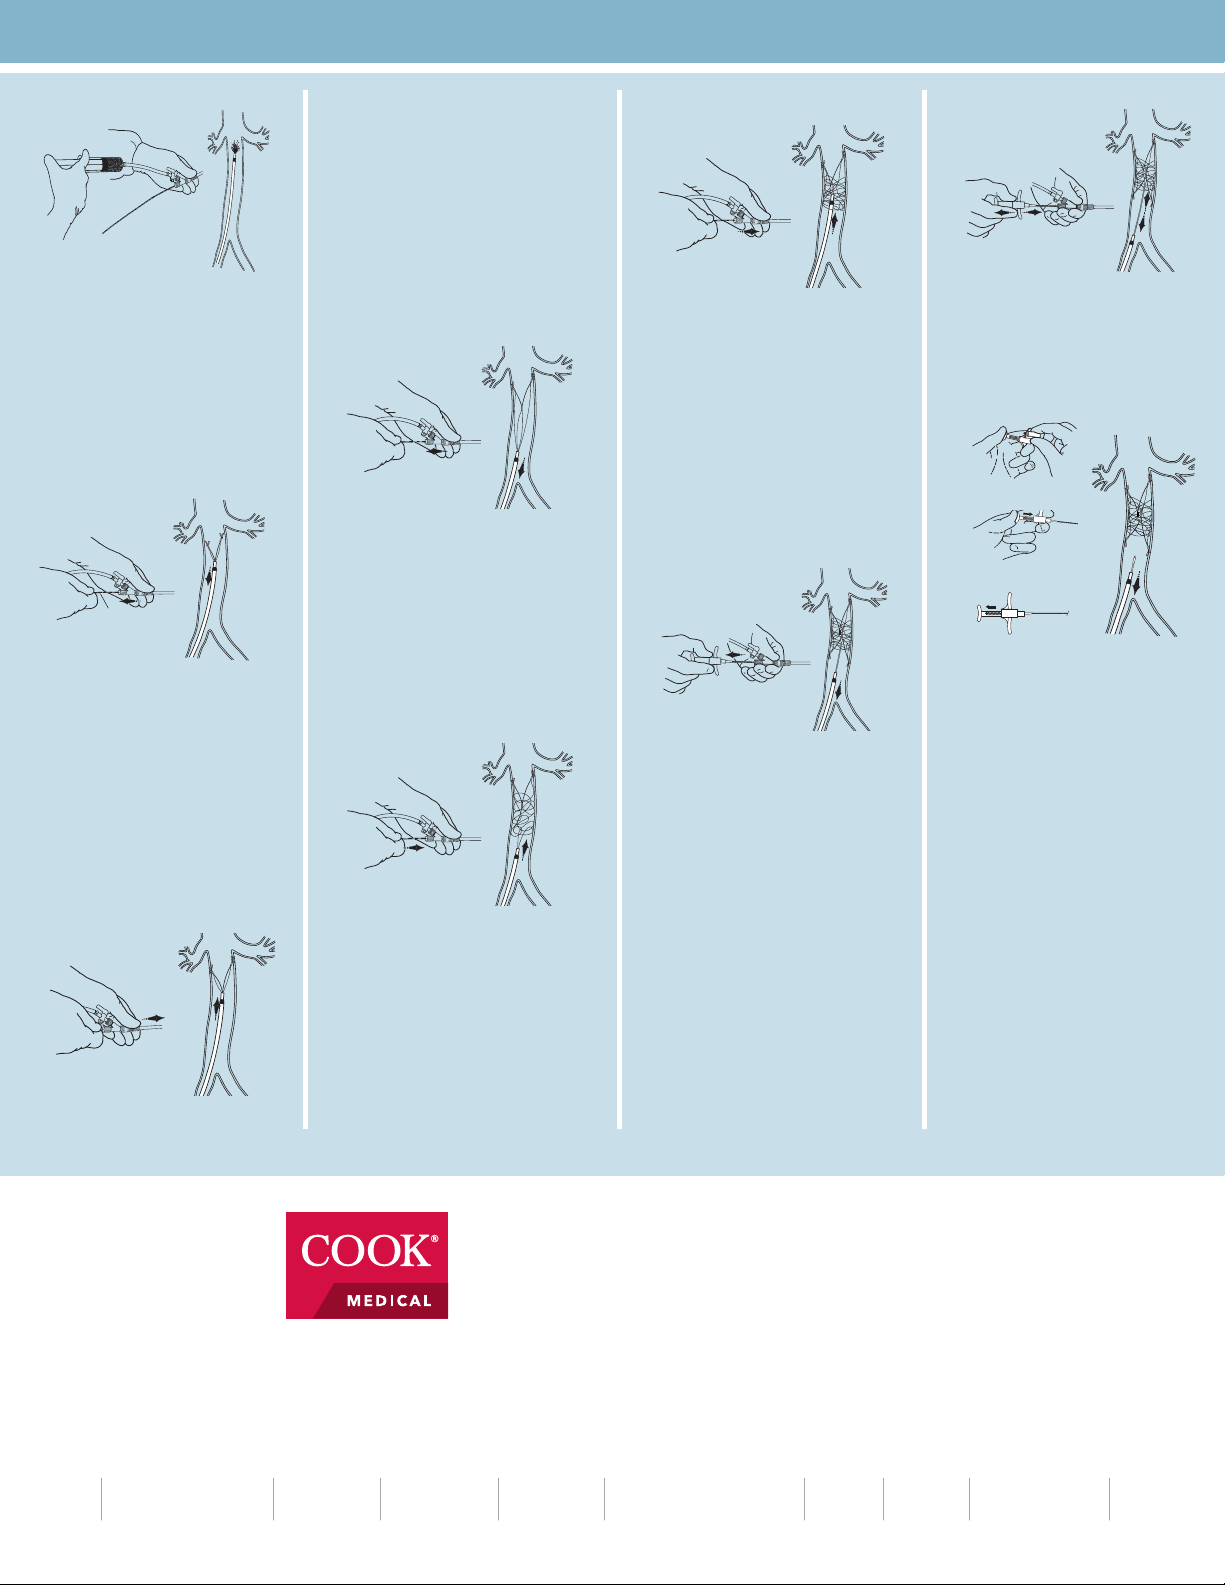
SUGGESTED INSTRUCTIONS FOR FEMORAL PLACEMENT
SUGGESTED INSTRUCTIONS FOR FEMORAL PLACEMENT
1. Introduce filter/sheath assembly
Insert the filter catheter into the introducer
sheath and Luer lock it into position. The
tip of the filter catheter will then extend
approximately 1.5 cm beyond the tip of the
sheath. While performing hand injections of
contrast medium through the filter catheter
sidearm, the filter catheter/introducer sheath
assembly can be properly positioned to initi-
ate filter placement. When using a femoral
approach, position the filter catheter tip just
below (caudad to) the renal veins.
2. Pull filter/sheath
Loosen the Tuohy-Borst valve and, while hold-
ing the wire guide pusher stationary, withdraw
the filter catheter/introducer sheath assembly
to the mark on the wire guide pusher. This
movement will expose the distal anchoring
hooks. Fluoroscopically, this corresponds to
the position of the junction point of the hook
wires remaining just within the tip of the filter
catheter. If this can be clearly visualized with
fluoroscopy, the mark can be ignored.
NOTE: At the end of the filter, the V-shaped
hook wire struts are readily visible, but filter wires
are too fine to be identified fluoroscopically.
3. Anchor hooks
Gently advance the filter catheter/introducer
sheath assembly one time, 1-3 mm, to secure
the hooks to the vena cava wall.
Be certain junction point of distal pair of hooks
is in catheter tip when positioning these hooks
into caval wall. If there is uncertainty regarding
hook fixation, the catheter may be advanced
up over the hook wires to the edge of the hooks.
The catheter may then be repositioned, and
the filter placement re-initiated in a slightly
different caval orientation or level.
CAUTION: Overly forceful or multiple jabs
with the filter catheter/introducer sheath
assembly could result in perforation of the
wall of the inferior vena cava by the exposed
hooks and struts of the filter.
4. Pull filter/sheath
Again, hold the wire guide pusher stationary
and withdraw the filter catheter/introducer
sheath assembly 1-3 cm. This will facilitate
subsequent passage of the filter wires through
the tip of the filter catheter and provide room
for filter formation within the vena cava.
CAUTION: Do not withdraw the filter catheter/
introducer sheath assembly into the iliac vein.
Repositioning into the inferior vena cava may
prove difficult.
5. Push filter wires
Holding the filter catheter/introducer sheath
assembly stationary and with fluoroscopic
control, advance the wire guide pusher with
a steady, smooth motion until the junction
point of the proximal hook wires is seen
fluoroscopically at the filter catheter tip.
CAUTION: Do not advance too quickly or
forcefully as wire kinking within filter catheter
may occur, making advancement difficult.
Mark
6. Push filter/sheath assembly
Advance the filter catheter/introducer sheath
assembly so that the proximal junction point
is in close proximity to or overlaps the junction
point of previously positioned hook wires.
NOTE: The approximation or slight overlap
of the junction points ensures adequate
compression and formation of the filter wires
and places the second pair of hooks in the
inferior vena cava. Placement of a hook in a
renal vein, or passage of filter wires distal to
the first hook position (wire prolapse), may
occasionally occur and is of no consequence.
7. Pull sheath
While maintaining slight forward pressure
on the wire guide pusher, slowly withdraw
the filter catheter/introducer sheath assembly.
This will permit the proximal hook wires
to exit the catheter, springing open to
engage with the caval wall. This is readily
seen fluoroscopically.
To be sure the hooks are completely free
from the filter catheter tip, the filter catheter/
introducer sheath assembly should be
withdrawn to within approximately 1 cm of
the Bird’s Nest Filter handle attached to the
wire guide pusher.
CAUTION: Do not advance the wire guide
pusher after the proximal hook wires have
exited the filter catheter tip. Forceful
advancement of wire guide pusher may
alter the orientation of the filter attachment
site, making disengagement difficult.
Refer to Suggested Instructions For Use for indications, warnings and precautions.
8. Anchor hooks
Gently tug or use a slight to-and-fro motion
on the wire guide pusher to secure the
second pair of hooks to the vena cava wall
before disengaging the filter.
9. Detach filter
To release filter:
a. Maintaining wire guide pusher position,
remove red safety lock from handle by
grasping both sides and pulling up and
away from the handle.
b. Holding the wire guide pusher steady,
use the handle to fully depress the
thumb grip of the wire guide pusher
forward into the cannula. Maintaining
this position will release the filter.
Separation can be seen fluoroscopically.
c. Release pressure on the thumb grip of
the handle.
d. Pull the wire guide pusher’s distal end
back into the filter catheter.
Remove the wire guide pusher and filter
catheter, leaving the introducer sheath
in place. Reposition the sheath for a final
vena cavogram.
Fig. 9a
Fig. 9c
Fig. 9b
Fig. 9d


