8
14. Peel the sheath away from the catheter by grasping the two wings of the
sheath and pulling outward and upward. NOTE: Final catheter position
is accomplished by alternately advancing the catheter into the sheath
and then further pulling on the two wings. Once the sheath is removed, a
slight advancement of the catheter may be needed for final positioning.
15. After catheter is in final position, remove obturator, secure catheter to
skin and dress in standard fashion.
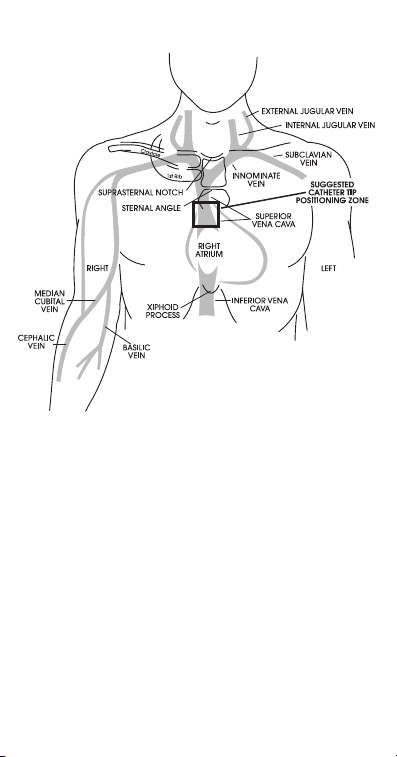
16. Verify catheter tip position using radiography or appropriate technology.
In order to guarantee extrapericardial location, the catheter tip should be
located above the SVC-RA junction, within the lower 1/3 of the SVC.
Catheter Placement (Non-Fluoroscopic Method)
17. After prepping the access site, introduce the access needle into the vessel.
NOTE: The use of ultrasound is helpful to determine suitability for vessel
access and patency. The EchoTip® marking on the needle is used to locate
the tip of the needle during vessel access.
18. Introduce the wire guide through the needle and advance it 15-20 cm
into the vessel.
19. Withdraw the needle, leaving wire guide in place. If necessary, enlarge the
puncture site with scalpel blade.
20. Introduce the Peel-Away introducer assembly (sheath and dilator) over
the wire guide. With a twisting motion, advance the assembly into the
vessel. (Fig. 1)
21. Using a Tyvek® tape measure, clinical judgment, or other institutional
protocol, determine the correct catheter length and trim catheter as
needed. NOTE: Remove obturator prior to trimming catheter; reinsert for
catheter introduction.
22. Leaving the sheath in place, remove the dilator. (Fig. 2) NOTE: To prevent
inadvertent air aspiration after removing wire guide and dilator, place
thumb or finger over the proximal end of the sheath.
23. Introduce the catheter/obturator assembly into the sheath as far as
possible. NOTE: Resistance may be felt approximately 7 cm distal to the
catheter suture wing when introducing the assembly into the sheath due
to an increase in outer diameter. (Fig. 3)
24. Peel the sheath away from the catheter by grasping the two wings of the
sheath and pulling outward and upward. NOTE: Final catheter position
is accomplished by alternately advancing the catheter into the sheath
and then further pulling on the two wings. Once the sheath is removed, a
slight advancement of the catheter may be needed for final positioning.
25. After catheter is in final position, remove obturator, secure catheter to
skin and dress in standard fashion.
26. Verify catheter tip position using radiography or appropriate technology.
In order to guarantee extrapericardial location, catheter tip should be
located above the SVC-RA junction, within the lower 1/3 of the SVC.
HOW SUPPLIED
Supplied sterilized by ethylene oxide gas in peel-open packages. Intended
for one-time use. Sterile if package is unopened or undamaged. Do not use
the product if there is doubt as to whether the product is sterile. Store in a
dark, dry, cool place. Avoid extended exposure to light. Upon removal from
package, inspect the product to ensure no damage has occurred.