manuals.online logo
Brands
  1. Home
  2. •
  3. Brands
  4. •
  5. Crestron
  6. •
  7. Controllers
  8. •
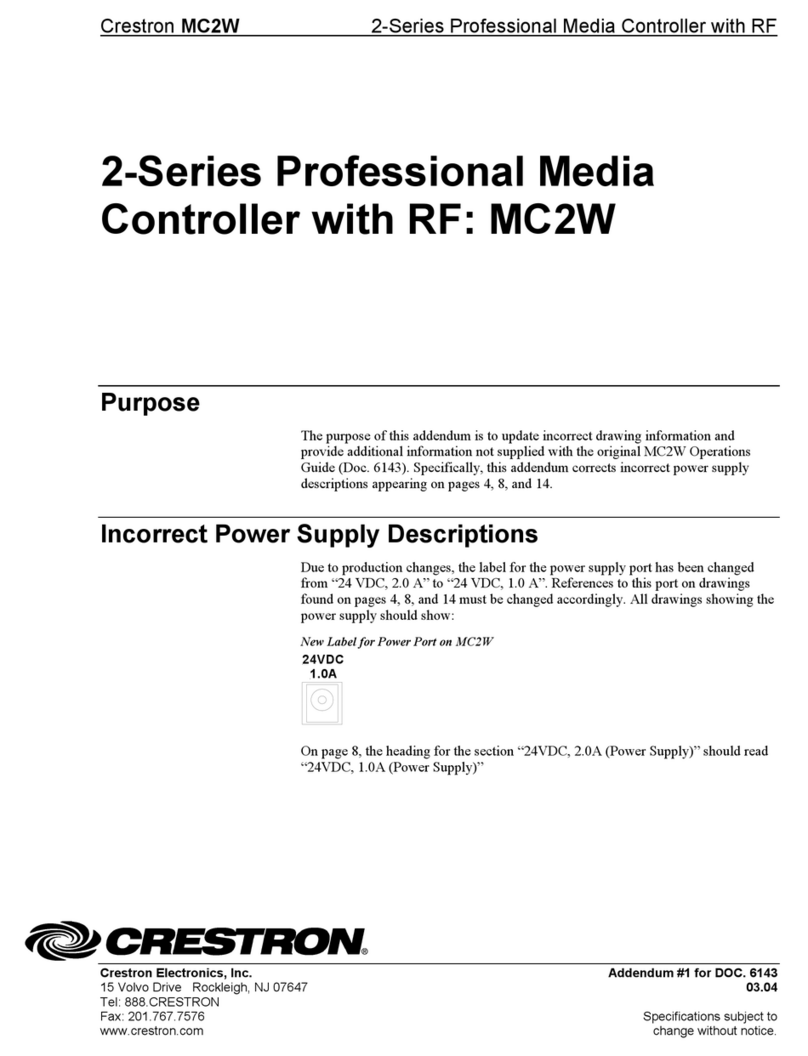
  9. Crestron 302 User manual

Crestron 302 User manual

DO GUIDE
DO Complete the Installation
1. Once all connections have been made, use the six 4-40 x 1/4" screws to attach the MPC3-302 assembly to the mounting plate.
NOTE: The six 4-20 x 3/4" screws are used to attach the MPC3-302 assembly to the TTK-MP/MPC/IPAC enclosure. For more information, refer to
the TTK/MP/MPC/IPAC & SMK-MP/MPC/IPAC Installation Guide (Doc. 6782).
MPC3-302
3-Series®Media Presentation Controller 302
DO Attach the Mounting Plate
The Crestron®MPC3-302 3-Series®media presentation controller installs
into a 3-gang U.S. electrical box.
NOTE: The MPC3-302 may also be installed onto a tabletop or other at
surface using the TTK-MP/MPC/IPAC tabletop kit and the optional
SMK-MP/MPC/IPAC swivel mount kit. For more information and installation
instructions, refer to the TTK/MP/MPC/IPAC & SMK-MP/MPC/IPAC
Installation Guide (Doc. 6782) at www.crestron.com/manuals.
Use the four 6-32 x 1" screws to attach the MPC3-302 mounting plate to the
electrical box. Ensure that the mounting plate is level and ush against the
electrical box after installation.
DO Connect the Device
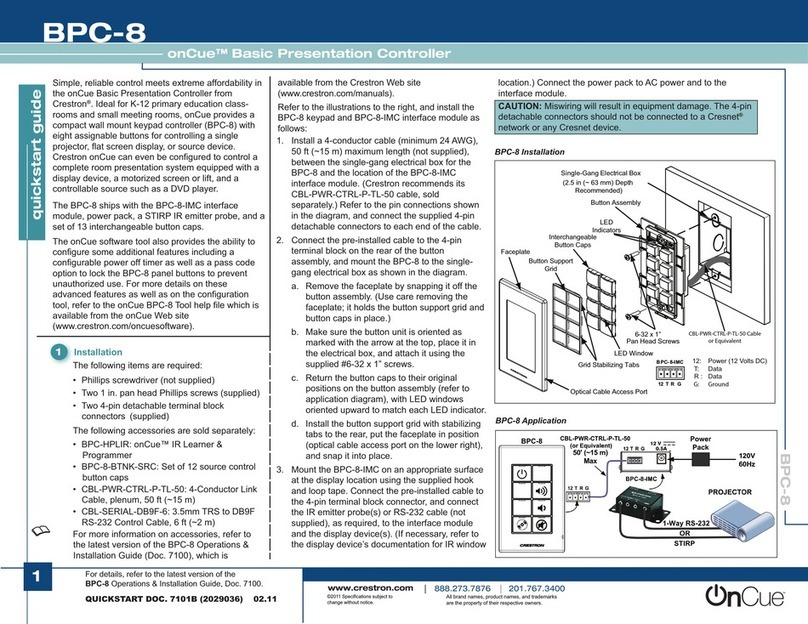
Route all necessary cables through the rear of the electrical box, and then
make connections to the MPC3-302 as shown in accompanying illustration.
NOTE: All cable connections must be made prior to attaching the
MPC3-302 assembly to the electrical box.
Observe the following when connecting the MPC3-302:
• Use Crestron power supplies for Crestron equipment.
• Power is supplied to the MPC3-302 over a single Ethernet cable.
A PoE+ (Power over Ethernet) power supply or a network switch
capable of PoE+ is recommended (both sold separately).
• The MPC3-302 must use PoE+ to supply power to a
Cresnet®network device via the NET connector.
• Ensure that the device is properly grounded by connecting the
chassis ground lug to an earth ground (building steel).
• Apply power after all connections have been made.
DO Check the Box
QUANTITY ITEM PART NUMBER
1Bit, Torx®, T8, Security 2025915
1 Plate, Metal, Mounting, 6.5" x 4.3" x 1.5" 2049785
6 Screw, 4-20 x 3/4", Pan Head, Phillips, Thread Forming 2007140
6 Screw, 4-40 x 1/4", Pan Head, Phillips 2007156
4 Screw, 6-32 x 1", Pan Head, Phillips 2007251
1Screw, Security, Torx 2051148
MPC3-302-B Only
10 Button Cap, Black 2049780
1Button Cap, Mute, Black 2049784
1 Button Cap, Power, Black 2049782
1Cover, Black 4527101
1Labels, Sources, 30 Piece Set, Black 4527386
MPC3-302-W Only
10 Button Cap, White 2049779
1Button Cap, Mute, White 4527719
1Button Cap, Power, White 4527718
1Cover, White 4527100
1Labels, Sources, 30 Piece Set, White 4527385
Drywall
surface
3-gang U.S.
electrical box
Mounting
plate
Screw (4):
6-32 x 1"
I/O
LAN PoE
NET:
To any Cresnet
network device
LAN PoE:
10BASE-T / 100BASE-TX
Ethernet to LAN
IR:
To IRP2 emitter
or serial devices
RELAY:
To controllable
devices
COM:
To any
RS-232 device
I/O:
To digital or
analog devices
Ground
Screw (6):
4-40 x 1/4"
Mounting
plate
MPC3-302
assembly
DO GUIDE DOC. 8249A (2050725) 03.18
Specications subject to change without notice.
2. Attach the ten button caps:
a. Peel the desired button label off the label sheet.
b. Press the label into the back opening of the button cap, non-adhesive side rst, so the
label icon is visible through the window on the front of the button cap.
CAUTION: Do not press the label into the button cap adhesive side rst, as the label is
difcult to remove if it adheres to the inside of the button cap.
NOTE: The label icon must be aligned to t neatly inside of the button cap and should not
be skewed, as this may cause the button to not release fully when pressed.
c. Place each button cap, bottom side rst, over one of the ten buttons on the assembly.
NOTE: Ensure that the label icon is oriented correctly before attaching the button cap to
the assembly.
d. Press against the button cap rmly to adhere it to the button.
3. Align the front panel with the assembly so that all of the buttons align with their respective
openings in the panel.
NOTE: If the power and volume mute button caps detach from the assembly during
installation, place the button caps over their respective buttons as shown in the illustration
above.
4. Press the front panel into the assembly until the panel snaps into place.
5. Test the buttons to ensure that they can be pressed and released without becoming impeded
by the front panel, and test the volume knob by rotating it gently. If any buttons are impeded
or if the knob does not rotate easily, remove the panel as described in step 7, adjust the button
and front panel placement, and then reattach the front panel.
CAUTION: Do not apply force when rotating the knob, and do not attempt to pull the knob
away from the assembly.
6. Using the included drill bit, screw the included Torx®security screw into the screw hole on the
bottom of the front panel to secure the panel to the assembly.
7. To remove the front panel after installation, grasp both sides of the panel from the bottom, and
pull upward rmly until the bottom half of the panel detaches from the assembly. Then, pull the
top half of the panel upward rmly until it detaches from the assembly.
DO Program the Device
Use the Device Discovery tool in Crestron Toolbox™ software to discover the MPC3-302 and its
IP address on the network, and then perform any necessary programming for the MPC3-302 via TCP/IP
over the Ethernet connection. For more information on device discovery and programming, refer to the
embedded Crestron Toolbox help le.
As of the date of manufacture, the product has been tested and found to comply with specications for CE marking.
Federal Communications Commission (FCC) Compliance Statement
This device complies with part 15 of the FCC Rules. Operation is subject to the following two conditions:
(1) This device may not cause harmful interference, and (2) this device must accept any interference received, including interference that may cause undesired operation.
CAUTION:Changes or modications not expressly approved by the manufacturer responsible for compliance could void the user’s authority to operate the equipment.
NOTE: This equipment has been tested and found to comply with the limits for a Class B digital device, pursuant to part 15 of the FCC Rules. These limits are designed to provide reasonable protection
against harmful interference in a residential installation. This equipment generates, uses and can radiate radio frequency energy and, if not installed and used in accordance with the instructions, may
cause harmful interference to radio communications. However, there is no guarantee that interference will not occur in a particular installation.
If this equipment does cause harmful interference to radio or television reception, which can be determined by turning the equipment off and on, the user is encouraged to try to correct the interference
by one or more of the following measures:
• Reorient or relocate the receiving antenna.
• Increase the separation between the equipment and receiver.
• Connect the equipment into an outlet on a circuit different from that to which the receiver is connected.
• Consult the dealer or an experienced radio/TV technician for help.
Industry Canada (IC) Compliance Statement
CAN ICES-3(B)/NMB-3(B)
Crestron product development software is licensed to Crestron dealers and Crestron Service Providers (CSPs) under a limited non-exclusive, non-transferable Software Development Tools License Agreement. Crestron product operating system software is licensed to Crestron dealers, CSPs, and
end-users under a separate End-User License Agreement. Both of these Agreements can be found on the Crestron website at www.crestron.com/legal/software_license_agreement.
The specic patents that cover Crestron products are listed at www.crestron.com/legal/patents. The product warranty can be found at www.crestron.com/legal/sales-terms-conditions-warranties.
Certain Crestron products contain open source software. For specic information, visit www.crestron.com/legal/open-source-software.
Crestron, the Crestron logo, 3-Series, Cresnet, Crestron Toolbox, and the MPC logo are either trademarks or registered trademarks of Crestron Electronics, Inc., in the United States and/or other countries. Torx is either a trademark or a registered trademark of Acument Intellectual Properties,
LLC, in the United States and/or other countries. Other trademarks, registered trademarks, and trade names may be used in this document to refer to either the entities claiming the marks and names or their products. Crestron disclaims any proprietary interest in the marks and names of others.
Crestron is not responsible for errors in typography or photography.
This document was written by the Technical Publications department at Crestron.
©2018 Crestron Electronics, Inc.
DO Learn More
Visit the website for additional information and the latest rmware updates. To learn
more about this product, use a QR reader application on your mobile device to scan the
QR image.
Crestron Electronics
15 Volvo Drive, Rockleigh, NJ 07647
888.CRESTRON | www.crestron.com
Button cap (10) Button label (10)
MPC3-302
assembly
Power
button cap
Volume mute
button cap
Attach the button label, nonadhesive
side rst, to the inside of the button cap
MPC3-302
assembly
MPC3-302
front panel
MPC3-302
front panel
Torx®security
screw
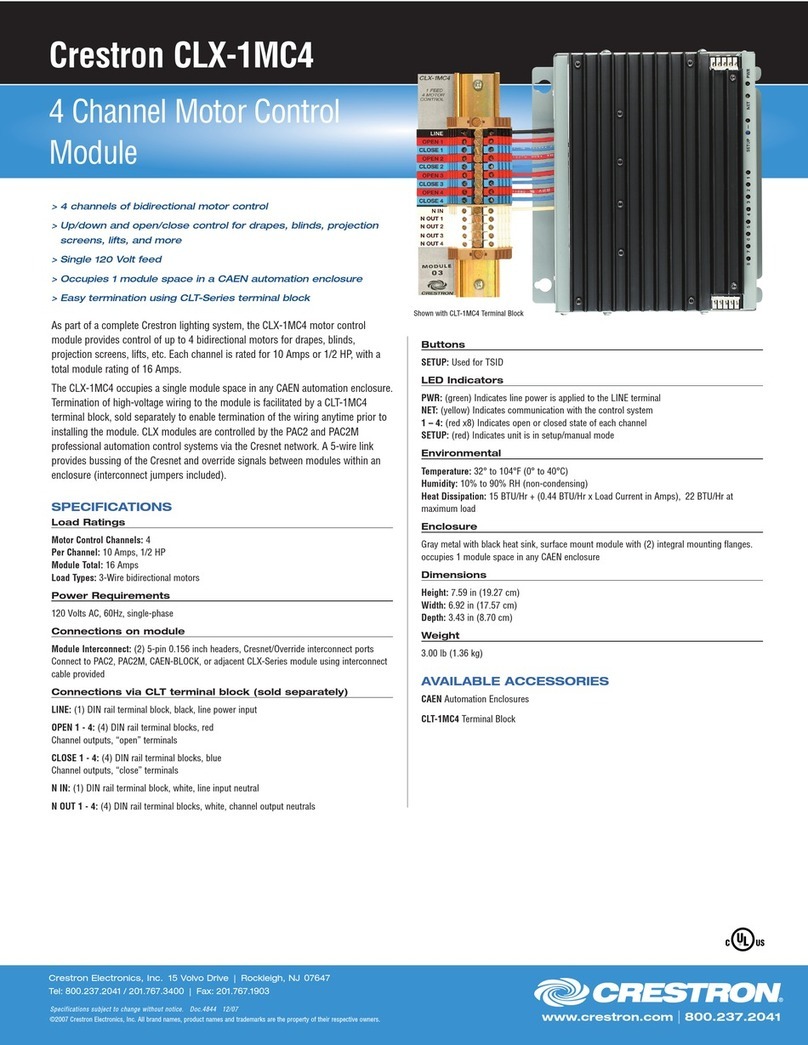
This manual suits for next models

1

Other Crestron Controllers manuals

Crestron 3 Series Dimensional drawing

Crestron

Crestron 3 Series Dimensional drawing

Crestron CN-TVAV User manual

Crestron

Crestron CN-TVAV User manual

Crestron CP3-R User manual

Crestron

Crestron CP3-R User manual

Crestron C2N-SDC How to use

Crestron

Crestron C2N-SDC How to use

Crestron CLCI-MCEX User manual

Crestron

Crestron CLCI-MCEX User manual

Crestron MPC-M5 Dimensional drawing

Crestron

Crestron MPC-M5 Dimensional drawing

Crestron CLS-EXP-DIMFLV User manual

Crestron

Crestron CLS-EXP-DIMFLV User manual

Crestron 4K DigitalMedia 3-Series User manual

Crestron

Crestron 4K DigitalMedia 3-Series User manual

Crestron DigitalMedia 8G+ DM-RMC-200-C Dimensional drawing

Crestron

Crestron DigitalMedia 8G+ DM-RMC-200-C Dimensional drawing

Crestron ZUMMESH-JBOX-DALI User manual

Crestron

Crestron ZUMMESH-JBOX-DALI User manual

Crestron PC-350V-12 User manual

Crestron

Crestron PC-350V-12 User manual

Crestron CH-HREL8-D6 User manual

Crestron

Crestron CH-HREL8-D6 User manual

Crestron PC-200 Owner's manual

Crestron

Crestron PC-200 Owner's manual

Crestron QM-RMC User manual

Crestron

Crestron QM-RMC User manual

Crestron IPAC User manual

Crestron

Crestron IPAC User manual

Crestron CGDMX-512BI How to use

Crestron

Crestron CGDMX-512BI How to use

Crestron CNECI-4A User manual

Crestron

Crestron CNECI-4A User manual

Crestron CNXFZ User manual

Crestron

Crestron CNXFZ User manual

Crestron infiNET HTT-B10X User manual

Crestron

Crestron infiNET HTT-B10X User manual

Crestron CEN-TVAV User manual

Crestron

Crestron CEN-TVAV User manual

Crestron C3COM-3 User manual

Crestron

Crestron C3COM-3 User manual

Crestron PC-350V Series User manual

Crestron

Crestron PC-350V Series User manual

Crestron MPC-M10 How to use

Crestron

Crestron MPC-M10 How to use

Crestron 4 Series User manual

Crestron

Crestron 4 Series User manual

Popular Controllers manuals by other brands

Genasun GVB-8-WP Series manual

Genasun

Genasun GVB-8-WP Series manual

Comunello Automation SALIENT Installation and user manual

Comunello Automation

Comunello Automation SALIENT Installation and user manual

Gree XK46 owner's manual

Gree

Gree XK46 owner's manual

Savant SmartControl Quick reference guide

Savant

Savant SmartControl Quick reference guide

involight COMMANDER EASYCONTROL manual

involight

involight COMMANDER EASYCONTROL manual

elco PISCES MINIFILL E1/1 INSTRUCTIONS FOR INSTALLATION, SERVICING & MAINTENANCE

elco

elco PISCES MINIFILL E1/1 INSTRUCTIONS FOR INSTALLATION, SERVICING & MAINTENANCE

Palazzetti EASYTOUCH USE AND FUNCTION

Palazzetti

Palazzetti EASYTOUCH USE AND FUNCTION

SIPOS AKTORIK SIPOS 5 Operation instructions

SIPOS AKTORIK

SIPOS AKTORIK SIPOS 5 Operation instructions

JLCooper Electronics CS-32 MiniDESK user manual

JLCooper Electronics

JLCooper Electronics CS-32 MiniDESK user manual

Mec MEGR-6120 Series instruction manual

Mec

Mec MEGR-6120 Series instruction manual

KINGDOM KFE2201C instruction manual

KINGDOM

KINGDOM KFE2201C instruction manual

Bose SoundTouch quick start guide

Bose

Bose SoundTouch quick start guide

Hanna Instruments HI 8510 instruction manual

Hanna Instruments

Hanna Instruments HI 8510 instruction manual

EMS Imaging iVu9s user manual

EMS Imaging

EMS Imaging iVu9s user manual

Siemens SIMATIC S7-200 System manual

Siemens

Siemens SIMATIC S7-200 System manual

Allen-Bradley ControlLogix 5570 series Reference manual

Allen-Bradley

Allen-Bradley ControlLogix 5570 series Reference manual

FreeHand 1.2 user manual

FreeHand

FreeHand 1.2 user manual

Carel FCP/1 user manual

Carel

Carel FCP/1 user manual

manuals.online logo
manuals.online logoBrands
  • About & Mission
  • Contact us
  • Privacy Policy
  • Terms and Conditions

Copyright 2025 Manuals.Online. All Rights Reserved.