manuals.online logo
Brands
  1. Home
  2. •
  3. Brands
  4. •
  5. Crestron
  6. •
  7. Transmitter
  8. •
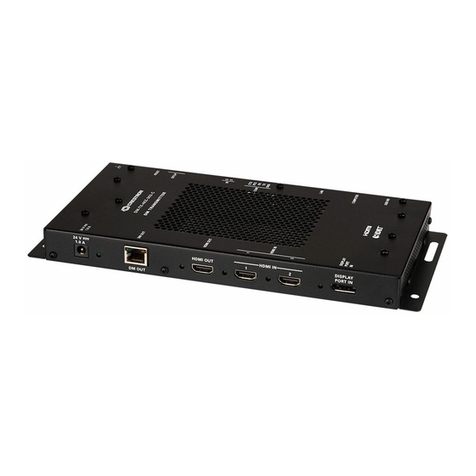
  9. Crestron DigitalMedia 8G+ DM-TX-4K-100-C-1G Dimensional drawing

Crestron DigitalMedia 8G+ DM-TX-4K-100-C-1G Dimensional drawing

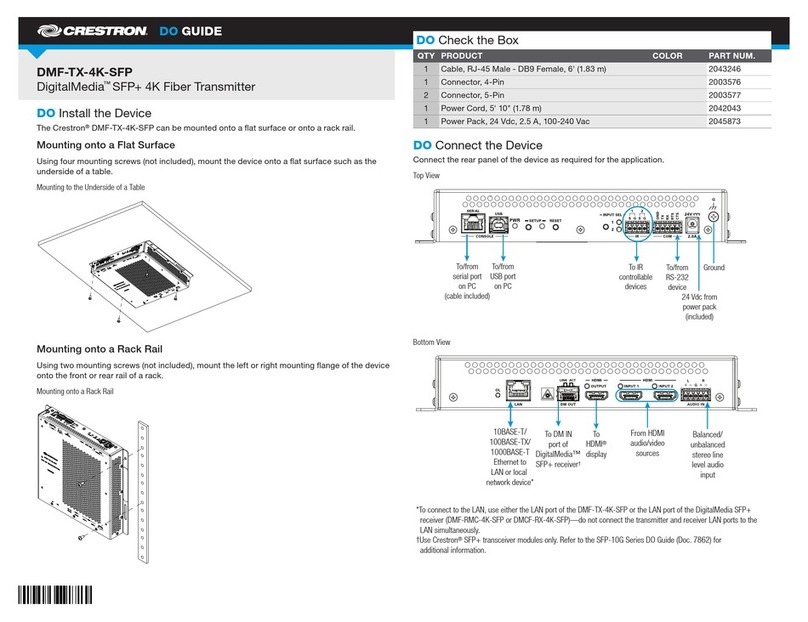
DO GUIDE
DO Install the Device
The DM-TX-4K-100-C-1G can be mounted into an electrical box, under a table, or onto a at
surface or rack rail.
Mounting into an Electrical Box
The DM-TX-4K-100-C-1G mounts into a 1-gang electrical box (not included). A minimum
mounting depth of 3-1/2 inches (89 mm) is required.
Using a Phillips head screwdriver, attach the DM-TX-4K-100-C-1G to the electrical box using
the two included 6-32 x 3/4-inch truss combo head screws. Then, attach a decorator-style
faceplate (not included) to the front panel of the DM-TX-4K-100-C-1G using two screws (not
included). Refer to illustration .
Mounting into an Electrical Box
DM-TX-4K-100-C-1G
Wall Plate 4K DigitalMedia 8G+®Transmitter 100
DO Make Connections to the Rear Panel
Make connections to the rear panel of the DM-TX-4K-100-C-1G before mounting the unit into an
electrical box. If the unit is to be mounted under a table or onto a at surface or rack rail, make
connections to the rear panel after the unit is mounted. (For mounting instructions, refer to the
“DO Install the Device” section in this guide.)
Make connections to the rear panel as follows:
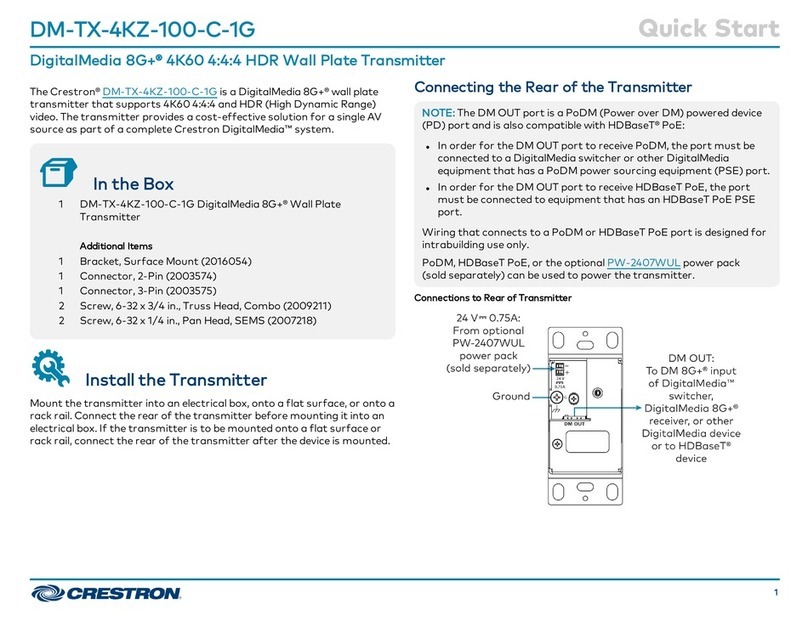
DM OUT: Connect to the DM 8G+®input of a DigitalMedia™ switcher, DigitalMedia 8G+®
receiver, or other DigitalMedia device or to an HDBaseT®device.
NOTE: The DM OUT port is a PoDM (Power over DM) and PoH (Power over HDBaseT) PD
(Powered Device) port. To receive PoDM or PoH, the DM-TX-4K-100-C-1G requires a connection
to a DigitalMedia switcher or other equipment that has a PoDM or PoH PSE (Power Sourcing
Equipment) port. Any wiring that is connected to a PoDM or PoH PSE port is for intrabuilding
use only and should not be connected to a line that runs outside of the building in which the
PSE is located.
24VDC 0.75A: Connect to the included power pack using the included 2-pin interface
connector.
NOTE: Connection to the power pack is not required when PoDM or PoH is used to power the
device.
G: Connect to earth ground (building steel).
Refer to illustrations and for sample rear panel connections.
Connection to DigitalMedia Switcher Using PoDM
(External Power Pack Not Required)
DO Check the Box
QTY PRODUCT COLOR PART NUM.
1Bracket (for Interface Module) Black 2016054
2Connector, 2-Pin 2003574
1Connector, 3-Pin 2003575
1 Power Pack, 24 Vdc 0.75 A, 100-240 Vac 2037285
2 Screw, 6-32 x 3/4", Truss Head, Combo 2009211
2 Screw, 6-32 x 1/4", Pan Head, SEMS Black 2007218
Not Included: Electrical Box, Philips Head Screwdriver, Decorator-Style Faceplate and Screws, Cables, Rack Mount Screws, and Table or Surface
Mount Screws
DM-RMC-4K-100-C
Ground
DM-RMC-4K-100-C
DM RO O M CONT R O L L E R
DBT
ASE
TM
HDMIOUT
GND
TX
RX
RTS
CTS
COM
S
G
S
G
1
2
IR
LAN
DMIN
RESET
SETUP
24V
0.75AMAX
Power
Pack
Connection to DigitalMedia Receiver
(External Power Pack Required)
DM-MD8X8
Ground
DO GUIDE DOC. 7551C (2042252) 08.15
Specications subject to change without notice.
Mounting under a Table or onto a Flat Surface
The DM-TX-4K-100-C-1G mounts under a table or onto a
suitable at surface using the included surface mount bracket.
Using a Phillips head screwdriver, attach the included surface
mount bracket to the DM-TX-4K-100-C-1G using the two
included 6-32 x 1/4-inch SEMS screws. Then, attach the
bracket to the underside of a table or onto a at surface using
two mounting screws (not included). Refer to illustration .
Mounting under a Table or onto a Flat Surface
Mounting onto a Rack Rail
The DM-TX-4K-100-C-1G mounts onto the front or rear rail of
a rack. Position the DM-TX-4K-100-C-1G horizontally so that
the holes in the left or right mounting ange align with the holes
in the rack rail. Then, secure the unit to the rack rail using two
mounting screws (not included). Refer to illustration .
Mounting onto a Rack Rail
DO Make Connections to the Front Panel
Make connections to the front panel of the DM-TX-4K-100-C-1G
as required for the application.
HDMI IN: Connect to an HDMI®audio/video source.
IR OUT: Connect to the Crestron®IRP2 emitter probe (not
included) using the included 2-pin connector.1
COM: Connect to the device to be controlled using the
included 3-pin connector.1
Refer to illustration for sample front panel connections.
Sample Front Panel Connections
1. The IR OUT port and the COM (RS-232) port are enabled only when the
DM-TX-4K-100-C-1G connects to an Ethernet-enabled DigitalMedia receiver
or switcher that is addressable from a Crestron control system.
DO Learn More
Visit the website for additional information and
the latest rmware updates. To learn more about
this product, use a QR reader application on your
mobile device to scan the QR image.
Crestron Electronics
15 Volvo Drive, Rockleigh, NJ 07647
888.CRESTRON | www.crestron.com
As of the date of manufacture, the product has been tested and found to comply with specications for CE marking.
Federal Communications Commission (FCC) Compliance Statement
This device complies with part 15 of the FCC Rules. Operation is subject to the following two conditions:
(1) This device may not cause harmful interference, and (2) this device must accept any interference received, including interference
that may cause undesired operation.
CAUTION:Changes or modications not expressly approved by the manufacturer responsible for compliance could void the
user’s authority to operate the equipment.
NOTE: This equipment has been tested and found to comply with the limits for a Class B digital device, pursuant to part 15 of the
FCC Rules. These limits are designed to provide reasonable protection against harmful interference in a residential installation.
This equipment generates, uses and can radiate radio frequency energy and, if not installed and used in accordance with the
instructions, may cause harmful interference to radio communications. However, there is no guarantee that interference will not
occur in a particular installation.
If this equipment does cause harmful interference to radio or television reception, which can be determined by turning the
equipment off and on, the user is encouraged to try to correct the interference by one or more of the following measures:
• Reorient or relocate the receiving antenna.
• Increase the separation between the equipment and receiver.
• Connect the equipment into an outlet on a circuit different from that to which the receiver is connected.
• Consult the dealer or an experienced radio/TV technician for help.
Industry Canada (IC) Compliance Statement
CAN ICES-3(B)/NMB-3(B)
The specic patents that cover Crestron products are listed at patents.crestron.com. The product warranty can be found at www.crestron.com/warranty.
Certain Crestron products contain open source software. For specic information, please visit www.crestron.com/opensource.
Crestron, the Crestron logo, DigitalMedia, DigitalMedia 8G+, and DM 8G+ are either trademarks or registered trademarks of Crestron Electronics, Inc. in the United States and/or other countries.
Blu-ray is either a trademark or registered trademark of the Blu-ray Disc Association in the United States and/or other countries. HDBaseT and the HDBaseT Alliance logo are either trademarks
or registered trademarks of the HDBaseT Alliance in the United States and/or other countries. HDMI and the HDMI logo are either trademarks or registered trademarks of HDMI Licensing LLC in
the United States and/or other countries. Other trademarks, registered trademarks, and trade names may be used in this document to refer to either the entities claiming the marks and names
or their products. Crestron disclaims any proprietary interest in the marks and names of others. Crestron is not responsible for errors in typography or photography.
This document was written by the Technical Publications department at Crestron.
©2015 Crestron Electronics, Inc.
Blu-ray™
Player
IRP2 Emitter Probe
Blu-ray
™
Player

This manual suits for next models

2

Other Crestron Transmitter manuals

Crestron HD-TX-4KZ-401 User manual

Crestron

Crestron HD-TX-4KZ-401 User manual

Crestron IM-TCC How to use

Crestron

Crestron IM-TCC How to use

Crestron CNLCDRFHT-A User manual

Crestron

Crestron CNLCDRFHT-A User manual

Crestron IM-WCC How to use

Crestron

Crestron IM-WCC How to use

Crestron DigitalMedia DM-TX-200-2G How to use

Crestron

Crestron DigitalMedia DM-TX-200-2G How to use

Crestron DigitalMedia DM-TX-300N User manual

Crestron

Crestron DigitalMedia DM-TX-300N User manual

Crestron DM-TX-401-S User manual

Crestron

Crestron DM-TX-401-S User manual

Crestron ST-4T User manual

Crestron

Crestron ST-4T User manual

Crestron DM-TX1-4K-C-1G User manual

Crestron

Crestron DM-TX1-4K-C-1G User manual

Crestron CNIRHT-MM User manual

Crestron

Crestron CNIRHT-MM User manual

Crestron DM-TX-4K-202-C Owner's manual

Crestron

Crestron DM-TX-4K-202-C Owner's manual

Crestron DigitalMedia 8G+ DM-TX-201-C Dimensional drawing

Crestron

Crestron DigitalMedia 8G+ DM-TX-201-C Dimensional drawing

Crestron DigitalMedia 8G DM-TX-201-S User manual

Crestron

Crestron DigitalMedia 8G DM-TX-201-S User manual

Crestron HD-TXC-4KZ-101-1G User manual

Crestron

Crestron HD-TXC-4KZ-101-1G User manual

Crestron DM-TX-200 How to use

Crestron

Crestron DM-TX-200 How to use

Crestron DM-TX-201-C How to use

Crestron

Crestron DM-TX-201-C How to use

Crestron IM-TCCV Quick start guide

Crestron

Crestron IM-TCCV Quick start guide

Crestron DigitalMedia DMCF-TX-4K-SFP Dimensional drawing

Crestron

Crestron DigitalMedia DMCF-TX-4K-SFP Dimensional drawing

Crestron DM-TX-4K-202-C User manual

Crestron

Crestron DM-TX-4K-202-C User manual

Crestron DigitalMedia 8G+ DM-TX-4KZ-202-C Owner's manual

Crestron

Crestron DigitalMedia 8G+ DM-TX-4KZ-202-C Owner's manual

Crestron HD-TX-4KZ-111-1G User manual

Crestron

Crestron HD-TX-4KZ-111-1G User manual

Crestron DM-TX-4KZ-100-C-1G User manual

Crestron

Crestron DM-TX-4KZ-100-C-1G User manual

Crestron DM-TX-201-S Dimensional drawing

Crestron

Crestron DM-TX-201-S Dimensional drawing

Crestron HD-TXA-4KZ-101-1G User manual

Crestron

Crestron HD-TXA-4KZ-101-1G User manual

Popular Transmitter manuals by other brands

attas MIDO 433 instruction manual

attas

attas MIDO 433 instruction manual

Marantz professional PMD-750T user guide

Marantz professional

Marantz professional PMD-750T user guide

CLA-VAL X117D Installation

CLA-VAL

CLA-VAL X117D Installation

Lindy 38019 Quick installation guide

Lindy

Lindy 38019 Quick installation guide

WT sensor PCT381 quick start guide

WT sensor

WT sensor PCT381 quick start guide

YOKOGAWA Dpharp EJX110A installation manual

YOKOGAWA

YOKOGAWA Dpharp EJX110A installation manual

Trust Start Series Important information

Trust

Trust Start Series Important information

Beninca RF manual

Beninca

Beninca RF manual

Audiovox Pursuit PRO-OE3 Programming guide

Audiovox

Audiovox Pursuit PRO-OE3 Programming guide

Eaton xComfort CAEE-02/01 Assembly instructions

Eaton

Eaton xComfort CAEE-02/01 Assembly instructions

ARTEX C406-1 Series Description, operation, installation and maintenance manual

ARTEX

ARTEX C406-1 Series Description, operation, installation and maintenance manual

Spatz HDMI-GIGALAN-TX user guide

Spatz

Spatz HDMI-GIGALAN-TX user guide

Shinko SAAR instruction manual

Shinko

Shinko SAAR instruction manual

FuehlerSysteme FS5021 operating manual

FuehlerSysteme

FuehlerSysteme FS5021 operating manual

RIDGID NaviTrack Battery Sonde user manual

RIDGID

RIDGID NaviTrack Battery Sonde user manual

Paso MA153 manual

Paso

Paso MA153 manual

TESTO 6681 Profibus instruction manual

TESTO

TESTO 6681 Profibus instruction manual

NIVELCO EchoTREK S-300 User and programming manual

NIVELCO

NIVELCO EchoTREK S-300 User and programming manual

manuals.online logo
manuals.online logoBrands
  • About & Mission
  • Contact us
  • Privacy Policy
  • Terms and Conditions

Copyright 2025 Manuals.Online. All Rights Reserved.