Cuppone Michelangelo User manual

Michelangelo
Use and maintenance manual

2
service@linda-lewis.co.uk
0161 696 0052

3
Ed. 0219 - 70702522 REV00 Michelangelo - Use and maintenance
Contents
We congratulate you for choosing a product designed and
manufactured with cutting-edge technology.
Before delivery to the customer, the oven is tested and checked
in the Manufacturer’s factory.
The “production process sheet” attached to it guarantees that
every production step, from assembly to packaging, has been
carefully checked, both from a functionality and safety point
of view.
Before the installation, read the content of this manual
carefully: it contains important information regarding product
assembly and safety regulations.
The foundation
Our company was founded in 1963 by the Lorenzo, Luigi and
Paolo Cuppone brothers. It immediately specialized in the
production of ovens and equipment to prepare and cook pizza.
The constant research and experimentation of new equipment
that are even now the strength of our company, have led us
to design and patent the machinery and ovens that have
revolutionized the way pizza is made.
Technical service
The Manufacturer can solve any technical problem regarding
use and maintenance.
Do not hesitate to contact him in case of doubt.
CUPPONE 1963
Cuppone F.lli S.r.l.
Via Sile, 36
31057 Silea (TV) - ITALY
T +39 0422 361143
F +39 0422 360993
info@cuppone.com - www.cuppone.com
Introduction
Introduction................................................................. 3
The foundation............................................................................................3
Technical service.........................................................................................3
Safety instructions ...................................................... 4
Symbols used in the manual ..............................................................5
Basic notions................................................................ 6
Knowing your oven..................................................................................6
Preparing to use the oven....................................................................6
Some piece of advice..............................................................................7
Using CD models.......................................................... 9
Using TS models........................................................... 13
Maintenance and cleaning ......................................... 28
Warnings..........................................................................................................28
Oven cleaning..............................................................................................28
Replacing components..........................................................................30
Oven downtime for prolonged periods......................................32
Disposal at end of life..............................................................................32
Warranty....................................................................... 33
Warranty conditions ................................................................................33
Limits and exclusions .............................................................................33
Claims under warranty ...........................................................................33
Something is not working........................................... 34
What to do in case of any malfunction........................................34
Error messages CD mod........................................................................35
Error messages TS mod..........................................................................35
Warnings TS mod.......................................................................................35
User’s exploded view................................................... 37
0161 696 0052

4
• Read this guide carefully before using and
maintaining the appliance, and keep it with care
in an accessible place for any future consultation
by the various operators.
• Moreover, the manual must always accompany the
product through its life, even in case of transfer.
• Before performing any maintenance, disconnect
the electricity supply.
• Unauthorised actions, tampering or
modifications that do not follow the information
provided in this manual can cause damages,
injuries or fatal accidents and null and void the
warranty.
• Use or maintenance that fail to comply with the
instructions in this manual may cause damage,
injury or fatal accidents.
• The serial plate provides important technical
information. This is vital in case of a request for
maintenance or repair of the equipment: please
do not remove, damage or modify it.
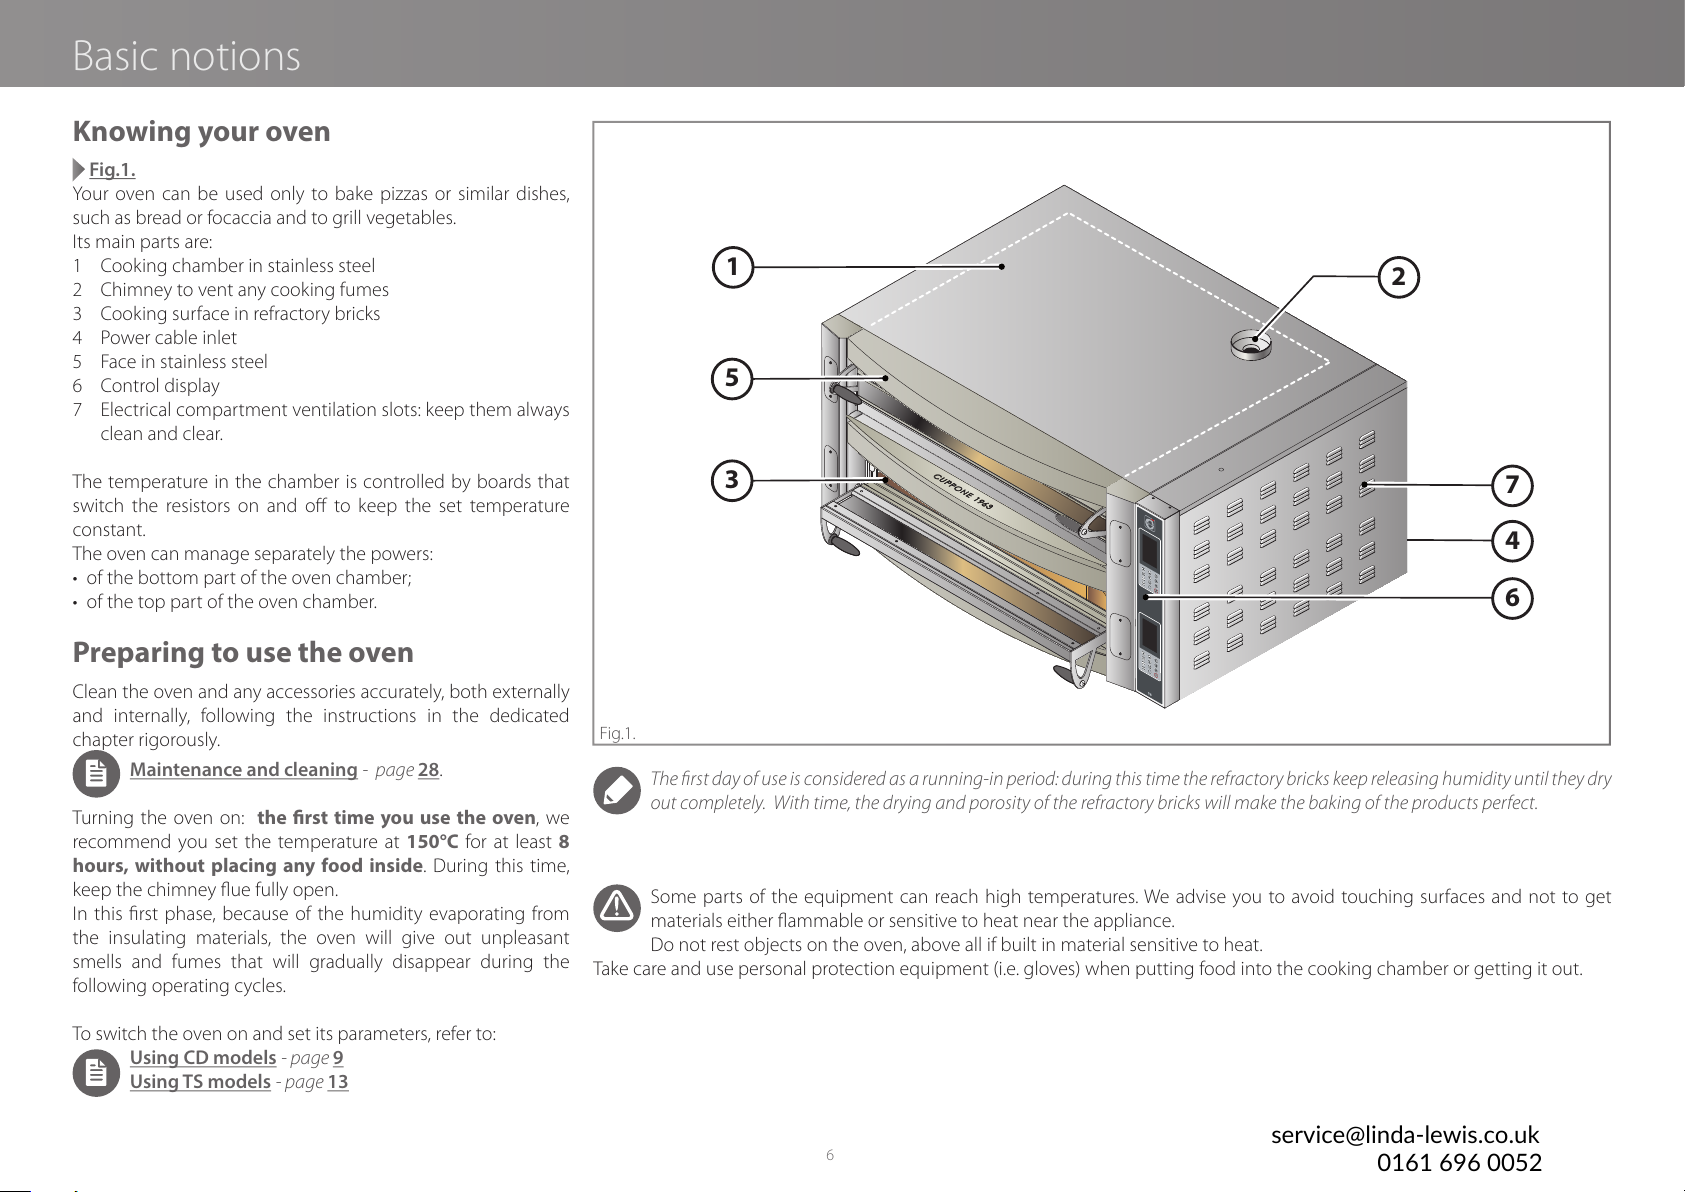
• Some parts of the equipment can reach high
temperatures. We advise you to avoid touching
surfacesandnottogetmaterialseitherflammable
or sensitive to heat near the appliance.
• Do not rest objects on the oven, above all if built
in material sensitive to heat.
• The appliance is a product used only to bake
pizzas or similar products. A use other than the
stated one is considered improper, potentially
dangerous for people and animals and might
permanently damage the appliance. The
improper use of the equipment shall void the
warranty.
• This appliance can be used by children aged from
8 years and above and persons with reduced
physical, sensory or mental capabilities or lack
of experience and knowledge if they have been
given supervision or instruction concerning use
of the appliance in a safe way and understand the
hazard involved. Children must not play with the
appliance. Cleaning and user maintenance shall
not be made by children without supervision.
• The staffusing the appliance must be
professionally prepared and periodically trained
on its use, as well as the safety and accident
prevention regulations.
• Children must be supervised to make sure they
do not play with the appliance or parts of it.
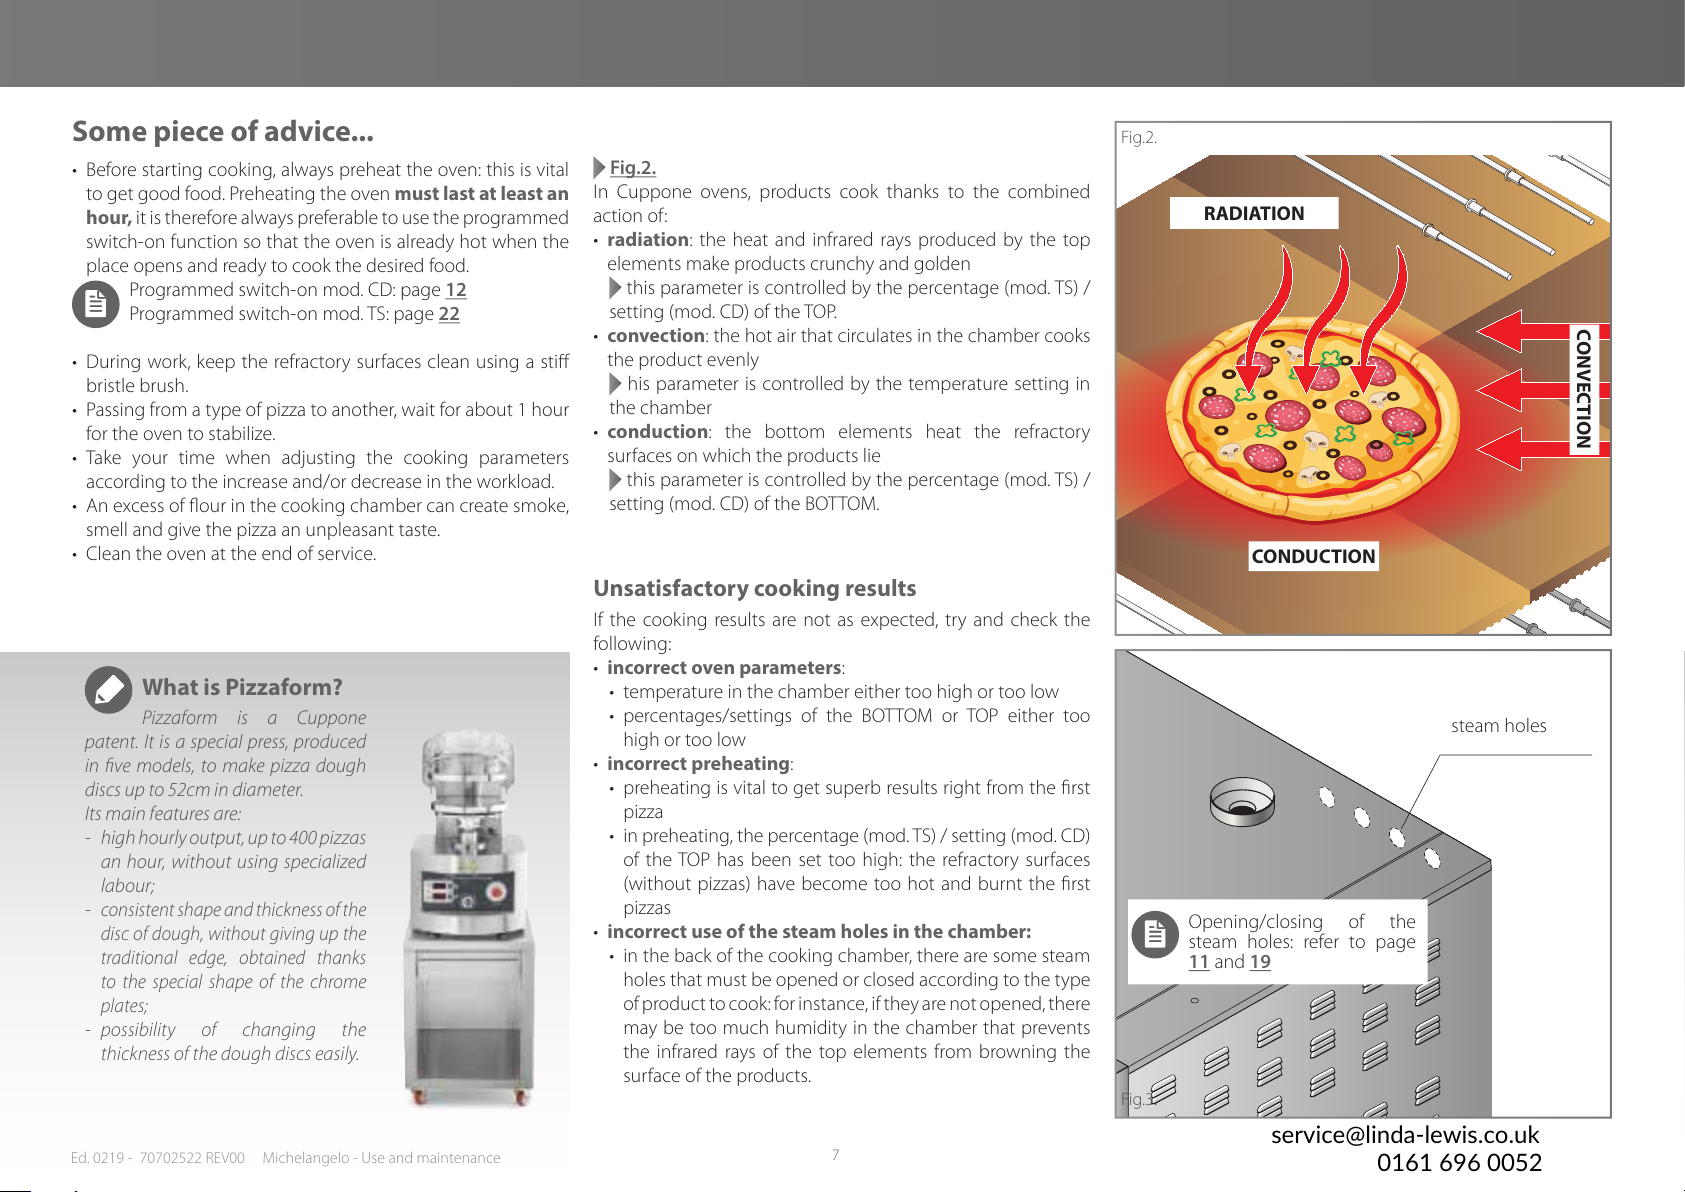
• Always use tools resistant to heat (e.g. In steel).
Cooking utensils in plastic or similar material
mightnotwithstandtheovenhigh temperatures.
• Check regularly that fumes can be discharged
safely. Do not obstruct the duct for any reason
(e.g. laying some pans on the oven).
• FIRE RISK: leave the area around the appliance
free and clean from fuels. Do not store flammable
materials near this appliance.
• WARNING: RISK OF EXPLOSION! It is forbidden to
use the oven in environments at risk of explosion.
• WARNING: always switch offthe main switch
when you finish using the appliance, above
all during cleaning or in cases of prolonged
downtime.
• If you notice any anomaly (e.g. damaged power
cable, etc.), malfunction or fault, do not use
the appliance and contact a Service Centre
Safety instructions
authorized by the Manufacturer. Demand
original spare parts, or the Warranty will be null
and void.
• Place the emergency phone numbers in a visible
location.
• WARNING: it is forbidden to place flammable
solids or liquids (spirits for instance) in the
cooking chamber during the operation.
• Monitor the appliance during its entire operation,
do not leave dishes in the oven unattended!
• Failure to follow these regulations may cause
damage or even fatal injury, subsequently
invalidating the guarantee and relieving the
Manufacturer of all liability.
• We recommend you have the appliance checked
by an Authorized Service Centre at least once a
year.
service@linda-lewis.co.uk
0161 696 0052

5
Ed. 0219 - 70702522 REV00 Michelangelo - Use and maintenance
Symbols used in the manual
Important warning, if disregarded it can lead to serious
damages to the appliance and injuries to people.
Reference to another chapter where the subject is
dealt with in more detail.
Manufacturer’s advice
The company cannot be held liable for any print or transcription
errors, reserving the right to make changes where deemed
suitable without prior notice.
Partial reproduction without the manufacturer's consent
is prohibited. Measurements are purely indicative and not
binding.
The original language used to prepare this manual is Italian:
the Manufacturer is not responsible for any translation/
interpretation or print errors.
service@linda-lewis.co.uk
0161 696 0052

6
4
ECO
ECO
12
3
5
6
7
Fig.1.
Knowing your oven
Fig.1.
Your oven can be used only to bake pizzas or similar dishes,
such as bread or focaccia and to grill vegetables.
Its main parts are:
1 Cooking chamber in stainless steel
2 Chimney to vent any cooking fumes
3 Cooking surface in refractory bricks
4 Power cable inlet
5 Face in stainless steel
6 Control display
7 Electrical compartment ventilation slots: keep them always
clean and clear.
The temperature in the chamber is controlled by boards that
switch the resistors on and offto keep the set temperature
constant.
The oven can manage separately the powers:
• of the bottom part of the oven chamber;
• of the top part of the oven chamber.
Preparing to use the oven
Clean the oven and any accessories accurately, both externally
and internally, following the instructions in the dedicated
chapter rigorously.
Maintenance and cleaning - page 28.
Turning the oven on: the rst time you use the oven, we
recommend you set the temperature at 150°C for at least 8
hours, without placing any food inside. During this time,
keep the chimney flue fully open.
In this first phase, because of the humidity evaporating from
the insulating materials, the oven will give out unpleasant
smells and fumes that will gradually disappear during the
following operating cycles.
To switch the oven on and set its parameters, refer to:
Using CD models - page 9
Using TS models - page 13
Basic notions
The first day of use is considered as a running-in period: during this time the refractory bricks keep releasing humidity until they dry
out completely. With time, the drying and porosity of the refractory bricks will make the baking of the products perfect.
Some parts of the equipment can reach high temperatures. We advise you to avoid touching surfaces and not to get
materials either flammable or sensitive to heat near the appliance.
Do not rest objects on the oven, above all if built in material sensitive to heat.
Take care and use personal protection equipment (i.e. gloves) when putting food into the cooking chamber or getting it out.
service@linda-lewis.co.uk
0161 696 0052

7
Fig.2.
Fig.3.
Opening/closing of the
steam holes: refer to page
11 and 19
steam holes
Ed. 0219 - 70702522 REV00 Michelangelo - Use and maintenance
Some piece of advice...
• Before starting cooking, always preheat the oven: this is vital
to get good food. Preheating the oven must last at least an
hour, it is therefore always preferable to use the programmed
switch-on function so that the oven is already hot when the
place opens and ready to cook the desired food.
Programmed switch-on mod. CD: page 12
Programmed switch-on mod. TS: page 22
• During work, keep the refractory surfaces clean using a stiff
bristle brush.
• Passing from a type of pizza to another, wait for about 1 hour
for the oven to stabilize.
• Take your time when adjusting the cooking parameters
according to the increase and/or decrease in the workload.
• An excess of flour in the cooking chamber can create smoke,
smell and give the pizza an unpleasant taste.
• Clean the oven at the end of service.
Fig.2.
In Cuppone ovens, products cook thanks to the combined
action of:
•radiation: the heat and infrared rays produced by the top
elements make products crunchy and golden
this parameter is controlled by the percentage (mod. TS) /
setting (mod. CD) of the TOP.
•convection: the hot air that circulates in the chamber cooks
the product evenly
his parameter is controlled by the temperature setting in
the chamber
•conduction: the bottom elements heat the refractory
surfaces on which the products lie
this parameter is controlled by the percentage (mod. TS) /
setting (mod. CD) of the BOTTOM.
Unsatisfactory cooking results
If the cooking results are not as expected, try and check the
following:
•incorrect oven parameters:
• temperature in the chamber either too high or too low
• percentages/settings of the BOTTOM or TOP either too
high or too low
•incorrect preheating:
• preheating is vital to get superb results right from the first
pizza
• in preheating, the percentage (mod. TS) / setting (mod. CD)
of the TOP has been set too high: the refractory surfaces
(without pizzas) have become too hot and burnt the first
pizzas
•incorrect use of the steam holes in the chamber:
• in the back of the cooking chamber, there are some steam
holes that must be opened or closed according to the type
of product to cook: for instance, if they are not opened, there
may be too much humidity in the chamber that prevents
the infrared rays of the top elements from browning the
surface of the products.
What is Pizzaform?
Pizzaform is a Cuppone
patent. It is a special press, produced
in five models, to make pizza dough
discs up to 52cm in diameter.
Its main features are:
- high hourly output, up to 400 pizzas
an hour, without using specialized
labour;
-
consistent shape and thickness of the
disc of dough, without giving up the
traditional edge, obtained thanks
to the special shape of the chrome
plates;
- possibility of changing the
thickness of the dough discs easily.
RADIATION
CONDUCTION
CONVECTION
service@linda-lewis.co.uk
0161 696 0052

8
COOKING TABLES
The parameters in the tables are just indicative, since they can vary according to the temperature of the room where the oven is installed and the type of dough to bake (e.g. type of flour, hydration, etc.).
TS CHECK Manual stretching Stretching with Pizzaform
Preheating for both types
(manual stretching or with Pizzaform)
TYPE COOKING COOKING
TIME TEMP. % TOP
% BOTTOM
TIME TEMP. % TOP
% BOTTOM
CLASSIC 3 min 300°C 85% 5% 3 min 290° 85% 0%
time: 1 hour
(can vary according to the % set)
temperature / %: the same as the type of pizza
During preheating, the steam holes in the back of the cooking
chamber must be kept always closed, to prevent the elements from
being on too long and warming the refractory surfaces too much,
causing the first pizzas to burn.
PAN 3 - 4 min 320°C 40% 100% 3 - 4 min / / /
NEAPOLITAN 1 - 2 min 370°C 80% 0% 1 - 2 min / / /
BAKING-TIN 7 - 8 min 280°C 30% 100% 7 - 8 min / / /
PADDLE
PRECOOKING 5 min 270°C 40% 60% 5 min / / /
FINISHING 3 min 270°C 40% 60% 3 min / / /
CD CHECK Manual stretching Stretching with Pizzaform
Preheating for both types
(manual stretching or with Pizzaform)
TYPE COOKING COOKING
TIME TEMP. TOP
BOTTOM
TIME TEMP. TOP
BOTTOM
CLASSIC 3 min 300°C MAX OFF/MIN 3 min 290°C MAX OFF
time: 1 hour
(can vary according to the selected setting)
temperature / selection: the same as the type of pizza
During preheating, the steam holes in the back of the cooking
chamber must be kept always closed, to prevent the elements from
being on too long and warming the refractory surfaces too much,
causing the first pizzas to burn.
PAN 3 - 4 min 320°C MIN MAX 3 - 4 min / / /
NEAPOLITAN 1 - 2 min 370°C MAX OFF 1 - 2 min / / /
BAKING-TIN 7 - 8 min 280°C MIN MAX 7 - 8 min / / /
PADDLE
PRECOOKING 5 min 270°C MIN MAX 5 min / / /
FINISHING 3 min 270°C MIN MAX 3 min / / /
Basic notions
0161 696 0052

9
1
2
7
9
4
4A
5A
3
5
6
8
Fig.4.
Ed. 0219 - 70702522 REV00 Michelangelo - Use and maintenance
Knowing the control panel
Fig.4.
1 Main display
Displays alternatively:
• the current temperature in the chamber
• the set temperature
• the intervention time of the end-of-cooking sound warning
• the countdown time (time to the oven switching on if
programmed switch-on is used)
2 Keys + e -
Allow increasing or decreasing:
• the temperature values in the chamber,
• the intervention time of the end-of-cooking sound warning
• the countdown time (time to the oven switching on if
programmed switch-on is used)
3 elements LED:
with the oven ON, if lit, it means the resistances
are heating; with the oven OFF, if flashing, it shows a countdown
is in progress (active programmed switch-on).
4 Top power check
Allows checking the power of the elements in the top, offering
three adjustments:
• OFF
• MIN = 33%
• MAX = 100%
4A Top LEDs: show the selection made
5 Bottom power check
Allows checking the power of the elements in the bottom,
offering three adjustments:
• OFF,
• MIN = 33%
• MAX = 100%
5A Bottom LEDs: show the selection made
6 ON/OFF switch
Switches the display on and off
7 Light button
Switches the light in the cooking chamber on and off
8 Clock button
With the oven on: activates an end-of-cooking acoustic signal
With the oven off: sets the programmed switch-on
9 Chimney button
Opens and closes the steam holes in the back of the cooking
chamber
Using CD models
The control panel must be used only with dry and
clean fingers.
Continuous and prolonged pressing of the 2“+”
and “-” keys increases or decreases the value quicker.
CD MODELS
Contents of CD models
Knowing the control panel............................................................9
Use guided procedure......................................................................10
A - Turning the oven on manually.......................................10
B - Setting the preheating ........................................................10
C - Setting the cooking...............................................................10
D - Filling the oven........................................................................11
E - Switching the light on (optional)..................................11
F - Adjusting the steam holes.................................................11
G - Activating an end-of-cooking signal (buzzer)......11
H - Switching the oven off........................................................11
Programmed switch-on...................................................................12
service@linda-lewis.co.uk
0161 696 0052

10
Fig.5.
Fig.6.
Fig.7.
The oven can be switched on:
•manually: switching the oven on when it must be used it
is necessary to wait at least an hour for the oven to preheat
and get the right temperature.
Check the following use procedure (points A, B, C, D,
etc.)
•programming it: setting the number of hours missing to
the next switch-on the oven will switch on automatically.
See page 12
• automaticallyusing a clock or SMS (with external modules
not supplied by the Manufacturer).
Use guided procedure
The number of the buttons in the following procedure
(e.g. light button 7) refer to Fig.4.
A - Turning the oven on manually
Fig.5.
Pressing the ON/OFF key, 6the display 1lights up and
shows the current temperature of the cooking chamber (e.g.
25°C).
B - Setting the preheating
Fig.6. - Fig.7.
Set the preheating temperature acting on the 2“
+” or “-”
keys until the display shows
1
the desired value (see table on
page 8, preheating information).
Acting on the 4and 5keys, set the top as well as the bottom
power (see table on page 8, preheating information).
After setting these three parameters, the oven starts heating
straight away.
The preheating temperature must be the same as the
next cooking and depends on the type of product to
cook. If necessary, check page 7for some advice.
During preheating, the steam holes in the back of the
cooking chamber must be kept always closed, to
prevent the elements from being on too long and
warming the refractory surfaces too much, causing the first
pizzas to burn.
The led 3will switch offafter about an hour: this means the
oven has reached the temperature set for pre-heating and is
ready to cook.
C - Setting the cooking
Fig.6. - Fig.7.
When preheating is complete, set the cooking temperature
acting on the 2“+”or“-”keys until the display shows 1the
desired value (see table on page 10, cooking information).
Set also the power of the top and bottom acting on the 4
and 5keys.
After setting these three parameters, the oven starts heating
straight away.
During cooking, the led 3may switch back on; this
means the elements have come back on to keep the set
temperature constant.
top powerbottom power
Using CD models
service@linda-lewis.co.uk
0161 696 0052

11
ECO
ECO
Fig.8.
Fig.9.
Fig.10.
Ed. 0219 - 70702522 REV00 Michelangelo - Use and maintenance
D - Filling the oven
Fig.8.
Fill the oven using personal protection equipment (e.g. gloves)
and tools suitable for contact with food and made in a material
resistant to high temperatures (e.g. steel).
For optimal results, always adhere to the oven capacity
declared by the Manufacturer and position the products
to be cooked evenly in the cooking chamber.
E - Switching the light on (optional)
Fig.9.
When necessary, it is possible to switch on the oven light to
check the cooking, acting on the light button 7.
Press the same button to switch it off.
F - Adjusting the steam holes
Fig.10.
In the back of the cooking chamber there are some steam
holes: they can be more or less open to keep the degree of
humidity more suited to the type of product to bake in the
cooking chamber.
To open the vents, keep the
9
button pressed:
they start
opening progressively. To block them in the desired position,
just release the button.
G - Activating an end-of-cooking signal (buzzer)
Fig.11.
If you wish, you can enable a buzzer that will go offwhen the
set time expires, warning that cooking is complete.
To activate it, with the oven on, press the clock button 8.
The display 1shows after how much time the buzzer
will go o(e.g. 3.3 that is three minutes and thirty seconds): if
you wish to change this default time, use the 2“+” or “-” keys
until the display 1shows the desired time (e.g. 5.2 that is five
minutes and twenty seconds).
After setting it, the countdown starts, at the end of which a
buzzer will sound to highlight the end of cooking.
To stop the buzzer, press the clock button 8.
Warning! the oven continues heating when the
buzzer goes off!
H - Switching the oven o
Fig.12.
To switch the oven off, keep the ON/OFF 6button pressed for
about 2 seconds.
service@linda-lewis.co.uk
0161 696 0052

12
Fig.11.
Fig.12.
Fig.13.
Programmed switch-on
The programmed switch-on function is very useful because
the oven can be already hot, and therefore ready to bake,
when the restaurant is opened.
Fig.13.
To activate it, with the oven o, press the clock button 8.
The display 1will show the time to switch-on: if you wish
to change this default time, use the 2“+” or “-” keys until the
display 1shows the desired time (maximum time 99.5 that is
99 hours and 50 minutes).
Once set, the countdown starts, at the end of which the oven
will switch on automatically with the temperature and power
parameters used for the last cooking.
If you wish to change them:
• exit programmed cooking pressing the clock button 8,
• switch the oven on with the ON/OFF 6button,
• set a cooking cycle with the desired parameters ( Fig.6. -
Fig.7.)
• switch the oven offwith the ON/OFF 6button,
• set the programmed switch-on as explained above.
To exit the function and cancel programmed cooking, touch
the clock 8button again.
Using CD models
0161 696 0052

13
ECO
1
4
7
10
3
6
9
11
25
8
Ven 27/04/2018 13:00
CUPPONE
Fig.14.
Ed. 0219 - 70702522 REV00 Michelangelo - Use and maintenance
Using TS models
Knowing the control panel
Fig.14.
1 Pyrolysis program button
Starts the pyrolysis program to clean the oven
2 ECO program button
Starts the ECO program (p. 15)
3 MAX program button
Starts the MAX program (p. 19)
4 TIMER button
Stand-by screen: enables the holiday mode;
Work screen: enables/disables the weekly switch-on timer
function.
5 Buzzer button
Activates an end-of-cooking acoustic signal
6 Program button
Allows viewing and using the programs saved by the user
7 Chimney button
Opens and closes the steam holes in the back of the
cooking chamber
8 Light button
switches the light in the cooking chamber on and off
9 DIARY button
Gives access to the diary page
10 SERVICE button (settings)
Gives access to the user’s settings
11 ON/OFF switch
Powering the oven on and off
FUNCTION BAR
A Current date
B Chamber light
Shows the state of the light in the chamber (on or off)
C Vent
If on, it shows the chimney is opening (the user is acting on
the chimney button 7)
D Warning
Highlights a warning to read (e.g. maintenance)
E Current time
Contents of TS models
Knowing the control panel............................................................13
Entering the values.............................................................................14
Use guided procedure......................................................................15
A - Turning the oven on manually.......................................15
B - Setting the preheating ........................................................16
C - Setting the cooking...............................................................17
D - Activating an end-of-cooking signal (buzzer)......18
E - Filling the oven.........................................................................18
F - Switching the light on (optional)..................................18
G - Adjusting the steam holes................................................19
H - Switching the oven off........................................................19
Creating a recipe..................................................................................20
How to create a recipe ...............................................................21
Programmed switch-on ..................................................................22
Setting an event ..................................................................................22
Setting a Diary ......................................................................................24
Setting a Holiday .................................................................................25
User settings ..........................................................................................26
The control panel must be used only with dry and
clean fingers.
TS MODELS
service@linda-lewis.co.uk
0161 696 0052

14
CUPPONE
Ven 27/04/2018 13:00
A B C D E
120°C
56
27/04/2018 13:00
300
20
57”
Program 01
temp
1234 5
6789 0
xOK
05:50
+-
Imposta valore tempo
X
FUNCTION BAR
STAND-BY page
Entering the values
To enter the values with the keypad:
•A) enter the desired value using the number keys (e.g. if 1-1-0 is pressed in sequence, 01:10
is displayed, that is one minute and 10 seconds)
or, alternatively
•B) use the “+” or “-” keys: pressing once increases/decreases the value by one unit at a time,
prolonged pressing increases/decreases the value very quickly.
In both cases, confirm with
OK
or delete with
x
.
PROGRAMMED SWITCH-ON button
Gives access to the Weekly programmed switch-on page: it is possible
to program the oven automatically switching on and offfor the whole
week.
HOLIDAY button
Gives access to the Holiday page: this function allows interrupting for a
certain period of time the oven switching on and offevery week, without
having to cancel it.
DIARY button
Gives access to the Diary page, where it is possible to set up to 10 notes
that will be displayed at the set time on the set day. Every note can also
be repeated cyclically.
Is the oven time or date wrong?
On first switch-on or after a sudden or prolonged switch-off
period, the oven date or time may be wrong: go to “Settings”
to enter the correct values.
See page 26
Using TS models
service@linda-lewis.co.uk
0161 696 0052

15
ECO
Ven 27/04/2018 13:00
ECO
CUPPONE
Ven 27/04/2018 13:00
25
°C
80
27/04/2018 13:00
370
0
NAPOLETANA
-:-
CUPPONE
25
°C
56
27/04/2018 13:00
300
20
57”
Program 01
1234 5
6789 0
x
OK
300
+-
Impostare valore temperaturaz X
25°C
80
27/04/2018 13:00
300
0
57”
Program 01
B
A
C
Fig.15.
Fig.16.
25 °C
45
27/04/2018 13:00
280
5
-:-
ECO
ECO
Ed. 0219 - 70702522 REV00 Michelangelo - Use and maintenance
The oven can be switched on:
•manually: switching the oven on when it must be used it
is necessary to wait at least an hour for the oven to preheat
and get the right temperature.
Check the following use procedure (points A, B, C, D,
etc.)
•programmed: programming the oven switching on and off
automatically for the whole week.
See page 22
• automaticallyusing a clock or SMS (with external modules
not supplied by the Manufacturer).
Use guided procedure
The number of the buttons in the following procedure
(e.g. light button 8) refer to Fig.14.
A - Turning the oven on manually
Fig.15.
After powering the oven, the display lights up and shows the
STAND-BY page. Pressing the ON/OFF 11 key, the display
shows the cooking page.
preheating or cooking
temperature
top power
bottom power
end-of-cooking signal (optional)
See page 18
What needs to be set for every
manual preheating or cooking
cycle:
During cooking or
preheating, if the current
temperature in the chamber
is:
• lower than the one set (so
the elements are active),
the icons identifying the
top and bottom are red
• equal to or higher
than the set one (so the
elements are off), the
icons identifying the top
and bottom are white
A special program
ECO ECO program: The ECO program is used to maintain
the oven functionality when there is not much work,
lowering the temperature in the chamber to 280°C
with top power at 45% and bottom power at 5%. These val-
ues can be changed by the user by acting as usual ( see
Fig.16.).
The program is interrupted
when a different program is
selected, the oven is switched
offor the ECO button is pres-
sed again.
service@linda-lewis.co.uk
0161 696 0052

16
300°C
80
27/04/2018 13:00
300
0
MANUAL
300°C
80
27/04/2018 13:00
300
0
MANUAL
310°C
80
27/04/2018 13:00
370
0
-:--:-
-:-
NAPOLETANA
27/04/2018 13:00
Selezione programma
EXIT
310°C
56
27/04/2018 13:00
300
20
MANUAL
12345
67890
xOK
310 +-
Impostare valore temperaturaz
X
-:-
B
A
C
310°C
56
27/04/2018 13:00
300
20
MANUAL
12345
67890
xOK
370 +-
Impostare valore temperaturaz
X
-:-
D
E
C
A3
A1
ECO
A2
CLASSICA
NAPOLETANA
TEGLIA
PADELLINO
FOCACCIA
PRE. NAPOLETANA
PRE. CLASSICA
B
300
°C
80
27/04/2018 13:00
300
0
MANUAL
300°C
80
27/04/2018 13:00
300
0
MANUAL
310°C
80
27/04/2018 13:00
370
0
-:--:-
-:-
PRE. NAPOLETANA
27/04/2018 13:00
Selezione programma
CLASSICA
NAPOLETANA
TEGLIA
PADELLINO
FOCACCIA
PRE. NAPOLETANA
PRE. CLASSICA
EXIT
310°C
56
27/04/2018 13:00
300
20
MANUAL
12345
67890
xOK
310 +-
Impostare valore temperaturaz
X
-:-
B
A
B
C
310°C
56
27/04/2018 13:00
300
20
MANUAL
12345
67890
xOK
370 +-
Impostare valore temperaturaz
X
-:-
D
E
C
A3
A1
ECO
A2
Fig.17.
Fig.18.
B - Setting the preheating
IT IS possible to set the preheating in two ways:
•Fig.17.
entering the manually the preheating
temperature and the desired top and bottom power
(see
table on page 8, cooking information)
.
The entered parameters cannot be stored, so they need to
be reset every time. To avoid this operation, you need to
create a recipe, as explained on page 20. We advise
you to create a preheating recipe for every type of pizza (e.g.
Neapolitan preheating, classic preheating, etc.)
•Fig.18. starting a recipe (program) already stored,
previously saved by the user.
Manual insertion Fig.17.
ASet the preheating
temperature
touching the
corresponding field;
Ban alphanumeric keypad will appear on which the desired
valued can be set (see table on page 8, cooking
information);
Cconfirm with “OK”.
Similarly, set the top as well as the bottom power (see table
on page 8, cooking information).
After setting these three parameters, the oven starts heating
straight away in compliance with the set parameters.
Using an already stored recipe Fig.18.
Apress the program key A1 in the display or keypad A2 or
touch A3 ;
Btouch the name of the recipe you wish to use: the oven
starts to heat straight away according to the parameters of
the recipe;
C... Eif you wish, you can change the parameters of the
selected recipe (e.g. the temperature) the usual way: the
changes will affect only the
preheating
in progress and
will not affect the original recipe (temporary effect).
To modify the original recipe permanently, see page
20
“MANUAL” means you are
working with parameters set
manually.
The name shows which recipe you are using (e.g. PRE.
NEAPOLITAN). If you change a parameter manually (e.g.
the temperature), the wording changes to “MANUAL” to
show the user’s intervention.
The name of the programs in the
figure are just an example (they
depend on the names gives by the
user to his/her recipes)
Using TS models
During preheating, the
steam holes in the back
of the cooking chamber
must be kept always closed, to
prevent the elements from
being on too long and warming
the refractory surfaces too
much, causing the first pizzas to
burn.
0161 696 0052

17
300°C
80
27/04/2018 13:00
300
0
MANUAL
300°C
80
27/04/2018 13:00
300
0
MANUAL
310°C
80
27/04/2018 13:00
370
0
-:--:-
-:-
NAPOLETANA
27/04/2018 13:00
Selezione programma
EXIT
310°C
56
27/04/2018 13:00
300
20
MANUAL
12345
67890
xOK
310 +-
Impostare valore temperaturaz
X
-:-
B
A
C
310°C
56
27/04/2018 13:00
300
20
MANUAL
12345
67890
xOK
370 +-
Impostare valore temperaturaz
X
-:-
D
E
C
A3
A1
ECO
A2
CLASSICA
NAPOLETANA
TEGLIA
PADELLINO
FOCACCIA
PRE. NAPOLETANA
PRE. CLASSICA
B
300°C
80
27/04/2018 13:00
300
0
MANUAL
300°C
80
27/04/2018 13:00
300
0
MANUAL
310°C
80
27/04/2018 13:00
370
0
-:--:-
-:-
NAPOLETANA
27/04/2018 13:00
Selezione programma
EXIT
310°C
56
27/04/2018 13:00
300
20
MANUAL
12345
67890
xOK
310 +-
Impostare valore temperaturaz
X
-:-
B
A
C
310°C
56
27/04/2018 13:00
300
20
MANUAL
12345
67890
xOK
370 +-
Impostare valore temperaturaz
X
-:-
D
E
C
A3
A1
ECO
A2
CLASSICA
NAPOLETANA
TEGLIA
PADELLINO
FOCACCIA
PRE. NAPOLETANA
PRE. CLASSICA
B
Fig.19.
Fig.20.
Ed. 0219 - 70702522 REV00 Michelangelo - Use and maintenance
C - Setting the cooking
When preheating is complete, cooking can start:
•Fig.19. entering manually the cooking temperature
and the desired top and bottom power. The entered
parameters cannot be stored, so they need to be reset
every time. To avoid this operation, you need to create a
recipe, as explained on page 20
•Fig.20. starting a recipe (program) already stored,
previously saved by the user.
Manual insertion Fig.19.
ASet the preheating temperature touching the
corresponding field;
Ban alphanumeric keypad will appear on which the desired
valued can be set (see table on page 8, cooking
information);
Cconfirm with “OK”.
Similarly, set the top and bottom power.
After setting these three parameters, the oven starts heating
straight away in compliance with the set parameters.
Using an already stored recipe Fig.20.
Apress the program key A1 in the display or keypad A2 or
touch A3 ;
Btouch the name of the recipe you wish to use: the oven
starts to heat straight away according to the parameters of
the recipe;
C... Eif you wish, you can change the parameters of the
selected recipe (e.g. the temperature) the usual way: the
changes will affect only the cooking in progress and will
not affect the original recipe (temporary effect).
To modify the original recipe permanently, see page
20
“MANUAL” means you are
working with parameters set
manually.
The name shows which recipe you are using (e.g.
NEAPOLITAN). If you change a parameter manually (e.g.
the temperature), the wording changes to “MANUAL” to
show the user’s intervention.
The name of the programs in the
figure are just an example (they
depend on the names gives by the
user to his/her recipes)
0161 696 0052

18
300
°C
56
27/04/2018 13:00
300
20
MANUAL
1234 5
6789 0
x
OK
03:10 +-
Imposta valore tempo
X
300°C
56
27/04/2018 13:00
310
20
MANUAL
-:-
D
300°C
56
27/04/2018 13:00
310
20
MANUAL
-:-
E
F
03:10
Fig.21.
Fig.23.
ECO
ECO
Fig.22.
ECO
Ven 27/04/2018 13:00
CUPPONE
300
°C
56
27/04/2018 13:00
310
20
MANUAL
03:10
ECO
Ven 27/04/2018 13:00
310
°C
70
27/04/2018 13:00
310
20
NAPOLETANA
-:-
Fig.24.
D - Activating an end-of-cooking signal (buzzer)
Fig.21.
If you wish, you can enable a buzzer that will go offwhen the
set time expires, warning that cooking is complete.
DTo activate it, press the key on the display or the key 5
on the keypad;
Ean alphanumeric keypad will appear on which the desired
value can be entered (in minutes: seconds);
Fconfirm with “OK”.
The display shows after how much time the buzzer will go
o(e.g. 3:10 that is three minutes and ten seconds).
After setting it, the countdown starts, at the end of which a
buzzer will sound to highlight the end of cooking.
To stop the buzzer, press the buzzer button 5.
Warning! the oven continues heating when the
buzzer goes off!
E - Filling the oven
Fig.22.
Fill the oven using personal protection equipment (e.g. gloves)
and tools suitable for contact with food and made in a material
resistant to high temperatures (e.g. steel).
For optimal results, always adhere to the oven capacity
declared by the Manufacturer and position the products
to be cooked evenly in the cooking chamber.
F - Switching the light on (optional)
Fig.23.
When necessary, it is possible to switch on the oven light to
check the cooking, acting on the light button 8.
Press the same button to switch it off.
When the set time expires(e.g.
3 minutes and 10 seconds), a
buzzer will sound to show
cooking has completed but
the oven keeps heating until
the ON/OFF key is pressed 11
Using TS models
service@linda-lewis.co.uk
0161 696 0052

19
ECO
Ven 27/04/2018 13:00
ECO
Ven 27/04/2018 13:00
310°C
70
27/04/2018 13:00
310
20
NAPOLETANA
-:-
CUPPONE
Fig.25.
25
°C
56
27/04/2018 13:00
300
20
1:00
MAX
1234 5
6789 0
x
OK
01:00 +-
Imposta durata MAX X
25
°C
56
27/04/2018 13:00
300
20
1:00
MAX
1234 5
6789 0
x
OK
04:00+-
Imposta durata MAX X
25 °C
100
27/04/2018 13:00
330
100
4:00
MAX
MAX
100
0
C
ECO
CUPPONE
Ven 27/04/2018 13:00
-:-
25
°C
80
27/04/2018 13:00
370
0
NAPOLETANA
A
B1
B2
B3
Ed. 0219 - 70702522 REV00 Michelangelo - Use and maintenance
G - Adjusting the steam holes
Fig.24.
In the back of the cooking chamber there are some steam
holes: they can be more or less open to keep the degree of
humidity more suited to the type of product to bake in the
cooking chamber.
To open the vents, keep the
9
button pressed:
they start
opening progressively. To block them in the desired position,
just release the button.
H - Switching the oven o
Fig.25.
To stop cooking, press the ON/OFF button 11 : the oven goes
into stand-by mode.
A special program
MAX program: the MAX program heats the refractory
surface quickly when the user realizes it is too low and raises
the temperature in the chamber according to the set time.
ATo start the program, touch its symbol.
BA screen appears that allows you to:
•B1 start the program by pressing “OK”: in this case the
program will last 1 minute (default duration) or
•B2 set the duration of the program by entering the
desired time (e.g. Four minutes) and then start it by pressing
“OK” B3 .
CA summary screen appears: by touching the “top” or “bottom”
field it is possible to set the power to 100% or 0% (it is not possible
to set powers other than these two values).
Default values of the MAX program
•duration 1 minute
•offset temperature 30°C higher than the temperature in
the chamber
•top and bottom power at 100%
The program ends when the MAX key is pressed or at the end
of the set time: the buzzer sounds and you return to the active
program before the MAX program starts.
set time
top/bottom
power: 100%
or 0%
0161 696 0052

20
300°C
80
27/04/2018 13:00
300
0
NAPOLETANA
310°C
80
27/04/2018 13:00
370
0
-:--:-
NAPOLETANA
27/04/2018 13:00
Selezione programma
EXIT
A3
A1
310°C
56
27/04/2018 13:00
300
20
MANUAL
12345
67890
x
OK
320 +-
Impostare valore temperaturaz
X
-:-
D
E
C
ECO
A2
CLASSICA
NAPOLETANA
TEGLIA
PADELLINO
FOCACCIA
PRE. NAPOLETANA
PRE. CLASSICA
B
Fig.26.
Creating a recipe
Saving a recipe means you can reuse it without having to reset
its cooking parameters.
Moreover, by giving it a name (e.g. NEAPOLITAN), it can be
easily found and quickly started.
For every recipe it is necessary to set:
•preheating temperature
•top and bottom power
• its name (optional - useful to find it more easily)
• after how long an end-of-cooking buzzer must go off
(optional).
To know how to create a recipe, see page 21
Fig.26.
Once these parameters are stored, to use the recipe, you just
have:
• press the program button A1 on the display or keypad A2 or
touch the name A3 ;
• the list of the available recipes is displayed: touch the name
of the recipe you wish to use B, the oven starts to heat with
the relative parameters.
If, during cooking, you wish to change the parameters of the
selected recipe (e.g. increase the temperature), act the usual
way (points C, Dand E): the changes will affect only the
cooking in progress and will not affect the original recipe
(temporary effect).
To modify the original recipe permanently, see page
21 Why saving a program?
To have available a real customized recipe book, easy
to access and use. Using an already stored recipe means being
able to start cooking with just a few actions, without having
to reset the cooking parameters every time: this guarantees
maximum functionality and consistent results.
The name of the programs in the
figure are just an example (they
depend on the names gives by the
user to his/her recipes)
The name shows which recipe you are using (e.g.
NEAPOLITAN). If you change a parameter manually (e.g.
the temperature), the wording changes to “MANUAL” to
show the user’s intervention.
Using TS models
service@linda-lewis.co.uk
0161 696 0052
Other manuals for Michelangelo
5
Table of contents
Other Cuppone Kitchen Appliance manuals

Cuppone
Cuppone Leonardo User manual

Cuppone
Cuppone Donatello DN 435 User manual

Cuppone
Cuppone Michelangelo ML435 User manual

Cuppone
Cuppone Pizzaform PZF/30DS Operating manual

Cuppone
Cuppone Michelangelo User manual

Cuppone
Cuppone Tiziano TZ420 User manual

Cuppone
Cuppone Tiziano TZ420 Operating manual

Cuppone
Cuppone Gas G4 - 33 Operating manual

Cuppone
Cuppone Leonardo VPR User manual

Cuppone
Cuppone Michelangelo User manual