DAD TOURING 12AG2 User manual

MANUALE UTENTE
USER MANUAL
TOURING POWER
ACTIVE - PASSIVE LOUDSPEAKERS
IT - EN

REV.01-06/19
Music & Lights S.r.l. si riserva ogni diritto di elaborazione in qualsiasi forma delle presenti istruzioni per l’uso.
La riproduzione - anche parziale - per propri scopi commerciali è vietata.
Al fine di migliorare la qualità dei prodotti, la Music&Lights S.r.l. si riserva la facoltà di modificare, in
qualunque momento e senza preavviso, le specifiche menzionate nel presente manuale di istruzioni.
Tutte le revisioni e gli aggiornamenti sono disponibili nella sezione 'Manuali' sul sito www.musiclights.it
All rights reserved by Music & Lights S.r.l. No part of this instruction manual may be
reproduced in any form or by any means for any commercial use.
In order to improve the quality of products, Music&Lights S.r.l. reserves the right to modify the
characteristics stated in this instruction manual at any time and without prior notice.
All revisions and updates are available in the ‘manuals’ section on site www.musiclights.it

3
TOURING POWER ENIT
CONTENTSINDICE
• TOURING 208A/P - 10A/P - 12AG2 -12P - 15AG2 - 15P - 215A/P
• TOURING12M A/P - 15M A/P
• TOURING15S A/P - 18S A/P - 218S A/P
Loudspeakers:
Stage-monitor:
Subwoofers:
4
5
6
9
9
10
11
13
17
22
23
23
24
24
25
29
31
32
Safety
General instructions
Warnings and installation precautions
1 Introduction
1. 1 Introduction
2 Installation
2. 1 Wall mounting
2. 2 Wall mounting
2. 3 Stand mounting
3 Connections and controls
3. 1 Loudspeaker panel - active version
3. 2 Stage-monitor panel - active version
3. 3 Subwoofer panel - active version
3. 4 Loudspeaker panel - passive version
4 Connection cables
4. 1 Input connection
4. 2 Output connection
5 Connectors
5. 1 Audio signal connectors
5. 2 Power supply connectors
Technical specification
Filters frequency response
Troubleshooting
Brief notes on acoustics
Sicurezza
Avvertenze generali
Attenzioni e precauzioni per l’installazione
1 Introduzione
1. 1 Introduzione
2 Installazione
2. 1 Installazione a muro
2. 2 Installazione su stativo
2. 3 Installazione sospesa
3 Connessioni e controlli
3. 1 Pannello diffusori - versione attiva
3. 2 Pannello monitor - versione attiva
3. 3 Pannello subwoofer - versione attiva
3. 4 Pannello diffusori - versione passiva
4 Cavi di collegamento
4. 1 Collegamenti di ingresso
4. 2 Collegamenti di uscita
5 Connettori
5. 1 Connettori di segnale audio
5. 2 Connettori di alimentazione
Specifiche tecniche
Risposta in frequenza dei filtri
Risoluzione dei problemi
Brevi cenni di acustica
4
5
6
9
9
10
11
13
17
22
23
23
24
24
25
29
31
32

4TOURING POWER ENIT
SAFETY
General instruction
• The products referred to in this manual con-
form to the European Community Directives
and are therefore marked with .
• The unit is supplied with hazardous network
voltage (230V~). Leave servicing to skilled
personnel only. Never make any modifica-
tions on the unit not described in this in-
struction manual, otherwise you will risk an
electric shock.
• Connection must be made to a power supply
system fitted with efficient earthing (Class I
appliance according to standard EN 60598-
1). It is, moreover, recommended to protect
the supply lines of the units from indirect
contact and/or shorting to earth by using ap-
propriately sized residual current devices.
• The connection to the main network of elec-
tric distribution must be carried out by a
qualified electrical installer. Check that the
main frequency and voltage correspond to
those for which the unit is designed as given
on the electrical data label.
• This unit is not for home use, only profes-
sional applications.
• Make certain that no inflammable liquids,
water or metal objects enter the fixture.
• Do not dismantle or modify the fixture.
• All work must always be carried out by quali-
fied technical personnel. Contact the nearest
sales point for an inspection or contact the
manufacturer directly.
• If the unit is to be put out of operation defini-
tively, take it to a local recycling plant for a
disposal which is not harmful to the environ-
ment.
Before carrying out any operations with the unit,
carefully read this instruction manual, and keep it
with cure for future reference.
It contains important information about the
installation, usage and maintenance of the unit.
SICUREZZA
Avvertenze generali
• I prodotti a cui questo manuale si riferisce sono
conformi alle Direttive della Comunità Euro-
pea e pertanto recano la sigla .
• Il dispositivo funziona con pericolosa tensione
di rete 230V~. Non intervenire mai al suo in-
terno al di fuori delle operazioni descritte nel
presente manuale; esiste il pericolo di una sca-
rica elettrica.
• È obbligatorio effettuare il collegamento ad
un impianto di alimentazione dotato di un’ef-
ficiente messa a terra (apparecchio di Classe I
secondo norma EN 60598-1). Si raccomanda,
inoltre, di proteggere le linee di alimentazione
delle unità dai contatti indiretti e/o cortocircui-
ti verso massa tramite l’uso di interruttori diffe-
renziali opportunamente dimensionati.
• Le operazioni di collegamento alla rete di
distribuzione dell’energia elettrica devono
essere effettuate da un installatore elettrico
qualificato. Verificare che frequenza e tensione
della rete corrispondono alla frequenza ed alla
tensione per cui l’unità è predisposta, indicate
sulla targhetta dei dati elettrici.
• L’unità non per uso domestico, solo per uso
professionale.
• Evitare che nell’unità penetrino liquidi infiam-
mabili, acqua o oggetti metallici.
• Non smontare e non apportare modifiche
all’unità.
• Tutti gli interventi devono essere sempre e
solo effettuati da personale tecnico qualifica-
to. Rivolgersi al più vicino centro di assistenza
tecnica autorizzato.
• Se si desidera eliminare il dispositivo definiti-
vamente, consegnarlo per lo smaltimento ad
un’istituzione locale per il riciclaggio.
WARNING!
Prima di effettuare qualsiasi operazione con
l’unità, leggere con attenzione questo manuale
e conservarlo accuratamente per riferimenti
futuri. Contiene informazioni importanti riguardo
l’installazione, l’uso e la manutenzione dell’unità.
ATTENZIONE!

5
TOURING POWER ENIT
Attenzioni e precauzioni per l’installazione
• Questo prodotto da solo oppure in combina-
zione con amplificatore può essere capace di
produrre livelli sonori che possono causare
perdite d’udito permanenti. Si raccomanda di
evitare l’esposizione ad alti livelli sonori o livelli
non confortevoli per periodi di tempo lunghi.
• Vi sono numerosi fattori meccanici ed elettri-
cida considerare quando si installa un sistema
audio professionale (oltre a quelli prettamente
acustici, come la pressione sonora, gli angoli di
copertura, la risposta in frequenza, ecc.).
• Se il dispositivo dovesse trovarsi ad operare
in condizioni differenti da quelle descritte nel
presente manuale, potrebbero verificarsi dei
danni; in tal caso la garanzia verrebbe a deca-
dere. Inoltre, ogni altra operazione potrebbe
provocare cortocircuiti, incendi, scosse elettri-
che, rotture ect.
• Per le versioni con amplificatore incorporato:
- Collegare il prodotto ad una linea di alimen-
tazione adeguata facendo uso del cavo rete
in dotazione, controllando sempre che sia
in buono stato.
- Fare attenzione che il punto di alimentazio-
ne sia dotato di una efficiente presa di terra.
- Disconnettere il cavo rete se non viene usa-
to per un lungo periodo di tempo.
• Evitare di installare l’unità in prossimità di fonti
di calore.
• Posizionare l’unità al riparo dagli agenti atmo-
sferici e a distanza di sicurezza dall’acqua.
• Non appoggiare l’unità su parti infiammabili.
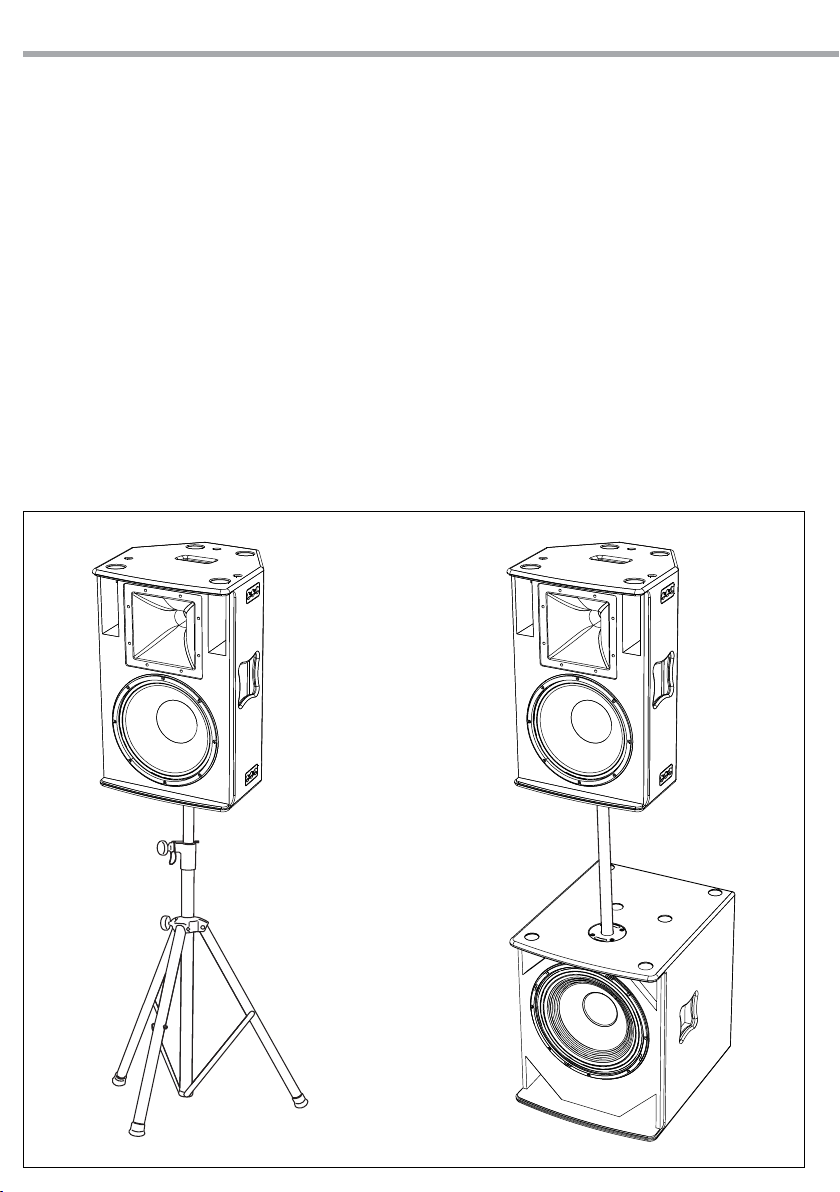
• L’installazione del prodotto è prevista a pavi-
mento o mediante appropriati ganci per so-
spensione o su specifici supporti adeguati al
peso da sopportare. Si raccomanda di rispetta-
re sempre le vigenti norme di sicurezza.
• Nel caso di installazione sospesa, questa deve
avvenire sotto la responsabilità dell’installato-
re, nel rispetto di tutte le precauzioni e le nor-
me di sicurezza applicabili nel caso specifico.
Non è possibile fornire regole e consigli det-
tagliati e validi per i tutti i casi, ma ricordiamo
che, per la sicurezza dell’installazione, occorre
seguire alcune precauzioni importanti:
- Per la sospensione, utilizzare accessori (con-
formi alle norme di sicurezza applicabili nel
paese di impiego) il cui produttore ne di-
chiari e ne garantisca la portata.
- Non usare un solo accessorio per la sospen-
sione (ad esempio, una sola catena), ma al-
meno due, di portata adeguata. In caso di
Warnings and installation precautions
• This product in combination with ampli-
fier, may be capable of producing dangerous
sound levels that could cause permanent
hearing loss. Do not operate for a long period
of time at high volume level or at a level that is
uncomfortable.
• There are numerous mechanical and electrical
factors to be considered when installing a profes-
sional audio system (in addition to those which
are strictly acoustic, such as sound pressure, an-
gles of coverage, frequency response, etc.).
• If this device will be operated in any way differ-
ent to the one described in this manual, it may
suffer damages and the guarantee becomes
void. Furthermore, any other operation may
lead to dangers like short circuit, burns, elec-
tric shock, ect.
• The version with the built-in amplifier needs
extra precautions:
- Connect the apparatus to a power supply
using only power cord included making al-
ways sure it is in good conditions.
- Make sure that power supply has a proper
ground connection.
- Power supply cord should be unplugged
from the outlet when left unused for a long
period of time.
• Do not install the fixture near sources of heat.
• Protect the fixture from atmospheric agents
and keep it away from water.
• Do not place the unit on inflammable parts or
material.
• The product is designed for suspended or floor
installation or installation on special stands
able to support its weight. It is recommended
to follow all applicable safety regulations.
• All hanging installation jobs are carried out
under the sole responsibility of the person
doing the actual work and must be done in full
compliance with all the applicable safety rules
and regulations. We do not attempt to provide
detailed guidelines for all the potential ways
in which these extremely flexible systems can
be installed, but do want to remind you that
to ensure a safe installation, it is necessary to
adhere to the following:
- When hanging the speakers, use only means
of suspension (in accordance with the safety
regulation valid in the country of use) having
a carrying capacity rated and guaranteed by
the manufacturer.
- Never depend on only one means of

6TOURING POWER ENIT
rottura di uno di essi, l’altro sarà in grado
di sostenere il sistema.
- Verificare sempre che la struttura cui i
diffusori sono sospesi sia in grado di sop-
portarne il peso, anche in condizioni av-
verse. Considerare l’effetto di altri carichi
(ad esempio, il vento nelle installazioni
all’aperto).
• Evitare di orientare i microfoni nella stessa
direzione degli altoparlanti; potrebbero ge-
nerare fastidiosi inneschi (effetto Larsen).
• Evitare di toccare il cono degli altoparlanti
con qualsiasi oggetto o con le mani per non
arrecare danneggiamenti irreparabili.
• Prima di iniziare qualsiasi operazione di ma-
nutenzione o pulizia disconnettere l’unità
dalla rete di alimentazione.
• Per la pulizia del prodotto non usare solventi
tipo acetone o alcool per non danneggiare
la finitura esterna e le serigrafie dei pannelli.
suspension for hanging speakers (for example
one chain); always use at least two of them
and make sure they are sufficiently strong. So,
if one fails the other will sustain the load.
- Always make sure that the truss structure
intended to support the speakers is sturdy
enough to hold their weight, even under
stressful, adverse conditions.
• Avoid pointing microphones in the direction
of the speakers, as this could result in annoy-
ing feedbacks.
• Avoid touching the cones of the loudspeak-
ers with any object or with your hands, as this
could cause irreparable damage.
• Before starting any maintenance work or clean-
ing the unit, cut off power from the main supply.
• When cleaning loudspeakers, please do not
use solvents such as acetone or alcohol, since
they may damage the of the unit outer finish
and the printings on the panels.

7
TOURING POWER ENIT
- 1 - INTRODUZIONE
La serie Touring Power DAD si compone di una
gamma completa di sistemi, disponibili in ver-
sione amplificata e passiva, progettati per offrire
livelli di fedeltà, definizione e pressione sonora
in grado di eccellere nelle molteplici esigenze di
sonorizzazione professionale.
Questa finalità ha indirizzato la progettazione
della serie Touring Power verso l’impiego di tec-
nologie di amplificazione Powersoft in classe D,
controllo DSP e componenti B&C Speakers.
I vantaggi di queste scelte progettuali e l’elevato
rapporto tra SPL, peso e dimensioni consentono
rapidità di installazione e riduzione dei volumi
di carico. La serie Touring Power comprende un
ampio numero di diffusori, consentendo nume-
rose possibilità di configurazioni. La versatilità
dei diffusori Touring Power è favorita da valori
di peso estremamente ridotti, dalla presenza di
meccaniche per sospensione di utilizzo imme-
diato, da accorgimenti costruttivi quali la doppia
angolazione dei cabinet e la possibilità di rota-
zione delle trombe.
- 1 - INTRODUCTION
The new DAD Touring Power series is composed
by a range of complete systems, available both
in amplified and passive mode, duly designed
to offer fidelity level, hight definition and sound
pressure able to excel in the many needs of pro-
fessional sound reinforcement.
This aim has influenced the design of the Tour-
ing Power series towards the use of amplification
technologies Powersoft in class D, DSP control
and B&C Speakers components.
The advantages of these design choices and the
high relation between SPL, weight and dimen-
sions allow quick installation and reduction of
load volumes. The Touring Power Series includes
a large number of speakers, offering many pos-
sible configurations.
The versatility of the Touring Power speakers is
favoured by the extremely reduced weight, by
the presence of mechanical suspension for im-
mediate use and by precise design features such
as the cabinet double angles and the possibility
of horns rotation.

8TOURING POWER ENIT
- 2 - INSTALLAZIONE
Per aumentare la zona di copertura e l’SPL mas-
simo, è possibile affiancare più diffusori in modo
da formare un array. Nel disegno qui sotto sono
riportate alcune regole sul posizionamento dei
diffusori per minimizzare l’interazione tra le trom-
be di casse adiacenti ed ottenere una risposta in
frequenza omogenea su tutto l’angolo di coper-
tura dell’array. Nell’installazione dei subwoofer, si
raggiunge il massimo della performance instal-
landolo a ridosso del terreno; posizionamenti su
palco o sospesi sono possibili ma non consiglia-
bili perché diminuiscono il rendimento del diffu-
sore. È importante ricordare che l’allineamento
sullo stesso piano verticale (rispetto al punto di
ascolto) è fondamentale in quanto evita rotazio-
ni di fase indesiderate delle onde acustiche nella
zona di sovrapposizione; queste, possono causa-
re una risposta in frequenza non uniforme.
- 2 - INSTALLATION
To increase coverage and maximum SPL value it
is advisable to place more cabinets side by side
creating an array.
The drawing explains how to place the cabinets
in order to avoid the interaction between the
horns and to obtain a linear frequency response
on the whole angle of the array.
Subwoofers placed on the floor give the maxi-
mum performance. Hanging or placing them on
the stage reduces their performance.
It is very important to keep the vertical align-
ment to avoid phase rotations of acoustic waves
in the area where they overlap, generating a non-
uniform frequency response.
TOURING10/12 TOURING15/215
H
80°
V
50°
H
90°
V
60°
TOURING208 TOURING12M/15M
H
60°
V
40°
H
100°
V
100°
Fig.1

9
TOURING POWER ENIT
Fig.2
TOURING15/215
TOURING10/12
LOUDSPEAKERS LOUDSPEAKERS POSITION HORN POSITION (H) TOTAL COVERAGE (HxV)
TOURING 10 - 12
30° 80° 110° x 50°
40° 80° 130° x 50°
30° 50° 80° x 80°
40° 50° 90° x 80°
30˚
40˚
30˚
40˚
LOUDSPEAKERS LOUDSPEAKERS POSITION HORN POSITION (H) TOTAL COVERAGE (HxV)
TOURING15/215
30° 90° 120° x 60°
40° 90° 130° x 60°
30° 60° 90° x 90°
40° 60° 100° x 90°

10 TOURING POWER ENIT
2.1 INSTALLAZIONE A MURO
• Selezionare con cura l’area dove installare i
diffusori.
• Assicurarsi che la struttura sia adeguata a sop-
portare il peso del diffusore.
• Fissare la base della staffa al muro utilizzando
viti appropriate su tutti i fori di fissaggio delle
staffe.
• Sollevare il diffusore e fissarlo all’innesto della
staffa.
2.2 INSTALLAZIONE SU STATIVO
• Accertarsi che lo stativo supporti il peso del
diffusore.
• Non superare l’altezza consigliata.
• Posizionare lo stativo su una superficie piana
e non sdrucciolevole.
• Per rendere stabile lo stativo, allargare al mas-
simo i piedini.
2.1 WALL MOUNTING
• Take care when choosing the place for the
loudspeaker installation.
• Make sure that the structure is adequate to
with stand the weight of the loudspeaker.
• Fix the base of the bracket to the wall using
suitable screws in all of fixing holes.
• Lift up the loudspeaker and fix it on the brack-
et.
2.2 STAND MOUNTING
• Make sure that the stand can support the
weight of the box.
• Do not exceed the recommended height.
• Place the stand on a flat, non-skid surface.
• To make the stand more stable, extend its legs
as wide as you can.
Fig.3

11
TOURING POWER ENIT
2.3 INSTALLAZIONE SOSPESA
• È possibile sospendere le TOURING tramite
appositi ganci per mezzo del sistema di ag-
gancio rapido“fly track” (fig.4)
Attenzione! La sospensione dei diffusori deve
essere affidata esclusivamente a personale qua-
lificato.
2.3 SUSPENDED INSTALLATION
• It is possible to suspend the TOURING series
cabinets through appropriate hook by means
of the quick hook system“fly track” (fig.4)
Caution! The suspension of the speakers must
be entrusted exclusively to qualified personnel.
Importante
I diffusori della serie TOURING
sono predisposti solo per la
sospensione delle singole uni-
tà, quindi si consiglia di non
sospendere più unità in un
singolo cluster verticale.
Important
The TOURING series is pre-
pared only for the suspension
of individual units, therefore
it is advisable not to suspend
the units in a single vertical
cluster.
I diffusori della serie TOURING
devono essere sospesi solo
per mezzo di accessori origi-
nali ed approvati. In ogni caso
utilizzare sempre almeno 2 ap-
positi inserti “fly track”.
The TOURING speakers must
be suspended only with ap-
proved rigging hardware. In
any case always use at least 2
“fly-track” inserts.
I diffusori TOURING possono
essere appesi nei seguenti
modi:
• Installazione orizzontale
singola a 4 punti (fig.5).
• Installazione verticale sin-
gola a 4 punti (fig.6).
The TOURING are equipped
with fly tracks inserts. The in-
serts can be used in the fol-
lowing ways:
• Single 4 points horizontal
installation (fig.5).
• Single 4 points vertical in-
stallation (fig.6).
Fig.4
Fig.5
Fig.6

12 TOURING POWER ENIT
- 3 - CONNESSIONI E CONTROLLI
3.1 PANNELLO DI CONNESSIONE DIFFUSORI
VERSIONE ATTIVA
TOURING208A - 10A - 12A - 15A TOURING208A - 10A - 12A - 15A
- 3 - CONNECTIONS AND CONTROLS
3.1 LOUDSPEAKER PANEL CONNECTION
ACTIVE VERSION
LIMIT/PROT FULL RANGE
HIGH PASS F.
COUPLED EQ
MONIT EQ
TEMP
SIGNAL
READY
LINE OUT LINE IN
PRESET
SELECT
+4dBu
-
8
MADE I N ITA LY
dad-audio.it
Powered by
MAINS IN MAINS OUT
LIMIT/PROT FULL RANGE
HIGH PASS F.
COUPLED EQ
MONIT EQ
TEMP
SIGNAL
READY
LINE OUT LINE IN
PRESET
SELECT
+4dBu
-
8
MADE I N ITA LY
dad-audio.it
Powered by
MAINS IN MAINS OUT
TOURING 208A
MAINS IN MAINS OUT
Fig.7

13
TOURING POWER ENIT
COUPLED EQ
FULL RANGE
MONIT EQ
HIGH PASS F.
SIGNAL
LIMIT/PROTECT
READY
LINE OUT LINE IN
PRESET
SELECT
TEMP
+4dBu
-
8
TOURING 215A
MADE I N I TA LY
dad-audio.it Powered by
MAINS OUT
MAINS IN
80Hz MULTI UNIT EQ
120Hz STANDARD
70Hz INFRA BASS
120Hz EXTEND.LOW
SIGNAL
LIMIT/PROTECT
READY
LINE OUT LINE IN
PRESET
SELECT
TEMP
+4dBu
-
8
TOURING 18SA
MADE I N I TA LY
dad-audio.it Powered by
MAINS OUT
MAINS IN
MAINS IN MAINS OUT
PANNELLO DI CONNESSIONE DIFFUSORI
VERSIONE ATTIVA
TOURING215A
LOUDSPEAKER PANEL CONNECTION
ACTIVE VERSION
TOURING215A
Fig.8

14 TOURING POWER ENIT
Fig.9
3.2 PANNELLO DI CONNESSIONE DIFFUSORI
MONITOR VERSIONE ATTIVA
TOURING 12MA - 15MA
LIMIT/PROT FLAT EQ
CUT 80 Hz
CUT 60 Hz
PUNCH EQ
TEMP
SIGNAL
READY
LINE OUT LINE IN
PRESET
SELECT
+4dBu
-
8
MADE I N I TA LY
dad-audio.it
Powered by
MAINS IN MAINS OUT
LIMIT/PROT FULL RANGE
HIGH PASS F.
COUPLED EQ
MONIT EQ
TEMP
SIGNAL
READY
LINE OUT LINE IN
PRESET
SELECT
+4dBu
-
8
MADE I N I TA LY
dad-audio.it
Powered by
MAINS IN MAINS OUT
TOURING 12MA
MAINS IN MAINS OUT
3. 2 STAGE-MONITOR PANEL CONNECTION
ACTIVE VERSION
TOURING 12MA - 15MA

15
TOURING POWER ENIT
CONNESSIONI
LINE IN - Connettore XLR femmina che accetta
XLR maschi da tutti gli apparecchi con un livello
di uscita bilanciato. Le terminazioni dell’ingresso
XLR sono:
Pin1 = schermo o massa
Pin2 = +positivo o“caldo”
Pin3 = -negativo o “freddo”
NOTA - Qualora possibile, usare sempre cavi bi-
lanciati. Cavi sbilanciati possono essere ugual-
mente usati ma potrebbero dare problemi di
rumore se molto lunghi.
LINE OUT - Connettore XLR maschio connesso
in parallelo con il connettore XLR femmina di
ingresso, rendendo possibile il collegamento in
cascata di una seconda unità. In questo modo è
possibile inviare lo stesso segnale a più casse, per
formare un più complesso e potente sistema di
rinforzo del suono.
MAINS IN - Connettore di alimentazione Po-
werCon® NAC3FCA (di colore blu). L’accensione
dell’amplificatore avviene inserendo il connetto-
re PowerCon® e ruotandolo in senso orario fino
a portarlo in posizione POWER ON. Tirando il
pulsante (push) e ruotandolo in senso antiorario
fino alla posizione POWER OFF avviene lo spe-
gnimento dell’amplificatore.
NOTA - In caso di guasto o di sostituzione dei
fusibili scollegare definitivamente il connettore
di alimentazione. Il cavo di alimentazione deve
sempre essere collegato ad una presa che soddi-
sfi le specifiche di alimentazione indicate sull’ap-
parecchio. La linea di alimentazione del diffusore
deve essere protetta tramite interruttore magne-
totermico di caratteristiche appropriate al carico.
MAINS OUT - Connettore di alimentazione in
uscita PowerCon® NAC3FCB (di colore grigio).
Collegamento in parallelo al connettore MAIN
IN; massimo carico collegabile 10A/230V~. Ruo-
tando il connettore in senso orario si attiva l’ali-
mentazione in uscita. Tirando il pulsante (push) e
ruotando in senso antiorario si disattiva l’alimen-
tazione in uscita.
NOTA - In caso di alimentazione di altri amplifi-
catori con guasto o in caso di sostituzione dei
fusibili, scollegare definitivamente il connettore
di alimentazione in ingresso (MAINS IN) ed il con-
nettore di alimentazione di uscita (POWER OUT).
CONNECTIONS
LINE IN - female XLR connector, which accepts
a XLR plug from almost any type of equipment
with a balanced line level outputs. The XLR input
is wired as follows:
Pin1 = shield or ground
Pin2 = + positive or“hot”
Pin3 = - negative or “cold”
NOTE - Whenever possible, use always balanced
cables. Unbalanced lines may also be used but
nay result in noise over long cable runs.
LINE OUT - This XLR male connector is connect-
ed in parallel with the input female connector.
This enables a second units to be daisy-chained
to the first. It’s thus possible to power several
speakers using the same signal, forming more
powerful sound reinforcement systems.
MAINS IN - PowerCon® NAC3FCA power input
connector (blue). To switch the amplifier on,
insert the PowerCon® connector and turn it in
a clockwise direction into the ON position. To
switch the amplifier off, pull back the switch on
the connector and turn the connector in an anti-
clockwise direction into the POWER OFF posi-
tion.
NOTE - In the case of product failure or fuse re-
placement, disconnect the unit completely from
the mains power. The power cable must only be
connected to a socket adequate to the specifica-
tions indicated on the amplifier unit. The power
supply must be protected by a suitably rated
thermo-magnetic breaker.
MAINS OUT - PowerCon® NAC3FCB power out-
put connector (grey).This is connected in parallel
with the MAINS IN; the maximum load applicable
is 10A/230V~. Turning the connector in a clock-
wise direction will activate the power output.
Pulling back in the switch located on the connec-
tor and turning the connector in an anti-clock-
wise direction will disconnect the power output.
NOTE - If the unit connected to the power output
fails or in the case of fuse replacement, discon-
nect the unit completely both the MAINS IN con-
nector and the POWER OUT connector to ensure
that the unit is completely disconnected from
the power supply.

16 TOURING POWER ENIT
CONTROLLI
TOURING208A - 10A - 12AG2 - 15AG2 - 215A
FULL RANGE - Controllo che permette un ascol-
to timbricamente bilanciato a brevi o medie di-
stanze.
HIGH PASS FILTER - Controllo che permette di
eliminare le basse frequenze nel caso i sistemi
siano utilizzati come satelliti per la riproduzione
della gamma medio alta.
COUPLED EQ - Controllo che riduce l’aumento
del livello delle frequenze medio-basse dovuto
all’utilizzo di due o più sistemi affiancati.
MONIT EQ - Controllo che permette un ascolto
timbricamente bilanciato a brevi distanze, tipi-
che per l’utilizzo quale monitor da palco.
TOURING12MA - 15MA
FLAT EQ - Controllo che permette di ottenere
una risposta in frequenza lineare.
CUT 80 Hz - Controllo che permette di eliminare
le basse frequenze al di sotto degli 80 Hz.
CUT 60 Hz - Controllo che permette di eliminare
le basse frequenze al di sotto i 60 Hz.
PUNCH EQ - Controllo che permette di esaltare
le frequenze medio-basse ( inferiori a 200 Hz).
INDICATORI LED
LIMIT/PROT
Funzione Protect
LED rosso illuminato fisso quando l’amplificatore
entra in modalità protetta per uno dei seguenti
motivi:
• Il dissipatore ha superato la temperatura limi-
te di lavoro.
• È presente un corto circuito sull’uscita
• Lo stadio di uscita è guasto.
Funzione Limit
LED rosso lampeggiante quando l’uscita dell’am-
plificatore è limitata.
Quando questo LED resta acceso in maniera con-
tinua ridurre il segnale di ingresso.
TEMP - LED giallo illuminato quando la tempera-
tura del dissipatore raggiunge gli 80°. Il diffusore
CONTROLS
TOURING208A - 10A - 12AG2 - 15AG2 - 215A
FULL RANGE - Control that allows listening ton-
ally balanced to limited or medium distances.
HIGH PASS FILTER - This control deletes the bass
frequencies whenever the systems are employed
as satellites for the reproduction of the high aver-
age range.
COUPLED EQ - This control reduces the incre-
ment of mid-low frequencies due to the simul-
taneous use of two or more system side by side.
MONIT EQ - Control that allows listening tonally
balanced to limited distances, typical for use as
stage monitor.
TOURING12MA - 15MA
FLAT EQ - Control that allows you to get a linear
frequency response.
CUT 80 Hz - This control deletes the frequencies
below 80 Hz.
CUT 60 Hz - This control deletes the frequencies
below 60 Hz.
PUNCH EQ - Control that allows you to boost
low-mid frequencies (below 200 Hz).
LED INDICATORS
LIMIT/PROT
Protect Function
Red LED illuminates when the amplifier module
is in protect mode for one of the following rea-
sons:
• The heatsink reaches a temperature above
the normal working limit.
• There is a short circuit at the amplifier output.
• The amplifier output stages are faulty.
Limit Function
Red LED blinking when the output of the ampli-
fier is limited.
When this LED stays lit continuously reduce the
input signal level.
TEMP - Yellow LED illuminated when the heat-
sink temperature reaches 80°.

17
TOURING POWER ENIT
continua comunque a funzionare. Se la tempe-
ratura continua a incrementarsi raggiungendo i
90°, il sistema di protezione diminuisce il segnale
in uscita e successivamente scollega il diffusore.
L’amplificatore entra nella modalità “mute” (LED
rosso illuminato).
Il diffusore si riattiverà automaticamente quando
la temperatura scenderà sotto la soglia dei 90°.
SIGNAL - LED verde illuminato quando è presen-
te un segnale audio sull’ingresso dell’amplifica-
tore.
READY - LED verde illuminato quando il diffuso-
re è pronto per il funzionamento.
PRESET SELECT - Pulsante per selezionare le di-
verse modalità (FULL RANGE, HIGH PASS F, COU-
PLED EQ, MONIT EQ)
POTENZIOMETRO DI VOLUME - Regola il livello
del segnale di uscita del diffusore.
The speaker nevertheless continues to operate.
If the temperature continues to grow while
reaching 90°, the protection system decreases
the output signal and then the disconnects the
speaker.
The amplifier comes in a “mute” (RED LED illumi-
nated).
The speaker will automatically reset when the
temperature drops below the threshold of 90°.
SIGNAL - Green LED illuminates to indicate the
presence of the signal at the amplifier input.
READY - Green LED illuminates when the loud-
speaker is ready for operation.
PRESET SELECT - button to select the different
modes (FULL RANGE, HIGH PASS F, COUPLED EQ,
MONIT EQ).
VOLUME POTENTIOMETER - adjusts the level of
the output signal of the loudspeaker.

18 TOURING POWER ENIT
3.3 PANNELLO DI CONNESSIONE SUBWOOFER
VERSIONE ATTIVA
TOURING15SA
3.3 SUBWOOFER PANEL CONNECTION
ACTIVE VERSION
TOURING15SA
LIMIT/PROT 150 Hz
120 Hz
100 Hz
80 Hz
TEMP
SIGNAL
READY
LINE OUT LINE IN
PRESET
SELECT
+4dBu
-
8
MADE I N I TA LY
dad-audio.it
Powered by
MAINS IN MAINS OUT
LIMIT/PROT 150 Hz
120 Hz
100 Hz
80 Hz
TEMP
SIGNAL
READY
LINE OUT LINE IN
PRESET
SELECT
+4dBu
-
8
MADE I N I TA LY
dad-audio.it
Powered by
MAINS IN MAINS OUT
TOURING 15SA
MAINS IN MAINS OUT
Fig.10

19
TOURING POWER ENIT
PANNELLO DI CONNESSIONE SUBWOOFER
VERSIONE ATTIVA
TOURING18SA - 218SA
SUBWOOFER PANEL CONNECTION
ACTIVE VERSION
TOURING18SA - 218SA
80Hz MULTI UNIT EQ
120Hz STANDARD
70Hz INFRA BASS
120Hz EXTEND.LOW
SIGNAL
LIMIT/PROTECT
READY
LINE OUT LINE IN
PRESET
SELECT
TEMP
+4dBu
-
8
TOURING 18SA
MADE I N I TA LY
dad-audio.it Powered by
MAINS OUT
MAINS IN
80Hz MULTI UNIT EQ
120Hz STANDARD
70Hz INFRA BASS
120Hz EXTEND.LOW
SIGNAL
LIMIT/PROTECT
READY
LINE OUT LINE IN
PRESET
SELECT
TEMP
+4dBu
-
8
TOURING 18SA
MADE I N I TA LY
dad-audio.it Powered by
MAINS OUT
MAINS IN
MAINS IN MAINS OUT
Fig.11

20 TOURING POWER ENIT
CONNECTIONS
LINE IN - female XLR connector, which accepts
a XLR plug from almost any type of equipment
with a balanced line level outputs. The XLR input
is wired as follows:
Pin1 = shield or ground
Pin2 = + positive or“hot”
Pin3 = - negative or “cold”
NOTE - whenever possible, use always balanced
cables. Unbalanced lines may also be used but
nay result in noise over long cable runs.
LINEOUT - this XLR male connector is connected
in parallel with the input female connector. This
enables a second units to be daisy-chained to
the first. It’s thus possible to power several speak-
ers using the same signal, forming more power-
ful sound reinforcement systems.
MAINS IN - PowerCon® NAC3FCA power input
connector (blue). To switch the amplifier on,
insert the PowerCon® connector and turn it in
a clockwise direction into the ON position. To
switch the amplifier off, pull back the switch on
the connector and turn the connector in an anti-
clockwise direction into the POWER OFF posi-
tion.
NOTE - In the case of product failure or fuse re-
placement, disconnect the unit completely from
the mains power. The power cable must only be
connected to a socket adequate to the specifica-
tions indicated on the amplifier unit. The power
supply must be protected by a suitably rated
thermo-magnetic breaker.
MAINS OUT - PowerCon® NAC3FCB power out-
put connector (grey).This is connected in parallel
with the MAINS IN; the maximum load applicable
is 10A/230V~. Turning the connector in a clock-
wise direction will activate the power output.
Pulling back in the switch located on the connec-
tor and turning the connector in an anti-clock-
wise direction will disconnect the power output.
NOTE - If the unit connected to the power output
fails or in the case of fuse replacement, discon-
nect the unit completely both the MAINS IN con-
nector and the POWER OUT connector to ensure
that the unit is completely disconnected from
the power supply.
CONNESSIONI
LINE IN - Connettore XLR femmina che accetta
XLR maschi da tutti gli apparecchi con un livello
di uscita bilanciato. Le terminazioni dell’ingresso
XLR sono:
Pin1 = schermo o massa
Pin2 = +positivo o“caldo”
Pin3 = -negativo o “freddo”
NOTA - qualora possibile, usare sempre cavi bi-
lanciati. Cavi sbilanciati possono essere ugual-
mente usati ma potrebbero dare problemi di
rumore se molto lunghi
LINE OUT - Connettore XLR maschio connesso
in parallelo con il connettore XLR femmina di
ingresso, rendendo possibile il collegamento in
cascata di una seconda unità. In questo modo è
possibile inviare lo stesso segnale a più casse, per
formare un più complesso e potente sistema di
rinforzo del suono.
MAINS IN - Connettore di alimentazione Po-
werCon® NAC3FCA (di colore blu). L’accensione
dell’amplificatore avviene inserendo il connetto-
re PowerCon® e ruotandolo in senso orario fino
a portarlo in posizione POWER ON. Tirando il
pulsante (push) e ruotandolo in senso antiorario
fino alla posizione POWER OFF avviene lo spe-
gnimento dell’amplificatore.
NOTA - In caso di guasto o di sostituzione dei
fusibili scollegare definitivamente il connettore
di alimentazione. Il cavo di alimentazione deve
sempre essere collegato ad una presa che soddi-
sfi le specifiche di alimentazione indicate sull’ap-
parecchio. La linea di alimentazione del diffusore
deve essere protetta tramite interruttore magne-
totermico di caratteristiche appropiate al carico.
MAINS OUT - Connettore di alimentazione in
uscita PowerCon® NAC3FCB (di colore grigio).
Collegamento in parallelo al connettore MAIN
IN; massimo carico collegabile 10A/230V~. Ruo-
tando il connettore in senso orario si attiva l’ali-
mentazione in uscita. Tirando il pulsante (push) e
ruotando in senso antiorario si disattiva l’alimen-
tazione in uscita.
NOTA - In caso di alimentazione di altri amplifi-
catori con guasto o in caso di sostituzione dei
fusibili, scollegare definitivamente il connettore
di alimentazione in ingresso (MAINS IN) ed il con-
nettore di alimentazione di uscita (POWER OUT).
This manual suits for next models
20
Table of contents
Other DAD Speakers manuals

DAD
DAD ARK208SA-SP User manual

DAD
DAD ARK Series User manual

DAD
DAD HDA Series User manual

DAD
DAD LIVEX Series User manual

DAD
DAD Fusion10P-10A User manual

DAD
DAD FUSION Series User manual

DAD
DAD Event series User manual

DAD
DAD LIVEPACK1000 User manual

DAD
DAD STAGE Series User manual

DAD
DAD LIVE series User manual