Installation notes
DANLERS Limited, Vincients Road, CHIPPENHAM, Wiltshire, SN14 6NQ, UK.
Telephone: +44 (0)1249 443377 Fax: +44 (0)1249 443388
Company Registered Number 2570169 VAT Registration Number 543 5491 38
Products available from DANLERS
• PIRoccupancyswitches•Daylightlinkeddimmers•Manualhighfrequencydimmers
• Photocells • Radio remote controls • Time lag switches • Outdoor security switches
• Dimmers•Heating,ventilationandair-conditioningcontrols•Bespoke/O.E.M.products
Please call for more information or a free catalogue.
ThisproductconformstoBSEN60669-2-1.
Pleaseensurethemostrecenteditionoftheappropriatelocalwiringregulationsareobserved
andsuitableprotectionisprovidede.g.overcurrentprotection,1kVovervoltage.Pleaseensure
thatthisdeviceisdisconnectedfromthesupplyifaninsulationtestismade.
Thisproductiscoveredbyawarrantywhichextendsto5yearsfromthedateofmanufacture.
Precautions and Warranty
Batten Mount PIR occupancy switches
BMPIR5M BMPIR10M BMPIRSP BMPIRRH
DANLERSBattenmountpassiveinfra-redoccupancyswitches(PIR)
canbemountedontotheendoflightingbattensviathe20mmknock
out.Theswitchincludestheconnection20mmthreadand1mofwire
tails to connect to the lighting ballast.
The PIRs incorporate a passive infra-red quad sensor to detect
movementofawarmbodywithinthedetectionzoneandincludea
photocelltomonitortheambientlightlevel.
Ondetectingmovement,iftheambientlightisdarkenough,thePIR
will switch the load on. The ambient threshold can be set by the user
to between approximately 100 and 3000 lux (on the working plane)
viatheLUXadjuster.
BMPIR5Mhasa5mdiameterrange,5mmaxheight,seediag.B.
BMPIR10Mhasa10mdiameterrange,5mmaxheight,seediag.B.
BMPIRSPhasa1.5mdiameterrange,5mmaxheight,seediag.B.
BMPIRRHhasa2.5mdiameterrange,2.5mmaxheight,seediag.B.
A ‘real time’ photocell status indicator glows green when the photocell
isactiveandglowsredwhenthephotocellisinactive.
Ifnomoremovementisdetectedwithinacertaintime,thenthePIRwill
switchofftheload.ThetimecanbesetviatheinternalTIMEadjuster
to between 10seconds and 40 minutes (diagram D).
Loading
ThesePIRsshouldonlybeconnectedtoa230V50Hzacsupply.
Theycanswitchthefollowingtypeofloads:
• 10amps(2500W)resistiveloadsandtungsten
• 6amps(1500W)uorescent(switchstart)/mainshalogenlamps
(recommendedwithintegralsafetyfuse)
• 3amps(750W)electronicorwirewoundtransformers.
• 2amps(500W)CFL,2Dlamps,LEDDriversandLEDlamps
andttings.
NormallyOPENcontacts.
13/03/15 INS713BMPIR5M/10M/SP/RH
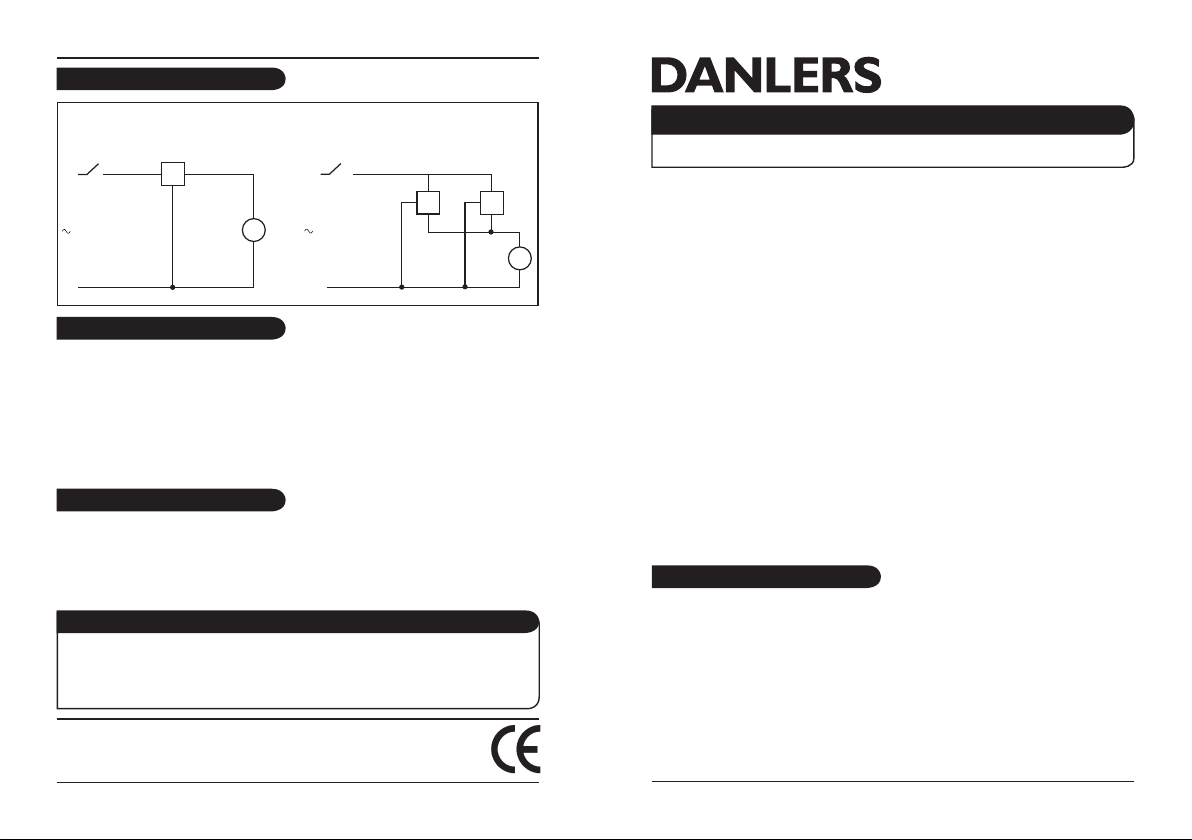
Wiring diagram
The PIR does not detect
• PersonistoofarfromthePIRswitch,seedetectiondiagram.
• Personismovingunusuallyslowly(perhapswhentesting).
ThePIRfalsetriggers
• Detectorisplacedtooclosetoheatormovingairsources.
Trouble shooting
L
load
optional manual
wall switch for
overriding off
N
230 VAC
SL
N
L
load
optional manual
wall switch for
overriding off
N
230 VACSL
NSL
N
Single BMPIRxxAfew BMPIRxx wired in parallel
BMPIR5M/10M/SP/RH


