manuals.online logo
Brands
  1. Home
  2. •
  3. Brands
  4. •
  5. DELTA DORE
  6. •
  7. Security Sensor
  8. •
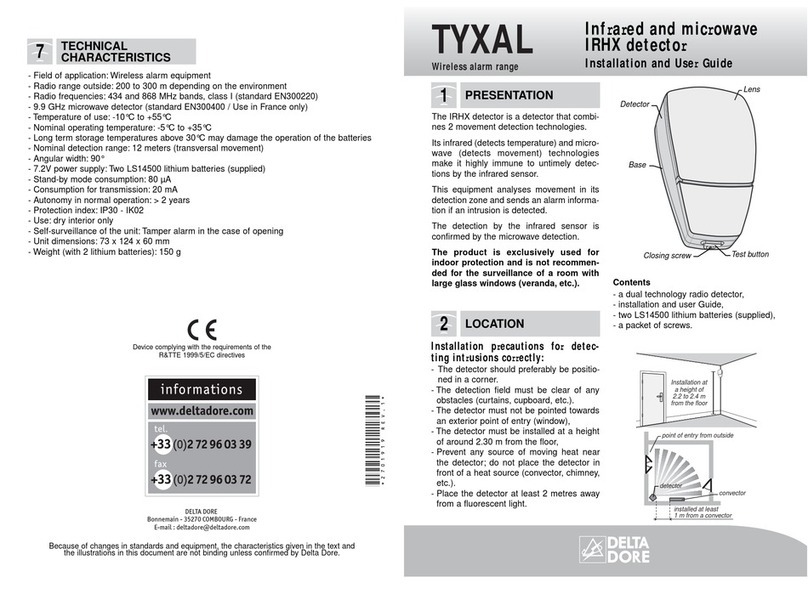
  9. DELTA DORE DMDR TYXAL+ User manual

DELTA DORE DMDR TYXAL+ User manual

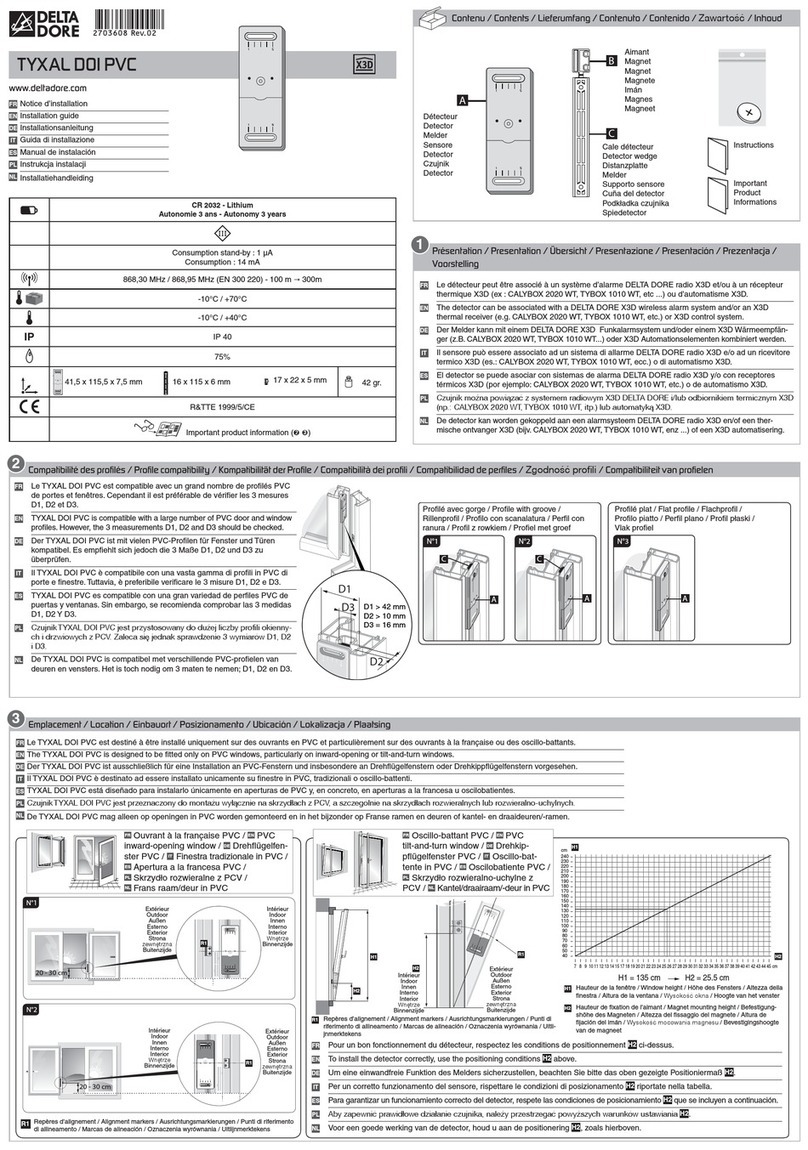
Contenu / Contents / Inhalt / Contenuto / Contenido / Spis treści / Inhoud
www.deltadore.com
DMDR TYXAL+
Instructions
Important Product
Informations
Présentation / Presentation / Beschreibung / Presentazione / Presentación / Prezentacja /
Voorstelling
1
Emplacement / Location / Einbauort / Posizionamento / Ubicación / Lokalizacja / Locatie
2
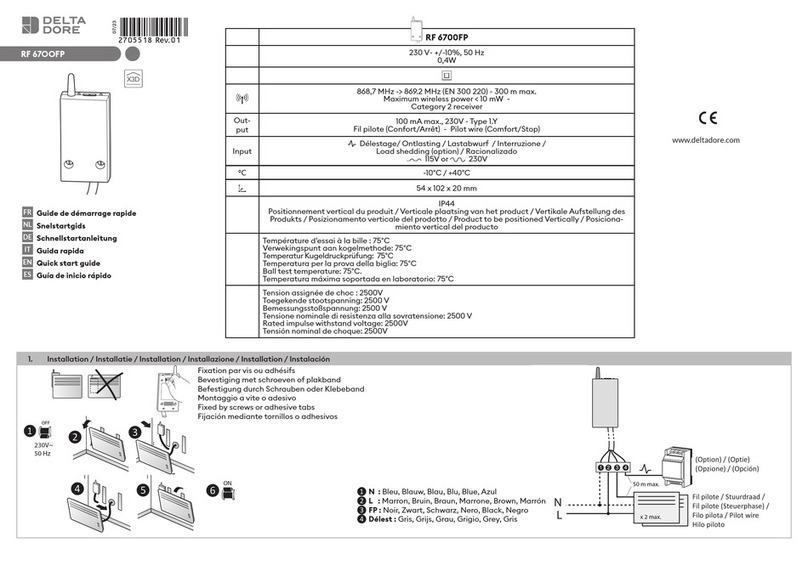
1x LS 17500 – 3,6V - 3,6Ah- Lithium
Autonomie 10 ans - Autonomy 10 years
Consumption stand-by :14,5 µA
Consumption : 45 mA
868,30 MHz / 868,95 MHz (EN 300 220)
100 m Ý300m - 24 GHz (EN 300440)
-10°C / +70°C
-10°C / +40°C
IP IP 54 - IK 04
75%
192 x 40 x 45 mm
R&TTE 1999/5/CE
Important product information (Ì)
FR
Notice d’installation
EN
Installation guide
DE
Installationsanleitung
IT
Guida di installazione
ES
Manual de instalación
PL
Instrukcja instalacji
NL
Installatiehandleiding
FR Le DMDR TYXAL+ est destiné à la protection des accès (fenêtres, baies vitrées, portes). Il détecte par
infra-rouge (chaleur) puis confirme par hyperfréquence (mouvement), chaque passage détecté.
Il peut être installé en intérieur comme en extérieur (protégé des intempéries).
Ce détecteur est équipé d’une autoprotection à l’arrachement et à l’ouverture.
IT Il rilevatore DMDR TYXAL+ è destinato alla protezione degli accessi (finestre, grandi superfici vetrate,
porte).Rileva attraverso gli infrarossi (calore), poi conferma mediante iperfrequenza (movimento) ogni
passaggio rilevato.Può essere installato all’interno e all’esterno (protetto dalle intemperie).
Questo rilevatore è dotato di un’autoprotezione contro gli atti di vandalismo e l’apertura.
ES El DMDR TYXAL+ está diseñado para proteger los accesos (ventanas, cristaleras, puertas).
Detecta a través de infrarrojos (calor) y confirma mediante hiperfrecuencia (movimiento) cada paso
detectado.Se puede instalar tanto en el interior como en el exterior (protegido de la intemperie).
Este detector está equipado con una autoprotección al arranque y a la apertura.
EN DMDR TYXAL+ protects access points (windows, bay windows, doors, etc.).It uses IR detection (heat)
then confirms each detected movement via hyperfrequency (motion).It can be installed either indoors
or outdoors (in a suitable enclosure).The detector is tamper proof and cannot be pulled off or opened.
DE Die Lichtschranke DMDRTYXAL+ schützt die Zugänge des Hauses (Fenster, Glastüren,Türen).
Sie erfasst per Infrarot-Technologie (Wärme) und bestätigt per Hochfrequenztechnologie (Bewegung)
jede erkannte Überquerung. Sie kann im Innen- sowie im Außenbereich (witterungsgeschützt)
installiert werden.Dieser Melder verfügt über einen Sabotageschutz gegen Öffnen und Entfernen.
PL Czujnik DMDR TYXAL+ jest przeznaczony do ochrony punktów dostępu (okien, przeszkleń, drzwi).
Wykrywa on za pomocą podczerwieni (ciepło) każde przejście, a następnie potwierdza je za pomocą
nadczęstotliwości (ruch). Można go montować wewnątrz i na zewnątrz budynku (w miejscu
chronionym przed czynnikami atmosferycznymi).
Czujnik jest wyposażony w automatyczne zabezpieczenie przed zerwaniem i otwarciem.
NL De DMDR TYXAL + is bedoeld om toegangspunten (ramen, vensters, deuren) te beschermen.
Elke detectie gebeurt via infrarood (warmte) en wordt vervolgens bevestigd door hyperfrequentie
(beweging).
Het kan zowel binnen als buiten geïnstalleerd worden (beschermd tegen weersomstandigheden).
Deze sensor is uitgerust met een zelfbeschermende functie, tegen losrukken en openen.
FR Vous pouvez installer le DMDR horizontalement
ou verticalement, en intérieur ou à l’extérieur
(protégé des intempéries).
Ne pas installer DMDRTYXAL+ :
• près ou en face d’une source de chaleur
ou de froid.
• près d’un élément pouvant créer un
mouvement (ventilateur, rideau qui vole,...),
• près d’une source électrique (câbles, lampes,
néons,...)
Entretien :
En extérieur, nettoyez au moins deux fois par
an le détecteur avec de l’eau savonneuse et
une éponge non abrasive. Ne pas utiliser de
nettoyeur haute pression, de produits acides
ou corrosifs.
ES Puede instalar el DMDR horizontal o vertical-
mente, en el interior o en el exterior (protegido
de la intemperie).
No instale DMDRTYXAL+:
• cerca o frente a una fuente de calor o frío
• cerca de un elemento que pueda generar
movimiento (ventilador, vuelos de cortinas,
etc.)
• cerca de una fuente de electricidad (cables,
lámparas, neones, etc.)
Mantenimiento:
En el exterior, limpie al menos dos veces al año
el detector con agua jabonosa y una esponja
no abrasiva. No utilizar un limpiador de alta
presión, productos ácidos o corrosivos.
PL Czujnik DMDR można montować poziomo lub
pionowo, wewnątrz lub na zewnątrz budynku
(w miejscu chronionym przed czynnikami
atmosferycznymi).
Czujnika DMDR TYXAL+ nie należy montować:
• w pobliżu ani na powierzchni źródła ciepła lub
zimna,
• w pobliżu elementu mogącego wywoływać
ruch (wentylator, poruszająca się zasłona itp.),
• w pobliżu źródła energii elektrycznej
(przewody, lampy, neony itp.).
Konserwacja:
Czujnik zamontowany na zewnątrz należy
czyścić co najmniej dwa razy w roku wodą
z mydłem przy użyciu miękkiej gąbki. Nie
używać myjki wysokociśnieniowej ani
produktów kwaśnych lub żrących.
DE Die Lichtschranke DMDR kann horizontal oder
vertikal im Innen- sowie im Außenbereich
(witterungsgeschützt) installiert werden.
DMBRTYXAL+ nicht wie folgt installieren:
• In der Nähe oder gegenüber einer Wärme-
oder Kältequelle.
• In der Nähe eines Elementes in Bewegung
(Ventilator, wehender Vorhang usw.).
• In der Nähe einer Stromquelle (Kabel,
Lampen, Neonlampen usw.)
Wartung:
Bei der Installation im Außenbereich, den
Melder zweimal jährlich mit Seifenwasser und
einem nicht scheuerndem Schwamm reinigen.
Von der Verwendung eines Hochdruckreinigers
oder von säurehaltigen bzw. ätzenden
Produkten ist abzuraten.
NL U kunt de DMDR horizontaal of verticaal
installeren, binnen of buiten (beschermd tegen
weersomstandigheden).
De DMDRTYXAL+ mag niet worden
geïnstalleerd:
• bij of in de buurt van een warmte- of
koudebron.
• in de buurt van een element dat kan bewegen
(ventilator, gordijnen,...),
• in de buurt van een stroombron (kabels,
lampen, neon, ...)
Onderhoud:
Buitenzijde, maak minstens twee keer per jaar
de detector met zeepsop en een zachte spons
schoon. Gebruik geen hogedrukreiniger, zuren
of bijtende producten.
IT Potete installare il DMDR orizzontalmente o
verticalmente, all’interno o all’esterno (protetto
dalle intemperie).
Il rilevatore DMDRTYXAL+ non deve essere
installato:
• vicino o davanti a una sorgente di calore o di
freddo.
• vicino a un elemento che può creare un
movimento (ventilatore, tenda che si muove,
ecc.).
• vicino a una fonte elettrica (cavi, lampade,
neon, ecc.).
Manutenzione:
All’esterno, pulite almeno due volte all’anno il
rilevatore con acqua saponata e una spugna
non abrasiva. Non utilizzate pulitori ad alta
pressione, prodotti acidi o corrosivi.
EN Your DMDR can be installed either horizontally
or vertically, indoors or outdoors (in a suitable
enclosure).
Do not install DMDRTYXAL+:
• close to or opposite a source of heat or cold.
• close to a moving element (fan, curtain, etc.),
• close to a source of electricity (cables, lights,
neon lights, etc.)
Maintenance:
When installed outdoors, clean the detector at
least twice a year with soapy water and a soft
sponge. Never use a high pressure cleaner,
acid or corrosive products.
0,30m
2,40 m
max.
1,20 m
2,20 m max.
2 x / an
2 x / year
> 2,20m
80° 80°
80°
A
BC
H
I
G
H
P
R
E
C
I
S
I
O
N
S
E
N
S
O
R
Fixation / Mounting / Montage / Fissaggio / Fijación / Mocowanie / Bevestigen
Sélectionnez la portée du détecteur / Selezionate la portata
del rilevatore /Seleccione el alcance del detector /Set the
detector’s range /Wählen Sie die Reichweite des Melders
/Wybór zasięgu czujnika /Selecteer het bereik van de
detector
Changement de la pile / Changing the batteries / Batte-
rien ersetzen / Sostituzione delle batterie / Cambiar las
pilas / Wymiana baterii / De batterijen vervangen
Test / Prueba
Démontage / Smontaggio / Desmontaje / Disassembly /
Abmontage / Demontaż / Demontage /
3
4 65
7
FR L’appareil émet une série de bips à chaque détection, la pile
est usée.Le DMDR TYXAL+ utilise un bloc-pile spécifique
DELTA DORE. Contactez votre installateur.Si une centrale
d’alarme est associée, passez-la en mode maintenance avant
d’ouvrir le produit (voir notice d’installation système).
IT L’apparecchio emette una serie di bip a ogni rilevamento, le
batterie sono esaurite. Il DMDR TYXAL+ utilizza un blocco-pile
specifico DELTA DORE. Contattate il vostro installatore.
Se il sensore è associato ad una centrale d’allarme, metterla
in modalità manutenzione prima di aprire il prodotto.
(Vedi le istruzioni di installazione “Sistema”)
ES El dispositivo emite una serie de bips en cada detección, la
pila está agotada. El DMDR TYXAL+ requiere un bloque de
pilas específico de DELTA DORE. Póngase en contacto con
su instalador.Si se asocia una central de alarma, póngala en
modo de mantenimiento antes de abrir el producto
(ver manual de instalación del sistema).
EN If the device beeps several times every time is detects
something, the battery is dead. DMDR TYXAL+ uses a
special DELTA DORE battery pack.Contact your installer.
If an alarm control unit is associated, set it to maintenance
mode before opening the product (refer to system installation
guide).
DE Wenn das Gerät nach jeder Erfassung mehrmals piept, muss
die Batterie gewechselt werden.Der DMDR TYXAL+
verwendet einen spezifischen DELTA DORE-Batterieblock.
Wenden Sie sich an Ihren Installateur. Bei Kombination mit
einer Alarmzentrale muss sich diese beim Öffnen des Geräts
im Wartungsmodus befinden (siehe Installationsanleitung
System).
PL Jeżeli przy każdym wykryciu urządzenie emituje serię
sygnałów dźwiękowych, oznacza to rozładowanie baterii.
Czujnik DMDR TYXAL+ wykorzystuje specjalny zestaw baterii
DELTA DORE. Skontaktować się z instalatorem. Jeżeli
powiązana jest centrala alarmowa, przed otwarciem
urządzenia przejdź w tryb konserwacji (patrz instrukcja
instalacji systemu).
NL Het apparaat zendt een reeks pieptonen uit bij elke detectie,
de batterij is leeg. De DMDR TYXAL+ maakt gebruik van een
specifieke DELTA DORE-accu.Neem contact op met uw
installateur. Als een alarmcentrale is verbonden, ga dan naar
de modus Onderhoud voordat u het product opent
(zie de installatiehandleiding).
Ref : 2280014
2
1
D E F
G
C
12
A
5
67 8
3 4
B
B
10 11
9
(§ 4)
(§ 5)
1
2
Biiip
FR Appuyez sur le boutonTest du détecteur. Refermez le boîtier.
L’appareil émet un bip à chaque détection (durée du test :
10 minutes, 3 secondes entre chaque détection).
Réorientez le détecteur si nécessaire (voir §3 étape 7).
IT Premete il pulsante Test del rilevatore.Richiudete la scatola.
L’apparecchio emette un bip a ogni rilevamento (durata del
test: 10 minuti, 3 secondi tra ogni rilevamento).
Riorientate il rilevatore, se necessario (vedere §3 fase 7).
ES Pulse el botón Test del detector.Cierre la caja. El dispositivo
emite un bip en cada detección (duración de la prueba: 10
minutos, 3 segundos entre cada detección).Vuelva a orientar
el detector en caso necesario (ver apartado 3 paso 7).
EN Press the detector’s Test button. Close the unit.The device
beeps every time it detects something (test time: 10 minutes,
3 seconds between each detection).
Reposition the detector if necessary (see §3 step 7).
DE
Drücken Sie auf den Test-Knopf des Melders. Schließen Sie
das Gehäuse wieder. Das Gerät piept bei jeder Erfassung
(Testdauer: 10 Minuten, 3 Sekunden zwischen jeder Erfassung)
Richten Sie den Melder ggf.neu aus (siehe Abschnitt 7).
PL Nacisnąć przycisk Test czujnika. Zamknąć obudowę. Przy
każdym wykryciu urządzenie emituje krótki sygnał dźwiękowy
(czas trwania testu: 10 minut, 3 sekundy między kolejnymi
wykryciami). W razie potrzeby zmienić ustawienie czujnika
(patrz § 3, etap 7).
NL Druk op de toets Test van de detector. Sluit de behuizing
opnieuw. Het apparaat piept bij elke detectie (testtijd: 10
minuten, 3 seconden tussen de detectie).
Richt de detector indien nodig (zie §3 stap 7).
FR Selon l’installation, sélectionnez le réglage adapté.
IT In base all’impianto, selezionate la regolazione adatta.
ES Según la instalación, seleccione el ajuste que mejor se adapte.
EN
Depending on the installation layout, select the appropriate setting.
DE Je nach Anlage muss die geeignete Einstellung gewählt werden.
PL Dobrać ustawienie w zależności od miejsca montażu.
NL Afhankelijk van de installatie, selecteert u de geschikte instelling.
FR T° = 19°C + personne de corpulence moyenne.
IT T° = 19 °C + persona di corporatura media.
ES T° = 19°C + persona de corpulencia media.
EN T° = 19°C + person of average body size.
DE T° = 19°C + Person von mittlerer Statur.
PL T° = 19°C + osoba średniej postury.
NL T° = 19°C + persoon met gemiddelde lichaamsbouw.
1
Separate le 2 parti del rilevatore (A).
2
Collegate il blocco-pile.
3
Selezionate la portata del rilevatore (vedere §4).
4
Tracciate, effettuate i fori di fissaggio, poi fissate il supporto a muro
(B) usando un insieme vite/tassello adatto (non fornito).
5
6
Agganciate la base del rilevatore sul supporto a muro (B).
7
Orientate e poi immobilizzate la base del rilevatore stringendo
le viti (D e E).
8
Associazione con un sistema di allarme:
Consultate le istruzioni della centrale.
9
Effettuate un test di rilevamento (vedere §5).
10
Stringete le 2 viti di fissaggio (F e G).
11
Posizionate gli otturatori a tenuta stagna (C).
1
Trennen Sie die 2 Gehäuseteile des Melders (A) voneinander.
2
Verbinden Sie den Batterieblock.
3
Wählen Sie die Reichweite des Melders (Siehe Abschnitt 4).
4
Markieren und bohren Sie die Befestigungslöcher und befestigen
Sie die Wandhalterung (B) mit den geeigneten Schrauben/Dübeln
(nicht mitgeliefert).
5
6
Verbinden Sie den Sockel des Melders an der Wandhalterung (B).
7
Befestigen Sie den Sockel des Melders, indem Sie die Schrauben
(D und E) anziehen.
8
Zuordnen mit einem Alarmsystem:
Siehe Bedienungsanleitung der Zentrale.
9
Führen Sie einen Meldetest durch (siehe Abschnitt 5).
10
Ziehen Sie die 2 Befestigungsschrauben (F und G) an.
11
Bringen Sie die Abdichtungen (C) wieder an.
1
Separe las 2 partes del detector (A)
2
Conecte el bloque de pilas.
3
Seleccione el alcance del detector (ver apartado 4)
4
Marque, taladre los agujeros de fijación y, a continuación, fije el
soporte mural (B) con tornillos/tacos adaptados (no incluidos).
5
6
Fije la base del detector al soporte mural (B).
7
Oriente y después inmovilice la base del detector apretando los
tornillos (D y E).
8
Asociación con un sistema de alarma: Consulte las instrucciones
de la central.
9
Realice una prueba de detección (ver apartado 5)
10
Apriete los 2 tornillos de fijación (F y G).
11
Coloque los obturadores estancos (C).
1
Oddzielić od siebie 2 części czujnika (A).
2
Podłączyć zestaw baterii.
3
Wybrać zasięg czujnika (patrz § 4).
4
Zaznaczyć i wywiercić otwory do mocowania, a następnie za
pomocą zestawu odpowiednich wkrętów/kołków rozporowych
(poza zestawem) zamocować uchwyt ścienny (B).
5
6
Zatrzasnąć podstawę czujnika na uchwycie ściennym (B).
7
Odpowiednio ustawić, a następnie unieruchomić podstawę
czujnika, dokręcając wkręty (D i E).
8
Powiązanie z systemem alarmowym: patrz instrukcja centrali.
9
Wykonać test wykrywania (patrz § 5).
10
Dokręcić 2 wkręty mocujące (F i G).
11
Włożyć szczelne zaślepki (C).
1
Open the unit (A).
2
Connect the battery pack.
3
Set the detector’s range (see §4)
4
Mark out and drill the holes then attach the wall mount (B)
with suitable screwsand bushing (not included).
5
6
Clip the detector base onto the wall mount (B).
7
Position then secure the detector’s base with the screws
(D and E).
8
Association with an alarm system:
Refer to the alarm control unit’s installation guide.
9
Perform a detection test (see §5)
10
Fasten the 2 retaining screws (F and G).
11
Install the plugs (C).
1
Séparez les 2 parties du détecteur (A),
2
Connectez le bloc pile.
3
Sélectionnez la portée du détecteur (voir §4).
4
Tracez, percez les trous de fixation puis fixez le support mural (B)
par un ensemble vis/cheville adapté (non fourni).
5
6
Clipsez le socle du détecteur sur le support mural (B).
7
Orientez puis immobilisez le socle du détecteur en resserrant les
vis (D et E).
8
Association avec un système d’alarme :
Reportez-vous à la notice de la centrale.
9
Effectuez un test de détection (voir §5).
10
Serrez les 2 vis de fixation (F et G).
11
Mettez en place les obturateurs étanches (C).
1
Scheid de twee delen van de behuizing.
2
Sluit de accu aan.
3
Selecteer het bereik van de sensor (zie §4)
4
Markeer, boor de bevestigingsgaten en bevestig vervolgens
de muurbeugel (B) door een combinatie van schroef/borgring
(niet-meegeleverd).
5
6
Klem de sokkel van de detector op de muurbeugel (B).
7
Draai en bevestig de sokkel van de detector door middel van de
schroeven (D en E).
8
Verbinden met een alarmsysteem:
Raadpleeg de gebruiksaanwijzing van de centrale.
9
Voer een detectietest uit (zie §5)
10
Draai de 2 bevestigingsschroeven vast (F en G).
11
Monteer waterdichte stekkers (C).
IT
DE
ES
PL
EN
FR
NL
ON
1 2
ON
1 2
ON
1 2
ON
1 2
2,40 m
max.
Par défaut / Predefinito / Por defecto / By default
Werkseinstellung / Standaard /
Domyślnie.
*
*
2,20 m
max.
2,40 m
max.
2,50 m
max.
2,10 m
max.
1,70 m
max.
2,40 m
max.
1,80 m
max.
1,40 m
max.
1,40 m
max.
1m
max.

Other DELTA DORE Security Sensor manuals

DELTA DORE TYXAL DOS User manual

DELTA DORE

DELTA DORE TYXAL DOS User manual

DELTA DORE DU TYXAL + User manual

DELTA DORE

DELTA DORE DU TYXAL + User manual

DELTA DORE DMB TYXAL+ User manual

DELTA DORE

DELTA DORE DMB TYXAL+ User manual

DELTA DORE TYXAL DCS User manual

DELTA DORE

DELTA DORE TYXAL DCS User manual

DELTA DORE DVR TYXAL+ User manual

DELTA DORE

DELTA DORE DVR TYXAL+ User manual

DELTA DORE Tybox RF6700FP User manual

DELTA DORE

DELTA DORE Tybox RF6700FP User manual

DELTA DORE DMBD TYXAL+ User manual

DELTA DORE

DELTA DORE DMBD TYXAL+ User manual

DELTA DORE DTX User manual

DELTA DORE

DELTA DORE DTX User manual

DELTA DORE DCS TYXAL + User manual

DELTA DORE

DELTA DORE DCS TYXAL + User manual

DELTA DORE TYXAL DU User manual

DELTA DORE

DELTA DORE TYXAL DU User manual

DELTA DORE DMF Tyxal+ User manual

DELTA DORE

DELTA DORE DMF Tyxal+ User manual

DELTA DORE TYXAL DF User manual

DELTA DORE

DELTA DORE TYXAL DF User manual

DELTA DORE DMB TYXAL+ User manual

DELTA DORE

DELTA DORE DMB TYXAL+ User manual

DELTA DORE TYXAL DOS User manual

DELTA DORE

DELTA DORE TYXAL DOS User manual

DELTA DORE DOI PVC TYXAL + User manual

DELTA DORE

DELTA DORE DOI PVC TYXAL + User manual

DELTA DORE TYXAL DOI PVC User manual

DELTA DORE

DELTA DORE TYXAL DOI PVC User manual

DELTA DORE Tywatt 5400 User manual

DELTA DORE

DELTA DORE Tywatt 5400 User manual

DELTA DORE Tyxal+ DME 180 User manual

DELTA DORE

DELTA DORE Tyxal+ DME 180 User manual

DELTA DORE DOS TYXAL + User manual

DELTA DORE

DELTA DORE DOS TYXAL + User manual

DELTA DORE TYXAL User manual

DELTA DORE

DELTA DORE TYXAL User manual

DELTA DORE DMBV TYXAL+ User manual

DELTA DORE

DELTA DORE DMBV TYXAL+ User manual

DELTA DORE TYXAL DF User manual

DELTA DORE

DELTA DORE TYXAL DF User manual

DELTA DORE TYXAL DCP User manual

DELTA DORE

DELTA DORE TYXAL DCP User manual

DELTA DORE TYXAL DOI PVC User manual

DELTA DORE

DELTA DORE TYXAL DOI PVC User manual

Popular Security Sensor manuals by other brands

C.P. Electronics UNLCDHS Programming manual

C.P. Electronics

C.P. Electronics UNLCDHS Programming manual

Timeguard LEDPROSLB Installation & operating instructions

Timeguard

Timeguard LEDPROSLB Installation & operating instructions

Alarmcom ADC-IS-221-LP installation guide

Alarmcom

Alarmcom ADC-IS-221-LP installation guide

Paradox Magellan PMD1P user manual

Paradox

Paradox Magellan PMD1P user manual

C.P. Electronics GEFL-PB-ABS installation guide

C.P. Electronics

C.P. Electronics GEFL-PB-ABS installation guide

Elmo IRB60F2 Technical manual

Elmo

Elmo IRB60F2 Technical manual

C.P. Electronics VITMR-MWS6-PRM Product guide

C.P. Electronics

C.P. Electronics VITMR-MWS6-PRM Product guide

AirLive SI-104 user manual

AirLive

AirLive SI-104 user manual

Bin Master NCR-30 operating instructions

Bin Master

Bin Master NCR-30 operating instructions

DELTA PLUS PVC7335 Tehnical manual

DELTA PLUS

DELTA PLUS PVC7335 Tehnical manual

Abus FU8330 manual

Abus

Abus FU8330 manual

Resolution Connect O2 RE610P+ installation guide

Resolution

Resolution Connect O2 RE610P+ installation guide

Blackline Safety G7 BRIDGE user manual

Blackline Safety

Blackline Safety G7 BRIDGE user manual

C.P. Electronics MWS6-PRM-VFC-LV Product guide

C.P. Electronics

C.P. Electronics MWS6-PRM-VFC-LV Product guide

Agni AGNI-203 quick start guide

Agni

Agni AGNI-203 quick start guide

TTC D740KIT Instructions for use

TTC

TTC D740KIT Instructions for use

HomeMatic HM-Sen-MDIR-O-2 manual

HomeMatic

HomeMatic HM-Sen-MDIR-O-2 manual

SEI Insta-Berm Operation manual

SEI

SEI Insta-Berm Operation manual

manuals.online logo
manuals.online logoBrands
  • About & Mission
  • Contact us
  • Privacy Policy
  • Terms and Conditions

Copyright 2025 Manuals.Online. All Rights Reserved.