manuals.online logo
Brands
  1. Home
  2. •
  3. Brands
  4. •
  5. DentalEZ
  6. •
  7. Dental Equipment
  8. •
  9. DentalEZ StarDental PROPHY STAR 3 User manual

DentalEZ StarDental PROPHY STAR 3 User manual

CONTENTS
Prophy Star 3 Handpiece, StarDental Part #264422
INSTALLATION & OPERATION
Diameter x Length: .660in x 4.291in (16.76mm x 108.99mm)
Operating Speed: 0 to 5000 rpm
Power Output: 5.8 watts
Weight: 62 grams
Operating Air Pressure: 35-40 psi (2.46 to 2.81 kgs/cm2)
Line Configuration: 4-Line
Filtration: 25 micron air filter recommended
Attachments: ISO standard Doriot style disposable
prophy angles
Materials Provided: Prophy Star 3 Handpiece(FIG.1), Cleaning Brush, Instructions
NOTE: Before installing the Prophy Star 3 Handpiece, be sure the air filter operates efficiently. Verify recommended
air filtration of 25 microns. Recommended air pressure, while operating, is 35 to 40 psi, see #2.
U.S.A.
StarDental®
Instruments
4 LINE TUBING ISO CONNECTOR
TUBING COUPLER
SWIVEL TUBES
THREADS
TUBING
5. Slide tubing coupler until the end of the ISO tubing connector is exposed; hold in hand as shown with fingers
securing the tubing.
6. Align and insert fittings on handpiece into the ISO tubing connector holes.
7. While applying slight pressure to hold fittings in the connector holes, slide coupler forward and engage threads.
Continue threading coupler clockwise until hand tight against the handpiece.
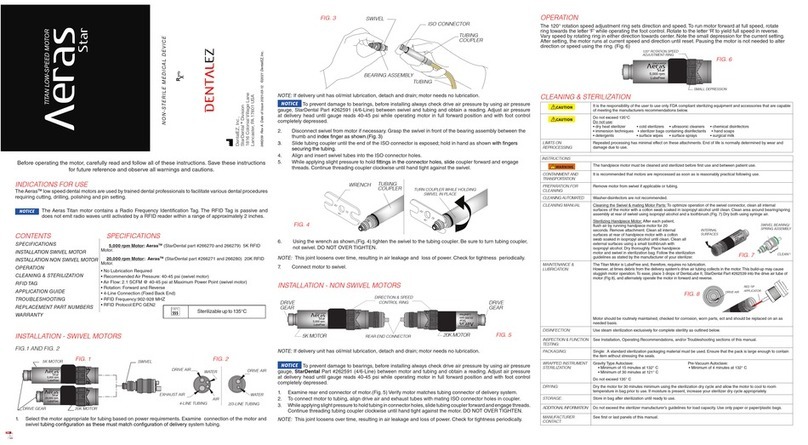
NOTICE If delivery unit has oil/mist lubrication, detach and drain; handpiece is LubeFree.
The Prophy Star 3 Handpiece (5,000 rpm) is suitable for low speed prophy procedures using disposable prophy
angles. The overall reduction in length of the Prophy Star 3 improves work positioning and reduces operator fatigue.
U.S.A.
StarDental®
Instruments
PROPHY STAR 3
LOW SPEED HANDPIECE BACK END
2. Mount 4/6-line air pressure gauge, between the back end of handpiece and air supply tubing and obtain a
reading. Adjust air pressure until gauge reads 35-40 psi (FIG. 3) while operating handpiece with foot control
completely depressed.
NOTE: If a gauge is not available, set pressure at delivery head allowing 1 psi pressure loss for every foot of
tubing. For example, to operate at 35 psi and you are using either 5 feet or 12 feet of tubing, then the
pressure should be set at the delivery head to compensate for the air pressure losses:
5 feet of tubing 35 psi + 5 psi = 40 psi
12 feet of tubing 35 psi + 12 psi = 47 psi
3. After adjustment, uncouple the pressure gauge and install handpiece as follows.
4. Grasp the handpiece at the back end, in front of the threads between the thumb and finger as shown in FIG. 4.
U.S.A.
StarDental®
Instruments
4/6 LINE PRESSURE GAUGE
NOTE: To remove the angle, simply pull the angle out of the handpiece.
U.S.A.
StarDental®
Instruments
STEM
CHUCK
SLOT
NOSE
PIN
REMOVAL OF GRIP
Rear of grip 1. With thumb at rear of grip, push down and forward.
2. Continue pushing until grip clears nosepiece(FIG.6).
NOTE: Do Not Pull or Peel To Remove.
INSTALLATION OF GRIP
Rear recess wall
Front recess wall
Grip recess
Front of grip
1. Push grip onto nosepiece at front of grip.
2. Continue pushing until grip fits in nosepiece grip recess. Grip
should rest against front and rear recess wall.
INSTALLATION & OPERATION, CONT.
1. Verify that the back end of the handpiece corresponds to the delivery system’s tubing configuration (ISO standard
4-line configuration FIG.2).
EXHAUST AIR
DRIVE AIR
DISPOSABLE PROPHY ANGLE INSTALLATION
NOTE: Metal prophy angles are not recommended to be used with the Prophy Star handpiece. Prophy angles
with plastic stems with ISO standard Doriot couplings may be used. Attachments other than prophy angles are
not recommended with this handpiece.
1. Insert the stem of the prophy angle into the chuck of the handpiece while making sure that the slot is aligned
with the nose pin.
2. Push the angle until the slot is fully seated around the nose pin (FIG. 5).
Sterilizable up to 135°C
135°C
TO MINIMIZE RISK OF SERIOUS INJURY:
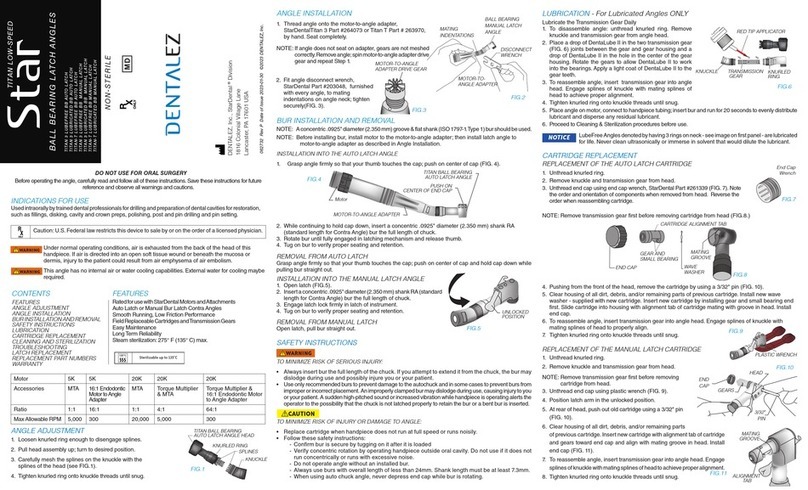
• Always pull lightly on angle after mounting to handpiece to confirm that the angle is secured.
DO NOT USE FOR ORAL SURGERY
NOTE: Operating pressure must be maintained between 35 psi and 40 psi.
CAUTION
WARNING
TO MINIMIZE RISK OF INJURY OR DAMAGE TO HANDPIECE OR ANGLE:
• Before use, verify concentric rotation by operating the handpiece outside the oral cavity in a
safe place. Do not use angles that do not run concentrically or produce excessive noise.
• Never operate handpiece without an angle installed.
• Use only recommended angles to prevent damage to chuck. An improperly inserted angle may
dislodge during use, causing injury to you or your patient.
REAR SEAL REPLACEMENT
U.S.A.
StarDental®
Instruments
REAR SEAL
Seals wear with repeated use. Once a year, or as needed, replace the rear seal (see FIG.8) with
StarDental Part #202897.
Before operating the handpiece, carefully read and follow all of these instructions. Save these instructions for
future reference and observe all warnings and cautions.
INDICATIONS FOR USE
The Prophy Star®3 Handpiece is used by trained dental professionals to perform dental prophylaxis.
Caution: U.S.Federal law restricts this device to sale by or on the order of a licensed physician.
SPECIFICATIONS
FIG. 1
FIG. 2
FIG. 3
FIG. 4
FIG. 5
FIG. 6
FIG. 7
SAFETY INSTRUCTIONS
FIG. 8
SPECIFICATIONS
INSTALLATION & OPERATION
DISPOSABLE PROPHY ANGLE
INSTALLATION
REMOVAL OF GRIP
INSTALLATION OF GRIP
SAFETY INSTRUCTIONS
REAR SEAL REPLACEMENT
CLEANING & STERILIZATION
TROUBLESHOOTING
REPLACEMENT PART NO.’S
WARRANTY
064423 Rev J Date of Issue 2023-01-30 ©2023 DENTALEZ, Inc.
PROPHY STAR 3
DENTALEZ, Inc., StarDental ®Division
1816 Colonial Village Lane
Lancaster, PA 17601 USA
NON-STERILE
MD
Prophy Star 3 Handpiece.................................................................................. 264422
Cleaning Brush ................................................................................................ 203043
Rear Seal, 4-Line (Package of 3)...................................................................... 202897
DentaLube II ..................................................................................................... 262539
Rubber Grips (Package of 4) ............................................................................ 264441
Nosepiece......................................................................................................... 264434
TROUBLESHOOTING
PROBLEM: LOW POWER
Cause: Air leak at motor
Correction: Replace rear seal. StarDental Part #202897
(Refer to 'Rear Seal Replacement')
Cause: Debris buildup
Correction: Refer to Cleaning
Cause: Faulty angle
Correction: Replace angle
Cause: Air pressure too low
Correction: Verify proper handpiece air pressure
Cause: Crimped Tubing
Correction: Straighten tubing inside and outside of tubing delivery head
Cause: Brittle rear seal
Correction: Replace rear seal. StarDental Part #202897
(Refer to 'Rear Seal Replacement')
PROBLEM: PROPHY ANGLE SLIPS IN CHUCK
Cause: Insufficient clamp load between chuck and drive stem of
prophy angle
Correction: Replace faulty prophy angle with a prophy angle that meets ISO
standards for drive stems
Cause: Build up of debris in chuck
Correction: Clean chucking mechanism
Refer to Cleaning Prophy Star 3 Chuck
PROBLEM: PROPHY ANGLE VIBRATES EXCESSIVELY
Cause: Angle is out of balance
Correction: Install new prophy angle
NOTE: If a problem persists, contact dealer for further assistance; or contact
StarDental Technical Service at 1-866-DTE-INFO.
CAUTION It is the responsibility of the user to use only FDA compliant sterilizing equipment and accessories
that are capable of meeting the manufacturers recommendations below.
CAUTION Do not exceed 135°C
Do not use: • dry heat sterilizer • cold sterilizers • ultrasonic cleaners • hand soaps
• surface sprays • surface wipes • chemical disinfectors
• surgical milk • detergents • immersion techniques
• sterilizer bags containing disinfectants
LIMITS ON REPROCESSING Repeated processing has minimal effect on these attachments. End of life is normally
determined by wear and damage due to use.
INSTRUCTIONS
WARNING Clean and sterilize handpiece as soon as practical before first use and after each patient.
CONTAINMENT AND
TRANSPORTATION:
It is recommended that handpieces are reprocessed as soon as is reasonably practical
following use.
PREPARATION FOR
CLEANING:
Remove handpiece from dental unit tubing; remove angle from handpiece. No further
disassembly is required.
CLEANING - AUTOMATED: Washer-disinfectors are not recommended.
CLEANING - MANUAL: Cleaning chuck:
Insert round end of brush (FIG.9), StarDental Part #203043, straight into chuck and withdraw.
NOTE: Do not rotate brush while inserting or removing. After
removing brush, tap nose of chuck to expel debris.
CAUTION Do not adjust or disassemble the handpiece.
Handpiece: Remove debris from external surfaces using a
small brush and isopropyl alcohol. Dry thoroughly. Repeat after each patient.
LUBRICATION: The Prophy Star 3 Handpiece is LubeFree and therefore requires no lubrication.
At times, debris from the delivery system’s drive air tubing collects in the handpiece. This
build up may cause sluggish operation. To ease, place 1 drop of DentaLube II, StarDental
Part #262539, into the drive air tube, and operate the handpiece for 15 seconds.
DISINFECTION: Use steam sterilization exclusively for complete sterility as outlined below.
MAINTENANCE: See 'Cleaning' above
The Prophy Star 3 Handpiece should be routinely maintained, checked for corrosion, worn parts,
etc. and should be replaced on an as needed basis.
INSPECTION & FUNCTION
TESTING:
See Installation, Operating Recommendations, and/or Troubleshooting sections of this
manual.
PACKAGING: Single: A standard sterilization packaging material must be used. Ensure that the pack is
large enough to contain the item without stressing the seals.
In sets: Handpieces may be loaded into dedicated instrument trays or general purpose
sterilization trays. Ensure that cutting edges are protected and do not exceed the tray
manufacturer’s limit per tray. Wrap the trays using appropriate packaging materials and
methods.
WRAPPED INSTRUMENT
STERILIZATION:
Gravity Type Autoclave: Pre-Vacuum Autoclave:
• Minimum of 15 minutes at 132° C • Minimum of 4 minutes at 132° C
• Minimum of 30 minutes at 121° C
Do not exceed 135° C
DRYING: Dry the handpiece for 30 minutes minimum using the sterilization dry cycle and allow the
handpiece to cool to room temperature in bag prior to use. If moisture is present, increase
your sterilizer dry cycle appropriately.
STORAGE: Store in bag after sterilization until ready to use.
ADDITIONAL
INFORMATION:
Do not exceed the sterilizer manufacturer’s guidelines for load capacity. Use only paper or
paper/plastic bags.
MANUFACTURER CONTACT: See first or last panels of this manual.
CLEANING BRUSH
U.S.A.
StarDental®
Instruments
CLEANING AND STERILIZATION
FIG. 9
DESCRIPTION ITEM NUMBER
REPLACEMENT PART NUMBERS & ACCESSORIES
ALWAYS INSIST ON STARDENTAL PARTS FOR BEST PERFORMANCE.
LIMITED WARRANTY
O-Rings, Seals, and Rubber Grips are specifically excluded from this warranty.
DENTALEZ warrants the Prophy Star 3Handpiece for 2 years from the date of purchase*.
Please note the following additional terms of our warranty policy:
• Warranty covers manufacturing defects only and does not cover defects resulting from abuse, accidents, misuse, improper
handling, cleaning, care or maintenance or the failure to follow or observe our operating/use, maintenance and/or installation
instructions. Damage resulting from the use of chemicals, cleaners, disinfectants or sterilization is not covered under this
warranty nor is normal wear and tear. Failure to use authorized parts or an authorized repair facility voids this warranty.
• Liability is limited to repair or replacement of the defective part(s) or products at our sole discretion. All other liabilities, in
particular liability for damages, including, without limitation, special, exemplary, consequential or incidental damages are
excluded
• THIS WARRANTY IS IN LIEU OF ALL OTHER WARRANTIES, EXPRESSED OR IMPLIED, INCLUDING ANY IMPLIED
WARRANTIES OF MERCHANTABILITY OR FITNESS FOR A PARTICULAR PURPOSE.NO EMPLOYEE, REPRESENTATIVE
OR DEALER IS AUTHORIZED TO CHANGE THIS WARRANTY IN ANY WAY OR TO GRANT ANY OTHER WARRANTY.
*Provided conditions in warranty are met.
WARRANTY REGISTRATION
Please visit the website below to register your StarDental product. This will ensure proper registration and prompt and accurate
service should any of your purchases need evaluation or repair during the warranty period.
StarDental Products: www.DENTALEZ.com/warranty
FOR NEW PRODUCTS, MANUALS AND TECHNICAL INFORMATION, CALL
1-866-DTE-INFO OR VISIT OUR WEB SITE @ WWW.DENTALEZ.COM
IMPORTANT NOTICE ABOUT RETURNING PRODUCT TO DENTALEZ INC.
Anyone wishing to return any DENTALEZ Inc. product to a DENTALEZ facility MUST obtain the proper RETURN AUTHORIZATION
NUMBER from the Customer Service Department. The RA Number must appear clearly marked on both the outside and inside of
the returned product carton. When calling for a return authorization number you will be asked to provide the following information:
To Obtain A
Return Authorization
Number Call
1-866-DTE-INFO
1. Product Name, Model Number or Part Number
2. Serial Number of Product
3. Dealer Return Purchase Order Number
4. Reason For Return
5. Copy of Invoice Showing Purchase
Items will be evaluated. Return Authorization Number is not a guarantee for credit.Your cooperation with this procedure will
help us expedite processing of any returns.

This manual suits for next models

1

Other DentalEZ Dental Equipment manuals

DentalEZ StarDental Titan 3 257506 User manual

DentalEZ

DentalEZ StarDental Titan 3 257506 User manual

DentalEZ Heritage Simplicity LED Light User manual

DentalEZ

DentalEZ Heritage Simplicity LED Light User manual

DentalEZ StarDental 430 SWL Flex User manual

DentalEZ

DentalEZ StarDental 430 SWL Flex User manual

DentalEZ aXcs Basic-Duo User manual

DentalEZ

DentalEZ aXcs Basic-Duo User manual

DentalEZ Aeras Ramvac C3 User manual

DentalEZ

DentalEZ Aeras Ramvac C3 User manual

DentalEZ Star TITAN 3 User manual

DentalEZ

DentalEZ Star TITAN 3 User manual

DentalEZ RAMVAC Utility User manual

DentalEZ

DentalEZ RAMVAC Utility User manual

DentalEZ Heritage User manual

DentalEZ

DentalEZ Heritage User manual

DentalEZ AERAS Star User manual

DentalEZ

DentalEZ AERAS Star User manual

DentalEZ StarDental 430 SWL Torque User manual

DentalEZ

DentalEZ StarDental 430 SWL Torque User manual

DentalEZ Forest User manual

DentalEZ

DentalEZ Forest User manual

DentalEZ Aeras Star 500 Elite Handpice User manual

DentalEZ

DentalEZ Aeras Star 500 Elite Handpice User manual

DentalEZ Forest User manual

DentalEZ

DentalEZ Forest User manual

DentalEZ Star User manual

DentalEZ

DentalEZ Star User manual

DentalEZ StarDental Titan 3 Five Star User manual

DentalEZ

DentalEZ StarDental Titan 3 Five Star User manual

DentalEZ Star User manual

DentalEZ

DentalEZ Star User manual

DentalEZ Star Titan Low-Speed User manual

DentalEZ

DentalEZ Star Titan Low-Speed User manual

DentalEZ Heritage CORE Chair User manual

DentalEZ

DentalEZ Heritage CORE Chair User manual

DentalEZ StarDental Titan LubeFree Five Star User manual

DentalEZ

DentalEZ StarDental Titan LubeFree Five Star User manual

DentalEZ Aeras 400 Flex User manual

DentalEZ

DentalEZ Aeras 400 Flex User manual

DentalEZ StarDental Concentrix FX User manual

DentalEZ

DentalEZ StarDental Concentrix FX User manual

DentalEZ StarDental 430 SWL RA User manual

DentalEZ

DentalEZ StarDental 430 SWL RA User manual

DentalEZ Aeras Ramvac RV4-12 User manual

DentalEZ

DentalEZ Aeras Ramvac RV4-12 User manual

DentalEZ everLight EVLCE User manual

DentalEZ

DentalEZ everLight EVLCE User manual

Popular Dental Equipment manuals by other brands

Carestream DENTAL CS 7600 manual

Carestream DENTAL

Carestream DENTAL CS 7600 manual

EMS Piezon Operation instructions

EMS

EMS Piezon Operation instructions

Bego 37600 Translation of the original instructions

Bego

Bego 37600 Translation of the original instructions

Miele professional G 7881 Installation and In-Service Manual

Miele professional

Miele professional G 7881 Installation and In-Service Manual

Renfert Silent compactCAM Translation of the original instructions for use

Renfert

Renfert Silent compactCAM Translation of the original instructions for use

KaVo PROPHYflex 3 Instructions for use

KaVo

KaVo PROPHYflex 3 Instructions for use

Planmeca FIT CAD System user manual

Planmeca

Planmeca FIT CAD System user manual

Sirona Heliodent plus installation instructions

Sirona

Sirona Heliodent plus installation instructions

Aseptico AMC-20CF Service manual & parts list

Aseptico

Aseptico AMC-20CF Service manual & parts list

3M ESPE Elipar DeepCure-S operating instructions

3M ESPE

3M ESPE Elipar DeepCure-S operating instructions

DENTSPLY Multimat Easy Instructions for use

DENTSPLY

DENTSPLY Multimat Easy Instructions for use

Good Doctors Dr's Light CL-AT24 user manual

Good Doctors

Good Doctors Dr's Light CL-AT24 user manual

EMS PIEZON MASTER 700 operating instructions

EMS

EMS PIEZON MASTER 700 operating instructions

KaVo SONICflex tips paro Instructions for use

KaVo

KaVo SONICflex tips paro Instructions for use

Ancar Sd-150 user manual

Ancar

Ancar Sd-150 user manual

ASI Triton Advanced Dental System 2025M Operation & service manual

ASI

ASI Triton Advanced Dental System 2025M Operation & service manual

KaVo INTRAflex LUX 2 Series Instructions for use

KaVo

KaVo INTRAflex LUX 2 Series Instructions for use

Dentsply Sirona Purevac HVE Directions for use

Dentsply Sirona

Dentsply Sirona Purevac HVE Directions for use

manuals.online logo
manuals.online logoBrands
  • About & Mission
  • Contact us
  • Privacy Policy
  • Terms and Conditions

Copyright 2025 Manuals.Online. All Rights Reserved.