Dietz CANEO_E User manual

DE
EN
IT
NL
FR
Lightweight folding wheelchair
Operating instructions
Version 5.0.0

Product group: Manual wheelchair
Product: Lightweight folding wheelchair
User’s manual Version 5.0.0. EN
State 07/2018 (BL)
DIETZ GmbH
Reutäckerstraße 12
76307 Karlsbad
Tel.: +49 7248.9186-0
Fax: +49 7248.9186-86
www.dietz-reha.de
Misprint, falsities, price and product changes reserved.
© 2018 DIETZ GmbH Reha-Produkte, Karlsbad
Reproduction, also extracts, by written permission from DIETZ GmbH, Karlsbad only.
2
DIETZ GmbH / Operating instructions lightweight folding wheelchair CANEO_E / Version 5.0.0. EN
OPERATING INSTRUCTIONS CANEO_E

Thank you for purchasing a CANEO_E
wheelchair from DIETZ Reha Produkte.
Please read these operating instructions carefully before first using the
wheelchair. They contain important safety instructions and valuable tips
on correctly using and caring for the wheelchair. If you have any ques-
tions or require additional information, please contact the specialist re-
tailer which supplied the wheelchair to you.
These operating instructions contain all of the instructions necessary for
adjusting and operating the CANEO_E wheelchair.
3
DE
EN
FR
IT
NL
OPERATING INSTRUCTIONS CANEO_E
NOTE
For better visibility find our user
manual also online under
www.dietz-reha.de as PDF
file with zoom function.

4CONTENTS
DIETZ GmbH / Bedienungsanleitung Leichtgewicht-Faltrollstuhl CANEO_E / Version 5.0.0 DE
01 Information
Intended Purpose . . . . . . . . . . . . . . . . . . . . . .6
Indication . . . . . . . . . . . . . . . . . . . . . . . . . . . .6
Contraindication . . . . . . . . . . . . . . . . . . . . . . .6
Symbols . . . . . . . . . . . . . . . . . . . . . . . . . . . . .7
02 Product Description
Scope of delivery . . . . . . . . . . . . . . . . . . . . . . .8
Wheelchair total width . . . . . . . . . . . . . . . . . .8
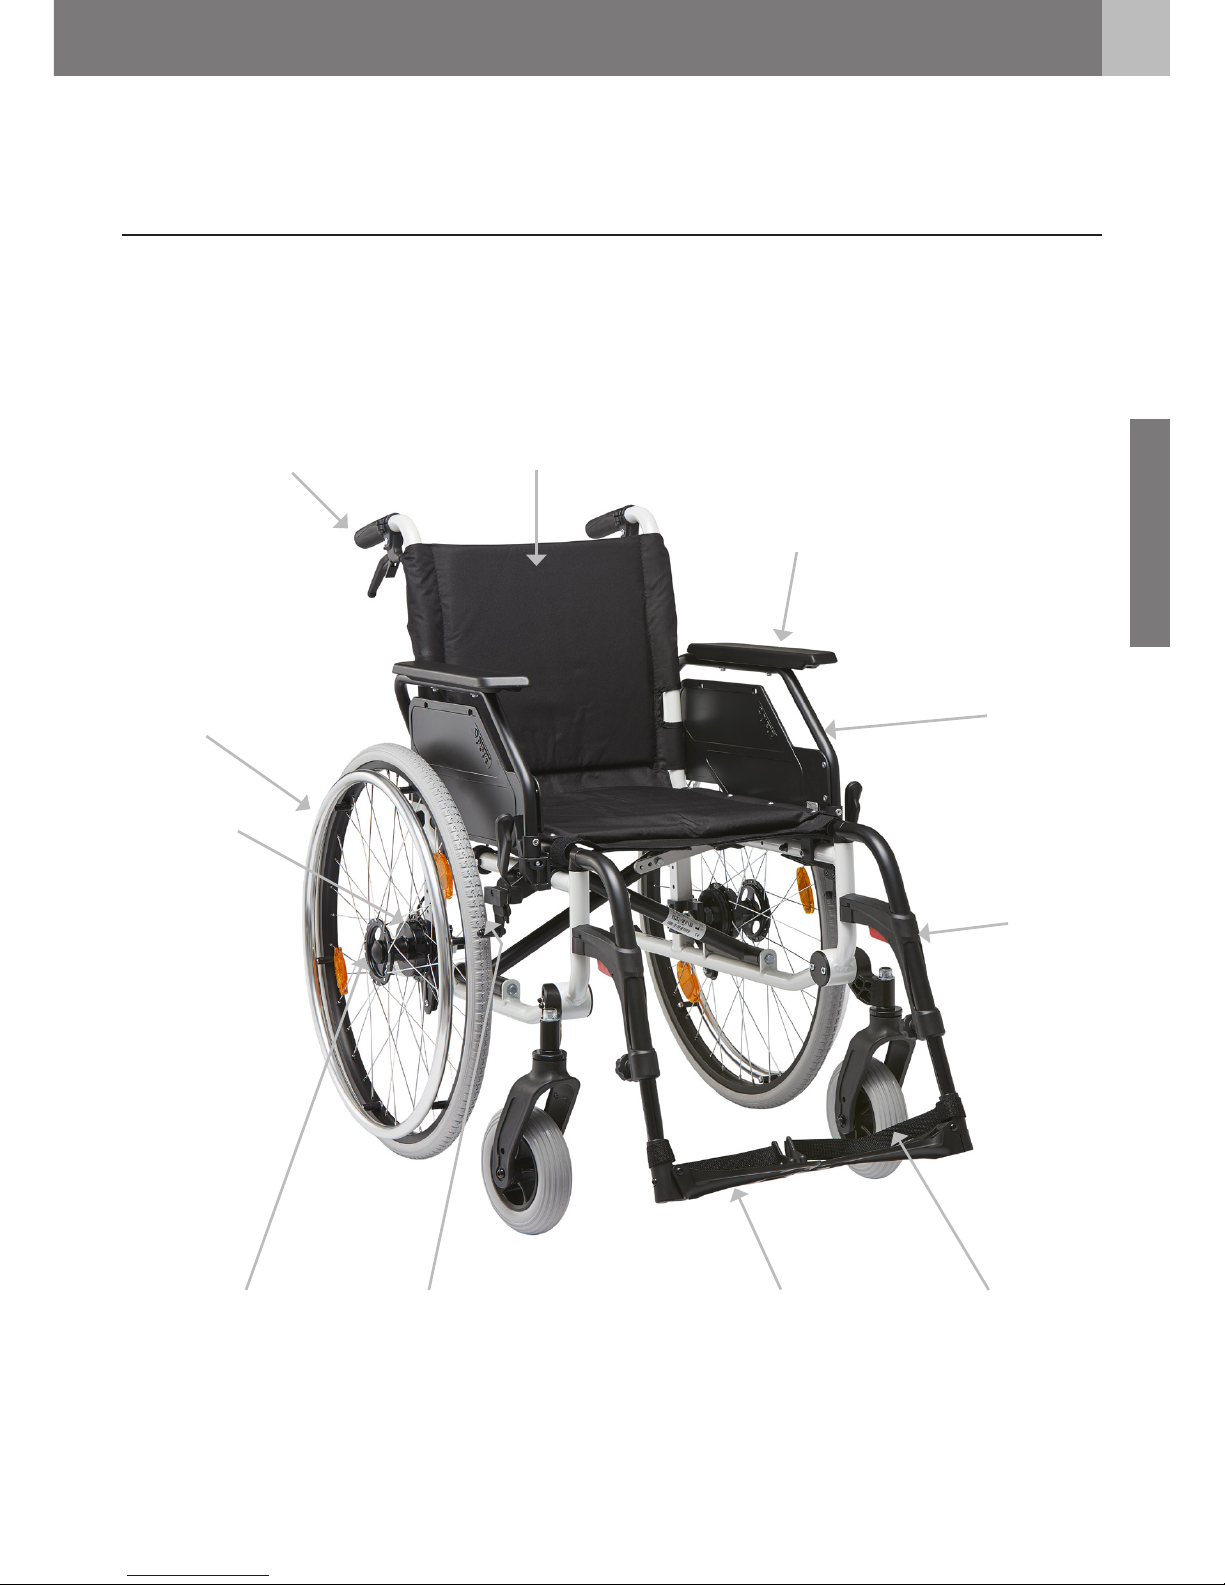
The CANEO_E equipment . . . . . . . . . . . . . . . .9
03 Putting into operation
Preparing the wheelchair for use . . . . . . . . . .10
3.1 Folding apart . . . . . . . . . . . . . . . . . . . .11
3.2 Back upholstery . . . . . . . . . . . . . . . . . .12
3.3 Leg rests . . . . . . . . . . . . . . . . . . . . . . .12
3.4 Foot plates . . . . . . . . . . . . . . . . . . . . . .13
3.5 Removing and connecting the rear
wheels . . . . . . . . . . . . . . . . . . . . . . . . .13
3.6 Seat depth . . . . . . . . . . . . . . . . . . . . . .14
3.7 Lower leg length. . . . . . . . . . . . . . . . . .15
04 Using the wheelchair
Using the Wheelchair . . . . . . . . . . . . . . . . . .16
4.1 Getting in and out of your
wheelchair . . . . . . . . . . . . . . . . . . . . . .16
4.2 Swivelling the side panels back . . . . . . .18
4.3 Folding the foot plates up . . . . . . . . . .18
4.4 Swivelling away and detaching the
leg rests . . . . . . . . . . . . . . . . . . . . . . . .19
4.5 Angle-adjustable foot plates . . . . . . . .19
4.6 Propelling and slowing down the
wheelchair with the push rims. . . . . . . .20
4.7 Park brake . . . . . . . . . . . . . . . . . . . . . .21
4.8 Braking by an accompanying
person (optional) . . . . . . . . . . . . . . . . .22
4.9 Anti-tip wheels (optional) . . . . . . . . . . .23
4.10 Tipping aid . . . . . . . . . . . . . . . . . . . . . .23
4.11 Safety belt (optional). . . . . . . . . . . . . . .24
4.12 Transport . . . . . . . . . . . . . . . . . . . . . . .25
Transport of the wheelchair without user . . . .25
Using wheelchairs as a passenger seat in a
vehicle . . . . . . . . . . . . . . . . . . . . . . . . . . . . .26
Securing the wheelchair restraint system . . .27
Wheelchair occupant restraint system . . . . . .28

5
DE
EN
FR
IT
NL
CONTENTS
05 Individual settings
Adjustments for individual settings . . . . . . . .30
5.1 Park brake . . . . . . . . . . . . . . . . . . . . . .30
5.2 Drum brake (optional) . . . . . . . . . . . . . .31
5.3 Backrest . . . . . . . . . . . . . . . . . . . . . . . .31
5.4 Armrest height . . . . . . . . . . . . . . . . . . .32
5.5 Armrest positioning (desk/long). . . . . . .32
5.6 Seat height adjustment . . . . . . . . . . . . .33
5.7 Seat angle adjustment . . . . . . . . . . . . .34
5.8 Wheelbase extension . . . . . . . . . . . . . .35
5.9 Pushing handle . . . . . . . . . . . . . . . . . .35
06 Technical data
DIETZ measurement system. . . . . . . . . . . . . .36
Technical specications . . . . . . . . . . . . . . . . .38
Maintenance log . . . . . . . . . . . . . . . . . . . . . .39
07 Safety instructions
Safety instructions. . . . . . . . . . . . . . . . . . . . .40
08 Instructions for general use
Checking the wheelchair by the user . . . . . . .42
Care instructions for the user. . . . . . . . . . . . .43
Disposal . . . . . . . . . . . . . . . . . . . . . . . . . . . .43
Forwarding/reusing . . . . . . . . . . . . . . . . . . . .45
09 Manufacturer‘s declarations
Warranty. . . . . . . . . . . . . . . . . . . . . . . . . . . .46
Lifetime. . . . . . . . . . . . . . . . . . . . . . . . . . . . .46
Declaration of conformity . . . . . . . . . . . . . . .46
Product testing . . . . . . . . . . . . . . . . . . . . . . .46
Responsibility . . . . . . . . . . . . . . . . . . . . . . . .47
Liability. . . . . . . . . . . . . . . . . . . . . . . . . . . . .47

6
DIETZ GmbH / Operating instructions lightweight folding wheelchair CANEO_E / Version 5.0.0. EN
01 INFORMATION
INTENDED PURPOSE
The CANEO_E wheelchair has been designed for indoor and outdoor
use. It can be self-propelled by the patient or used with an accompa-
nying person to support.
In two variants, the CANEO_E is designed for a maximum load of 125 kg
or 130 kg. This specification can be checked on the serial number sticker
placed on the crossbar/frame.
INDICATION
Inability to walk or severely pronounced walking disability due to
t Paralysis
t Loss of limbs
t Limb defect/deformation
t Joint contracture/joint damage (not on both arms)
t Other diseases
CONTRAINDICATION
Use of the wheelchair is unsuitable in the case of
t False sensations
t Severe disequilibrium
t Loss of limbs on both arms
t Joint contracture/joint damage on both arms
t Inability to sit
t Impaired or inadequate vision

WARNING
Warnings about potential
dangers with the risk of injury of
the user or accompanying person.
NOTE
Valuable tips and tricks to help
you use your wheelchair.
CAUTION
Warning about potential dangers
that might damage or destroy the
product.
7
DE
EN
FR
IT
NL
01 INFORMATION
SYMBOLS
Different symbols are used in this manual to give
you warnings about potential dangers and help-
ful advice for the daily use of your wheelchair.

8
DIETZ GmbH / Operating instructions lightweight folding wheelchair CANEO_E / Version 5.0.0. EN
02 PRODUCT DESCRIPTION
The CANEO_E wheelchair is packed in a cardboard box. Please keep the
packaging if possible; it can subsequently be used to store the wheel-
chair if necessary.
The CANEO_E is pre-assembled and very easy to set up. To get started
you simply have to unfold the wheelchair and click the leg rests into
place. In the following chapter you can find some information about
how to set up and use your wheelchair.
SCOPE OF DELIVERY
On receipt of the wheelchair, please immediately check to make sure
that the contents are complete and undamaged. The contents consist of:
t 1 set of cardboard box and packaging
t 1 pre-assembled wheelchair
t 1 pair of leg rests
t 1 set of bushes and screws for armrest height adjustment
t 1 user’s manual
t Accessories (if selected)
WHEELCHAIR TOTAL WIDTH
The wheelchair CANEO_E exceeds the recommended total width of a
wheelchair according to DIN EN12183 of 70 cm slightly with 1 cm only
in the seat width 51 cm. The seat widths 39/42/45 and 48 cm are in the
recommended range in relation to the total width.
NOTE
Ensure that the wheelchair is not parked in direct vicinity
of emergency exits and escape routes and blocks them.

9
DE
EN
FR
IT
NL
02 PRODUCT DESCRIPTION
THE CANEO_E EQUIPMENT
Basic components
Park brake Foot plate
Heel strap
Quick-release axle
Leg rest
Sideguard
(swing-away)
Armrest (height-adjustable)
Backrest
(adjustable)
Push handles
(height-adjustable)
Push rims
Curb climber

10
DIETZ GmbH / Operating instructions lightweight folding wheelchair CANEO_E / Version 5.0.0. EN
PREPARING THE WHEELCHAIR FOR USE
The CANEO_E is pre-assembled and very easy to set up. To get started
you simply have to unfold the wheelchair and click the leg rests into
place. In this folowing chapter you can find some information about
how to set up and use your wheelchair. You can find information about
simple settings and adjustments that can be done without any tools.
Information about more complex adjustments like seat height etc. can
be found in chapter »05 Individual settings«.
03 PUTTING INTO OPERATION
WARNING
Risk of trapping!
When folding and unfolding your wheelchair, pay attention
to your ngers and only grip the parts as seen in the
illustrations.

11
DE
EN
FR
IT
NL
03 PUTTING INTO OPERATION
3.1 Folding apart
Position yourself next to the wheelchair and
tilt it slightly towards you. Then press the
crossbar apart with both your hands.
Make sure that the crossbar engages properly
in its sideframe brackets.

12
DIETZ GmbH / Operating instructions lightweight folding wheelchair CANEO_E / Version 5.0.0. EN
3.2 Back upholstery
Pull the backupholstery lid to the rear undersi-
de of the seat and secure it with the Velcro
strap; the gap between the backrest and the
seat surface is now closed.
3.3 Leg rests
Hook the leg supports in and swivel them for-
wards. The leg rest will then click into place
automatically.
03 PUTTING INTO OPERATION

13
DE
EN
FR
IT
NL
03 PUTTING INTO OPERATION
3.4 Foot plates
Fold the foot plates down.
3.5 Removing and connecting the rear
wheels
In some situations it is helpful to remove the
rear wheels.
Press the button on the quick-release axle and
hold the hub with four fingers. Then pull the
rear wheel out of the axle mounting.
To connect the rear wheels, press the quick-re-
lease axle button with your thumb again. Now
insert the axle into the axle mounting; the
quick-release axle will engage automatically.
CAUTION
After connecting the wheels
make sure that the quick-release
axles are engaged properly.
NOTE
Push the quick-release button
while engaging the wheels. The
axle/wheel will engage a lot
easier.

14
DIETZ GmbH / Operating instructions lightweight folding wheelchair CANEO_E / Version 5.0.0. EN
3.6 Seat depth
The wheelchair is always delivered with the
maximum possible seat depth. To reduce the
seat depth, first remove the leg supports. Next,
open the Velcro straps on the right and left of
the seat frame. Secure the Velcro straps to the
extension so that they are no longer wrapped
around the frame. Fold the extension beneath
the seat and fasten the Velcro straps to secure
it there.
Carry the procedure out in the opposite se-
quence to increase the seat depth.
03 PUTTING INTO OPERATION

15
DE
EN
FR
IT
NL
03 PUTTING INTO OPERATION
3.7 Lower leg length
The setting is correct when your upper legs are
horizontal with your feet positioned on the
foot plates.
To adjust, release the adjustment screw one
quarter of a turn and pull the locking mecha-
nism backwards. Move the foot plate to a
comfortable position and release the locking
mechanism again. The mechanism automati-
cally locks in the next position. Then tighten
the adjustment screw securely again.

16
DIETZ GmbH / Operating instructions lightweight folding wheelchair CANEO_E / Version 5.0.0. EN
04 USING THE WHEELCHAIR
USING THE WHEELCHAIR
4.1 Getting in and out of your
wheelchair
Different handicaps allow more or less
manoeuvrability.
To get in and out of your wheelchair easily and
safely, the following tips can be helpful.
NOTE
To stop the wheelchair from rolling
or sliding away while getting
seated, it is helpful to place both
rear wheels against a wall.

17
DE
EN
FR
IT
NL
04 USING THE WHEELCHAIR
Getting into your wheelchair
1. Take off the leg rests (see chapter 4.4).
2. If possible, place the wheelchair’s rear wheels against a wall to
avoid any roll-off.
3. Apply both locking brakes.
4. Place yourself in front of the wheelchair. Then carefully move back-
wards until your legs touch the seat.
5. Now grab the armrest with your hands.
6. You can now sit down slowly and safely.
7. Put the leg rests back into place.
8. Fold the foot plates down (see chapter 3.4).
Getting out of your wheelchair
Carry the procedure out in the opposite sequence.
NOTE
To transfer sideways, you can swing away the side panels
(see chapter 4.2).

18
DIETZ GmbH / Operating instructions lightweight folding wheelchair CANEO_E / Version 5.0.0. EN
04 USING THE WHEELCHAIR
4.2 Swivelling the sideguards back
To swivel up, press the locking lever and pull
the sideguard upwards.
The sideguardl engages automatically on swi-
velling back.
This engagement is clearly audible.
4.3 Folding the foot plates up
Fold the foot plates up to make entering and
exiting easier.
The foot plates must be folded up to save spa-
ce when folding the wheelchair together.

19
DE
EN
FR
IT
NL
04 USING THE WHEELCHAIR
4.4 Swivelling away and detaching the
leg rests
To remove the leg rests, first fold the foot
plates up.
Now pull the locking lever (orange) and swivel
the leg support outwards.
The leg support can now be detached upwards.
Carry the procedure out in the opposite se-
quence during assembly.
When the leg support is swivelled forwards, it
can be clearly heard to engage.
4.5 Angle-adjustable foot plates
The CANEO_E is equipped with angle-adjusta-
ble foot plates as standard. To adjust the ang-
le, first loosen the lever bolt and pull the foot
plate slightly inwards until the locking mecha-
nism is released. Now set the desired angle
and tighten the lever bolt again.

WARNING
When propelling your wheelchair,
make sure that you do not touch
the tyre casing with your thumb.
Risk of trapping between the tyre
and sideguard/armrest!
20
DIETZ GmbH / Operating instructions lightweight folding wheelchair CANEO_E / Version 5.0.0. EN
04 USING THE WHEELCHAIR
4.6 Propelling and slowing down the
wheelchair with the push rims
The wheelchair can be manoeuvred forwards,
rearwards and left to right by using the push
rims on the rear wheels.
Hold the push rim with your hand and move
the wheel to the front or rear.
Your thumb should lay on top while you grab
the push rim by making a fist.
To slow down the wheelchair, control the push
rim by letting it slide through your hand.
WARNING
During hard braking manoeuvres
the pushrims can become quite
hot.
To steer the wheelchair, the push rim is braked
on the side to which you want to steer or turn.
To turn on the spot one hand pushes forward
and the other hand backwards at the same
time.
Table of contents
Other Dietz Wheelchair manuals

Dietz
Dietz TOMTAR Levina 320-2 User manual

Dietz
Dietz SANGO ADVANCED Series User manual
![Dietz AS[01] User manual Dietz AS[01] User manual](/data/manuals/20/j/20jko/sources/dietz-as-01--manual.jpg)
Dietz
Dietz AS[01] User manual

Dietz
Dietz Tauron DTRS User manual

Dietz
Dietz SANGO ADVANCED Series User manual

Dietz
Dietz 197022 User manual

Dietz
Dietz Caneo 200 User manual

Dietz
Dietz tauron rsi XXL User manual

Dietz
Dietz CANEO_XL User manual

Dietz
Dietz 430101 User manual
Popular Wheelchair manuals by other brands

Plusmed
Plusmed pM-WCH52 instruction manual

VELTOP
VELTOP COSY PLUS INSTRUCTIONS OF INSTALLING

Graham Field
Graham Field 5226 Assembly & operation instructions

Vitea Care
Vitea Care MDH W4026 Mini Instructions for use

Unicare Health
Unicare Health ANSA Relax Instruction & safety manual

Invacare
Invacare 2GT parts catalog