Dietz TOMTAR Levina 320-2 User manual

EN
IT
NL
FR
Version 3.0.0
Levina 320-2
Levina 400-2
Levina 320-2
Levina 400-2
Shower commode chairs
User manual

Record of product identication data
We recommend that you write down your product identication data (found on product label) be-
low, so that you have these on hand should you require any further information about your product
(see chapter “Product labelling”).
Type / model:
Item No. / REF:
Serial number (21):
Date of manufacture:
Other information/notes:

Thank you for choosing to purchase a
Levina shower commode chair
from DIETZ.
This product is a medical aid. In order to use it properly and avoid possible
risks due to unintended use, you must become thoroughly familiar with its
operation.
Read this user manual carefully before you begin using your shower com-
mode chair. It contains important instructions that will enable you to fully
take advantage of the technical benets.
In addition, you will receive information that will aid with maintaining op-
erational safety and the preservation of your investment in your shower
commode chair.
If you have any questions or require additional information, please contact
the specialist retailer which supplied the product to you.
You will always nd the latest information about your product on our web-
site. For information or queries concerning product safety and on recalls,
please contact DIETZ in writing or by telephone. You will nd our contact
information on the back of this user manual.
NOTE
A large-print version of this user manual is available
for visually impaired persons at
www.dietz-group.de in PDF format.
3
DE
EN
FR
IT
NL
FOREWORD

4
DIETZ GmbH // User manual Levina 320-2 & 400-2 shower commode chair | Version 3.0.0 EN
CONTENTS
01 Important information
General information . . . . . . . . . . . . . . . . . . . .5
Intended purpose . . . . . . . . . . . . . . . . . . . . . .5
Indications . . . . . . . . . . . . . . . . . . . . . . . . . . .5
Contraindications . . . . . . . . . . . . . . . . . . . . . .5
02 Product description
Symbols . . . . . . . . . . . . . . . . . . . . . . . . . . . . .6
Scope of delivery . . . . . . . . . . . . . . . . . . . . . .6
Accessories (optional) . . . . . . . . . . . . . . . . . . .7
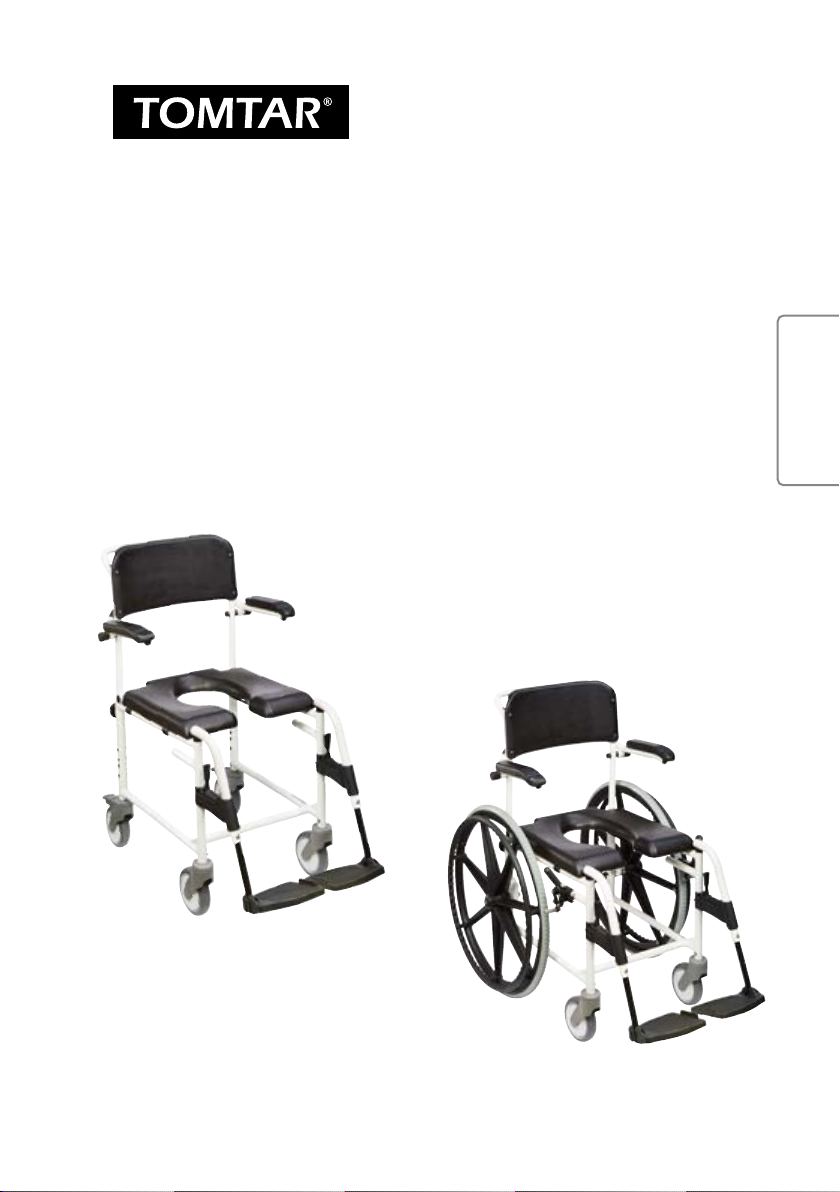
Levina 320-2 product layout . . . . . . . . . . . . . .7
Levina 400-2 product layout . . . . . . . . . . . . . .7
03 Preparing the product for use
Information on Assembly. . . . . . . . . . . . . . . . .8
Tools . . . . . . . . . . . . . . . . . . . . . . . . . . . . . . .8
Assembly instructions . . . . . . . . . . . . . . . . . . .8
Mounting rear wheels on Levina 400-2 . . . . . .8
Mounting parking brakes on Levina 400-2. . . .9
Attaching the seat surface. . . . . . . . . . . . . . .10
04 Using the shower commode chair
Attaching the leg rests . . . . . . . . . . . . . . . . .11
Basic adjustments . . . . . . . . . . . . . . . . . . . . .11
Adjusting the height of the foot plates. . . . . .11
Using the parking brakes. . . . . . . . . . . . . . . .12
Getting in and out of the Levina . . . . . . . . . .13
Getting in and out from the side . . . . . . . . . .14
Getting in and out from the front. . . . . . . . . .14
Propelling and slowing down Levina 400-2 . .15
Use as a commode chair . . . . . . . . . . . . . . . .16
Use as a shower chair . . . . . . . . . . . . . . . . . .16
Transport. . . . . . . . . . . . . . . . . . . . . . . . . . . .17
Accessories & add-ons from external suppliers.17
05 Settings & accessories
Important notes for making adjustments . . . .18
Removing/replacing the pail rail. . . . . . . . . . .18
Accessory toilet pail (optional). . . . . . . . . . . .18
Accessory height adapter 50 mm (optional) . .19
06 Technical data
Shower commode chair dimensions . . . . . . . .20
Product tests. . . . . . . . . . . . . . . . . . . . . . . . .21
Further technical information. . . . . . . . . . . . .22
Materials . . . . . . . . . . . . . . . . . . . . . . . . . . .22
07 Safety instructions
Safety instructions. . . . . . . . . . . . . . . . . . . . .23
08 Instructions for general use
Servicing / maintenance. . . . . . . . . . . . . . . . .24
Maintenance schedule. . . . . . . . . . . . . . . . . .25
Fault-nding and rectication . . . . . . . . . . . .26
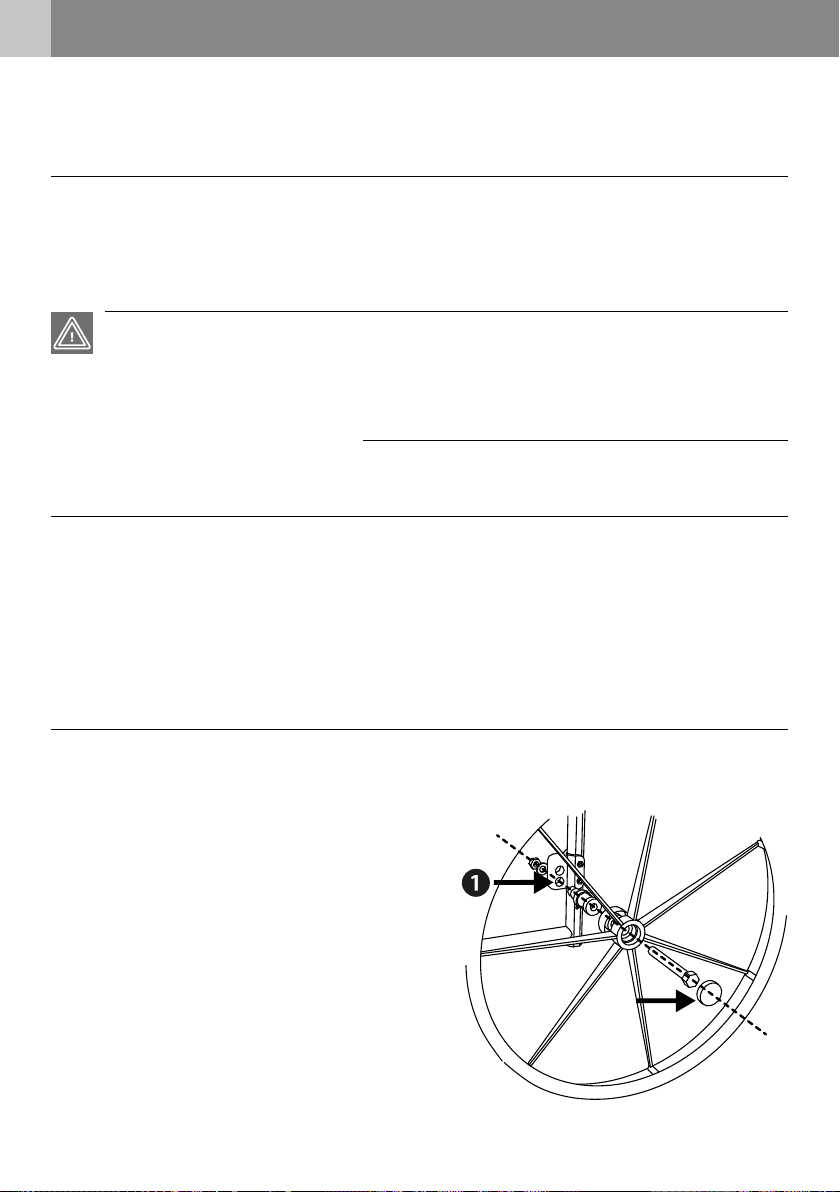
Repair / replacement of a swivel wheel . . . . .26
Cleaning . . . . . . . . . . . . . . . . . . . . . . . . . . . .27
Disinfection. . . . . . . . . . . . . . . . . . . . . . . . . .27
Handing over and reuse. . . . . . . . . . . . . . . . .27
Storage. . . . . . . . . . . . . . . . . . . . . . . . . . . . .28
Disposal . . . . . . . . . . . . . . . . . . . . . . . . . . . .28
Product labelling . . . . . . . . . . . . . . . . . . . . . .29
09 Manufacturer declarations
Warranty . . . . . . . . . . . . . . . . . . . . . . . . . . .30
Lifetime. . . . . . . . . . . . . . . . . . . . . . . . . . . . .30
Liability. . . . . . . . . . . . . . . . . . . . . . . . . . . . .30

5
DE
EN
FR
IT
NL
01 IMPORTANT INFORMATION
GENERAL INFORMATION
This user manual is included in the scope of delivery. The user should keep this manual on hand at
all times and it must remain with the product if the product is passed on to a third party. We reserve
the right to make changes to the versions shown in this user manual as a result of further technical
development. Reprints, translations and reproductions of this manual in any form, in whole or in
part, require the written approval of DIETZ GmbH. The copyright is owned by the manufacturer. You
can obtain the latest version of the user manual by contacting DIETZ GmbH.
INTENDED PURPOSE
The shower commode chair was developed for people with limited mobility. It is designed exclusive-
ly for indoor use and serves as an aid for bodily hygiene, showering, bathing and going to the toilet.
Use for other purposes is not permitted. The shower commode chair is designed for a maximum user
load of 120 kg. If the shower commode chair is moved by an accompanying person, this person
must be physically capable of pushing and braking the occupied wheelchair. The shower commode
chair is not to be used by children and persons who are shorter than 146 cm or weigh less than 40
kg (BMI < 17). The Levina is not suitable for use as permanent seating.
INDICATIONS
The use of a Levina is indicated when people with limited mobility are unable to use the existing
bathtub and/or shower, possibly also with a bath or shower aid. Even if it is not possible to use or
reach the shower / toilet due to the disability, the Levina can be used as a commode chair.
CONTRAINDICATIONS
The use of the shower commode chair is not indicated for:
tPerception disorders
tSevere disequilibrium
tInability to sit
tA body weight exceeding 120 kg.

6
DIETZ GmbH // User manual Levina 320-2 & 400-2 shower commode chair | Version 3.0.0 EN
SYMBOLS
These symbols indicate passages of text that are helpful for using and operating the product in every-
day life.
WARNING
It is mandatory to observe and comply with warnings. They draw your attention to the fact that failure
to comply with them may result in injury and/or damage to the product or the environment.
NOTE
Tips and advice which make using the various functions easier.
SCOPE OF DELIVERY
The shower commode chair is partially assembled at the factory and packaged in a box. Loose com-
ponents are secured in other enclosed cardboard boxes and lms. Upon receipt of the goods, please
immediately check to make sure that the contents are complete and undamaged. If the contents are
noticeably damaged, inform the specialist retailer immediately.
The contents consist of:
t1 Levina shower commode chair incl. seat surface with hygiene opening/insert
t1 user manual
tIn separate box: 2 leg rests, calf strap, and locking screws
t2 parking brakes, separately for Levina 400-2
tAccessories (if selected)
WARNING
Risk of poisoning: When burnt, packaging lms can release toxic gases.
Risk of suffocation: Keep the plastic bags out of the reach of children.
02 PRODUCT DESCRIPTION

7
DE
EN
FR
IT
NL
02 PRODUCT DESCRIPTION 02 PRODUCT DESCRIPTION
ACCESSORIES (OPTIONAL)
Accessories available from the manufacturer:
tHeight adapter
tPail
LEVINA 320-2 PRODUCT LAYOUT
A) Push bar for accompanying person
B) Backrest
C) Armrests, can be folded upwards
D) Seat surface with opening
E) Leg rest, can be swiveled away, removable
F) Locking screw for rear frame
G) Swivel wheel
H) Swivel wheel with total lock
Not shown in the gure:
wCalf strap
wHygiene opening/insert
wInsertion rail for toilet pail
LEVINA 400-2 PRODUCT LAYOUT
A) Push bar for accompanying person
B) Backrest
C) Armrests, can be folded upwards
D) Seat surface with opening
E) Parking brake
F) Rear wheel with push rims
G) Swivel wheels
H) Leg rest, can be swiveled away, removable
Not shown in the gure:
wCalf strap
wHygiene opening/insert
wInsertion rail for toilet pail
A
B
C
D
E
F
H
G
Fig.1
Fig.2
A
B
C
D
E
F
G
H

8
DIETZ GmbH // User manual Levina 320-2 & 400-2 shower commode chair | Version 3.0.0 EN
03 PREPARING THE PRODUCT FOR USE
INFORMATION ON ASSEMBLY
The shower commode chair will need to be assembled after being unpacked. The assembly and the
functional check are to be performed by the specialist dealer. The dealer’s technician adapts the
shower commode chair to the respective user.
WARNING
Risk of rolling away: Before any action while stationary, actuate the total locks or the parking brakes
on the shower commode chair (Levina 400-2).
Risk of trapping: on all movable parts!
TOOLS
The following standard tools are required for the shower commode chair:
tOpen-end spanner 8, 10, 17
tAllen key 4, 5
tPhillips screwdriver ph1, ph2
ASSEMBLY INSTRUCTIONS
Mounting rear wheels on Levina 400-2
Tools: 2 x 17 mm open-end spanner,
Phillips screwdriver ph1
1. Disassemble the axle from the drive wheels.
2. Mount the drive wheels with the axle from
the outside to the inside in the lower drill hole
of the rear wheel adapter plate (1, Fig. 3).
3. Finally screw the cover caps back onto the
quick-release axle (2, Fig. 3). ❷
Fig.3

9
DE
EN
FR
IT
NL
03 PREPARING THE PRODUCT FOR USE 03 PREPARING THE PRODUCT FOR USE
Mounting parking brakes on Levina 400-2
Tools: 5 mm Allen key
The parking brakes are enclosed seperately
in in the scope of delivery.
1. The distance between the brake pin and tyre
casing must be 50 mm at the narrowest point
when the brake is fully open (Fig. 4).
2. Make sure that the distance between the
brake bolt and the tire cover is 50 mm (Fig. 4),
when installing the brake fastening adapter
(1, Fig. 5).
3. Subsequently, re-tighten the connection
(1, Fig. 5) and repeat the steps on the other
side for the second parking brake.
4. Check that everything is working properly.
When the brakes are engaged, it must not be
possible to push the shower commode chair.
When using the optional height adapter, the
distance between the brake bolt and the tire
cover must also be 50 mm. To correct this, loo-
sen the fastening adapter of the brake again
and bring it into the correct position (1, Fig. 5).
WARNING
Risk of rolling away: Ensure that the brakes
are evenly adjusted on both sides of the shower
commode chair.
50
mm
Fig.4
❶
Fig.5
NOTE
Orientation marker: The red markings on
the frame and on the brake include the fas-
tening adapter of the brake (1, Fig. 5) on the
right and left side, when standard mounting
without the height adapter set.

10
DIETZ GmbH // User manual Levina 320-2 & 400-2 shower commode chair | Version 3.0.0 EN
Mounting the backrest
1. Insert the back frame tubes from above into
the rear tubes of the base frame (1, Fig. 5).
2. The frame tubes are rmly screwed together
using the star grip screws provided (2, Fig. 3).
Attaching the seat surface
1. First, engage the parking brakes.
2. Now insert the seat cushion, aligning the re-
cess with the rear cross member of the frame
(1, Fig. 7).
3. Now press the seat down onto the frame
from above with your hands spread at.
4. Make sure that the clips on the underside of
the seat surface snap completely into the
frame.
WARNING
Risk of trapping: When the seat upholstery
snaps into place, there is a danger of ngers get-
ting caught between the frame and the uphol-
stery!
Fig.6
04 USING THE SHOWER COMMODE CHAIR03 PREPARING THE PRODUCT FOR USE
Fig.7

11
DE
EN
FR
IT
NL
Attaching the leg rests
1. Hook the leg rests into the sides of the frame
tube from above (1, Fig. 8).
2. Fold the leg rest forwards until it audibly en-
gages (2, Fig. 8).
BASIC ADJUSTMENTS
Adjusting the height of the foot plates
1. Loosen the screw connection on the back of
the leg rest tube. (1, Fig. 9).
2. Set the desired height of the foot plate over
the 9 drill holes (2, Fig. 9).
3. Insert the screw into the desired drill hole and
tighten the screw rmly.
NOTE
The setting is correct if your thighs are horizontal
on the seat surface when the feet are placed on
the foot plates.
Fig.8
04 USING THE SHOWER COMMODE CHAIR
❶
❷
Fig.9
03 PREPARING THE PRODUCT FOR USE

12
DIETZ GmbH // User manual Levina 320-2 & 400-2 shower commode chair | Version 3.0.0 EN
USING THE PARKING BRAKES
Brakes on Levina 320-2
The Levina 320-2 is outtted with four 5-inch
swivel wheels. The two rear ones are equipped
with total locks. When the respective total lock is
engaged, the swivel wheel is braked and also
prevented from rotating. To ensure a rm foot-
ing, always engage both total locks.
1. Actuate the total lock mechanism by stepping
on the locking rocker of both rear wheels. (1,
Fig. 10)
2. To release the total lock, step on the small
rocker lever (2, Fig. 10).
Brakes on Levina 400-2
The shower commode chair has one parking
brake on either side. They can be used to park the
shower commode chair safety. They are not suit-
able for braking while in motion! For this pur-
pose, the push rims are to be used. To brake, use
your palms to apply light pressure. (see chapter
„Levina 400-2 propelling and slowing down“).
1. Push both brake levers forwards (1) until they
snap perceptibly into place and the brake
pads (2) lock the wheels into place (Fig. 11).
2. To release the parking brakes: Pull the brake
levers back towards the rear.
WARNING
Risk of injury: Do not use the parking brakes to stop the shower commode chair during motion, as
this may cause the wheels to lock.
If a brake is damaged, discontinue use of the shower commode chair immediately.
❷
❶
Fig.10
❷
❶
Fig.11
04 USING THE SHOWER COMMODE CHAIR04 USING THE SHOWER COMMODE CHAIR

13
DE
EN
FR
IT
NL
GETTING IN AND OUT OF THE LEVINA
To get in and out of your Levina as easily and
safely as possible, pay attention to the following
tips:
1. Release the leg rests and fold them out-
wards. (see next section).
2. If possible, place the Levina’s rear wheels
against a solid wall.
3. Apply the parking brakes or locking brakes
to lock the Levina in place.
4. Stand as close as possible to the Levina.
Turn around, then carefully move back-
wards until your legs touch the edge of the
seat.
5. Now grasp the side elements with both
hands and seat yourself down slowly and
carefully into the shower commode chair.
6. Now fold both leg rests forward, towards
the direction of travel. Listen and feel for
the click to ensure that the leg rests are cor-
rectly engaged.
7. Finally, fold both foot plates downwards
using your feet and place your feet on the
foot plates (see the section „Getting in and
out from the front“)..
Perform these steps in reverse to get back up.
04 USING THE SHOWER COMMODE CHAIR04 USING THE SHOWER COMMODE CHAIR
Fig.12
NOTE
Place the rear of the shower commode chair up
against a stable wall. This ensures that the
shower commode chair will not roll away
on smooth surfaces.

14
DIETZ GmbH // User manual Levina 320-2 & 400-2 shower commode chair | Version 3.0.0 EN
GETTING IN AND OUT FROM THE SIDE
WARNING
Danger of falling: When transferring side-
wards or standing up, always swivel the footrests
off to the side. Never stand on the foot plates.
1. First, engage the parking brakes (1, Fig 13).
2. To make it easier to sit down or get up, the
armrests can easily be folded back (2, Fig. 13).
3. To swivel the leg rests, operate the lever on
the frame pipe (1, Fig. 14) and swivel the leg
rest simultaneously towards the outside (2,
Fig. 14).
4. The leg rest can then be removed in an up-
wards direction (3, Fig 14).
WARNING
Risk of trapping: When folding the armrests
down, body parts and pieces of clothing may get
caught in the attachment.
GETTING IN AND OUT FROM THE FRONT
1. First, engage the parking brakes.
2. To make it easier to sit down and get back up,
the foot plates can be folded upwards
(Fig. 15). Alternatively, the entire leg rest can
also be swiveld outwards (Fig. 14).
Fig.13
Fig.15
Fig.14
04 USING THE SHOWER COMMODE CHAIR04 USING THE SHOWER COMMODE CHAIR

15
DE
EN
FR
IT
NL
PROPELLING AND SLOWING DOWN LEVINA 400-2
The Levina 400-2 is pushed and slowed down
using the push rims. Grip the push rims with
your hands, with your thumbs pointing forwards
on the push rims (siehe Fig.16).
WARNING
Risk of injury: Ensure that your thumbs do not
touch the tyre casing of the wheel whilst the
wheelchair is in motion.
To propel the Levina 400-2 forwards: Push both
wheels forwards evenly.
To propel the shower commode chair back-
wards: Push both wheels backwards evenly.
To brake the shower commode chair: Close your
hands around the push rims and gradually in-
crease the pressure of your grip.
To steer to one side: Slow the wheel on the side
to which you wish to turn.
To turn the shower commode chair on the spot:
Push one wheel forwards and the other wheel
backwards at the same time.
WARNING
Risk of burning: If you brake the shower com-
mode chair sharply, the push rims can become
hot in your hands.
Fig.16
04 USING THE SHOWER COMMODE CHAIR04 USING THE SHOWER COMMODE CHAIR

16
DIETZ GmbH // User manual Levina 320-2 & 400-2 shower commode chair | Version 3.0.0 EN
USE AS A COMMODE CHAIR
Before use:
1. First, engage the parking brakes.
2. Place the pail without a lid over the slide rail
from behind under the seat until it locks in
place.
3. If necessary, remove the insert of the hygiene
opening.
After use:
1. To empty the pail, pull it out towards the
rear. (Fig. 17)
2. Place the lid on the pail.
3. After emptying, clean the product as
prescribed (see chapter “Cleaning” /
“Desinfection”).
Use with a conventional toilet:
1. First, remove the pail by pulling it out
towards the rear (Fig. 17).
2. Remove the hygiene opening.
3. Fold the toilet seat back.
4. Move the chair over the toilet bowl and
engage the parking brake (or have your accompanying person do it for you).
USE AS A SHOWER CHAIR
1. First, engage the parking brakes and pull the
toilet pail out towards the rear.
2. To make it easier to clean and care for your
body, remove the insert of the hygiene open-
ing.
After showering, clean the product as
prescribed (see chapter “Cleaning”/“Disinfection”).
Fig.17
WARNING
Risk of trapping: Do not pull out the pail
while a person is still sitting on the shower com-
mode chair.
WARNING
Risk of trapping: Do not pull out the pail
while a person is still sitting on the shower com-
mode chair.
04 USING THE SHOWER COMMODE CHAIR04 USING THE SHOWER COMMODE CHAIR

17
DE
EN
FR
IT
NL
TRANSPORT
The shower commode chair is not a device for frequent transport. Should it be necessary to
transport the chair, we recommend disassembling it according above assembly instructions in
reverse. The shower commode chair should be packed such that it is in a stable position and
there is no danger of sudden and dangerous movements in the means of transport.
If you have to carry the assembled Levina, we recommend that you remove the footrests before
lifting the shower commode chair by using both sides of the seat frame.
WARNING
Risk of injury: Never lift the wheelchair by the footrest suspensions or the leg rests.
ACCESSORIES & ADD-ONS FROM EXTERNAL SUPPLIERS
Generally, only original accessories from DIETZ GmbH are permitted to be used. If third-party products
are installed on the shower commode chair, responsibility for the safety of the product passes to the
person who installs the accessories or carries out the installation. A new declaration of the compliance
of the combination of accessories or add-on and product is then to be made by the person who at-
taches it. The compliance declared by DIETZ according to MDR 2017/745, Annex II shall expire.
WARNING
Safety hazard: Should add-ons or accessories that are not sold by DIETZ be used, the safety of the
product cannot be guaranteed.
If accessories or add-ons are added to the shower commode chair, the safety instructions in the user
manual for the accessories or add-ons must be observed.
04 USING THE SHOWER COMMODE CHAIR04 USING THE SHOWER COMMODE CHAIR

18
DIETZ GmbH // User manual Levina 320-2 & 400-2 shower commode chair | Version 3.0.0 EN
IMPORTANT NOTES FOR MAKING ADJUSTMENTS
Accessories are sometimes required for the settings described below. Only original accessories
from DIETZ may be used. Only then is the compliance and thus the safety of the product guaran-
teed.
When setting up a new user for the first time, all wheelchair adjustments must be carried out by
qualified specialists so that correct positioning and safety can be guaranteed.
WARNING
Complex adjustment tasks that can result in a risk of accident if not performed correctly must only
be conducted by designated specialist staff and are labelled accordingly. “Only to be performed by
specialist staff”.
This applies in particular to adjusting the brakes and for settings that affect the stability of the
wheelchair.
Removing/replacing the pail rail
Tools: Phillips screwdriver ph2
By removing the pail rail, you gain an additional drive-over height of 25 mm. This may be nec-
essary for using the Levina with a conventional toilet.
1. To do so, remove the seat surface from the frame by pulling it upwards from the front, out of the
clamp bracket.
2. Loosen the four screws of the pail rails on the underside using a Phillips screwdriver.
Accessory toilet pail (optional)
The optional toilet pail is supplied with a lid and is pushed into the pre-assembled pail rails
from behind under the chair before use as a commode chair. For cleaning instructions, please
refer to the chapter “Cleaning”/”Disinfection”.
05 SETTINGS & ACCESSORIES05 SETTINGS & ACCESSORIES

19
DE
EN
FR
IT
NL
Accessory height adapter 50 mm (optional)
Only to be performed by specialist staff:
Tools: Phillips screwdriver ph1, open-end spanner 17 mm (2 pc.) and 10 mm, Allen key 5 mm
The height adapter set consists of two height adapters for the front wheels ∅19 mm and two height
adapters for the rear wheels ∅17.7 mm. With the Levina 320-2 all four height adapters are required,
with the Levina 400-2 only the front ones (∅ 19 mm), as the drive wheel height is adjusted down-
wards by moving the rear wheel adapter.
Levina 320-2
1. Remove all four swivel wheels with the 10
mm open-end spanner and pull them down
out of the frame.
2. Place the four height adapters between the
frame and the swivel wheel and screw them
rmly onto the frame ( Fig. 18).
Levina 400-2
1. Disassemble the rear wheels (see chapter
„Mounting rear wheels on Levina 400-2“)
and the swivel wheels.
2. Loosen the rear wheel adapter plates and
position them in the lower two frame drill ho-
les (1, Fig. 19).
3. Now mount the rear wheels back in the lower
hole of the rear wheel adapter plates.
4. Now mount the two height adapters (∅ 19
mm) between the frame and the swivel
wheel (2, Fig. 19) and screw them onto the
frame.
5. The parking brakes will need to be readjust-
ed after installing the height adapters (see
chapter „Mounting the parking brake“).
05 SETTINGS & ACCESSORIES05 SETTINGS & ACCESSORIES
Ø 19 mm Ø 17,7 mm
Fig.18
Ø 19 mm
Fig.19

20
DIETZ GmbH // User manual Levina 320-2 & 400-2 shower commode chair | Version 3.0.0 EN
SHOWER COMMODE CHAIR DIMENSIONS
The dimensions given here refer to the standard conguration of the shower commode chair.
NOTE
All dimensions taken on textile parts (e.g. back
upholstery) are to be understood with a toler-
ance of +/– 10 mm.
06 TECHNICAL DATA
Fig.20
a
b
Fig.21
539.65
401.42
208.48
401.42
401.42
This manual suits for next models
1
Table of contents
Other Dietz Wheelchair manuals

Dietz
Dietz SANGO ADVANCED Series User manual

Dietz
Dietz MINKO User manual
![Dietz AS[01] User manual Dietz AS[01] User manual](/data/manuals/20/j/20jko/sources/dietz-as-01--manual.jpg)
Dietz
Dietz AS[01] User manual

Dietz
Dietz CANEO_E User manual

Dietz
Dietz Tauron DTRS User manual

Dietz
Dietz Serena II User manual

Dietz
Dietz CANEO B User manual

Dietz
Dietz TOMTAR Bano User manual

Dietz
Dietz SANGO ADVANCED Series User manual
![Dietz AS[01] User manual Dietz AS[01] User manual](/data/manuals/1u/i/1ui1k/sources/dietz-as-01--manual.jpg)
Dietz
Dietz AS[01] User manual