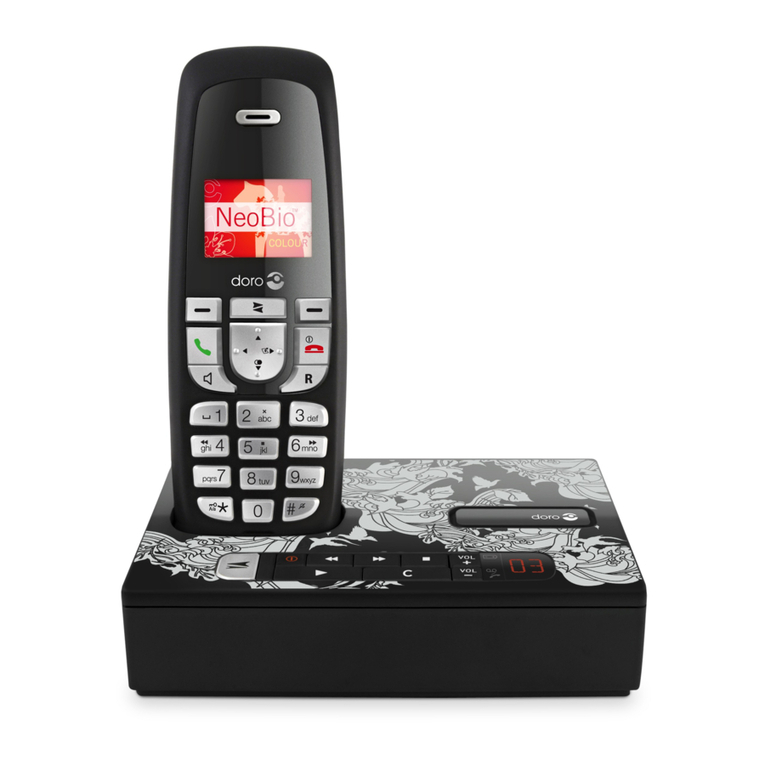
Doro airborne 5000 User manual

5000

8
9
3
56
7
2
1
4
10

Česky
1 Zpětnévolání
2 TlačítkoHovor/tlačítkoR
3 TlačítkoIDvolajícího/listování
4 *avypnutí/zapnutízvonění
5 Interníhovory
6 Programování/potvrzení
7 TlačítkoSmazat/Ztlumit
8 #azámekklávesnice
9 TlačítkoOdpojit
10 Telefonníseznam
English
1 CallBack
2 Talkbutton/RButton
3 CallerID/Scrollbutton
4 *andringsignaloff/on
5 INTcalls
6 Programming/Conrm
7 Delete/mutebutton
8 #andkeyguard
9 Disconnectbutton
10 Phonebook
Magyarul
1 Újrahívás
2 Hívásgomb/Rgomb
3 Hívóazonosítógomb/léptetőgomb
4 *éscsengéski-be
5 Belsőhívások
6 Programozás/megerősítés
7 Törlés/némításgomb
8 #ésbillentyűzár
9 Megszakításgomb
10 Telefonkönyv
Ελληνικά
1 Επιστροφήκλήσης
2 Πλήκτροομιλίας/ΠλήκτροR
3 Πλήκτροαναγνώρισηςκλήσης/
Κύλισης
4 *καιενεργοποίηση/απενεργοποίηση
κουδουνισμού
5 Κλήσειςενδοεπικοινωνίας
6 Πλήκτροπρογραμματισμού/
Επιβεβαίωσης
7 Πλήκτροδιαγραφής/σίγασης
8 #καικλείδωμαπλήκτρων
9 Πλήκτροαποσύνδεσης
10 Τηλεφωνικόςκατάλογος
1 Terugbellen
2 Spreken/R-toets
3 Beller-ID/Scrollen
4 *enbelsignaaluit/aan
5 Interneoproepen
6 Programmeren/Bevestigen
7 Wissen/Microfoonuit
8 #entoetsenblokkering
9 Ophangen
10 Telefoonboek
Nederlands
Français
1 ToucheBis
2 TouchedePrisedeligneetR
3 Touchedenavigation/Journaldes
appelants
4 Touche*etSonnerieOff/On
5 Appelsinternes
6 TouchedeProgrammation/
Conrmation
7 ToucheEffacer/Secret
8 Touche#etdeverrouillageduclavier
9 TouchedeRaccroché
10 Répertoire

8
9
3
56
7
2
1
4
10

Polski
1 Ponownewybieranienumeru
2 Przyciskrozmowy/przyciskR(Recall)
3 Przyciskidentykacjinumeru
dzwoniącego/przewijania
4 Przycisk*iwył./wł.sygnałudzwonka
5 Połączeniawewnętrzne
6 Programowanie/zatwierdzenie
7 Przyciskkasowania/wyłącznik
mikrofonu
8 Przycisk#iblokadaklawiatury
9 Przyciskrozłączania
10 Książkatelefoniczna
1 Richiamata
2 TastoConversazione/TastoR
3 TastoIDchiamante/Scorrimento
4 *esegnaledichiamataon/off
5 Chiamateinterne
6 Programmazione/Conferma
7 TastoCancella/Silenziamento
8 #eBloccotasti
9 TastoDisconnessione
10 Rubrica
Italiano
Slovenčina
1 Zavolaťspäť
2 Tlačidlohovoru/tlačidloR
3 IDvolajúceho/tlačidlorolovania
4 *asignálvyzváňaniavyp/zap
5 HovoryINT
6 Programovanie/potvrdiť
7 Vymazať/tlačidlostlmiť
8 #ochranatlačidiel
9 Tlačidloodpojenia
10 Telefónnyzoznam
Türkçe
1 Geriarama
2 Cevaplamatuşu/Rtuşu
3 Arayankimliği/ilerlemetuşu
4 *vezilsesinikapatma/açmatuşu
5 Dahiliaramalar
6 Programlama/onaylama
7 Silme/sessiztuşu
8 #vetuşkilidi
9 Bitirmetuşu
10 Telefonrehberi
Português
1 Repetirchamada
2 Botãodeactivaçãodelinha/BotãoR
3 Id.dechamada/Botãodedeslocamento
4 *eligar/desligarsinaldetoque
5 Chamadasinternas
6 Programação/Conrmação
7 BotãoEliminar/Mute
8 #eKeyGuard
9 Botãodeterminarchamada
10 Listatelefónica

1
English
Connection
1. Connect the mains adapter (6V DC) and the telephone cord to the wall sockets.
2. Insert the batteries (AAA 1.2V 650 mAh NiMH) into the handset with plus/minus
as indicated.
3.
Range
The telephone’s range depends on whether or not the radio waves carrying the call are
restricted by obstacles in their path, and is usually between 50 and 300 metres. Coverage
can be improved by turning one’s head so that the handset is aligned with the base unit.
The symbol
Battery
As batteries only have a certain lifespan it is quite normal that call time and standby time will
Fully-charged batteries (10 hours charging) will last for approx. 110 hours standby time
or approx. 8 hours call time. These times apply at normal room temperature.
Full battery capacity will not be reached until the batteries have been charged 4-5 times.
The base unit has an automatic charging mechanism that prevents the batteries from
being overcharged or damaged due to prolonged charging.
Battery LED
When the batteries are running low, the indicator will show and a warning tone will
be heard once when the indicator drops to its lowest level during a call.
Please note that the battery indicator in the handset display rotates while charging and
will stop when the battery is fully charged.
Making a call
1. Enter required telephone number (C=delete).
2. Press qto dial the number. Press Lto terminate the call.
Receiving a call
1. Wait for the handset to ring.
2. Press qto answer. Press Lto terminate the call.
Please note!
When the batteries are low (NO BATT) or when there is too great a distance to the base unit the
telephone will be unable to connect to the line.
The charging connections should be cleaned regularly with a soft cloth and/or an eraser.
The base unit should not be located close to other electrical equipment, in direct sunlight or near any other
strong heat source! This is to minimize the risk of any interference.
It is normal for the device to become warm during charging and this is not dangerous.
Use only original batteries. The guarantee does not cover any damage caused by incorrect batteries.
2
English
Volume control
The volume can be adjusted during a call with 8/9.
Call Back
Press rto display the most recently dialled number. Press qto dial.
Mute button
The microphone can be switched off/on during a call with C( =off).
KeyGuard
The keyguard can be activated ( =on) by pressing down #, and deactivated by
pressing any button followed by 0.
Incoming numbers/Caller ID
In the display you can see who is calling and the 10 most recently received calls.
New calls are indicated by in standby mode.
If one and the same number calls in more than once it will be saved as only one entry.
This function requires a subscription from your service provider.
Retrievinganddiallingincomingnumbers
1. Scroll to required position with 8/9.
2. Press 0to switch between name*, number and time/date.
3. Press qto dial, press bto save number in phonebook or press Lto return to standby.
*The name can only be displayed if it has been stored in the phonebook.
Deletingnumbers
1. Scroll to the desired entry as described above.
2. Press C.
3. 0.
Deletingallnumbers
1. Scroll to the desired entry as described above.
2. Press down Cuntil the display shows RST LIST.
3. 0.
Calleridenticationmessages
In addition to number display, the following messages are shown sometimes:
INTERNAT No information received, e.g. an international call.
PRIV NUM Information about the number is blocked. Number cannot be shown.
Number not previously seen.
Message indication (sent from your network operator to indicate a
message waiting)*.
*Message indication can be deleted manually by pressing down Lfor a few seconds in
standby mode.

3
English
Paging
The handset will ring when (on the base unit) is pressed. The signal will stop
automatically after a while or if Lon the handset is pressed or on the base unit.
Phonebook
10 telephone numbers (max. 20 digits) with names (max. 8 letters) can be stored in the
handset’s phonebook. If you subscribe to a caller ID service, the name allocated to the
caller in the phonebook will be shown for incoming calls.
Letters
Each number key has been allocated certain letters.
1.....................................[Space]
#(press&hold)..............Pauseintelephonenumber
Savename/numberinhandset
1. Enter the telephone number, including the area code (C=delete). Press b.
2. Press equivalent digit key one or more times for desired name. Press 0.
3. The telephone number is shown again. Press 0
Diallingfromthephonebook
1. Press b.
2. Scroll between entries with 8/9. A quick search is also possible by pressing the
3. Press qto dial the number.
Changingtelephonenumbers/names
1. Press b. Scroll between entries with 8/9.
2. Press b.
3. Correct the name entry with C. Press 0.
4. Correct the number entry with C. Press 0.
Deletingaphonebookentry
1. Press b. Scroll between entries with 8/9.
2. Press C.
3. 0.
Deleteentirephonebook
1. Press b.
2. Press down Cuntil the display shows RST LIST.
3. 0.
If you want a pause in the telephone number, press down #until the display shows P.

4
English
Settings
1. Press 0.
2. Scroll to the required function with 8/9according to the list below e.g. R. Press 0.
3. Scroll to required setting. Press 0.
4. Press Lto return to standby mode.
Command Function
..................................Ringsignaltype/volumeforthehandset
................................Ringsignaltype/volumeforthebaseunit
.....................................Flashtime(1=standard,2=France/Portugal)
.................................Tone/Pulse(1=tone/normal,2=pulse)
....................................Registration,seeseparatedescription
*The ring signal in the handset can also be connected/disconnected with *( =off).
PIN code
The PIN code (four digits) provides protection against unauthorized use of certain functions.
1. Press 08.
2. Enter the current PIN code (0000 when supplied). Press 0.
3. Enter the new code. Press 0.
4. Enter the new code again. Press 0.
To reset settings
1. Press 0.
2. Press down Cuntil RESET? is shown.
3. Press 0.

5
English
Expanded system (only +1…)
All handsets included in the package are already registered to the base unit. The handset
number used for internal calls is shown in the display on standby mode.
The base unit should be positioned centrally so that the coverage area is roughly equal
for all handsets.
It is not possible to add extra handsets at a later point.
INTcalls
1. Press I.
2. Enter the allocated number of the handset that you wish to call, 1- 4.
A tone will be heard if an external call comes in while an internal call is in progress.
Terminate the internal call by pressing Land press qto answer the external call.
Transferringcalls/Conferencebetweenhandsets
1. An external call is connected.
2. Initiate an internal call as described above.
3. Press Lto transfer the call or press down Ifor a few seconds for conference.
Register
Every new handset must be registered in order for it to be able to use the base unit in
question. Every base unit can manage up to 4 different handsets.
1. Press 0.
2. Scroll to with 8/9. Press 0.
3. Enter the base unit’s PIN code (0000 on delivery). Press 0.
4. Hold down the button on the base unit until you hear two beeps.
5. If the registration is successful the handset will return to standby mode within one minute.
De-registeringanotherhandset
1. Press 09.
2. Enter the required handset 1-4. Press 0.
3. Enter the base unit’s PIN code (0000 on delivery). Press 0.

6
English
Troubleshooting
Check that the telephone cord is undamaged and properly plugged in. Disconnect any
additional equipment, extension cords and other phones. If the problem is resolved, the
fault is with some other equipment. Test the equipment on a known working line (e.g.
at a neighbour’s house). If the equipment works there the fault is probably with your
telephone line. Please inform your network operator.
Check the charge status of the handset batteries.
If the telephone still does not work, contact the place of purchase. Don’t forget the
receipt or a copy of the invoice.
Specic Absorption Rate (SAR)
This device meets approved international safety requirements for exposure to radio
waves. This telephone measures 0.05 W/kg (measured over 10g tissue).
The max. limit according to WHO is 2W/kg (measured over 10g tissue).
Declaration of conformity
Doro hereby declares that the product Airborne 5000 conforms to the essential
requirements and other relevant regulations contained in the Directives 1999/5/EC
(R&TTE) and 2002/95/EC (ROHS).
A copy of the manufacturer’s declaration is available at www.doro.com/dofc
Guarantee
This product is guaranteed for a period of 12 months from the date of purchase. Proof
of purchase is required for any service or support required during the guarantee period.
This guarantee shall not apply to a fault caused by an accident or a similar incident
or damage, liquid ingress, negligence, abnormal usage, not reasonably maintained or
any other circumstances on the purchaser’s part. Furthermore, this guarantee shall
guarantee does not in any way affect your statutory rights. (As a matter of precaution, we
recommend disconnecting the telephone during a thunderstorm.)
UK
by email on tech@doro-uk.com
-premium rate telephone number: 0905 895 0854, calls cost 50 pence per minute
(prices correct at the time of publication).
You can also contact us in writing (regarding any Spares or Technical query):
Customer Services
Doro UK Ltd
1 High Street
Chalfont St Peter
Buckinghamshire
SL9 9QE.
Further contact details are available on our website: www.doro-uk.com.

1
Français
Raccordement
1. Reliez le bloc d’alimentation (6V CC) et le câble téléphonique aux prises murales.
2. Insérez les batteries (AAA 1,2V 650mAh NiMH) dans le combiné en respectant la
polarité (+ et -).
3. Placez le combiné sur le chargeur, le clavier tourné vers l’extérieur et chargez-le 24
heures en continu avant la première utilisation.
Portée
En général, la portée du téléphone varie de 50 à 300 mètres en fonction de l’environnement.
Vous pouvez améliorer la portée en tournant la tête de façon à pointer le combiné vers la base.
La qualité du son se détériore quand le combiné se rapproche de sa limite de portée, puis
la communication est coupée.
Le symbole
Batterie
Les batteries ayant une durée de vie limitée, l’autonomie en veille ou en communication
(charge de 10 heures) ont une autonomie d’environ 8 heures en communication et
110 heures en veille. Ces durées sont données pour une utilisation à l’intérieur à des
températures normales. Les batteries sont complètement chargées au bout de 4 à 5
charges. La base a un système de recharge automatique qui évite de surcharger les
batteries ou de les endommager par une charge prolongée.
Témoin de charge
Quand le niveau de charge des batteries s’affaiblit, le témoin
communication, la charge du combiné est faible, le combiné émet un signal sonore.
Veuillez noter que le témoin des batteries du combiné clignote pendant la charge et
s'arrête quand les batteries sont complètement chargées.
Appeler
1. Composez le numéro (C=effacer).
2. Appuyez sur qpour appeler le numéro. Appuyez sur L
communication.
Recevoir un appel
1. Attendez que le combiné sonne.
2. Prenez l’appel en appuyant sur q. Appuyez sur L
Remarque !
Vous ne pouvez pas prendre la ligne lorsque les batteries sont faibles (NO BATT) ou quand le combiné
est trop éloigné de la base. Nettoyez régulièrement les contacts de charge avec un chiffon doux et/ou uneNettoyez régulièrement les contacts de charge avec un chiffon doux et/ou une
gomme. Ne placez pas la base à proximité d'appareils électriques, d'une source de chaleur ou dans unNe placez pas la base à proximité d'appareils électriques, d'une source de chaleur ou dans un
endroit exposé directement au soleil an de minimiser les risques d'interférences. Vous pourrez observer
un réchauffement de l'appareil pendant la charge ; ce phénomène est normal. Utilisez uniquement des
batteries d’origine. La garantie ne couvre pas les dommages causés par d’autres batteries.

2
Français
Régler le volume
Vous pouvez ajuster le volume en cours de communication avec les touches 8/9.
Touche Bis
Appuyez sur rq.
Touche Secret
Vous pouvez couper ou activer le micro du combiné en cours d’appel en appuyant sur C
( = coupé).
Verrouillage des touches
Activez le verrouillage des touches ( =activé) en appuyant sur #, ; désactivez-le en
appuyant sur n’importe quelle touche puis sur 0.
Présentation des numéros/noms
En veille, le symbole indique que vous avez reçu de nouveaux appels.
Si le même correspondant appelle plusieurs fois, son numéro n’apparaît qu’une seule fois.
Remarques:
- L’écran du téléphone ne peut afcher que 8 lettres au maximum pour la Présentation du Nom. Le nom
sera alors tronqué automatiquement au delà.
- La présentation du numéro/nom est disponible sous réserve d’abonnement auprès de votre opérateur.
Consulteretappeleràpartirdujournaldesappelants(JAP)
1. Atteignez le correspondant désiré avec les touches 8/9.
2. Appuyez sur 0
3. Appuyez sur qpour l’appeler, appuyez sur b pour l’enregistrer dans le répertoire
ou appuyez sur Lpour repasser en veille.
Effacerunnuméro
1. Atteignez le numéro désiré comme décrit précédemment.
2. Appuyez sur C.
3. 0.
Effacertouslesnuméros
1. Atteignez le numéro désiré comme décrit précédemment.
2. Appuyez sur Cjusqu’à ce que RST LIST
3. 0.
Informationssupplémentaires
INTERNAT L’appel provient de l’étranger.
PRIV NUM L’appel provient d’un numéro masqué.
Numéro inconnu.
Message déposé sur la messagerie de votre opérateur*.
*En veille, l’indication de nouveau message peut être effacée manuellement en appuyant
quelques secondes sur L.

3
Français
Recherche du combiné
Le combiné sonne quand on appuie sur la touche de la base. Le signal s’arrête
automatiquement au bout de quelques secondes ou lorsqu’on appuie sur la touche L
du combiné ou sur la touche de la base.
Répertoire
Le répertoire du téléphone peut enregistrer jusqu’à 10 numéros de téléphone de 20
chiffres maximum avec des noms de 8 lettres maximum. Quand vous êtes abonné
(uniquement pour les numéros déjà dans le répertoire).
Lettres
Vous pouvez saisir les noms dans votre répertoire grâce aux touches numériques du
téléphone y compris certains caractères spéciaux.
1.....................................[Espace]
#(pressionprolongée)...Permetd’insérerunepausedanslenumérodetéléphone
Enregistrerunnom/numérodanslecombiné
1. Saisissez le numéro de téléphone ainsi que l’indicatif (C=effacer). Appuyez sur b.
2. Vous pouvez entrer le nom par pressions successives des touches numériques.
Appuyez sur 0.
3. 0
Appelerunnumérodurépertoire
1. Appuyez sur b.
2. 8/9. Vous pouvez effectuer une recherche
rapide en appuyant sur la touche numérotée correspondant à la première lettre du
nom de l’entrée.
3. Appuyez sur qpour appeler le numéro.
Modierlesnoms/numérosdetéléphone
1. Appuyez sur b8/9.
2. Appuyez sur b.
3. Corrigez le nom en appuyant sur C. Appuyez sur 0.
4. Corrigez le numéro en appuyant sur C. Appuyez sur 0.
Effaceruncorrespondantdurépertoire
1. Appuyez sur b8/9.
2. Appuyez sur C.
3. 0.
Effacerlecontenudurépertoire
1. Appuyez sur b.
2. Appuyez sur Cjusqu’à ce que RST LIST
3. 0.
Insérez une pause en appuyant sur # jusqu’à ce que P s’afche.

4
Français
Réglages
1. Appuyez sur 0.
2. Atteignez la fonction désirée avec les touches 8/9(voir la liste suivante). Appuyez sur 0.
3. Atteignez le réglage désiré. Appuyez sur 0.
4. Appuyez sur Lpour repasser en veille.
Commande Fonction
..................................Typeetvolumedelasonnerieducombiné
................................Typeetvolumedelasonneriedelabase
.....................................DélaidelatoucheR(1=pardéfaut,2=France/Portugal)
.................................Fréquencesvocalesoudécimales(1=FV/normal,2=DC)
....................................Déclarationducombiné,voirladescription.
*Pour couper ou rétablir la sonnerie du combiné, appuyez sur *( = coupée).
Code PIN
Le code PIN de quatre chiffres protège certaines fonctions de votre appareil.
1. Appuyez simultanément sur 08.
2. Entrez le code PIN (0000 à la livraison). Appuyez sur 0.
3. Entrez le nouveau code. Appuyez sur 0.
4. Entrez à nouveau ce code. Appuyez sur 0.
Pour rétablir les réglages d’origine
1. Appuyez sur 0.
2. Appuyez sur Cjusqu’à ce que RESET?
3. Appuyez sur 0.

5
Français
Système élargi (+1… uniquement)
Tous les combinés livrés avec la base sont déclarés sur celle-ci. Le numéro attribué au
Placez la base à distance égale des combinés pour une portée répartie sur la zone à couvrir.
Déclarerlescombinés
Pour utiliser un nouveau combiné avec la base courante, vous devez l’y déclarer. Vous
pouvez déclarer jusqu’à 4 combinés par base.
1. Appuyez sur 0.
2. Atteignez avec les touches 8/9. Appuyez sur 0.
3. Entrez le code secret de la base (0000 à la livraison). Appuyez sur 0.
4. Appuyez sur la touche de la base jusqu’à ce qu’elle émette deux bips sonores.
5. Si la déclaration du combiné est réussie, le combiné repasse en veille dans la minute
qui suit.
Annulerladéclarationd’uncombiné
1. Appuyez sur 09.
2. Saisissez le numéro du combiné à effacer 1-4. Appuyez sur 0.
3. Entrez le code secret de la base (0000 à la livraison). Appuyez sur 0.
Intercom/Appelinterne
1. Appuyez sur I.
2. Composez le numéro du combiné que vous voulez appeler, 1- 4.
Si vous recevez un appel de l'extérieur pendant un appel interne, le combiné émet un bip
Lpuis prenez l’appel extérieur en
appuyant sur q.
Transfertd’appel/Conférenceentrecombinés
1. Vous êtes en communication avec un correspondant de l’extérieur.
2. Passez en mode intercom comme décrit ci-dessus.
3. Appuyez sur Lpour transférer l’appel ou appuyez de façon prolongée sur Ipour
établir une conférence.

6
Français
En cas de problèmes
Débranchez tout autre matériel, rallonges et téléphones. Si l’appareil fonctionne alors
normalement, la panne est causée par le matériel additionnel. Testez le matériel sur une ligne
en état de marche (chez un voisin par ex.). Si le matériel fonctionne sur ce raccordement, votre
propre ligne téléphonique est défectueuse. Signalez la panne à votre opérateur.
Si le téléphone ne fonctionne toujours pas, contactez votre revendeur. N’oubliez pas de
vous munir du ticket de caisse ou d’une copie de la facture.
DAS (Débit d’Absorption Spécique)
Cet appareil est conforme aux normes de sécurité concernant l’exposition aux fréquences
radioélectriques. La valeur enregistrée pour ce téléphone est de 0,05 W/kg (mesurée sur
un tissu de 10g).
2 W/kg en moyenne sur un tissu de dix grammes.
Déclaration de conformité
requises et autres points des directives 1999/5/EC (R&TTE) et 2002/95/EC (ROHS).
La déclaration de conformité peut être consultée à l'adresse suivante : www.doro.com/dofc.

7
Français
Garantie et S.A.V.
Pour la France
Cet appareil est garanti deux ans à partir de sa date d’achat, la facture faisant foi. En cas
de panne, contactez votre revendeur. La réparation dans le cadre de cette garantie sera
effectuée gratuitement.
notice d’utilisation. Les fournitures utilisées avec l’appareil ne sont pas couvertes par
la garantie. Sont exclues de cette garantie les détériorations dues à une cause étrangère
à l’appareil. Les dommages dus à des manipulations ou à un emploi non conformes, à
un montage ou entreposage dans de mauvaises conditions, à un branchement ou une
installation non-conformes ne sont pas pris en charge par la garantie. Par ailleurs, la
garantie ne s’appliquera pas si l’appareil a été endommagé à la suite d’un choc ou d’une
chute, d’une fausse manœuvre, d’un branchement non-conforme aux instructions
mentionnées dans la notice, de l’effet de la foudre, de surtensions électriques ou
tout état de cause, la garantie légale pour vices cachés s’appliquera conformément aux
articles 1641 et suivants du Code Civil.
Si vous souhaitez obtenir de l’aide lors de l’installation ou poser une question
technique sur le produit, contactez notre Service d’Assistance Téléphonique au 08
92 68 90 18 ( N° Audiotel - 0,34€ /min.). (Il est recommandé de débrancher l’appareil
en cas d’orage.)
En tant que consommables, les batteries sont exclues de la garantie.
Cette garantie ne s’applique pas en cas d’utilisation de batteries autres que des batteries
DORO originales.

1
Česky
Zapojení
1.
linky na zdi.
2.
3.
24 hodin).
Dosah
. Je-li telefon mimo dosah,
Baterie
Kontrolka baterie
poté, co je baterie zcela nabita.
Volání
1. C=smazat).
2. qL
Přijetí hovoru
1.
2. qL
Pozor!
Pokud jsou baterie hodně vybité (NO BATT) nebo je telefon příliš vzdálen od základny, nebude telefon
schopen připojit se k lince.
Nabíjecí kontakty pravidelně čistěte pomocí měkkého hadříku nebo gumy na tužky.
Základna by neměla bıt umístěna v blízkosti elektrickıch zařízení, na přímém slunečním světle nebo
v blízkosti silnıch zdrojů tepla! Tím se minimalizuje riziko rušení.
Přístroj se během nabíjení zahřeje. Je to normální jev a není to nebezpečné. Používejte pouze originální
baterie. Záruka se nevztahuje na jakékoliv poškození způsobené nesprávnımi bateriemi.

2
Česky
Ovládání hlasitosti
8/9.
Zpětné volání
rq
Tlačítko ztlumení mikrofonu
C( =vyp.).
Zámek klávesnice
#a vypnout stisknutím
0.
Čísla příchozích hovorů a identikace volajícího
.
Zobrazeníavoláníčíselpřijatıchhovorů
1. 8/9.
2. 0
3. qb
L
Mazáníčísel
1.
2. C.
3. 0.
Smazánívšechčísel
1.
2. CRST LIST.
3. 0.
Zprávyfunkceidentikacevolajícího
INTERNAT
PRIV NUM
L.
Table of contents
Languages:
Other Doro Telephone manuals

Doro
Doro PhoneEasy 311C User manual

Doro
Doro PhoneEasy 311C User manual

Doro
Doro 6521 User manual

Doro
Doro PhoneEasy Display 312C User manual

Doro
Doro 916i cr User manual

Doro
Doro 912c Installation guide

Doro
Doro 6531 User manual

Doro
Doro Audioline AL505 User manual

Doro
Doro SECURE 350 User manual

Doro
Doro MATRA 25 User manual