dyras SB-509-REVO User manual

Kezelési útmutató Smoothie turmixhoz
HU
Model: SB-509-REVO
AC 220-240V 50/60Hz 300W
FONTOS UTASÍTÁSOK
A KÉSZÜLÉK ELSŐ HASZNÁLATA ELŐTT OLVASSA EL A
TELJES ÚTMUTATÓT!

2
Megjegyzés:
* Krjk, hasznlatba vtel eltt gondosan tanulmnyozza
t, s kvesse ezt a kezelsi tmutatt. Fontos, hogy
rizze is meg a kezelsi tmutatt, hogy idnknt -
vagy brmely ktelye esetn - jra elvehesse s
feleleventhesse a hasznlati tudnivalkat, ezltal
mindenkor ki tudja majd hasznlni a kszlk
sszes szolgltatst, s sok rmet lelhet benne.
Amennyiben a kezelsi tmutatban foglalt elrsok
be nem tartsa miatt kvetkezik be a termk esetleges
meghibsodsa, gy az ebbl fakad krokra a gyrt
felelssget nem vllal. Amennyiben a termk esetleg
meghibsodna a rendeltetsszer hasznlat sorn, gy
krjk, csak a hivatalos szakszervizzel javttassa!
Fontos biztonsági tudnivalók
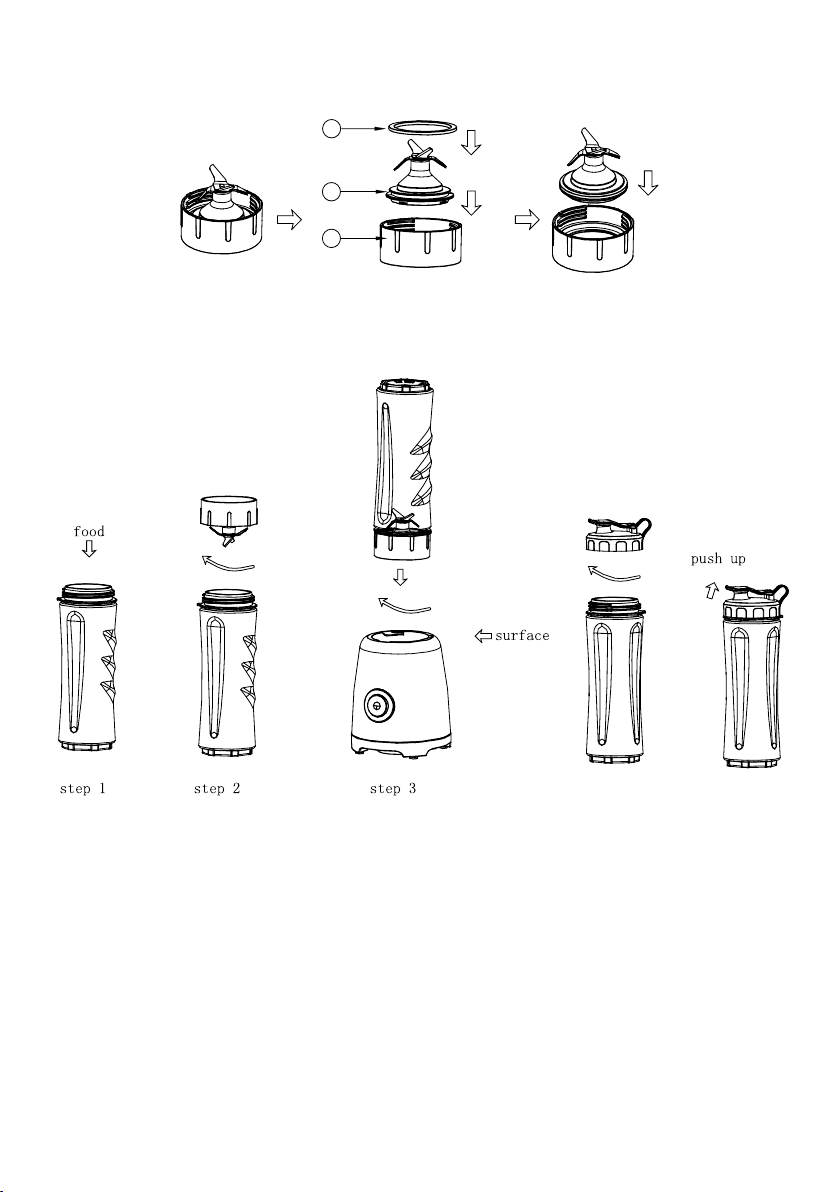
* Ha a kszlket felgyelet nlkl hagyja, sszeszerels,
sztszerels vagy tisztts eltt mindig hzza ki a
hlzatbl.
* A kszlket gyermekek nem hasznlhatjk! Tartsa a
kszlket s vezetkt gyermekektl elzrva.
* A kszlket csak azon cskkentett mentlis vagy fizikai
kpessg szemlyek hasznlhatjk akik megfelel
felgyelet alatt vannak vagy megfelel tmutatst
kaptak a kszlk biztonsgos hasznlathoz
* Gyermekek nem jtszhatnak a kszlkkel.
* Ha a tpkbel srlt, akkor a veszly elkerlse
rdekben a gyrtt, a szervzzel fel kell vennie a
kapcsolatot, a srlt, vagy nem jl mkd kbelt ki kell
cserlni a veszly megelzse vgett.
* A kehely kirtsekor s tiszttsakor nagyon vatosan
kell eljrni a pengk krl mert rendkvl lesek s

3
knnyen vgst okoznak.
* Figyeljen r, hogy ujjai ne legyenek a pengk kzelben
valamint a kehelyben a termk mkdtetse kzben.
* Az lelmiszerekkel rintkezsbe kerl felletek
tiszttsval kapcsolatos tmutatsoknak ksznheten
olvassa el az „Ápols s tisztts” fejezetet.
* Ez a kszlk hztartsi s hasonl clokra szolgl
pldul:
- Üzletek szemlyzeti konyhjban
- az gyfelek ltal a szllodkban, motelekben s ms
lakossgi tpus krnyezetekben
- Sajt hztartsban val hasznlatra
* A készülék csak az itt leírt háztartási használatra
szolgl, minden egyb (iparszer) felhasznls nem
megengedett.
* Kapcsolja ki a kszlket, s hzza ki a hlzati dugt
a tartozkok cserjekor vagy a mozg alkatrszekhez
val hozznyls eltt. Ne helyezzen zembe hibs
kszlket.
* A kszlk biztonsgos zemeltetse rdekben csak
a kezelsi tmutatban megadott informcik szerint
szerelje ssze, majd csatlakoztassa s a hasznlati
alapjn hasznlja.
* Tiszttskor ne hasznljon semmilyen ers tiszttszert
a kszlken.
* Hasznlat kzben hagyjon elg lgterletet a kszlk
krnykn. Ne hagyja, hogy a kszlk hozzrjen
fggnykhz, falhoz, rongyokhoz.
* Hzza ki a hlzati kbelt a fali aljzatbl ha:
-Problma lp fel a hasznlat sorn
-Amikor a termk nincsen hasznlatban
-Tiszttsa kzben

4
* Ne rintse a mozg alkatrszeket mkds kzben.
* A gyrt ltal nem ajnlott vagy nem a gyrt ltal
eladott kiegsztk hasznlata tzet, ramtst vagy
srlst okozhat
* Ne hzza a csatlakozkbelt les szleken keresztl, a
kbelt ne rintkezzen forr fellettel (belertve a stt)
és ne használja rajta
* A csatlakozkbel ne legyen nylt tz vagy fttt
fzlapok kzelben.
* A kszlk javtst bzza a gyrt ltal kijellt
szakszervzre.
* A termket motorjt soha ne rje vz.
* Mindig hzza ki a hlzatbl a termket mieltt kinyitn
a kehely fedelt.
* Soha ne rjen a pengkhez amg be van dugva a
hlzatba a kszlk.
* Ne hasznlja a termket olyan hosszabbtval amit nem
ellenrztt egy hivatalos szakember.
* Ne hasznlja a kszlket semmilyen ms fajta
hasznlatra mint amire gyrtva lett.
* Tartsa tisztn a krnyezett! Az elhasznldott
kszlket szilrd lakossgi hulladkkal egytt nem
helyezhet el. Krjk a termket lettartama vgn
adja le a lakhelyn illetkes elektromos kszlkek
begyjtsre szakosodott szervezetnl.
* Ne nyomja meg a bekapcsols gombot addig amg
nincsen hlzatba dugva a termk!
* Maximum 1 percig hasznlja a kszlket meglls
nlkl, utna pr percig tilos hasznlni.
* Ne mertse vzbe, ne tartsa vz al s ne tiszttsa foly
vz alatt a motort!
* A pengk rendkvl lesek, nagyon kell velk vigyzni!

5
* Jl tiszttsa ki a kszlket els hasznlat eltt!
* Ne tltsn tbb folyadkot a flakonba mint a jellt
mennyisg.
Alkatrészek azonosítása
1. Manyag flakon (2 pcs) (BPA mentes)
2. Pengk
3. Penge egysg
4. Turmix gp
5. Verzl gomb
6. Dug s tpkbel
7. Manyag talpak
8. Manyag flakon kupakja (2 pcs)

6
A turmixgép és a kupak használata
A
B
C
Fig 1 Assembly for Blending blade
Fig 2 Assembly for Blending cup (600ml)
* Helyezze be a tmt gyrt a pengk (2) kr a (Fig 1)-es
illusztrcit kvetve. Amennyiben nem helyesen helyezi be a
tmtgyrt szivrgs trtnhet. Fokozottan gyeljen, a pengk
nagyon lesek.
* Óvatosan helyezze a pengket a penge egysgbe (3), amg
kattanst nem hall.
* (1. lps) Tltse fel tellel a manyag flakont (1)
* (2. Lps) A penge egysget csavarja bele a turmix gpbe (4)

7
az ramutat jrsval megegyez irnyba amg kattanst nem
hall. Kattans jelzi, hogy a turmixgp hasznlatra ksz.
* Csatlakoztassa hlzatba a kszlket majd nyomja meg a
vezrl gombot (5). Amg nyomva tartja a kszlk mkdsben
lesz.
* Amikor vgzett a turmixolssal s elrte a kvnt llagot engedje
el a vezrl gombot s a turmix mkdse megll.
* Hasznlat utn hzza ki a hlzatbl.
* A manyag flakont, ramutat jrsval ellenttes irnyba tudja
kiszerelni a turmixgpbl.
* Fordtsa meg a flakont, gy, hogy a penge egysg legyen fell.
Ezt csavarja ramutat irnyval ellenttesen s vegye le a
flakonrl
* Öntse ki a flakon tartalmt vagy helyezze r a kupakot melyben
knnyen szllthatja (8)
* Figyelmeztets: Maximum 1 percig szabad meglls nlkl
hasznlni a gpet. Soha ne hasznlja forr alapanyagokkal,
vrja meg mg kihlnek. Turmixolshoz mindig adjon hozz
folyadkot.
* Ha a kszlk mkdse megakad minden esetben tiszttsa
eltt eltt hzza ki a hlzatbl.
The Guide to Your Blender with Plastic Blending cup (600ml)
Suggested Blending Quantities/Processing Time
Ingredients Quantity(g) Time(seconds)
Cream 100-300g 50-60s
Note: only for cream, at 4-8℃

8
Suggested Blending Quantity/Processing Time/Operating Speed
Processing Task Ingredients Quantity(g) Time(seconds)
Strawberry, Purple
cabbage and Carrot
juice
Carrots 100g
50-60s
The sizes of
ingredients
can be various,
if necessary,
repeat
processing until
the desired
consistency is
achieved.
Purple cabbages 50g
Strawberries 3pcs
Coconut milk 200ml
Carrot and Gourd
juice (with mint
ornament)
Puried water 100ml
Yoghourt 100ml
Carrots 80g
Gourds 80g
Mint leaves 6pcs
Markisa and Apricot
juice (with corn and
mint ornament)
Coconut water 200ml
Markisas 2pc
Dried apricosts 3pcs
Lemon 1/2pc
Corns 30g
Mint leaves 5pcs
Apple, Pear and
Cabbage juice
Puried water 150ml
Celeries 30g
Cabbages 40g
Apple (pitted) 1/2pc
Pear(pitted) 1/2pc
Orange(peeled) 1/4pc
Leek-potato soup
Potatoes 100g
Leeks 50g
Water 250ml
Ice slush
Ice cubes 120g On:3 sec,Off :3
sec
Repeat : 7-10
times
Water 360g
On crushing ice with water,Max. quantity: ≤600g(Ice to water : 1:3)
Max operating time :90s

9
Praktikus keverési tippek
* A turmixolsra sznt hozzvalkat kockkra (kb. 1-2 cm ) kell
vgni , ez elsegti az egyenletes eredmny elrst.
* Soha ne tltse a turmixgpet a maximum szintet jelz jel fl.
* Mindig figyeljen r, hogy a gymlcsk magjait eltvoltotta
hasznlat eltt mert ezek krt okozhatnak a pengkben.
* Soha ne turmixoljon forr alapanyagokat. Minden esetben vrja
meg mg kihlnek.
* Minden turmixoland alapanyagnak 40 celsius fok alatt kell
lennie hasznlat eltt.
Ápolás és tisztítás
1. A kehelyt tltsk fel flig langyos vzzel s egy kis
mosogatszerrel.
2. Hasznlja a bekapcsols gombot, 1-2 msodpercig majd ezt
ismtelje meg 3-4 alkalommal.
3. Öntse ki a tartalmt majd bltse el.
4. Komolyabb tisztts rdekben mossa el a tetejt s a kelyhet
meleg mosszeres vzben.
5. A penge egysget foly csapvz alatt tisztthatja amg a pengk
felfel nznek. A penge egysg aljt ne mossa el!
6. Komolyabb tisztts dekben helyezze a manyag flakonokat
mosogatgpbe.
Megjegyzés: A pengk nagyon lesek ezrt kiemelt vatosggal
jrjon el tisztts kzben.
A motor alapjának tisztítása
Hasznljon enyhn nedves tiszttszerrel elltott szivacsot, majd
trlje szrazra.
Megjegyzés: Soha ne merítse a motor alapját vízbe.
Tárolás
1. Tekerje be a tpkbelt a motor aljn tallhat kbeltart krl.
2. Trolja hvs s szraz helyen.

10
Dyras SB-509 Turmixgép
Mszaki adatok
Nvleges feszltsg: 220-240V
Nvleges frekvencia: 50/60Hz
Nvleges fogyaszts: 300W
rintsvdelmi osztly (ramts ellen): II
Gyrt: Vrsk kft.
Hasznlt elektromos s elektronikus
berendezsek megsemmistse
Ez a jelzs a termken s a csomagolson azt jelzi,
hogy tilos hztartsi hulladk kz dobni a mr
nem hasznlt termket mivel kifejezetten krnyezet
szennyez. Tovbbi rszletekkel kapcsolatban
rdekldjn a helyi hatsgnl.
Ez a jelzs az Eurpai Uni teljes terletre rvnyes.
Amennyiben az Eurpai Unin kvl szeretn
megsemmisteni a termket rdekldjn az ezzel
kapcsolatos szablyzsokrl a helyi hatsgnl.
TISZTELT VÁSÁRLÓ
* Felhvjuk figyelmt, hogy a kszlk lettartamra, hasznl-
hatsga az albbi zemeltetetsi, illetve trolsi, krnyezeti be-
hatsok, krlmnyek kihathatnak, s krosan befolysolhatjk,
lervidthetik azt, amennyiben tartsan fennllnak s nem csak t-
meneti jellegek. Mindig vja meg a kszlket a felsoroltaktl:
* A nedves, prs, dohos krnyezetben val hasznlat vagy
trols okozhatja:
− a kszlk burkolatnak, elektromos szigetelsnek meg-
gyenglst, id eltti regedst,
− manyag s gumi szerkezeti komponenseinek id eltti el-
hasznldst, elregedst,
− illetve elsegtheti, felgyorsthatja elektromos egysgeinek,
vezetkeinek oxidcijnak, fm alkatrszeinek korrzijt.

11
* A poros lgter, vagy konyhai hasznlat (ahol a lgtrben pl.
tolaj vagy fzzsr prja terjeng) okozhatja:
− Zsros porbevonat lelepedst a kszlk szerkezeti mechani-
kus s elektromos egysgein valamint burkolatn, mely elektromos
rintkezsi hibt, akr teljes mkdskptelensget is okozhat, il-
letve a plasztik s gumi alkatrszeket krosthatja.
* A kszlket r kzvetlen napfny okozhatja:
− A kszlk burkolatnak, illetve plasztik s gumi alkatrszek id
eltti elregedst, szilrdsgnak s egyb szerkezeti jellemzinek
krosodst, felletk porzuss, trkenny vlst, mely a ren-
deltetsszer, biztonsgos hasznlatot veszlyeztetheti.
* Folyamatos, ipari jelleg hasznlat okozhatja:
− A kszlk forszrozott zemeltetsbl ered, id eltti szerkezeti
kopsait, a motor id eltti elhasznldst, krosodst a folyama-
tos zemeltetsbl ered kopsok s tlhevls miatt.
* Fagyos, hideg krnyezetben val kszlktrols okozhatja:
− Plasztik s gumi alkatrszek szerkezeti krosodst, trkenny
vlst, mely a rendeltetsszer biztonsgos hasznlatot veszly-
ezteti,
− pralecsapdsbl ered oxidcit, a kszlk fm alkatrszeinek
korrzijt.
* Sugrz vagy kzvetlen hhats okozhatja (mint pldul nem
megfelel tvolsg biztostsa a tzhelytl, fttesttl):
− plasztik s gumi alkatrszek, burkolati elemek szerkezeti kro-
sodst, alakvltozst, deformcijt, kilgyulst, megolvadst,
elektromos szigetelsek meggyenglst.
* A kszlk lettartamnak megnvelse s a szakszertlen
hasznlata elhrtsa rdekben kerlje el, illetve akadlyozza meg
a fenti krlmnyek kialakulst, s tartsa be minden esetben a
termkre vonatkoz zemeltetsi elrsokat, mivel ellenkez es-
etben szakszertlen zemeltetst valst meg, melyre a gyrt fe-
lelssget nem vllal. Javasoljuk, hogy idszakonknt vizsgltassa
fell egy meghatalmazott szakszervzben a kszlkt mg akkor
is, ha egybknt hibajelensget nem tapasztal
− ezzel idejekorn elhrthat egy kezdeti stdiumban lv hibt is, s
gy a termke lettartamt nvelheti.


Instruction Manual for Smoothie Blender
EN
Model: SB-509-REVO
AC 220-240V 50/60Hz 300W
PLEASE READ AND SAVE THESE INSTRCTIONS TO ENSUSE
THE SAFE USE OF THIS APPLIANCE.

14
Safety Precautions
* Read all instructions carefully before you use the
appliance.
* Always disconnect the appliance from the supply if it is
left unattended and before assembling, disassembling or
cleaning.
* This appliance shall not be used by children. Keep the
appliance and its cord out of reach of children.
* Appliances can be used by persons with reduced
physical, sensory or mental capabilities or lack of
experience and knowledge if they have been given
supervision or instruction concerning use of the appliance
in a safe way and understand the hazards involved.
* Children shall not play with the appliance.
* Do not allow children to use the blender without
supervision.
* If the supply cord is damaged, it must be replaced by
the manufacturer, its service agent or similarly qualified
persons in order to avoid a hazard.
* Care shall be taken when handling the sharp cutting
blades, emptying the container and during cleaning.
* Switch off the appliance and disconnect from supply
before changing accessories or approaching parts that
move in use.
* This appliance is intended to be used in household and
similar applications such as:
–staff kitchen areas in shops, offices and other working
environments;
– farm houses;
– by clients in hotels, motels and other residential type
environments;

15
– bed and breakfast type environments.
* Ensure fingers are kept well away from the blades when
in use.
* Unplug from outlet when it is not in use, before putting
on or taking off parts, before moving the appliance or
adding the food, and before cleaning.
* Do not blend hot ingredients.
* Always operate on a flat surface.
* Do not press the Power Button before plugging into the
power outlet. Remove by grasping the Plug and do not pull
on the cord.
* The continuous operating time must be less than 1
minutes.
* Read carefully and save all the instructions provided
with an appliance.
* Do not use your appliance with an extension cord
unless this cord has been checked and tested by a
qualified technician or service person.
* Always use your appliance from a power outlet of the
voltage (A.C. only) marked on the appliance.
* Do not use an appliance for any purpose other than its
intended use.
* Do not place an appliance on or near a hot gas flame,
electric element or on a heated oven. Do not place on top
of any other appliance.
* Do not let the power cord of an appliance hang over the
edge of a table or bench top or touch any hot surface.
* Do not operate any electrical appliance with a damaged
cord or after the appliance has been dropped or damaged
in any manner.
* Do not immerse Motor Base in water or any other liquid
unless recommended.

16
* The blades are extremely sharp, handle carefully.
* Thoroughly clean the parts which will come into with
food or water before the first use.
* Do not exceed the maximum indicated level on all the
containers.
Identification of parts
1. Plastic Blending Cup (2 pcs)
2. Blade
3. Blending cup base
4. Main Body
5. Power Button
6. Plug and Power cord
7. Plastic foot
8. Blending Cup Cap (2 pcs)

17
Using the Blender (with Plastic Blending Cup)
A
B
C
Fig 1 Assembly for Blending blade
Fig 2 Assembly for Blending cup (600ml)
* Fit the Seal Ring (A) into the groove (B) on the Blade Assembly
(C) and ensure that the Seal Ring is positioned correctly;
otherwise, the leakage will occur.
* Carefully clip the top of the blade and then place into the Blade
Holder until a click is heard. Now the Cup Base Assembly is fitted
in.
* Fill the food into the Plastic Blending Cup (step 1).
* Screw the Blending Cup Base on the Blending Cup clockwise

18
(step 2).
* Place the Blending Cup Base Assembly onto the Motor Base and
rotate clockwise by holding the surface of the Blending Cup Base
(step 3) to lock until you hear a slight click. If this is the case,
the Blending Cup Base Assembly is locked correctly. Now the
blender is ready for use.
* Plug in; press the Power Button inwards and remains on as long
as the Power Button keeps being pressed.
* After you have completed blending, Release the Power Button to
stop running.
* After use, unplug and dismantle
* Rotate anticlockwise to unlock and remove the Blending Cup
Base Assembly from the Motor Base.
* Place the Blending Cup assembly downwards. Unscrew the
Blending Cup Base anticlockwise from the Blending cup and
pour out the food.
* Warning: The continuous operating time must be less than 1
minute. Never blend hot oil, fat or meat. Do not operating without
liquid.
* If your blender gets blocked, first stop and unplug before
clearing.
* For the convenience of drinking clean and fresh mixture, screw
the Blending Cup Cap on the Blending Cup clockwise. The
hand hook on the Blending Cup Cap is designed for being
easily portable. Push up the snap fastener to open the outlet
when drinking or pouring out the inside mixture at any time. The
Blending Cup Cap can also be placed onto the bottom of the
Cup when blending.
* Always switch off and unplug before cleaning. Please refer to the
i n s t r u c t i o n i n t h e “ c a r e a n d c l e a n i n g ” .
The Guide to Your Blender with Plastic Blending cup (600ml)
Suggested Blending Quantities/Processing Time
Ingredients Quantity(g) Time(seconds)
Cream 100-300g 50-60s

19
Note: only for cream, at 4-8℃
Suggested Blending Quantity/Processing Time/Operating Speed
Processing Task Ingredients Quantity(g) Time(seconds)
Strawberry, Purple
cabbage and Carrot
juice
Carrots 100g
50-60s
The sizes of
ingredients
can be various,
if necessary,
repeat
processing until
the desired
consistency is
achieved.
Purple cabbages 50g
Strawberries 3pcs
Coconut milk 200ml
Carrot and Gourd
juice (with mint
ornament)
Puried water 100ml
Yoghourt 100ml
Carrots 80g
Gourds 80g
Mint leaves 6pcs
Markisa and Apricot
juice (with corn and
mint ornament)
Coconut water 200ml
Markisas 2pc
Dried apricosts 3pcs
Lemon 1/2pc
Corns 30g
Mint leaves 5pcs
Apple, Pear and
Cabbage juice
Puried water 150ml
Celeries 30g
Cabbages 40g
Apple (pitted) 1/2pc
Pear(pitted) 1/2pc
Orange(peeled) 1/4pc
Leek-potato soup
Potatoes 100g
Leeks 50g
Water 250ml
Ice slush
Ice cubes 120g On:3 sec,Off :3
sec
Repeat : 7-10
times
Water 360g
On crushing ice with water,Max. quantity: ≤600g(Ice to water : 1:3)
Max operating time :90s

20
Handy Blending Hints
* Food items for blending should be cut into cubes (approximately
1-2cm), this will assist in achieving an even result.
* Never fill the Blending Cup above the maximum level indicated.
* When pureeing fruit or vegetable, cooked or raw, cut into small
pieces to facilitate blending.
* Always ensure stones are removed from fruit as these can harm
the blades.
* Do not process hot liquids in your blender. Allows to cool before
processing.
* All the ingredients and foods must be below 40℃centigrade.
Care and Cleaning
Unplug the appliance and detach all the accessories before
cleaning.
1. Half fill the Blending Cups with warm and a small amount of
detergent.
2. Press the Power Button and hold for 1-2 seconds and release.
Repeat 3-4 times.
3. Then remove the Blending Cup and rinse it under running water.
4. For thorough cleaning, wash the Blending Cups and Blending
Cup Caps in the dishwasher or in warm soapy water.
5. The Blending Cup Base can be cleaned in running water in the
direction of the blades upwards. Do not flush the bottom of all the
bases.
Caution: Take care when cleaning the blades as they are extremely
sharp.
To clean the motor base
Use a damp, soft sponge with detergent and wipe over the motor
base.
Note: Never immerse the motor base in water or other liquids.
Table of contents
Languages:
Other dyras Blender manuals

dyras
dyras HBL-976B User manual

dyras
dyras HBL-976B User manual

dyras
dyras HBL-956WH User manual

dyras
dyras MIXXL HBLX-190 User manual

dyras
dyras PB-460 User manual

dyras
dyras SB-631X User manual

dyras
dyras HBLX-200 User manual

dyras
dyras TB-4696X User manual

dyras
dyras HBL-969G User manual

dyras
dyras MM-480 User manual
Popular Blender manuals by other brands

Philips
Philips HR7769 user manual

Kooper
Kooper 5900987 User instructions

Russell Hobbs
Russell Hobbs Soup and Blend 21481-56 instructions

Cuisinart
Cuisinart Mini Prep Pro ECH4 Series user manual

TECHWOOD
TECHWOOD TMS-8360 instruction manual

Hamilton Beach
Hamilton Beach HBB908 - Bar Blender, 44 oz. Poly Top Operation manual