manuals.online logo
Brands
  1. Home
  2. •
  3. Brands
  4. •
  5. E2S
  6. •
  7. Safety Equipment
  8. •
  9. E2S GNExCP6A-PB User manual

E2S GNExCP6A-PB User manual

European Safety Systems Ltd. Impress House, Mansell Road, Acton, London W3 7QH sales@e2s.com Tel: +44 (0)208 743 8880
Document D154-00-101-IS Issue 4 03-02-2020 Sheet 1 of 3 www.e2s.com Fax +44 (0)208 740 4200
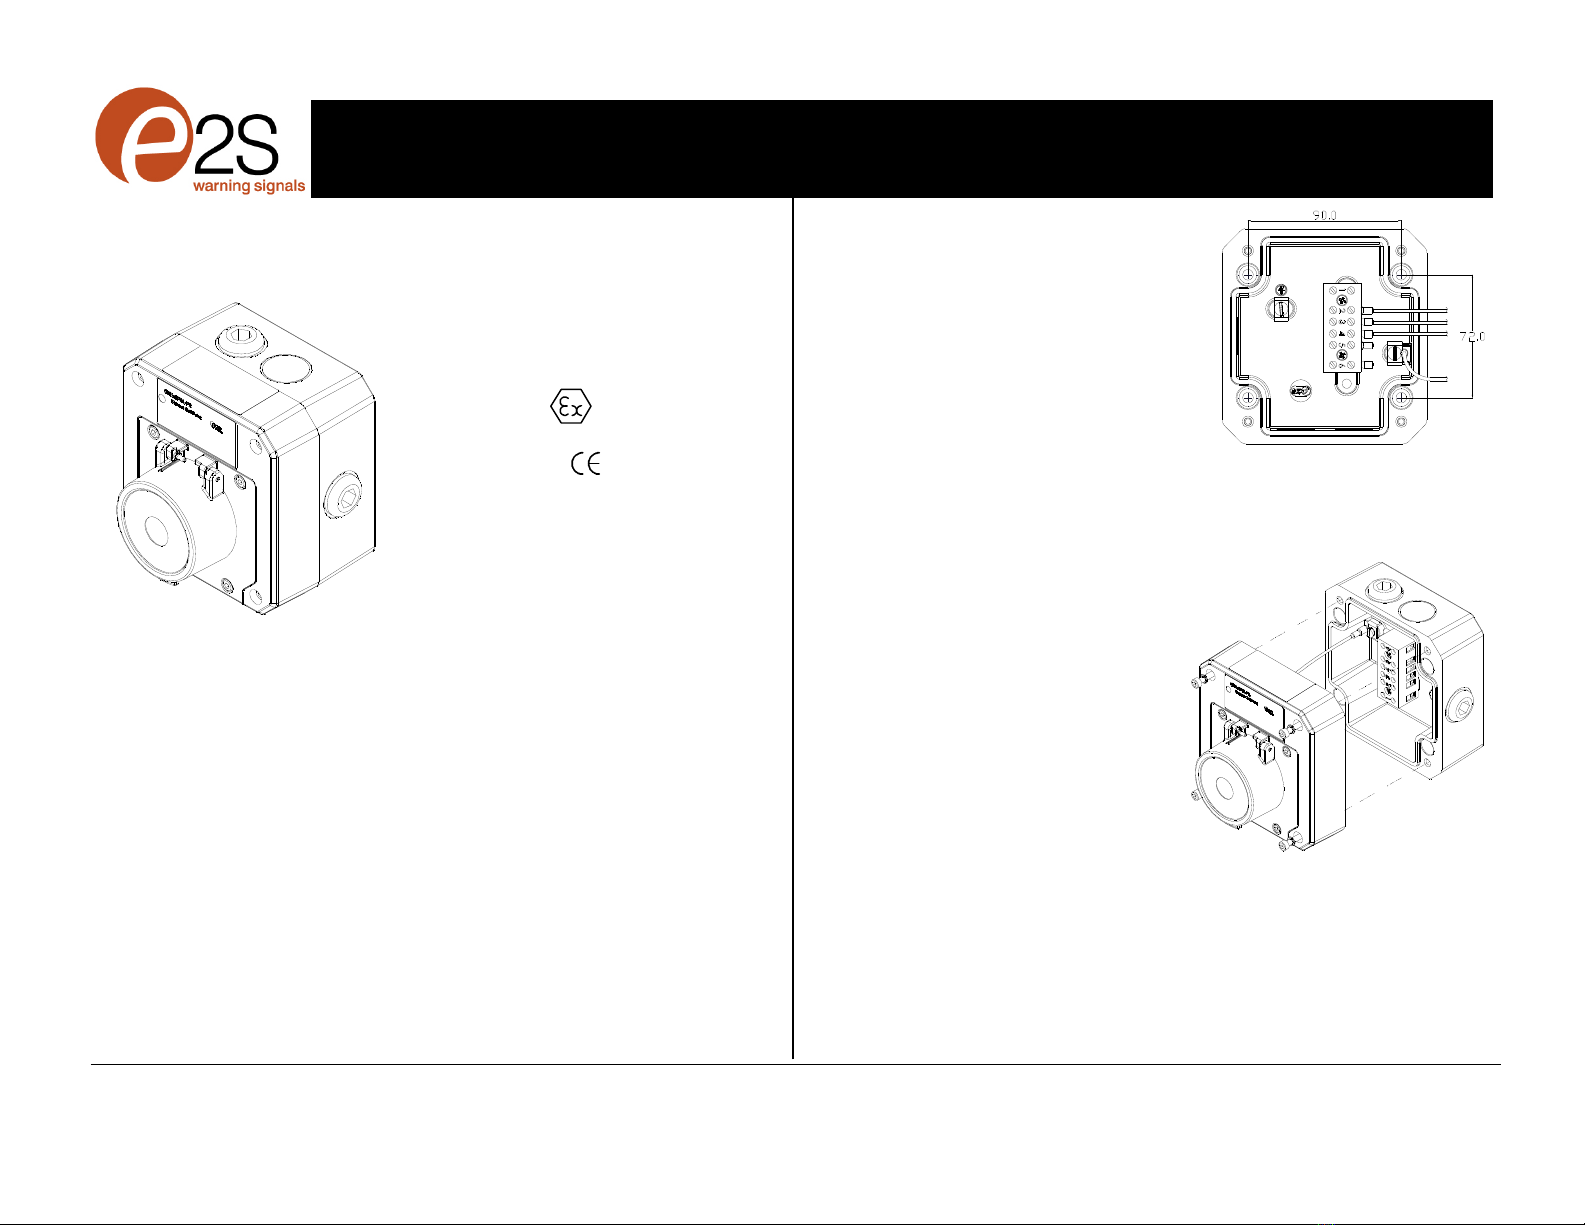
GNExCP6A-PB
Manual Call Point – Push Button
For use in Flammable Gas and
Combustible Dust Atmospheres.
1) Introduction
The GNExCP6A-PB is a push button manual call
point which is certified to the European and
International Gas and Dust standards. The unit
meets the requirements of the ATEX directive
2014/34/EU and IECEx scheme.
The call point can be used in hazardous areas
where potentially flammable gas and dust
atmospheres may be present.
2) Ratings & Markings
All units have a rating label, which carries the
following important information: -
Unit Type No.:
GNExCP6A-PB Manual Call Point
Input Voltage:
AC voltage 250V Max Current 5.0A Max
DC voltage 75V Max Current 0.75A Max
DC voltage 50V Max Current 1.0A Max
DC voltage 30V Max Current 5.0A Max Resistive
Load; Inductive Load 3.0A Max
DC voltage 12V Max Current 5.0A Max
Code:
Ex db eb IIC T6 Gb
Ex tb IIIC T75 ºC Db
IP66
–40ºC <= Ta <= +70ºC
Certificate No.:
SIRA 09ATEX3286X
IECEx SIR 09.0121X
Epsilon x: II 2GD
CE Marking
Notified body No. 2813
Year/Serial No. i.e. 20/1CP6APB000001
WARNING - DO NOT OPEN WHEN AN
EXPLOSIVE ATMOSPHERE MAY BE PRESENT
3) Type Approval Standards
The call point has an EC Type examination
certificate issued by SIRA and have been approved
to the following standards: -
EN60079-0:2018 / IEC60079-0:2017
EN60079-1:2014 / IEC60079-1:2014
EN60079-7:2015 / IEC60079-7:2017
EN60079-18:2015 / IEC60079-18:2014
EN60079-31:2014 / IEC60079-31:2013
The equipment is certified for use in ambient
temperatures in the range -40oC to +70oC and shall
not be used outside this range.
4) Installation Requirements
Installation of this equipment shall only be carried
out by suitably trained personnel in accordance
with the applicable code of practice e.g.
IEC 60079-14/EN 60079-14
A) Repair of this equipment shall only be carried
out by the manufacturer or in accordance with the
applicable code of practice e.g. IEC 60079-19/EN
60079-19.
B) The certification of this equipment relies on the
following materials used in its construction:
Enclosure: GRP - Glass Reinforced Polyester
Through enclosure mechanism: Plastic Nylon Zytel
Injection Moulded
Sealing of enclosure and mechanism: O-ring
Acrylonitrile-Butadiene Rubber
If the equipment is likely to come into contact with
aggressive substances, then it is the responsibility
of the user to take suitable precautions that prevent
it from being adversely affected, thus ensuring that
the type of protection is not compromised.
“Aggressive substances” - e.g. acidic liquids, gases
or solvents that may affect polymeric materials.
“Suitable precautions” - e.g. regular checks as part
of routine inspections or establishing from the
material’s data sheet that it is resistant to specific
chemicals.
Leads connected to the terminals shall be insulated
for the appropriate voltage and this insulation shall
extend to within 1mm of the metal of the terminal
throat. They shall only be installed and wired with
cable in an ambient temperature of -10°C to +80°C
All terminal screws, used or unused, shall be
tightened down to between 0.5 Nm and 0.7 Nm
Refer to certificates SIRA 09ATEX3286X and
IECEx SIR 09.0121X for special conditions of safe
use.
Under extreme conditions the unit may generate an
ignition-capable level of electrostatic charges. The
unit must not be installed in a location where it may
be subjected to external conditions (such as high-
pressure steam) which may cause a build-up of
electrostatic charges on non-conducting surfaces.
Cleaning of the unit must only be carried out with a
damp cloth.
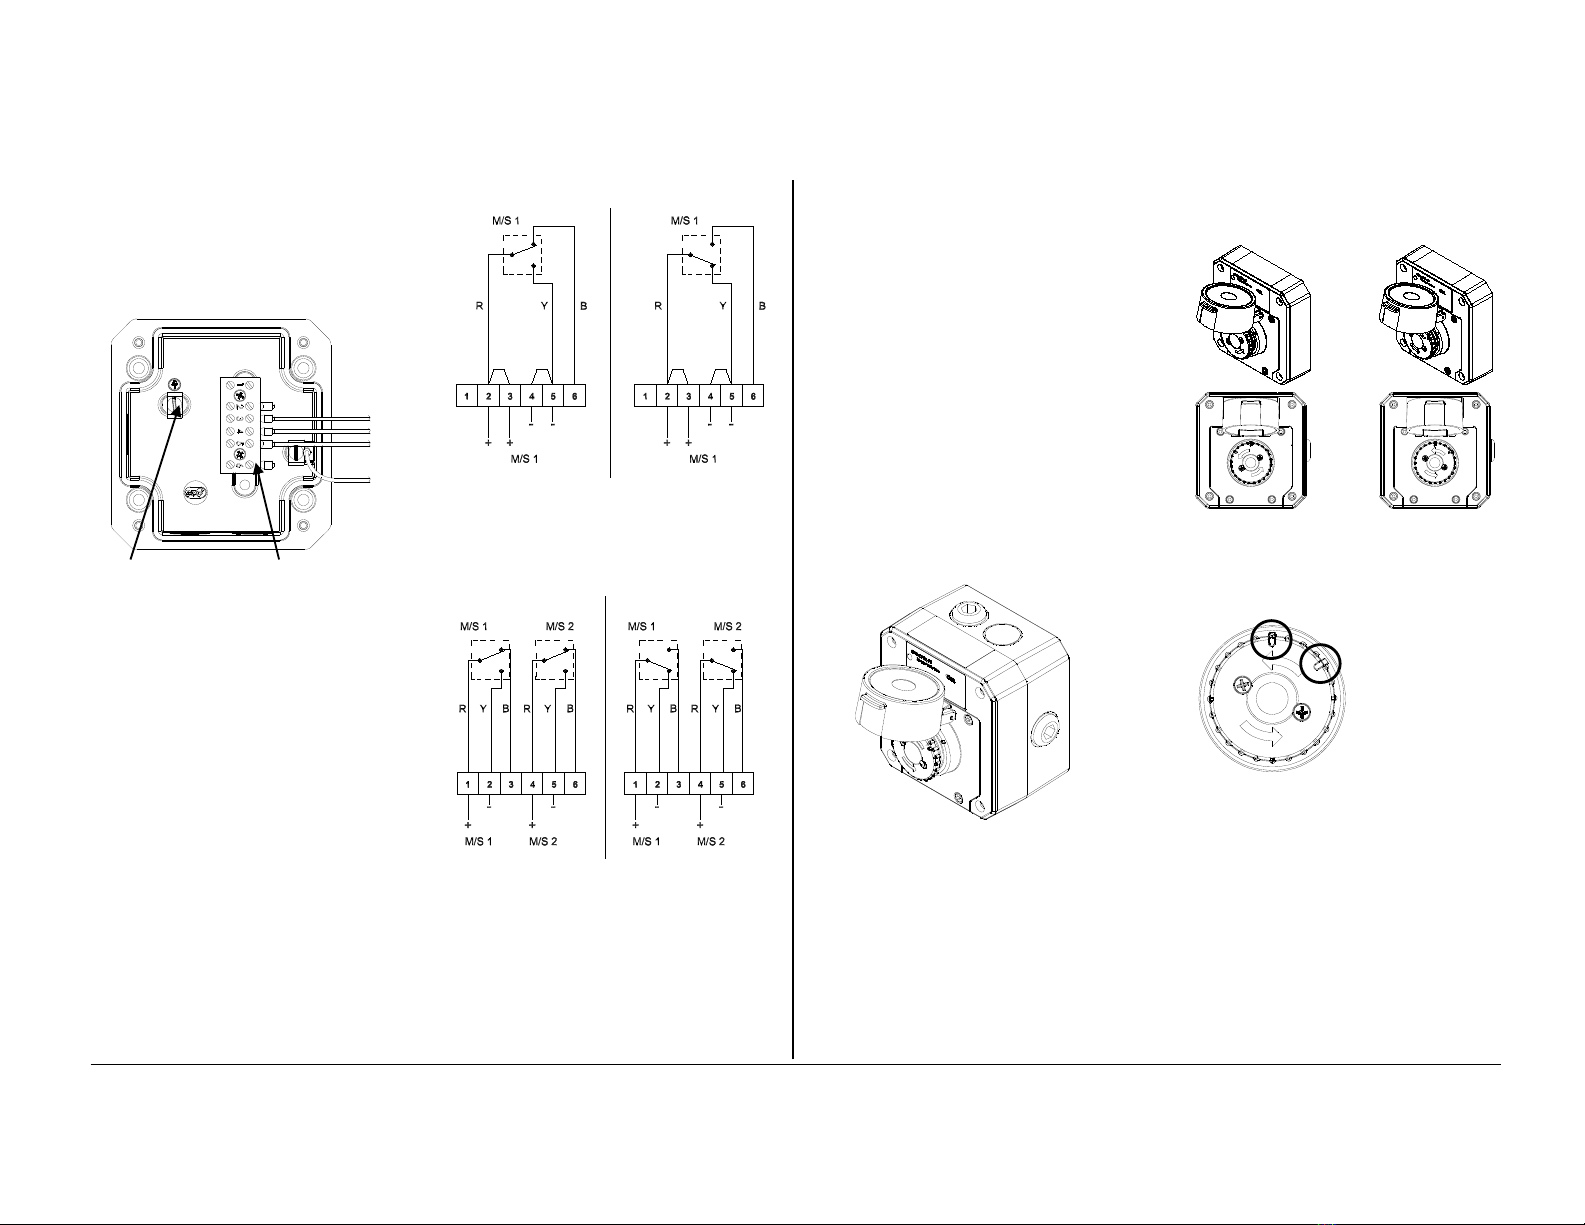
5) Call Point Location and Mounting
The location of the call point should enable ease of
access for operation and testing. The unit should
be mounted using the 4 off fixing holes which will
accept up to M4 sized fixings.
View of base unit showing fixing centres (in mm).
To gain access to the mounting holes in the base
the front cover must be removed.
This is achieved by removing the 4 off M4 cap
head bolts holding on the cover.
Once the screws are removed the cover will hang
down out of the way to gain access to the Ex e
terminal block, the internal earth terminal and
mounting hole recesses.
INSTRUCTION MANUAL
GNExCP6A-PB Push Button Manual Call Point
For use in Flammable Gas and Dust Atmos
p
here
s
European Safety Systems Ltd. Impress House, Mansell Road, Acton, London W3 7QH sales@e2s.com Tel: +44 (0)208 743 8880
Document D154-00-101-IS Issue 4 03-02-2020 Sheet 2 of 3 www.e2s.com Fax +44 (0)208 740 4200
Unit in ‘Standby
condition’ unoperated
Terminal +(2,3) & (6)
switch contacts closed
Terminals +(2,3) & -(4,5)
switch contacts open
Unit in ‘Operated condition’
(button pushed in)
microswitch contacts changed
over
Terminal +(2,3) & (6) switch
contacts open
Terminals +(2,3) & -(4,5) switch
contacts closed
Unit in ‘Operated condition’
(button pushed in)
microswitch contacts changed
over
Terminal +(1) & (3)
Terminal +(4) & (6) switch
contacts open
Terminals +(1) & -(2)
Terminals +(4) & +(5) switch
contacts closed
Unit in ‘Standby
condition’ unoperated
Terminal +(1) & (3)
Terminal +(4) & (6) switch
contacts closed
Terminals +(1) & -(2)
Terminals +(4) & -(5)
switch contacts open
6) Earthing
The unit has an internal earth terminal.
It is recommended that a cable crimp lug is used
on the earth wires.
The internal earth wire is placed under a earth
clamp which will stop the cable twisting. This is
secured by an M4 screw and spring washer.
Internal Earth Ex e terminal block
terminal
7) Cable connections
There are 3 off cable entries for M20x1.5 Ex e
approved cable glands or stopping plugs with a
minimum ingress protection of IP66.
The unit can be wired in a number of different ways
depending whether normally open or normally
closed contacts are required.
Single microswitch units:
Double microswitch units:
When wiring to Increased Safety terminal
enclosures, you are only permitted to connect one
wire into each way on the terminal block, unless a
pair of wires are crimped into a suitable ferrule.
Wire sizes allowable are 0.5sqmm to 4.0sqmm
The terminals are only permitted to be wired with
cable in an ambient temperature range of between
-10°C to 80°C. All terminal screws, used or
unused, must be fully tightened down.
Leads connected to the terminals must be
insulated for the appropriate voltage and this
insulation must extend to within 1mm of the metal
of the terminal throat.
8) Testing unit operation
The push button unit can be tested without the
need to replace any element.
To test, lift the cover lift flap to reveal the push
button. The button should be pressed into the body
to activate the unit and place it into the operated
condition.
The call point switch will now change over its
contacts to operate the alarm.
Once testing is complete the unit needs to be reset
from the operated condition.
Rotate the push button anticlockwise by an angle
of 55°, see guide alignment marks on the button
and cover, shown below (1). The push button
should pop back up to its original position.
Ensure that the push button has also twisted back
clockwise by 55° to its original position see guide
marks on button and cover, shown below (2). The
unit is now reset.
1. On operated unit 2. Button should pop
twist push button up and twist back to
anticlockwise 55° original position
to reset
Resetting an operated unit is the same as resetting
a tested unit.
Note: use alignment
marks circled to
indicate the push
buttons
status/position
Unit currently shown
as ‘standby
condition’
European Safety Systems Ltd. Impress House, Mansell Road, Acton, London W3 7QH sales@e2s.com Tel: +44 (0)208 743 8880
Document D154-00-101-IS Issue 4 03-02-2020 Sheet 3 of 3 www.e2s.com Fax +44 (0)208 740 4200
9) SIL 2 Reliability Data
Reliability and Functional safety IEC/EN61508
which has been assessed and is considered
suitable for use in low demand safety function:
• Random Hardware Failures and Systematic
Failures (route 2H)
• As an unvoted item (i.e. hardware fault tolerance
of 0) at SIL 2
The product was assessed against failure modes:
• Failure to close a contact when the call point is
struck with specified force
• Failure to open a contact when the call point is
struck with specified force
• Spurious output despite no input
Integrityinrespectof
failuretoclose
SIL2
TotalFailurerate 0.133pmh
“hazardous”failure
rate(revealed)
0pmh
“hazardous”failure
rate(unrevealed)
0.1pmh
“safe”failurerate
(revealed)
0.033pmh
“safe”failurerate
(unrevealed)
0
DiagnosticCoverage 99%
Systemtype A
HardwareFault
Tolerance
0
SafeFailureFraction >99%
PFD(hazardous
failure)
1.25x10‐3
ProofTestInterval Upto1year

Other E2S Safety Equipment manuals

E2S GNExCP7-PB-S User manual

E2S

E2S GNExCP7-PB-S User manual

E2S GNExCP6A-PB User manual

E2S

E2S GNExCP6A-PB User manual

E2S WP7-PB-S User manual

E2S

E2S WP7-PB-S User manual

E2S IS-CP4B-BG User manual

E2S

E2S IS-CP4B-BG User manual

E2S BExCP3C-BG User manual

E2S

E2S BExCP3C-BG User manual

E2S A141 User manual

E2S

E2S A141 User manual

E2S IS-CP4A-PB User manual

E2S

E2S IS-CP4A-PB User manual

E2S IS-CP4A-BG User manual

E2S

E2S IS-CP4A-BG User manual

E2S AL112NH User manual

E2S

E2S AL112NH User manual

E2S STExCP8-PB-S User manual

E2S

E2S STExCP8-PB-S User manual

E2S E2xC1X05R User manual

E2S

E2S E2xC1X05R User manual

E2S GNExCP6A-BG User manual

E2S

E2S GNExCP6A-BG User manual

E2S STExCP8-BG-S User manual

E2S

E2S STExCP8-BG-S User manual

E2S IS-CP4A-PT User manual

E2S

E2S IS-CP4A-PT User manual

E2S BExCP3A-BG User manual

E2S

E2S BExCP3A-BG User manual

Popular Safety Equipment manuals by other brands

Uvex aXess one User instruction

Uvex

Uvex aXess one User instruction

ABS ABS-Lock X-SW-6 manual

ABS

ABS ABS-Lock X-SW-6 manual

ABS ABS-Lock DH04-BS manual

ABS

ABS ABS-Lock DH04-BS manual

Ferno 131 quick start guide

Ferno

Ferno 131 quick start guide

Viking YouSafe Hurricane user manual

Viking

Viking YouSafe Hurricane user manual

optrel weldcap bump RCB 3/9-12 quick start guide

optrel

optrel weldcap bump RCB 3/9-12 quick start guide

CMC RESCUE & PROTECH PULLEYS manual

CMC

CMC RESCUE & PROTECH PULLEYS manual

HOLOVISION 400-A-VIK manual

HOLOVISION

HOLOVISION 400-A-VIK manual

IOTA IIS Series user manual

IOTA

IOTA IIS Series user manual

Vokkero GUARDIAN EUROPE ATEX user guide

Vokkero

Vokkero GUARDIAN EUROPE ATEX user guide

ASO ISK 76-21 operating manual

ASO

ASO ISK 76-21 operating manual

VEVOR Q-3A user manual

VEVOR

VEVOR Q-3A user manual

MSA PremAire System CARRIER AND HARNESS ASSEMBLY

MSA

MSA PremAire System CARRIER AND HARNESS ASSEMBLY

Nora Lighting NX-605 Installation & operation instructions

Nora Lighting

Nora Lighting NX-605 Installation & operation instructions

BBC Bircher ExpertLine EL45 99A1 Series Short guide

BBC Bircher

BBC Bircher ExpertLine EL45 99A1 Series Short guide

Confio SOS Button User manua

Confio

Confio SOS Button User manua

Sonmez Tent SMZ60 operating manual

Sonmez Tent

Sonmez Tent SMZ60 operating manual

Dynello Spaceball RS0402 instruction manual

Dynello

Dynello Spaceball RS0402 instruction manual

manuals.online logo
manuals.online logoBrands
  • About & Mission
  • Contact us
  • Privacy Policy
  • Terms and Conditions

Copyright 2025 Manuals.Online. All Rights Reserved.