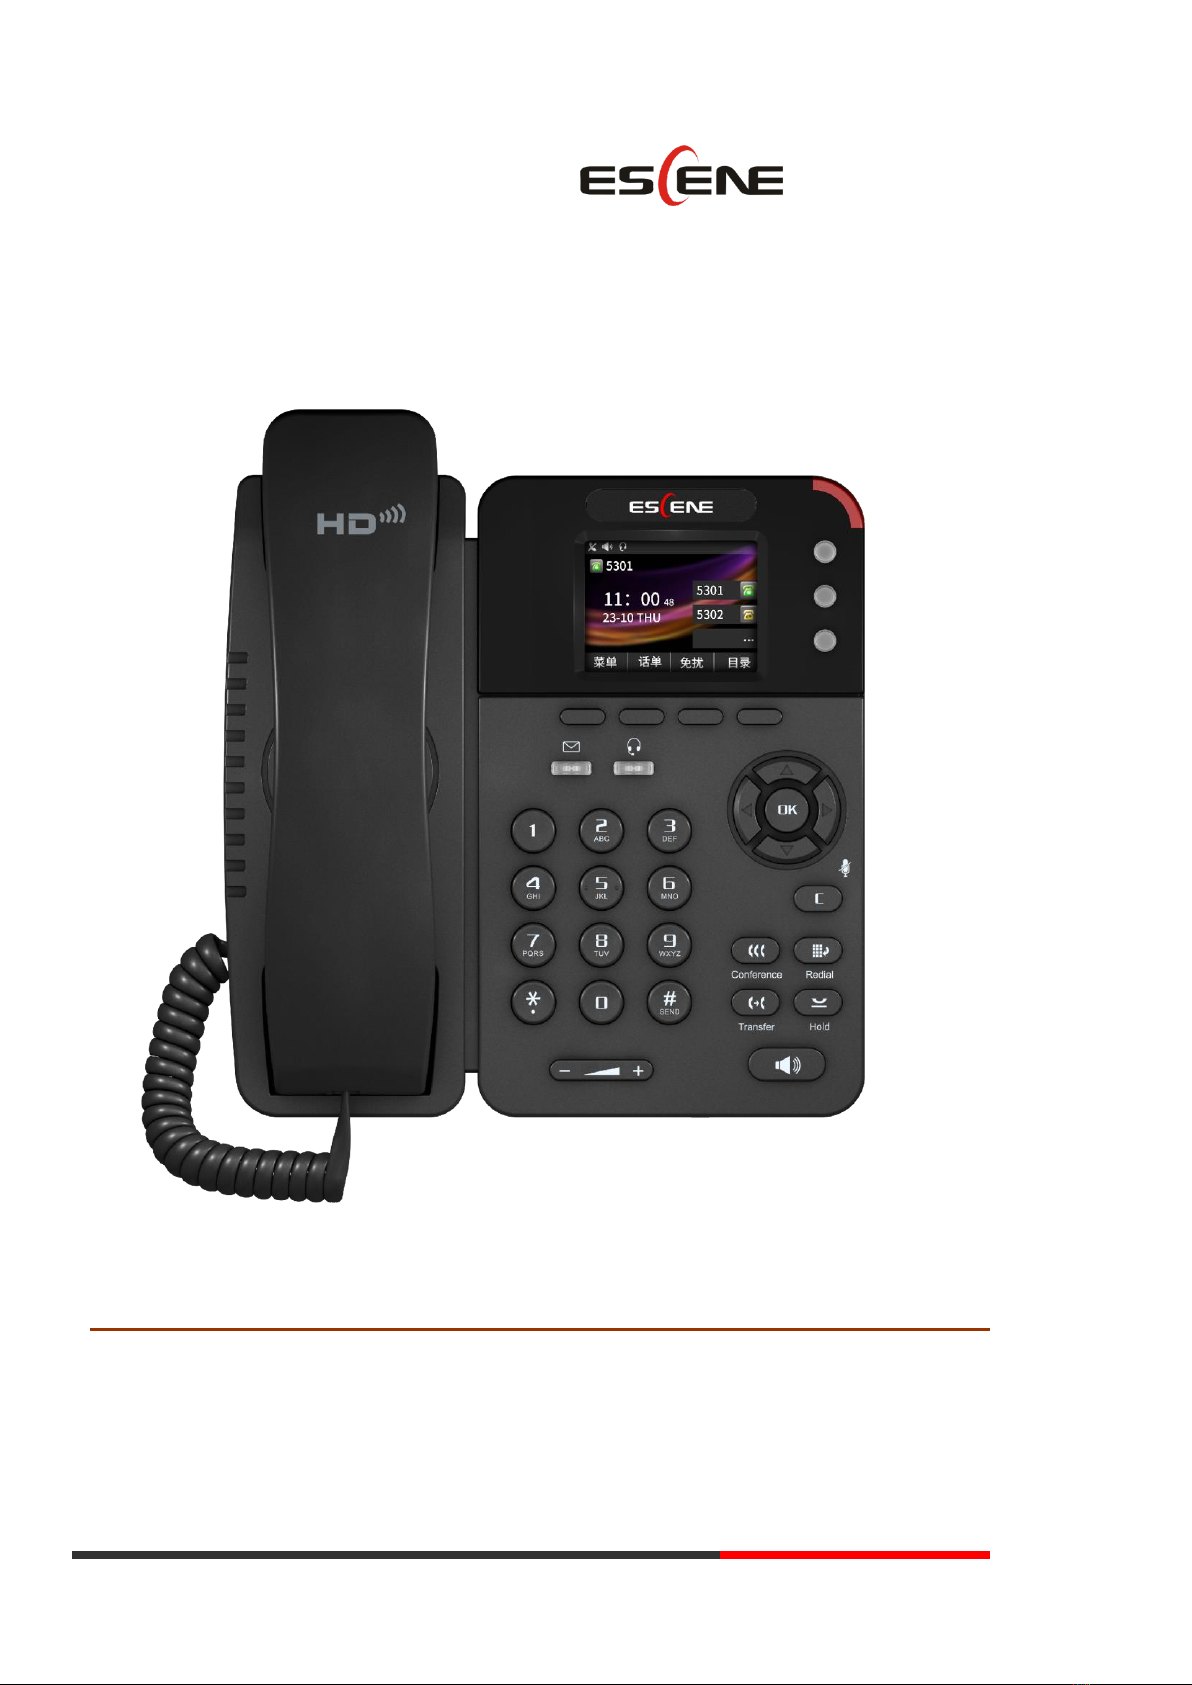
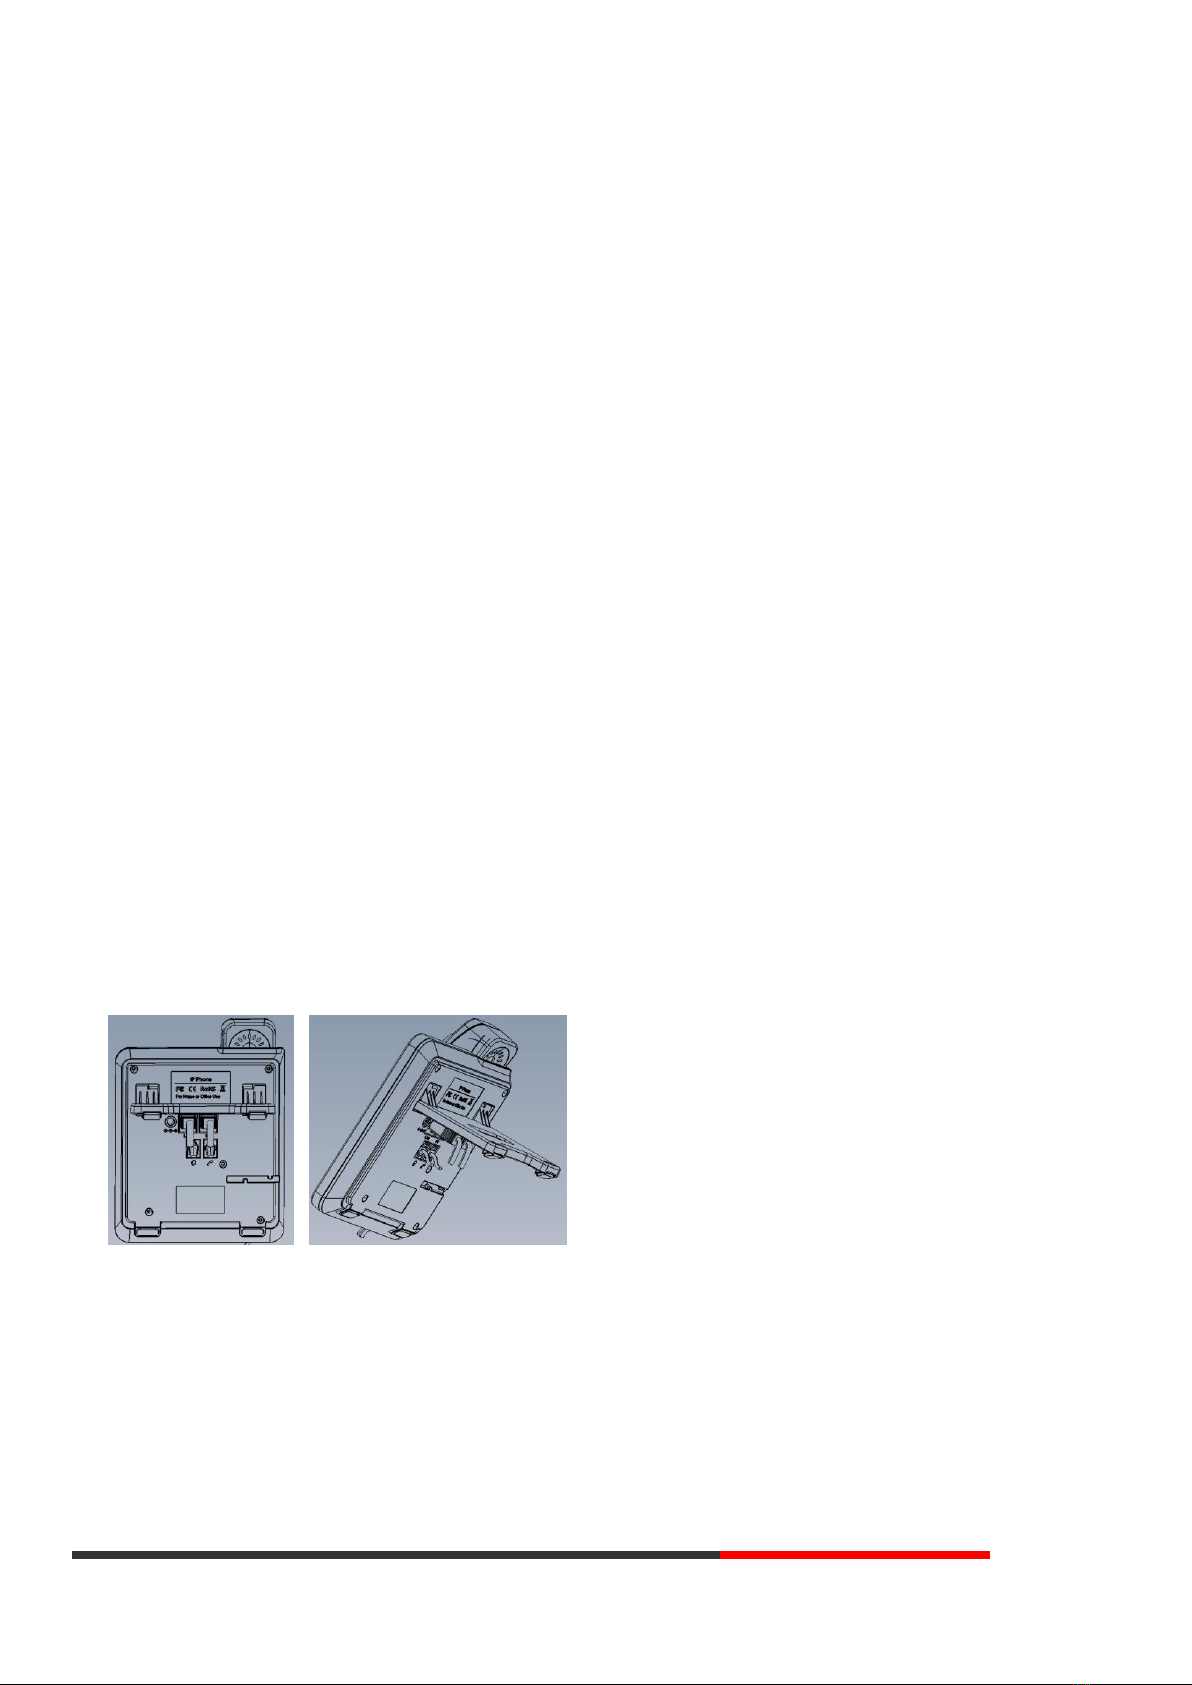
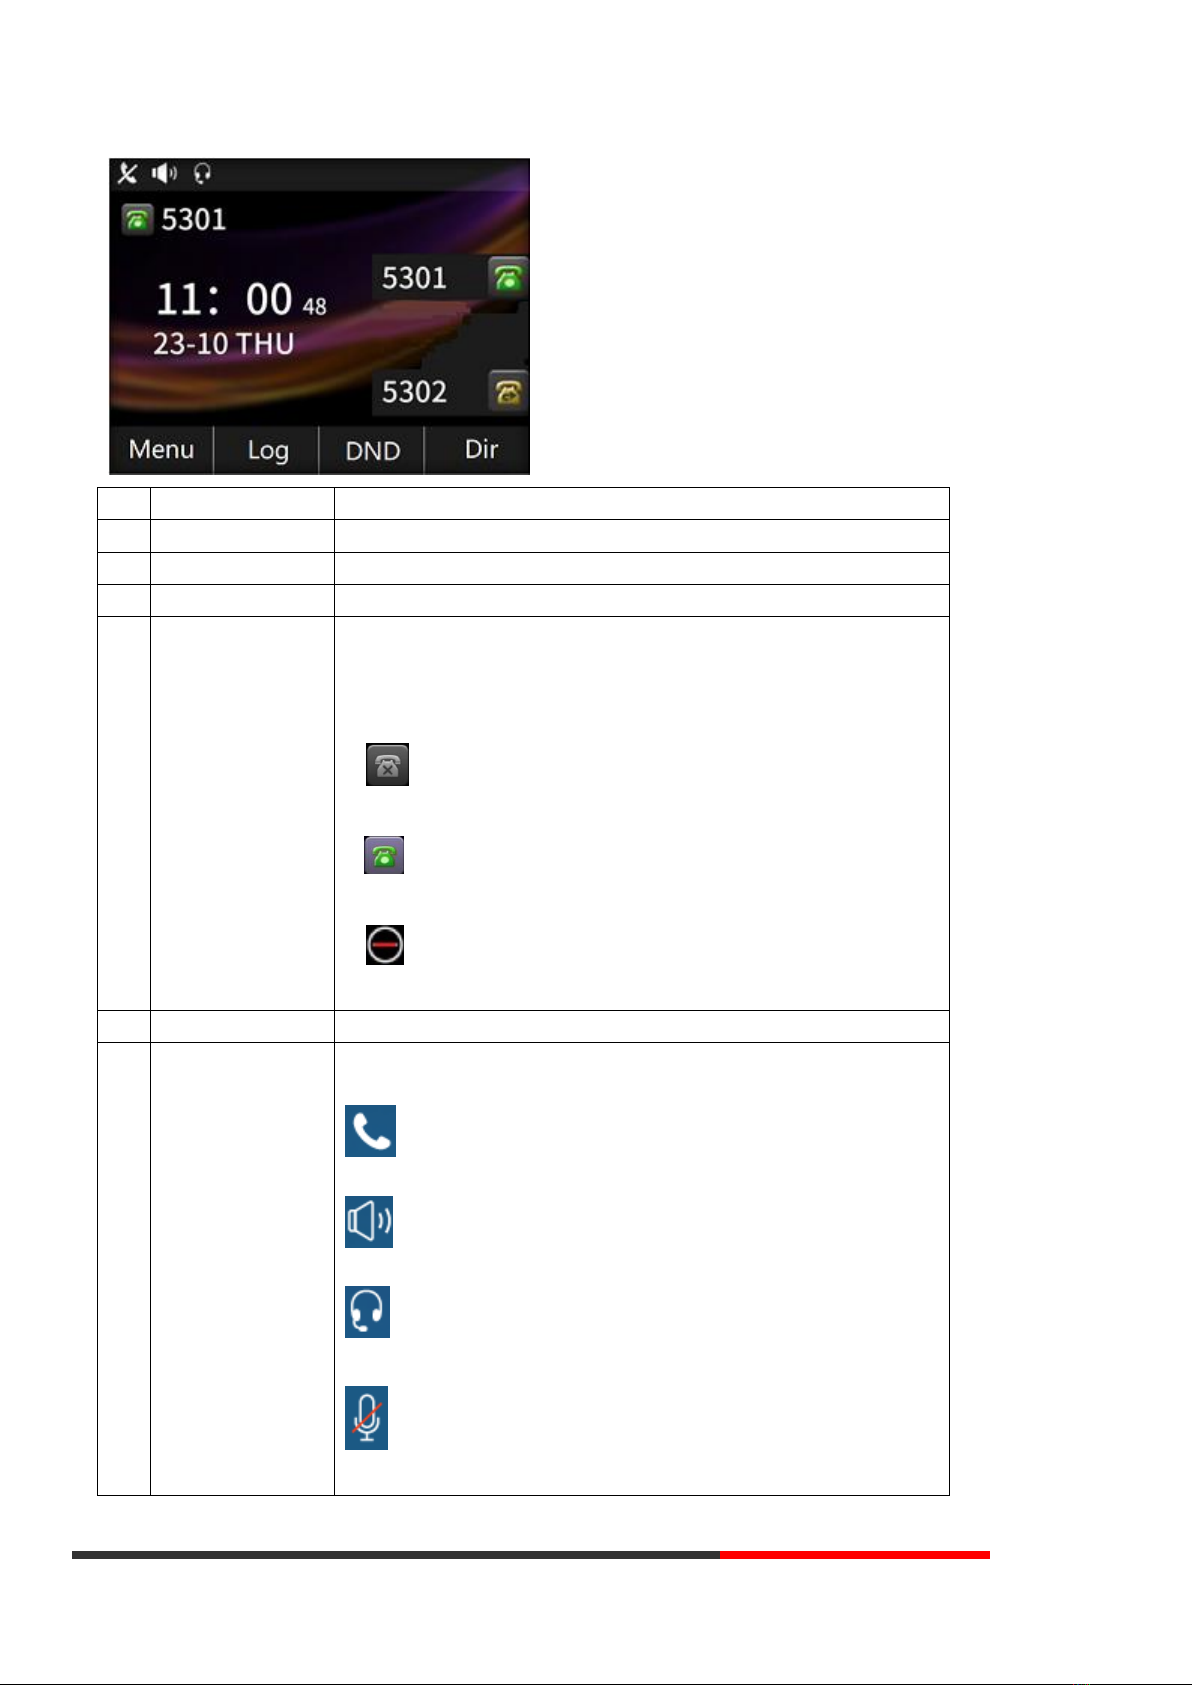
Escene ES282-PC User manual

www.escene.cn/en/ Escene Communication
ES282-PC IP Smart VoIP Phone User Manual
E
Es
sc
ce
en
ne
e
C
Co
om
mm
mu
un
ni
ic
ca
at
ti
io
on
n
C
Co
o.
.
L
Lt
td
d

www.escene.cn/en/ Escene Communication
INDEX
INDEX2
1. Getting Started 4
About4
Feature Highlights 4
2. Set up the Phone 5
3. Phone User Interface 6
3.1 Hardware Component Instructions 6
3.2 Phone Screen Display Features 8
3.3 Basic Network Settings 10
3.4 SIP Account Settings 11
3.5 Basic Features 12
3.5.1 Making a Call12
3.5.2 Anonymous Call 12
3.5.3 Redial 12
3.5.4 Call Log 13
3.5.5 Making Calls to Contact 13
3.5.6 Multi-lines to Answer the Call 13
3.5.7 Auto-Answer 13
3.5.8 Ending a Call 14
3.5.9 Using Hold and Recover (Switch Calling Line) 14
3.5.10 Transferring Calls 15
3.5.11 Using Mute 15
3.5.12 Do Not Disturb 15
3.5.13 3-way Conference 16
3.5.14 Voice Mail 16
3.6 Advanced Settings 17
3.6.1 Using the phone book 17
3.6.2 Using Call Logs 19
3.6.3 Peer-to-Peer 19
3.7 Keypad Setting 20
3.7.1 Language Setting 20
3.7.2 Message 20
3.7.3 Time & Date 20
3.7.4 Ring Tone and Volume Setting 21
3.7.5 Searching Phone Book 22

www.escene.cn/en/ Escene Communication
3.7.6 Cannot Set the Features with Keypad 22
4. WEB User Interface 22
Main Interface-Phone Status 22
4.1 Net Work 23
4.1.1 LAN Port 23
4.1.2 PC Port 26
4.1.3 Advanced 26
5 SIP Account 27
5.1Basic 27
5.2 Call 29
5.3 Security 30
6 Phone Setting 30
6.1 Basic 30
6.1.1 Time Settings31
6.1.2 Call 32
6.1.3 VoIP Call Forward 34
6.1.4 QoS 34
6.2 Advanced 35
6.2 .0 Audio 35
6.3 Line Keys 37
6.4 Function Keys 37
6.5 Soft Key 38
6.6 Dial Plan 38
6.7 IP Strategy 39
7 Phone Book 40
7.1 Group 40
7.2 Contact 40
7.3 LDAP 41
7.4 Ban List 42
8 Phone Maintenance 42
8.1 Basic 42

www.escene.cn/en/ Escene Communication
8.1.1 HTTP Upgrade 42
8.1.2 FTP Upgrade 43
8.1.3 TFTP Upgrade 44
8.1.4 Default Setting 45
8.1.5 Reboot45
8.2 Advanced 46
8.2.1 Log 46
8.2.2 Auto Provision 46
9 Password 47
10 WEB Other Settings or Information - Appendix 47
10.1 WEB User 47
10.2 Multi-Language 48
10.3 Note Tips 48
1. Getting Started
About
ESCENE ES282-PC is a compact office IP phone with rich features. It has 2.4-inch
320x240 HD color LCD up to 4-line display; it also has HD Sound Quality, unique art design, demountable bracket to provide multi-ang
le, 4 programmable keys, and friendly user interface to satisfy users's communication needs. This document revised and updated by
Escene Turkey Distributor Nolto Bilişim (www.nolto.com) at June 2020.
Feature Highlights
a) Multi-Language
The LCD display supports Multi-Language.
b) HD Voice
Special voice processing technology, high-fidelity voice quality, HD encoding, HD Handset, ensure clear, realistic smooth communication.
c) Senior Calling Ability
3 lines with double color (GREEN & RED) LEDs, synchronously control or manage 3 calls, Call queue, Switch between lines. Multi-parties conference
call transfer.
d) All kinds of Phone Book

www.escene.cn/en/ Escene Communication
It supports XML Personal Phone Book\LDAP\Enterprise Phone Book etc. This feature satisfies customer's phone book requirements.
e) Support HTTP\TFTP\FTP\Auto-Provision.
f) Support POE (Remark: ES282-PC) and Power Adapter.
g) Standard desktop bracket.
h) Support 15 programmable keys.
2. Set up the Phone
a) Packing List:
Check the packing list before installation, if you find anything missing, contact your system administrator.
⚫1*ES282-PC IP Phone
⚫1*Handset
⚫1* Handset Cord
⚫1*Ethernet Cable
⚫1*Phone Bracket
⚫1*Quick Setup Guide
b) Phone Installation:
This section introduces how to install the phone with the components in the packing list:
⚫Attach the Bracket
⚫Connect the Handset and optional Headset
⚫Connect the Network and Power
Attach the Bracket
Pls follow as below pictures to attach the bracket.
Connect the Handset and optional Headset

www.escene.cn/en/ Escene Communication
Connect the Network and Power
You have two options for power supply. Your system administrator will advise you which one to use.
⚫AC power adapter
⚫POE (Power over Ethernet) IEEE802.3af
NOTES:Pls make sure your phone support POE feature. You can check the label on the back of the phone, for example "Model: ES282-PC-P
Rev:2.1.0", the P means it support POE feature.
Note: If POE works, the phone does not need to connect to the AC power adapter. Make sure the Ethernet cable and switch/hub are POE compliant.
3. Phone User Interface
3.1 Hardware Component Instructions
The main hardware components of the ES282-PC IP Phone are the LCD screen and the keypad.

www.escene.cn/en/ Escene Communication
Hardware component instructions of the ES282-PC IP Phone are:
ITEM
DESCRIPTION
1
LCD Screen
Displayed information about calls, messages, soft keys, time, date, and other relevant data:
• Call information — caller ID, call duration
• Icons (e.g. )
• Missed calls or second incoming caller's information
•Time and date
2
Light Status
Red-Flashing: There is an incoming call or be Hold.
Red-Steady: Hook-off. or be in a usual conversation
3
Line Key
Green-Steady: There is a conversation making on the line
Red-Flashing: There is call coming in

www.escene.cn/en/ Escene Communication
Green-Flashing: The line is on hold
Dark: Accounts are idle
4
Soft Key
Labels automatically to identity their context-sensitive features
5
Navigation Key
Scroll through the displayed information, and in the idle feature:
UP: Open the "All CONTACT LOG"
DOWN: Open the "MISSED CALL"
RIGHT: Open the "RECEIVED CALL"
LEFT: Open the "DAIL CALL"
6
OK Key
Confirm the action
7
C Key
Cancels actions or rejects an incoming call, and the other feature:
In the idle: Open the "Phone Status".
Diagnosis: Press and hold 3 second to open "Hardware Diagnosis".
MUTE: "MUTE" feature is enabled if you press it while the conversation making on the
phone.
8
Functions Key
Conference\Redial\Transfer\Hold
9
Speaker Key
Toggles the hands-free speaker phone mode.
10
Mc
Voice input
11
Volume Key
Adjusts the volume of the handset, headset, speaker, and ringer
12
Keypad
Provides the digits, letters, and special characters in context-sensitive applications.
13
Handset
Voice input and output
14
Speaker
Voice output
15
Headset Key
Toggles and indicates the headset mode.
16
Message Key
Indicates and accesses voice messages.
3.2 Phone Screen Display Features
If the phone has successfully started up and after using, the idle LCD display will show information as below:

www.escene.cn/en/ Escene Communication
ITEM
DESCRIPTION
1
TIME & DATE
TIME & DATE display in the middle of the screen.
2
Auto-Answer icon
Enable this feature, it will display "AA" at the top right corner.
3
Missed Call
Missed Call under the TIME in the middle of screen
4
Line Status
There are four status as below:
a. LAN Disconnect: Disconnect the network
b. :Account failed to register
c. :Account successfully registered
d. :Account successfully registered and DND feature is enabled. The DND icon also
will display at the top right corner.
5
Soft Key Area
Labels automatically to identity their context-sensitive features
6
Screen Top Icon
The Screen Top Icon from left to right is:
: Handset Hand on status
: Speaker Hand on status
: Headset Hand on status
: Call MUTE

www.escene.cn/en/ Escene Communication
: Missed Call
: Call Forward
: Text Message
: Keypad Lock
: Network is unavailable
3.3 Basic Network Settings
The phone supports Three Modes of Network Setting. Include PPPoE\Static IP\DHCP.
DHCP Setting
Feature
Operating Steps
DHCP
Press MENU> System Settings> Advanced Settings> Password (Default is Empty)> Network> LAN Port
⚫Press LAN Port to login into the menu
⚫Select "DHCP" mode
⚫Press "Enter" key
⚫Set the DNS\web port\telnet port
⚫Press "Save" key to make it work
⚫Tips "Network is changed, press OK reboot "
Static IP Setting
Feature
Operating Steps
Static IP
Press MENU> System Settings> Advanced Settings> Password (Default is Empty)> Network> LAN Port
⚫Press LAN Port to login into the menu
⚫Select "Static" mode
⚫Press "Enter" key
⚫Set the IP\Mask\GW\DNS\web port\telnet port
⚫Press "Save" key to make it work
⚫Tips "Network is changed, press OK reboot "
PPPoE Setting
Feature
Operating Steps

www.escene.cn/en/ Escene Communication
PPPoE
Press MENU> System Settings> Advanced Settings> Password (Default is Empty)> Network> LAN Port
⚫Press LAN Port to login into the menu
⚫Select "PPPoE" mode
⚫Press "Enter" key
⚫Set the Username\Password\web port\telnet port
⚫Press "Save" key to make it work
⚫Tips "Network is changed, press OK reboot "
3.4 SIP Account Settings
ES282-PC IP phone makes calls based on sip accounts, it can support Single account or Multi-account, each account can be configured to the different
SIP server.
If you want to…
Then...
Create a SIP account
--1) Select “System setting” > “Advanced setting”.
--2) Enter the password required(The default is empty).
--3) Select “SIP” > “Account sip”.
--4) Select one of the accounts you want to set, you can configure the following parameters
-Enable account*: Select Enable
-Number of lines: Default is 2
-Description: description of this account
-Display Name: The name displayed on the screen
-Authentication user: The Authenticated users are matched with the SIP server. (The
default with the same account)
-Account*: the account matches with the SIP server. (extension number)
-User password*: the user password matches with the SIP server
-SIP Server*: The primary SIP server, all calls through this server
-Out Bound Server: The out bound SIP server
-STUN Type: Enable/Disable STUN feature

www.escene.cn/en/ Escene Communication
-STUN: Input STUN URL
-Auto Answer: Enable/Disable this account auto answer feature
* Note: When you finish the setting, you can press Save to make it work, and then you can see
the status icon in the LCD idle. The parameters with the * mark must be set.
Disable sip account
--1) Select “System setting” > “Advanced setting”.
--2) Enter the password required(The default is empty).
--3) Select “SIP” > “Account sip”.
--4) Select “Enable account” > “Disable”.
--5) Select “Save” to saves settings
3.5 Basic Features
3.5.1 Making a Call
Here are some easy ways to place a call on SayHi IP Phone:
If you want to...
Then…
Place a call using the
handset
Pick up the handset
--1) You can hear dial tone.
--2) Enter a number.
--3) Press #button (default),
-or wait 5s (default), then it sends the number
automatically.
Place a call using a
speakerphone
Press Speaker button
Place a call using a
headset
Put on your headset, Press, and
hold the speaker button to active
Headset feature, and then do as
using speakerphone
3.5.2 Anonymous Call
You can use anonymous call feature to block the identity and phone number from showing up to the called party when you call someone. E.g, you
want to call to consult some of the services, but you do not want to be harassed.
Enable Anonymous Call
Press MENU> Function Setting> Anonymous
--Press Enter button,
-You can select which Account want to use, enable/disable this feature, and
enable/disable reject anonymous
3.5.3 Redial

www.escene.cn/en/ Escene Communication
To redial the last placed call from your phone
Redial
--Press REDIAL button to dial the last number
-or press Navigation Button-Left > “Dialed number”, select a number, and press
3.5.4 Call Log
Dial from a call log
--1) Press MENU button >“Call history”, you can select "All Calls", “Missed calls”, “Received calls” and
“Dialed numbers”,
- or press Navigation UP/DOWN button (in idle status) > select "All Calls"(up) “Missed calls” (down), left
and right can select “Dialed numbers” or “Received calls”
--2) Then press button.
NOTE: You also can press the "log" to login this menu when in the idle.
3.5.5 Making Calls to Contact
You can also dial a contact from the Personal Phone Book.
Placing Calls to Contacts
--1) Press MENU button >“Phone Book”, you can select "Personal Phone Book",
“Enterprise Phone Book”, “LDAP” and “Blacklist”,
- or press Navigation UP/DOWN button (in idle status) > select the desired contact.
--2) Then press button.
NOTE: You also can press the "DIR" to login this menu when in the idle.
3.5.6 Multi-lines to Answer the Call
Multi-lines to Answer the Call
--1) Another Line button is Red and flashing, Light strip is Red and flashing.
--2) Press the flashing Line button to answer (at this time, the original call will be hold.)
3.5.7 Auto-Answer
You can set the phone and let it auto-answer the coming call.

www.escene.cn/en/ Escene Communication
Auto-Answer the Coming Call
--1) Enable the Auto-Answer feature.
--2) Auto-Answer mode you can set in the MENU>Function Setting> Auto Answer >Device
⚫Speaker
⚫Handset
⚫Headset
When you use the Handset mode, at this time you need to hand up the handset and then
it can work at this status.
--3) Filter Groups
Auto-answer the coming call in this special groups.
3.5.8 Ending a Call
To end a call, hang up. Here are some more details. NOTE: Press and hold the speaker key can change to Handset feature.
Hang up while using the Handset
--Return the handset to its cradle,
-or press End
Hang up while using the
Speakerphone
--Press Speaker button,
-or press Line button for the appropriate line,
-or press End
Hang up while using the Headset
--Press Handset button, (Do not keep the headset mode),
-or press End (keep the headset mode)
Hang up one call, but preserve
another call on the other line
--Press End,
-or refer to the above three methods
3.5.9 Using Hold and Recover (Switch Calling Line)
You can hold and resume calls. You can take a call in one line at any time, and the other lines would be hold. As a result of that, you can switch
different calling line on our phone. Note: If the phone is not having the hold button, pls using the soft key.
If you want to...
Then...
Put a call on hold
--Press HOLD button,
-or press soft key
Hold a line and switch to another
Press another Line button for the appropriate line

www.escene.cn/en/ Escene Communication
line
Resume a call on current line
--Press Line button,
Release a call on different line
Select the line want to release hold, press the line, so recovery;
NOTES
•Engaging the Hold feature typically generates music or a beeping tone.
• A held call is indicated by the Yellow-green and flashing Line button or Hold in the LCD.
3.5.10 Transferring Calls
Transfer redirects a connected call. The target is the number to which you want to transfer the call.
Talk to the transfer recipient
before transferring a call
(consult transfer)
--1) Press TRANSFER button or press XFER.
--2) Enter number.
--3) press “#” (default),
-or press then transfer the call,
-or wait five seconds(default)then transfer the call
Transferred to idle lines or
other numbers without
talking to the transfer
recipient
(Blind transfer)
--1) Press TRANSFER button or XFER.
--2) Press ;
--3) Enter number.
--4) Press “#” (default)
-or press , then transfer the call.
-or wait five seconds(default)then transfer the call
Blind transfer to the
held line
--1) Press TRANSFER button or press XFER.
--2) Press the Line button of held line
3.5.11 Using Mute
With Mute enabled, you can hear other parties on a call, but they cannot hear you. You can use mute in conjunction with the handset, speakerphone,
or a headset。
Toggle Mute on
Press C button, then the screen top and left will have a MUTE icon
Toggle Mute off
Press C button again, then the button lights off
3.5.12 Do Not Disturb

www.escene.cn/en/ Escene Communication
You can use the Do Not Disturb (DND) feature to block incoming calls on your IP Phone with a busy tone(Can also be set to their voice mail or other
extension numbers, etc.).
Enable global DND
--1) Press DND.
--2) All enabled line on the phone would changes to status. and the icon is
.
Enable DND on a single line
Press MENU button > “Function setting” > “DND” > (select line) “Enable”
Disable DND
--Global DND enabled, press to disable global DND.
--Line DND enabled, press twice ,
-or press MENU button > “Function setting” > “DND” > (select line) “Disable”
3.5.13 3-way Conference
You can enable a three-party conference, during the conversation three phone parties can communicate with every party.
If you want to...
Then...
Invite the transfer recipient
into a conference in a
transferring
--1) When the transfer recipient answers the call, press CONFERCENCE button or "CONF"
on your phone.
--2) Then the held one, transfer recipient and you will be into a conference, and the LCD
will display Conference: 0:0:10 status.
Invite the third party into a
conference in an active call
--1) Press "CONFERENCE"button or "CONF" in an active call.
--2) Enter the third-party number.
--3) After connected the third party, press "CONFERENCE" button or "CONF" again
establish a conference
withheld line
--1) when one phone line is holding on and the other line is busy.
--2) Press "CONFERENCE" button,
-or Press "CONF" Soft key
--3) Press the held line's programmable button, the 3-way Conference is enabling.
3.5.14 Voice Mail
You can set Voice Mail function in Menu> Message.
Voice Mail
--1) Dial the voice mail number, e.g. *97
--2) Enter the User Password
--3) It will login into the voice mail server. You need to follow the IVR to do it.

www.escene.cn/en/ Escene Communication
3.6 Advanced Settings
3.6.1 Using the phone book
Enterprise Phone Book
Search the Contacts from
Enterprise Phone Book
--1) Press DIR in the idle status,
-or press "MENU" button > “Phone book”> “Enterprise Phone Book”,
--2) Select “Enterprise Phone Book”, press "OK" button.
--3) Press "Find" and input the name who you want to search.
Call the Contact from
Enterprise Phone Book
--1) Press "DIR" in the idle,
-or press "MENU" button > “Phone book”> “Enterprise Phone Book”,
--2) Select “Enterprise Phone Book”, press "OK" button.
--3) Press "Find" and input the name who you want to search.
--4) When you search the person, you can dial it.
Personal Phone Book
Add Contacts
--1) Press Phone Book,
-or press "MENU" button > “Phone book”> “Personal phone book>View All”,
-or press "OK"button > “Phone book”> “Personal phone book>View All”.
--2) Select “Add contact”, press "OK" button.
--3) Use the navigation keys to select content, press "OK" button to set and modify:
-Name: set the name of contact,
-Office Number: Setting the contact Office Number
-Mobile Phone Number: Setting the contact Mobile Phone Number
-Others Number: Setting the contact Others Number
-SIP Account: Setting the contact call SIP account

www.escene.cn/en/ Escene Communication
-Group: the contacts be divided into different user’s groups
--4) Press "Save" soft key to complete
Add group
--1) Press "DIR" soft key,
-or press "MENU" button > “Phone book”> “Personal phone book>View All”,
-or press "OK"button > “Phone book”> “Personal phone book>View All”.
--2) Select the “add group” then press OK button.
--3) Use the navigation keys to select content, press OK button to set and modify:
-Group name: name of the group
--4) Press "Save "soft key to complete
Modify group
--1) Press "DIR" soft key,
-or press "MENU" button > “Phone book”> “Personal phone book>View All”,
-or press "OK"button > “Phone book”> “Personal phone book>View All”;
--2) Select the “Modify group” then press "OK" button;
--3) Select the group you want to modify, press the "OK"button to set and modify, press
"Save" to save the change
Delete group
--1) Press "DIR" soft key,
-or press "MENU" button > “Phone book”> “Personal phone book>View All”,
-or press "OK" button > “Phone book”> “Personal phone book>View All”;
--2) Select the “Delete group” button;
--3) Select a group you want to delete, press OK button
LDAP
Search the Contacts from
LDAP
--1) Press "DIR" in the idle,
-or press "MENU" button > “Phone book”> “LDAP”,
--2) Select “LDAP”, press "OK" button.
--3) Press "Find" and input the name or number who you want to find search from the LDAP

www.escene.cn/en/ Escene Communication
server.
Call the Contact from LDAP
--1) Press "DIR" in the idle,
-or press "MENU" button > “Phone book”> “LDAP”,
--2) Select “LDAP”, press "OK" button.
--3) Press "Find" and input the name or number who you want to find from the LDAP server.
--4) When you search the person, you can dial it.
Blacklist
Add the Contacts
--1) Press "DIR" in the idle,
-or press "MENU" button > “Phone book”> “Black List”,
--2) Select “Blacklist”, press "OK" button;
--3) Press "Add" and input the name\office number\mobile number\other number\SIP
account who what you want to add into the Blacklist.
View the Contact from
Blacklist
--1) Press "DIR" in the idle,
-or press "MENU" or "OK" button > “Phone book”> “Black List”,
--2) Select “Blacklist”, press "OK" button;
--3) Press "RUN" to view someone who what you want to find.
--4) If you want to move or change it, you can follow the RUN to do.
3.6.2 Using Call Logs
Your phone maintains records of your missed, placed, and received calls.
View call logs
--1) Press "MENU" or "LOG" button > “All Call” > “Missed Calls”, “Received Calls”, or “Dialed
numbers”
--2) Use the navigation keys to view the call record information.
Delete/Save Call Logs
--1) Login into the Call Logs
--2) Use the navigation keys to view the call record or select DEL key.
--3) Use the navigation keys to view the call record or select Save key.
3.6.3 Peer-to-Peer

www.escene.cn/en/ Escene Communication
When all the phone accounts were disable or not register. it will be showing this mode in the idle. It can use by when the new workstation is not
having SIP server.
Peer-to-Peer
Disable all of accounts or not register.
Make Call with
Peer-to-Peer
--1)Press MENU button> System Setting> Advanced Setting> SIP Account.
--2)Disable all of accounts or un-register.
--3)Turn back the phone idle, you can call someone use IP address.
3.7 Keypad Setting
SayHi series IP Phone can through two ways configuration it, one is setting in MENU, another is setting in website. Here just description in MENU.
NOTES: When you want to input the IP address like ".", it was replaced by the "*".
3.7.1 Language Setting
ES282-PC IP Phone support Multi-Language setting, as below is an example.
Switch the Language between
Chinese and English
--1)Press MENU button> System Setting> Phone Setting> Language
--2)Here you can select
English\French\Italian\Polish\Protuguese\Runssian\Spanish\Turkish\Chinese
--3) After you finish select, press Save to make it work.
3.7.2 Message
ES282-PC have Message feature. It will display in the LCD when it has a New Message.
Create a Message
--1)Press MENU button.
--2)Select "Messaging"
--3)Voice Message: Setting the Voice Message code in here.
Text Message: Write down the Text Message in here.
--4)Select Text Message> New Message.
--5)Input the receiver and write down message body, and then press send to finish.
Message Inbox
--1)Select Message Inbox.
--2)Select which one you want to check.
--3)You can press Enter to read or press Del to delete.
3.7.3 Time & Date
Other manuals for ES282-PC
1
Table of contents
Other Escene IP Phone manuals

Escene
Escene ES330-PEG User manual

Escene
Escene SayHi CC800v2 User manual

Escene
Escene SayHi 320 Series User manual

Escene
Escene ES320P User manual

Escene
Escene ES206 User manual

Escene
Escene ES29X User manual

Escene
Escene ES205 User manual

Escene
Escene 102 Series User manual

Escene
Escene Sayhi US102 User manual

Escene
Escene ES320 User manual

Escene
Escene DS622PE User manual

Escene
Escene WS320 User manual

Escene
Escene ES620 User manual

Escene
Escene HS108-PS Manual

Escene
Escene ES320 User manual

Escene
Escene SayHi ES290 User manual

Escene
Escene WS118 User manual

Escene
Escene ES292 User manual

Escene
Escene SayHi ES280 User manual

Escene
Escene ES282 User manual