GB - Don’t throw away batteries
or out-of-order products with
household waste (rubbish). They
are likely to contain hazardous
substances that are dangerous to
both health and the environment.
Return the equipment to your local distributor
or use the recycling collection service provided
by your local council.
I - Non gettare le pile e le apparecchiature fuori
uso insieme ai rifiuti domestici. Le sostanze
dannose contenute in esse possono nuocere
alla salute dell’ambiente. Restituire questo
materiale al distributore o utilizzare la raccolta
differenziata organizzata dal comune.
ES - No tire las pilas ni los aparatos inservibles
con los residuos domésticos, ya que las
sustancias peligrosas que puedan contener
pueden perjudicar la salud y al medio
ambiente.
Pídale a su distribuidor que los recupere o uti-
lice los medios de recogida selectiva puestos
a su disposición por el ayuntamiento.
P- Não junte as pilhas nem os aparelhos
que já não se usam com o lixo caseiro. As
substâncias perigosas que ambos podem
conter podem ser prejudiciais para a saúde e
para o ambiente. Entregue esses aparelhos
ao seu lixeiro ou recorra aos meios de recolha
selectiva ao seu dispor.
NL - De lege batterijen en oude apparaten
niet met het huisvuil meegeven: deze kunnen
gevaarlijke stoffen bevatten die de gezondheid
en het milieu schaden.
De oude apparaten door uw distributeur laten
innemen of de gescheiden vuilinzameling van
uw gemeente gebruiken.
GB - Don’t throw batteries or out of order
products with the household waste (garbage).
Les substances dangereuses qu’ils sont
susceptibles de contenir peuvent nuire à la
santé et à l’environnement. Faites reprendre
ces appareils par votre distributeur ou utilisez
les moyens de collecte sélective mise à votre
disposition par votre commune.
D- Verbrauchte Batterien und nicht mehr
benützte Geräte sind Sondermüll. Sie
enthalten möglicherweise gesundheits- und
umweltschädliche Substanzen.
Geben Sie alte Geräte zur fachgerechten
Entsorgung beim Gerätehändler ab bzw.
benutzen Sie die örtlichen Recyclinghöfe.
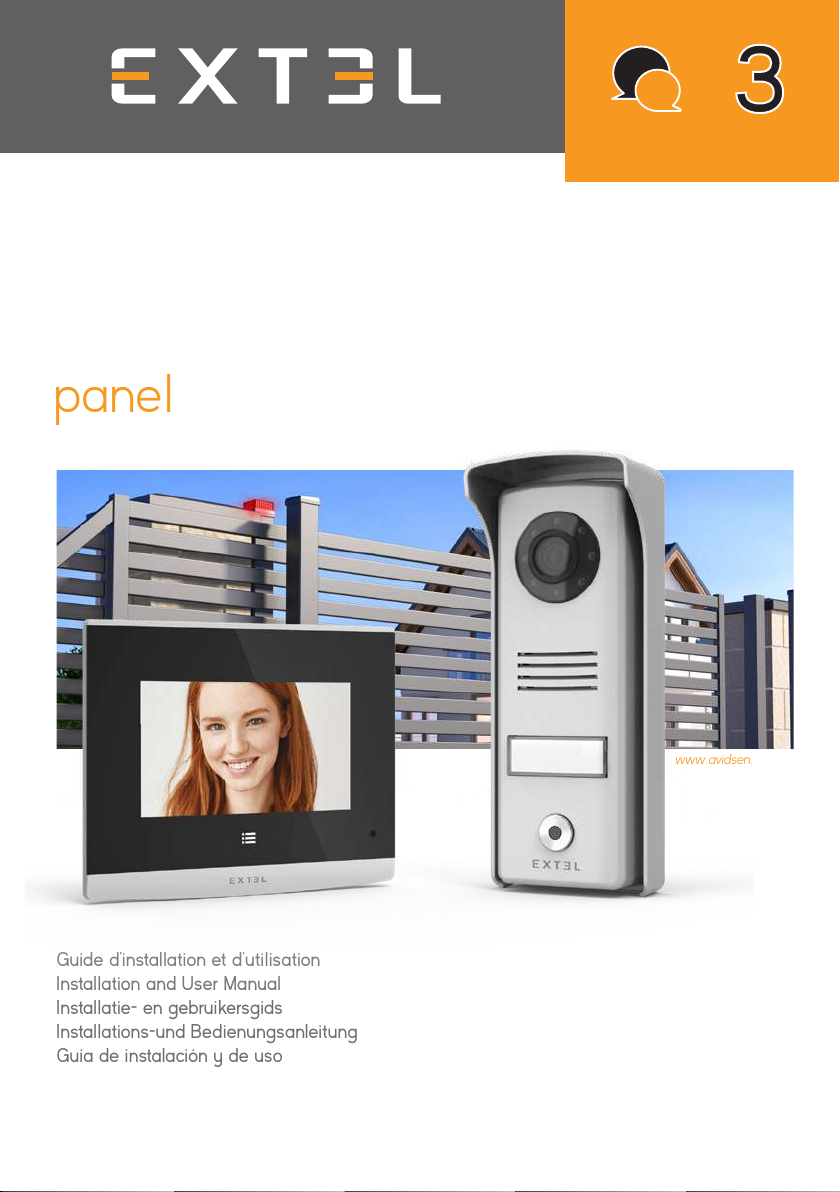
EXTEL - COMPACT - 720315
FR - Ce symbole indique que l’appareil s’installe et s’utilise uniquement à l’intérieur
I - Questo simbolo indica che l’apparecchio si installa e si utilizza unicamente all’interno
E- Este símbolo indica que el aparato se instala y utiliza únicamente en el interior
P- Este símbolo indica que o aparelho só pode ser instalado e usado em interiores
GB - This symbol indicates that the device must only be installed and used indoors
NL - Dit symbool betekent dat het apparaat alleen binnen mag worden geïnstalleerd en gebruikt
D- Dieses Symbol zeigt an, dass das Gerät nur innen installiert und verwendet wird
Service 0,35 € / min
+ prix appel
Fra n ce
Italy: + 39 02 97 27 15 98 assistenza@cfi-extel.com
Spain: + 34 902 101 633
sat-hotline@cfi-extel.com