Extel WAVE 2 User manual

Guide d’installation et d’utilisation
Installation and User Manual
Installatie- en gebruikersgids
Installations-und Bedienungsanleitung
Guía de instalación y de uso
Manual de instalação e utilização
Manuale d’uso e installazione
Οδηγός εγκατάστασης και χρήσης
WAVE 2
Connected videophone
Screen and intercom panel
REF. 720321
www.avidsen.com
v1
?
i
HOTLINE WARRANTY
33
YEARSYEARS

EXTEL - WAVE 2 - 720321
Fig. 1
Slave
+Master
3 4 7 1265 8
1
2
Fig. 2
10
9
11
4x 4 5x 4 7x 1
6x 1
Slave
+Master
1x 1 2x 1 3x 1
Fig. 3
1
3
4
2
6
5
7
8

EXTEL - WAVE 2 - 720321
Fig. 4 50cm
160cm 150cm
Fig. 5
Option Option
Option
or
Contents of the kit
Fig. 6

EXTEL - WAVE 2 - 720321
Fig. 7
Option
Option
Option
Automated gate dry contact control
input
Power supply of 12V/1.1A
(to be adapted to the electric strike
plate)
Connecting an electric strike
plate
Connecting gate automation
Or

EXTEL - WAVE 2 - 720321 en - 1
CONTENTS
A - KIT CONTENTS .........................................................................................................................................................02
B - DESCRIPTION OF MONITOR ...............................................................................................................................02
C - DESCRIPTION OF THE INTERCOM PANEL..................................................................................................02
D - INSTALLATION.......................................................................................................................................................... 03
1 - Wiring
2 - Intercom panel installation
3 - Button functions
4 - Pairing the monitor with the intercom panel
5 - Smartphone application
E - MONITOR USER MANUAL.....................................................................................................................................12
1 - Main menu
2 - Sound adjustment menu
3 - WiFi settings
4 - Advanced settings
F - CHARGING THE BATTERY...................................................................................................................................14
G - TECHNICAL SETTINGS ........................................................................................................................................16
H - WARRANTY.................................................................................................................................................................17
I - SAFETY INSTRUCTIONS ........................................................................................................................................18
J - TECHNICAL AND LEGAL INFORMATION.......................................................................................................19
1 - Declaration of conformity

EXTEL - WAVE 2 - 720321
en - 2
A - KIT CONTENTS
B - DESCRIPTION OF MONITOR
1Monitor
2Intercom panel
3Rechargeable battery
4Plug
5Fixing screws for monitor bracket and surface
mounting bracket
17" colour screen
2Microphone
3
Screen off: Intercom panel preview
Menu: left arrow or up arrow
Call in progress: takes a photo
4
During communication: Starts/ends a call
In monitoring mode: initiates communication
Menu: right arrow or down arrow
5
Screen off: Enables touch keys and access
to the time and then the menu by pressing
again
Menu: OK (selection button)
Call in progress: Access the image settings
6Hexagonal screwdriver 1.5mm
7Plug-in power supply for the screen
6In call or monitoring mode: Closing of the
control output S1 S2 of the intercom panel
7Menu: Back/Exit (back button to parent menu)
8Loudspeaker
9Jack connector for powering
10 SD memory card slot (8GB, included)
11 QR code to identify the doorkeeper
12 Antenna
Fig. 1
Fig. 2
C - DESCRIPTION OF THE
INTERCOM PANEL
1Protective case
2Camera
3Loudspeaker
4
Call button and name holder (the transparent
plastic can be peeled back to write on the
label)
5Microphone
6Dawn-to-dusk cell capable of detecting
ambient brightness and in infrared LEDs
Fig. 3
7Transformer power input 5V 1A (not included)
8Control output

EXTEL - WAVE 2 - 720321 en - 3
D - INSTALLATION
1 - WIRING
• The wiring diagrams can be found in:
- Fig6: Generic diagram
- Fig 7: Connection diagram of the intercom panel to the optional power supply, electric strike plate and gate
motor drive
• You can connect and use the control of an automated gate or an electric strike with your intercom panel. The
electric strike must have a mechanical memory and its wiring requires an external power supply (not included).
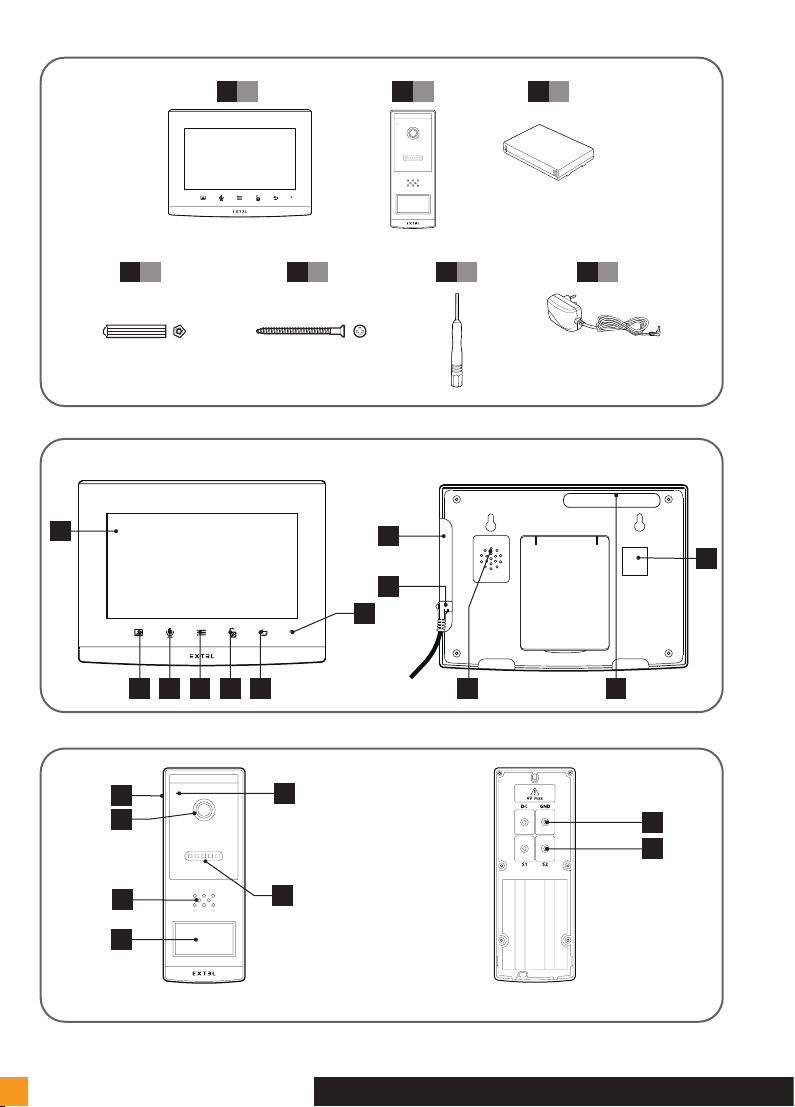
2 - INSTALLING THE INTERCOM PANEL
- Fig6 . Assembly
1. Loosen the screw at the bottom of the intercom panel to remove the front cover
Warning:
- Use the tool provided to unscrew the intercom panel, do not unscrew the intercom panel screw by hand: the
screw does not have to be removed to remove the intercom panel cover
- When you unscrew the screw (anti-clockwise), the screw goes in instead of coming out: this is normal. Unscrew
to fully retract the screw and release the front cover of the intercom panel.
2. Screw the intercom panel to the wall as recommended in Fig. 4.
3. If you want to connect the control of an electric strike plate or an automated gate, connect the wires according
to the wiring diagram (Fig 7 )
Important:
• The maximum distance between the intercom panel and the electric strike plate or electric lock is 50 m
maximum. The wire size to be used is 0.75 mm².
• The use of a 12 V/1.1 A max. electric strike plate with WECA mechanical memory (Extel reference 109021
or 109031 or reference 150011).
• The product has been tested and approved with Thomson, Extel and Avidsen gate motors, which can be
found at maisonic.fr
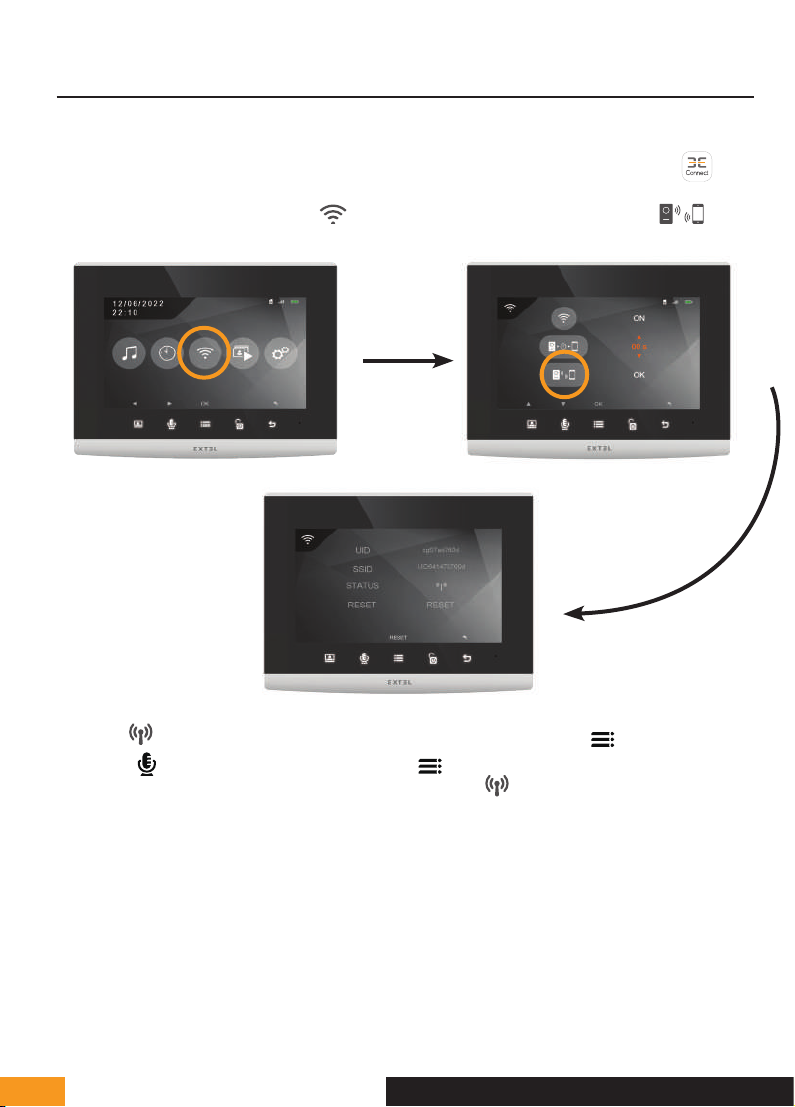
3 - BUTTON FUNCTIONS
The Extel Wave 2 videophone is controlled through touch-sensitive keys. The button functions vary depending on the
menu accessed. The icons at the bottom of the screen help guide you as to their use.
1 2 3 4 5
Slave
+Master
1
Screen off: Intercom panel preview
Menu: left arrow or up arrow
Call in progress: takes a photo
2
During communication: Starts/ends a call
In monitoring mode: initiates communication
Menu: right arrow or down arrow

EXTEL - WAVE 2 - 720321
en - 4
D - INSTALLATION
3
Screen off: Enables touch keys and access to the time and then the menu by pressing again
Menu: OK (selection button).
Call in progress: Access the image settings
4In call or monitoring mode: Control closing of the control output S1 S2 of the intercom panel.
5Menu: Back/Exit (back button to parent menu)
4 - PAIRING THE MONITOR WITH THE INTERCOM PANEL
To simplify product installation, the screen and the intercom panel of your kit have already been paired at the
factory. If pairing has not been successfully completed during the production stage, you can do it by following the
steps below.
Note: For example, you can place the 2 products close by on a table or any other flat base. You may get a
feedback effect if the intercom panel and the monitor are too close (screeching noise).
1 - Put the screen in pairing mode
In the menu of your videophone, go to the settings sub-menu
In the settings sub-menu, go to the second line and press the
Slave
+Master
button. Press the
Slave
+Master
button once to display
the orange and press the
Slave
+Master
button.

EXTEL - WAVE 2 - 720321 en - 5
Your screen is in pairing mode when a 60sec countdown timer starts
2 - Put the intercom panel in pairing mode
While the display is counting down, remove the orange tab from the intercom panel and press the pairing button
once for 1 second as shown above.
If pairing is successful, the screen will display a instead of the countdown. If the pairing is not successful, the
countdown continues to 0.
D - INSTALLATION

EXTEL - WAVE 2 - 720321
en - 6
5 - SMARTPHONE APPLICATION
Connecting a monitor to the WiFi network
1- Download the Extel Connect application onto your smartphone. From the Apple store or Play store
2- From the monitor, go to the WiFi menu then the pairing with your smartphone sub-menu
Note: If the icon does not appear on the third line, reset the WiFi by selecting the
Slave
+Master
button. Select YES by
pressing the
Slave
+Master
button once and confirm by pressing the
Slave
+Master
button.
The monitor will restart. Wait 30 seconds and return to the menu, the icon should appear.
The Extel Wave 2 videophone works with all types of 2.4GHz or 5GHz WiFi.
Before starting the pairing procedure, it is essential to connect your smartphone to the WiFi to which you wish to
connect the videophone.
D - INSTALLATION

EXTEL - WAVE 2 - 720321 en - 7
3 - From the Extel Connect application, click on + to
add a device.
4 - Click on “1ere installation” (first installation) and then
“suivant” (next)
The application reminds you that the screen of your
videophone must be in pairing mode, and indicates
where to find the QR Code you need to scan. Click on
“suivant” (next).
Scan the QR Code of your videophone as shown on
the previous page.
D - INSTALLATION

EXTEL - WAVE 2 - 720321
en - 8
The WiFi network to which your phone is connected
appears. To change it, click on . If no network
appears, your phone is probably on the mobile network.
When the WiFi network you want appears, enter the
WiFi password located on your internet box.
Place your phone next to the monitor microphone and
click “suivant” (next).
A Countdown will start so that the connection can
be made. Once you find the monitor, this screen will
display. Your mobile phone will emit a sound that
allows it to connect to your videophone.
Choose the name of the videophone that will appear
on the application
Your videophone is now connected to the WiFi network
and your smartphone can receive calls.
The first time you view the video stream, you will be
asked to customise your password.
Click on “Modifier mdp appareil” (Modify device
password).
The Avt box is already filled in. In the NV and Confirm
boxes, enter a password between 6 and 32 digits.
The password must not be made up of two identical
numbers in a row (ex: 202206 is not valid. 202106 is
valid). Next click on in the top right corner to save
the new password. Remember this password, as
it will be necessary to save the screen on another
smartphone.
Add a smartphone to a connected videophone
1- Download the Extel Connect application to your
smartphone from the Apple store or Play store
Note: Disable the smartphone's WiFi smart network
mode if it is activated.
D - INSTALLATION

EXTEL - WAVE 2 - 720321 en - 9
D - INSTALLATION
2 - From the Extel Connect application, click
on + to add a device.
3. Click on device already connected. Make sure
that the smartphone is connected to the same WiFi
network as the monitor.
4. Enter the name you want to give your device.
Scan the monitor's QR code or enter the monitor
ID (information available in the WiFi settings and
password).
Important: When you click on the QR Code to the
right of the UID line, you will be able to scan the
videophone monitor's QR Code and get its UID
faster. In the Mdp box, enter the password that was
set up during the first installation.
Click on “Enregistrer” (Save).
If the videophone is not nearby, you can scan the
barcode in the Extel Connect owner's application.
The barcode is available under the “Inviter un ami” (Invite
a friend) menu in the already connected application.
5. Your smartphone can now receive calls from your
videophone.
Interface function
Contains the different devices and enables
switching to monitoring mode.
Enables you to add a device.
Click the image to enter monitoring mode.
Warning: using the monitoring option consumes
energy from the intercom panel's battery and may
reduce its battery life.

EXTEL - WAVE 2 - 720321
en - 10
D - INSTALLATION
Activate/Deactivate the sound
Take a video (saved in the smartphone's
memory)
Take a photo (saved in the smartphone's
memory)
Full-screen mode
Open the electric strike plate or the gate
Press and hold to speak to the visitor.
To enter the settings, click on in the top right
corner.
1
2
3
4
5
1Used to rename your videophone
2Used to change the opening command
password (disabled by default) and video
password
3Unlocking setting
4Enables or disables call notifications
5Used to delete a device from the account
Warning: is used to modify and is used to
validate.

EXTEL - WAVE 2 - 720321 en - 11
D - INSTALLATION
Click on “Inviter un ami” (Invite a friend) to open the
device sharing setting.
• QR Code: this QR code allows your
friends or family to simply connect to your
Extel Wave videophone. See chapter:
“Add a smartphone to a connected videophone”.
• Link: Share your Extel Wave videophone login
details with friends and family.
• Have your friends download the Extel Connect
application.
• Share the link using the messaging service of your
choice by pressing ‘Share’.
• Securely share your password with friends.
• When you click on the link, your friend's Extel
Connect application automatically opens and all
information on the videophone is pre-populated.
• The application asks you to enter the password you
have already set.
• Your friend is now connected to your videophone.
Allows you to delete the call history
Call history
Allows you to edit photos (delete, sort and group)
Groups saved photos in the
phone's memory

EXTEL - WAVE 2 - 720321
en - 12
E - MONITOR USER MANUAL
1 - MAIN MENU
1Sound adjustment (ring tone, volume)
2Time and date settings
3WiFi settings
4Viewing video recordings or photos
5
Advanced settings
- Silent – Do not disturb mode
- Pairing
- Recording mode in absence: video or photo
- Erasing the memory
- Dry contact closing time
- Product reset
1 2 3 4 5
2 - SOUND ADJUSTMENT MENU
1
2
1
Doorbell melody selection
2
Ring volume
3 - WIFI SETTINGS
1 - Main menu
1
2
3
1Turn the WiFi on or off
2
Adjusting the time between the call to
the intercom panel and the despatch of
the call to the smartphone
3Access the pairing the videophone with
your smartphone sub-menu

EXTEL - WAVE 2 - 720321 en - 13
E - MONITOR USER MANUAL
2 - Smartphone pairing menu
1Videophone ID
2WiFi network connected
3
WiFi status
pairing mode
connected (if fixed icon)
connecting (if dynamic icon)
1
2
3
4 - ADVANCED SETTINGS
2
3
1
4
5
6
1“Do not disturb” sub-menu
2Start pairing
3Selecting the recording mode (photo or
video)
4Erasing photos/videos/full memory
5Opening pulse duration for the gate
motor drive
6Restore videophone factory settings

EXTEL - WAVE 2 - 720321
en - 14
F - CHARGING THE BATTERY
Your battery life is displayed in the top right corner of the monitor screen when it is turned on
It is also displayed on the live image on your smartphone
To recharge the intercom panel battery if necessary:
Remove the front cover using the tool provided
Remove the battery by grabbing it from the sides

EXTEL - WAVE 2 - 720321 en - 15
F - CHARGING THE BATTERY
The battery is charged using the cable provided and a mobile phone charger or the USB port of a computer.
Charging is indicated by an indicator light:
Red: charging is in progress
Blue: charging is finished
The battery life is about 6 months.
Important: Many factors can reduce battery life:
• Repeated use of the monitoring function (displaying the image when a visitor is not present)
• High number of calls per day
• High use of night vision
• Distance and nature of obstacles between the intercom panel and the monitor

EXTEL - WAVE 2 - 720321
en - 16
G - TECHNICAL SETTINGS
Wiring Wireless
Max. distance 350m wireless - communication frequency between the intercom panel and
the screen: 2.4GHz
Dry contact Lock OR gate
Doorbell melody 6 melodies
Sound level: 85 dB
Screen features
Diagonal: 7" (18cm)
Resolution: 1296 x 732px
Internal memory: photos
External memory: videos (8 GB SD card included)
WIFI 2.4GHz/5GHz IEEE 8111b/g/n/ac
Intercom panel features
Sensor: CMOS colour
Viewing angle: H110°
Lens: fixed
Colour night vision: Infrared LEDs
Gate or strike plate control: breaking capacity 12V/2A for 2s
Surface mounting
Settings Image: brightness, contrast, colours
Audio: ring volume, conversation volume
Finish Screen: grey and black plastic
Intercom panel: grey and black plastic
Electrical features Monitor: 5V/1A
Intercom panel: included 3.7V 5000mAh rechargeable battery or external
power supply 5V / 1A
Smartphone compatibility
Application: Extel Connect (smartphone with 3G/4G/5G or WiFi connection
required)
OS compatibility: Android (v4.4 or higher) / iOS (7 or higher) Push notifications
if a visitor calls
Operating temperature -10°C/+40°C
Usage Monitor: indoors
Intercom panel: outdoors (IP44)
Single product features Monitor dimensions: 14.9cm (H) x 19.7cm (W) x 1.8cm (D)
Intercom panel dimensions: 18.5cm (H) x 7cm (W) x 3.3cm (D)
Weight: 1.0 kg
Kit features Dimensions: 21cm (H) x 31.5cm (W) x 9.0cm (D)
Weight: 1.35 kg
Standard and certification CE, RoHS, REACH
This manual suits for next models
1
Table of contents
Other Extel Telephone manuals

Extel
Extel 720320 User manual

Extel
Extel WEVP 630 E BIS User manual

Extel
Extel WEVA DB-9035E User manual

Extel
Extel WEVPSF 659 User manual

Extel
Extel WEVP 252 BIS User manual

Extel
Extel Karo HD-2660 User manual

Extel
Extel MOMBO User manual

Extel
Extel 720315 User manual

Extel
Extel VisioSmart 720303 User manual

Extel
Extel Compact User manual
Popular Telephone manuals by other brands

elmeg
elmeg C300 reference guide

Clarity
Clarity RC200 operating instructions

Grandstream Networks
Grandstream Networks GHP610 Quick installation guide

Mitel
Mitel SmarT-1 EuroRoute Installation & programming guide

THOMSON
THOMSON Serea Combi TH-540DRBLK instruction manual

Coby
Coby CT-P920 Installation and operation instructions