Ezviz A1 User manual

www.ezvizlife.com
Quick Start Guide
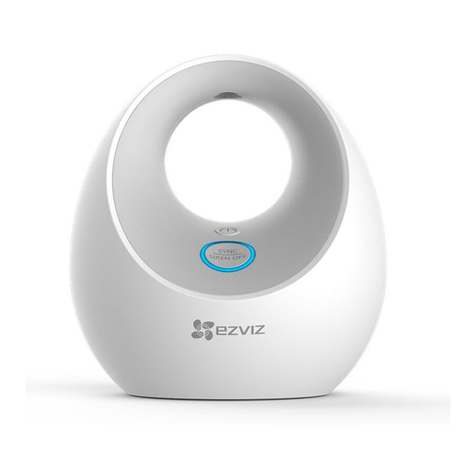
Home Sense Alarm Hub
102016176, E


COPYRIGHT © Hangzhou EZVIZ Software Co., Ltd.. ALL RIGHTS RESERVED.
Any and all information, including, among others, wordings, pictures, graphs are the properties of Hangzhou EZVIZ Software
Co., Ltd. (hereinafter referred to as “EZVIZ”). This user manual (hereinafter referred to as “the Manual”) cannot be
reproduced, changed, translated, or distributed, partially or wholly, by any means, without the prior written permission of
EZVIZ. Unless otherwise stipulated, EZVIZ does not make any warranties, guarantees or representations, express or implied,
regarding to the Manual.
About this Manual
The Manual includes instructions for using and managing the product. Pictures, charts, images and all other information
hereinafter are for description and explanation only. The information contained in the Manual is subject to change, without
notice, due to firmware updates or other reasons. Please find the latest version in the ™ website (http://www.
ezvizlife.com).
Revision Record
New release – January, 2019
Trademarks Acknowledgement
™, ™, and other EZVIZ’s trademarks and logos are the properties of EZVIZ in various jurisdictions. Other
trademarks and logos mentioned below are the properties of their respective owners.
Legal Disclaimer
TO THE MAXIMUM EXTENT PERMITTED BY APPLICABLE LAW, THE PRODUCT DESCRIBED, WITH ITS HARDWARE, SOFTWARE
AND FIRMWARE, IS PROVIDED “AS IS”, WITH ALL FAULTS AND ERRORS, AND EZVIZ MAKES NO WARRANTIES, EXPRESS
OR IMPLIED, INCLUDING WITHOUT LIMITATION, MERCHANTABILITY, SATISFACTORY QUALITY, FITNESS FOR A PARTICULAR
PURPOSE, AND NON-INFRINGEMENT OF THIRD PARTY. IN NO EVENT WILL EZVIZ, ITS DIRECTORS, OFFICERS, EMPLOYEES, OR
AGENTS BE LIABLE TO YOU FOR ANY SPECIAL, CONSEQUENTIAL, INCIDENTAL, OR INDIRECT DAMAGES, INCLUDING, AMONG
OTHERS, DAMAGES FOR LOSS OF BUSINESS PROFITS, BUSINESS INTERRUPTION, OR LOSS OF DATA OR DOCUMENTATION, IN
CONNECTION WITH THE USE OF THIS PRODUCT, EVEN IF EZVIZ HAS BEEN ADVISED OF THE POSSIBILITY OF SUCH DAMAGES.
TO THE MAXIMUM EXTENT PERMITTED BY APPLICABLE LAW, IN NO EVENT SHALL EZVIZ’S TOTAL LIABILITY FOR ALL DAMAGES
EXCEED THE ORIGINAL PURCHASE PRICE OF THE PRODUCT.
EZVIZ DOES NOT UNDERTAKE ANY LIABILITY FOR PERSONAL INJURY OR PROPERTY DAMAGE AS THE RESULT OF PRODUCT
INTERRUPTION OR SERVICE TERMINATION CAUSED BY: A) IMPROPER INSTALLATION OR USAGE OTHER THAN AS REQUESTED; B)
THE PROTECTION OF NATIONAL OR PUBLIC INTERESTS; C) FORCE MAJEURE; D) YOURSELF OR THE THIRD PARTY, INCLUDING
WITHOUT LIMITATION, USING ANY THIRD PARTY’S PRODUCTS, SOFTWARE, APPLICATIONS, AND AMONG OTHERS.
REGARDING TO THE PRODUCT WITH INTERNET ACCESS, THE USE OF PRODUCT SHALL BE WHOLLY AT YOUR OWN RISKS.
EZVIZ SHALL NOT TAKE ANY RESPONSIBILITES FOR ABNORMAL OPERATION, PRIVACY LEAKAGE OR OTHER DAMAGES
RESULTING FROM CYBER ATTACK, HACKER ATTACK, VIRUS INSPECTION, OR OTHER INTERNET SECURITY RISKS; HOWEVER,
EZVIZ WILL PROVIDE TIMELY TECHNICAL SUPPORT IF REQUIRED. SURVEILLANCE LAWS AND DATA PROTECTION LAWS VARY
BY JURISDICTION. PLEASE CHECK ALL RELEVANT LAWS IN YOUR JURISDICTION BEFORE USING THIS PRODUCT IN ORDER
TO ENSURE THAT YOUR USE CONFORMS TO THE APPLICABLE LAW. EZVIZ SHALL NOT BE LIABLE IN THE EVENT THAT THIS
PRODUCT IS USED WITH ILLEGITIMATE PURPOSES.
IN THE EVENT OF ANY CONFLICTS BETWEEN THE ABOVE AND THE APPLICABLE LAW, THE LATTER PREVAILS.
Regulatory Information
EU Conformity Statement
This product and - if applicable - the supplied accessories too are marked with "CE" and comply therefore
with the applicable harmonized European standards listed under the Radio Equipment Directive 2014/53/
EU, the EMC Directive 2014/30/EU, the RoHS Directive 2011/65/EU.

SAVE THIS MANUAL FOR FUTURE REFERENCE
2012/19/EU (WEEE directive): Products marked with this symbol cannot be disposed of as unsorted
municipal waste in the European Union. For proper recycling, return this product to your local supplier
upon the purchase of equivalent new equipment, or dispose of it at designated collection points. For more
information see: www.recyclethis.info.
2006/66/EC and its amendment 2013/56/EU (battery directive): This product contains a battery that cannot
be disposed of as unsorted municipal waste in the European Union. See the product documentation for
specific battery information. The battery is marked with this symbol, which may include lettering to
indicate cadmium (Cd), lead (Pb), or mercury (Hg). For proper recycling, return the battery to your supplier
or to a designated collection point. For more information see: www.recyclethis.info.
EC DECLARATION OF CONFORMITY
Hereby, Hangzhou EZVIZ Software Co., Ltd. declares that the radio equipment type [
CS-A1-32W
] is in compliance with
Directive 2014/53/EU.
The full text of the EC DECLARATION OF CONFORMITY is available at the following web link:
http://www.ezvizlife.com/declaration-of-conformity.
Safety Instruction
CAUTION: THE PRODUCT IS BUILT IN A REPLACEABLE BATTERY.
• Warning: Do not ingest battery, which can result in chemical burn hazard.
• This product contains a coin/button cell battery. If the coin/button cell battery is swallowed, it can cause severe internal
burns in just 2 hours and can lead to death.
• Keep new and used batteries away from children.
• If the battery compartment does not close securely, stop using the product and keep it away from children.
• If you think batteries might have been swallowed or placed inside any part of the body, seek immediate medical
attention.
• Risk of fire or explosion if the battery is replaced by an incorrect type.
• Disposal of a battery into fire or a hot oven, or mechanically crushing or cutting of a battery can result in an explosion.
• Leaving a battery in an extremely high temperature surrounding environment can result in an explosion or the leakage of
flammable liquid or gas.
• A battery subjected to extremely low air pressure may result in an explosion or the leakage of flammable liquid or gas.
• Dispose of used batteries according to the instructions.
Due to the product shape and dimension, the name and address of the importer/manufacturer are printed on
the package.
Customer Service
For more information, please visit www.ezvizlife.com
Need help? Contact us:
Telephone: +31 20 204 0128

COPYRIGHT © Hangzhou EZVIZ Software Co., Ltd. ALLE RECHTE VORBEHALTEN.
Alle Informationen, einschließlich Wortlaute, Bilder und Grafiken, jedoch nicht darauf beschränkt, sind das Eigentum von Hangzhou EZVIZ
Software Co., Ltd. (nachstehend als „EZVIZ“ bezeichnet). Dieses Benutzerhandbuch (nachstehend als „das Handbuch“ bezeichnet) darf ohne
vorherige schriftliche Genehmigung von EZVIZ weder ganz noch teilweise reproduziert, geändert, übersetzt oder verbreitet werden. Sofern nicht
anderweitig vereinbart, bietet EZVIZ keine ausdrückliche oder implizierte Gewährleistung oder Garantie bezüglich der Bedienungsanleitung.
Hinweise zu dieser Bedienungsanleitung
Die Bedienungsanleitung beinhaltet Anleitungen zur Verwendung und Verwaltung des Produkts. Bilder, Diagramme, Abbildungen und alle
sonstigen Informationen dienen nur der Beschreibung und Erklärung. Die Änderung der in der Bedienungsanleitung enthaltenen Informationen
ist aufgrund von Firmware-Updates oder aus anderen Gründen vorbehalten. Die aktuelle Version finden Sie auf der ™ Website
(http://www.ezvizlife.com).
Überarbeitungsdatensatz
Neuerscheinung – Januar, 2019
Marken
™, ™ und andere Marken und Logos von EZVIZ sind das Eigentum von EZVIZ in verschiedenen Ländern. Andere nachstehend
erwähnte Marken und Logos stehen im Besitz der entsprechenden Eigentümer.
Haftungsausschluss
SOWEIT GESETZLICH ZULÄSSIG WIRD DAS BESCHRIEBENE PRODUKT MIT SEINER HARDWARE, SOFTWARE UND FIRMWARE OHNE
MÄNGELGEWÄHR, MIT ALLEN FEHLERN UND FEHLFUNKTIONEN GELIEFERT, UND EZVIZ GIBT KEINE AUSDRÜCKLICHEN ODER IMPLIZIERTEN
GARANTIEN, EINSCHLIEßLICH UND OHNE EINSCHRÄNKUNG, DER MARKTFÄHIGKEIT, ZUFRIEDENSTELLENDEN QUALITÄT, EIGNUNG FÜR
EINEN BESTIMMTEN ZWECK UND NICHTVERLETZUNG DER RECHTE DRITTER. AUF KEINEN FALL HAFTEN EZVIZ, SEINE GESCHÄFTSFÜHRER,
ANGESTELLTEN, MITARBEITER ODER PARTNER FÜR BESONDERE, ZUFÄLLIGE, DIREKTE ODER INDIREKTE SCHÄDEN, EINSCHLIEßLICH, JEDOCH
NICHT DARAUF BESCHRÄNKT, VERLUST VON GESCHÄFTSGEWINNEN, GESCHÄFTSUNTERBRECHUNG ODER VERLUST VON DATEN ODER
DOKUMENTATIONEN IN VERBINDUNG MIT DER VERWENDUNG DIESES PRODUKTS, SELBST WENN EZVIZ ÜBER DIE MÖGLICHKEIT DERARTIGER
SCHÄDEN INFORMIERT WAR.
IN DEM NACH GELTENDEM RECHT MAXIMAL ZULÄSSIGEN UMFANG IST DIE GESAMTHAFTUNG VON EZVIZ FÜR ALLE SCHÄDEN IN
KEINEM FALL HÖHER ALS DER URSPRÜNGLICHE KAUFPREIS DES PRODUKTS.
EZVIZ ÜBERNIMMT KEINE HAFTUNG FÜR PERSONEN- ODER SACHSCHÄDEN INFOLGE VON PRODUKTAUSFALL ODER
SERVICEEINSTELLUNG, DIE DURCH: A) UNSACHGEMÄßE INSTALLATION ODER NUTZUNG, DIE NICHT DEN ANFORDERUNGEN ENTSPRICHT,
B) SCHUTZ NATIONALER ODER ÖFFENTLICHER INTERESSEN, C) HÖHERE GEWALT, D) SIE SELBST ODER DRITTE, EINSCHLIEßLICH, ABER
NICHT DARAUF BESCHRÄNKT, DIE VERWENDUNG VON PRODUKTEN, SOFTWARE, ANWENDUNGEN UND ANDEREN PRODUKTEN DRITTER
VERURSACHT WERDEN.
BEZÜGLICH PRODUKTEN MIT INTERNETZUGANG ERFOLGT DIE VERWENDUNG DER PRODUKTE AUSSCHLIEßLICH AUF EIGENES RISIKO. EZVIZ IST
NICHT FÜR ANORMALEN BETRIEB, DATENSCHUTZVERSTÖßE ODER ANDERE SCHÄDEN AUFGRUND VON CYBERATTACKEN, HACKERANGRIFFEN,
VIREN ODER ANDEREN INTERNET-SICHERHEITSRISIKEN VERANTWORTLICH; EZVIZ BIETET JEDOCH AUF ANFRAGE ZEITGERECHTE TECHNISCHE
UNTERSTÜTZUNG.ÜBERWACHUNGS- UND DATENSCHUTZGESETZE VARIIEREN JE NACH GERICHTSBARKEIT. ÜBERPRÜFEN SIE VOR DER
VERWENDUNG DIESES PRODUKTS ALLE RELEVANTEN GESETZE IN IHRER GERICHTSBARKEIT, UM SICHERZUSTELLEN, DASS IHRE
VERWENDUNG GEGEN KEINE GELTENDEN GESETZE VERSTÖßT. EZVIZ HAFTET NICHT, FALLS DIESES PRODUKT FÜR UNGESETZLICHE
ZWECKE VERWENDET WIRD.
FÜR DEN FALL VON WIDERSPRÜCHEN ZWISCHEN DEM VORSTEHENDEN UND DEM GELTENDEN RECHT GILT DAS LETZTERE.
Behördliche Informationen
EU-Konformitätserklärung
Dieses Produkt und – ggf. – auch das mitgelieferte Zubehör sind mit „CE“ gekennzeichnet und entsprechen somit
den geltenden harmonisierten europäischen Normen, die unter der Funkgeräterichtlinie 2014/53/EU, der EMV-
Richtlinie 2014/30/EU und der RoHS-Richtlinie 2011/65/EU aufgeführt sind.

2012/19/EU (Elektroaltgeräte-Richtlinie): Produkte, die mit diesem Symbol gekennzeichnet sind, dürfen innerhalb der
Europäischen Union nicht mit dem Hausmüll entsorgt werden. Für korrektes Recycling geben Sie dieses Produkt an
Ihren örtlichen Fachhändler zurück oder entsorgen Sie es an einer der Sammelstellen. Weitere Informationen finden
Sie unter: www.recyclethis.info.
2006/66/EG und deren Änderung 2013/56/EU (Batterie-Richtlinie): Dieses Produkt enthält eine Batterie, die innerhalb
der Europäischen Union nicht mit dem Hausmüll entsorgt werden darf. Siehe Produktdokumentation für spezifische
Hinweise zu Batterien. Die Batterie ist mit diesem Symbol gekennzeichnet, das zusätzlich die Buchstaben Cd für
Cadmium, Pb für Blei oder Hg für Quecksilber enthalten kann. Für korrektes Recycling geben Sie die Batterie an
Ihren örtlichen Fachhändler zurück oder entsorgen Sie sie an einer der Sammelstellen. Weitere Informationen finden
Sie unter: www.recyclethis.info.
EG-KONFORMITÄTSERKLÄRUNG
Hiermit erklärt Hangzhou EZVIZ Software Co., Ltd., dass der Funkgerätetyp [
CS-A1-32W
] mit der Richtlinie 2014/53/EU übereinstimmt.
Der vollständige Text der EU-Konformitätserklärung ist unter folgendem Weblink verfügbar:
http://www.ezvizlife.com/declaration-of-conformity.
Sicherheitshinweis
VORSICHT: DAS PRODUKT VERFÜGT ÜBER EINE AUSWECHSELBARE BATTERIE.
• Warnung: Die Batterie ist nicht zum Verzehr geeignet. Verätzungsgefahr.
• Dieses Produkt enthält eine Knopfzellenbatterie. Im Falle eines Verschluckens kann die Knopfzelle innerhalb von nur 2 Stunden
schwere innere Verätzungen verursachen und zum Tod führen.
• Neue und gebrauchte Batterien von Kindern fernhalten.
• Wenn das Batteriefach nicht sicher schließt, verwenden Sie das Gerät nicht mehr, und bewahren Sie es außerhalb der Reichweite
von Kindern auf.
• Wenn Sie vermuten, dass Batterien verschluckt oder in eine Körperöffnung eingeführt worden sein könnten, suchen Sie sofort
einen Arzt auf.
• Bei Austausch der Batterie durch einen falschen Typ besteht Explosions- oder Brandgefahr.
• Die Verbrennung einer Batterie im Feuer oder in einem heißen Ofen sowie mechanisches Zerdrücken oder Zerkleinern einer Batterie
kann zu Explosionen führen.
• Im Fall extrem hoher Umgebungstemperaturen kann es zu Explosionen oder dem Austritt von brennbaren Flüssigkeiten oder Gasen
kommen.
• Im Fall von extrem niedrigem Luftdruck kann es zu Explosionen oder dem Austritt von brennbaren Flüssigkeiten oder Gasen
kommen.
• Gebrauchte Batterien vorschriftsgemäß entsorgen.
Aufgrund der Produktform und -abmessungen sind Name und Anschrift des Importeurs/Herstellers auf der
Verpackung vermerkt.
Kundendienst
Weitere Informationen erhalten Sie auf www.ezvizlife.com
Benötigen Sie Hilfe? Setzen Sie sich mit uns in Verbindung:
Telefon: (+49) 0 696 640 4321
BEWAHREN SIE DIESES HANDBUCH FÜR SPÄTERES NACHSCHLAGEN AUF

1
Operations
Step 1
Preparation
Make sure the following power and environmental requirements are met:
•Power voltage: DC 5V (Micro USB)
•Working temperature: -10°C to 55°C (14°F to 131°F)
•Working humidity: 10% to 90% (non-condensing)
1Start Alarm Hub
Connect the power adapter to the Alarm Hub using the USB data cable. Plug in the power adapter
to a power socket (or outlet). The white indicator turns on indicating the Alarm Hub is starting, and
then the red indicator turns on when the Alarm Hub is completely powered on.
2Install the EZVIZ App
- Connect your mobile phone to Wi-Fi or mobile network.
- Download and install the EZVIZ app by searching the “EZVIZ” in App Store (iOS version) and Google
PlayTM (Android version).
- Start the app and register for an EZVIZ user account following the start-up wizard.
Power Socket
Power Adapter
USB Data Cable

2
Step 2
Quick Settings
1Add Alarm Hub
- Log in the EZVIZ app.
- On the Home screen, tap “+” on the upper-right corner to go to the scan QR code page.
- Scan the QR code at the buttom of the Alarm Hub.
- Hold and press the Setting Button on the Alarm Hub to enter Wi-Fi configuration mode.
- Follow the EZVIZ app wizard to finish Wi-Fi configuration.
•Make sure the mobile phone is connected to the 2.4GHz Wi-Fi network and the is not
connected to any Wi-Fi network, or the connection fail.
•For best result, place your phone no more than 2ft. from the Alarm Hub during the adding
process.
2Complete Configuration
Once the Alarm Hub has successfully connected to the Wi-Fi network, the yellow indicator starts to
blink and a voice prompt "Wi-Fi connected" will be heard from the Alarm Hub.
If the connection failed or you want to reconfigure Wi-Fi, please press and hold the RESET
button with a needle and release until the 3 indicators flicker at the same time for once to
reset and repeat the steps above.

3
Step 3
Add Detectors
1Enable the Adding Detectors Mode
Enable the adding detector mode by quickly pressing the Setting button of the Alarm Hub. The
yellow and red indicators will start to blink. Follow voice prompt.
2Add Detectors
Bring the detector close to the Alarm Hub (within 2ft) and then press the detector's alarm button to
start the adding process. A voice prompt states the type and the serial number of the detector being
added (up to 32 detectors are allowed).
T
U
R
N
T
O
R
E
M
O
V
E
D
O
N
O
T
P
A
I
N
T
……
3Disable the Adding Detectors Mode
Press the Setting Button again to disable the Adding Detectors Mode after all the detectors are
added.
•The Adding Detectors Mode will be disabled if no operation occurs within 3 minutes.
•The maximum distance between the detectors and the Alarm Hub varies up to 300ft.

4
Appendix
Box Contents
Alarm Hub x1 USB Data Cable x1
Quick Start Guide x1 Power Adapter x1
(Power adapter type may vary according to countries.)
Functionality
Irreplaceable Home Guard
Accessible to various EZVIZ wireless detectors and provide a comprehensive protection to
your home.
World’s leading Communication Technology
Convenient security deployment with wireless detectors.
Convenient Network Configuration
One-push Wi-Fi connection (supports ONLY 2.4GHz Wi-Fi).
EZVIZ Cloud P2P Service
Receives and controls alarms on mobile phone and PC.

5
Alarm Hub Basics
Name Description
Power Input Power supply for the device (by USB port).
ALARM LED Indicator Steady Red: The Alarm Hub is in the normal status.
Red Flicker: An alarm occurs.
LINK LED Indicator Yellow Flicker: The Wi-Fi is connected.
Unlit: The Wi-Fi is disconnected.
READY LED Indicator Steady White: The Alarm Hub is powered on (by USB port).
Mounting Hole Hole for hanging the device.
RESET Button Connect the device to the power supply (by USB port). Press and hold the RESET
button with a needle and release until the 3 indicators flicker at the same time
for once. The device restarts and all settings are restored except the connected
detectors.
Setting Button
Power Input
Speaker
Mounting Hole
RESET Button
LED Indicators
(ALARM, LINK,and READY)

6
Troubleshooting
Q: “The device is offline.” or “The device is not registered.” prompts when adding Alarm Hub by EZVIZ
app.
A: 1. Check the Wi-Fi is connected with the Alarm Hub and make sure it’s working.
2. Check whether the yellow indicator flickers; if not, please restart the Alarm Hub and connect to
the Wi-Fi again.
Q: The mobile phone does not detect the alarm when the Alarm Hub is online and alarm occurs.
A: 1. Make sure the EZVIZ app is running on your mobile phone.
2. For Android OS mobile phone, make sure the app is running in the background; and for the iOS,
enable the message push function in “Settings > Notification”.
Q: The status of the detector is displayed as offline on the EZVIZ app.
A: 1. Make sure the Wi-Fi status that the Alarm Hub connected with is normal.
2. Make sure the distance between the detectors and the Alarm Hub is less than 100m and no
barrier is allowed.
3. Make sure the detector’s battery has not been depleted.
Q: The detector can detect the alarm and the Alarm Hub works normally, but no voice prompts.
A: 1. Make sure the distance between the detector and the Alarm Hub is less than 100m and no
barrier is allowed.
2. Adjust the installation position of the Alarm Hub. You’re recommended to install the Alarm Hub
in the center of your house.
3. Make sure the Alarm Hub is not in Mute mode.
EXPOSURE TO RADIOFREQUENCY RF
The frequency bands and the nominal limits of transmitted power (radiated and/or conducted) applicable to
this radio device are the following:
Band RF 868MHz
Frequency From 867.981MHz to 868.019MHz
Power transmission (EIRP) 10mW
Band Wi-Fi 2.4 GHz
Frequency From 2.412 GHz to 2.472 GHz
Power transmission (EIRP) 100 mW

7
Betrieb
Schritt 1
Vorbereitung
Achten Sie darauf, dass die Umgebung und die Spannungsversorgung die nachstehenden
Anforderungen erfüllen:
•Versorgungsspannung: 5V DC (Micro USB)
•Temperatur (Betrieb): -10°C bis 55°C
•Luftfeuchtigkeit (Betrieb) 10% bis 90% (nicht kondensierend)
1A1 einschalten
Schließen Sie den A1 mit dem USB-Datenkabel und am Netzteil und dieses dann an einer Steckdose
an. Die weiße LED leuchtet als Hinweis darauf auf, dass der A1 aktiviert wird. Anschließend leuchtet
die rote LED auf , wenn der A1 vollständig gestartet ist.
2EZVIZ App installieren
- Smartphone mit dem Wi-Fi-Netz verbinden.
- EZVIZ App herunterladen und installieren, indem Sie „EZVIZ" im App Store (iOS-Version) oder bei
Google PlayTM (Android-Version) suchen.
- Die App starten und ein EZVIZ-Anwenderkonto nach Anweisungen des Assistenten erstellen.
Versorgungsbuchse
Netzteil
USB-Datenkabel

8
Schritt 2
Schnelleinstellungen
1A1 hinzufügen
- Melden Sie sich an der EZVIZ-App an.
- Tippen Sie im Startbildschirm oben rechts auf „+“, um auf die Seite zum Scannen des QR-Codes
zu gelangen.
- Scannen Sie den QR-Code auf der Unterseite des Alarm Hub.
- Halten Sie die Einstellungen-Taste am Alarm Hub 3 Sekunden lang gedrückt, um den WLAN-
Konfigurationsmodus aufzurufen.
- Befolgen Sie die Anweisungen des EZVIZ-App-Assistenten zum Abschließen der WLAN-
Konfiguration.
•Achten Sie darauf, dass nur das Smartphone eine Wi-Fi-Verbindung hat, der A1 jedoch noch
nicht. Andernfalls kommt keine Verbindung zustande.
•Der Abstand zwischen dem A1 und dem Smartphone darf nicht mehr als 50cm betragen.
2Konfiguration abschließen
Die LINK-LED blinkt gelb, wenn der A1 erfolgreich mit dem Wi-Fi (des Routers) verbunden ist.
Wenn die Verbindung fehlgeschlagen ist oder Sie das WLAN neu konfigurieren möchten,
drücken Sie die Zurücksetzen-Taste mit einem spitzen Gegenstand, bis die 3 LEDs gleichzeitig
einmal blinken, um das Gerät zurückzusetzen, und wiederholen Sie die oben beschriebenen
Schritte.

9
Schritt 3
Melder hinzufügen
1"Adding Detectors"-Modus aktivieren
Drücken Sie die Einstelltaste einmal. Der Voice Guide bestätigt daraufhin den "Adding Detectors"-
Modus. Die gelbe und die rote LED blinken zweimal pro Sekunde als Hinweis darauf, dass der
"Adding Detectors"-Modus aktiviert ist.
2Melder hinzufügen
Bringen Sie den Melder nahe an den A1 (min. 50cm) und lösen Sie manuell Alarm aus. Daraufhin
bestätigt der Voice Guide Typ und Seriennummer des Detektors als Hinweis darauf, dass der
entsprechende Melder hinzugefügt wurde (bis zu 32 Melder sind möglich).
T
U
R
N
T
O
R
E
M
O
V
E
D
O
N
O
T
P
A
I
N
T
……
3"Adding Detectors"-Modus deaktivieren
Drücken Sie die Einstelltaste einmal, um den "Adding Detectors"-Verbindungsmodus zu
deaktivieren, nachdem alle Melder hinzugefügt wurden.
•Der "Adding Detectors"-Modus wird nach drei Minuten Inaktivität automatisch deaktiviert.
•Die maximal zulässige Arbeitsdistanz zwischen Meldern und dem A1 beträgt 100m (keine
Hindernisse zulässig).

10
Anhang
Lieferumfang
A1 x1 USB-Datenkabel x1
Schnellstartanleitung x1 Netzteil x1
Funktionsübersicht
Unersetzlicher Hauswächter
Ermöglicht den Zugriff auf verschiedene drahtlose Melder und bietet einen umfassenden
Schutz für Ihr Zuhause.
Weltweit führende Kommunikationstechnologie
Ein komfortables Sicherheitssystem mit drahtlosen Meldern.
Bequeme Netzwerkkonfiguration
Wi-Fi-Verbindung per Tastendruck
EZVIZ Cloud P2P Service
Alarmierung und Fernbedienung via Smartphone und PC.

11
A1 Allgemeines
Bezeichnung Beschreibung
Versorgungseingang Spannungsversorgung für das Gerät (via USB-Port).
ALARM LED-Anzeige Durchgehend rot: Der A1 befindet sich im Normalstatus.
Blinkt rot: Ein Alarm ist aufgetreten.
LINK LED Blinkt gelb: Das Wi-Fi-Netz ist verbunden.
Aus: Das Wi-Fi-Netz ist nicht verbunden.
READY LED Durchgehend weiß: Der A1 ist eingeschaltet (via USB-Port).
Montageöffnung Öffnung zum Aufhängen des Geräts.
RESET-Taste Verbindet das Gerät mit der Spannungsversorgung (via USB-Port). Drücken und
halten Sie die RESET-Taste mit einer Nadel und lassen Sie sie los, wenn die
drei LEDs gleichzeitig blinken. Das Gerät wird daraufhin neu gestartet, und alle
Einstellungen bis auf die angeschlossenen Melder und die Fernbedienung werden
zurückgesetzt.
Einstelltaste
Versorgungs-
eingang
Lautsprecher
Montageöffnung
RESET-Taste
LED-Anzeigen
(ALARM, LINK und READY)

12
Häufig gestellte Fragen
F: Beim Hinzufügen des A1 mit der EZVIZ App erscheint die Meldung "The device is offline" oder "The
device is not registered".
A: 1. Überprüfen Sie, ob eine funktionierende Wi-Fi-Verbindung mit dem A1 besteht.
2. Überprüfen Sie, ob die gelbe LED-Anzeige blinkt. Falls nicht, starten Sie den A1 bitte neu und
stellen die Wi-Fi-Verbindung wieder her.
F: Das Smartphone kann keinen Alarm empfangen, wenn der A1 online ist und ein Alarm ausgelöst
wird.
A: 1. Kontrollieren Sie, ob die EZVIZ App auf Ihrem Smartphone läuft.
2. Achten Sie bei Android-Smartphones darauf, dass die App im Hintergrund läuft. Aktivieren Sie
im iOS die "Message push"-Funktion unter "Einstellungen > Benachrichtigung".
F: In der EZVIZ App wird der Status des Detektors wird als "offline" angezeigt.
A: 1. Kontrollieren Sie, ob der Wi-Fi-Status der A1-Verbindung normal ist.
2. Kontrollieren Sie, ob die Entfernung zwischen den Melder und dem A1 weniger als 100m beträgt
und keine Hindernisse vorhanden sind.
3. Kontrollieren Sie, ob die Batterie des Detektors in Ordnung ist.
F: Der Melder kann einen Alarm erkennen und der A1 arbeitet normal, aber der Voice Guide
funktioniert nicht.
A: 1. Kontrollieren Sie, ob die Entfernung zwischen Melder und A1 weniger als 100m beträgt und
keine Hindernisse vorhanden sind.
2. Justieren Sie die Montageposition des A1. Der A1 sollte in der Mitte des Hauses montiert sein.
3. Achten Sie darauf, dass der A1 nicht stummgeschaltet ist.
HOCHFREQUENZBELASTUNG (HF)
Die für dieses Funkgerät geltenden Frequenzbänder und Nenngrenzwerte der Sendeleistung (abgestrahlt
und/oder leitungsgeführt) sind folgende:
Band HF 868 MHz
Frequenz Von 867,981 MHz bis 868,019 MHz
Strahlungsleistung (EIRP) 10 mW
Band WLAN, 2,4 GHz
Frequenz Von 2,412GHz bis 2,472GHz
Strahlungsleistung (EIRP) 100mW

13
Funciones
Paso 1
Preparación
Asegúrese de que el entorno y la fuente de alimentación cumplan los requisitos siguientes:
•Voltaje de fuente de alimentación: DC 5 V (Micro USB)
•Temperatura de trabajo: De -10°C a 55°C (de 14°F a 131°F)
•Humedad de trabajo: De 10% a 90% (sin condensación)
1Inicio del A1
Conecte el A1 y el adaptador de corriente con el cable de datos USB y, a continuación, enchufe el
adaptador de corriente a la toma de corriente. El indicador blanco se encenderá, lo que indica que el
A1 se está iniciando. Cuando el A1 se haya iniciado completamente, el indicador se volverá rojo.
2Instalación de la aplicación EZVIZ
- Conecte el teléfono móvil a la red Wi-Fi.
- Descargue la Aplicación Móvil EZVIZ buscando "EZVIZ" en App Store (versión iOS) y Google PlayTM
(versión Android).
- Inicie la aplicación y regístrese para obtener una cuenta de usuario de EZVIZ mediante el asistente
de inicio.
Toma de corriente
Adaptador de corriente
Cable de datos USB

14
Paso 2
Configuración rápida
1Incorporación del A1
- Inicie sesión en la aplicación EZVIZ.
- En la pantalla de inicio, toque “+” en la esquina superior derecha para ir a la página de escaneo
de códigos QR.
- Escanee el código QR situado en la parte inferior de la central de alarma.
- Mantenga pulsado el botón de configuración de la central de alarma durante 3s para acceder al
modo de configuración de la red wifi.
- Siga las indicaciones del asistente de la aplicación EZVIZ para finalizar la configuración de la
conexión wifi.
•Asegúrese de que el teléfono móvil esté conectado al Wi-Fi y de que el A1 aún no se
haya conectado a ninguna red Wi-Fi, ya que, de no ser así, se puede producir un error de
conexión.
•La distancia entre el A1 y el teléfono móvil no debe ser superior a 50 cm.
2Finalización de la configuración
El indicador de conexión LINK parpadea en amarillo cuando el A1 se ha conectado correctamente a
la red Wi-Fi (del enrutador).
Si la conexión falla o si desea reconfigurar la red wifi, mantenga pulsado el botón
«Restablecer» con una aguja y suéltelo cuando los 3 indicadores parpadeen al mismo tiempo
para restablecer y repetir los pasos anteriores.
Other manuals for A1
4
Table of contents
Other Ezviz Security System manuals