manuals.online logo
Brands
  1. Home
  2. •
  3. Brands
  4. •
  5. Fisher-Price
  6. •
  7. Baby Swing
  8. •
  9. Fisher-Price T8377 User manual

Fisher-Price T8377 User manual

1
T8377
BML92
fisher-price.com
Quick Start
1Turn power on
2Select swing speed
3Push seat to start swinging
PUSH
EMPUJAR
Inicio rápido
1Prender la unidad
2Seleccionar la velocidad del
columpio
3Empujar la silla para empezar
el movimiento
4Slide music/volume
switch ON
4Poner el interruptor de música/
volumen en ENCENDIDO
2
Consumer Information
Información al consumidor
WARNING
ADVERTENCIA
Prevent serious injury or death from falls or strangling in the
restraint system:
• Never leave child unattended.
• This product is not intended to replace a crib or bassinet for prolonged
periods of sleep.
• Always use the restraint system.
• Discontinue use when an active child attempts to climb out.
• Never use on any elevated surface. Use only on a floor.
• Never use toy bar as a handle.
Para evitar lesiones graves o la muerte como resultado de caídas o quedar
estrangulado en el sistema de sujeción:
• Nunca dejar al niño sin supervisión.
• Este producto no está diseñado para reemplazar una cuna o moisés por
periodos prolongados de sueño.
• Siempre usar el sistema de sujeción.
• Descontinuar el uso cuando un niño activo intente salirse del producto.
• No usar sobre superfices elevadas. Usar únicamente sobre el piso.
• No usar la barra de juguetes como asa.
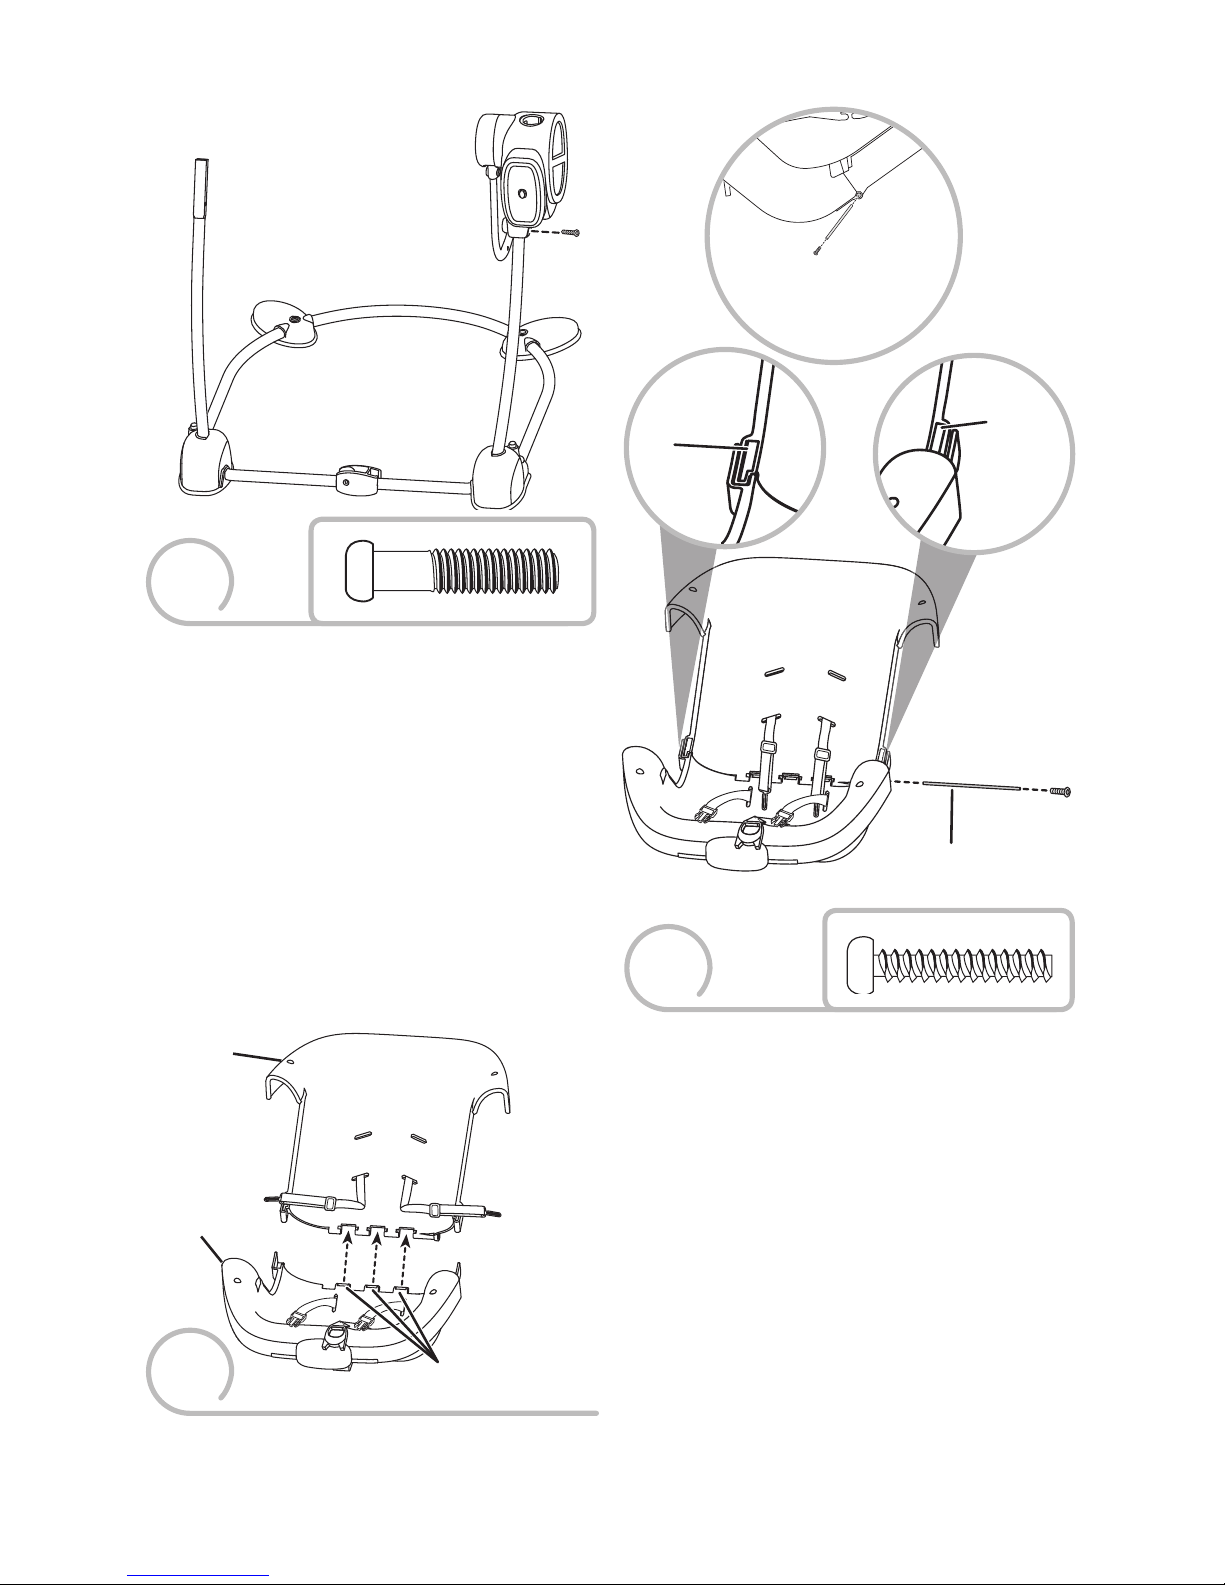
IMPORTANT! Please keep these
instructions for future reference.
• Please read these instructions before
assembly and use of this product.
• Adult assembly is required.
• Tools required for assembly: Allen wrench
(included) and Phillips screwdriver
(not included).
• Requires four C (LR14) alkaline batteries
for swing/sounds operation and one
D (LR20) alkaline battery for vibration
unit operation. Batteries not included.
• The weight limit for this product is 25 lb
(11,3 kg). If your child weighs less than
25 lb (11,3 kg), but is really active and
appears to be able to climb out of the
swing, immediately discontinue its use.
• Product features and decoration may vary
from the photographs.
¡IMPORTANTE! Guardar estas
instrucciones para futura referencia.
• Leer estas instrucciones antes de
ensamblar y usar este producto.
• Requiere montaje por un adulto.
• Herramientas necesarias para el montaje:
llave (incluida) y desatornillador de cruz
(no incluido).
• El columpio/sonidos funcionan con 4 pilas
alcalinas C (LR14) x 1,5V y la unidad de
vibraciones funciona con 1 pila alcalina
D (LR20) x 1,5V (no incluidas).
• La capacidad máxima de este producto es
de11,3 kg (25 lb).
• Si el bebé pesa menos de 11,3 kg pero es
muy activo y parece poder salirse de la
silla, descontinuar de inmediato el uso.
• Las características y decoración del
producto pueden variar de las mostradas.
3
Assembled Parts Piezas ensambladas
IMPORTANT! Please remove all parts from the package and identify them before assembly.
Some parts may be packed in the pad.
¡IMPORTANTE! Sacar todas las piezas del empaque e identificarlas previo al montaje.
Algunas piezas pueden venir embaladas en el colchón.
Both Shown Actual Size
Se muestran a tamaño real
M6 x 25 mm Screw – 2
Tornillo M6 x 25 mm – 2
2 Swing Housings
2 compartimentos del columpio
Seat Bottom
Asiento
Seat Back
Respaldo
2 Side Rails
2 barandillas laterales
Seat Pad
Almohadilla
Toy Bar
Barra de juguetes Allen Wrench
Llave
Base
Base
Hinge Rod
Varilla de bisagra
Frame
Armazón
#8 x 1" (2,5 cm) Screw – 7
Tornillo n° 8 x 2,5 cm – 7
Note: Tighten or loosen all screws with a Phillips screwdriver or Allen wrench.
Do not over-tighten the screws.
Atención: Apretar y aflojar todos los tornillos con un desatornillador de cruz o una
llave. No apretar en exceso.
4
Assembly Montaje
IMPORTANT! Before assembly and each
use, inspect this product for damaged
hardware, loose joints, missing parts or
sharp edges. DO NOT use if any parts are
missing or broken. Contact Fisher-Price®
for replacement parts and instructions if
needed. Never substitute parts.
¡IMPORTANTE! Antes del montaje y de
cada uso, revisar que el producto no tenga
piezas dañadas, conexiones sueltas, piezas
faltantes o bordes filosos. NO usar el
producto si falta o está rota alguna pieza.
Póngase en contacto con la oficina Mattel
más próxima a su localidad para obtener
piezas de repuesto e instrucciones,
en caso de ser necesarias. Visite
http://service.mattel.com/intl/es.asp
para un listado completo. No usar piezas
de terceros.
Base
Base
Frame
Armazón
1
2
• Insert and “snap” the base into the sockets
in each side of the frame, as shown.
Hint: The base is designed to fit one way.
If it does not seem to fit, turn it around and
try again.
• Insertar y ajustar la base en las
conexiones de cada lado del armazón, tal
como se muestra.
Atención: La base está diseñada para
ajustarse de una sola manera. Si no se
ajusta, voltearla e intentar de nuevo.
Swing Arm
Brazo del columpio
Frame Tube
Tubo del armazón
• Position one of the swing housings so
that the swing arm is facing the inside of
the assembly.
• Fit the swing housing onto the frame tube.
Hint: The swing housing is designed to
fit one way. If it does not seem to fit, try
assembling it to the other frame tube.
• Colocar uno de los compartimentos
del columpio de modo que el brazo del
columpio apunte hacia el interior de
la unidad.
• Ajustar el compartimento del columpio en
el tubo del armazón.
Atención: El compartimento del columpio
está diseñado para ajustarse de una
manera. Si no se ajusta correctamente,
ajustarlo en el otro tubo del armazón.
5
Assembly Montaje
4
5
3
• Insert an M6 x 25 mm screw into the hole
in the swing housing. Fully tighten the
screw with the Allen wrench.
• Repeat this procedure to assemble the
remaining swing housing to the other
frame tube.
• Insertar un tornillo M6 x 25 mm en el
orificio del compartimento del columpio.
Usar la llave para apretar el tornillo.
• Repetir este procedimiento para ensamblar
el otro compartimento del columpio en el
otro tubo del armazón.
Seat Back
Respaldo
Tabs
Lengüetas
Seat Bottom
Asiento
• Fit the tabs on the seat bottom into the
slots in the seat back.
• Ajustar las lengüetas del asiento en las
ranuras del respaldo.
Hinge Rod
Varilla de bisagra
Side View
Vista del lado
Tab
Lengüeta
Tab
Lengüeta
• Make sure the tab on each side of the seat
back is fitted inside the socket on each
side of the seat bottom.
• Insert the hinge rod through the hinge on
the seat assembly.
• Insert a #8 x 1" (2,5 cm) screw into the
end of the hinge rod. Tighten the screw
with a Phillips screwdriver.
• Asegurarse que la lengüeta de cada lado
del respaldo esté ajustada dentro de la
conexión de cada lado del asiento.
• Insertar la varilla de bisagra en la bisagra
de la unidad del asiento.
• Insertar un tornillo n° 8 x 2,5 cm en el
extremo de la varilla de la bisagra. Usar un
desatornillador de cruz para apretar
el tornillo.
6
Assembly Montaje
8
6
7
Side Rails
Barandillas laterales
• Fit the side rails under the grooved areas
under the seat, as shown.
• Insert four #8 x 1"(2,5 cm) screws into
the holes in the seat.
• Tighten the screws with
a Phillips screwdriver.
• Ajustar las barandillas laterales debajo de
las áreas irregulares abajo del asiento,
tal como se muestra.
• Insertar cuatro tornillos n° 8 x 2,5 cm en
los orificios del asiento.
• Usar un desatornillador de cruz para
apretar el tornillo.
Swing Arm
Brazo del columpio
Groove
Ranura
Side View
Vista desde el lado
• Fit the end of each swing arm into the
grooves in the seat.
• Ajustar el extremo de cada brazo del
columpio en las ranuras del asiento.
Swing Arms
Brazos del columpio
Side View
Side View
Vista del lado
Vista del lado
• Insert a #8 x 1" (2,5 cm) screw into each
swing arm. Tighten the screws with a
Phillips screwdriver.
IMPORTANT! Push down on the seat
assembly to be sure it’s secure to the
swing arms.
• Insertar un tornillo n° 8 x 2,5 cm en
cada brazo del columpio. Usar un
desatornillador de cruz para apretar
el tornillo.
¡IMPORTANTE! Presionar hacia abajo la
unidad del asiento para asegurarse de que
está asegurada en los brazos del columpio.
7
Assembly Montaje
9
10
Waist Restraints
Cinturones de la cintura
Shoulder Restraints
Cinturones de los
hombros
• Insert the shoulder and waist restraint
belts through the slots in the seat pad.
Hint: The shoulder belts come assembled to
the seat back in the lower slots for a smaller
child. To change to the upper slots for
a larger child, refer to page 14.
• Insertar los cinturones de los hombros
y cintura en las ranuras de la almohadilla
del asiento.
Nota: Los cinturones de los hombros están
instalados en el respaldo en las ranuras
bajas para niños más pequeños. Para
cambiar la altura a las ranuras superiores
para un niño más grande, consultar la
página 14.
Crotch Restraint
Cinturón de la entrepierna
• Insert the crotch restraint belt up through
the slot in the seat pad.
• Insertar el cinturón de la entrepierna en la
ranura de la almohadilla.
8
Assembly Montaje
11
Side View
Vista del lado
Pocket
Compartimento
• Fit the pocket on the back of the seat pad
onto the seat back.
• Ajustar la funda de la parte de atrás de la
almohadilla en el respaldo.
Elastic Loops
Ganchos elásticos
Elastic Loops
Ganchos elásticos
Tab
Lengüeta
Tab
Lengüeta
Bottom View
Bottom View
Vista de abajo
Vista de abajo
12
• Lift the front edge of the seat pad and
insert both elastic loops on the seat pad
through the holes in the seat bottom.
• From the bottom of the seat, hook the
elastic loops to the tabs on the seat.
• Levantar el borde frontal de la almohadilla
e insertar ambos ganchos elásticos en la
almohadilla por los orificios del asiento.
• Desde la parte de abajo del asiento,
enganchar los ganchos elásticos en las
lengüetas del asiento.
9
13
15
14
Assembly Montaje
Clips
Sujetadores
• Fit the clips on the front edge of the seat
pad to the front edge of the seat bottom.
• Ajustar los sujetadores del borde delantero
de la almohadilla en el borde delantero
del asiento.
Swing Arm
Brazo del columpio
Elastic Loops
Ganchos elásticos
• Fit the notch in the seat pad around each
swing arm.
• Hook the seat pad elastic loops to the tabs
on the seat.
Toy Bar
Barra de
juguetes
• Ajustar la muesca de la almohadilla
alrededor de cada brazo del columpio.
• Enganchar los ganchos elásticos de la
almohadilla en las lengüetas del asiento.
• Insert the end of the toy bar into the socket
in the swing housing.
Hint: The toy bar only fits one way. If it does
not seam to fit, turn it around and try again.
• Insertar el extremo de la barra de juguetes
en la conexión del compartimento
del columpio.
Atención: La barra de juguetes solo se
ajusta de una manera. Si no se ajusta,
voltearla e intentar de nuevo.
10
Battery Installation Colocación de las pilas
1,5V x 4
C (LR14) 1,5V x 1
D (LR20)
Hint: We recommend using alkaline batteries for longer battery life.
Atención: Se recomienda usar pilas alcalinas para una mayor duración.
Swing/Sounds Battery Installation
• Locate the swing/sounds battery
compartment on a swing housing.
• Loosen the screws in the battery
compartment door with a Phillips
screwdriver. Remove the battery
compartment door.
• Insert four C (LR14) alkaline batteries into
the battery compartment.
• Replace the battery compartment
door and tighten the screws with
a Phillips screwdriver.
Colocación de las pilas para el
columpio/sonidos
• Localizar el compartimento de pilas del
columpio/sonidos en un compartimento
del columpio.
• Aflojar los tornillos de la tapa del
compartimento de pilas con un
desatornillador de cruz. Retirar la tapa.
• Insertar 4 pilas alcalinas C (LR14) x 1,5V
en el compartimento.
• Cerrar la tapa del compartimento de pilas
y apretar los tornillos con un
desatornillador de cruz.
Vibration Battery Installation
• Locate the vibration battery compartment
on a swing housing.
• Loosen the screw in the battery
compartment door with a Phillips
screwdriver. Remove the battery
compartment door.
• Insert one D (LR20) alkaline battery into
the battery compartment.
• Replace the battery compartment
door and tighten the screw with
a Phillips screwdriver.
Colocación de la pila de la unidad
de vibraciones
• Localizar el compartimento de la pila
de la unidad de vibraciones en un
compartimento del columpio.
• Desatornillar el tornillo de la tapa
del compartimento de la pila con un
desatornillador de cruz. Retirar la tapa.
• Insertar 1 pila alcalina D (LR20) x 1,5V en
el compartimento.
• Cerrar la tapa del compartimento de la pila
y apretar el tornillo con un desatornillador
de cruz.
11
Battery Safety Information
In exceptional circumstances, batteries may
leak fluids that can cause a chemical burn
injury or ruin your product. To avoid
battery leakage:
• Do not mix old and new batteries or
batteries of different types: alkaline,
standard (carbon-zinc) or rechargeable
(nickel-cadmium).
• Insert batteries as indicated inside the
battery compartment.
• Remove batteries during long periods
of non-use. Always remove exhausted
batteries from the product. Dispose of
batteries safely. Do not dispose of product
in a fire. The batteries inside may explode
or leak.
• Never short-circuit the battery terminals.
• Use only batteries of the same or
equivalent type as recommended.
• Do not charge non-rechargeable batteries.
• Remove rechargeable batteries from the
product before charging.
• If removeable, rechargeable batteries are
used, they are only to be charged under
adult supervision.
Información de seguridad sobre las pilas
En circunstancias excepcionales, las pilas
pueden derramar líquido que puede causar
quemaduras o dañar el producto. Para
evitar derrames:
• No mezclar pilas nuevas con gastadas ni
mezclar pilas alcalinas, estándar (carbono-
cinc) o recargables (níquel-cadmio).
• Cerciorarse de que la polaridad de las pilas
sea la correcta.
• Sacar las pilas gastadas del producto
y desecharlas apropiadamente. Sacar
las pilas si el producto no va a ser usado
durante un periodo prolongado. No quemar
las pilas ya que podrían explotar o derramar
el líquido incorporado en ellas.
• No provocar un cortocircuito con
las terminales.
• Usar sólo el tipo de pilas recomendadas
(o su equivalente).
• No cargar pilas no recargables.
• Sacar las pilas recargables antes de cargarlas.
• La carga de las pilas recargables sólo debe
realizarse con la supervisión de un adulto.
• Protect the environment by not disposing
of this product with household waste
(2002/96/EC). Check your local authority
for recycling advice and facilities.
• Proteger el medio ambiente no desechando
este producto en la basura del hogar
(2002/96/EC). Consultar con la agencia local
pertinente en cuanto a información y centros
de reciclaje.
Battery Installation Colocación de las pilas
• If this product begins to operate erratically,
you may need to reset the electronics. Turn
the power off and then back on.
• When motion or sounds from the product
become slow/faint or stop, replace
the batteries.
• Si este producto no funciona
correctamente, restablecer el circuito
electrónico. Poner el botón de encendido
en apagado y nuevamente en encendido.
• Cuando el movimiento o sonidos del
producto se debiliten o dejen de funcionar,
sustituir las pilas.
12
Setup and Use Preparación y uso
WARNING
ADVERTENCIA
Prevent serious injury or death from falls or strangling in the
restraint system:
• Never leave child unattended.
• This product is not intended to replace a crib or bassinet for prolonged
periods of sleep.
• Always use the restraint system.
• Discontinue use when an active child attempts to climb out.
• Never use on any elevated surface. Use only on a floor.
• Never use toy bar as a handle.
Para evitar lesiones graves o la muerte como resultado de caídas o quedar
estrangulado en el sistema de sujeción:
• Nunca dejar al niño sin supervisión.
• Este producto no está diseñado para reemplazar una cuna o moisés por
periodos prolongados de sueño.
• Siempre usar el sistema de sujeción.
• Descontinuar el uso cuando un niño activo intente salirse del producto.
• No usar sobre superfices elevadas. Usar únicamente sobre el piso.
• No usar la barra de juguetes como asa.
13
1
2
Setup and Use Preparación y uso
Crotch Belt
Cinturón de la entrepierna
Waist/Shoulder Belts
Cinturones de la
cintura/hombros
Restraint System
• Place your child in the seat.
• Insert the ends of the waist belts through
the slots in the shoulder belts.
• Pull the crotch belt up between your child’s
legs and fasten both waist/shoulder belts
to the crotch belt. Make sure you hear
a “click” on both sides.
• Tighten each waist belt and shoulder belt
so that the restraint system is snug against
your child. Please refer to the next section
for instructions to tighten these belts.
Sistema de sujeción
• Sentar al niño en el asiento.
• Insertar los extremos de los cinturones de
la cintura en las ranuras de los cinturones
de los hombros.
• Jalar el cinturón de la entrepierna entre las
piernas del bebé y abrochar los cinturones
de la cintura/hombros en el cinturón de la
entrepierna. Asegurarse de oír un clic en
ambos lados.
• Apretar cada cinturón de la cintura
y del hombro de modo que el sistema
de sujeción quede bien ajustado al niño/a.
Consultar la siguiente sección para
mayores detalles sobre cómo apretar
los cinturones.
Adjuster
Ajustador
Adjuster
Ajustador
LOOSEN
AFLOJAR
TIGHTEN
APRETAR
• To tighten the waist belts: Feed the
anchored end of the waist belt up through
the buckle to form a loop A. Pull the free
end of the waist belt B.
• To tighten the shoulder belts: Hold the
adjuster and pull the shoulder belt down C.
• To loosen the waist belts: Feed the free end
of the waist belt up through the buckle to
form a loop A. Enlarge the loop by pulling
on the end of the loop toward the buckle.
• Pull the anchored end of the waist belt to
shorten the free end of the waist belt B.
• To loosen the shoulder belts: Pull the
adjuster down C.
Note: After adjusting the restraint system to
fit your child, make sure you pull on it to be
sure it is securely fastened.
• Para apretar los cinturones de la cintura:
Introducir el extremo fijo del cinturón de
la cintura en la hebilla para formar un
espacio A. Jalar el extremo libre del
cinturón de la cintura B.
• Para apretar los cinturones de los
hombros: Sujetar el ajustador y jalar hacia
abajo el cinturón del hombro C.
• Para aflojar los cinturones de la cintura:
Introducir el extremo libre del cinturón
de la cintura en la hebilla para formar un
espacio A. Agrandar el espacio jalando el
extremo libre del cinturón hacia la hebilla.
• Jalar el extremo fijo del cinturón para
acortar el extremo libre del cinturón B.
• Para aflojar los cinturones de los
hombros: Jalar hacia abajo el ajustador C.
Atención: Después de ajustar el sistema de
sujeción al tamaño del niño, asegurarse de
jalarlo para verificar que está bien ajustado.
14
Setup and Use Preparación y uso
35
6
• To adjust the restraint height for baby,
unbuckle the restraint system.
• Para ajustar la altura de sujeción para un
bebé, desabrochar el sistema de sujeción.
Shoulder Belts
Cinturones de hombro
4
• Push to remove the shoulder belts from
the seat back.
• Empujar para retirar del respaldo los
cinturones de los hombros.
Upper Slots for
Larger Baby
Ranuras superiores
para bebés grandes
Larger Baby
• Insert the ends of the shoulder belts
through the upper slots in the pad.
Bebé más grande
• Insertar los extremos de los cinturones de
hombro en las ranuras superiores de
la almohadilla.
Lower Slots for
Smaller Baby
Ranuras inferiores para
bebés pequeños
Smaller Baby
• Insert the ends of the shoulder belts
through the lower slots in the pad.
Bebé más pequeño
• Insertar los extremos de los cinturones
de hombro en las ranuras inferiores de
la almohadilla.
15
Easy Conversion Fácil de transformar
Seat Post
Poste del asiento
Seat Latch
Seguro del asiento
Swing Mode
Modalidad de columpio
• Pull and slide the seat latch off of the
seat post.
• Jalar y mover el seguro del asiento del
poste del asiento.
Seat Mode
Modalidad de asiento
Seat Post
Poste del asiento
Seat Latch
Seguro del asiento
• Lower the seat post on the seat bottom.
• While holding the seat post, lift the seat
latch. Slide the seat latch over the
seat post.
• Bajar el poste del asiento en el asiento.
• Mientras sujeta el poste del asiento, subir
el seguro del asiento. Ajustar el seguro
del asiento sobre el poste del asiento.
16
Swinging Motion, Soothing Sounds
and Calming Vibrations
Movimiento de columpio, sonidos
y vibraciones relajantes
Main Power Switch
Interruptor principal
Swing Speed/Power Switch
Interruptor de velocidad/encendido
del columpio
Music/Volume Switch
Interruptor de música/volumen
Swing Mode
• Place your child in the seat and
secure properly.
Hint: You can turn the toy bar back when
placing baby in the seat.
• Slide the main power switch ON. The power
L.E.D. turns ON .
• Slide the swing speed/power switch ON .
• Give the seat a light push to start the
swinging motion.
• Adjust the swing speed/power switch to
the desired swing motion setting.
Hints:
-
After turning on power, this product may not
swing unless there is a child in the seat.
-
As with most battery-power swings,
a heavier child will reduce the amount of
swinging motion on all settings. In most
cases, the low setting works best for a
smaller child while the higher setting
works best for a heavier child.
-
If the low setting provides too much
swinging motion for your child, try
placing one end of a blanket underneath
your child and let the other end of the
blanket drape down while swinging.
-
If swinging stops while using a lower
setting, try a higher setting. Give the seat
a light push to start the swinging motion
again and vice versa.
• To turn off swinging, slide the swing
speed/power switch off .
17
Music
• Slide the music/volume switch to ON with
low volume , ON with high volume or
OFF .
Swing and Music
• To turn off swinging and music,
slide the main power switch OFF .
The power L.E.D. turns OFF.
Seat Mode
• Place your child in the seat and
secure properly.
• Slide the vibration switch ON or
OFF .
Modalidad de columpio
• Sentar al niño en el asiento y abrochar los
cinturones de seguridad.
Atención: La barra de juguetes se puede
volver a ajustar después de sentar al bebé
en la silla.
• Poner el interruptor principal de encendido
en ENCENDIDO. Se prenderá la luz L.E.D.
de encendido .
• Poner el interruptor de velocidad/
encendido del columpio en ENCENDIDO .
• Darle un ligero empujón a la silla para empezar
el movimiento mecedor.
• Ajustar el interruptor de velocidad/
encendido del columpio en el nivel
de movimiento deseado.
Atención:
-
Después de activar la unidad, este
producto no producirá movimiento de
columpio salvo que un niño esté sentado
en el asiento.
-
Al igual que con la mayoría de columpios
que funcionan con pilas, entre más
pesado el niño, menor será el movimiento
del columpio en todos los niveles. En la
mayoría de casos, el nivel bajo funciona
mejor para niños pequeños, mientras que
el nivel alto funciona mejor para niños
más grandes.
-
Si el nivel bajo proporciona movimiento
de columpio excesivo para el niño,
colocar un extremo de un cobertor debajo
del niño y dejar que el otro extremo
cuelgue mientras se columpia.
-
Si el movimiento se detiene en uno de los
niveles bajos, intentar un nivel más alto.
Darle un ligero empujón a la silla para
volver a activar el movimiento.
• Para apagar el movimiento mecedor, poner
el interruptor de velocidad/encendido del
columpio en APAGADO .
Música
• Poner el interruptor de música/volumen
en ENCENDIDO con volumen bajo ,
ENCENDIDO con volumen alto
o APAGADO .
Columpio y música
• Para apagar el movimiento y la música,
poner el interruptor principal de encendido
en APAGADO . Se apagará la luz L.E.D.
de apagado.
Modalidad de silla
• Sentar al niño en el asiento y abrochar los
cinturones de seguridad.
• Poner el interruptor de la unidad de
vibraciones en ENCENDIDO
o APAGADO .
Swinging Motion, Soothing Sounds
and Calming Vibrations
Movimiento de columpio, sonidos
y vibraciones relajantes
18
Storage
Almacenamiento
Care
Mantenimiento
PRESS
PRESIONAR
• Press the button on each end of the frame
and remove the base.
• Press the tab on the toy bar and lift
to remove.
• Store the base and the toy bar in a safe
place for future use.
• Presionar el botón de cada extremo del
armazón y retirar la base.
• Presionar la lengüeta de la barra de
juguetes y levantarla para retirarla.
• Guardar la base y la barra de juguetes
en un lugar seguro para uso futuro.
• The pad is machine washable. Wash it
separately in cold water on the gentle cycle.
Do not use bleach. Tumble dry separately
on low heat and remove promptly.
• The frame and mobile may be wiped clean
using a mild cleaning solution and a damp
cloth. Do not use bleach. Do not use harsh
or abrasive cleaners. Rinse clean with
water to remove residue.
To remove the pad:
• Unbuckle the restraints.
• Lift the bottom of the pad from the
seat bottom.
• Remove the pad elastic loops from the
pegs on the sides and bottom of the seat.
• Pull the restraints through the slots
in the pad.
• Remove the pad from the seat.
To re-assemble the pad:
• Refer to assembly steps 9-14.
• La almohadilla se puede lavar a máquina.
Lavarla por separado en agua fría, en ciclo
para ropa delicada. No usar blanqueador.
Meter a la secadora por separado
a temperatura baja y sacar inmediatamente
después de finalizado el ciclo.
• Limpiar el armazón y el móvil con un paño
humedecido en una solución limpiadora
neutra. No usar blanqueador. No usar
limpiadores fuertes o abrasivos. Enjuagar
con agua para eliminar el residuo.
Para quitar la almohadilla:
• Desabrochar los cinturones de seguridad.
• Levantar la parte inferior de la almohadilla
del asiento.
• Quitar los ganchos elásticos de la
almohadilla de las clavijas de los lados
y parte de abajo del asiento.
• Jalar los retenedores por las ranuras de
la almohadilla.
• Quitar la almohadilla del asiento.
Para volver a montar la almohadilla:
• Consultar los pasos de montaje 9 a 14.
19
Consumer Information
Información al consumidor
FCC Statement (United States Only)
This equipment has been tested and found
to comply with the limits for a Class B digital
device, pursuant to Part 15 of the FCC
Rules. These limits are designed to provide
reasonable protection against harmful
interference in a residential installation.
This equipment generates, uses and can
radiate radio frequency energy and, if not
installed and used in accordance with the
instructions, may cause harmful interference
to radio communications. However, there is
no guarantee that interference will not occur
in a particular installation. If this equipment
does cause harmful interference to radio or
television reception, which can be determined
by turning the equipment off and on, the user
is encouraged to try to correct the interference
by one or more of the following measures:
• Reorient or relocate the receiving antenna.
• Increase the separation between the
equipment and receiver.
• Consult the dealer or an experienced radio/
TV technician for help.
Note: Changes or modifications not
expressly approved by the manufacturer
responsible for compliance could void the
user’s authority to operate the equipment.
This device complies with Part 15 of the
FCC Rules. Operation is subject to the
following two conditions: (1) this device
may not cause harmful interference and
(2) this device must accept any interference
received, including interference that may
cause undesired operation.
Nota FCC (Válido sólo en los Estados Unidos)
Este equipo fue probado y cumple con los
límites de un dispositivo digital de Clase B,
según está establecido en la Parte 15 del
reglamento FCC. Estos límites están
diseñados para proporcionar una protección
razonable contra interferencia dañina en
una instalación residencial. Este equipo
genera, utiliza y puede radiar energía de
radiofrecuencia y, si no se instala y utiliza
según lo estipulado en las instrucciones,
puede causar interferencia dañina
a radiocomunicaciones.
Sin embargo, no hay ninguna garantía de
que no haya interferencia en una instalación
particular. Si este equipo llega a causar
interferencia dañina a la recepción de radio
o televisión, lo cual puede ser verificado
encendiendo y apagando el equipo, se
recomienda tomar una de las siguientes
medidas para corregir el problema:
• Cambiar la orientación o localización de la
antena receptora.
• Aumentar la distancia entre el equipo
y el receptor.
• Ponerse en contacto con el distribuidor
o con un técnico de radio/TV.
Nota: los cambios o modificaciones no
expresamente autorizados por el fabricante
responsable del cumplimiento de las
normas puede cancelar la autoridad del
usuario de usar el equipo.
Este dispositivo cumple con la Parte 15 del
reglamento FCC. El uso está sujeto a las dos
condiciones siguientes: (1) Este dispositivo
no debe causar interferencia dañina y (2) este
dispositivo debe aceptar cualquier interferencia
recibida, incluyendo interferencia que
pueda causar que el dispositivo no
funcione correctamente.
20
©2013 Mattel. All Rights Reserved.
PRINTED IN CHINA T8377pr-0822
ICES-003
This Class B digital apparatus complies with
Canadian ICES-003. Operation is subject to
the following two conditions: (1) this device
may not cause harmful interference and
(2) this device must accept any interference
received, including interference that may
cause undesired operation.
NMB-003
Cet appareil numérique de la classe B est
conforme à la norme NMB-003 du Canada.
L’utilisation de ce dispositif est autorisée
seulement aux conditions suivantes :
(1) il ne doit pas produire de brouillage et
(2) l’utilisateur du dispositif doit être prêt
à accepter tout brouillage radioélectrique
reçu, même si ce brouillage est susceptible
de compromettre le fonctionnement
du dispositif.
CO
N
SU
MER A
SS
I
S
TAN
CE
AYUDA AL CONSUMIDOR
1-800-432-5437 (US)
Fisher-Price, Inc., 636 Girard Avenue, East Aurora, NY 14052.
Hearing-impaired consumers/Clientes con problemas auditivos
1-800-382-7470.
Centro de Servicio en México:
59-05-51-00 Ext. 5206 ó 01-800-463-59-89
MÉXICO
Importado y distribuido por Mattel de México, S.A. de
C.V., Miguel de Cervantes Saavedra No. 193, Pisos 10
y 11, Col. Granada, Delegación Miguel Hidalgo,
C.P. 11520, México, D.F. R.F.C. MME-920701-NB3.
CHILE
Mattel Chile, S.A., Avenida Américo Vespucio 501-B,
Quilicura, Santiago. Tel.: 1230-020-6213.
VENEZUELA
Mattel de Venezuela, C.A., RIF J301596439, Ave. Mara,
C.C. Macaracuay Plaza, Torre B, Piso 8, Colinas de la
California, Caracas 1071. Tel.: 0-800-100-9123.
ARGENTINA
Mattel Argentina, S.A., Curupaytí 1186, (1607) –
Villa Adelina, Buenos Aires. Tel.: 0800-666-3373.
COLOMBIA
Mattel Colombia, S.A., calle 123#7-07 P.5, Bogotá.
Tel.: 01800-710-2069.
PERÚ
Mattel Perú, S.A., Av. Juan de Arona # 151, Centro
Empresarial Juan de Arona, Torre C, Piso 7, Oficina 704,
San Isidro, Lima 27, Perú. RUC: 20425853865. Reg.
Importador: 02350-12-JUE-DIGESA. Tel.: 0800-54744.

Other manuals for T8377

1

This manual suits for next models

1

Other Fisher-Price Baby Swing manuals

Fisher-Price P0098 User manual

Fisher-Price

Fisher-Price P0098 User manual

Fisher-Price Rainforest M6711 User manual

Fisher-Price

Fisher-Price Rainforest M6711 User manual

Fisher-Price DELUXE TAKE-ALONG 79618 User manual

Fisher-Price

Fisher-Price DELUXE TAKE-ALONG 79618 User manual

Fisher-Price T3635 User manual

Fisher-Price

Fisher-Price T3635 User manual

Fisher-Price X2535 User manual

Fisher-Price

Fisher-Price X2535 User manual

Fisher-Price DELUXE TAKE-ALONG 79618 User manual

Fisher-Price

Fisher-Price DELUXE TAKE-ALONG 79618 User manual

Fisher-Price CMR40 User manual

Fisher-Price

Fisher-Price CMR40 User manual

Fisher-Price P1397 User manual

Fisher-Price

Fisher-Price P1397 User manual

Fisher-Price BMK14 User manual

Fisher-Price

Fisher-Price BMK14 User manual

Fisher-Price RAINFOREST M6711 User manual

Fisher-Price

Fisher-Price RAINFOREST M6711 User manual

Fisher-Price V1179 User manual

Fisher-Price

Fisher-Price V1179 User manual

Fisher-Price DVL42 User manual

Fisher-Price

Fisher-Price DVL42 User manual

Fisher-Price B2108 User manual

Fisher-Price

Fisher-Price B2108 User manual

Fisher-Price BGB37 User manual

Fisher-Price

Fisher-Price BGB37 User manual

Fisher-Price 79739 User manual

Fisher-Price

Fisher-Price 79739 User manual

Fisher-Price FFJ00 User manual

Fisher-Price

Fisher-Price FFJ00 User manual

Fisher-Price M5598 User manual

Fisher-Price

Fisher-Price M5598 User manual

Fisher-Price G8653 User manual

Fisher-Price

Fisher-Price G8653 User manual

Fisher-Price H7184 User manual

Fisher-Price

Fisher-Price H7184 User manual

Fisher-Price M7343 User manual

Fisher-Price

Fisher-Price M7343 User manual

Fisher-Price H0640 User manual

Fisher-Price

Fisher-Price H0640 User manual

Fisher-Price V9944 User manual

Fisher-Price

Fisher-Price V9944 User manual

Fisher-Price HBT17 Quick setup guide

Fisher-Price

Fisher-Price HBT17 Quick setup guide

Fisher-Price W9510 User manual

Fisher-Price

Fisher-Price W9510 User manual

Popular Baby Swing manuals by other brands

SportsPlay 8 MODERN BIPOD ADA SWING installation guide

SportsPlay

SportsPlay 8 MODERN BIPOD ADA SWING installation guide

4 Moms mamaRoo 4 instruction manual

4 Moms

4 Moms mamaRoo 4 instruction manual

MIRA-ART TRAUMSCHWINGER Babyschwinger manual

MIRA-ART

MIRA-ART TRAUMSCHWINGER Babyschwinger manual

SportsPlay 381-404H installation instructions

SportsPlay

SportsPlay 381-404H installation instructions

KIKKA BOO ANGEL'S HUG Instructions for use

KIKKA BOO

KIKKA BOO ANGEL'S HUG Instructions for use

SportsPlay 581-242HD installation guide

SportsPlay

SportsPlay 581-242HD installation guide

Brevi Slex Evo 223 Instructions for use

Brevi

Brevi Slex Evo 223 Instructions for use

TP active fun FoldAway TP913 Instructions for assembly maintenance and use

TP active fun

TP active fun FoldAway TP913 Instructions for assembly maintenance and use

Huck MAXI Assembly instructions

Huck

Huck MAXI Assembly instructions

Premium Poly Patios AD-0117 Assembly

Premium Poly Patios

Premium Poly Patios AD-0117 Assembly

Outsunny 84A-074 Assembly instructions

Outsunny

Outsunny 84A-074 Assembly instructions

Hudora Vario Basic Module INSTRUCTIONS ON ASSEMBLY AND USE

Hudora

Hudora Vario Basic Module INSTRUCTIONS ON ASSEMBLY AND USE

Lillagunga TODDLER user manual

Lillagunga

Lillagunga TODDLER user manual

BIG Activity-Swing Assembly instructions

BIG

BIG Activity-Swing Assembly instructions

Pragma A030.135.01 user manual

Pragma

Pragma A030.135.01 user manual

Jack-Post Woodlawn WL-70 Assembly instructions

Jack-Post

Jack-Post Woodlawn WL-70 Assembly instructions

Boppy Rock in Comfort 32810 owner's manual

Boppy

Boppy Rock in Comfort 32810 owner's manual

TP TP510 Instructions for assembly, maintenance and safe use

TP

TP TP510 Instructions for assembly, maintenance and safe use

manuals.online logo
manuals.online logoBrands
  • About & Mission
  • Contact us
  • Privacy Policy
  • Terms and Conditions

Copyright 2025 Manuals.Online. All Rights Reserved.