manuals.online logo
Brands
  1. Home
  2. •
  3. Brands
  4. •
  5. FLOS
  6. •
  7. Outdoor Light
  8. •
  9. FLOS MILE BOLLARD 1 600 MONO User manual

FLOS MILE BOLLARD 1 600 MONO User manual

Outdoor
Mile Bollard
Design by Antonio Citterio
Mile Bollard
ITA. Gruppo di Rischio 1
UK. Risk Group 1
ESP. Grupo de riesgo 1
FR. Groupe de risque 1
DE. Gefahrgruppe 1
RU. Группа риска 1
ITA. Prima di effettuare qualsiasi
intervento sugli apparecchi to-
gliere l’alimentazione elettrica.
UK. Make sure there is no power
connected to the tting before
carrying out any maintenance.
ESP. Antes de manipular el apa-
rato, desconectar la alimenta-
ción eléctrica.
FR. Avant de procéder à toute
opération, toujours couper l’ali-
mentation électrique et s’assurer
qu’elle ne peut pas être rétablie
accidentellement.
DE. Vor Durchführung sämtlicher
Arbeiten an der Leuchte, ist der
Netzstecker vom Stromanschluss
zu trennen.
R U . Убедитесь, что осветительный
прибор не подключен к источнику
питания, прежде чем начать любые
ремонтные действия.
OFF
ITA. Il modulo LED contenuto in
questo apparecchio di illumi-
nazione può essere sostituito
esclusivamente dal costruttore.
Per un’eventuale sostituzione,
si prega contattare il proprio ri-
venditore.
UK. The LED module contained
in this luminaire shall be repla-
ced by the manufacturer only.
For further information, please
contact your supplier.
ESP. El módulo led contenido en
esta luminaria solo podrá ser
reemplazado por el fabricante.
Para más información por favor
contacte con el proveedor.
FR. La source lumineuse LED
de cet appareil peut être rem-
placée seulement par le con-
structeur. Merci de contacter
votre revendeur.
DE. Das LED-Modul in dieser
Leuchte enthalten darf nur vom
Hersteller ersetzt werden. Für wei-
tere Informationen, wenden Sie
sich bitte an Ihren Lieferanten.
RU. Светодиодный модуль
светильника должен быть заменен
только производителем. За
дополнительной информацией
просим обратиться к Вашему
поставщику.
Outdoor
ITA. Utilizzare un cavo di alimen-
tazione con tipologia idonea
(cavi essibili HAR H05/07 RN-F o
idonei per l’utilizzo all’esterno): i
cavi rigidi possono compromet-
tere la tenuta attraverso il pas-
sacavo.
UK. Use HAR H05/07 RN-F exi-
ble cables or dedicated cables
for outdoor use only. Stiff cables
do not assure the effectiveness
of the cable holder.
ESP. Utilizar un cable de alimen-
tación adecuado para insta-
laciones de exterior (tipo HAR
H05/07 RN-F). Los cables rígidos
pueden comprometer la estan-
queidad del pasacables.
FR. Utiliser seulement des câbles
souples type <HAR> H05/07 RN-F
ou spécialement conçus pour
un usage à l’extérieur. L’emploi
de câbles rigides risque de
compromettre l’étanchéité du
passe-l.
DE. Für den Außenbereich dür-
fen nur exible Kabel vom Typ
<HAR> H05/07 RN-F oder typen-
gleiche Kabel verwendet wer-
den. Starre Kabel können den
Halt des Kabels in der Kabeldur-
chführung nicht gewährleisten
RU. Используйте гибкие
кабели HAR H05/07 RN-F, или
кабели, предназначенные для
использования вне помещений.
Силовые кабели постоянного тока
не гарантируют качество кабельная
муфта.
ITA. Non installare il prodotto in
caso di pioggia, nebbia o forte
umidità.
UK. Do not install the luminaire
in case of rain, fog or intense
humidity.
ESP. No instalar el producto en
caso de lluvia, niebla o situacio-
nes de alta humedad.
FR. N’installez pas l’appareil en
présence de pluie, brouillard ou
humidité intense.
DE. Die Leuchte nicht bei Regen,
Nebel oder hoher Luftfeuch-
tigkeit installieren.
RU. Не проводите установку
светильника в дождь, туман и при
повышенной влажности.
ITA. Fare funzionare gli apparec-
chi aperti per 30-60 minuti prima
di chiuderli.
UK. Switch the luminaire on and
let it work for 30-60 minutes befo-
re closing it.
ESP. Encender el aparato estan-
do abierto, durante 30-60 minu-
tos antes de cerrarlo completa-
mente.
FR. Allumez l’appareil et laissez-
le en fonction pour 30-60 minu-
tes avant de le fermer et terminer
l’installation.
DE. Die Leuchten vor Ver-
schließen ca. 30-60 Minuten of-
fen brennen lassen.
RU. Перед закрытием включите
светильник на 30-60 минут.
CLOSE AFTER
CLOSE AFTER
30-60 MINUTES
30-60 MINUTES
ITA. E’ obbligatorio che l’instal-
lazione e la messa in servizio
dell’apparecchio venga effettua-
ta da personale qualicato nel ri-
spetto delle norme impiantistiche
nazionali vigenti. Non aprire l’ap-
parecchio in caso di guasto ma
contattare l’assistenza.
UK. Connection and mainte-
nance of the luminaire must be
carried out by trained and quali-
ed staff only in compliance with
national safety regulations.Do not
open the product in case of failure
but contact the support service.
ESP. Es obligatorio que la instala-
ción y la puesta en servicio de
la luminaria las realice personal
cualicado que respete los regla-
mentos de seguridad nacionales
vigentes. No abra la luminaria en
caso de avería; póngase en con-
tacto con el servicio técnico.
FR. Il est impératif que l’installation
et la mise en service de l’appareil
soient effectuées par un profes-
sionnel qualié, conformément à
la réglementation nationale en
matière de sécurité. En cas de
panne, ne pas ouvrir l’appareil
mais contacter le service d’assi-
stance.
DE. Die Installation und die Inbe-
triebnahme des Geräts müssen
von qualiziertem Personal gemäß
den geltenden nationalen Vor-
schriften für den Anlagenbau dur-
chgeführt werden.
Bei Störungen darf das Gerät nicht
geöffnet werden.Wenden Sie sich
im Störfall an den Kundendienst.
RU. Установка и подключение
устройства должны выполняться
квалифицированным персоналом
в соответствии с действующими
нормами по безопасности.
Не открывайте изделие в случае
повреждение, свяжитесь с
поддержкой.
ITA. I componenti elettronici in-
stallati negli apparecchi sono
protetti da sovratensioni.
Per raggiungere una protezione
addizionale raccomandiamo
dei dispositivi di protezione sup-
plementari.
UK. The electronic components
installed in the luminaire are pro-
tected against overvoltage.
To achieve greater device pro-
tection we recommend addi-
tional overvoltage protection
components.
ESP. Los componentes electróni-
cos instalados en la luminaria
están protegidos contra sobre-
tensiones.
Para obtener una protección
superior, recomendamos el uso
de dispositivos de protección
adicionales.
FR. Les composants électroni-
ques installés dans les appareils
sont protégés contre les surten-
sions.
Pour obtenir une protection sup-
plémentaire, nous recomman-
dons d’ajouter des dispositifs de
protection supplémentaires.
DE. Die in den Geräten installier-
ten elektronischen Komponen-
ten sind gegen Überspannung
geschützt.
Für einen höheren Schutzgrad
empfehlen wir zusätzliche
Schutzvorrichtungen.
RU. Электронные компоненты,
установленные в устройстве,
защищены от избыточного
напряжения.
Для достижения более высокой
защиты рекомендуются
дополнительные компоненты
защиты от избыточного
напряжения.
<
<
H
H
A
A
R
R
>
>
H
H
0
0
5
5
/
/
0
0
7
7
R
R
N
N
-
-
F
F
Mile Bollard
ITA. Bloccare e sbloccare le viti
di chiusura con sequenza alter-
nata.
UK. Tighten and release screws
alternately or crosswise.
ESP. Apretar y aojar los tornillos
de cierre de modo alterno.
FR. Vissez et dévissez les vis en
diagonale.
DE. Verschlußschrauben über
Kreuz öffnen und schließen.
RU. Закручивайте и выкручивайте
винты не сразу до конца, а
постепенно поочередно или крест-
накрест.
1
3
2
4
ITA. Nessuna parte dell’appa-
recchio, deve stare a contatto
diretto con sostanze chimiche
aggressive (es. fertilizzanti, diser-
banti, calce).
UK. Keep away from aggressive
agents and chemical substan-
ces (e.g. fertilizer, weed-killer,
lime).
ESP. Ninguna parte del aparato
debe estar en contacto directo
con el terreno o con sustancias
químicas agresivas (fertilizantes,
herbicidas,cal, etc).
FR. Gardez l’appareil à l’abri
de toute substance chimique
agressive (engrais, désherbant,
chaux).
DE. Die Leuchte darf nicht mit
chemischen oder aggressiven
Substanzen (wie z.B. Dünge-
mittel, Unkrautvertilgungsmittel,
Kalk) in Kontakt kommen.
RU. Необходимо избегать
агрессивных веществ. При
установке внешние детали
светильника должны быть
защищены от прямого контакта
с агрессивными и химическими
веществами (удобрения,
гербициды, лимон и т.д.).
NO
ITA. Durante il montaggio e la
manutenzione degli apparecchi
è necessario prestare partico-
lare attenzione a non danneg-
giare la verniciatura a polvere.
Un danno combinato all’azione
dell’acqua potrebbe provocar-
ne la corrosione.
I prodotti chimici danneggiano
la protezione anticorrosione.
UK. During the installation and
the maintenance of the xtures
it is IMPORTANT to be careful and
avoid damages on the paint co-
ating. Damages on the coating
exposed to outdoor conditions
or water, could cause corrosion.
Chemical substances affect the
anticorrosion covering protec-
tion.
ESP. Durante el montaje y el
mantenimiento de los dispositi-
vos, es preciso tener un cuida-
do especial para no dañar el
revestimiento de la pintura en
polvo. Un daño al revestimiento
combinado con la exposición
en el exterior o con el efecto del
agua, podría causar corrosión.
Los productos químicos dañan
la protección anticorrosión.
FR. Lors de l’installation et de
l’entretien des appareils, il est
IMPORTANT de veiller à ne pas
endommager le revêtement de
peinture. Les dommages sur le
revêtement exposé aux condi-
tions extérieures et l’action de
l’eau peuvent provoquer la cor-
rosion. Les produits chimiques
affectent la protection anticor-
rosion.
DE. Bei der Montage und der
Wartung der Geräte muss da-
rauf geachtet werden, dass
die Pulverbeschichtung nicht
beschädigt wird. Eine Beschädi-
gung kann in Kombination mit
der Wirkung von Wasser zu einer
Korrosion führen. Die chemi-
schen Produkte beschädigen
den Korrosionsschutz.
RU. Во время сборки и
обслуживания приборов
необходимо соблюдать особую
осторожность, чтобы не повредить
порошковое окрашивание.
Повреждение покрытия в сочетании
с воздействием воды может вызвать
коррозию. Химические вещества
повреждают антикоррозионную
защиту.
ITA. E’ consigliabile, nelle appli-
cazioni soggette agli agenti at-
mosferici, utilizzare del grasso al
silicone sui letti delle viti di chiu-
sura dell’apparecchio per facili-
tarne le manutenzioni future.
UK. For an easy maintenance
(unscrewing) of the luminaire we
recommend protecting screws
threads with silicone grease be-
fore exposure to weather.
ESP. Para facilitar el manteni-
miento, en instalaciones expue-
stas a agentes atmosféricos,
se recomienda impregnar de
grasa siliconada las roscas de
los tornillos de cierre del aparato.
FR. Pour une bonne maintenan-
ce des appareils exposés aux
agents atmosphériques, il est
recommandable de protéger
les lets des vis par de la graisse
silicone.
DE. Zur Vereinfachung der
Wartung wird empfohlen, die
Silikonplättchen, die sich auf
dem Gewinde der Verschluss-
Schrauben benden, mit Fett
einzureiben.
RU. Для упрощения сборки
мы рекомендуем использовать
защитную винтовую резьбу с
силиконовой смазкой, что должно
предотвратить негативное
воздействие окружающей среды.
SILICONE
SILICONE
GREASE
GREASE
ITA. Pulire periodicamente gli
apparecchi per rimuovere gli
accumuli di sporco che si depo-
sitano sulle griglie e nella testa
delle viti. Pulire le parti in acciaio
utilizzando appositi detergenti.
Per la pulizia dell’apparecchio
utilizzare un panno morbido e
detergente neutro.
UK. Keep the luminaire clean to
prevent dirt deposit on frames
and screws’ head. On steel parts
use dedicated cleaners only.Use
a soft cloth and neutral soap to
clean the device.
ESP. Limpiar periódicamente los
aparatos para retirar la acumu-
lación de sedimentos deposita-
dos sobre los aros y las cabezas
de los tornillos.Limpiar las partes
de acero utilizando el detergen-
te adecuado. Utilícese un paño
suave y un detergente neutro
para limpiar el producto.
FR. Nettoyez l’appareil périodi-
quement pour éviter l’oxidation
de la collerette et des vis. Net-
toyez les parties en acier avec
des produits spéciques. Utiliser
un chiffon doux et un détergent
neutre pour le nettoyage de
l’appareil.
DE. Die Leuchten regelmäßig
vom Schmutz befreien, der
sich auf den Rastern und den
Schraubenköpfen ansammelt.
Edelstahlteile nur mit dafür geei-
gneten Mitteln reinigen. Das
Gerät mit einem weichen Tuch
und neutralem Reinigungsmittel
reinigen.
RU. Содержите светильник в
чистоте, избегайте накопления
грязи на рамке и головках винтов.
Для стальных деталей используйте
только соответствующие средства.
Используйте мягкую ткань и
нейтральное моющее средство для
очистки прибора.
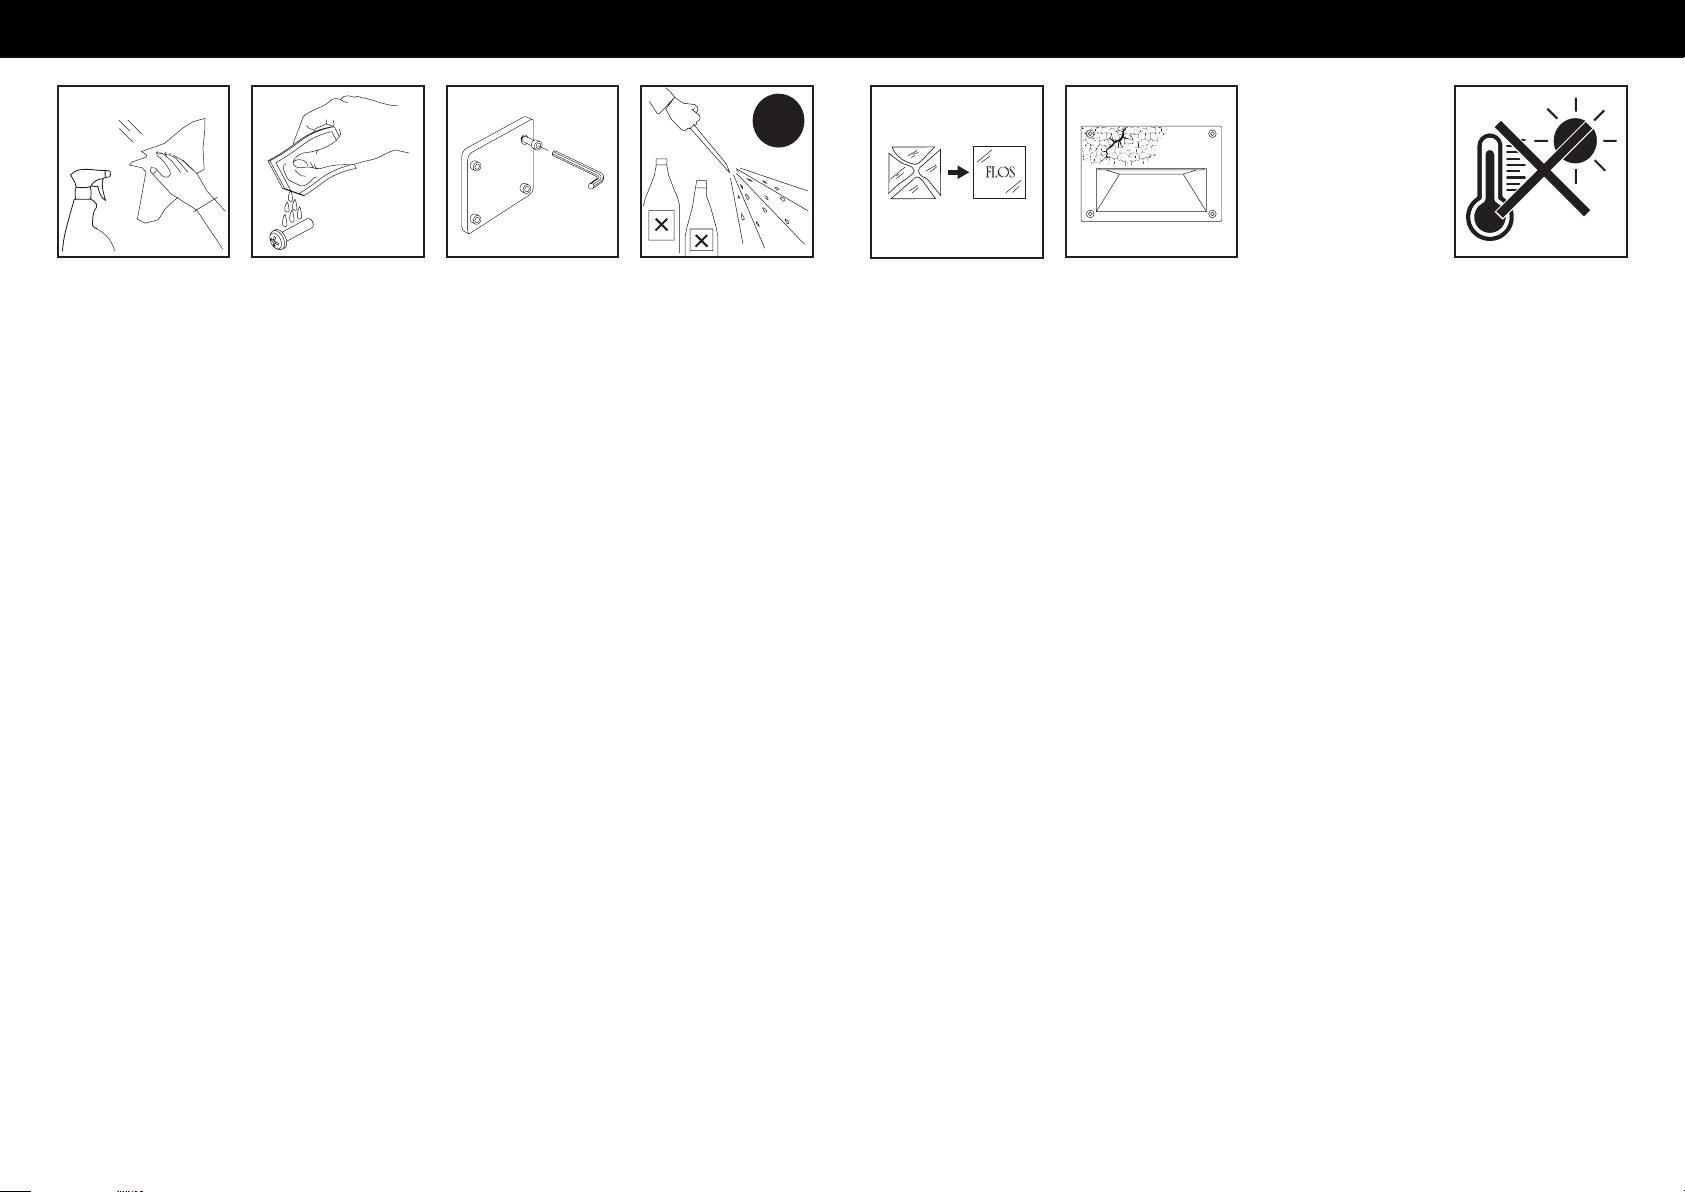
ITA. Alte temperature ambientali
provocate da condizioni clima-
tiche estreme o da altre fonti di
calore riducono la durata e l’ef-
cienza della componentistica o
del modulo LED.
UK. High environmental tem-
peratures caused by extreme
weather conditions or other
heat sources reduce the durabi-
lity and efciency of the compo-
nents or LED module.
ESP. Las altas temperaturas
ambiente provocadas por con-
diciones climáticas extremas u
otras fuentes de calor reducen
la duración y la eciencia de los
componentes o del módulo LED.
FR. Les températures environne-
mentales élevées causées par
des conditions météorologiques
extrêmes ou d’autres sources de
chaleur réduisent la durabilité et
l’efcacité des composants ou
du module LED.
DE. Hohe Umgebungstempera-
turen, die durch extreme Witte-
rungsverhältnisse oder andere
Wärmequellen verursacht wer-
den,reduzieren die Lebensdauer
und Efzienz der Komponenten
oder des LED-Moduls.
RU. Высокая температура воздуха,
вызванная экстремальными
климатическими условиями или
другими источниками тепла,
сокращает срок службы и снижает
эффективность компонентов
светодиодного модуля.
ITA. Sostituire il vetro/diffusore
con ricambio originale FLOS in
caso di rottura.
UK. In case of break of the
glass/diffuser use original FLOS
spare parts only.
ESP. En caso de rotura del cri-
stal/difusor, substituirlo por re-
cambios originales FLOS.
FR. Remplacez le verre/diffuseur
cassé par des pièces de rechan-
ge originales FLOS.
DE. Defekte gläser/diffusor
durch original FLOS Ersatzteile
ersetzen.
RU. Производите замену разбитого
стекла FLOS только оригинальными
запасными частями.
Mile Bollard
ITA. Per tutti gli apparecchi di illuminazione deve essere effettuata a cadenza programmata la manutenzione dell’installa-
zione (norme CEI 64-8 ) che deve prevedere le seguenti operazioni:
- Vericare il serraggio delle viti che ssano le varie parti dell’apparecchio;
- Vericare l’integrità di tutti i pressacavi e dei cavi;
- Vericare il serraggio dei pressacavi;
- Vericare l’integrità e l’elasticità delle guarnizioni che non devono risultare danneggiate;
- In caso di componenti danneggiati essi vanno sostituiti prima di rimettere in servizio l’apparecchio utilizzando solo ricambi
originali.
Si consiglia di effettuare controlli ad ogni sostituzione di lampada o almeno ogni anno, scegliendo il periodo più breve in relazio-
ne al tipo di impianto.
E’ vietato l’uso improprio dell’apparecchio o ogni manomissione del prodotto o modica non autorizzata dalla casa costruttrice
(in caso contrario decade ogni forma di garanzia e responsabilità).
Nel caso in cui ARES dia il consenso al reso degli apparecchi per il controllo,essi dovranno essere restituiti lasciando un pezzo di
cavo di alimentazione di 10/20 cm uscente dall’apparecchio.
UK.All luminaires have to undergo regular maintenance (CEI 64-8 standards) according to the following steps:
- Check the fastening of the screws.
- Inspect cables and cable glands for any possible damage.
- Check the fastening of cable glands.
- Check if seals are in working order.
- Defect or damaged components must be replaced before switching the luminaire on.Use original spare parts only.
It is important to carry out luminaire maintenance at each bulb substitution or at least once per year.
Any improper use or installation, any tampering or any unauthorised modication of the luminaire causes the immediate expiry of
the warranty on the luminaire and of any claim against the manufacturer.
Should Ares allow the return of a luminaire for technical inspection or tests, they must be returned with a piece of wiring cable
(10-20cm connected to the luminaire).
ESP. Para todos los aparatos de iluminación,debe programarse un mantenimiento de la instalación (Norma CEI 64-8) que
prevee las siguientes operaciones:
- Vericar el par de apriete de los tornillos que jan las diferentes partes del aparato.
- Vericar la integridad de todos los prensaestopas y de los cables.
- Vericar el par de apriete del prensaestopas.
- Vericar la integridad y elasticidad de las juntas de goma. En ningún momento pueden estar dañadas.
- En caso de componentes dañados, se substituirán siempre por recambios originales antes de volver a poner en servicio el
aparato.
Se aconsejan controles en cada substitución de la lámpara o al menos una vez al año, lo que antes suceda, en función del tipo
de instalación.
Está prohibido el uso inadecuado del aparato, manipulación del producto o modicación no autorizada del cuerpo constructi-
vo (en caso contrario decaerá la garantía y responsabilidad por parte de ARES).
En el caso de que ARES acepte una devolución del aparato para su examen, se deberán enviar dejando un trozo de cable de
la alimentación saliendo del aparato de al menos 10/20 cms.
FR. Programmez régulièrement l’entretien des appareils (CEI 64-8) selon les étapes suivantes:
- Controlez le serrage des vis.
- Contrôlez l’intégrité du câble et du presse-étoupe.
- Controlez le serrage du presse-étoupe.
- Contrôlez l’intégrité des joints.
- Avant d’allumer l’appareil remplacez tous composants endommagés par des pièces de rechange originales.
Effectuez l’entretien de l’appareil après chaque remplacement de l’ampoule ou au moins une fois par an.
La garantie perd toute validité en cas d’utilisation ou installation inexacte ou de modication non autorisée de l’appareil.
En cas de retour de l’appareil pour contrôle technique, après autorisation de Ares,veuillez le rendre avec un morceau de câble
de 10-20cm connecté à l’appareil.
DE. Bei allen Leuchten gilt es, in festgelegten Rhytmen,Installationswartungen durchzufürhen (Norm CEI 64-8). Diese bein-
halten folgenden Aktionen:
- Prüfen der Anzugskraft der Schrauben, die die einzelnen Teile der Leuchte verbinden.
- Überprüfen der Kabelklemmen und Kabel auf Defekte.
- Anzugskraft der Kabelklemmen prüfen.
- Prüfen der Unversehrtheit und Elastizität der Dichtungen,sie dürfen nicht gequetscht sein.
- Beschädigte Komponenten durch Originalteile austauschen,bevor die Leuchte erneut in Betrieb genommen wird.
Es wird empfohlen, bei jedem Leuchtmitteltausch oder wenigstens einmal pro Jahr, die Kontrolle durchzuführen.Bei Leuchtmitteln
mit kürzerer Lebensdauer genügt hingegen eine jährliche Durchsicht.
Missbräuchliche Verwendung, jegliche Produktfälschung oder Änderungen, die vom Hersteller nicht genehmigt wurden, sind
verboten (dies entgegengesetzt verfällt jede Garantie und Haftung).
Im Reklamationsfall müssen die Leuchten mit einem 10-20 cm langen Stück montiertem Stromkabel zurück geschickt werden,
sofern Ares seine Zustimmung zum Retournieren gibt und sie überprüft.
RU. Все светильники должны подвергаться регулярному обслуживанию (стандарт CEI 64-8) согласно следующим пунктам:
-Проверьте, достаточно ли плотно закручены винты.
-Осмотрите кабели и кабельные входы на возможные повреждения.
-Проверьте, достаточно ли плотно затянуты кабельные вводы.
-Проверите, на своих ли местах находятся прокладки и изоляция.
-Поврежденные или неисправные детали должны быть заменены до включения светильника. Используйте только оригинальные запасные
части.
Важно выполнять осмотр светильника при каждой замене лампы или, по крайней мере, один раз в год.
Любые неправильные установка или использование, любые манипуляции или несанкционированное изменение прибора являются основанием
для немедленного снятия прибора с гарантии и отказа заводом в удовлетворении любых претензий.
В случаях если ARES позволил вернуть светильник для технической инспекции или тестов, он должен быть возвращен с кабелем питания (не
менее 10-20 см соединенные со светильником).
Mile Bollard
- Stagno alla polvere e protetto contro i getti d’acqua IP65
- Apparecchio di classe I
- Protezione contro gli urti IK09
- Marcatura
- Dust-tight and protected against waterjets IP65
- Class I
- Protection against impact IK09
- Marking
- Protection contra el polvo y salpicaduras de agua IP65
- Luminaria de classe I light xture
- Protección contra impactos IK09
- Marcado
- Étange aux poussières et protegé contre les jets d’eau IP65
- Peut étre installé sur surfaces normalement inammables
- Appareil de classe I
- Protection contre les impacts IK09
- Marquage
- Staubdicht.Schutz gegen Strahlwasser aus allen Richtungen IP65
- Schutzklasse I
- Stoßfestigkeitsgrad IK09
- Kennzeichnung
-пыленепроницаем и защищен от капель IP65
-светильник Class I
-Защита от ударов класс защиты IK09
-Маркировка
IP65 IK09
MILE BOLLARD 1 600 MONO
MILE BOLLARD 1 900 MONO
220÷240V/50-60Hz
Total power 4,9W
CLASS I
MID-POWER LED
2700K_3000K_4000K
Integral electronic power supply
MILE BOLLARD 1 600 DOUBLE
MILE BOLLARD 1 900 DOUBLE
220÷240V/50-60Hz
Total power 8,1W
CLASS I
MID-POWER LED
2700K_3000K_4000K
Integral electronic power supply
MILE BOLLARD 2 600 MONO
MILE BOLLARD 2 900 MONO
220÷240V/50-60Hz
Total power 7,8W
CLASS I
MID-POWER LED
2700K_3000K_4000K
Integral electronic power supply
MILE BOLLARD 2 600 DOUBLE
MILE BOLLARD 2 900 DOUBLE
220÷240V/50-60Hz
Total power 13,5W
CLASS I
MID-POWER LED
2700K_3000K_4000K
Integral electronic power supply
ITA. La sicurezza dell’apparecchio è garantita solo rispet-
tando le normative europee del settore elettrico e le istru-
zioni contenute in questa scatola: pertanto è necessario
conservarle. Il rispetto di queste istruzioni è fondamentale
per il corretto funzionamento dell’apparecchio e dell’im-
pianto.
UK. For safety to be assured, the tting has to be installed
and used properly, in compliance with EU Regulations and
Directives on electrical and electronic equipments and
with the mounting instructions included in the present box:
please keep this instruction data sheet for future reference.
ESP. La seguridad del aparato se garantiza únicamente re-
spetando las normativas europeas del sector eléctrico y
las instrucciones contenidas en esta caja, por lo tanto es
necesario conservarlas. La observación de estas instruc-
ciones es fundamental par el correcto funcionamiento del
aparato y de la instalación.
FR.La sécurité de l’appareil ne peut être assurée que par un
strict respect des Normatives Européennes sur les équipe-
ments éléctriques et des instructions suivantes. Gardez ces
istructions pour des consultations ultérieures.
DE. Die Leuchtensicherheit ist nur gewährleistet, wenn die
europäischen Normen des Elektroniksektors und die hier
beigelegte Montageanleitung befolgt werden. Aus diesem
Grund sollte sie aufbewahrt werden. Die Beachtung der
Anleitung ist Voraussetzung für die einwandfreie Funktion
der Leuchte und der Installation.
R U . Для соблюдения мер безопасности убедитесь, что прибор
будет установлен и использоваться согласно настоящей
инструкции в соответствии с нормами и правилами ЕС по
электричеству и электрооборудованию. Пожалуйста, сохраните
инструкцию для будущих обращений.

This manual suits for next models

7

Other FLOS Outdoor Light manuals

FLOS CAPTAIN FLINT User manual

FLOS

FLOS CAPTAIN FLINT User manual

FLOS Clessidra User manual

FLOS

FLOS Clessidra User manual

FLOS BELLHOP User manual

FLOS

FLOS BELLHOP User manual

FLOS IC F Outdoor User manual

FLOS

FLOS IC F Outdoor User manual

FLOS SERENA F6582030 User manual

FLOS

FLOS SERENA F6582030 User manual

FLOS MILE WALL Series User manual

FLOS

FLOS MILE WALL Series User manual

FLOS Michael Anastassiades COPYCAT F1952030 User manual

FLOS

FLOS Michael Anastassiades COPYCAT F1952030 User manual

FLOS TOIO User manual

FLOS

FLOS TOIO User manual

FLOS ARCO User manual

FLOS

FLOS ARCO User manual

FLOS ARES Pan User manual

FLOS

FLOS ARES Pan User manual

FLOS In Vitro Unplugged User manual

FLOS

FLOS In Vitro Unplugged User manual

FLOS TILEE User manual

FLOS

FLOS TILEE User manual

FLOS SERENA F6582054 User manual

FLOS

FLOS SERENA F6582054 User manual

FLOS Melrie User manual

FLOS

FLOS Melrie User manual

FLOS SUPERARCHIMOON OUTDOOR User manual

FLOS

FLOS SUPERARCHIMOON OUTDOOR User manual

FLOS GAKU User manual

FLOS

FLOS GAKU User manual

FLOS BELLHOP User manual

FLOS

FLOS BELLHOP User manual

FLOS KLEIN PRO User manual

FLOS

FLOS KLEIN PRO User manual

FLOS IPNOS User manual

FLOS

FLOS IPNOS User manual

FLOS ROMEO MOON/SOFT F User manual

FLOS

FLOS ROMEO MOON/SOFT F User manual

FLOS JASPER MORRISON GLO-BALL F Series User manual

FLOS

FLOS JASPER MORRISON GLO-BALL F Series User manual

FLOS SUPERLOON User manual

FLOS

FLOS SUPERLOON User manual

FLOS Tatou Table F7761009 User manual

FLOS

FLOS Tatou Table F7761009 User manual

FLOS 45 ADJ User manual

FLOS

FLOS 45 ADJ User manual

Popular Outdoor Light manuals by other brands

Kichler Lighting HELEN 37536 instructions

Kichler Lighting

Kichler Lighting HELEN 37536 instructions

Thorn OXANE L installation instructions

Thorn

Thorn OXANE L installation instructions

esotec Solar Globe Light multicolor 20 operating instructions

esotec

esotec Solar Globe Light multicolor 20 operating instructions

mitzi HL200201 ELLIS Assembly and mounting instructions

mitzi

mitzi HL200201 ELLIS Assembly and mounting instructions

HEPER TILA S AFX 3 Module Installation & maintenance instructions

HEPER

HEPER TILA S AFX 3 Module Installation & maintenance instructions

Designplan TRON 180 installation instructions

Designplan

Designplan TRON 180 installation instructions

Sealey LED37 instructions

Sealey

Sealey LED37 instructions

nordlux VEJERS Mounting instruction

nordlux

nordlux VEJERS Mounting instruction

SImx ELITE LED LHTC637 installation instructions

SImx

SImx ELITE LED LHTC637 installation instructions

GEV CAROLINE 10833 manual

GEV

GEV CAROLINE 10833 manual

WE-EF PFL540 LED Installation and maintenance instructions

WE-EF

WE-EF PFL540 LED Installation and maintenance instructions

HEPER DOGO Side LW6048.585-US Installation & maintenance instructions

HEPER

HEPER DOGO Side LW6048.585-US Installation & maintenance instructions

BEGA 84 253 Installation and technical information

BEGA

BEGA 84 253 Installation and technical information

HEPER LW8034.003-US Installation & maintenance instructions

HEPER

HEPER LW8034.003-US Installation & maintenance instructions

HEPER MINIMO Installation & maintenance instructions

HEPER

HEPER MINIMO Installation & maintenance instructions

LIGMAN BAMBOO 3 installation manual

LIGMAN

LIGMAN BAMBOO 3 installation manual

Maretti TUBE CUBE WALL 14.4998.04 quick start guide

Maretti

Maretti TUBE CUBE WALL 14.4998.04 quick start guide

Maxim Lighting Carriage House VX 40428WGOB installation instructions

Maxim Lighting

Maxim Lighting Carriage House VX 40428WGOB installation instructions

manuals.online logo
manuals.online logoBrands
  • About & Mission
  • Contact us
  • Privacy Policy
  • Terms and Conditions

Copyright 2025 Manuals.Online. All Rights Reserved.