manuals.online logo
Brands
  1. Home
  2. •
  3. Brands
  4. •
  5. Forest garden
  6. •
  7. Garden House
  8. •
  9. Forest garden ODA810DD User manual

Forest garden ODA810DD User manual

8’ x 10’
Overlap Workshop
Issue 0215
FELT
B
60360200A1
TRUSS SUPPORT QTY 2
ODA8PE
PLAIN END
ODA810WS
WINDOW PANEL
QTY 2
ODA810PS
PLAIN PANEL
QTY 2
WS10X8FL
FLOOR
QTY 2
85052 QTY 3
C D E G IF
28120675PARDTR
675mmm STRIP QTY 2
OPA8TRUSS
TRUSS
A
ODA810DD PARTS LIST
4
3
154013408
ROOF SHEET
QTY 4
DDRDT
DOOR QTY 2
ODA8DE
DOOR END
90121375AII74DT
1375mm BARGE BOARD QTY 4
60151710DT
1710mm CORNER STRIP QTY 6
45281462
1462mm BATTEN QTY 8
H
O
L
N
H
J
2
45451630DT
1630mm BATTEN QTY 1
M
P
Floor
Top View
M
5 I
K
45281540
1540mmm BATTEN QTY 4
Q
32161695DTR
1695mm BATTEN QTY 2
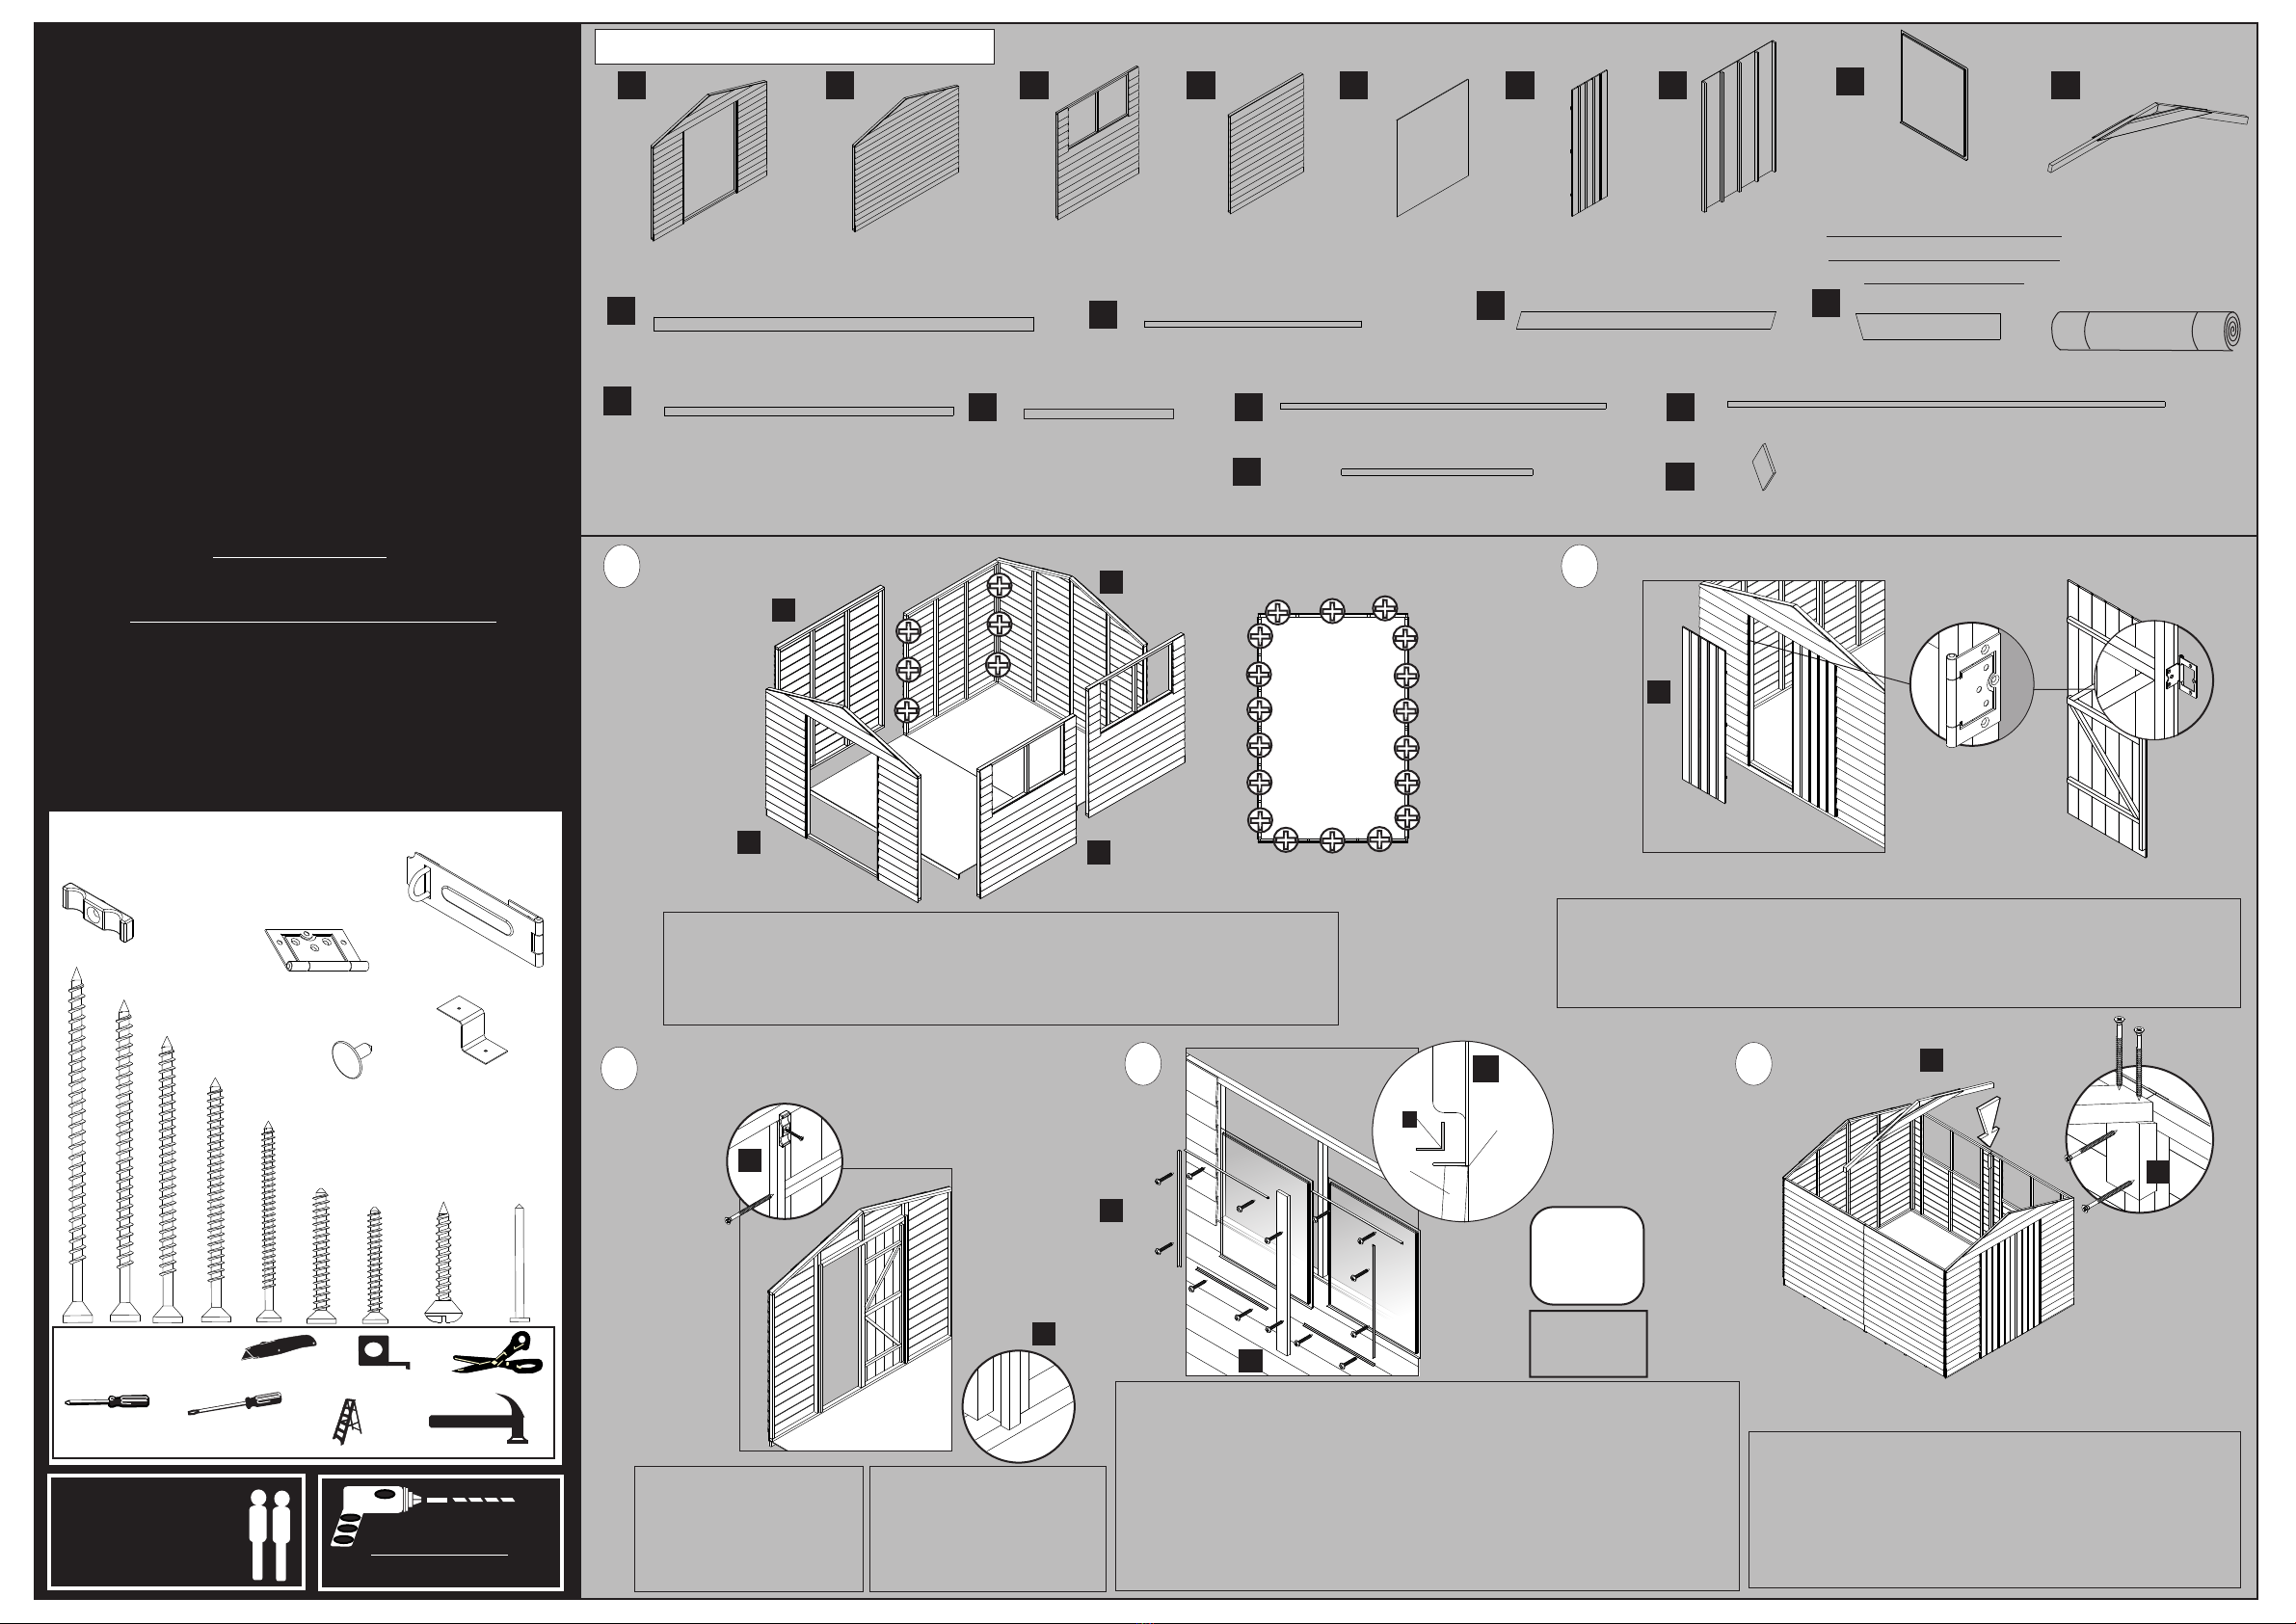
Important : Assembly of
this shed requires a
minimum of two adults. Must Pre-drill for
each screw used.
PCWIN1
WINDOW QTY 4
The windows are packed
together tightly, separate
before assembly.
R
1
84996
675mmm PLASTIC STRIP QTY 8
SFIN20010512DT
FINIAL QTY 2
Place the hinge against the inside of the door frame and position the large section of the hinge so
that it is flush with the inside of the framing as shown and fix with 25mm screws.
Open the hinge and fix the smaller section to the door framing. Again make sure that the hinge is
flush and that the holes are positioned so that the 25mm screws locate correctly into the batten.
Place the two floor sections together and position the panels on top of the completed floor. Make
sure that all the panels are tight and flush before fixing them to each other using 3x50mm screws.
When the panels are secured to each other, make sure they are flush and fix to the floor using
3x50mm screws for each panel. Make sure that the screws locate into the bearers underneath.
Place the window from the outside so that the lip sits on the bottom board as shown.
Place the plastic strips at the top and bottom of the window so that one side butts up
against the cladding. Fix each strip in place using 2 x security screws.
Position the remaining strip vertically against the outer edge of the window so that one
side of the strip butts up against the cladding.
Place one 675mm wooden strip in the middle so that it overlaps the window equally on
both sides and the remaining strip on the door side of the window. Again fix each wooden
strip in place using 2 x security screws.
Q
32mm
Fix the 1630mm batten against the
end of the door using 3x70mm
screws. Make sure it is flush with the
door end framework.
Fix a turn button to the top and
bottom of the batten using 1x30mm
(zinc) screw for each.
Place the 1695mm batten against the
inside of the door end so that the
batten is covering the gap between
the door end and the door. Fix this in
place using 3x30mm screws.
Repeat for the opposite side of the
door way.
Board
H
Lip
P
Attention:
Take care when
placing the
screws. These
can not be
backed out.
You may need to
cut the plastic
strips to size using
a pair of scissors
Place and secure each angled block using 2x70mm screws. Make
sure these are 1470mm from the floor level and are tight against the
framework.
Place the truss so that is sits on the angled blocks. Secure this in
place by screwing down through the truss into the blocks using 2 x
90mm screws for each end.
O
R
REQUIRED TOOLS :
(NOT SUPPLIED)
HAMMER
SHARP KNIFE SCISSORS
FLAT HEAD
SCREWDRIVER
POZI DRIVE
SCREWDRIVER
TAPE MEASURE
LADDER
Fixing Pack (OPA812DDFP)
This fixing pack is used for several products.
There may be additional fixings.
Not to Scale
Turn Button
Qty 2
Z’ bracket
Qty 16
70mm Screw Qty 7
50mm Screw Qty 36
10mm Felt tacks
Qty 110
25mm Screw Qty 61
30mm Screw Qty 18
30mm Nail Qty 90
Flush Hinge
Qty 4
25mm Countersunk
Security Screws Qty 40
Hasp & Staple
40mm Screw Qty 18
80mm Screw Qty 3
90mm Screw Qty 4
IMPORTANT, RETAIN FOR FUTURE REFERENCE; READ
CAREFULLY
This building is pre-treated with a factory base coat for
protection during storage and transit. We recommend that
you treat your new building as soon as possible after
assembly using a wood preservative treatment. Apply in
accordance with the manufacturers instructions.
- This product must be built on a solid level base.
- The roof of this building is not a load bearing structure.
- Please keep all plastic bags and small parts away from
children.
- Timber is a natural material. It will shrink and swell as a
result of varying moisture content.
- Due to the nature of the material the doors may need some
trimming for a neater fit.
Technical Helpline: 0333 7777 089 8.30am and 5.00pm
Monday to Friday.
Please check all parts prior to assembly
Assembly of damaged parts may be deemed to be
acceptance and this may affect the remedies you are entitled
to.
If the product is not constructed in accordance with the
instructions, or is altered in anyway (e.g. painted), the
manufacturer cannot be held liable for any resulting damage.
D
AC
B
J
P
F
Forest Garden Ltd, Unit 288 Hartlebury Trading Estate, Hartlebury, Worcestershire, DY10 4JB
9
L
Maintenance.
We recommend that you treat your shed at the beginning of each season with a wood preservative treatment. Apply in
accordance with the manufacturers instructions.
Regularly check all fixings are secure.
Biocidal Product Regulation (EU 528/2012) Article 58 Information
This article contains timber treated with Celcure AC-500, incorporating biocidal products to give protection against wood destroying insects & wood rotting fungi.
Contains: Basic copper carbonate (Copper (II) carbonate – Copper (II) hydroxide (1:1)), Boric acid, Benzalkonium chloride.
Wear gloves when handling freshly treated wood. Avoid breathing dust when cutting treated or untreated wood. Dispose of off-cuts responsibly – do not burn.
7
E
K
Attention
Take care when
cutting and trimming
the roof felt.
Unroll the felt and place a section on to each eaves so that there is a 50mm overhang on the
three edges as shown. Fix this to the roof using felt nails spaced in 150mm intervals. Cut and
fold the corners securing with a single felt nail for each.
Place the two remaining sections as shown making sure that the last piece overlaps the others.
Again secure each sheet in place using felt nails spaced in 150mm intervals.
10 11
8
5
N
Secure a Z’ bracket to each end of the 1462mm battens using a single
25mm screw for each bracket. Position the battens as shown so that there
is four battens on either side of the truss and the Z’ bracket sits on the
framework. Secure the battens in position using a 25mm screw for each Z’
bracket. You will need to stagger the battens to allow the bracket to sit
properly on the truss.
S
Before fixing the Hasp to the door, make sure that it is in line with the framing
on the reverse of the door and that it closes over the Staple. Fix this in place
using 2 x 25mm screws.
Position the Staple opposite, again making sure that it is in line with the
framing behind and fix it in place using 3 x 25mm screws.
6
Place the barge boards against the ends of the workshop so that they are flush
with the overhang of the roof and in line with the top. Fix each in place using
4x40mm screws.
Place the finial over the top where the barge boards meet and fix it in place
using 2 x 30mm screws.
Repeat for the opposite end of the shed.
Lift the roof sections into place making sure that they are in line with
the apex and the front and back panels of the shed.
Fix the roof in place using 30mm nails spaced in approximately
300mm intervals (Make sure the nails locate into the framework of
the truss and panels)
Place a roof sheet on top of one of the 1540mm
battens. Make sure the board is sat on the narrow side
of the batten and that it is flush on all sides. Fix this in
place using 30mm nails spaced in 300mm intervals.
Repeat for each roof sheet.
Place the 1710mm strips so that they cover the joins at
each corner and between the panels. Fix each corner
strip in place using 3x30mm screws and each middle
strip with 3 x 40mm screws
J

Other Forest garden Garden House manuals

Forest garden ODA46 User manual

Forest garden

Forest garden ODA46 User manual

Forest garden TPCS88 User manual

Forest garden

Forest garden TPCS88 User manual

Forest garden OPP64NWM User manual

Forest garden

Forest garden OPP64NWM User manual

Forest garden ODA68M User manual

Forest garden

Forest garden ODA68M User manual

Forest garden ODR86 User manual

Forest garden

Forest garden ODR86 User manual

Forest garden SDA68ON User manual

Forest garden

Forest garden SDA68ON User manual

Forest garden 8' x 6' Overlap Apex Shed User manual

Forest garden

Forest garden 8' x 6' Overlap Apex Shed User manual

Forest garden BCSHSL77 User manual

Forest garden

Forest garden BCSHSL77 User manual

Forest garden OPA810DD User manual

Forest garden

Forest garden OPA810DD User manual

Forest garden SUMMERHOUSE User manual

Forest garden

Forest garden SUMMERHOUSE User manual

Forest garden Overlap Apex Shed 6 x 4 User manual

Forest garden

Forest garden Overlap Apex Shed 6 x 4 User manual

Forest garden Overlap Apex Shed 7' x 5' User manual

Forest garden

Forest garden Overlap Apex Shed 7' x 5' User manual

Forest garden CSHSL66 User manual

Forest garden

Forest garden CSHSL66 User manual

Forest garden 8' x 6' Shiplap Apex Shed User manual

Forest garden

Forest garden 8' x 6' Shiplap Apex Shed User manual

Forest garden Overlap Apex Shed Operator's manual

Forest garden

Forest garden Overlap Apex Shed Operator's manual

Forest garden RETREAT SHED FRA46 User manual

Forest garden

Forest garden RETREAT SHED FRA46 User manual

Forest garden SDA68 User manual

Forest garden

Forest garden SDA68 User manual

Forest garden TPC77 User manual

Forest garden

Forest garden TPC77 User manual

Forest garden TRADSUMV2FP User manual

Forest garden

Forest garden TRADSUMV2FP User manual

Forest garden MODULAR PERGOLA User manual

Forest garden

Forest garden MODULAR PERGOLA User manual

Forest garden OPASUM75M User manual

Forest garden

Forest garden OPASUM75M User manual

Forest garden FRA46 User manual

Forest garden

Forest garden FRA46 User manual

Forest garden 8 x 8 Summer House User manual

Forest garden

Forest garden 8 x 8 Summer House User manual

Forest garden OPA68DD User manual

Forest garden

Forest garden OPA68DD User manual

Popular Garden House manuals by other brands

Big Game hunters Evermeadow instructions

Big Game hunters

Big Game hunters Evermeadow instructions

Lemeks Palmako Britta FRF40-4141 installation manual

Lemeks

Lemeks Palmako Britta FRF40-4141 installation manual

OLT GS124-SLIDER-PLY-FJ Assembly manual

OLT

OLT GS124-SLIDER-PLY-FJ Assembly manual

Palmako FRBC44-5540 installation manual

Palmako

Palmako FRBC44-5540 installation manual

finnhaus ELEGANTO Assembly instructions

finnhaus

finnhaus ELEGANTO Assembly instructions

Bertsch HolzBau MH2 2121 S Assembly instructions

Bertsch HolzBau

Bertsch HolzBau MH2 2121 S Assembly instructions

Lemeks Palmako EL18-3345 Assembly, installation and maintenance manual

Lemeks

Lemeks Palmako EL18-3345 Assembly, installation and maintenance manual

Palmako Lotta installation manual

Palmako

Palmako Lotta installation manual

Palmako FRI28-4242FSC installation manual

Palmako

Palmako FRI28-4242FSC installation manual

STILLA S3081 Assembly instructions

STILLA

STILLA S3081 Assembly instructions

Luoman Lillevilla Pemu Assembly and Maintenance

Luoman

Luoman Lillevilla Pemu Assembly and Maintenance

Mercia Garden Products 03DTSHPN0806FGD1TW-V1 manual

Mercia Garden Products

Mercia Garden Products 03DTSHPN0806FGD1TW-V1 manual

ABSCO SHEDS 23301GK Assembly instructions

ABSCO SHEDS

ABSCO SHEDS 23301GK Assembly instructions

telluria DUO 2721 Assembly instructions

telluria

telluria DUO 2721 Assembly instructions

Palmako FR44-4836 installation manual

Palmako

Palmako FR44-4836 installation manual

Palmako FRI40-5050 installation manual

Palmako

Palmako FRI40-5050 installation manual

Waltons 12x8 COMBI SUMMERHOUSE V7 General instructions

Waltons

Waltons 12x8 COMBI SUMMERHOUSE V7 General instructions

GARDIVAL Vintage manual

GARDIVAL

GARDIVAL Vintage manual

manuals.online logo
manuals.online logoBrands
  • About & Mission
  • Contact us
  • Privacy Policy
  • Terms and Conditions

Copyright 2025 Manuals.Online. All Rights Reserved.