FREERIDER FR168-4S Operator's manual

FR168-4S/ FR168-4S2b
USERS INSTRUCTION
MANUAL
USERS INSTRUCTION
MANUAL
USERS INSTRUCTION
MANUAL
USERS INSTRUCTION
MANUAL
ATTENTION
Read all parts in this
manual beforeoperating
your scooter
ATTENTION
Read all parts in this
manual beforeoperating
your scooter
ATTENTION
Read all parts in this
manual before operating
your scooter
ATTENTION
Read all parts in this
manual before operating
your scooter
FR510DXs2b

Using your product safely depends upon your diligence in
following the warnings, cautions and instructions in this
manual. Using your Scooter safely also depends upon your
good judgment and / or common sense, as well as that of
your Provider, Carer or Health Professional. Always think
safety!
FOREWORD
Battery and battery charging . . . . . . . . . . . . . . . . . . . . 23
Care and maintenance. . . . . . . . . . . . . . . . . . . . . . . . . 26
Basic fault finding . . . . . . . . . . . . . . . . . . . . . . . . . . . . 30
Technical specification. . . . . . . . . . . . . . . . . . . . . . . . . 33
Circuit diagrams. . . . . . . . . . . . . . . . . . . . . . . . . . . . . 38
Advisory safety notice . . . . . . . . . . . . . . . . . . . . . . . . . 39
Scooter spare parts . . . . . . . . . . . . . . . . . . . . . . . . . . 39
Optional accessories . . . . . . . . . . . . . . . . . . . . . . . . . . 40
Guarantee terms . . . . . . . . . . . . . . . . . . . . . . . . . . . . 41
Service history . . . . . . . . . . . . . . . . . . . . . . . . . . . . . . 42
Please keep in mind that the operator of the Scooter is
responsible for hazards occurring to other people or
their property.
Congratulations on purchase of your Scooter.
Please read this User Instruction Manual carefully
before your attempt to operate Scooter. Your User
Instruction Manual will assist you to get the most
from your machine.
This manual contains important information regarding
the safe operation and maintenance of your
Scooter. Before beginning to use your Scooter, make
sure you completely read and understand all
instructions thoroughly. Please observe the "Rules for
safe use"and the Safety Instructions outlined on
page of this manual. If you have any queries
concerning operation or maintenance, consult your
authorized dealer.
5,12
Please read and follow all instructions in this Users
Instruction Manual before attempting to operate your
Scooter for the first time. If there is anything
in this manual that you do not understand, or if you
require additional assistance for setting it up , contact
your Authorized Agent.
CONTENTS
Introduction . . . . . . . . . . . . . . . . . . . . . . . . . . . . . . . . . 2
Product description. . . . . . . . . . . . . . . . . . . . . . . . . . . . 3
Purpose of your Scooter . . . . . . . . . . . . . . . . . . . . . . . 5
Rules for safe use. . . . . . . . . . . . . . . . . . . . . . . . . . . . . . 5
Getting to know your Scooter. . . . . . . . . . . . . . . . . . . . . 7
Operating your Scooter. . . . . . . . . . . . . . . . . . . . . . . . . 8
Freewheeling your Scooter . . . . . . . . . . . . . . . . . . . . . .12
Safety instructions and warnings . . . . . . . . . . . . . . . . . . 12
Safety warning & instruction labels . . . . . . . . . . . . . . . . 16
Learning to get about . . . . . . . . . . . . . . . . . . . . . . . . . 16
Transporting your Scooter . . . . . . . . . . . . . . . . . . . . . 19
INTRODUCTION
Your Scooter has numberous features not found on
other power Scooters. With proper care and
maintenance, you will enjoy many years of dependable
service.
Your Scooter needs to receive maintenance at
regular intervals and should be inspected frequently
for proper mechanical operation. Troubles shooting
Guidelines, methods of detecting improper operation
and making minor adjustments are included in manual.
Follow all recommendations to obtain trouble free, safe
and enjoyable operation of your Scooter.
Please remember that when it comes to service and
repairs, your authorized dealer knows your Scooter
best.
2

Rear-wheel drive via sealed drive axle
36 A/H sealed non-maintenance lead-acid batteries.
Automatic charging system.
Off-board charging facility.
Seat with folding backrest, height adjustment and
adjustable width arm-rests.
Seat rotates and is fully adjustable forwards and backwards
and for height.
Multi-positional handle bars for greater comfort, driving
mirror, front basket for storing personal items.
A simple 'wig-wag' tyre control lever situated on the
handlebar, controls speed, braking and direction.
Steering is controlled by handlebar attached to a linkage
system containing front wheels for
.
1
2
3
4
5
6
7
8
9
10
11
12
13
Steering handlebars
Drive mirror
Console
Charging socket
Basket
Front light
Direction indicator lights
Front bumper
Amber side reflectors
Floor mat
Pneumatic wheels with grey tyres
Rear lights and indicators
Adjustable angle seat with backrest
1
2
3
4
5
6
7
8
9
10
11
12
13
3
PRODUCT DESCRIPTION
Steering is controlled by handlebar attached to a fork system
containing the single front wheel for FR168-3/FR168-3S.
'System-of-the-art' micro-controller electronics ensure a
smooth, comfortable and safe drive on all surfaces and
gradients.
Two piece steel chassis for ease of transporting.
Your scooter can be dismantled into separate components
without the use of tools for ease of transporting. However,
your scooter is not designed to transport the user in a
moving vehicle; for advice on transporting consult your
selling agent.
Your Scooter should be serviced as recommended by
an approved distributor in order to ensure safe,
reliable operation. For details and list of options available
for user, refer to accessories section of this manual.
FR168-3/FR168-3S
FR510DXs2b FEATURE GUIDE
12
2
4
10
8
11
7
1
3
69
5
13

1
2
3
4
5
7
8
9
10
11
12
13
Adjustable steering handlebars
Driving mirror
Console
Charging socket
Basket
Front light
Direction indicator lights
Front bumper
Amber side reflectors
Floor mat
Pneumatic wheels with grey tyres
Rear lights and indicators
Adjustable angle seat with backres
6
1
2
3
4
5
6
7
8
9
10
11
12
13
FR168-4S/FR168-4S2b FEATURE GUIDE
4
12
2
4
10
8
11
1
3
6
9
5
13
7

Your Scooter is suitable for persons who
require independent mobility combined
with comfort, maneuverability,reliability
and a product that needs a minimal
amount of maintenance.
The intended user should possess some degree of ability with
the use of both arms and hands, reasonable balance and
eyesight, and a degree of spatial awareness. The user should
have received training in the use of the product, preferably in
their normal environment. The maximum user weight for your
Scooter can be found in the rear of this manual,
under'Technical Specification'(see page 33,34).
Your Scooter is suitable for use indoors in shopping malls or
precincts for example, or outdoors on dry, smooth level
surfaces. It climbs slopes safely up to 8 rain or snow, on
loose slippery surfaces and slopes or on wet grass etc.,
which could become a danger to the rider. Passengers must
not be carried. Excess baggage outside of the seating area
can affect stability.
Your Scooter is a 'Class 2' (B) * vehicle and designed for
pavement use only. The Scooter must only be used on the
road with caution if a pavement is not available. It is designed
for a single occupant who experiences difficulty or discomfort
when walking for prolonged periods, but has the use of both
legs and the physical, visual and cognitive ability to operate
the Scooter safely.
Do not drive your Scooter if you are under the influence of
alcohol, drugs or medication that may affect your ability. If in
doubt consult your doctor. As a pavement user you should
PURPOSE OF YOUR SCOOTER
Warning:
Cautions:
These symbols below are used in this owner manual to
identify and warnings and cautions. It is very important for
you to read and understand them.
Failure to note the warnings in this users
manual may result in personal injury.
Failure to observe the cautions in this
users manual in damage to your scooter.
Your scooter is a powerful machine, for your safety
and the safety of bystanders, please read all of the
instruction in this manual before operating your scooter, they
have been prepared from years of experience with this tyre of
equipment.
Follow notes carefully to ensure safety at all times.
Always make certain your machine is in full working order
before starting your journey.
Warning:
Cautions:
familiarize yourself with the current editions of the Highway
Code.
Electrically powered scooter are classified in the following
categories :
Class 2 as defined in "The use of invalid carriages on the
Highways Regulations 1988"
A scooter tyre invalid carriage designed for the use on the
footway, with maximum speed up to 4 M.P.H.
Class 'B', as defined in The European Standard EN12184
:1999. A scooter sufficiently compact and maneuverable for
some indoor environments and capable of traveling over
longer distances and negotiating outdoor obstacles.
* DEFINITION* DEFINITION
RULES FOR SAFE USE
1. Do not ride your scooter without reading this instruction
manual. Also read all of safety instructions and warnings
starting on page12 of this manual.
2. Only drive your scooter if your health condition will allow
you to be safe.
3. Do not exceed the maximum safe gradient outlined for
your vehicle (see Technical Specification, page 33).
Always have the anti-tipping wheels fitted
when outdoors or on rams indoors (see Fig18 page19).
4. Do not carry passengers or exceed the maximum carrying
weight.
5. Do not mount or dismount your scooter unless it is
switched off with the freewheel device fully engaged.
Warning:Warning:
5

6. Do not switch your scooter 'on' with the forward/reverse
lever depressed. Do not hang bags etc over
your steering handlebars, always use the front basket.
Failure to observe this warning may interfere with your
controls and put you and other at risk.
7. Do not mount or dismount your scooter unless the
speed adjustment dial is set to minimum.
8. Do not reverse your scooter onto uneven inclines or
surfaces. Be cautions when traversing slopes.
9. Do not drive your Scooter in a confined space unless the
speed adjustment dial is set low.
10. Do not turn suddenly at full speed, especially on uneven
or sloping ground.
11. Do not drive your Scooter where you cannot safely or
legally walk. Obey the Highway Code.
12. Do not drive your Scooter unless the seat is locked into
the driving position.
13. Do not drive your scooter with the handlebar adjustment
lock, in the unlocked position.
14. Do not drive your scooter over deep, soft terrain
(eg. soft earth, deep grass, snow).
15. Do not drive when under the influence of alcohol or certain
drugs which may impair your safety.
16. Avoid climbing or descending kerbs, you may ground your
chassis and fall over.
17. Always approach small obstacles "straight on" and at slow
speed. Do not attempt to climb or descend kerbs. This may
damage your Scooter
18. Always stop fully before changing dissection
(forward or reverse).
19. Always keep your feet on the vehicle when driving.
20. Always proceed carefully while riding, especially as you
approach the downgrade of a ramp.
21. Always avoid uneven surfaces.
22. Always consult your physician or a therapist if in doubt
about your ability to operate a Scooter.
23. Transport- Do not sit on your scooter while it is in a
moving vehicle. Always strap down your scooter then
transfer to the vehicle seat.
24. The batteries fitted to your scooter are Maintenance
free and do not require topping up with distilled water.
Do not attempt to remove the safety values situated in
the top of the battery. Failure to observe this warning
Warning:Warning:
will invalidate your battery guarantee.
25. Do not drive your Scooter through deep water or clean
with a high pressure hose.
26. Do not drive your Scooter through sea sand or sea water,
this is very corrosive. Always wash salt splashing from the
metal parts of your scooter with hot soapy water as soon
as possible. This is also important during the winter
mouths when roads and pavements have been treated with
sal1t to prevent icing.
Please remember you are a motorized pedestrian and must
observe all rules and regulations of other pedestrians
wherever possible. Your scooter has not been designed for
use on normal roads, except for crossing between pavements
and where a pavement is not available.
Please have a safe journeyPlease have a safe journey
6

COMFORT-
VERSATILITY-
SERVICE-
Your scooter is delivered in a strong tri-wall carton.
When unpacking the carton, first remove all of the sharp
metal staples which are located in the top. Carefully dispose
of the staples to avoid injury. Remove all packing materials,
avoid using sharp instruments as this may damage the
scooter. Carefully remove the scooter from the carton; to
minimize damage to the scooter and the operator, two
people should be used for this operation.
Safely dispose of all packaging materials, your local waste
disposal authority can advise you on this procedure.
Your Scooter is delivered fully assembled, fitting the
two batteries and the seat assembly together with some
minor adjustments are detailed on the following pages, under
'Operating your Scooter'. A full technical specification
for your Scooter can be found at the rear of this manual.
A great deal of thought and consultation has gone into the
design of your state-of-the-art, life-changing scooter. Your
Scooter will help to increase your mobility and
therefore give you more time and energy to enjoy life.
Six models of Scooter are described in this manual.
They have same control functions but vary in wheel sizes,
battery location and seats. Please refer to your appropriate
model when reading the manual. A full technical
specification for each model can be found at the rear of this
manual. A great deal of thought has gone into the design of
your Three wheeled vehicle which will allow you to
negotiate obstacles found in confined shopping areas, four
wheels will give you added stability on uneven surfaces. This
is just one of the features you will find on your Scooter.
Others are:
The contoured seat helps cushion you from the
vibrations of a journey, giving you maximum comfort. A fully
proportional speed-controller with a speed restriction facility
allows you a smooth jerk-free ride. Automatic braking gives
you that added peace of mind.
The removable fold down seat, together with
a facility to fully lower the steering handlebar, allows your.
to be easily transported in an average saloon or
hatchback car for those days when you travel further afield.
Your scooter has been designed to be service friendly.
Sealed batteries which are virtually maintenance-free will give
your scooter the power it requires. Should you need to take
you batteries on an aircraft, then you can peace of mind because
the batteries are totally Spill-free. (Please consult your carrier
for details).
COMFORT-
VERSATILITY-
SERVICE-
The advanced speed controller has been designed
with extensive self-checking circuits to give you the maximum
'state-of-the-art' safety technology. Fully automatic braking
give the driver confidence in any environment. The on/off key
be removed for added security and safety, this disables the
electronic drive circuitry, and your scooter cannot therefore
be easily driven away by any other person.
Do not switch 'off' the on/off power key when
you are moving; this will automatically apply the motor
parking brake suddenly and could place you in a dangerous
situation. Your scooter is fitted with anti-tipping wheels.
, they are an important
part of the scooter design provided specifically for your safety.
They help protect against backwards tipping on excessively
sharp inclines.
Your scooter is fitted with a battery level
indicator. Charging is straight forward. Your charge is fully
automatic and will reduce to a top-up charge mode when the
re-charge cycle is complete. (See Batteries and Battery
Charging section of this manual).
SAFETY-
CAUTION-
Do
not remove these anti-tipping wheels
CHARGING-
SAFETY-
CAUTION-
CHARGING-
GETTING YOU KNOW YOUR SCOOTER
7

Warning:
Caution:
Warning:
Caution:
Warning:
Warning:
Before setting out on your scooter you need to make sure
that your seat is in the correct driving position. Your
distributor will set the seat to the correct height for
your individual needs (note: see warnings on page 9). The
seat has four basic adjustments to assist your comfort.
1. Seat Lock Lever :(Fig 1). This allows the seat to swivel
through 360 NB: It can be re-located on the right side for
your convenience. Pull up fully to release the seat allowing
rotation. Release level to lock the seat into the desired
position.
When driving, the seat should be locked in the
straight ahead position.
The seat locking level must lock be lifted up fully
when rotating the seat, failure to observe this may result in
unnecessary wear of the seat post.
The seat base has a series of threaded holes for
universal mounting, on no account must your scooter seat
be relocated from the original factory setting. Failure to
observe this warning will put you into an unstable and
dangerous situation which could cause you harm.
2. Armrest Width Adjustment: On each side at the rear of
the seat you will find a large black knob (Fig 2). By simply
loosening this knob you are able to slide the armrests in or
out to whatever width you desire. Re-tighten the knobs fully.
You may need a friend to assist you with this initial setting
up operation. This may extend the width of your Scooter.
The backrest of your seat will not fully fold
forwards if armrests are positioned too closely towards one
another.
Do not drive your scooter with the arms removed
or in the raised position.
(Fig 3). The armrest angle
can be adjusted individually to suit your needs. To make
adjustments to the armrest angle you will need two 13mm
spanners (not provided). Lift the arm upwards, you will note
the adjusting bolt. First loosen the locking nut, rotate the
bolt in or out until the required angle is found, lower the
arm and check the angle for comfort; re-adjust as necessary.
Finally tighten the locking nut.
When lowering the arm make certain clothing or
fingers are not positioned under it.
4. Seat Height Adjustment: You may need to alter the seat
height setting at a later date, please follow these
instructions.
1.Remove your seat from the Scooter by lifting the seat
3. Armrest Angle Adjustment :
Removing seat from Scooter: The seat mounting post is
designed with a special safety lifting point, this will prevent
the seat from inadvertently dismounting itself in the case
only be demounted by turning the 90 the forward driving
position.
Seat Lock Lever :
Armrest Width Adjustment:
Armrest Angle Adjustment :
Seat Height Adjustment:
Warning:
Caution:
Warning:
Caution:
Warning:
Warning:
The seat locking level must lock be lifted up fully
when rotating the seat, failure to observe this may result in
unnecessary wear of the seat post.
OPERATING YOUR SCOOTER
locking lever and lifting the seat clear of the vehicle (see
Fig 4). Note your seat for safety reasons can only be
removed when it is Turned 90 . Please take care when
lifting heavy weights. Place your seat on a soft clean
work area.
FIG 1
FIG 2
FIG 3
FIG 4
8

2. With the aid of a 17mm spanner (not supplied) loosen
the 10mm seat clamp fixing bolt (see Fig 5).
3. Remove the 10mm fixing bolt and reposition the bolt
into one of the four preferred location holes of the seat
mounting tube (see Fig 6).
4. Re-tighten the 10mm fixing bolt. Refit the seat onto
your Scooter.
Do not have the seat set too high, you must be
able to place both feet firmly on the Scooter's floor area.
Stability will be reduced the higher your seat is set on the
mounting tube. Always take great care when cornering,
lean into the corner to achieve the best stability from your
Scooter.
5. Seat Slide of the seat: (see Fig 7) Located on the right
front side of the seat. The lever allows you to adjust your
seat forwards and backwards when sitting on the seat.
Simply pull up the lever and move in the desired position
backward by pushing or forward by hitching. As soon as
the lever is released, the seat will lock into the new position.
The best the seat has fully locked by hitching
backwards and forwards.
Do not carry out this operation when your scooter
is moving, first stop apply the brakes and then carry out the
seat position.
CAPTAIN SEAT
The seat as fitted to your Scooter, has a fold down backrest .
The seat has four height positions similar to those found on
the standard seat. Your distribution wick position the seat
to allow you the most comfortable driving position.
6. Backrest Angle Adjustment (option): The angle of your
backrest can be adjusted to a comfortable driving position
by the operation of the lever situated on the left side
of your seat. When sitting on your seat, lean backwards
against the backrest and at the same time lift the operation
lever upwards. Lean forwards or backwards once the
locking mechanism has released, positioning the backrest
in a comfortable driving position. Releasing the lever will
lock the backrest in your chosen position.
Care should be taken during this operation as the
backrest mechanism has a strong assisting spring to aid
movement. Please Note: Damage can result the mechanism
if the backrest is not supported during this operation.
7.Backrest Height Adjustment: The upper cushion of
your backrest (See Fig 8) can be adjustment for
height, giving you more back support if you are tall,
by operating the small latch cushion up or push
down for the most comfortable position. The headrest will
also lift out for convenience.
Warning:
Caution:
Warning:
Caution:
HANDLEBAR ADJUSTMENT
Warning:
Caution:
Warning:
Caution:
HANDLEBAR ADJUSTMENT
Seat Slide of the seat:
Backrest Height Adjustment
FIG 5
FIG 6
FIG 7
FIG 8
The handlebar of your Scooter is designed to allow you to
position it in a comfortable driving position. It can be locked
into numberous positions or unlocked to move freely for
transportation.
The handlebar lock is operated by a black lever positioned
on the right hand side of the handlebar (see Fig 9, page10).
To release the handlebar from a locked position pull the black
lever upwards, the handlebar will now move freely, but under
mild tension.
9

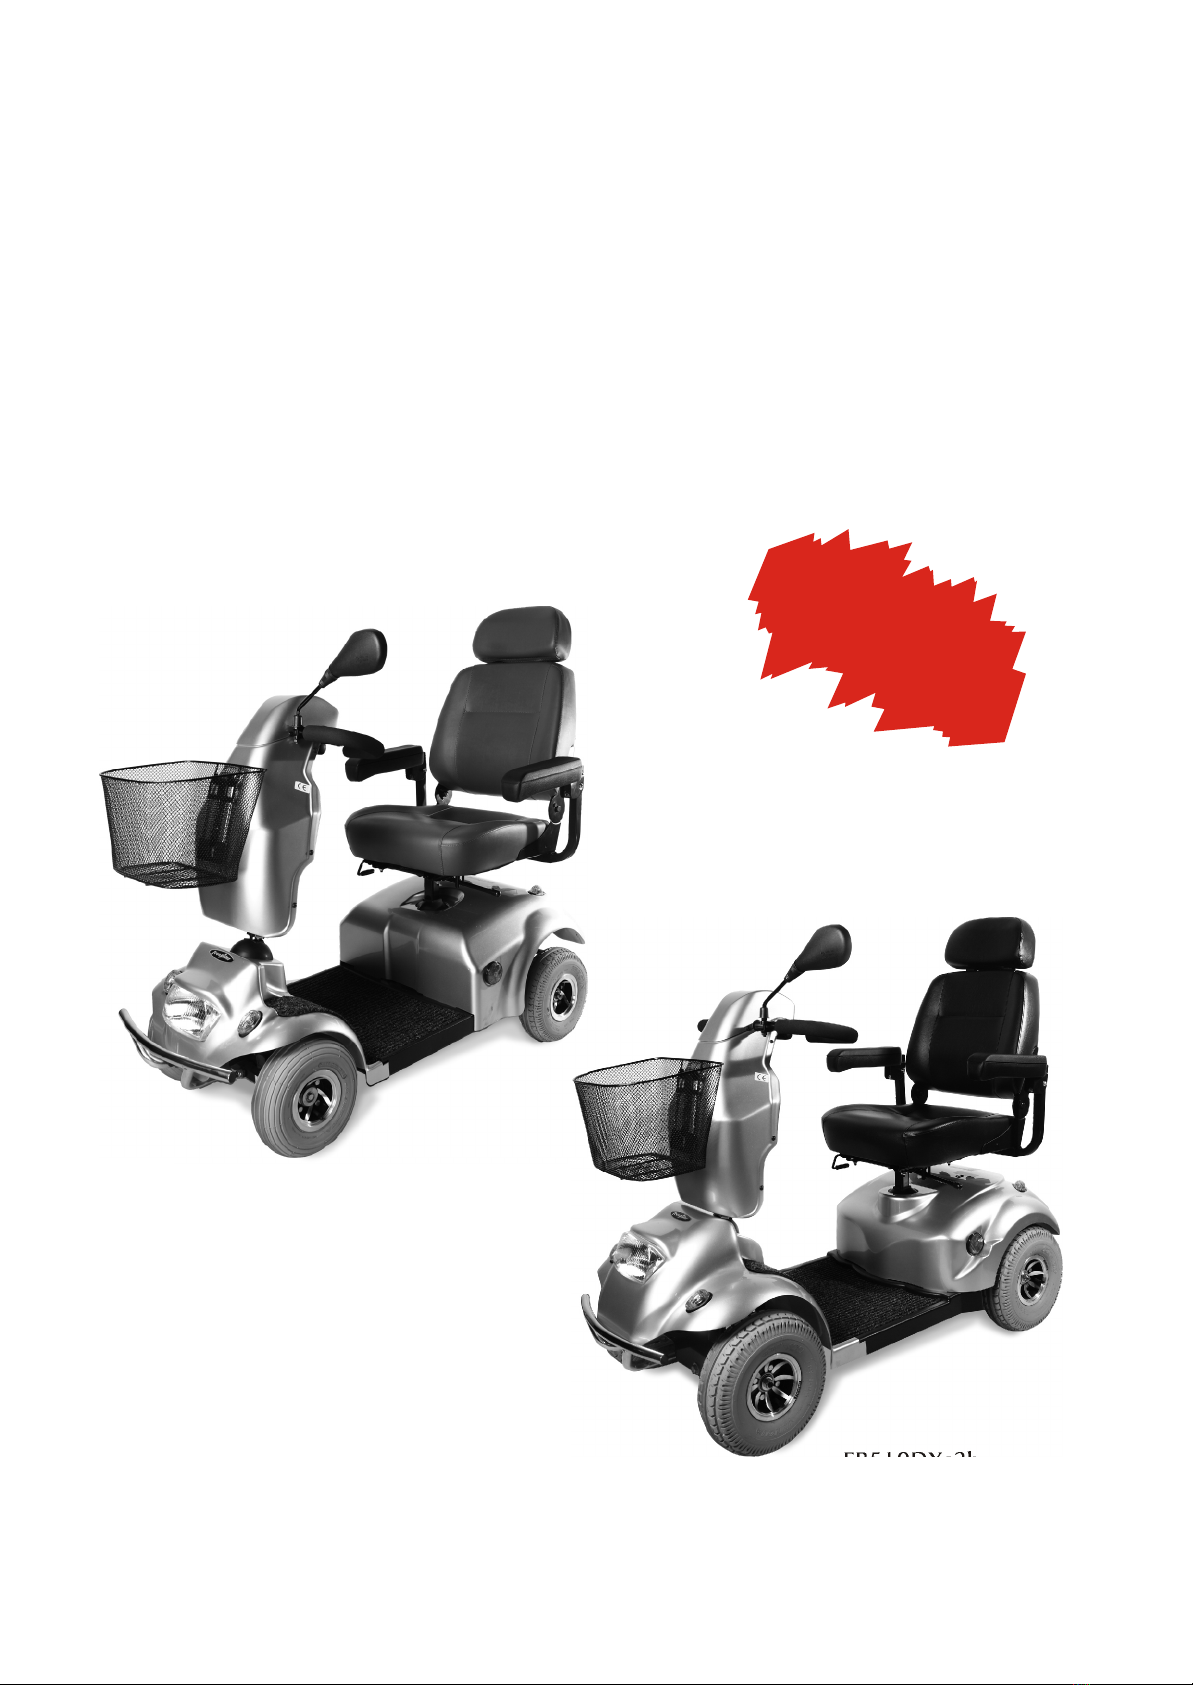
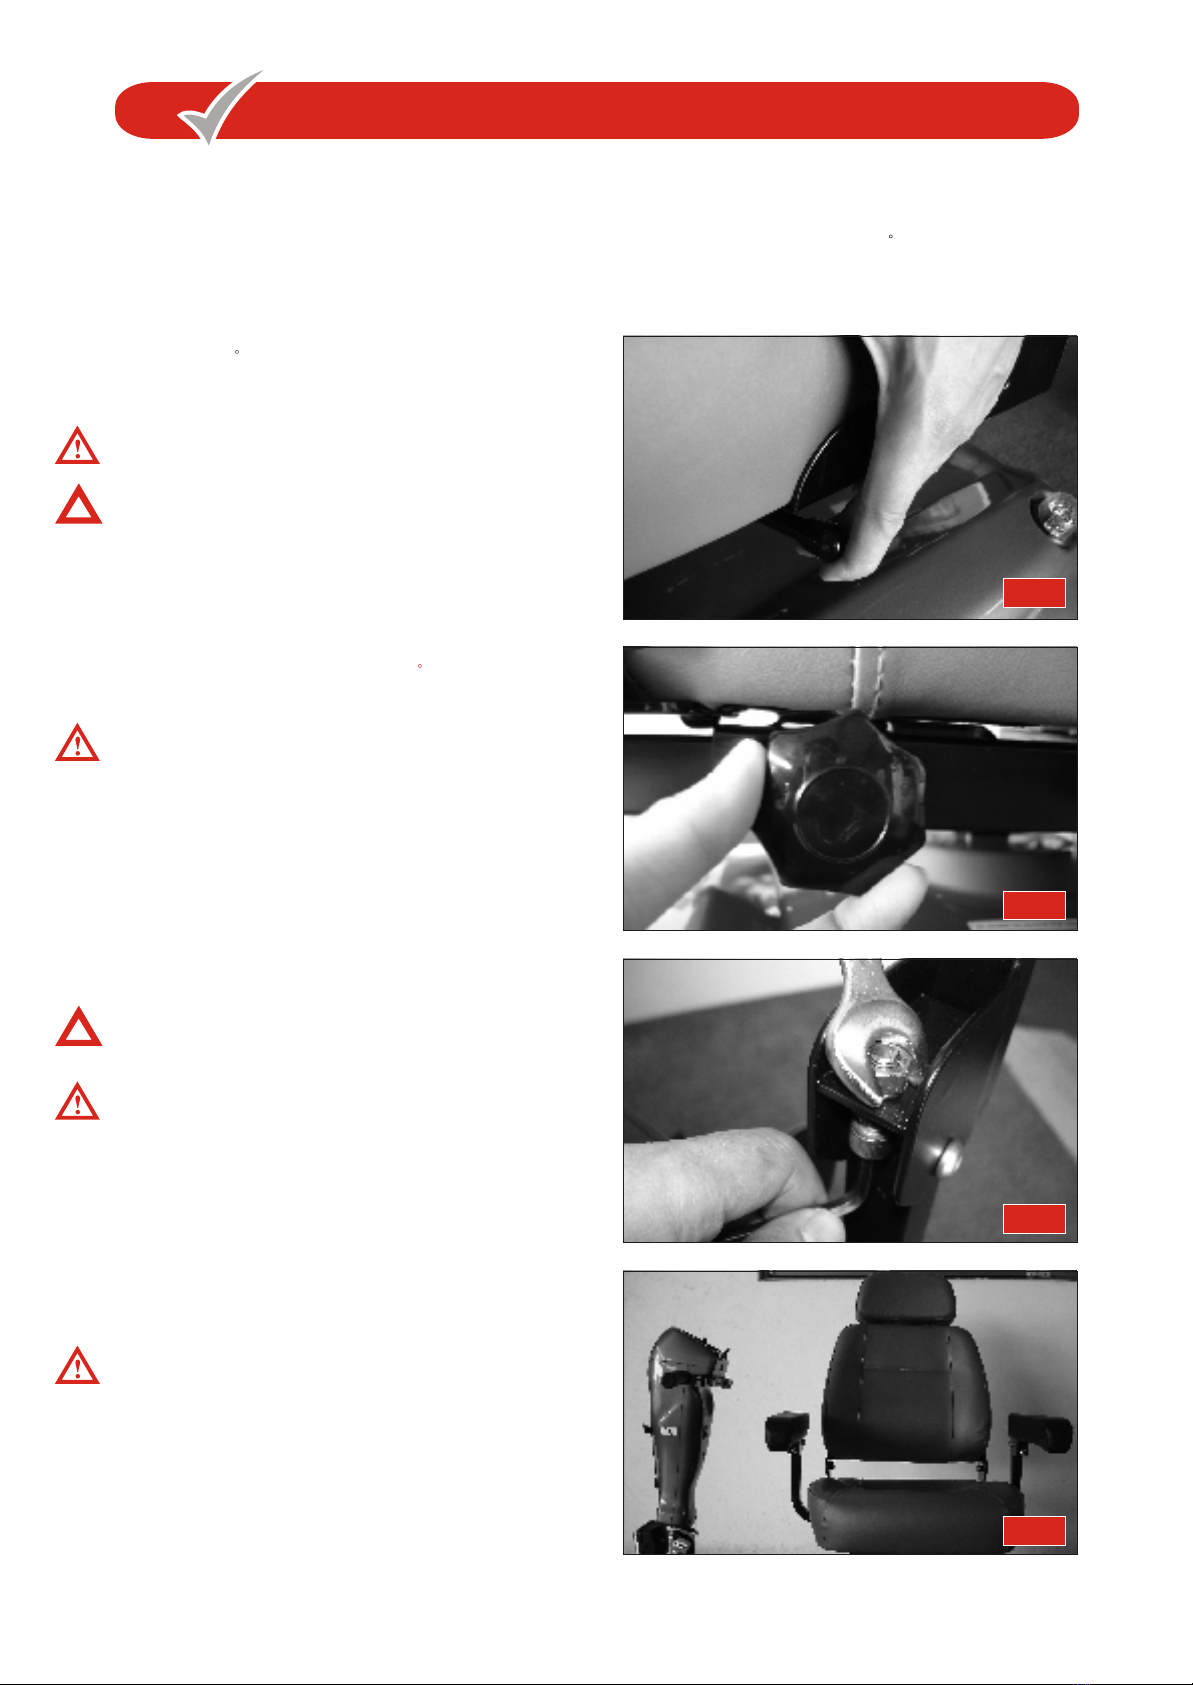
To lock the handlebar into a comfortable driving position,
simply push the black lever downwards until the handlebar is
locked firmly into position.
With the combination of the height adjustment together with
the handlebar movement, you should find a suitably
comfortable driving position.
Always make certain the handlebar locking lever is
fully down and the handlebar is securely clamped onto the
chrome support plates before driving your Scooter. To make
service adjustment of this part, refer to the Care and
Maintenance section of this manual.
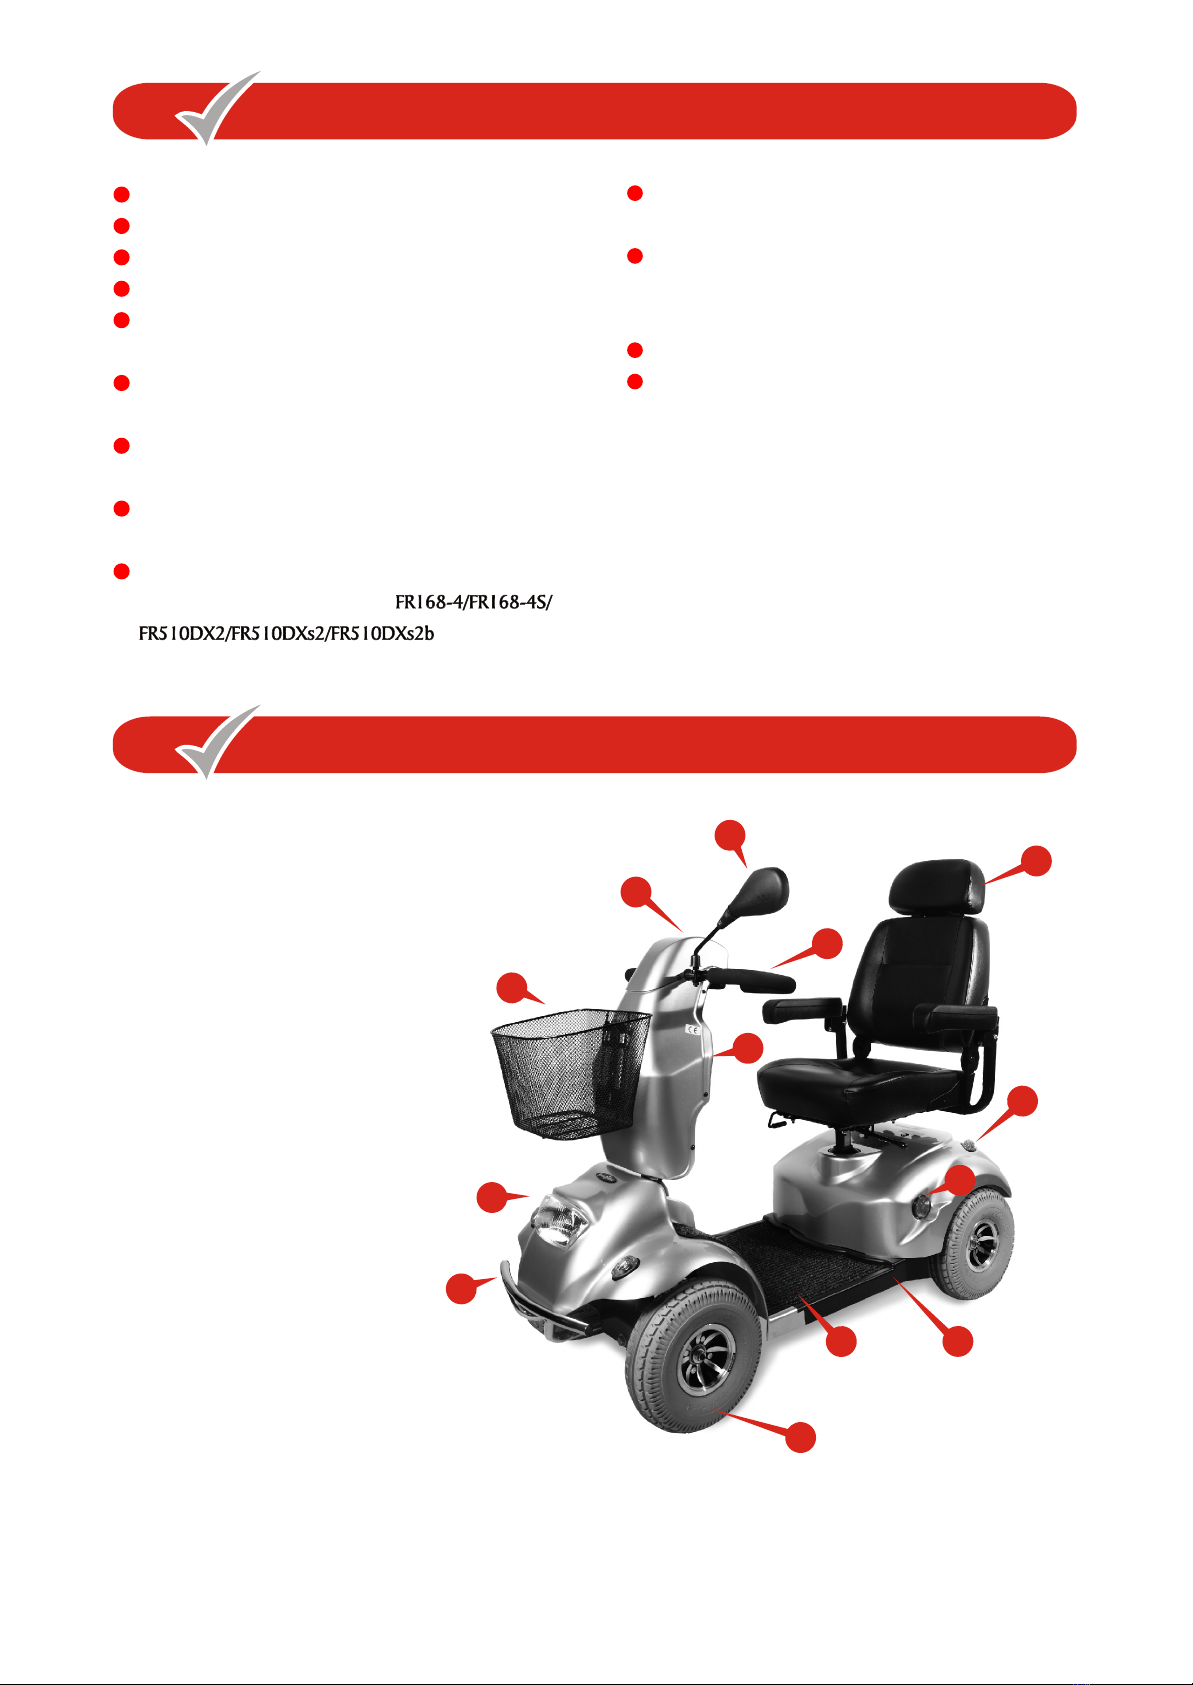
Your controls are located on the handlebar console (see
Fig10) they are:
1. Speed Adjustment Dial: This allows you to pre-select your
desired top speed. The dial is proportional to speed and
can be set anywhere between minimum ('min') and maximum
('max') increments. Turn the dial knob anticlockwise to
minimum for a very gentle operation, and clockwise
towards maximum to increase your speed. NOTE: When
attempting to climb obstacles, you will need to set the dial
to a high setting. Remember the higher position you set
your speed dial to, the faster your Scooter will travel.
2. Horn Buttons: (yellow). Sounds a polite warning signal.
3. On-Off Power Switch: Located at the right side of the
control console. Insert the key and turn clockwise. You will
note after a second the needle on the battery state indicator
moves towards the green sector and the green status light
illuminates. Your Scooter is now ready to drive. To switch
off your machine turn the key anticlockwise. Remove the
key when your vehicle is left unattended. Do not attach
heavy additional keys to your key ring, the weight can
damage the switch unit.
Do Not switch to 'off' when your Scooter is moving.
Failure to observe this warning will result in the motor brake
being applied suddenly and placing you 1.in a dangerous
situation.
You should only switch 'off' when in motion in the case of
an emergency. Continual use in this mode may cause undue
stress to the drive system and damage the main electronic
speed control unit. Be extremely cautious on slopes. Sit
upright in your seat or your machine could become less
stable.
Sleep Time: When you rest your Scooter with the electronics
switched 'on' you are using valuable battery power. Your
Scooter will automatically go into a sleep mode to preserve
battery energy after approximately 15 minutes, the battery
indicator and green status light goes off. To start your
Scooter again simply switch the key switch to 'off' and
back to 'on' again, your Scooter is now ready to go.
4. Status Light: When you turn your Scooter on, the green
light on your console will illuminate at a constant rate.
The status light is connected to a very sophisticated
Warning:
CONTROL FEATURES
Caution:
Warning:
CONTROL FEATURES
Caution:
1. Speed Adjustment Dial:
2. Horn Buttons:
3. On-Off Power Switch:
Status Light:
Located at the right side of the
control console. Insert the key and turn clockwise. You will
note after a second the needle on the battery state indicator
moves towards the green sector and the green status light
illuminates. Your Scooter is now ready to drive. To switch
off your machine turn the key anticlockwise. Remove the
key when your vehicle is left unattended. Do not attach
heavy additional keys to your key ring, the weight can
damage the switch unit.
Do Not switch to 'off' when your Scooter is moving.
Failure to observe this warning will result in the motor brake
being applied suddenly and placing you 1.in a dangerous
situation.
You should only switch 'off' when in motion in the case of
an emergency. Continual use in this mode may cause undue
stress to the drive system and damage the main electronic
speed control unit. Be extremely cautious on slopes. Sit
upright in your seat or your machine could become less
stable.
Sleep Time: When you rest your Scooter with the electronics
switched 'on' you are using valuable battery power. Your
Scooter will automatically go into a sleep mode to preserve
battery energy after approximately 15 minutes, the battery
indicator and green status light goes off. To start your
Scooter again simply switch the key switch to 'off' and
back to 'on' again, your Scooter is now ready to go.
4.
FIG 9
FIG 10
diagnostic system which can identify faults which could
occur on the main speed control system or some other
part of your Scooter's electronic drive system. For
instance if your batteries run low in power, the status light
will flash slowly at one flash a second; this indicates your
batteries need recharging.
If you notice the status light flashing at two flashes per
second, you are being notified that the battery voltage
is too low and you must stop using your Scooter at
the earliest opportunity.
Your status light has nine similar flashing diagnostic
signals, reference to these diagnostic codes is found
under 'Fault Finding' at the rear of this manual.
5. Battery Condition Indicator: Located at the top of your
console. When your Scooter is switched on, the needles
on the gauge will move across the scale from the left 'red'
sector towards the 'green' sector, indicating the state of
charge in your batteries. As the power is used up in your
5. Battery Condition Indicator:
33On-Off
Power
Switch
55Battery
Condition
Indicator
Hazzard
WIIarning
Speed
Adjustment
Dial 7
77
44Status
Light
66
Horn
Buttons
Direction
Indicator
Light Switch
22
8811
Front/Rear
Light Switch
10

batteries the needle will move towards the red sector
indicating the state of charge at that precise time. When
the needle is fully over to the right (green sector), the
batteries are fully charged. When the needle falls towards
the red sector your batteries are losing power, but you will
still have power to spare. When the needle falls into the
red sector your batteries are low in power and need to be
re-charged, although you will still have approximately
half-an-hours normal flat pavement driving in reserve.
It is not recommended to use this power regularly as it
will shorten battery life. It is wise to re- charge your
batteries when the needle enters the red zone (see
Batteries and Battery Charging section of this manual).
6. Front/Rear Light Switch: This rocker tyre switch controls
the function of the front and rear lights. Simply push down
on the left side (white spot) (Fig 11) for 'on' and the right
side for 'off'.
7. Direction Indicator Light Switch: Located at the bottom
right of your console, the direction indicator lights for
right and left manoeuvres are controlled by this switch.
When making a turning manoeuvre on the road the
appropriate switch dissection warning light (See Fig 10),
will flash. To cancel the direction indicator return
the switch to the centre position. The left direction
indicators are activated by 'flicking' the switch to the left.
Please note the direction indicators are not
self-canceling. Please be aware to test the
function of your direction light before each journey. Failure
to observe this warning could put you and other road
users into a dangerous situation.
8. Hazard Warning: Positioned to the bottom left o
your console, when pressed this red triangular button
activates all of the amber flashing direction lights to
warn other road users that you are stationary or in
distress. This function should only be used in
emergencies. You will note that both green direction
lights at the top of your console are flashing to warn you
the hazard system is in operation. To cancel the hazard
warning simply press and release the red triangular button.
Located under the handlebar grips. Your speed for
forwards and reverse motion and braking is controlled
here. The right thumb lever moves your Scooter in a
forwards direction (Fig 12) and also controls the rate of
speed by the proportional amount of pressure applied.
The left thumb lever moves the Scooter in a reverse direction
and controls the rate of speed by the pressure applied (Fig 13).
The lever when released will return itself, and you will gently
stop. You will note that you can obtain the reverse of this
procedure by pulling the levers backwards with your thumb.
NOTE: When driving up a slope or similar obstacle your
Scooter will be working hard, the battery gauge
will move into the red sector, it will return towards the
green sector once the load on your motor is reduced,
this does not indicate low batteries.
Caution:
Warning:
FORWARD, REVERSE CONTROL LEVER (Wig wag)
Caution:
Warning:
FORWARD, REVERSE CONTROL LEVER (Wig wag)
6. Front/Rear Light Switch:
7. Direction Indicator Light Switch:
8. Hazard Warning:
Do not hang bags etc over the steering handlebars
which could interfere with the movement of your control
lever. Failure to observe this warning could put you in a
dangerous situation.
Note: Your approved distributor can modify your vehicle
for left-hand forward operation use.
If you are not an accomplished outdoors
powered vehicle driver, we strongly recommend that
you first practice in an open, safe area, free from traffic,
preferably with a Scooter who can assist you.
Warning:
Warning:
Warning:
Warning:
FIG 11
FIG 12
FIG 13
11

Caution Notes:
If for the reasons of convenience, you require to push your
scooter, the drive from the motor can be disconnected to
allow the vehicle to roll freely.
e free wheel device is a 'red'
handled lever located at the rear right hand side of your
machine under body cover (See Fig 14).
To free wheel your scooter push down the red lever; gently
rock your machine to assist the drive to disengage. You can
now push your scooter with ease.
To re-engage the drive simply pull up the red lever; again
gently rocking your machine will allow full engagement of the
drive system.
1. You must sit on your scooter with free wheel in the
disengaged position. When the free device is disengaged,
you have no braking function of your scooter. Do not park
your scooter on a slope with free wheel device disengaged.
2. If the scooter is in the free wheel mode, when turn on
your machine and depress your speed control, you will
not be able to move under motor power. Dismount
and re-engage the drive.
3. "Always' check that the free wheel device is in the drive
position before attempting to drive your machine after
it has been left unattended for a period of time. Failure
to observe this warning may result in an accident.
Free wheel procedure: Th
Caution Notes:
FREEWHEELING YOUR SCOOTER
FIG 14
General Note:
Warning:
Please take extreme care
If you are able to push your scooter the
drive to the transmission brake is disconnected. Do not
attempt to drive your scooter. Please check once more
the above mentioned procedure for re-engaging the drive.
Yellow
warning notice
label situate on
your rear cover
located under
your seat.
General Note:
Warning:
Please take extreme care
SAFETY INSTRUCTIONS & WARNINGS
GENERAL
Warning: Do not attempt to operate your new Scooter for
the first time without completely reading and understanding
all of the facts in this Users Instruction Manual.
Your Scooter is a state-of-the-art device designed to
enhance and increase your mobility. provides a range of
Scooters to best suit the individual needs and circumstance
of the Scooter user.
Please be aware that the final selection and purchasing
decision regarding the model of Scooter to be used is the
responsibility of the Scooter user who is capable of making
such a decision with assistance from his/her healthcare
professional (i.e. medical doctor, physical therapist etc.)
The contents of this Users Instruction Manual are based on
the expectation that the mobility device
Expert has properly fitted the Scooter to the user and
Has assisted the prescribing healthcare professional and/or
GENERAL
The authorized Distributor in the instruction process for
the safe use of the scooter.
There are certain situations, including some medical
conditions, where the Scooter user will need to practice
operating the Scooter in the presence of a trained attendant.
A trained attendant can be defined as a family member or
care professional specially trained in assisting a Scooter user
in various daily living activities.
When you begin to use your Scooter, you will probably
encounter situations in which you will need some practice.
Simply take your time and you will soon become confident
and in control as you manoeuvre through doorways, on and
off elevators, up and down ramps and over moderate terrain.
Below are some tips, precautions and other safety measures
that will help you to become accustomed to the safe
operation of your Scooter.
Your Scooter is fitted with a number of "Safety & Warning
Instruction labels"(see page16).
DISENGAGE
BRAKE
ENGAGE
WARNING
EMERGENCY FREEWHEELING DEVICE
NEVER SIT ON YOUR SCOOTER WITH THE
FREEWHEEL DEVICE IN THE DISENGAGED
POSITION. ALWAYS RE-ENGAGE THE
EMERGENCY FREEWHEELING DEVICE AFTER
USE. FAILURE TO COMPLY WITH THIS
WARNING MAY RESULT IN INJURY.
12

These labels communicate important warnings or
instructions - Please familiarize yourself with their location.
Get to know the feel of your Scooter and it's capabilities.
We recommend that you perform a safety check before
each use to make certain your Scooter operates smoothly
and safely. For details on how to perform these necessary
inspections, see the Care and Maintenance section of
this manual. Perform the following inspection prior to
using your Scooter.
Check tyre inflation, maintain at 30 p.s.i. (210 kpa)
Check all battery connections, make certain they are
serviceable and not corroded.
Check front basket is fitted correctly.
Check batteries have been fully charged.
Check operation of brakes.
It is critical that the pressure in the pneumatic tyres
is maintained at 30 p.s.i. (210 kpa) at all times. Failure to
observe this warning may result in a serious failure of the
tyre or wheel, causing serious personal injury and/or damage
to your Scooter.
Do not carry passengers on your Scooter.
Your Scooter is designed for a single occupant which
complies with legal requirements for pavement vehicles.
Carrying passengers on your Scooter may result in personal
injury and/or property damage.
Your Scooter is designed for a maximum user weight limit of
136kg (300lbs).
Exceeding the weight limit will void your warranty
and may result in personal injury and damage to your
scooter. We will not be held responsible for injuries
and/or property damage resulting from failure to observe
these weight limitations. Please also remember when
carrying heavy objects that this will increase your total
weight and may make your Scooter unstable.
Excessively high cornering speeds can create the possibility
of tipping. Factors which affect the possibility of tipping
include, but are not limited to, cornering speed, steering
angle (how sharply you are turning), uneven surfaces,
inclined surfaces (such as heavily cambered pavements),
riding from an area of low traction to an area of high traction
(such as passing from grass areas to a paved area - especially
at high speed while turning), and abrupt directional changes.
Do not corner at high speed! If you feel that you may tip
over in a corner, reduce your speed and steering angle to
prevent your Scooter from tipping.
When cornering sharply, reduce your speed. When
using your Scooter at higher speeds, anticipate
SAFETY CHECK
Warning:
Warning:
WEIGHT LIMIT
Warning:
CORNERING
Warning:
SAFETY CHECK
Warning:
Warning:
WEIGHT LIMIT
Warning
CORNERING
:
Excessively high cornering speeds can create the possibility
of tipping. Factors which affect the possibility of tipping
include, but are not limited to, cornering speed, steering
angle (how sharply you are turning), uneven surfaces,
inclined surfaces (such as heavily cambered pavements),
riding from an area of low traction to an area of high traction
(such as passing from grass areas to a paved area - especially
at high speed while turning), and abrupt directional changes.
Do not corner at high speed! If you feel that you may tip
over in a corner, reduce your speed and steering angle to
prevent your Scooter from tipping.
Warning:
Changes in the road surface. This will greatly reduce the
possibility of a tip or fall. To avoid personal injury or
property damage, always exercise common sense when
cornering.
Your Scooter is equipped with one powerful brake
system:
Electric/Mechanical Disc Park Brake: Located on the end of
your drive motor it activates mechanically after the
regenerative brake slows your Scooter to a near stop, or
when power is removed from the drive system for any reason,
as in the case of switching your machine off!
Brake engagement is far more abrupt at higher speeds. It is
important that you anticipate when the brakes will engage
and that you are braced for the resulting deceleration.
Your Scooter can decelerate very quickly. Do not
decelerate or turn abruptly when traveling at high speed
unless absolutely necessary. If it is necessary to decelerate or
turn abruptly when driving at high speed, brace yourself by
gripping the steering handlebar tightly and positioning your
feet firmly on the floorboard. Users who cannot grip the
handlebar tightly and/or place their feet firmly against the
footboard should avoid deceleration from or turning abruptly
at high speed, and therefore should avoid travelling at high
speed. Failure to observe this warning could result in serious
personal injury and property damage. Always brace yourself
firmly when decelerating your Scooter.
Your Scooter is designed to provide optimum stability under
normal driving conditions i.e. dry, level surfaces composed
of concrete or asphalt. However we recognize that
there will be times when you will encounter other surfaces
such as packed soil, grass and gravel. These surfaces may not
be sound and fail to give good traction, caution should be
considered before driving on this tyre of surface to prevent
stability problems resulting in injury or damage to your Scooter.
Reduce your Scooters speed when driving on uneven
terrain or soft surfaces.
Avoid long and unsafe grass that can become tangles in
the running gear or may hide debris and holes.
Avoid snow, this can quickly build up around your wheels.
Avoid loosely packed sand and gravel.
If you feel unsure about a driving surface, please
anticipate and avoid that surface.
Your Scooter has not been designed for operation
on public streets and roads. It is designed for operation on
pedestrian pavements and traffic free shopping areas.
Your Scooter must be driven with due care and compliance
with the Road Traffic Acts and conditions of the Highway
BRAKING
Warning:
Never drive down slopes at full speed, always adjust your
speed to the driving condition and allow for gradual
descents on inclines.
OUTDOOR DRIVING SURFACES
STREET AND ROADWAY DRIVING
Warning:
BRAKING
Warning:
OUTDOOR DRIVING SURFACES
STREET AND ROADWAY DRIVING
Warning:
13

source. Over inflation from an unregulated air source could
Over inflate your tyres resulting in "blow out" or personal
injury.It is critically important that pneumatic tyres are
inflated to 30 p.s.i. (210 kpa). Do not over inflate your tyres
to the maximum inflation pressure of 50 p.s.i. (350 kpa)
indicated on the tyre cover, failure to observe this warning
could damage your Scooter wheels.
Currently there are no standards approved for "tie down"
systems in a moving vehicle of any tyre to transport a person
while seated in a Scooter.
Although your Scooter may be equipped with a positioning
belt *, this is not designed to provide proper restraint during
motor vehicle movements.
Anyone travelling in a motor vehicle should be properly
secured in the motor vehicle seat with a safety belt fastened
securely.
Do not sit on your Scooter while it is in a moving
vehicle. Personal injury may result.
Always make certain that your Scooter is properly
secured when being transported. Failure to comply may
result in personal injury and/or damage to your Scooter.
(NOT SUPPLIED)
Your authorized Agent, therapist and other healthcare
professionals are responsible for determining your
requirement for a positioning belt in order to operate your
Scooter safely.
If you require a positioning belt to safely operate
your Scooter, make certain it is adjusted and fastened
securely. Serious personal injury may result if you fall from
your Scooter.
Getting on and off your Scooter requires a good sense of
balance. Please observe the following tips when getting on
or off your Scooter:
Make certain your Scooter is switched off at the power
switch, and the power key is removed.
Ensure your Scooter is not in the freewheel mode (see
page 12 Freewheeling your Scooter)
Make certain the seat and handlebars are locked firmly
into position.
The seat armrests can be lifted up to make access easier.
Make certain you do not attempt to drive with the armrests
raised.
Position yourself as far back into the Scooter seat
as possible to prevent tipping and causing injury.
Avoid using the armrests for weight bearing
purposes, such use may cause the Scooter to tip and
cause personal injury and/or damage to the Scooter.
MOTOR VEHICLE TRANSPORTATION
Warning:
Warning:
* POSITIONING SAFETY BELT
Warning:
ACCESSING YOUR SCOOTER
Warning:
Warning:
MOTOR VEHICLE TRANSPORTATION
Warning:
Warning:
* POSITIONING SAFETY BELT
Warning:
ACCESSING YOUR SCOOTER
Warning:
Warning:
Code. Always obey all local pedestrian traffic rules. Wait until
your path is clear of traffic, and then proceed with extreme
caution. Note: Always wear light or illuminating clothing
When driving your Scooter. Be aware that it may be difficult
for traffic to see you when you are seated on your Scooter.
Only drive your Scooter on the road when a public pavement
is not available (i.e. in the countryside) or when crossing the
roadway from one pavement to another.
Although it is not a legal requirement for accident insurance
cover (third party), it is a sensible precaution. Your
Authorized Agent will be able to give you details of specialist
insurance companies or you own insurance company will be
able to advise you.
commend that you do not operate
your Scooter in icy or slippery conditions or on salted
surfaces i.e. Roads and Pavements etc. Such use may result
in accident, personal injury or adversely affect the
performance and safety of your Scooter.
We recommend that you do not expose your
Scooter to any tyre of heavy moisture at any time i.e. rain,
snow or power washer. Such exposure can damage your
Scooter. Never drive through deep water or expose your
Scooter to sea water. Do not operate your Scooter if it has
been exposed to heavy moisture until it has been thoroughly
dried out.
Your Scooter is equipped with a manual freewheel device for
convenience when you need to push it. See the Freewheeling
your Scooter section on page 12 of this manual.
Do not use your Scooter in the freewheel mode
without an attendant present. Personal injury may result.
Do not attempt to personally disengage your
Scooter in the freewheel mode while seated on it. Personal
injury may result. Ask an attendant for assistance if necessary
Do not place your Scooter in freewheel mode while
on an incline. The Scooter could roll uncontrollably on its
own, causing personal injury.
If your Scooter is equipped with pneumatic tyres, you should
check their condition on a daily basis. Have the tyre pressure
checked and if necessary inflated to 30 p.s.i. (210 kpa) at
least once a week. Properly inflated tyres will help ensure a
smooth, stable ride with minimum rolling resistance for your
motor, it will also prolong the tyre's life and resistance to
punctures..
Always inflate your tyres from a regulated air
INSURANCE
WEATHER PRECAUTIONS
Warning:
Warning:
FREEWHEEL YOUR SCOOTER
Warning:
Warning:
Warning:
TYRE INFLATION
Warning:
We re
INSURANCE
WEATHER PRECAUTIONS
Warning:
Warning:
FREEWHEEL YOUR SCOOTER
Warning:
Warning:
Warning:
TYRE INFLATION
Warning:
14

Avoid putting weight onto the steering
handlebars, such use may cause the Scooter to tip and
cause personal injury and/or damage to the Scooter.
Avoid putting all of your weight onto the
footboard, such use may cause the Scooter to tip and
cause personal injury.
access in mind. Ramps have specified percentage of
inclination, designed for easy and safe access. Some
ramps may have turning switchbacks (180 degree turns)
that require you to have good cornering skills on your
Scooter.
Proceed with extreme caution as you approach the
downgrade of a ramp or other incline, sit right back in
your seat, brace your arms on the handlebars and your
feet on the floorboard
Take a wide arc with your Scooter's front wheel around
tight corners, your rear wheels will follow preventing
you from cutting the corner short and bumping or
getting hung up on raised kerbs.
When descending an incline keep your speed
adjustment set to the slowest speed setting to ensure a
safely controlled descent and driving in a forward
direction only. If your Scooter descent is quicker than you
anticipated allow the Scooter to completely stop, then
progress at a slower speed setting.
Never drive down an incline at full speed.
When climbing an incline, try to keep your Scooter
moving, if you must stop, start up again slowly and then
accelerate smoothly with caution. Avoid sudden stop
starts, lean forward towards your handlebars to increase
stability and prevent rearward tipping.
When climbing an incline, do not zig-zag
or drive at an angle up the face of the incline. Drive
your Scooter smoothly up the incline without
stopping, this greatly reduces the possibility of a tip
or fall.
You should not travel over a potentially
hazardous incline i.e. areas covered with ice or snow,
cut grass or wet leaves or any unstable surface.
Warning:
Warning:
MODIFICATIONS
Warning: Failure to observe this warning may result in personal
injury and/or damage to your Scooter.
INCLINES
More and more modern buildings are designed with
disability
Warning:
Warning:
Warning:
We have designed your Scooter to provide maximum
mobility. A range of accessories are available from
Authorised Agents, to further customise your Scooter
needs. However, under no circumstances should you
modify, add, remove or disable any feature, part or
function of your machine.
Warning:
Warning:
MODIFICATIONS
Warning:
INCLINES
Warning:
Warning:
Warning:
Warning:
Warning:
STAIRS AND ESCALATORS
Warning:
Warning:
DISPOSAL OF ELECTRO-MOBILE SCOOTER
ALWAYS TAKE CARE AND BE SAFE
Do not overload your Scooter at the rear when
climbing an incline. Always lean forward to
Provide the best stability and prevent rearward tipping.
Any attempt to climb or descend an incline
steeper than shown in the Scooter Specification at the
rear of this manual may put your Scooter in an unstable
position and cause it to tip, resulting in personal injury.
Never remove the anti-tip wheels of your Scooter, they are
an important part of your Scooters design. See also
Control on an Incline page19.
Scooters are not designed to travel up or down
stairs or escalators. Always use an elevator. Failure to
observe this warning may result in injury to yourself and
others and damage your Scooter.
If you anticipate being seated in a stationary
position for an extended period of time turn off the power
key switch, this will prevent unexpected motion due to
inadvertent movement of the direction control (wig-wag) lever.
Failure to observe this warning may result in personal injury.
In time when your Scooter becomes unusable it must be
disposed of in accordance with the laws implemented at that
time. For further information regarding the recycling
arrangements for this tyre of vehicle and its batteries, contact
your local authority or government department, details of
this can be found in your telephone directory.
PREVENTING UNINTENDED MOVEMENT
Warning:
Warning:
STAIRS AND ESCALATORS
Warning:
PREVENTING UNINTENDED MOVEMENT
Warning:
DISPOSAL OF ELECTRO-MOBILE SCOOTER
ALWAYS TAKE CARE AND BE SAFE
Max10 Max6
15

Warning:
Warning:
Warning:
stop simply release the lever, the brakes will be automatically
applied.firmly in position. Next, turn the 'Speed Adjustment
Dial' to minimum (min), and turn the 'on/off' key to 'on' (Fig
10, page10). (The battery state indicator will move and the
green status light will illuminate). Gently press the right
thumb control lever (Fig 12, page 11) to start you in a forward
direction. To stop simply relese the lever, the brakes will be
automatically applied.
Please take care not to have your thumb on the
forward/reverse control lever when you switch 'on' your
Scooter; this will result in your machine going into a fault
mode. Switch 'off' then 'on' again to clear the fault.
If your Scooter has been adapted for left hand,
forward operation then this procedure will be reversed: i.e.
pressing with the left thumb for forward direction and the
right thumb for reverse direction.
If your Scooter has been converted with a "
Delta" tyre control system,please refer to the separate
Warning:
Warning:
Warning:
SAFETY WARNING & INSTRUCTION LABELS
MAIN CIRCUIT BREAKER
PRESS TO RESET
Control console label
Located on the top of the Scooter's rear cover
(under seat)
Data serial plate located on front wheel
cross member
Located on right of handlebar cover
Located on front wheel cross member
Wiring diagram for batteries located under
rear cover
Located at the left or right
hand rear cover of
Scooter
Located at right rear
of handlebars near
charging socket
Located on the top leftside of the rear cover
(under seat).
Yellow label located on the top of the rear cover
LEARNING TO GET ABOUT
Warning:
MOUNTING
If you are not an accomplished outdoors mobility
product driver, we strongly recommend that you first practice
in an open area, free from traffic and preferably with an
attendant who can assist you.
For your first drive make certain that you and your new
Scooter are on a level surface. Put the power on/off key into
its slot, but leave it turned off. Stand behind the Scooter's
seat, and reach down to the 'Seat Lock Lever'. It will be on
the left side directly under the armrest.
Grasp the 'black' knob on the lever and pull up, releasing the
Seat (Fig 15). It will now turn easily to meet you. If need be,
you can lock the seat into position to make it steady before
you sit down. You can also lift up the armrest to assist this
procedure. Seat yourself and swing the seat to face the
handlebars. Make sure you are straight, then release the
spring assisted lever, making certain that it locks your seat
Warning:
MOUNTING
The following labels are positioned on your Scooter, they
communicate important warnings or instructions regarding the
safe operation of your scooter. Please familiarize yourself
with their location.
16

FIG 15
instructions provided with this accessory (see also page 40 of
this manual)
If you prefer you can swing the armrests back to allow you to
pivot on your seat and then ease yourself onto your feet.
Do not use the handlebars as a crutch to lever
yourself out of your seat. Failure to observe this warning may
damage the handlebar mechanism and make the Scooter
unstable.
If you need to park and leave your Scooter, simply remove
your key. This will keep the brake on and make your Scooter
more difficult to move. It is best to leave it in sight of
someone like a store assistant etc. who can watch it for you.
Another precaution is to you're your serial number and
the date of purchase.
Your serial number can be found on a plate attached to the
front cross member located under the body cover.
Make certain you are comfortably seated on your Scooter
and both armrests are down. Ensure that the 'Speed
Adjustment Dial' (Fig 10, page 10) is turned to minimum for
your first drive. When you have become more confident you
can increase the setting to a higher speed. Push the right
'Thumb Lever Control' (Fig 12, page 11), as described earlier.
You will very gently move forwards. Release the lever, and
you will gently stop. Practice these two basic functions until
you get used to them.
Steering the Scooter is easy and logical by turning the
handle bars in the direction you wish to manoeuvre. Be sure
to remember to give a wide clearance when turning so that
the rear wheels follow the path of the front one, instead of
cutting short.
Cutting short on pavement corners or 'cut outs' can mean
DISMOUNTING
Always switch off your Scooter before dismounting. Locate
the seat lever and pull up (Fig 15). Now you can swing the
seat away, lock it, and ease yourself onto your feet.
Caution:
PARKING IN PUBLIC
BASIC DRIVING
DISMOUNTING
Caution:
PARKING IN PUBLIC
BASIC DRIVING
that a back wheel will go off the pavement, causing a stability
problem. Avoid this at all times by steering an exaggerated
wide arc around the obstacle.
If you must steer in a tight spot, such as entering a doorway
or when turning around, stop, turn the handlebars to where
you want to go, then apply the power gently. This will make
the Scooter turn sharply. It will still go gently, and with
complete stability. Practice in an open area, until you are
proficient.
Reversing requires attention. Be sure your 'Speed Adjustment
Dial' is turned to minimum before you reverse (Fig 10, page 10).
Push the left thumb reverse control lever (Fig 13, page 11).
Remember, when you reverse you have to steer in the opposite
direction to the way you want to go. Practice is required here,
again use that open space. Please note as a safety requirement
reverse speed is half of forward speed.
Note: If your Scooter is set up for left forward driving the
afore mentioned description is reversed.
REMEMBER: If it is a tight turn, turn your steering column
before applying power. Steer wide of all corners and
obstacles, please move slowly and with care.
Do not turn your 'on-off' power key switch to the
'off' position when your Scooter is in motion, failure to
observe this warning may irreparably damage the main
electronic speed control unit or drive transmission. Always
first slow your Scooter down to a stationery position before
you switch your Scooter off.
When you start using your Scooter you will meet some
obstacles that will require some practice to drive through
smoothly.
Here are some common problems, with tips that will help
you master them quickly. You will soon be in control through
doors and up and down ramps with surprising ease by
following these tips.
Approach an unfamiliar door slowly, sizing it up. Does it
have a knob or push bar? Does it open toward you or away?
Think in terms of using the power of the Scooter to do the
work for you! You need not strain.
Hold the doorknob or bar in one hand and apply power with
the other hand. (Remember that you can drive forwards by
using your left thumb to move the wig-wag lever towards
you.) If the door is self closing, you can go through, allowing
the door to close behind you, if you go quickly enough. If
not, just stop when you're clear of the door and push it
closed.
If the door opens toward you, hold the knob or bar with one
hand and gently let the reverse power do the work. When
Warning:
CONTROL THROUGH TIGHT SPOTS
CONTROL THROUGH DOORS
Warning:
CONTROL THROUGH TIGHT SPOTS
CONTROL THROUGH DOORS
17

where you are not certain of the terrain. Always anticipate
and think safety.
Because of the power of your Scooter, you
will be able to climb inclines. But The maximum safe gradient
limit is 10 degrees. The reason for this is to ensure good
stability. Always have the anti-tipping wheels fitted to your
machine (Fig 18) when climbing angles or obstacles.
Always avoid turning on slopes or climbing kerbs.
Always make certain that your Scooter is in full working order
before attempting to drive. Never attempt to drive beyond
the design capability of your Scooter. Observe
weather conditions. Tyres can slip on wet or icy surfaces.
DO NOT DRIVE THROUGH DEEP WATER OR LEAVE
YOUR SCOOTER EXPOSED TO HEAVY RAIN.
i.e. During or after a thunderstorm.
Do not attempt to turn when negotiating an incline, only turn
when all wheels are fully on or off the incline; failure to
observe this warning could result in the machine becoming
unstable and toppling over.
Always lean forward when ascending an incline and
backwards when descending an incline. This will enable you
to maintain good stability and will eliminate any chance of an
upset.
Caution:Caution: Because of the power of your Scooter, you
will be able to climb inclines. But The maximum safe gradient
limit is 10 degrees. The reason for this is to ensure good
stability. Always have the anti-tipping wheels fitted to your
machine (Fig 18) when climbing angles or obstacles.
Always avoid turning on slopes or climbing kerbs.
Always make certain that your Scooter is in full working order
before attempting to drive. Never attempt to drive beyond
the design capability of your Scooter. Observe
weather conditions. Tyres can slip on wet or icy surfaces.
DO NOT DRIVE THROUGH DEEP WATER OR LEAVE
YOUR SCOOTER EXPOSED TO HEAVY RAIN.
the door is open wide enough, go ahead quickly, leaving the
hand on the door to keep it free of the Scooter and letting go
as you pass the doorjamb. It is an easy technique. Practice
makes perfect. Remember - your Scooter can do the work
without wearing you out!
Going through doors, with the back wheels: If you're not
moving, your rear wheel is probably caught. Reverse and try
again. Take your time - relax - enjoy yourself.
More and more buildings have ramps for wheelchair access.
Some have a change of direction in the middle, and good
cornering is required.
Make a wide manoeuvre with your front wheel around tight
corners.so that your back wheels follow a wide arc to stay
clear of the corner.
If you stop while facing uphill, the automatic parking brake
will hold you safe. To start again, slowly push the forward
direction lever, the parking brake will release and you will
start to move.
When you approach an incline, it is best to lean forward, (Fig
16.17). This moves the centre of gravity of your Scooter
towards the front of the Scooter for improved stability.
When going down an incline, keep your speed slow. This will
keep you in a safely controlled descent. It is best to lean
backwards, this moves the centre of gravity of your Scooter
towards the rear of the scooter for improved stability. If you
wish to stop completely, release the control lever, and you
will come to a gentle stop, avoid sudden stop starts.
Do not exceed the incline guidelines or any other
specifications presented in this manual.
Stationery obstacles (steps, kerbs etc) must be avoided where
possible. Your Scooter has small wheels and a ground
clearance of 4.0cm. Proceed with extreme caution when
driving near raised surfaces, unprotected ledges and/or drop-
offs such as kerbs, porches, stairs etc.
Most new pavements have wheelchair access ramps at
intersections, use these at all times. Plan your route where
possible to avoid poor and uneven surfaces. Do not attempt
to ride up or down kerbs as you may ground your Scooter
and damage it's construction.
Care must be taken when attempting to drive over soft
surfaces such as those found in parks etc. The surface may
look level, but this can be deceiving and hidden dangers may
make your Scooter become unstable or grounded. Avoid
unkept grass, loose deep gravel or sand, do not exceed the
capabilities of your Scooter.
Always have an attendant to assist you in circumstances
CONTROL ON AN INCLINE
Warning:
CONTROL OVER STATIONARY OBSTACLES
CONTROL OVER GRASS & GRAVEL ETC.
CONTROL ON AN INCLINE
Warning:
CONTROL OVER STATIONARY OBSTACLES
CONTROL OVER GRASS & GRAVEL ETC.
FIG 16
FIG 17
Fig16:Normal driving position
Fig17:Normal driving position
18

PLEASE NOTE: The rear stability of your Scooter is
dependent on a number of factors which you should consider
before attempting to climb an incline or other obstacle: (a)
your height; (b) the height of your seat; (c) your weight and
(d) the angle of the incline you are attempting to climb. All of
these factors can affect the rear stability of your Scooter.
If you are unsure of your capability to climb an obstacle,
then try another route - always think 'safety first'.
Please take care and be safe
PLEASE NOTE:
Please take care and be safe
LOADING YOUR SCOOTER
Warning:
Whether it is for a holiday, a day out to visit family or friends,
or a trip to the shop, your scooter can be taken along too.
Depending on the size or model of your car you will be able
to load your scooter in one of the following methods.
1. With the aid of a car hoist. Your fealer will be able to
advise on suitable equipment.
2. With the aid of ramps. Ramps will aid you to drive your
scooter straight into a people carrier or estate car, if the
rear opening is low you may have to remove your
scooter seat and lower handlebars. You will also require
a suitable folding ramp to lift your scooter into your car.
Your Distributor will be able advise you of suitable for
this purpose (See Fig 19).
3. Small hatchback or estate or estate car (See Fig 20.21).
4. If your car is small or has a conventional boot, your
scooter can be dismantled into six basic parts (See Fig 29).
1. Remove your seat or fold down the backrest as necessary
(Fig 22).
2. Lower the steering handlebars sufficiently to allow the
handlebars clearance under the top of your tail gate
entry, lock handlebars into position with black locking lever
(See Fig 9 page 10 ).
3. Set your speed 'min-max' adjustment dial (See Fig 10
page10 ).
4. Switch Scooter 'on' and gently operate the speed control
lever, to make a slow and controlled accent of ramp.
5. When you have safety loaded your scooter into your
vehicle switch off the power switch. Load ramp into vehicle.
To unload your scooter from your car follow points to 5
in reverse order.
Always make certain that you are on level ground when
loading and unloading your scooter from your carrying
LOADING YOUR SCOOTER
Warning:
FIG 18
Anti-tipping wheels
TRANSPORTING YOUR SCOOTER
FIG 19
FIG 21
FIG 20
19

vehicle. Always keep your body clear of your scooter to
prevent entrapment.
Always make certain your scooter tyres and your ramp
surface is dry, failure of observe this warning could make
your scooter unstable and put you in a dangerous situation.
Always make certain your ramps are at a sufficiently
low angle to maintain good stability and climbing
adhesion. Failure to observe this warning could put you
in a dangerous situation.
Never ride on your scooter when loading it into a
vehicle, warning could put you in dangerous situation.
Always make certain that your scooter and any ancillary
art is correctly strapped into your carrying vehicle to
prevent forward or reward movement during normal
driving or in the case of severe braking. Most of modern
vehicles have 'loading eyes' situation in the carrying
vehicles floor, use these with suitable straps to prevent
your scooter moving.
Always make certain your scooter drive system
is in the engaged position.
For convenience, you may want to dismantle your scooter to
allow it to be transported in a smaller space. Your scooter
can be dismantled into six individual parts (See Fig 29, Page
21). To enable scooter to be dismantled and transported
follow these simple instructions. This procedure can be
carried out without tools.
1. Drive your scooter close to the vehicle into which
you are about to load it. You may need some assistance
to life the components once your machine is dismantled.
2. Switch off your scooter. First remove the seat by releasing
the 'black' locking lever. Rotate the 90 to the right or left
(See Fig 1,4), lift the seat upwards slightly twisting.This will
release it from its mounting tube.
3. Lift up the rear cover, disconnect the rear light plug
and socket (See Fig 23), please safely to one side.
Note the cover is secure by Velcro tyre material at each
side at the front and in the centre. Unfasten the battery
straps by parting Velcro fastening.
4. Battery Plugs: Disconnect the two shrouded battery plugs
be gently pulling apart. These plugs are polarized and
only be fitted together one way. Do not force together
when reassembling.
5. Carefully lift up each battery with the handle provided.
Use two hands for this operation, one to steady the
battery .
Make certain that the carry handles is fastened
tightly prior to lifting the battery. Please the batteries on a
firm and safe surface. Your batteries are sealed and cannot
spill if tipped over. Always carry the batteries upright.
Do not place metal objects over open battery
terminals. BEWARE of short circuits. Make certain the
terminals are covered by the red and black plastic
protectors at all times.
6. Lift the front wire basket from the mounting bracket
on the handlebar cover, you will note this mounts on
three clips (Fig 24).
Warning:
DISMANTLING YOUR SCOOTER FOR JOURNEYS AWAY
Note:
Warning:
Warning:
DISMANTLING YOUR SCOOTER FOR JOURNEYS AWAY
Note:
Warning:
FIG 22
FIG 25
FIG 23
7. Lower the handlebars by releasing the locking lever.
The handlebar will rest on the floor mat. Note place
a soft piece of material under the painted console
for protection.
8. Electric Plugs: disconnect the 12 pin and 3 pin 'white'
connectors (Fig 25) by squeezing the small latch and
carefully pulling apart. These connectors are polarized and
FIG 24
20
This manual suits for next models
2
Table of contents
Other FREERIDER Scooter manuals

FREERIDER
FREERIDER FR510DX2 User manual

FREERIDER
FREERIDER FR510-F Operator's manual

FREERIDER
FREERIDER Luggie Series Operator's manual

FREERIDER
FREERIDER Luggie Classic Operator's manual

FREERIDER
FREERIDER FR 168-3A3 Operator's manual

FREERIDER
FREERIDER FR1 User manual

FREERIDER
FREERIDER FR-S13 Series Operator's manual

FREERIDER
FREERIDER X2 HUB User manual

FREERIDER
FREERIDER FR168-3P Operator's manual

FREERIDER
FREERIDER FR168-3X Operator's manual