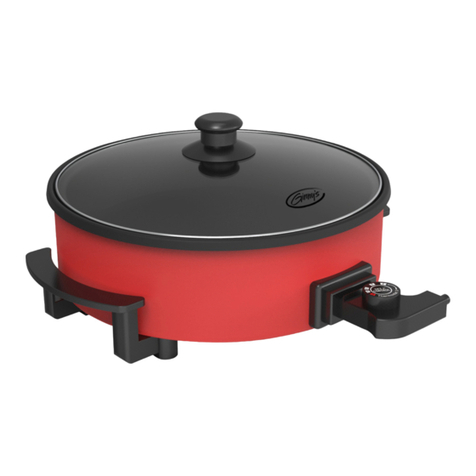
Ginnys GD–15B User manual

Easy 6-Quart Skillet
with Detachable Base
MODEL: GD–15B
Ginnys.com • 1.800.544.1590
BRAND

TABLE OF CONTENTS
“Life is happening.
We’ll help you live it...one moment at a time.”
READ ALL SAFETY INSTRUCTIONS BEFORE USING THIS
APPLIANCE
When using electrical appliances, basic safety precautions should always be
followed to reduce the risk of personal injury or property damage, including
the following:
1. Read all instructions carefully before use.
2. WARNING: To reduce the risk of fire, do NOT plug in with base assembly
removed.
3. Ensure that handles are assembled and fastened properly before using
this appliance.
4. Do NOT touch hot surfaces. Use handles or knobs.
5. To protect against electrical shock, do NOT immerse heat control, cord or
plug in water or other liquid.
6. Close supervision is necessary when any appliance is used by or near
children.
7. Children should be supervised to ensure they do not play with the appli-
ance.
8. Unplug from wall outlet when not in use and before cleaning.
9. Allow to cool before putting on or removing parts, and before cleaning the
appliance.
10. Do NOT operate any appliance with a damaged cord or plug, in the event
the appliance malfunctions, or has been damaged in any manner.
11. The use of accessory attachments not recommended by the appliance
manufacturer may cause injuries.
12. This appliance is not intended for deep frying foods.
13. Do NOT use outdoors.
14. Do NOT let the cord hang over the edge of table or counter or touch hot
surfaces.
President, Ginny’s
IMPORTANT SAFEGUARDS 3
2IMPORTANT SAFEGUARDS 32 IMPORTANT SAFEGUARDS
Ginnys.com •1.800.544.1590
“Thank you for purchasing a Ginny’s Brand Easy Skillet
with Detachable Base! Get ready for more efficiency in
the kitchen with a gorgeous ceramic-coated aluminum
skillet pan that comes right off its heating base. Roast,
fry, grill, stew or bake...detach and take skillet pan right
to the table for serving, clean and store (with handles
conveniently tucked inside). It’s so perfect for potlucks,
parties and one-dish meals at home, you’ll wonder how
you ever got along without one. Enjoy!”
SAVE THESE INSTRUCTIONS
Important Safeguards............... 3-4
Short Cord....................................5
Specications............................... 5
Assembly......................................6
Part Names...................................7
How to Operate............................8
Cleaning & Care...................... 9–10
Recipes................................. 11–14
Warranty .....................................15

15. Do NOT place on or near a hot gas or electric burner, or in a heated oven.
16. It is recommended that this appliance not be moved when it contains hot
oil or other hot liquid. If it must be moved, use extreme caution.
17. Always attach the heat control to the appliance first, then plug cord into
wall outlet. To disconnect, turn control to “OFF”, then remove plug from
wall outlet.
18. Do NOT use this appliance for other than intended use.
19. This appliance is not intended for use by persons (including children) with
reduced physical, sensory or mental capabilities, or lack of experience and
knowledge, unless they have been given supervision or instruction con-
cerning use of the appliance by a person responsible for their safety.
20. This appliance is not intended to be operated by means of an external
timer or a separate remote-control system.
21. Ensure that the correct heat control probe with power cord is used with
this appliance.
4
IMPORTANT SAFEGUARDS
SPECIFICATIONS
Power Consumption: 120V/60Hz, 1400W
Cooking Surface: 14.5" x 11.5" x 3" deep
Capacity: 6 quarts
Cord Length: 38"
PRECAUTIONS/SPECIFICATIONS 5
IMPORTANT SAFEGUARDS
4 5
IMPORTANT SAFEGUARDS Ginnys.com • 1.800.544.1590
IMPORTANT SAFEGUARDS
SHORT CORD INSTRUCTIONS
1. A short power supply cord is provided to reduce the risk of becoming
entangled in or tripping over a longer cord.
2. Longer detachable power-supply cords or extension cords are available
and may be used if care is exercised in their use.
3. If a long detachable power cord or extension cord is used:
•Themarkedelectricalratingofthedetachablepowersupplycordor
extension cord should be at least as great as the electrical rating of
the appliance.
•Iftheapplianceisofthegroundedtype,theextensioncordshould
be the same type 3-wire.
•Thelongercordshouldbearrangedsothatitwillnotdrapeover
the counter top or table top where it can be pulled on by children or
tripped over.
SHORT CORD

7
INSTALLATION & GROUNDING
6
10 PART NAMES
Ginnys.com • 1.800.544.1590
6 7
PART NAMES
Parts List from vendor manual goes
here
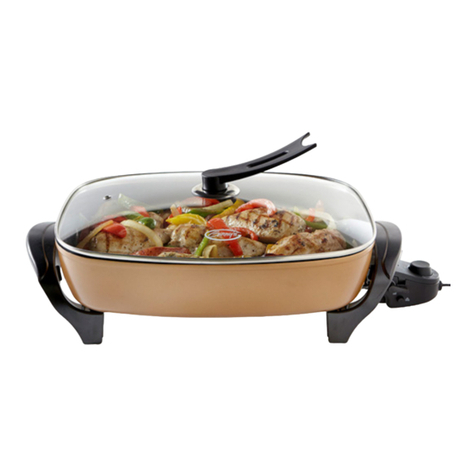
1. Handle
2. Glass Lid
3. Ceramic-Coated Aluminum Skillet
4. Folding Handle
5. Removable Base
6. Thermostat Heat Control Probe with Power Cord
7. Socket
ASSEMBLY
Skillet Assembly:
1. Place the removable base on a flat
surface, with the rubber feet down
(Figure A). Lift the handles and flip to
an outward position (Figure B).
2. Set the skillet pan onto the base so
that the supports fit into the recessed
areas on the base. (Figure C).
Figure A from vendor
manual here
Figure B from vendor
manual here
Before First Use:
1. Remove all packing materials and wash the skillet according to the “Care &
Cleaning” instructions on page 8.
2. Before using your skillet, it must be fully assembled according to the instructions
below.
Lid Assembly:
1. Using the image to the right as a
guide, assemble the handle, sealing
ring and screw onto the glass lid.
Need lid assembly
image here!!!

Hand wash the pan and cover before initial use, and after each subsequent use.
Do NOT immerse the Skillet (3) or Thermostat Heat Control Probe (6) in water, or
let it come in contact with any liquid.
To disassemble the skillet for cleaning and storage:
1. Lift the skillet pan off of the base and clean as described below.
2. Push the handles down, until they fold into the base.
3. For compact storage, rotate the handles up and inward and place the base in
the pan in an inverted position so that the rubber feet are facing up. Then place
the cover upright onto the pan (see figure below).
UTENSILS & COOKING CUSTOMER REVIEWS
CLEANING & CARE
8 9
HOW TO OPERATE Ginnys.com • 1.800.544.1590
8 9
Do NOT use steel wool or abrasive
kitchen cleaners.
Soaking the skillet to loosen food
residue is not necessary. If, however,
soaking the skillet is desired, do NOT
soak for more than 2 hours. Soaking
for more than 2 hours may damage
the ceramic nonstick finish.
Need image from vendor manual
here...
HOW TO OPERATE
CAUTION: This product is not intended to melt wax, gels, plastics, glue or other
materials for making candles, or for other hobbyist activities, or in any
commercial or business application.
1. Place assembled skillet on a dry, level heat-resistant surface.
2. Insert the Thermostat Heat Control Probe (6) into the skillet so the two
electrical pins on the skillet are fully inserted into the heat control. Connect
cord to a 120V AC electrical wall outlet only.
3. Turn Thermostat Heat Control Probe (6) to desired temperature. Remove
cover and preheat skillet. The pilot light will go off when the selected
temperature is reached (this takes approximately 5–10 minutes).
NOTE: As the skillet heats up, you may hear a clicking sound; this is due to the
expansion of the metal as it heats. It is normal. You may also notice this
sound as the unit cools down.
4. Prepare food for cooking. Because the skillet features a ceramic nonstick
finish, food may be prepared with little or no oil.
5. Place food in skillet and cook according to the temperature requested. Heat
should be adjusted according to personal preference and food being cooked.
During cooking, pilot light will go on and off (this indicates that the desired
temperature is being maintained).
NOTE: For best results, use heat resistant nylon, plastic or wood utensils in
the skillet. Do NOT use metal utensils as they may damage the ceramic
nonstick surface. Do NOT cut foods on the cooking surface.
6. Turn Thermostat Heat Control Probe (6) to “OFF” position when cooking is
complete. Unplug heat control from wall outlet, then from the appliance. Allow
skillet to cool before cleaning.
The Thermostat Heat Control Probe (6) on your Easy Skillet has a “simmer”
setting, along with a temperature range from 220–420°F (in 50° increments).
In time, the ceramic nonstick finish may darken over the heating element. To
remove this discoloration, use a non-abrasive cleaner, available at most grocery
and hardware stores. Follow the cleaner’s instructions, being careful that any
cleaning solution coming in contact with the exterior of the appliance is wiped off.
•Aftertreatingtheskilletwithacommercialcleaner,wipethecookingsurface
lightly with cooking oil before using.

PART NAMES & CONTROL PANEL PART NAMES & CONTROL PANEL 11
1010
10 11
RECIPES
Ginnys.com • 1.800.544.1590
10 11
RECIPES
Sweet and Sour Chicken
INGREDIENTS:
1. Heat oil over medium-high heat in skillet.
2. Season chicken strips with salt and pepper and add to pan. Brown chicken,
then move to plate.
3. Add red and green peppers to skillet and cook for 1 minute.
4. Stir in pineapple chunks, juice, vinegar, sugar and chicken stock.
5. Bring to a simmer. Continue to simmer until sauce begins to reduce.
6. Stir in cornstarch mixture while simmering.
7. Stir in chicken strips and cook for 5 minutes. Serve over cooked rice.
Serves 4.
2 Tbsp. vegetable oil
Salt and pepper
1/2 cup chopped red pepper
1 cup canned pineapple chunks, with 1/2
cup reserved juice
1/4 cup chicken stock
2 boneless chicken breasts,
sliced into strips
1/2 cup chopped green pepper
3 Tbsp. rice wine vinegar
3 Tbsp. light brown sugar
4 tsp. cornstarch, mixed with 4
tsp. water
Kielbasa Stew
INGREDIENTS:
1. Cut kielbasa into 1/2" chunks.
2. Heat oil in skillet on medium-high heat. Lightly brown sausage and onion. Stir
frequently to prevent burning.
3. Add the thyme, vegetables and broth to the skillet and cover.
4. Bring to a boil, then reduce heat to a simmer. Cook until vegetables are
tender.
5. Take 2-3 Tbsp. of broth liquid and mix with flour, then stir back into the skillet to
thicken.
6. Serve over rice or with a crusty bread.
Serves 3-4.
1 lb. kielbasa (polish sausage)
2 tsp. vegetable oil
2 cups mixed vegetables (thawed)
1 Tbsp. all-purpose flour
1 med. onion, sliced
1/2 tsp. crushed thyme
8–10 oz. beef broth
CLEANING & CARE (cont’d)
The outside finish of the skillet is easy to keep attractive and looking new. Simply
wipe spills and drips as they occur. If food should happen to scorch and burn onto
the pan, it can be removed with warm, sudsy water and a cleaning pad. Rinse
and wipe dry.
Glass Cover Care and Use Instructions:
•DoNOTusecoverifitischippedorcracked.Handlecovercarefullyandavoid
impact.
•DoNOThandlehotcoverwithwettowel,orplacehotcoveronacoldorwet
surface.
•Allowthedishwashersafecovertocoolbeforewashing.Keepthecoverclean.
Do NOT use steel wool cleaning pads or other abrasive substances as they
can scratch or weaken the glass. Nonabrasive pads or powders may be used if
necessary.
•DoNOTscrapeorgougeglasswithhardorsharputensils.
•CAUTION:Over-tighteningthescrewscanresultinstrippingthemorcracking
the handles or cover.
IMPORTANT: To ensure continued temperature accuracy of the Thermostat Heat
Control Probe (6), avoid removing the lid when cooking. Remove the lid when
necessary to stir, or remove food.

HOW TO OPERATE YOUR MICROWAVE 12 HOW TO OPERATE YOUR MICROWAVE 13
12 13
RECIPES Ginnys.com • 1.800.544.1590
12
Fish with Olive and Tomato Sauce
INGREDIENTS:
1. Sprinkle fish with salt and pepper.
2. Heat 1 Tbsp. olive oil in a skillet over medium-high heat.
3. Add the fish and cook (in 2 batches if necessary), turning once halfway through,
until golden brown and opaque in the center, 4-6 minutes total.
4. Transfer the fish to a serving platter; tent with foil to keep warm.
5. Reduce to low heat and add the remaining 1 Tbsp. oil, tomatoes, wine and garlic
to the pan.
6. Return to medium heat, cover and cook, stirring occasionally (until most of the
tomatoes are broken down), 4-5 minutes.
7. Stir in olive tapenade and cook for 1 minute more.
8. Serve with fish topped with sauce.
Serves 4.
1 1/4 lbs. tilapia (or other white fish)
1/4 tsp. pepper
1 pint cherry tomatoes, halved if large
2 cloves garlic, finely chopped
1/4 tsp. salt
2 Tbsp. extra-virgin olive oil, divided
1/4 cup dry white wine
3 Tbsp. olive tapenade
RECIPES
Family-Style Meatballs
INGREDIENTS:
1. Pour the marinara sauce into skillet, heated to medium-high.
2. Combine remaining ingredients in a large bowl.
3. Shape into small-sized balls.
4. Place the meatballs into simmering pasta sauce, do NOT stir for at least 20
minutes or you will risk breaking the meatballs.
5. Continue cooking in the simmering sauce for another 20 minutes.
6. Check that meatballs are cooked through before serving.
7. Serve over cooked egg noodles or spaghetti.
Serves 6.
18-24 oz. jar of favorite marinara sauce
1 1/2 lbs. ground beef (or mix 1 lb.
beef and 1/2 lb. ground pork)
1 large egg, slightly beaten
1/3 cup breadcrumbs
1/3 cup milk
1/2 cup grated parmesan cheese
1 tsp. dried garlic
1 tsp. fresh ground black pepper
1/2 tsp. dried oregano
1/4 cup chopped fresh parsley
1-2 tsp. salt
RECIPES
Chicken Parmesan
INGREDIENTS:
1. Pound out breasts until they are 1/4" thick. (Place between plastic wrap and
use rolling pin or meat mallet.)
2. Combine flour, salt and pepper on a plate.
3. Beat eggs in bowl with water.
4. Combine parmesan and bread crumbs on a plate.
5. Coat breasts with flour mixture, dip into beaten egg mixture and then into par-
mesan and bread crumb mixture.
6. Place breasts on foil lined baking sheets and refrigerate at least 1 hour (helps
coating stick to chicken before frying).
7. Heat 1 tsp. olive oil and 1 tsp. butter in skillet on medium/low heat and fry 2–3
breasts at a time for 2–4 minutes on each side until cooked through. Place in
200°F oven to stay warm.
8. Add more oil/butter to skillet and cook remaining breasts.
9. Serve with light salad.
Serves 6.
6 boneless, skinless chicken breasts
1 tsp. salt
2 large eggs
1/2 cup grated parmesan cheese
2 tsp. olive oil, divided
1 cup all-purpose flour
1/2 tsp. black pepper
1 Tbsp. water
1 1/4 cups bread crumbs
1 Tbsp. unsalted butter
13

PART NAMES & CONTROL PANEL PART NAMES & CONTROL PANEL 11
1010
10 11
WARRANTY
Ginnys.com • 1.800.544.1590
14 15
RECIPES
WARRANTY
Ginny’s warrants this product free from defects in material
and workmanship for one year from provable date of purchase.
Within this warranty period, Ginny’s will repair or replace,
at its option, defective parts at no charge, provided the
product is returned, freight prepaid with proof of
purchase to Ginny’s.
Allow 2-4 weeks for return shipping.
This warranty does not cover improper installation, misuse,
abuse or neglect on part of the owner.
Warranty is also invalid in any case that the
product is taken apart or serviced by an
unauthorized service station.
This warranty gives you specic legal rights
and they may vary from state to state.
THE FOREGOING WARRANTIES ARE IN LIEU
OF ALL OTHER WARRANTIES AND CONDITIONS,
EXPRESS OR IMPLIED,
INCLUDING BUT NOT LIMITED TO THOSE OF
MERCHANTIBILITY OR FITNESS
FOR A PARTICULAR PURPOSE.
Customer Service
Phone: 1•800•544•1590
8:00 am to Midnight, Monday through Friday
RECIPES
Skillet Sausage Supper
INGREDIENTS:
1. Heat 1 Tbsp. oil in skillet to medium heat. Add ground chuck and chorizo, cook
until brown, breaking it up as it cooks.
2. Season with salt and pepper, to taste.
3. Add potatoes, onion and 1 more Tbsp. oil, if needed.
4. Stir and combine, cook 10 minutes, until crust forms on bottom.
5. When potatoes are almost cooked through, add garlic, rosemary and red pep-
per.
6. Cook and stir until potatoes are tender.
7. Garnish with parsley before serving.
Serves 4.
3 Tbsp. olive oil
1/2 lb. fresh chorizo
2 med. red potatoes, diced small
1 clove garlic, minced
1/2 tsp. crushed red pepper flakes
1 Tbsp. parsley (fresh is best), chopped
1/2 lb. ground chuck
Salt and pepper
1/2 large Vidalia onion, chopped
1 tsp. rosemary leaves, chopped
Table of contents
Other Ginnys Kitchen Appliance manuals

Ginnys
Ginnys 735655 User manual

Ginnys
Ginnys 724610 User manual

Ginnys
Ginnys 710213 User manual

Ginnys
Ginnys DK-10 User manual

Ginnys
Ginnys XH-40T User manual

Ginnys
Ginnys 717246 User manual

Ginnys
Ginnys 740533 User manual

Ginnys
Ginnys 60099 User manual

Ginnys
Ginnys SBS-0110 User manual

Ginnys
Ginnys 779570 User manual

Ginnys
Ginnys 735649 User manual

Ginnys
Ginnys 724554 User manual

Ginnys
Ginnys HOUS-HS-3318 User manual

Ginnys
Ginnys TX-103S User manual

Ginnys
Ginnys GR 41140 User manual

Ginnys
Ginnys DCC0916 User manual

Ginnys
Ginnys DKM9801 User manual

Ginnys
Ginnys 733060 User manual

Ginnys
Ginnys 740544 User manual

Ginnys
Ginnys 773774 User manual