Godex 5VDC User manual
Note: 1. More details refer to User Manual, please visit: www.godexintl.com;2. For better readability, please print this document with laser printer.
註: 1.詳細內容請參閱《使用者手冊》,下載網址 www.godexintl.com;2.為確保條碼品質,請使用雷射印表機進行列印
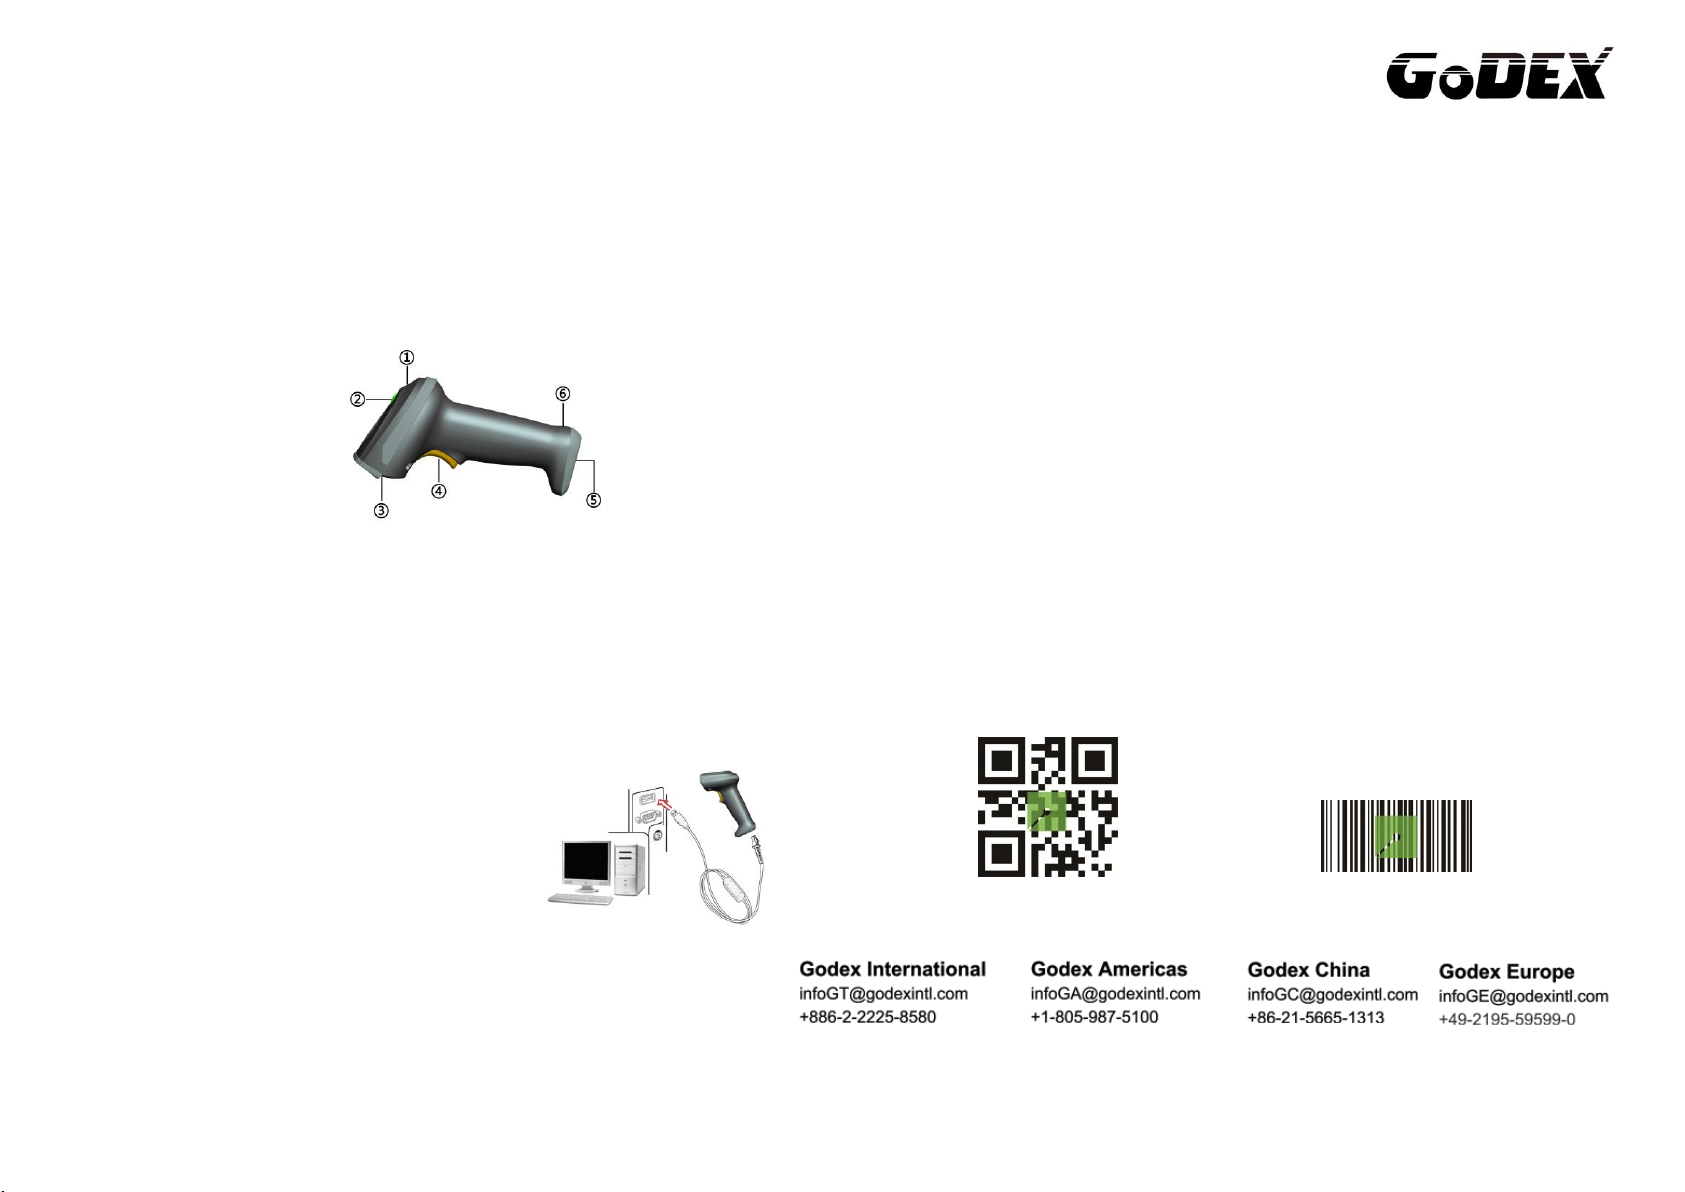
①蜂鳴器
②LED 指示燈
③條碼讀取視窗
④按鍵
⑤RJ45 接口
⑥電纜線拆除孔
條碼掃描器快速指引
Image Barcode Scanner Quick Guide
掃描器外觀圖
Parts of the scanner
①Beeper
②LED
③Exit window
④Trigger
⑤RJ-45 phone jack connector
⑥Release-hole of the cable
連接電線方式
Installing the cable
1. Refer to the below picture to connect the host
with the scanner.
2. Ensure that all connections are secure.
3. If the installation is successful, the beeper will beep and LED will light.
1. 請參考下圖,連接設備和掃描器。
2. 檢查連接是否正確,連接處是否穩固。
3. 打開設備電源,如連接正確,掃描器的蜂鳴器和 LED 燈會發出聲光提示。
掃描方式
Reading techniques
1. Press and hold the trigger, the scanner projects a green-squared LED which allows
positioning the barcode within its field of view, and turns on the white LED for
illumination.
2. When reading a barcode, the green-squared LED will be smaller when the scanner
is closer to the barcode and larger when it farther from the barcode. Please hold
the scanner at an appropriate distance from the barcode, and center the green-
squared LED on the barcode.
3. On a successful barcode reading, the scanner will beep once, and the green-
squared LED and white LED will be turned off temporarily. Then the scanner
transmits barcode data to the host.
1. 按住掃瞄器按鍵,掃描器會投射出一個瞄準條碼用的綠色方塊,並同是開起白色照明燈。
2. 掃瞄條碼時,綠色指示方塊會隨著掃瞄器靠近條碼而縮小、遠離條碼而變大。请移動掃瞄器
和條碼到一個適合讀取的距離,且綠色指示方塊應在條碼的中心位置。
3. 若讀取成功,掃描器會發出一聲”嗶”聲響,綠色指示方塊與白色照明燈會暫時熄滅,並同時
將條碼資料傳輸給主機。
A standard packing includes a scanner, a USB cable and a quick guide.
Use a piece of dry and soft cloth when cleaning the scanner is in need.
掃描器的工作電壓是 5VDC,在連接掃描器與設備前,請檢查電源的額定電壓。
每套掃描器標準配置包括:掃描器一支、USB 電纜線一條、《快速指引》一份。
清潔條碼讀取窗上的汙漬和灰塵時,推薦使用鏡頭拭紙,輕輕擦拭。
13F, No.168, Jian-Kang Rd,
Zhonghe Dist,
New Taipei City 235,
Taiwan
3963 Camino Ranchero,
Camarillo, California 93012,
United States
3F, No.303
Jiang Chang 3 Road
Shanghai, China
Industriestraße 19
42477 Radevormwald,
Germany

Note: 1. More details refer to User Manual, please visit: www.godexintl.com;2. For better readability, please print this document with laser printer.
註: 1.詳細內容請參閱《使用者手冊》,下載網址 www.godexintl.com;2.為確保條碼品質,請使用雷射印表機進行列印
D3A123
RoHS
回復出廠設定與顯示版本資訊
Return default parameters and version information
Default value initialization
(恢復出廠設定)
Firmware version list
(顯示版本資訊)
Programming instruction
Scan “Option bar code”
Scan “The 1st character of option”
Scan “The 2nd character of option”
Scan “END”
Example: To set Flow control to be XON/XOFF
一般參數設定流程圖
示例: 設置流量控制模式為 XON/XOFF
支架安裝示意圖
Assembling the stand
Note: The stand is an optional accessory.
1. Follow above steps and tighten the screw.
2. Bend the neck to the desired position for scanning.
3. Screw mounting: Screw #10 wood screw into each screw-mount-hole①until the
base of the stand secured.
注意:支架為選配件
1. 按上圖所示裝配好支架。
2. 彎曲蛇形支架管到合適的角度以便進行掃描。
3. 如需將支架固定到桌面,可用兩根 #10 螺絲穿過預留的螺絲孔(圖中①處)進行固定。
Other Godex Barcode Reader manuals


Godex
Godex GS550 User manual

Godex
Godex EZPi1000 Series User manual

Godex
Godex ZX1200i User manual

Godex
Godex GS220 User manual

Godex
Godex EZPi1000 Series User manual

Godex
Godex RT200i User manual

Godex
Godex G500 User manual

Godex
Godex EZ2050 User manual

Godex
Godex AP16-F User manual

Godex
Godex DT2 User manual


