Godox SL150IIBi User manual

Instruction Manual
705-SL152B-00
Made in China
: 2
: 0755-29609320(8062) : 0755-25723423 : godox@godox.com
godox.com
Add: Building 2, Yaochuan Industrial Zone, Tangwei Community, Fuhai Street, Bao’an District,
Shenzhen, China Tel: +86-755-29609320(8062) Fax: +86-755-25723423 E-mail: [email protected]
GODOX Photo Equipment Co., Ltd.
LED
Bi-color LED Video Light

LEDSL150IIBiSL150II
·(2800K~6500K)
·9FX
·
·2.4GLED
·0%-100%
·1632
·U
·
·LCD
·
•
40
LED
- 01 - - 02 -
FX GR CH
LED
U
2
1
&
DIM
LCD
C
LCD
SET
C
LCD
()
CH/GR
SET
FX
FX
GR CH
CCT/FX

*1
RC-A6 *1
*1 *1
*1 *1
- 03 - - 04 -
*1
LED
/
/ID
LEDLEDON
1.1 LED
1.2 LEDFX
FXFX9FX
FX1
Flash1
FX2
Flash2
FX3
Storm1
FX4
Storm2
FX5
TV
FX6
*6500K
FX7
FX8
FX9
1.3 LEDLED

FX GR CH
CCT/FX
- 05 - - 06 -
FX GR CH
CCT/FX
DIM
0%-100%LCD
IDGRCH
IDDIM
IDIDOF01-99
LED
CCT/FX
2800K~6500K,LCD
FX GR CH
CCT/FX
FX GR CH
CCT/FX
LEDSL150IIBiRC-A6
LED3299ID
LEDRC-A6(CH)(GR)ID
/
·CH/GR "-" "+"
(A~F, 0~9)
· CH/GR2 "-" "+"
(1~32)
ID
· CH/GR "-" "+" ID(IDOFF,
01-99)
· "-" "+"
· SET "-" "+"
"-" "+"
2800K~6500K
SETCH/GR
SET
LED
GRCHID
GRGR
GR
ABCDEF 0-9
CHCH
CH, 1-32
FX GR CH
CCT/FX

- 07 - - 08 -
100%(LUX1)
CRI
TLCI
()
()
SL150IIBi
AC100V-240V(50/60HZ)
150W
2800~6500K
30000
96
97
0%-100%
-1040
32
16(ABCDEF0-9)
34x20x16cm
3.07Kg
*
•
• 1
•
•
•
•
•
()
RC-A6
3.0V(AAA*2)()
2.4GHz
50
32
16(A-F0-9)
1
-10 ~ 40°C
120*38*15mm
30g
: CMIIT ID:2020DP13510

- 09 - - 10 -
When using your photographic equipment, basic safety precautions should
always be followed, including the following:
1. Read and understand all instructions before using.
2. Close supervision is necessary when any appliance is used by or near children.
Do not leave appliance unattended while in use.
3. Care must be taken as burns can occur from touching hot parts.
4. The appliance switch is provided with the symbols 0 indicating off and 1
indicating on. The symbols and may be used for this purpose.
5. Do not operate appliance with a damaged cord or if the appliance has been
dropped or damaged – until it has been examined by a qualified serviceman.
6. Position the cord so that it will not be tripped over, pulled, or contact hot
surfaces.
7. If an extension cord is necessary, a cord with a current rating at least equal to
that of the appliance should be used. Cords rated for less amperage than the
appliance may overheat.
8. Always unplug appliance from electrical outlet before cleaning and servicing and
when not in use. Never yank cord to pull plug from outlet. Grasp plug and pull to
disconnect.
9. Let appliance cool completely before putting away. Loop cord loosely around
appliance when storing.
10. To reduce the risk of electric shock, do not immerse this appliance in water or
other liquids.
11. To reduce the risk of electric shock, do not disassemble this appliance, but take
it to a qualified serviceman when service or repair work is required. Incorrect
reassembly can cause electric shock when the appliance is used subsequently.
12. The use of an accessory attachment not recommended by the manufacturer
may cause a risk of fire, electric shock, or injury to persons.
13. Connect this appliance to a grounded outlet.
14. Disconnect this unit from its source of supply before replacing the projection
lamp.
15. This appliance has a polarized plug (one blade is wider than the other). To
reduce the risk of electric shock, this plug is intended to fit in a polarized outlet
only one way. If the plug does not fit fully in the outlet, reverse the plug. If it still
does not fit, contact a qualified electrician. Do not modify the plug in any way.
IMPORTANT SAFETY INSTRUCTIONS
SAVE THESE INSTRUCTIONS
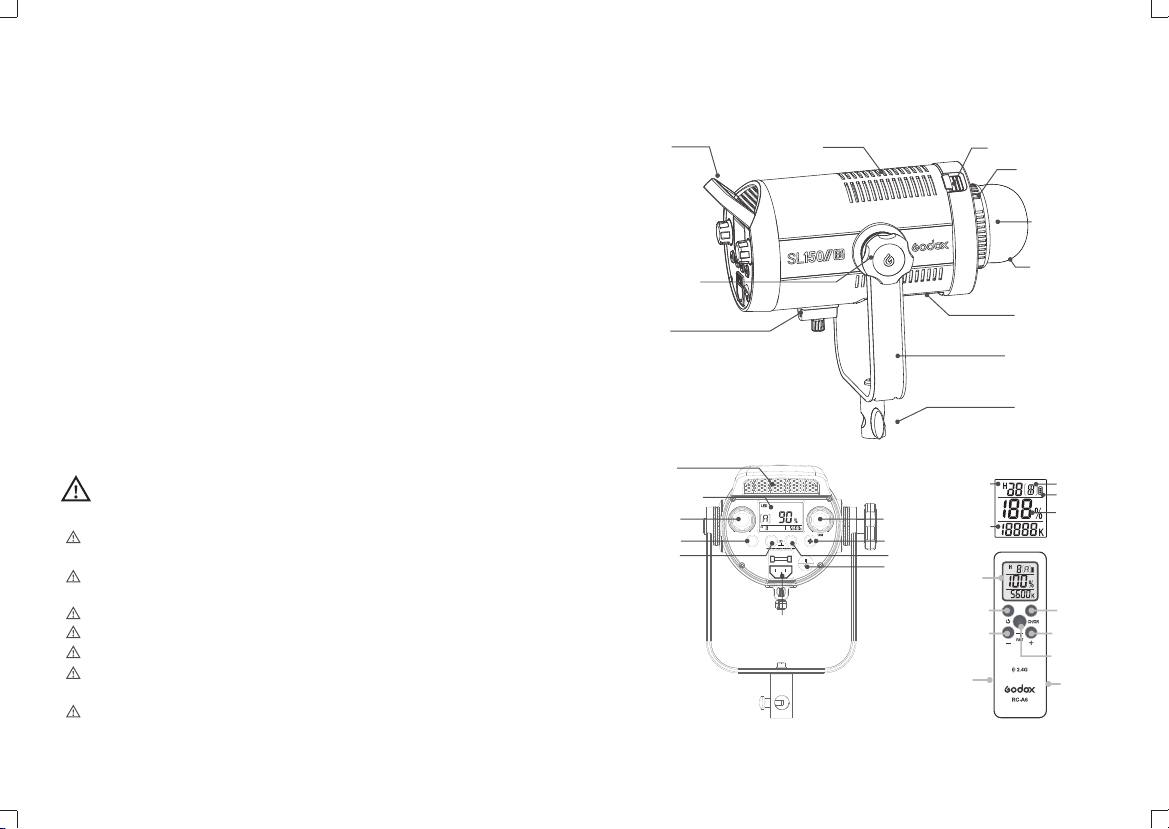
Thank you for purchasing this Godox Product!
With 8 special effects modes, strong power, soft illumination and abundant
functions, Bi-color LED Video Light SL150IIBi can achieve creative shooting easily.
Main Features:
• With color temperature adjustment from 2800K to 6500K.
• With 9 FX special effects mode to simulate various of shooting scene.
• Silent mode: without noises and interference.
• Built-in Godox 2.4G wireless & wirelessly adjust parameters.
• With stable light source and 0% to 100% precise light adjustment.
• With 16 groups and 32 channels wireless control.
• With U-type bracket to adjust different angles easily.
• Bowens-mount enables to install various of accessories.
• Clear LCD display.
• Excellent heat dissipation.
Always keep this product dry. Do not use in rain or in damp conditions.
Do not disassemble. Should repairs become necessary, this product must be
sent to an authorized maintenance center.
Keep out of reach of children.
As this product do not have waterproof function, please take measures of
waterproof in rainy or damp environment.
Do not use the product in the presence of flammable gases, chemicals and
other similar materials.
CAUTION: Hot parts!When the product is always on and flickering,please do
not touch the high temperature part of the LED head.
When replacing product accessories,please turn off the LED light and perform
a cold cut.
Foreword
Warning

FX GR CH
CCT/FX
- 11 - - 12 -
Name of Body
Power Input Socket
& Fuse Holder
Power Switch
DIM
Select Dial
Fan Button
LCD Display
Bracket
Screw
Air Inlet
C
SET
C
CCT/FX
Select Dial
FX Button
GR Button CH Button
Handle
Umbrella Input
U-type Bracket
Thermovent 2
Protect Cover
Bowens Mount
Accessory
Locking Ring
Thermovent 1
Remote Control
Group
Battery Level
Indication
Brightness
Channel
Color
Temperature
LCD Panel
(Black in White)
Power
Switch
Battery
Compartment
Cover
Battery
Compartment
SET Button
“+” Button
“-” Button
CH/GR
Button
Bracket Screw
LCD Panel
Group
LCD Panel
Color Temperature
Power/Light Brightness
Channel/ID
Special Effect
Included Items
Body *1 Reflector *1 Protect Cover *1
Power Cable *1 Instruction
Manual *1
RC-A6 Remote
Control *1
Frosted Cover *1
LED Light

Mode Selection
1.1 LED silent mode: in this mode, the fan is turned off. There is no noises and
interference in this mode.
1.2 LED special effects modes: Short press the FX button to enter or exit the special
effects. When entering the FX modes, FX icon will be displayed on the LCD panel. Then,
turn the FX select dial to choose one mode from the 9 special effects modes to achieve
creative shooting.
1.3 LED strong power mode: turn on the fan to enter LED strong power mode and the
power will up to the maximum value in this mode.
- 13 - - 14 -
Separately Sold Accessories
The product can be used in combination with the following accessories sold
separately, so as to achieve best photography effects: Power Inverter, Softbox,
Photographic Umbrella, Light Stand, Barndoor, Snoot, etc.
Power Connection
Use the power cord to connect the LED light to an AC power source and turn on the
power switch.
Operation
Note: Only 6500K color temperature can be displayed in special effects mode.
Light Brightness Adjustment
In LED mode, the light brightness of
LED light can be adjusted by turning
the DMX select dial from 0% to
100%. And the light brightness will
be clearly displayed on the LCD
Panel.
FX GR CH
CCT/FX
FX GR CH
CCT/FX
FX GR CH
CCT/FX
FX GR CH
CCT/FX
FX GR CH
CCT/FX
Color Temperature
Adjustment
In continuous LED mode, turn the
CCT/FX select dial to adjust color
temperature from 2800K to 6500K.
And the color temperature value will
be precisely displayed.
Group GR, Channel CH and
ID Setting
GR Setting: Short press GR button
to choose group from A, B, C, D, E,
F and 0 to 9.
CH Setting: Short press CH button
to choose channel from 1 to 32.
ID Setting: Long press GR and CH
button to enter ID setting interface.
Then, turn the DIM select dial to
choose ID from OF and 01 to 99.
Display
Scene
FX1
Flash1
FX2
Flash2
FX3
Storm1
FX4
Storm2
FX5
TV
FX6
Broken bulb
FX7
Camdle
FX8
Fire
FX9
Firework

- 15 - - 16 -
Note: The wireless signal can be received only when the controller of LED
light is powered on.
Wireless Control
With 2.4G wireless system, Bi-color LED Video Light SL150IIBi have receive and
control function. Up to multiple groups of LED lights can be controlled. 32
channels and 99 wireless IDs are available with strong anti-interference capability.
Please set the channels, groups and IDs of LED light to the same as those of RC-
A6 remote control before usage.
Adjusting Channel/Group with the Remote Control
● Press the CH/GR button and the group icon blinks.
Press the“-”“+”button to choose a group (A to F, 0 to 9).
● Press the CH/GR button twice and the channel icon blinks.
Press the“-”“+”button to choose a channel (1 to 32).
Adjusting ID with the Remote Control
● Double click the CH/GR button and press the“-”“+”button to choose ID from
OFF or 01 to 99.
Adjusting Light Brightness with the Remote Control
● Press the“-””+“button to adjust the light brightness.
Adjusting Color Temperature with the Remote Control
● Press the SET button of the remote control and the color temperature icon
blinks. Press the“-”“+”button to adjust the color temperature.
Remote control reset: press down "-" and "+" button simultaneously to reset.
Setting color temperature range
The factory setting of remote control's color temperature range is 2800-6500K.
In order to use remote control conveniently, color temperature range settings
are added: when the remote control is off, hold down the SET button and turn it
on to enter color temperature adjusting interface. Press CH/GR button to switch
the lowest and highest color temperature value and press "-" or "+" button to
change the value. Press the SET button to confirm it.
* Product design and specifications are subject to change without notice.
Technical Data
LED Video Light
Power Supply
Output Power
Color Temperature Range
100% Light Brightness(LUX,1M)
CRI
TLCI
Light Brightness Range
Operation Temperature
Channel
Group
Dimension (not included a
standard reflector)
Net Weight(not include reflector
and protect cover)
SL150IIBi
AC100V-240V(50/60HZ)
150W
2800~6500K
≈30000
96
97
0%-100%
-1040
32
16(A, B, C, D, E, F, 0-9)
34x20x16cm
3.07Kg
Remote Control
Power Supply
Wireless Frequency
Distance (emptiness)
Channel
Group
Standby Time
Operation Temperature
Dimension
Net Weight
RC-A6
3.0V(AAA*2)(not include)
2.4GHz
50m
32
16 groups(A-F, 0-9)
Over one year
-10 ~ 40°C
120*38*15mm
30g

- 17 - - 18 -
Maintenance
This product, except consumables e.g. cable, is supported with a one-year
warranty.
Avoid sudden impacts and the product should be dedusted regularly.
Maintenance of the flash must be performed by our authorized maintenance
department which can provide original accessories.
Unauthorized service will void the warranty.
If the product had failures or was wetted, do not use it until it is repaired by
professionals.
Changes made to the specifications or designs may not be reflected in this
manual.
FCC Statement
This device complies with part 15 of the FCC Rules. Operation is subject to the
following two conditions: (1) This device may not cause harmful interference, and (2)
this device must accept any interference received, including interference that may
cause undesired operation.
Any Changes or modifications not expressly approved by the party responsible for
compliance could void the user's authority to operate the equipment.
Note: This equipment has been tested and found to comply with the limits for a Class
B digital device, pursuant to part 15 of the FCC Rules. These limits are designed to
provide reasonable protection against harmful interference in a residential installation.
This equipment generates uses and can radiate radio frequency energy and, if not
installed and used in accordance with the instructions, may cause harmful interference
to radio communications. However, there is no guarantee that interference will not
occur in a particular installation. If this equipment does cause harmful interference to
radio or television reception, which can be determined by turning the equipment off
and on, the user is encouraged to try to correct the interference by one or more of the
following measures:
- Reorient or relocate the receiving antenna.
- Increase the separation between the equipment and receiver.
- Connect the equipment into an outlet on a circuit different from that to which the
receiver is connected.
- Consult the dealer or an experienced radio/TV technician for help.
Table of contents
Other Godox Lighting Equipment manuals

Godox
Godox ML60 LED Light User manual

Godox
Godox ML-150 II User manual

Godox
Godox DS300II User manual

Godox
Godox UL60Bi User manual

Godox
Godox SL150II User manual

Godox
Godox R1 User manual

Godox
Godox M1 User manual

Godox
Godox Knowled M300Bi User manual

Godox
Godox WT25R User manual

Godox
Godox RING72 User manual

Godox
Godox AD300Pro User manual

Godox
Godox KNOWLED M600 Bi User manual

Godox
Godox VL150 User manual

Godox
Godox ML30Bi User manual

Godox
Godox ST250 User manual

Godox
Godox KNOWLED AT200Bi User manual

Godox
Godox LED126 User manual

Godox
Godox S30 User manual

Godox
Godox LED500W User manual

Godox
Godox LEDP120C User manual