Gude GRK 250 User manual

# 5502
0
Deutsch 3
English 9
Čeština 15
Slovenčina 21
Français 27
Nederlands 33
Italiano 39
Magyar 45
GRK 250/300 LP
© Güde GmbH & Co. KG - Birkichstrasse 6 – D-74549 Wolpertshausen

2
11
8
9
57
4
14
12
33
2
10
l
5
11
6
6
13
15
4
6
16
7
2

DE Lesen Sie bitte diese Bedienungsanleitung sorgfältig durch, bevor Sie das Gerät in Betrieb nehmen.
A.V. 2 Nachdrucke, auch auszugsweise, bedürfen der Genehmigung. Technische Änderungen vorbehalten.
Abbildungen beispielhaft! Dies ist eine original Bedienungsanleitung.
DE
Sie haben technische Fragen? Eine Reklamation? Benötigen Ersatzteile oder eine Bedienungsanleitung?
Auf unserer Homepage www.guede.com im Bereich Service helfen wir Ihnen schnell und unbürokratisch weiter. Bitte helfen Sie uns Ihnen
zu helfen. Um Ihr Gerät im Reklamationsfall identifizieren zu können benötigen wir die Seriennummer sowie Artikelnummer und Baujahr. Alle
diese Daten finden Sie auf dem Typenschild. Um diese Daten stets zur Hand zu haben, tragen Sie diese bitte unten ein.
Seriennummer: Artikelnummer: Baujahr:
Kennzeichnungen auf dem Gerät
Erklärung der Symbole
In dieser Anleitung und/oder auf dem Gerät werden folgende
Symbole verwendet:
Produktsicherheit:
Produkt ist mit den einschlägigen
Normen der Europäischen
Gemeinschaft konform
Verbote:
Verbot, allgemein
(in Verbindung mit anderem
Piktogramm) Nicht in rotierende Teile fassen
Gerät nicht bei Nässe
verwenden Am Kabel ziehen verboten
Warnung:
Warnung/Achtung
Gebote:
Vor Gebrauch
Bedienungsanleitung lesen Schutzhandschuhe benutzen
Nur mit Gehör- und Augenschutz
benutzen
Umweltschutz:
Abfall nicht in die Umwelt sondern
fachgerecht entsorgen.
Verpackungsmaterial aus Pappe
kann an den dafür vorgesehen
Recycling-Stellen abgegeben
werden.
Schadhafte und/oder zu
entsorgende elektrische oder
elektronische Geräte müssen an
den dafür vorgesehen Recycling-
Stellen abgegeben werden.
Verpackung:
Vor Nässe schützen Packungsorientierung Oben
Vorsicht zerbrechlich
Technische Daten:
Motorleistung Anschluss
Drehzahl Sägeblatt-Ø
Schnittleistung bei 90° Schnittleistung 45°
Gewicht
Gerät
Radialkappsäge GRK 250/300 LP
Radial Kapp- und Gehrungssäge mit Zuschnitt Laser für
exakte Schnitte, Doppelführung, Grundgestell und Sägetisch
aus Alu-Druckguss, kugelgelagerte Radialführung für
leichtgängige Zugfunktion, beidseitig verwendbare
Klemmvorrichtung, großer Drehtisch mit Rasterfixung,
beidseitig Schwenkbar 0-45°, Sägekopf 45° Schwenkbar,
großer Staubfangsack bzw. Anschluss für Absaugung.
Inklusive Hartmetall-Sägeblatt, komplett mit Untergestell.
Gerätebeschreibung (Abb. 1)
1. Griff mit Einschalter
2. Kohlebürstendeckel
3. Entriegelungshebel Sägeblattschutz
4. Skala mit Gradeinstellung
5. Sägetisch
6. Befestigungslöcher
7. Vorrichtung für Tischverbreiterung
8. Anschlag
9. Staubfangsack
10. Sägeblattbefestigung
11. Arretierungsknopf
12. Sägeblattschutz
13. Feststellhebel Schrägschnitte
14. Feststellhebel Gehrungsschnitte
15. Absauganschluß/Staubfangsackanschluß
16. Laser
3

DE EG-Konformitätserklärung
Hiermit erklären wir,
Güde GmbH & Co. KG
Birkichstraße 6
74549 Wolpertshausen
Germany
Dass die nachfolgend bezeichneten Geräte aufgrund ihrer
Konzipierung und Bauart sowie in den von uns in Verkehr gebrachten
Ausführungen den einschlägigen, grundlegenden Sicherheits- und
Gesundheitsanforderungen der EG-Richtlinien entsprechen.
Bei einer nicht mit uns abgestimmten Änderung der Geräte
verliert diese Erklärung ihre Gültigkeit.
Bezeichnung der Geräte: Radialkappsäge GRK 250/300 LP
Artikel-Nr.: 55020
Datum/Herstellerunterschrift: 19.01.2010
Angaben zum Unterzeichner: Hr. Arnold, Geschäftsführer
Technische Dokumentation: J. Bürkle; FBL, QS
Einschlägige EG-Richtlinien:
2006/42 EG
2006/95 EG
2004/108 EG
Angewandte harmonisierte Normen:
EN 61029-1/A12:2003
EN 61029-2-9:2002
EN 55014-1:2006
EN 55014-2/A1:2001
EN 61000-3-2:2006
EN 61000-3-11:2000
Zertifizierstelle:
TÜV SÜD Product Service GmbH, Ridlerstr. 65, D-86339 München
Referenz Nummer:
Z1A 09 04 43412 172
Lärmwertangabe:
Lwa: 94,7 dB
Lpa: 107,7 dB
Gewährleistung
Die Gewährleistung erstreckt sich ausschließlich auf Mängel,
die auf Material- oder Herstellungsfehler zurückzuführen sind.
Bei Geltendmachung eines Mangels im Sinne der
Gewährleistung ist der original Kaufbeleg mit Verkaufdatum
beizufügen.
Von der Gewährleistung ausgeschlossen sind
unsachgemäße Anwendungen, wie z. B. Überlastung des
Gerätes, Gewaltanwendung, Beschädigungen durch
Fremdeinwirkung oder durch Fremdkörper. Nichtbeachtung
der Gebrauchs- und Aufbauanleitung und normaler
Verschleiß sind ebenfalls von der Gewährleistung
ausgeschlossen.
Bestimmungsgemäße Verwendung
Die Säge ist ausschließlich zum Sägen von Profilhölzern
innerhalb der in den technischen Daten angegebenen
Schnittleistungen konstruiert.
Bei Nichtbeachtung der Bestimmungen, aus den allgemein
gültigen Vorschriften sowie den Bestimmungen aus dieser
Anleitung, kann der Hersteller für Schäden nicht
verantwortlich gemacht werden.
Allgemeine Sicherheitshinweise
Bevor Sie mit dem Gerät arbeiten, lesen Sie die
nachstehenden Sicherheitsvorschriften und die
Bedienungsanleitung aufmerksam durch. Falls Sie das Gerät
an andere Personen übergeben sollten, händigen Sie die
Bedienungsanleitung bitte mit aus. Bewahren Sie die
Bedienungsanleitung immer gut auf!
Verpackung: Ihr Gerät befindet sich zum Schutz vor
Transportschäden in einer Verpackung. Verpackungen sind
Rohstoffe und somit wiederverwendungsfähig oder können
dem Rohstoffkreislauf zurückgeführt werden.
Bitte lesen Sie die Gebrauchsanweisung sorgfältig durch und
beachten Sie deren Hinweise. Machen Sie sich anhand
dieser Gebrauchsanweisung mit dem Gerät, dem richtigen
Gebrauch sowie den Sicherheitshinweisen vertraut. Bitte
bewahren Sie die Hinweise für späteren Gebrauch sicher auf.
Zu Ihrer eigenen Sicherheit gestatten wir den Betrieb
nur, wenn Sie die Säge, wie beschrieben, komplett
montiert, installiert und die Sicherheitshinweise gelesen
und verstanden haben.
Machen Sie sich mit dem Gerät vertraut
Lesen Sie die Bedienungsanleitung und alle an dem
Gerät angebrachten Warnhinweise sorgfältig durch.
Lernen Sie den Einsatzbereich sowie die Grenzen und
die mit dem Betrieb des Gerätes verbundenen Gefahren
kennen. Bewahren Sie diese Betriebsanleitung mit allen
Hinweisen sicher auf.
Erden Sie alle Geräte
Die Säge ist doppelt schutzisoliert dies bedeutet jedoch
nicht, dass die normalen elektrischen
Sicherheitsbestimmungen ignoriert werden dürfen.
Halten Sie alle Schutzvorrichtungen funktionsfähig
und korrekt montiert und ausgerichtet.
Einstellwerkzeuge entfernen !
Machen Sie es sich zur Angewohnheit, vor jedem
Einschalten des Gerätes darauf zu achten, dass alle
Einstellwerkzeuge entfernt sind.
Halten Sie den Arbeitsplatz aufgeräumt
Herumliegendes Werkzeug oder Material fordern Unfälle
heraus. Wachs oder Sägespäne machen den Fußboden
schlüpfrig.
Arbeiten Sie nicht in gefährdeter Umgebung
Benutzen Sie Elektrowerkzeuge nicht in feuchten oder
nassen Räumen und setzen Sie sie nicht Regen aus.
Sorgen Sie für ausreichende Beleuchtung und
ausreichende Bewegungsfreiheit.
Halten Sie Kinder fern
Alle Besucher sollten sich in sicherer Entfernung vom
Arbeitsplatz aufhalten.
Machen Sie Ihre Werkstatt kindersicher
mit Vorhängeschlössern, Hauptschaltern oder
abschließbaren Schaltern an Maschinen.
Überlasten Sie das Gerät nicht
Ihre Arbeit wird besser und schneller erledigt, wenn Sie
sie so ausführen, dass das Gerät nicht überlastet wird.
Benutzen Sie das richtige Werkzeug
Führen Sie keine Arbeiten mit einem Werkzeug oder
Zubehör aus, für die es nicht konstruiert ist.
Tragen Sie zweckmäßige Arbeitskleidung
Tragen Sie keine weite Kleidung, Handschuhe,
Krawatten oder Schmuck, die sich in drehenden Teilen
verfangen können. Achten Sie auf sicheren Stand
(rutschsicheres Schuhwerk). Bei langem Haar Haarnetz
tragen.
Tragen Sie eine Schutzbrille
Sie sollten während der Arbeit immer eine
Sicherheitsschutzbrille nach DIN 58214 tragen. Normale
Brillengläser sind nur stoßfest und ersetzen keine
Sicherheitsschutzbrille. Bei staubigen Arbeiten tragen
Sie eine Staubschutzmaske und bei längerer Arbeit mit
dem Gerät sollten Sie einen Gehörschutz tragen.
Werkstück sichern
Benutzen Sie Zwingen oder einen Schraubstock um das
Werkstück zu halten. Dies ist sicherer als das Halten von
Hand und hält Ihnen beide Hände zum Bedienen der
Säge frei.
Auf sicheren Stand achten
Vermeiden Sie Körperhaltungen, in denen Sie die
Balance verlieren könnten.
Behandeln Sie Werkzeuge vorsichtig
Halten Sie Werkzeuge sauber und scharf. Beachten Sie
die Anweisungen der Hersteller zum Schmieren und
Wechseln.
4

Maschine von Stromversorgung trennen
Ziehen Sie den Netzstecker vor allen Einstell- und
Wartungarbeiten.
Vermeiden Sie unbeabsichtigtes Anlaufen
Vergewissern Sie sich, dass der Schalter auf AUS steht,
bevor Sie den Stecker ziehen.
Verwenden Sie empfohlenes Zubehör
Befolgen Sie dem Zubehör beiliegenden Anweisungen .
Die Verwendung von ungeeignetem Zubehör kann
gefährlich sein.
Niemals auf der Maschine stehen
Schwere Verletzungen können die Folge sein, falls die
Maschine umkippt oder das Schneidwerkzeug
versehentlich berührt wird. Lagern Sie kein Material so
über oder neben der Maschine, dass man auf sie
steigen muss, um es zu erreichen.
20. Prüfen Sie auf beschädigte Teile
Vor jeder Anwendung sollten alle Schutzvorrichtungen
und sonstige Teile sorgfältig geprüft werden, um zu
sehen ob es seine Funktion noch erfüllt. Prüfen Sie auf
Ausrichtung, Leichtgängigkeit, Bruch oder sonstige
Schäden die sein Funktion beeinträchtigen können. Ein
beschädigtes Teil sollte umgehend fachgerecht repariert
oder ersetzt werden.
Maschinen nicht unbeaufsichtigt laufen lassen
Gerät ausschalten und erst verlassen, wenn das
Werkzeug zum Stillstand gekommen ist.
Das Gerät erfüllt die Anforderungen der EN 61000-3-11
und unterliegt Sonderanschlußbedingungen. Das heisst,
dass eine Verwendung an beliebigen frei wählbaren
Anschlusspunkten nicht zulässig ist.
Das Gerät kann bei ungünstigen Netzverhältnissen zu
vorübergehenden Spannungsschwankungen führen.
Das Gerät ist ausschließlich zur Verwendung an
Anschlußpunkten vorgesehen, die eine maximale
zulässige Netzimpedanz von Zmax = 0,233 Ωnicht
überschreiten.
Sie müssen als Benutzer sicherstellen, wenn nötig in
Rücksprache mit Ihrem Energieversorgungsunter-
nehmen, dass Ihr Anschlusspunkt, an dem Sie das
Gerät betreiben möchten, die oben genannte
Anforderung erfüllt.
Gerätespezifische Sicherheitshinweise
Vorsicht:
Zu Ihrer eigenen Sicherheit gestatten wir den Betrieb nur,
wenn Sie die Säge, wie beschrieben, komplett montiert,
installiert und die Sicherheitshinweise gelesen und
verstanden haben.
Vor der ersten Benutzung zu beachten:
Montage und Einstellung
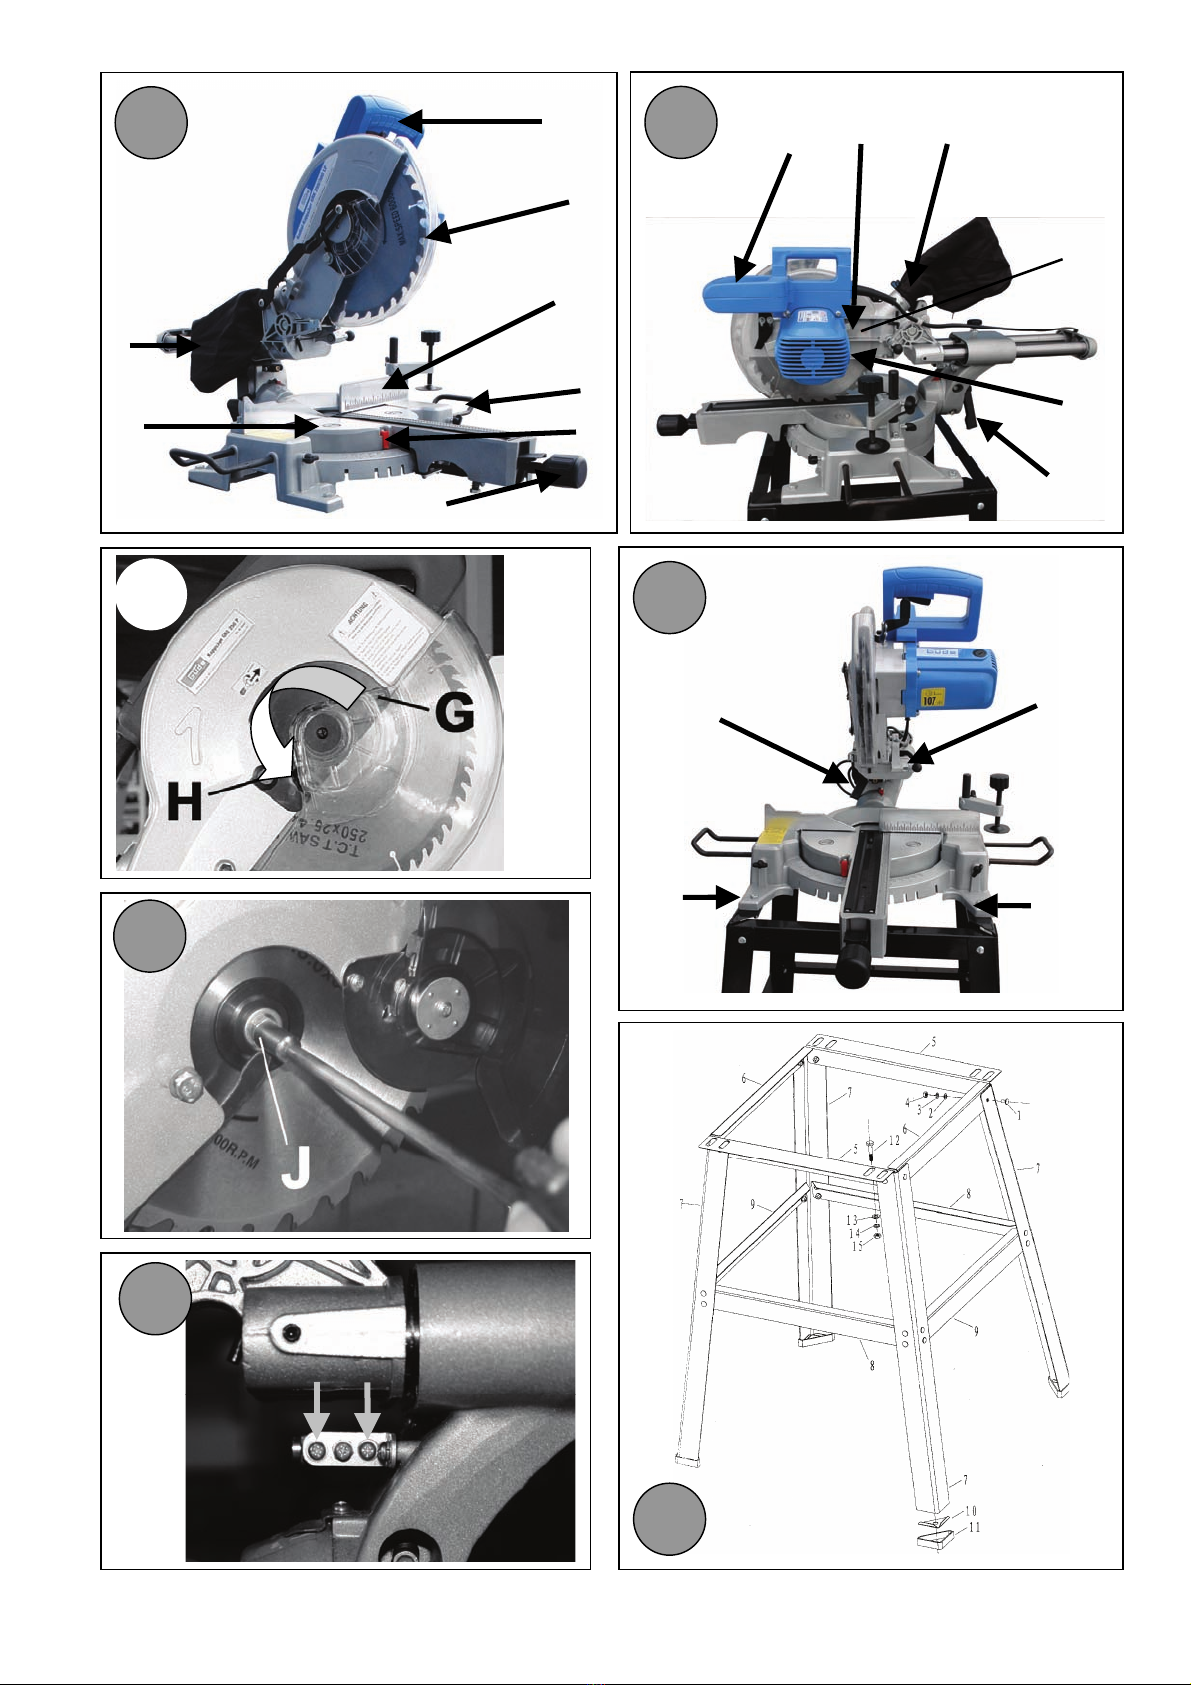
Kennen Sie die Funktion und die richtige Bedienung von
dem EIN/AUS –Schalter
oberer und unterer Schutzhaube
Sägewellenverriegelung und Grifftaste
Schrägverstellung des Sägekopfes,
Anschlagklammern und Drehtischverriegelung?
Lesen und verstehen Sie alle Sicherheitsinformationen
und Betriebshinweise in dieser Anleitung.
Beachten Sie die Warnhinweise auf der Kappsäge.
Vor jedem Gebrauch:
Überprüfen Sie Ihre Säge. Wenn irgendein Teil dieser
Kappsäge fehlt, verbogen oder sonstwie unbrauchbar ist
oder die Elektrik fehlerhaft ist, schalten Sie die Säge aus
und ziehen den Netzstecker. Ersetzen Sie alle
fehlenden, beschädigten oder fehlerhaften Teile, bevor
Sie die Säge wieder benutzen.
Planen Sie Ihre Arbeit so vor, dass Augen, Hände,
Gesicht und Gehör geschützt sind.
Tragen Sie eine Sicherheitsbrille, die den Anforderungen
der DIN Norm 58214 entspricht. Bei Gebrauch einer
Maschine könnten Fremdkörper in die Augen
geschleudert werden, dauerhafte Seestörungen können
die Folge sein. Sicherheitsbrillen erhalten Sie dort, wo
Sie Ihre Kappsäge erworben haben. Die Benutzung von
Schutzbrillen, die nicht der DIN Norm 58214
entsprechen, kann durch Bruch des Schutzglases zu
schweren Verletzungen führen.
Tragen Sie bei staubigen Arbeitsgängen zusätzlich zur
Schutzbrille eine Staubmaske.
Zur Vermeidung von Verklemmen des Sägeblattes in der
Schnittfuge oder Wegschleudern von Werkstücken:
Wählen Sie ein für den Schneidvorgang geeignetes
Sägeblatt. Sägen Sie mit dieser Kappsäge nur Holz,
holzähnliche Werkstücke oder weiches Metall wie z.B.
Aluminium-Profile.
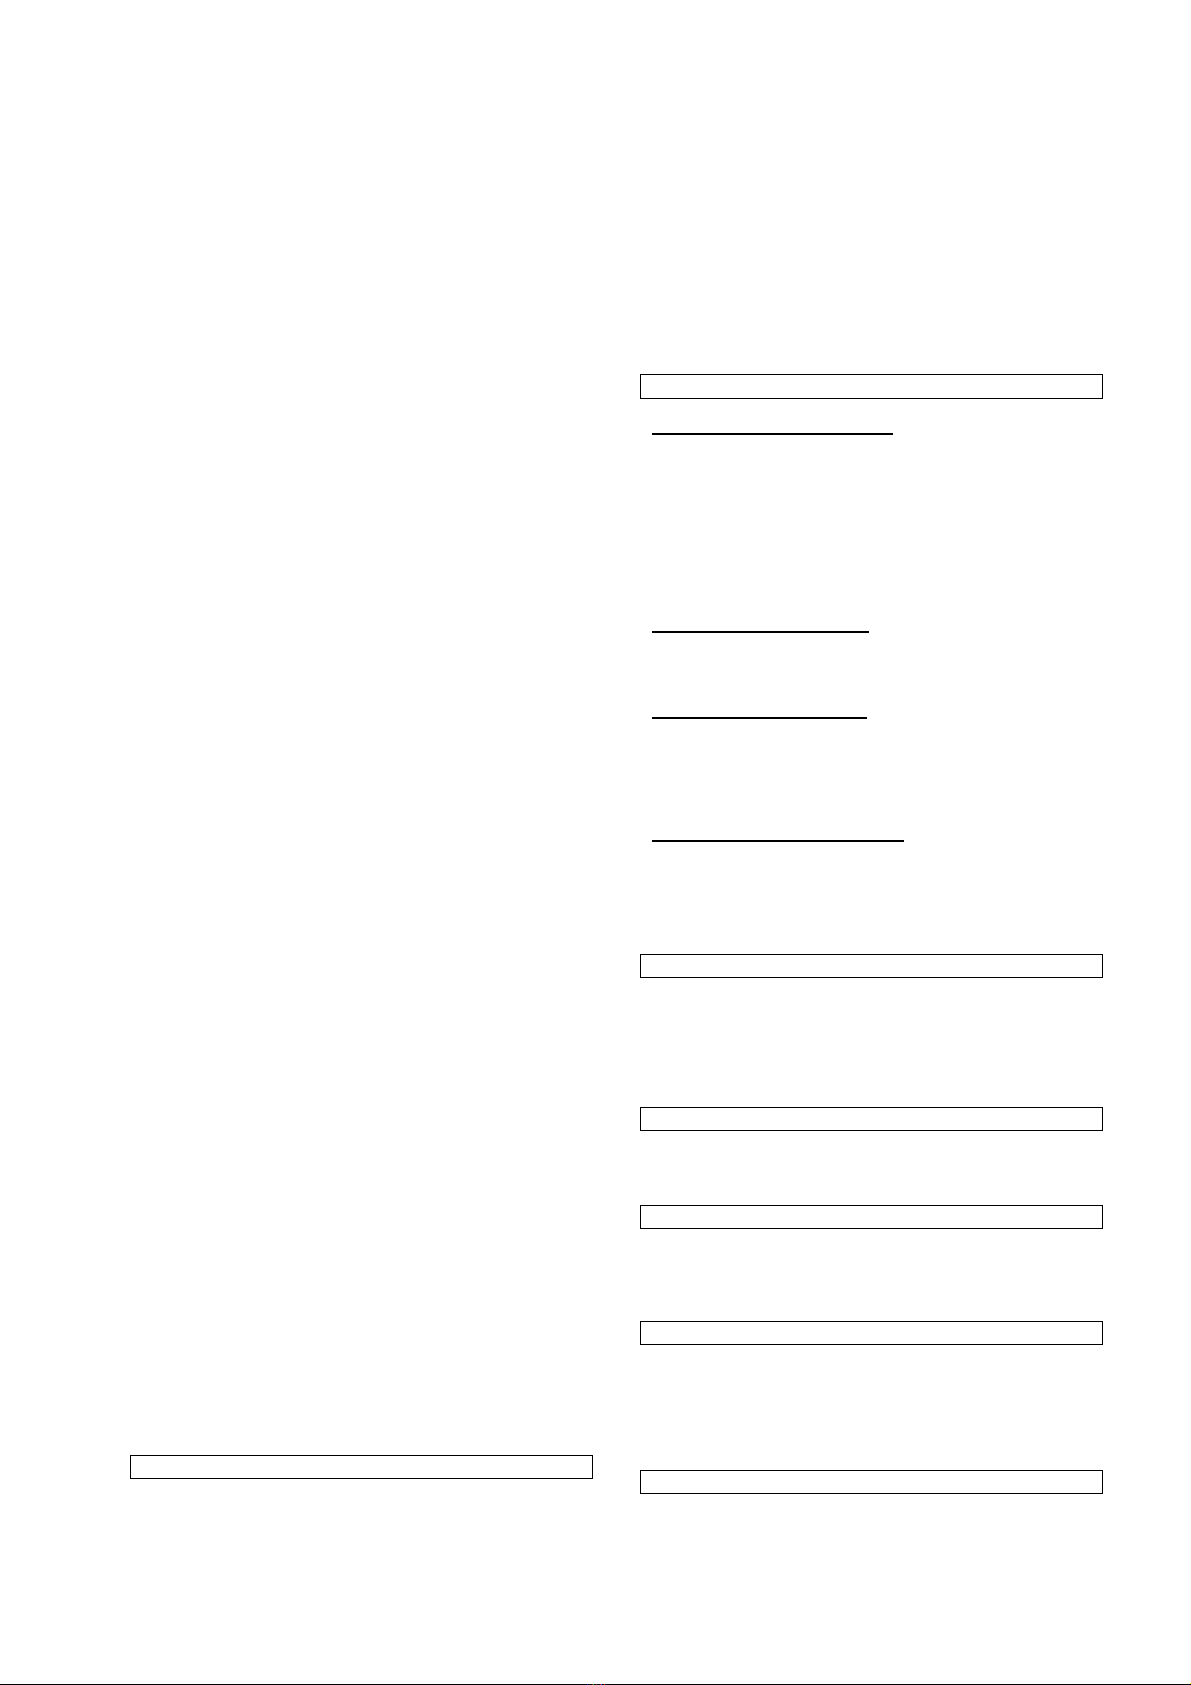
Der Pfeil auf dem Sägeblatt, der die Drehrichtung
anzeigt, muss in die gleiche Richtung zeigen wie der auf
der Säge angebrachte Pfeil. Die Sägeblattzähne müssen
an der Vorderseite des Gerätes nach unten zeigen.
Vergewissern Sie sich, dass das Sägeblatt scharf,
unbeschädigt und richtig justiert ist. Drücken Sie, bei
gezogenem Netzstecker, den Sägekopf nach unten.
Drehen Sie das Sägeblatt mit der Hand und prüfen Sie,
ob es frei läuft. Kippen Sie den Sägekopf auf 45°-
Position und wiederholen Sie den Test. Hat das
Sägeblatt an irgendeiner Stelle Berührung, justieren Sie
den Sägekopf neu, wie im Abschnitt 6
„Arbeitsvorbereitung“ beschrieben.
Halten Sie das Sägeblatt und die Spannflächen der
Sägeblattflansche sauber.
Die Sägeblattflansche müssen immer mit dem
angedrehten Absatz nach innen (zum Sägeblatt hin)
montiert sein.
Die Seite der Flanschscheibe mit dem angedrehten
Absatz muss am Blattflansch anliegen.
Die Flanschschraube muss mit einem 13 mm
Steckschlüssel handfest angezogen sein.
Stellen Sie sicher, dass alle Spannvorrichtungen und
Verriegelungen fest sind und kein Teil ein zu großes
Spiel vorweist.
Niemals freihändig schneiden:
Werkstück stets fest gegen Anschlag und Tisch
halten, so daß es während des Sägens nicht wackelt
oder sich verdrehen kann. Unter dem Werkstück
dürfen sich keine Sägespäne ansammeln können.
Stellen Sie sicher, dass das Werkstück sich nach
dem Durchtrennen nicht bewegen kann (z.B. weil es
nicht vollflächig auf- oder anliegt)
Benutzen Sie zum Schneiden von nicht vollflächig
aufliegenden Werkstücken Unterlagen,
Zuführhilfen oder eine andere Maschine.
Stellen Sie sicher, dass die Abschnitte sich seitlich vom
Sägeblatt entfernen können. Andernfalls können Sie
vom Sägeblatt erfaßt und weggeschleudert werden.
Sägen Sie nie mehrere Werkstücke gleichzeitig.
Seien Sie besonders vorsichtig beim Sägen von großen,
sehr kleinen und unhandlichen Werkstücken:
Benutzen Sie zusätzliche Auflagen (Tische, Böcke
etc.) für lange Werkstücke, die vom Maschinentisch
kippen, wenn sie nicht gestützt werden.
Sägen Sie mit dieser Säge keine Werkstücke, die
so klein sind, dass Sie sie nicht sicher halten
können, wenn Sie die Daumenseite Ihres
Zeigefingers auf die Außenkante des Anschlags
legen.
Beim Sägen von profilierten Werkstücken arbeiten
Sie so, dass das Werkstück nicht wegrutschen und
das Sägeblatt einklemmen kann. Ein profiliertes
Werkstück muss flach aufliegen oder durch eine
Vorrichtung gehalten werden, die ein Wackeln,
Kippen oder Wegrutschen während des
Schneidvorgangs verhindert.
Runde Werkstücke wie Dübelstangen oder Rohre
sicher halten. Diese drehen sich sonst und es
besteht die Gefahr, dass sich das Sägeblatt
verhakt. Runde Werkstücke immer mit einer
geeigneten Vorrichtung festspannen.
5

Es dürfen sich keine Nägel oder sonstige Fremdkörper
in dem zu sägenden Teil des Werkstücks befinden.
Halten Sie Zuschauer vom Arbeitsbereich fern, auch aus
dem Bereich hinter der Säge, in dem Sägespäne und
Abschnitte ausgeworfen werden.
Niemals die Kappsäge einschalten, ohne vorher alle
Gegenstände außer dem Werkstück und evtl.
erforderliche Haltevorrichtungen vom Maschinentisch zu
entfernen.
Um Gehörschäden zu vermeiden tragen sie bei längeren
Arbeiten einen Gehörschutz.
Um ein plötzliches Einziehen in das Sägeblatt zu
verhindern:
Tragen Sie keine Handschuhe.
Legen Sie Schmuck und weite Kleidungsstücke ab.
Bei langem Haar Haarnetz tragen.
Lange Ärmel über die Ellbogen aufrollen.
Zur Vermeidung von Unfällen durch unbeabsichtigtes
Starten der Säge unbedingt den Netzstecker ziehen,
bevor alle Einstellarbeiten am Anschlag bzw. am
Sägekopf und das Wechseln von Sägeblatt oder
Zubehör sowie sonstigen Wartungsarbeiten durchgeführt
sind.
Zur Vermeidung von Stromschlägen berühren Sie
während des Einsteckens des Steckers in eine
Steckdose nicht die metallenen Kontaktstifte des
Steckers.
Benützen Sie das Kabel nicht, um den Stecker aus der
Steckdose zu ziehen. Schützen Sie das Kabel vor Hitze,
Öl und scharfen Kanten.
Niemals Reinigungs- oder Gleitmittel auf ein sich noch
drehendes Sägeblatt aufbringen.
Zur Vermeidung von Feuer die Kappsäge nicht in der
Nähe von entzündlichen Flüssigkeiten, Dämpfen oder
Gasen betreiben.
Vermeiden Sie Verletzungen, die durch die Verwendung
von ungeeignetem Zubehör entstehen. Nur die
empfohlenen Sägeblätter verwenden.
Niemals in den Laserstrahl blicken!
Wenn die Säge läuft:
Bevor Sie den ersten Schnitt durchführen, lassen Sie die
Säge eine Weile im Leerlauf laufen. Sollten Sie
ungewöhnliche Geräusche oder starke Vibrationen
wahrnehmen, schalten Sie die Säge aus, ziehen den
Netzstecker und stellen die Ursache fest. Schalten Sie
die Sägen nicht ein, bevor die Ursache nicht gefunden
und behoben worden ist.
Engen Sie das abgeschnittene Teil des Werkstücks nicht
ein. Berühren, halten, klemmen Sie es nicht und setzen
Sie auch keinen Anschlag dagegen. Der abgeschnittene
Teil muß sich ungehindert seitlich vom Sägeblatt weg
bewegen können. Wird es daran gehindert, könnte es
vom sich drehenden Sägeblatt erfaßt und
weggeschleudert werden.
Vermeiden Sie ungeschickte Handpositionen, bei denen
durch ein plötzliches Abrutschen eine oder beide Hände
an das Sägeblatt geraten können.
Lassen Sie das Sägeblatt vor dem Schneidvorgang
seine volle Umdrehungsgeschwindigkeit erreichen.
Senken Sie den Sägekopf nur so schnell, daß der Motor
nicht überlastet wird und das Sägeblatt nicht blockiert.
Vor dem Entfernen von verklemmtem Material das
Sägeblatt zum Stillstand kommen lassen, das Gerät
ausschalten und den Netzstecker ziehen.
Halten Sie den Sägekopf nach Beendigung des
Schneidvorgangs gedrückt, lassen Sie den Schalter los
und warten Sie bis das Sägeblatt zum Stillstand
gekommen ist, bevor Sie Ihre Hände bewegen.
Verhalten im Notfall
Leiten Sie die der Verletzung entsprechend notwendigen
Erste Hilfe Maßnahmen ein und fordern Sie schnellst möglich
qualifizierte ärztliche Hilfe an. Bewahren Sie den Verletzten
vor weiteren Schädigungen und stellen Sie diesen ruhig.
Für einen eventuell eintretenden Unfall sollte immer ein
Verbandskasten nach DIN 13164 am Arbeitsplatz
griffbereit vorhanden sein. Dem Verbandskasten
entnommenes Material ist sofort wieder aufzufüllen.
Wenn Sie Hilfe anfordern, machen Sie folgende Angaben:
1. Ort des Unfalls
2. Art des Unfalls
3. Zahl der Verletzten
4. Art der Verletzungen
Restgefahren und Schutzmaßnahmen
1. Mechanische Restgefahren:
Schneiden, Abschneiden:
Das rotierende Sägeblatt kann zu schweren
Schnittverletzungen führen. Die Hände vom
Gefahrenbereich des Sägeblattes fernhalten.
Stoß:
Handgehaltene Werkstücke können vom rotierenden
Sägeblatt mitgerissen werden und zu Verletzungen
führen! Werkstück immer, entsprechend mit der
Werkstückklemme sichern!
2. Gefährdung durch Lärm:
Gehörschädigungen:
Längeres Arbeiten mit der Maschine kann zu
Gehörschädigungen führen. Immer Gehörschutz tragen.
3. Sonstige Gefährdungen:
Herausgeworfene Gegenstände oder Flüssigkeiten:
Nicht ausreichend gesicherte Werkstücke können durch
die Rotation des Sägeblattes herausgeschleudert werden
und zu Verletzungen führen. Werkstück immer festklemmen
und Schutzbrille tragen.
4. Gefährdung durch Strahlung:
Laserstrahlen:
Das Gerät ist mit einem Laser zur Anzeige der
Schnittlinie ausgestattet. Dieser kann zu
Schädigungen der Netzhaut führen. Sehen Sie niemals
direkt in den Laserstrahl.
Entsorgung
Die Entsorgungshinweise ergeben sich aus den
Piktogrammen die auf dem Gerät bzw. der Verpackung
aufgebracht sind. Eine Beschreibung der einzelnen
Bedeutungen finden Sie im Kapitel „Kennzeichnungen auf
dem Gerät“.
Anforderungen an den Bediener
Der Bediener muss vor Gebrauch des Gerätes aufmerksam
die Bedienungsanleitung gelesen haben.
Qualifikation
Außer einer ausführlichen Einweisung durch eine
sachkundige Person ist keine spezielle Qualifikation für den
Gebrauch des Gerätes notwendig.
Mindestalter
Das Gerät darf nur von Personen betrieben werden, die das
18. Lebensjahr vollendet haben. Eine Ausnahme stellt die
Benutzung als Jugendlicher dar, wenn die Benutzung im
Zuge einer Berufsausbildung zur Erreichung der Fertigkeit
unter Aufsicht eines Ausbilders erfolgt.
Schulung
Die Benutzung des Gerätes bedarf lediglich einer
entsprechenden Unterweisung. Eine spezielle Schulung ist
nicht notwendig.
6

Technische Daten
Anschluss: 230 V~50 Hz
Motorleistung: 1900 W
Sägeblatt- Ø: 250 x 20
Drehzahl: 5000 min-1
Schnittleistung bei 90°: 70 x 310 mm
Schnittleistung bei 45°: 40 x 210 mm
Schallleistungspegel LWA:107 dB
Gewicht mit Untergestell: 20 kg
Gewicht ohne Untergestell: 18 kg
Transport und Lagerung
Bei längerem Stillstand von der Stromzufuhr trennen und für
Kinder nicht erreichbar aufbewahren.
Achten Sie auf einen trockenen und sicheren Standort.
Kabelquerschnitt
Kabellänge erforderlicher Kabelquerschnitt:
bis 15 m 1,5 mm²
15 – 40 m 2,5 mm²
Bei zu langen Zuleitungen und zu geringem Kabelquerschnitt
tritt ein Spannungsabfall führen kann, der zu Motorproblemen
führt. Eine Zuleitung mit einem ausreichend dimensioniertem
Leiterquerschnitt ist deshalb zur einwandfreien Funktion
dieser Kappsäge unbedingt erforderlich. Die in der Tabelle
angegebenen Leitungslängen beziehen sich auf die
Entfernung zwischen Verteiler/Sicherungskasten und dem
Stecker der Netzzuleitung der Kappsäge. Dabei ist es
unerheblich, ob es sich um eine Verlängerungsleitung oder
eine Kombination aus beiden handelt.
Begriffsbestimmungen
Sägewelle Die Welle, auf welcher das Sägeblatt befestigt
ist.
Querschnitt Sägen quer zur Faser
Schrägschnitt Schneidevorgang nicht im rechten Winkel
zur Werkstückoberfläche
Gehrungsschnitt Schneidevorgang in einem nicht
rechtem Winkel zur Vorderkante des Werkstücks
Doppelgehrungsschnitt Kombination aus Gehrungs-
und Schrägschnitt
Umdrehungen pro Minute Die Anzahl von
Umdrehungen, die ein sich drehendes Objekt während
einer Minute ausführt.
Schnittlinie Der Bereich des Werkstücks oder Tisches,
der direkt in der Flucht des Sägeblattes liegt, auch der
Teil des Werkstückes, der bereits durch das Sägeblatt
aufgetrennt wurde.
Schränkung Das Maß, um das die Spitze des
Sägezahns nach außen, über die Breite des Sägeblatt-
körpers, herausgebogen ist.
Schnittfuge Der Spalt, der entsteht, wenn durch das sich
drehende Sägeblatt Material abgetragen wird.
Schrägeversatz Falsche Einstellung des Sägeblattes.
Harz (-einschluß) Eingetrocknetes Harz in Holz.
Werkstück Der Gegenstand, an dem der Trenn- oder
Schneidvorgang ausgeführt wird.
Montage
Heben Sie die Kappsäge mit beiden Händen aus der
Verpackung. Stellen Sie die Kappsäge auf eine glatte, stabile
Oberfläche. Sorgen Sie dafür, dass der Arbeitsplatz frei von
Behinderungen ist. Befestigen Sie die Kappsäge unbedingt
auf der Werkbank.
Montage Untergestell: siehe Abb. 7
Befestigung der Säge am Arbeitsplatz
Die Säge kann sowohl mobil als auch stationär genutzt
werden.
Bei stationärer Nutzung sollte die Maschine unbedingt auf
einem entsprechenden Arbeitstisch oder der Werkbankplatte
an den vorgesehenen Löchern festgeschraubt werden.
Staubsaugeranschluss (Abb. 3)
Am Absaugstutzen können Sie, anstelle des
Staubfangsackes, auch einen Staubsauger mit
gebräuchlichem Schlauchanschluß anschließen. (15)
Justieren des Lasers (Abb. 6)
Batterien 2x Micro/AAA einsetzen, um den Laser
einschalten zu können.
Laser anschalten durch Betätigen des Knopfes.
Rechten Winkel anlegen an den Anschlag, auf Flucht
zum Sägeblatt achten.
Mittels den 3 Schrauben den Laser justieren
Probeschnitt zur Kontrolle
Sicherheitshinweise für die Bedienung
Die Säge darf nicht für andere Materialien benutzt werden wie
in der Bedienungsanleitung beschrieben.
Benutzen Sie das Gerät erst nachdem Sie die
Bedienungsanleitung aufmerksam gelesen haben.
Beachten Sie alle in der Anleitung aufgeführten
Sicherheitshinweise.
Verhalten Sie sich verantwortungsvoll gegenüber
anderen Personen.
Vorgehensweise
Die Kappsäge wird über die Schaltertaste an der Handgriff-
Innenseite eingeschaltet.
Vor dem Schnitt muss sich das Sägeblatt in
Höchstgeschwindigkeit drehen. Arbeitskopf langsam am
Handgriff unter Beachtung eines gleichmäßigen, ruckfreien
Vorschubs absenken. Einen der Beschaffenheit und den
Maßen des zu schneidenden Materials entsprechenden
Druck in Richtung des Sägeblattvorschubs ausüben. Beim
Schnitt muss das Werkstück fest auf der Auflagefläche
gehalten werden. Zur Ausführung sicherer Schnitte an langen
Werkstücken ist die Verwendung zusätzlicher Stützunterlagen
unerläßlich.
Nach Ausführung des Schnitts, Arbeitskopf wieder in die
obere Ausgangsstellung zurückführen und nachprüfen, ob
sich der Sägeblattschutz in korrekter Position befindet.
Sägeblätter regelmäßig schärfen, eventuell austauschen.
ACHTUNG: Keine beschädigten Sägeblätter verwenden.
Bedienung (Abb. 1, 3)
Nehmen Sie niemals Einstellungsarbeiten am
laufenden Gerät vor. Das Gerät ist vor allen
Einstellarbeiten von der Stromzufuhr zu trennen! Es
besteht schwere Verletzungsgefahr.
Schrägschnitt
Für Schrägschnitte bis zu 45° Feststellhebel auf der
Maschinenrückseite lösen (13). Maschinenkopf von der linken
Seite bis zum gewünschten Winkel oder zum Endanschlag
(45°) neigen, und mit den Feststellhebel (13) wieder
festziehen.
Gehrungsschnitt
Der Maschinenkopf kann bis 45° sowohl nach rechts als auch
nach links gedreht werden. Zwischenabwinklungen sind leicht
einstellbar, indem man die gewünschten Gradwerte auf der
dafür vorgesehenen Gradskala am Tisch abliest. Lösen Sie
die Feststellschraube (14), drehen Sie den Maschinenkopf
(Rastertisch) in die gewünschte Stellung und fixieren Sie
diesen anschließend wieder mit der Feststellschraube (14).
7

Kombinierter Schnitt (horizontal-vertikal bis 45°)
Sägeschnittkombinationen:
Sägeblattwechsel (Abb. 2, 3, 4)
Achtung! Schalten Sie die Maschine immer aus und
ziehen Sie den Stecker ab, bevor Sie irgendwelche
Wartungsarbeiten oder Einstellungen vornehmen bzw. das
Sägeblatt auswechseln. Tragen Sie stets
Schutzhandschuhe um Verletzungen vorzubeugen.
Schraube (H) entfernen, Schraube (G) lösen und
anschließend die Halterung mit dem beweglichen
Sägeblattschutz nach unten schwenken, so daß die
Sägeblattschraube (J) frei zugänglich wird.
Blockieren Sie das Sägeblatt durch den Feststellknopf (I) und
halten Sie diesen gedrückt.
Lösen Sie die Sägeblattschraube (J) mit dem
mitgelieferten Steckschlüssel im Uhrzeigersinn
(Linksgewinde) und entfernen Sie das Sägeblatt. Vor der
Montage des neuen Sägeblattes, die Sägeblattflansche
sorgfältig reinigen und auf die Laufrichtung der Zähne
achten. Das neue Sägeblatt einlegen, den Außenflansch
auf die Welle schieben und die Sägeblattschraube
wieder eindrehen und festziehen. Anschließend die
Halterung mit dem Sägeblattschutz wieder sorgfältig
befestigen. Vor dem Stromnetzanschluß einen
Leerlaufschnitt durch Heben und Senken des
Arbeitskopfes ausführen, um die einwandfreie Funktion
des Sägeblattschutzes zu prüfen.
Schritt-für-Schritt-Anleitung
Zeichnen Sie das Werkstück an der für den Schnitt
vorgesehenen stelle an.
Legen Sie das Werkstück auf den Arbeitstisch und
justieren Sie das Sägeblatt in Ruhestand an die
Markierung.
Klemmen Sie nun das Werkstück mit der
Werkstückklemme fest.
Kontrollieren Sie die Sägeblattposition zur Markierung
nochmals.
Schalten Sie die Maschine ein und führen Sie den
Schnitt aus.
Schalten Sie die Maschine ab und warten Sie bis das
Sägeblatt vollständig zum Stillstand gekommen ist.
Entfernen Sie die Sägespäne und entnehmen Sie das
Werkstück.
Stecken Sie die Säge grundsätzlich aus wenn Sie
längere Zeit nicht benutzt wird.
Störungen - Ursachen - Behebung
Störung Ursache Behebung
Schnittwin-
kel stimmt
nicht
Position des
Sägekopfes
stimmt nicht
Einstellen wie unter Montage
und Erstinbetriebnahme
beschrieben.
Motor ohne
Funktion
Kohlen
verschlissen
Schalter defekt
Kohlen austauschen
Reparatur durch Fachmann
Inspektion und Wartung
1. Reparaturarbeiten nur durch einen qualifizierten
Servicetechniker durchführen lassen, unter
Verwendung von Originalteilen.
2. Säge vor Nässe und Feuchtigkeit schützen und nur in
trockener Umgebung verwenden.
Wartung (Bürsten und Kollektor)
Es wird empfohlen, sich für den Bürstenersatz an eine
Fachwerkstatt zu wenden und Wartungsarbeiten am Kollektor
durchführen zu lassen, um eine einwandfreie Funktion des
Motors zu gewährleisten.
Schmierung
Alle Motorlager sind für die Lebensdauer dieser Säge unter
normalen Betriebsbedingungen ausreichend geschmiert.
Eine Wartung ist nicht erforderlich.
Schmierung bei Bedarf:
1. Schmieren der Drehachse bei Schwergänigkeit
1.1 Durch Lösen der Einstellmutter und Auftropfen von
etwas Öl auf die Unterlegscheibe und
Kontaktfläche.
1.2 Durch Ausbauen und Fetten der Drehachse und
Kontaktflächen. HINWEIS: Der Ausbau der
Drehachse bedingt die Demontage der oberen
Sägeblattabdeckung und des Anschlagtops. Diese
Arbeit sollte ein Servicetechniker durchführen.
Achten Sie auf die Stellung der Federenden im
Gehäuse. Markieren Sie diese mit Kreide, um den
Zusammenbau zu erleichtern.
2. Schmieren des Betätigungshebels für die
Pendelschutzhaube:
2.1 leichtes Ölen mit Nähmaschinenöl an allen Metall-,
Kunstoff-Kontaktflächen von Zeit zu Zeit für leise
und leichtgänige Funktionen erforderlich. Zu viel Öl
vermeiden. Überschüssiges Öl setzt sich nur
Holzstaub fest und verharzt.
HINWEIS: „Stecker aus Steckdose ziehen bevor
irgendeine Einstellung oder Wartung vorgenommen wird.“
Motorbehandlung
ACHTUNG: Zur Vermeidung von Motorschäden ist der
Motor regelmäßig von Sägespänen und Staub zu reinigen
(Kühlung).
1. Schließen Sie diese Säge an einen 230 V-Stromkreis
an, der mir einer 16 A-Sicherung un einem
Fehlerstromschalter (RCD) abgesichert ist. Eine falsche
Sicherung kann einen Motorschaden verursachen.
2. Falls der Motor nicht anläuft, sofort den Schalter
loslassen. NETZSTECKER ZIEHEN. Sägeblatt auf
Freigängigkeit überprüfen. Wenn das Blatt frei läuft,
Motor noch einmal starten. Wenn der Motor während
eines Schneidevorganges plötzlich stehenbleibt, sofort
Schalter loslassen und Netzstecker ziehen, Dann das
Sägeblatt aus dem Werkstück lösen. Anschließend
können Sie den Schneidevorgang zu Ende führen.
3. Sicherungen oder Leitungsschutzschalter können
regelmäßig auslösen, wenn:
a. DER MOTOR ÜBERLASTET WIRD. Zu schnelles
Eintauchen des Sägeblattes in das Werkstück
oder häufiges Ein-/Ausschalten der Säge können
zu einer Überlastung des Motors bzw. einem
Defekt des Getriebes führen.
b. Spannungsschwankungen von 10% gegenüber
der Netzspannung beeinflussen den normalen
Betrieb der Kappsäge nicht. Bei starker Belastung
muss jedoch die auf dem Typenschild
angegebene Spannung an den
Motoranschlussklemmen anliegen.
4. Viele Motorprobleme sind auf lose oder schlechte
Steckverbindungen, Überlastung, Unter-spannung (evtl.
durch zu geringen Leiterquerschnitt in den Zuleitungen)
zurückzuführen. Prüfen Sie immer sämtliche
Verbindungen, die anliegende Spannung und
Stromaufnahme.
8

GB Please read carefully the following Operating Instructions before putting the appliance into operation
A.V. 2 Any reprints, even partial, are subject to approval. Technical changes reserved.
Illustrative pictures! Translation of original operating instructions.
GB
Do you have any technical questions?Any claim? Do you need any spare parts or operating instructions?
We will quickly help you and without needless bureaucracy at our home page www.guede.com in the Service part. Please help us be able to
help you. In order to be able to identify your appliance in case of claim, we need the serial No., Order No. and year of production. All this data
can be found on the type label. Please enter the data below for future reference.
Serial No.: Order No.: Year of production:
Sighs on Unit
Meaning of Symbols
Symbols shown below are used throughout this manual
and/or on the unit:
Product Safety:
Product compliance with
respective EU standards
Bans:
General ban (in combination with
another pictograph) Do not reach in rotating parts
Do not use the unit in rain No pulling the cable
Precaution:
Warning/caution
Commands:
Read operating manual before
use Use protection gloves
Wear goggles. Use ear
protectors
Environment Protection:
Wastes to be disposed of in a
professional manner not to harm
the environment
Cardboard packaging to be
collected for recycling.
Faulty and/or disposed of
electrical/electronic appliances to
be collected by authorised
salvage places
Packaging:
Protect from moisture Keep Up
Fragile
Technical Data:
Engine power Connection
Revolutions Ø circular saw blade
Cutting width at 90° Cutting width at 45°
Weight
Appliance
GRK 250/300 LP radial arm saw
Radial arm and mitre saw with laser for precision cutting,
double guidance, saw support and table out of pressure cast
aluminium, radial guidance embedded in ball bearings for
easy pulling in of the cut material, clamping mechanism with
possible double-sided use, big turn table with grid fixation,
optional inclination to both sides at 0-45° angle, saw
head can be inclined at 45° angle, big dust bag or exhaust
connection. Including cemented carbide circular saw
blade, all with a support.
Scope of Delivery (Fig. 1)
1. Hand grip and a switch
2. Carbon brush guard
3. Tripping lever
4. Scale with angle adjustment
5. Saw table
6. Mounting holes
7. Table extension equipment
8. End stop
9. Sawdust collecting bag
10. Circular saw blade mounting
11. Locking button
12. Circular saw blade guard
13. Locking lever for chamfer cutting
9

14. Locking lever for mitre cutting
15. Exhaust connection/dust bag connection
16. Laser
GB EU Declaration of Conformity
We,
Güde GmbH & Co. KG
Birkichstraße 6
74549 Wolpertshausen
Germany
hereby declare the conception and construction of the below-
mentioned appliances correspond - at the type of construction being
launched - to appropriate basic safety and hygienic requirements of
EC Directives. In case of any change to the appliance not discussed
with us the Declaration expires. Marking of appliances: GRK 250/300
LP Order No. 55020
Date/producer signature: 19.01.2010
Signed by: Mr Arnold, Managing Director
Technical Documentation: J. Bürkle; FBL, QS
Appropriate EU Directives:
2006/42 EG
2006/95 EG
2004/108 EG
Harmonised standards used:
EN 61029-1/A12:2003
EN 61029-2-9:2002
EN 55014-1:2006
EN 55014-2/A1:2001
EN 61000-3-2:2006
EN 61000-3-11:2000
Certification place:
TÜV SÜD Product Service GmbH, Ridlerstr. 65, D-86339 München
Reference number:
Z1A 09 04 43412 172
Noise details:
Lwa: 94.7 dB
Lpa: 107.7 dB
Guarantee
The guarantee solely covers inadequacies caused by material
defect or manufacturing defect.
Original payment voucher with the sales date needs to be
submitted for any claim in the guarantee period.
The guarantee does not cover any unauthorised use such as
appliance overloading, use of violence, damage as a result of
any unauthorised interference or caused by foreign items.
Failing to follow the operating and assembly instructions and
common wear are also not included in the guarantee.
Using the appliance as designated
The saw has exclusively been designed for cutting wooden
profiles with the cutting power specified in the technical
specifications.
Should provisions of generally applicable regulations or
provisions of these Operating Instructions not be adhered to,
the manufacturer shall not be liable for any damage incurred.
General Safety Instructions
Before you start working with the appliance please read
carefully the following safety regulations and Operating
Instructions. If any other person is to handle the appliance
provide him/her with the Operating Instructions. Keep the
Operating Instructions for future reference!
Package: The appliance has been put in a package to
prevent any damage during transport. Packages are raw
materials so they can be reused or recycled.
Please read carefully the Operating Instructions and follow
them. Use these Operating Instructions to get acquainted with
the appliance, its corresponding use and safety instructions.
Keep the Instructions for future reference.
Get Familiar with Machine
Read this instruction manual carefully and note all the
warnings and precautions on the machine. Get familiar
with the use and limits of the machines and the risks
related thereto. Keep the instruction manual at a safe
place.
Connect machines and devices to the ground
Although double protective insulation is provided on the
saw, regular electrical safety precautions should not be
ignored.
Keep all the protective devices in working condition
and properly installed and adjusted.
Remove any adjustment tools and aids!
Get used to check whether all the adjustment aids are
removed prior to switching the machine on.
Keep your workplace tidy
Tools or materials cluttered around shall give rise to
accidents. Wax and sawdust make the floor slippery.
Never work in endangered environment
Never use electrical tools in humid or wet areas and do
not expose them to rain. Provide for sufficient lighting
and sufficient room to move.
Keep children away at reasonable distance
Any visitors should be kept at a reasonable distance
from your working area.
Prevent children from access to your workshop
use padlocks, master switches or lockable switches on
the machines.
Do not overload machine
You will do your job in a better and faster manner if the
machine is not overloaded.
Use the right tools
Never get down to any job using tools or accessories not
designed for it.
Wear proper working clothing
Do not wear any wide garments, gloves, ties or jewellery
that could get stuck in the rotating parts of the machine.
Pay attention to keep stable (no slipping shoes). If your
hair is long, wear a hairnet.
Wear protective goggles
When working, you should always wear goggles
according to DIN 58214. Regular glasses will resist a
shock but they cannot be worn as a substitute for safety
goggles. Wear a dust protection mask when the job is
dusty and you should also have an ear protection when
working for prolonged periods.
Secure material to be cut
To hold the material to be cut, use lighteners or a vice. It
is safer than holding the piece with a hand and both your
hands will be free to operate the saw.
Care about your stable position
Avoid any position, in which you could lose balance.
Be particular about the machine
Keep the machine clean and sharp. Follow the
manufacturer’s instructions for lubrication and parts
replacement
Always disconnect machine from the source
Prior to any adjustment or maintenance unplug the
machine.
Avoid any unintended switching
Before unplugging the machine, make sure that the
switch is in OFF position
Use only recommended accessories
Follow the instructions attached to the accessories. Use
of improper accessories may be hazardous.
Never stand atop the machine
That might result in serious injuries, if the machines rolls
over or if you accidentally touch the cutting tool. Never
store the material above the machine or next to it so that
you have to get on the machine when you want take it.
Check all the parts of machine for damages
Prior to any use of the machine, you should carefully
check any protections and other parts of the machine to
see whether they are still working to the full. Check the
machine for adjustment, easy run, cracks and other
defects that could impair the machine working
10

conditions. Any damaged part of the machine should be
immediately repaired or replaced.
Do not leave the machine running unattended.
Switch the machine off and do not leave it until it
completely stops
The appliance meets EN 61000-3-11 requirements and
is subject to special connection conditions. That means
that use on optionally selected connection points is
inadmissible.
The appliance can lead to occasional voltage
fluctuations under unfavourable power conditions.
The appliance is only designated to be used for
connection points not exceeding the maximum allowed
impedance of Zmax = 0,233 Ω.
As a user, you must make sure your connection point on
which you want to use the appliance meets the above-
mentioned requirements – after agreement with your
electricity supplier if necessary.
Trimming Saw Safety Instructions
Steps to be taken prior to the first use:
Assembly and installation
Getting familiar with the function and correct operations
of the controls as follows:
switch on/off
upper and lower protective cover
saw shaft and pushbutton on the hand grip lock
skew setting of the saw head, stop clips and turning
table lock
Read all the safety information and operating
instructions in this manual and take care to understand
it.
Observe all the precautionary notices on the trimming
saw.
Before each use:
Check the saw. If a part is missing, bent or
unserviceable for another reason, if there is a defect on
electrical equipment, switch the saw off and unplug it.
Prior to the following use, replace all the missing,
damaged or defective parts.
Plan your job to have your eyes, hands, face and ears
protected at any time.
Wear safety goggles meeting the requirements of DIN
58214. While the machine is in use, various particles
could get in your eyes and cause a permanent visual
impairment. You may buy the safety goggles at the place
where you bought the trimming saw. Using goggles not
in conformity with DIN 58214 may result in a serious
injury in result of a crack of the protection glass.
When working on a dusty job, wear a dust-proof mask in
addition to the goggles.
To prevent blocking of the saw disc in the kerfs or
throwing the cut material off:
Select a saw disc matched to the specific job. Use this
trimming saw for wood and similar materials or soft
metals, such as aluminium.
The arrow on the saw disc showing the rotation direction
should coincide with the arrow on the saw. The saw disc
teeth should direct downwards on the front of machine
Make sure that the saw disc is sharp, undamaged and
properly set up. With the machine unplugged, push the
saw head downwards. Turn the saw disc with your hand
a check whether the movement is free. Turn the saw
head to the position at an angle of 45° and repeat the
check. If the disc drags at a place, the head should be
reset as described in Article 6 „Preparation Steps “
Keep the saw disc and the saw disc flanges faces clean.
The saw disc flanges should be fitted with the work
shoulder inwards (in the direction of the saw disc)
The work shoulder side of the flange should tightly fit on
the saw disc flange.
The flange screw should be fastened manually using a
socket spanner 13 mm.
Make sure that all the attachment devices and locks are
tight and no component is allowed too much of free
travel.
Never cut with free hand:
Press the cut material down to the table and to the
stop all the time so that any swinging and turning is
prevented. No sawdust should collect under the cut
piece.
Take steps to prevent any move of the piece after it is
cut through (e.g. if it does not touch the support with
its all surface
For cutting pieces not abutting the plate with their all
surface, use supports, feeding aids or another
machine.
Make sure that chips will fall away along the side of the
saw disc. If on the contrary, the chips could get stuck in
the disc and it would throw them off.
Never cut several pieces at a time.
Take special care when cutting large or very small
pieces or pieces difficult to handle.
Use auxiliary supports (table, holders) for long
pieces that tend to fall down from the table when
unsupported.
Never use this saw to cut pieces so small that they
cannot be safely held with hand if you put your
index finger on the stop outer edge.
When cutting pieces of various profile, work so that
the material cannot slip and get jammed in the disc.
The pieces of various profiles should either attach
with all their surface areas or it is necessary to hold
them with a device that will prevent waggling,
turning or slipping during the course of cutting. .
Round pieces, such as bars or tubes should be
held firmly otherwise, they would spin and there is a
risk of the disc getting stuck. Always clam round
pieces in a proper device.
No nails or foreign matters should be left in the cut
pieces.
The viewers should be kept at a safe distance from the
work area and the area behind the saw, where the
sawdust and chips go.
Never switch the trimming saw before removing all the
things except for the piece to be cut and clamping
devices from the table.
To prevent hearing deterioration, always wear ear
protectors when working for a longer time.
To prevent being retracted in the disc,
1. Do not wear gloves
2. Put off any jewellery and wide garments.
3. If your hair is long, wear a hairnet.
4. Roll up the long sleeves above your elbows.
Unplug the machine prior to any adjusting the end stop
or the saw head, replacement of the disc or accessories
and any other kind of maintenance in order to prevent
any accidents in result of unintentional switching on.
Do not touch the metal pins of the plug when plugging in
to get protected from the electrical shock.
Do not use the cable for pulling out the plug from the
socket.
Protect the cable against the high temperature, oil and
sharp edges.
Never apply detergents or lubricants on this disc, which
still turning.
To prevent fire, never operate the trimming saw close to
inflammable liquids, vapours or gases
Avoid any accidents possibly resulting from the use of
improper accessories. Only recommended saw discs
should be used.
While the saw is running:
Before the first cut, have the saw running idle for a while.
If you hear unusual sounds or feel strong vibrations,
switch the saw off, unplug and find out the cause. Do not
11

switch the saw on again before you find and remove the
cause.
The cut off part should not be restricted in any way. Do
not touch it, do not hold it, do not clamp it and do not
place the end stop against it either. The cut off piece
should be able to move freely along the saw side. If you
prevent the motion in any way, it could get stuck and
thrown away with the rotating disc.
Avoid any clumsy position of hands when your hands
could slip down or get stuck with the saw disc.
Pay attention to the disc reaching full speed before
cutting.
Switch the saw head at a speed so as to avoid any
motor overloading and blocking the disc.
Before removing any jammed material switch the
machine off, let the disc stop and unplug the machine.
With the cutting finished, hold the saw head pressed
down, release the switch and wait until the disc stops. It
is only then that you can move your hands.
Emergency Action
Apply the first aid adequate to the injury and get qualified
medical assistance as quickly as possible. Protect the injured
person from more accidents and calm him/her down.
For the sake of eventual accident, in accordance with DIN
13164, a workplace has to be fitted with a first-aid kit. It is
essential to replace any used material in the first-aid kit
immediately after it has been used. If you seek help, state
the following pieces of information:
1. Accident site
2. Accident type
3. Number of injured persons
4. Injury type(s)
Residual risks and protective measures
1. Mechanical residual risks:
Cut, amputation:
A rotating circular saw blade may lead to serious cutting
injuries. Keep your hands in a safe distance from the circular
saw blade.
Impact:
If the cut material is held in hand, the rotating circular
saw blade may throw it down and injure you! Secure
the cut material properly using a vice at all times!
2. Exposure to noise:
Hearing damage:
Hearing may get damaged if the appliance is worked with
for a long time. Personal protective aids to prevent hearing
damage should always be worn.
3. Other risks:
Thrown-off items or liquids:
Pieces of the cut material secured improperly may be
thrown off and cause injury as a result of circular saw
blade rotation. The cut material should always be secured
and protective glasses worn.
4. Exposure to emission:
Laser emission:
The appliance is fitted with laser to display the
cutting line. Laser may cause retina damage. Never
look directly to the laser beam.
Disposal
Disposal instructions are given by pictographs on the unit or
packaging. For meaning of individual symbols refer to chapter
“Symbols on Unit”.
Operator Requirements
The operator shall read the instruction manual carefully
before using the unit.
Qualification
No special qualification is required for use of the unit except
for detailed direction by a professional.
Minimum Age
Only persons above 18 years of age are allowed to work with
the unit. Exempted from the provision is the use of the
juvenile trainees if they work in the course of their
professional training with an aim to obtain the skill under a
trainer supervision.
Training
Use of the unit requires adequate lesson by a professional or
the use of the manual only. Special training is not required.
Technical Data
Voltage/Frequency: 230 V~50 Hz
Motor Capacity: 1900 W
Saw disc - Ø: 250 x 20
Saw disc speed: 5000 rpm.
Cutting width at 90°(max): 70 x 310 mm
Cutting width at 45° (max): 40 x 210 mm
Noise level LWA:107 dB
Weight including support: 20 kg
Weight without support: 18 kg
Transport and storage
If the appliance has not been used for a long time, unplug it
and keep it in a place inaccessible to children.
Make sure such place is dry and safe.
Cable Cross-section
Cable length Required Cross-section:
to 15 m 1,5 mm²
15 – 40 m 2,5 mm²
If the supply cables are too long while the cross-section of
them is small, the voltage drops, which may cause the motor
difficulties. Therefore, a supply cable of sufficient cross-
section is required for the saw to work perfectly. The cables
length show in the table applies to the distance between the
switchboard/fuse box and the trimming saw plug. It is of no
relevance then whether a supply and an extension cables are
combine or it is a supply cable alone.
Glossary of Terms
Saw Shaft
the shaft, which the saw disc is attached to.
Cross cut
Cutting across the grain.
Skew Cut
Cutting not at right angle to the cut piece surface
Bevel Square Cut
Cutting not at right angle to the cut piece front edge
Double Bevel Square Cut
bevel and skew cut combination
Revolutions per minute
Revolutions done by a rotating object per one minute .
Cutting line
Line on a piece to be cut off on the saw table directly
aligned with the saw disc, which applies also to the part
already cut away.
Spring Set
Dimension, by which the saw tooth tip is kicked up away
outside the saw disc body width.
Saw Kerfs
A kerf formed by the rotating saw disc in the material cut.
Improper Angular Adjustment
12

Saw disc maladjustment.
Resin (resin ingredient)
Dried resin in wood .
Material to be Cut
An object being cut .
Support assembly
Support assembly: see pic. 7
Fixing the saw in the place of work
The saw can be used as both a mobile and stationery
appliance.
If used as a stationary appliance, it must be screwed down to
the work-table or workbench using appropriate holes.
A vacuum cleaner with a common hose connection may also
be fitted on the exhaust neck instead of the dust bag. (15)
Laser adjusting (pic. 6)
Insert 2 Micro/AAA batteries to activate the laser.
Activate the laser by pressing the button.
Apply a rectangular square to the stop and make sure it
matches the circular saw blade.
Adjust the laser using 3 screws.
To check it, perform a test cut.
Safety instructions for the operator
The saw must not be used for other materials than those
described in the Operating Instructions.
Use the appliance only after you have thoroughly
read the Operating Instructions.
Follow all safety instructions specified in this
manual.
Behave responsibly to other persons.
Procedure
Switch on the trimming saw using the switch on the handgrip
inner side.
Before cutting, the saw disc should be turning at a maximum
speed. Hold the handgrip of the work head and put it on
slowly. Take care to have switching even without any jerky
movements. Exert pressure adequate to the character and
dimension of the material to be cut in the direction of the saw
disc travel. The piece to be cut should be firmly pushed
against the clamping plate. Additional supports should be
used to enable safe cutting of long pieces.
Upon the cut being completed, steer the head back to the
initial position and check the saw disc cover for correct
position. Sharpen the saw discs regularly and replace then
when necessary.
NOTICE: Never use saw discs if damaged.
Handling (Pic. 1, 3)
Never perform adjustment work when the appliance
is running. The appliance must always be unplugged
before adjusting! Risk of serious injury.
Skew cut
For skew cuts up to 45°, the lock lever on the rear side of the
machine (13) should be released.
Skew the head of the machine from the left to the required
angle or to the end stop (45°) and then lock it with the lever
(13).
Scarf cut
The machine head at 45° may be turned to the right and the
left. Smaller angles may be set easily by deducting the
required value on the scale on the table. Release the lock
screw (14), turn the machine head (grid table) to the
required position and fix it in required position using the lock
screw (14).
Combination Cut (horizontal and vertical up to 45°)
Saw cuts combinations:
Saw Disc Replacement (Fig. 2, 3, 4)
CAUTION: Get down to the replacement only with the
saw unplugged and the saw disc at standstill!
Unscrew (H), release (G) and remove the handgrip with the
movable saw disc cover
Lock the saw disc using lock knob j(l).
Release the saw disc screw (J) in clockwise direction
using a socket spanner (left-hand thread). Remove the
saw disc and replace with a new one, the teeth
inclination should coincide with the direction of the arrow
on casing.
Before fitting in the saw disc, carefully clean the saw disc
flange. Slip the saw disc external flange on the shaft,
screw the lock screw on (left-hand thread) and fasten in
place. The re-fit the saw disc cover. Prior to connecting
to the mains, test the idle run by lifting and dropping the
work head.
Step by step instructions
Draw the guiding direction on the cut piece.
Put the cut piece on the work-table and adjust the
circular saw blade according to the mark when the
appliance is still.
Now secure the cut piece using a clamp.
Check again the circular saw blade position if matching
the mark.
Switch the appliance on and perform the cut.
Switch the appliance off and wait until the circular saw
blade completely stops.
Remove the sawdust and take the cut piece away.
If the saw has not been used for a long time, it must
necessarily be unplugged.
Failures - causes - removal
Failure Cause Removal
Cut angle
not matching
Saw head
position not OK To be adjusted based on
instructions in the “Assembly
and first start-up“ chapter
Engine not
working Worn carbons,
faulty switch Carbons to be replaced
Repair by an expert
Inspections and maintenance
1. Have the repairs done by a skilled servicing technician
only. Only genuine spare parts should be used.
2. Protect the saw against wet and moisture conditions,
use it in dry areas only.
Maintenance (brushes and collector)
It is recommended that you turn to a specialised servicing
place for the brushes replacement and have the collector
maintained on the occasion to provide for a perfect function of
the motor.
Lubrication
All the motor bearings are lubricated sufficiently for the entire
service life of the saw subject to normal conditions of
operation. Maintenance is not required.
Lubrication in Case of Necessity:
13

1. Rotation axle lubrication if the run gets tight
1.1 Loosen the set nut a put a few drops of the lubricant oil
on the washer and the contact area.
1.2 Remove it and lubricate the rotating axle and contact
areas. NOTICE: Before removing the axle, the saw disc
top cover and the end stop upper part have to be
removed first. The job should be accomplished by a
skilled servicing technician. Mind the position of both the
spring’s ends in the case. Mark it with a piece of chalk to
facilitate re-installation.
2. To provide silent and easy run of the swinging
protective cover control lever, all the metal and plastic
contact areas should be slightly lubricated with sewing
machines oil now and then. Take care not too use
excessive amount of the oil. Sawdust tends to deposit in
the excessive oil and form hard spots.
NOTICE: „Unplug the machine prior to any adjustment or
maintenance. “
Handling Motor
Caution: To avoid any damage of the motor, clean it
(cooling) of the sawdust and dust regularly.
1. Connect the saw to the mains of 230V secured with a 16
A fuse and a protective undercurrent switch. Poor
protection may cause a damage to the motor.
2. If the motor does not start immediately, let the switch go.
UNPLUG .
Check the saw disc for easy run. If it is does run easily,
try restarting again.
3. When the motor stops sudden while cutting is in
progress, push the switch off and unplug the machine.
Release the saw disc from the material cut. Afterwards,
you may finish the job. .
4. Fuses or protection switches may respond to conditions
as follows:
a. THE MOTOR IS OVERLOADED. If the saw
disc is immersed in the material too fast or if the
saw is switched on and off too often, it may
result in the motor overloading or a fault on the
gear.
b. Fluctuations of the mains voltage within a range
of 10% will not pose any risk to normal
operation of the saw. However, if the load is too
high, the voltage on the motor connection
terminals should correspond to the plate data.
5. Many problems of the motor may be caused by loosen
or defective connectors, overloading, undervoltage (the
latter may result from too small cross-section of supply
cables). Always check all the connections, voltage value
and the current consumed.
14

CZ Dříve než uvedete přístroj do provozu, pročtěte si prosím pečlivětento návod k obsluze.
A.V. 2 Dotisky, a to i částečné, vyžadují schválení.Technické změny vyhrazeny. Ilustrační obrázky! Překlad originálního
návodu k provozu.
CZ
Máte technické otázky? Reklamaci? Potřebujete náhradní díly nebo návod k obsluze?
Na naší domovské stránce www.guede.com Vám v oddílu Servis pomůžeme rychle a nebyrokraticky. Prosím pomožte nám pomoci Vám.
Aby bylo možné Váš přístroj v případěreklamace identifikovat, potřebujeme sériové číslo, objednací číslo a rok výroby. Všechny tyto údaje
najdete na typovém štítku. Abyste měli tyto údaje vždy po ruce, zapište si je prosím dole.
Sériové číslo: Objednací číslo: Rok výroby:
Označení na přístroji
Vysvětlení symbolů
V tomto návodu a/nebo na přístroji jsou použity následující
symboly:
Bezpečnost produktu:
Produkt odpovídá příslušným
normám EU
Zákazy:
Zákaz, všeobecný
(ve spojení s jiným piktogramem) Nesahejte do rotujících součástí
Přístroj nepoužívejte za deštěTahat za kabel je zakázáno
Výstraha:
Výstraha/pozor
Příkazy:
Před použitím si přečtěte návod
k obsluze Používejte ochranné rukavice
Používejte sluchátka. Používejte
ochranné brýle.
Ochrana životního prostředí:
Odpad zlikvidujte odbornětak,
abyste neškodili životnímu
prostředí.
Obalový materiál z lepenky lze
odevzdat za účelem recyklace do
sběrny.
Vadné a/nebo likvidované
elektrické či elektronické
přístroje musí být odevzdány do
příslušných sběren.
Obal:
Chraňte před vlhkem Obal musí směřovat nahoru
Pozor - křehké
Technické údaje:
Výkon motoru Přípojka
Otáčky Ø pilového kotouče
Max. řezná šířka při 90° Max. řezná šířka při 45°
Hmotnost
Přístroj
Radiální kapovací pila GRK 250/300 LP
Radiální kapovací a pokosová pila s laserem pro přesné
řezání, dvojité vedení, základna a stůl pily z tlakovělitého
hliníku, radiální vedení uložené v kuličkových ložiskách pro
lehké vtahování řezaného materiálu, svěrací zařízení
s možností oboustranného použití, velký otočný stůl
s mřížkovou fixací, možnost náklonu do obou stran pod
úhlem 0-45°, hlavu pily lze naklonit pod úhlem 45°, velký
prachový vak resp. přípojka pro odsávání. Včetněpilového
kotouče ze slinutého karbidu, komplet s podstavcem.
Popis přístroje (Obr. 1)
1. Rukojeťse spínačem
2. kryt uhlíkových kartáčků
3. Odblokovací páka
4. stupnice s nastavením úhlu
5. stůl pily
6. upevňovací otvory
7. zařízení pro rozšíření stolu
8. Zarážka
9. Pytel na jímání pilin
10. upevnění pilového kotouče
11. aretační knoflík
12. kryt pilového kotouče
13. aretační páka pro šikmé řezy
14. aretační páka pro pokosové řezy
15. přípojka pro odsávání/přípojka pro sběrný vak
16. laser
15

CZ Prohlášení o shoděEU
Tímto prohlašujeme my,
Güde GmbH & Co. KG
Birkichstraße 6
74549 Wolpertshausen
Germany
že koncepce a konstrukce níže uvedených přístrojův provedeních,
která uvádíme do oběhu, odpovídá příslušným základním požadavkům
směrnic EU na bezpečnost a hygienu.
V případězměny přístroje, která s námi nebyla konzultována,
ztrácí toho prohlášení svou platnost.
Označení přístrojů: GRK 250/300 LP Obj. č.: 55020
Datum/podpis výrobce: 19.01.2010
Údaje o podepsaném: pan Arnold, jednatel
Technická dokumentace: J. Bürkle; FBL, QS
Příslušné směrnice EU:
2006/42 EG
2006/95 EG
2004/108 EG
Použité harmonizované normy:
EN 61029-1/A12:2003
EN 61029-2-9:2002
EN 55014-1:2006
EN 55014-2/A1:2001
EN 61000-3-2:2006
EN 61000-3-11:2000
Certifikační místo:
TÜV SÜD Product Service GmbH, Ridlerstr. 65, D-86339 München
Referenční číslo:
Z1A 09 04 43412 172
Údaje o hlučnosti:
Lwa: 94,7 dB
Lpa: 107,7 dB
Záruka
Záruka se vztahuje výhradněna nedostatky způsobené
vadou materiálu nebo výrobní vadou.
Při reklamaci v záruční doběje třeba přiložit originální doklad
o koupi s datem prodeje.
Do záruky nespadá neodborné použití jako např. přetížení
přístroje, použití násilí, poškození cizím zásahem nebo cizími
předměty. Nedodržení návodu k použití a montáži a normální
opotřebení rovněž nespadá do záruky.
Používání stroje v souladu s jeho určením
Pila je konstruována výhradněpro řezání dřevěných profilů
v rámci řezného výkonu uvedeného v technických údajích.
Při nedodržení ustanovení všeobecněplatných předpisůči
ustanovení z tohoto návodu nelze činit výrobce odpovědného
za vzniklé škody.
Všeobecné bezpečnostní pokyny
Než začnete pracovat s přístrojem, přečtěte si pozorně
následující bezpečnostní pokyny a tento návod k obsluze.
Pokud máte přístroj předat jiným osobám, předejte jim
prosím i návod k obsluze. Návod k obsluze vždy dobře
uschovejte!
Obal: Váš přístroj se kvůli ochraněpřed poškozením při
přepravěnachází v obalu. Obaly jsou suroviny a proto
mohou být znovu použity nebo je lze recyklovat.
Přečtěte si prosím pečlivěnávod k použití a dodržujte v něm
obsažené pokyny. Pomocí tohoto návodu k použití se
seznamte s přístrojem, jeho správným použitím a
bezpečnostními pokyny. Tyto pokyny si prosím bezpečně
uschovejte pro pozdější použití.
Pro Vaši vlastní bezpečnost je provoz stroje dovolen
teprve tehdy, když je pila kompletněnamontována a
nainstalována dle popisu a když jste si pročetli a
pochopili příslušné bezpečnostní předpisy.
S přístrojem se dobře seznamte
Pečlivěsi pročtěte tento návod k obsluze a všechny
výstražné pokyny umístěné na stroji. Seznamte se
s použitím a hranicemi použití stroje a s tím spojenými
riziky. Návod k obsluze se všemi pokyny uložte na
bezpečné místo.
Všechny přístroje uzemněte
Pila má dvojitou ochrannou izolaci. To však neznamená,
že je možno ignorovat normální bezpečnostní
ustanovení z oblasti elektro.
Veškerá ochranná zařízení udržujte ve funkčním
stavu, správněnamontovaná a seřízená.
Odstraňujte seřizovací nástroje!
Zvykněte si před každým spuštěním stroje zkontrolovat,
zda jsou odstraněny všechny seřizovací nástroje.
Své pracovištěudržujte uklizené
Poházené nářadí nebo materiál přispívají ke vzniku
úrazů. Vosk a piliny zvyšují kluzkost podlahy.
Nepracujte v ohroženém prostředí
Elektrické nářadí nepoužívejte ve vlhkých nebo mokrých
prostorách a nevystavujte jej dešti. Zajistěte dostatečné
osvětlení a dostatečnou volnost pohybu.
Děti udržujte v dostatečné vzdálenosti
Všichni návštěvníci by se měli zdržovat v bezpečné
vzdálenosti od Vašeho pracoviště.
Zajistěte svou dílnu před zásahy dětí
visacími zámky, hlavními vypínači nebo uzamykatelnými
spínači na strojích.
Přístroj nepřetěžujte
Svou práci vyřídíte lépe a rychleji, nebude-li při ní přístroj
přetěžován.
Používejte správné nářadí
Žádnou práci neprovádějte nářadím nebo
příslušenstvím, které nebylo pro tuto práci konstruováno.
Noste účelný pracovní oděv
Nenoste široký oděv, rukavice, kravaty nebo šperky,
které se mohou zachytit do rotujících částí stroje. Dbejte
na svou stabilitu (neklouzavá obuv). Máte-li dlouhé
vlasy, noste síťku.
Noste ochranné brýle
Při práci byste měli nosit vždy ochranné brýle podle DIN
58214. Normální brýlová skla jsou pouze odolná proti
nárazům a nenahrazují bezpečnostní ochranné brýle. Při
prašných pracích noste ochrannou protiprachovou
masku a při delší práci s přístrojem byste měli mít i
ochranu sluchu.
Řezaný materiál zajistěte
Pro přidržení řezaného materiálu použijte utahováky
nebo svěrák. Je to bezpečnější než přidržování rukou a
oběruce budete mít volné pro obsluhu pily.
Dbejte na dostatečnou stabilitu
Vyhněte se držení těla, při kterém byste mohli ztratit
rovnováhu.
S nářadím zacházejte opatrně
Nářadí udržujte čisté a ostré. Dodržujte pokyny výrobce
pro mazání a výměnu součástí.
Stroj odpojujte od zdroje elektrického napětí
Před každým seřizováním nebo údržbou vytáhněte
síťovou zástrčku ze zásuvky.
Zabraňte neúmyslnému spuštění stroje
Před odpojením stroje od zdroje elektrického napětí se
ujistěte, že spínačje v poloze VYP.
Používejte doporučené příslušenství
Dodržujte pokyny přiložené k příslušenství. Používání
nevhodného příslušenství může být nebezpečné.
Nikdy nestůjte na stroji
Následkem mohou být těžká poranění, pokud by se stroj
převrátil nebo byste se nedopatřením dotkli řezného
nástroje. Materiál nikdy neukládejte nad stroj nebo vedle
něho tak, abyste při jeho odebírání museli vylézt na
stroj.
Kontrolujte, zda nejsou některé části stroje
poškozené
Před každým použitím byste měli pečlivězkontrolovat
veškerá ochranná zařízení a ostatní součásti stroje a
zjistit, zda ještěplní svou funkci. Kontrolujte seřízení,
lehký chod, praskliny nebo jiná poškození, která by
mohla negativněovlivnit funkci stroje. Poškozenou
součást nechte neprodleněopravit u odborníka nebo ji
vyměňte.
16

Stroj nenechávejte běžet bez dozoru.
Stroj vypněte a opusťte jej až po úplném zastavení
nástroje.
Přístroj splňuje požadavky EN 61000-3-11 a podléhá
zvláštním podmínkám pro zapojení. To znamená, že
použití na libovolných volnězvolených bodech připojení
je nepřípustné.
Přístroj může při nevýhodných podmínkách sítěvést k
dočasným výkyvům napětí.
Přístroj je určen výhradněk použití na bodech připojení,
jež nepřekračují maximálněpřípustnou impedanci Zmax =
0,233 Ω.
Jako uživatel musíte zajistit, v případěpotřeby po
dohoděs Vaším dodavatelem elektřiny, aby Váš bod
připojení, na kterém chcete přístroj používat, splňoval
výše uvedený požadavek.
Bezpečnostní předpisy pro kapovací pily
Pozor:
Pro Vaši vlastní bezpečnost je provoz stroje dovolen teprve
tehdy, když je pila kompletněnamontována a nainstalována
dle popisu a když jste si pročetli a pochopili příslušné
bezpečnostní předpisy.
Kroky, které je třeba provést před prvním použitím:
Montáž a nastavení
Znáte funkci a správnou obsluhu těchto prvků
zapínače/vypínače
horního a spodního ochranného krytu
aretace hřídele pily a tlačítka na rukojeti
šikmého nastavení hlavy pily, zarážkové spony a
aretace otočného stolu?
Pročtěte si všechny bezpečnostní informace a provozní
pokyny v tomto návoděa ujistěte se, že jste je pochopili.
Respektujte výstražná upozornění na kapovací pile.
Před každým použitím:
Pilu kontrolujte. Chybí-li jí nějaký díl, je-li ohnutý či
z jiného důvodu neupotřebitelný nebo je-li závada
v elektrickém zařízení, pilu vypněte a odpojte od zdroje
elektrického napětí. Před dalším použitím pily vyměňte
všechny chybějící, poškozené nebo vadné díly.
Práci si rozvrhněte tak, abyste měli vždy chráněné oči,
ruce, obličej a sluch.
Noste
bezpečnostní brýle, které odpovídají požadavkům
normy DIN 58214. Při používání stroje by Vám do očí
mohly vlétnout různé částečky, které mohou být příčinou
trvalého poškození zraku. Bezpečnostní brýle dostanete
tam, kde jste koupili kapovací pilu. Používání
bezpečnostních brýlí, které neodpovídají norměDIN
58214, může vést v důsledku možného prasknutí
ochranného skla k těžkému poranění.
Při prašných pracích noste kroměochranných brýlí také
protiprachovou masku.
Abyste zabránili zakousnutí pilového kotouče v řezné
spáře nebo odhození řezaného materiálu:
Vyberte pilový kotouč, který je vhodný pro konkrétní
řezání. Touto kapovací pilou řežte pouze dřevo a
podobné materiály nebo měkké kovy, např. hliník.
Šipka na pilovém kotouči, která ukazuje směr otáčení,
musí souhlasit se šipkou umístěnou na pile. Zuby
pilového kotouče musí na přední straněpřístroje
ukazovat dolů.
Ujistěte se, že pilový kotoučje ostrý, nepoškozený a
správněseřízený. Když je zástrčka vytažená ze
zásuvky, tiskněte hlavu pily dolů. Pilový kotouč
protáčejte rukou a zkoušejte, zda se pohybuje volně.
Překlopte hlavu pily do polohy 45° a zkoušku opakujte.
Pokud pilový kotoučv některém místědrhne, je třeba
hlavu pily znovu vyrovnat podle popisu v článku 6
„Příprava práce“.
Pilový kotouča čelní plochy přírub pilového kotouče
udržujte čisté.
Příruby pilového kotouče je nutno namontovat
vysoustruženým osazením směrem dovnitř(k pilovému
kotouči).
Strana příruby s vysoustruženým osazením musí
přiléhat k příruběpilového kotouče.
Šroub příruby je třeba dotáhnout rukou nástrčným
klíčem 13 mm.
Zajistěte, aby veškerá upínací zařízení a zablokování
byla pevná a aby žádná součást neměla příliš velkou
vůli.
Nikdy
neřežte volněz ruky:
Řezaný materiál neustále pevnětiskněte ke stolu a
k zarážce, tak aby se nemohl při řezání kývat ani
přetáčet. Pod řezaným kusem se nesmí
shromažďovat piliny.
Zajistěte, aby se řezaný kus nemohl pro proříznutí
pohybovat (např. když nepřiléhá k opěře celou
plochou)
K řezání kusů, které nedoléhají k příložce celou
plochou, používejte podložky, podávací pomůcky
nebo jiný stroj.
Zajistěte, aby odřezky mohly odpadávat po straně
pilového kotouče. V opačném případěby se mohly
zachytit do pilového kotouče, který by je odmrštil.
Nikdy neřežte několik kusůsoučasně.
Buďte zvlášťopatrní při řezání velkých, velmi malých a
těžko zpracovatelných kusů:
Pro dlouhé kusy materiálu, které bez podpěry ze
stolu pily padají, používejte přídavné opěry (stoly,
držáky atd.).
Touto pilou neřežte kusy, které jsou tak malé, že je
nemůžete bezpečněpřidržovat rukou, když položíte
ukazovák na vnější hranu zarážky.
Při řezání profilovaných kusůpracujte tak, aby
řezaný materiál nemohl sklouznout a zaseknout se
v pilovém kotouči. Profilovaný materiál musí
přiléhat celou plochou nebo je nutno jej přidržovat
zařízením, které brání viklání, překlápění nebo
sklouznutí kusu při řezání.
Kulaté kusy jako jsou tyčky nebo trubky pevně
přidržujte. Jinak se budou protáčet a hrozí
nebezpečí, že dojde k zaseknutí pilového kotouče.
Kulaté kusy vždy upněte do vhodného zařízení.
V řezaném materiálu nesmí být hřebíky ani jiná cizí
tělíska.
Přihlížející osoby udržujte v bezpečné vzdálenosti od
svého pracovištěi od prostoru za pilou, kam odletují
piliny a odřezky.
Kapovací pilu nikdy nezapínejte, aniž byste předtím ze
stolu pily odstranili všechny předměty s výjimkou
řezaného kusu a případněpotřebných přídržných
zařízení.
Abyste zabránili poškození sluchu, noste při delších
pracích ochranná sluchátka.
Abyste zabránili náhlému vtažení do pilového kotouče:
Nenoste rukavice.
Odložte šperky a široké kusy oděvu.
Máte-li dlouhé vlasy, noste síťku.
Dlouhé rukávy si vyhrňte nad lokty.
Abyste zabránili úrazům v důsledku neúmyslného
spuštění pily, je nutno před jakýmkoliv nastavováním
zarážky resp. hlavy pily nebo výměnou pilového kotouče
či příslušenství a jinou údržbou odpojit stroj od zdroje
elektrického napětí vytažením zástrčky.
Na ochranu před úrazem elektrickým proudem se při
zasouvání zástrčky do zásuvky nedotýkejte kovových
dotykových kolíkůzástrčky.
Kabel nepoužívejte k vytahování zástrčky ze zásuvky.
Kabel chraňte před vysokými teplotami, olejem a ostrými
hranami.
Nikdy nenanášejte na pilový kotouč, který se ještětočí,
čisticí nebo lubrikační prostředky.
Abyste zabránili vzniku požáru, neprovozujte kapovací
pilu v blízkosti hořlavých kapalin, par nebo plynů.
Vyvarujte se poranění, která mohou vzniknout
v důsledku používání nevhodného příslušenství.
Používejte pouze doporučené pilové kotouče.
17

Za chodu pily:
Před provedením prvního řezu nechte pilu chvíli běžet
na volnoběh. Pokud byste slyšeli nezvyklé zvuky nebo
cítili silné vibrace, pilu vypněte, vytáhněte zástrčku ze
zásuvky a zjistěte příčinu. Pilu nespouštějte, dokud
příčinu nenajdete a neodstraníte.
Odříznutou část materiálu nijak neomezujte. Nedotýkejte
se jí, nepřidržujte ji ani neupínejte a také proti ní
neumisťujte zarážku. Odřezek musí mít možnost
neomezeného pohybu po straněpily. Pokud mu
v pohybu nějakým způsobem zabráníte, může být
zachycen a odmrštěn rotujícím pilovým kotoučem.
Vyvarujte se nešikovného umístění rukou, při kterém by
Vaše ruce mohly náhle sklouznout nebo se dostat do
pilového kotouče.
Dbejte na to, aby pilový kotoučpřed řezáním dosáhl
plných otáček.
Hlavu pily spouštějte pouze takovou rychlostí, aby
nedošlo k přetížení motoru a zablokování pilového
kotouče.
Před odstraněním zaseknutého materiálu vypněte
přístroj, nechte pilový kotoučzcela zastavit a vytáhněte
elektrickou zástrčku.
Po ukončení řezání držte hlavu pily stlačenou, uvolněte
spínača počkejte, až se pilový kotoučzastaví. Pak
teprve můžete pohybovat rukama.
Chování v případěnouze
Zaveďte úrazu odpovídající potřebnou první pomoc a vyzvěte
co možná nejrychleji kvalifikovanou lékařskou pomoc.
Chraňte zraněného před dalšími úrazy a uklidněte jej.
Kvůli případné nehoděmusí být na pracovišti vždy po
ruce lékárnička první pomoci dle DIN 13164. Materiál,
který si z lékárničky vezmete, je třeba ihned doplnit.
Pokud požadujete pomoc,
uveďte tyto údaje:
1. Místo nehody
2. Druh nehody
3. Počet zraněných
4. Druh zranění
Zbytková rizika a ochranná opatření
1. Mechanická zbytková rizika:
Říznutí, amputace:
Rotující pilový kotoučmůže vést k vážným řezným
poraněním. Udržujte své ruce v bezpečné vzdálenosti od
pilového kotouče.
Náraz:
Držíte-li řezaný materiál v ruce, může jej rotující
pilový kotoučstrhnout s sebou a způsobit Vám
poranění! Řezaný materiál vždy zajistěte odpovídajícím
způsobem pomocí svěráku!
2. Ohrožení hlukem:
Poškození sluchu:
Delší práce se strojem může vést k poškození sluchu.
Vždy noste osobní ochranné pomůcky na ochranu sluchu.
3. Jiná ohrožení:
Odhozené předměty nebo kapaliny:
Nedostatečnězajištěné kusy řezaného materiálu mohou
být v důsledku rotace pilového kotouče odhozeny a
způsobit Vám poranění. Řezaný materiál vždy upněte a
noste ochranné brýle.
4. Ohrožení zářením:
Laserové záření:
Přístroj je vybaven laserem pro znázornění řezné
linie. Laser může způsobit poškození sítnice. Nikdy se
nedívejte přímo do laserového paprsku.
Likvidace
Pokyny pro likvidaci vyplývají z piktogramůumístěných na
přístroji resp. obalu. Popis jednotlivých významůnajdete
v kapitole „Označení na přístroji“.
Požadavky na obsluhu
Obsluha si musí před použitím přístroje pozorněpřečíst
návod k obsluze.
Kvalifikace
Kroměpodrobného poučení odborníkem není pro používání
přístroje nutná žádná speciální kvalifikace.
Minimální věk
Na přístroji smí pracovat jen osoby, jež dosáhly 18 let.
Výjimku představuje využití mladistvých, pokud se toto děje
během profesního vzdělávání za účelem dosažení dovednosti
pod dohledem školitele.
Školení
Používání přístroje vyžaduje pouze odpovídající poučení
odborníkem resp. návodem k obsluze. Speciální školení není
nutné.
Technické údaje
Síťové napětí/frekvence: 230 V~50 Hz
Výkon motoru: 1900 W
Průměr pilového kotouče: 250 x 20
Otáčky pilového kotouče: 5000 ot./min
Max. řezná šířka při 90°: 70 x 310 mm
Max. řezná šířka při 45°: 40 x 210 mm
Hladina hluku LWA:107 dB
Hmotnost s podstavcem: 20 kg
Hmotnost bez podstavce: 18 kg
Přeprava a uložení
Je-li stroj delší dobu mimo provoz, odpojte jej od zdroje
elektrického proudu a uložte jej na místo nepřístupné pro děti.
Dbejte na to, aby místo uložení bylo suché a bezpečné.
Průřez kabelu
Délka kabelu Potřebný průřez kabelu:
do 15 m 1,5 mm²
15 – 40 m 2,5 mm²
Jsou-li přívodní kabely příliš dlouhé a mají malý průřez,
nastane pokles napětí, který může vést k problémům
s motorem. K bezvadné funkci pily je proto nutný přívodní
kabel s dostatečnědimenzovaným průřezem. Délky kabelů
uvedené v tabulce se týkají vzdálenosti mezi
rozvaděčem/pojistkovou skříní a síťovou zástrčkou kapovací
pily. Při tom není důležité, zda se jedná o kombinaci
přívodního kabelu a prodlužováku nebo pouze o přívodní
kabel.
Definice pojmů
Hřídel pily
Hřídel, na níž je upevněn pilový kotouč.
Příčný řez
Řezání kolmo k vláknům.
Šikmý řez
Řezání, které není v pravém úhlu k povrchu řezaného
kusu
Pokosový řez
Řezání, které není v pravém úhlu k přední hraně
řezaného kusu
Řezání na dvojitý pokos
kombinace pokosového a šikmého řezu
Otáčky za minutu
Počet otáček, které vykoná rotující objekt za jednu
minutu.
Řezná čára
Místo na řezaném kusu nebo na stole pily, které přímo
18

lícuje s pilovým kotoučem, a to i část řezaného kusu,
která již byla pilovým kotoučem odříznuta.
Rozvor zubůpily
Vzdálenost kterou je špička zubůpily vyhnutá směrem
ven od obvodu pilového kotouče
Řezná spára
Mezera, kterou vytváří rotující pilový kotoučv řezaném
materiálu.
Nesprávné nastavení sklonu
Špatné nastavení pilového kotouče.
Pryskyřice (příměsek pryskyřice)
Zaschlá pryskyřice ve dřevě.
Řezaný materiál
Předmět, na němž se provádí řezání.
Montáž
Kapovací pilu vyjměte oběma rukama z obalu. Postavte ji na
hladký a stabilní povrch. Zajistěte, aby na pracovišti nebyly
žádné překážky. Kapovací pilu je nutno upevnit k pracovnímu
stolu.
Montáž podstavce: viz obr. 7
Upevnění pily na pracovišti
Pilu lze používat jako mobilní i jako stacionární přístroj.
Při stacionárním použití je nutno stroj přišroubovat s využitím
k tomu určených otvorůna příslušný pracovní nebo dílenský
stůl.
Přípojka pro odsávání prachu (Obr. 3)
Na odsávací hrdlo lze místo sběrného vaku na prach napojit
také vysavačs běžnou hadicovou přípojkou. (15)
Seřízení laseru (obr. 6)
Vložte 2 baterie Micro/AAA, aby bylo možno laser
zapnout.
Laser zapněte stisknutím knoflíku.
K dorazu přiložte úhelník s pravým úhlem, dbejte, aby
lícoval s pilovým kotoučem.
Pomocí 3 šroubůlaser seřiďte.
Pro kontrolu proveďte zkušební řez.
Bezpečnostní pokyny pro obsluhu
Pilu není dovoleno používat na jiné materiály, než je popsáno
v návodu k obsluze.
Přístroj používejte teprve po pozorném přečtení
návodu k obsluze.
Dodržujte všechny bezpečnostní pokyny uvedené v
návodu.
Vůči jiným osobám se chovejte odpovědně.
Postup
Kapovací pilu zapněte pomocí spínače na vnitřní straně
rukojeti.
Před řezáním se pilový kotoučmusí točit maximální rychlostí.
Pracovní hlavu držte za rukojeťa pomalu ji spouštějte. Při
tom dbejte, aby spouštění bylo rovnoměrné a bez trhavých
pohybů. Ve směru posunu pilového kotouče vyvíjejte tlak
přiměřený charakteru a rozměrům řezaného materiálu. Při
řezání je nutno řezaný kus pevnětlačit k příložce. Abyste
mohli bezpečněřezat i dlouhé kusy, musíte použít přídavné
opěry.
Po provedení řezu veďte pracovní hlavu opět do horního
výchozího postavení a zkontrolujte, zda je kryt pilového
kotouče ve správné poloze. Pilové kotouče pravidelně
ostřete, v případěpotřeby vyměňte.
POZOR: Nepoužívejte poškozené pilové kotouče.
Obsluha (Obr. 1, 3)
Nikdy neprovádějte seřizování za chodu stroje.
Přístroj je nutno před každým seřizováním odpojit od
zdroje elektrického proudu! Hrozí nebezpečí vážného
poranění.
Šikmý řez
Pro šikmé řezy do 45° je třeba povolit aretační páku na zadní
straněstroje (13). Hlavu stroje naklánějte z levé strany až do
požadovaného úhlu nebo ke koncové zarážce (45°) a pak ji
opět zaaretujte pákou (13).
Pokosový řez
Hlavu stroje lze při 45° natočit vpravo i vlevo.
Menší hodnoty úhlu lze snadno nastavit tak, že požadovanou
hodnotu odečtete na stupnici na stole. Povolte aretační šroub
(14), otočte hlavu stroje do požadované polohy a pak ji fixujte
opět aretačním šroubem (14).
Kombinovaný řez (vodorovněi svisle do 45°)
Kombinace řezůpily:
Výměna pilového kotouče (Obr. 2, 3, 4)
POZOR: Výměnu provádějte pouze, když je pila
odpojena od zdroje elektrického napětí a pilový kotoučje
zcela v klidu!
Odšroubujte šroub (H), povolte šroub (G) a pak odmontujte
držák s pohyblivým (J) krytem pilového kotouče.
Pilový kotoučzablokujte pomocí aretačního knoflíku (I).
Šroub pilového kotouče (J) povolte nástrčným klíčem ve
směru hodinových ručiček (levotočivý závit). Pilový
kotoučvyjměte a vyměňte, sklon zubůpři tom musí
souhlasit se směrem šipky na skříni.
Před montáží pilového kotouče je třeba pečlivěvyčistit
přírubu pilového kotouče. Vnější přírubu pilového
kotouče nasuňte na hřídel, zašroubujte upevňovací
šroub, (levotočivý závit) a dotáhněte jej. Pak opět
upevněte kryt pilového kotouče. Před zapojením do sítě
příp. proveďte zvednutím a spuštěním pracovní hlavy
zkoušku volnoběžného chodu.
Návod „krok za krokem“
Na řezaném kusu si nakreslete, kudy má vést řez.
Řezaný kus položte na pracovní stůl a pilový kotouč
seřiďte za klidu stroje podle značky.
Nyní řezaný kus upněte pomocí svorky.
Znovu zkontrolujte pozici pilového kotouče vůči značce.
Zapněte stroj a proveďte řez.
Stroj vypněte a vyčkejte, až se pilový kotoučzcela
zastaví.
Odstraňte piliny a odeberte řezaný kus.
Zásadněpilu vytahujte ze zásuvky, pokud ji delší dobu
nepoužíváte.
Poruchy - příčiny - odstranění
Porucha Příčina Odstranění
Nesouhlasí
úhel řezu
Není v pořádku
poloha hlavy
pily
Seřídit podle pokynů
v kapitole „Montáž a první
uvedení do provozu“.
Motor
nefunguje
Opotřebené
uhlíky
vadný spínač
Vyměnit uhlíky
Oprava u odborníka
19

Prohlídky a údržba
1. Opravy svěřte pouze kvalifikovanému servisnímu
technikovi, který bude používat pouze originální
náhradní díly.
2. Pilu chraňte před mokrem a vlhkem a používejte ji pouze
v suchém prostředí.
Údržba (kartáčky a kolektor)
Doporučujeme, abyste se při výměněkartáčkůobrátili na
odbornou servisní dílnu a nechali si při tom provést údržbu
kolektoru, čímž zajistíte bezvadnou funkci motoru.
Mazání
Všechna ložiska motoru jsou dostatečněnamazána na celou
životnost této pily za normálních provozních podmínek.
Údržba není nutná.
Mazání v případěpotřeby:
1. Mazání otočné osy v případětěžkého chodu
1.1 Povolením stavěcí matice a kápnutím několika
kapek oleje na podložku a dotykovou plochu.
1.2 Vymontováním a namazáním otočné osy a
dotykových ploch. UPOZORNĚNÍ: Demontáž
otočné osy je podmíněna demontáží horního krytu
pilového kotouče a horní části zarážky. Tuto práci
by měl provádět kvalifikovaný servisní technik.
Dbejte na polohu koncůpružin ve skříni. Pro
usnadnění zpětné montáže si ji označte křídou.
2. Mazání ovládací páky pro výkyvný ochranný kryt:
2.1 pro tichý a lehký chod je třeba všechny kovové a
plastové dotykové plochy občas lehce namazat
olejem na šicí stroje. Dejte pozor, aby oleje nebylo
příliš. V přebytečném oleji se pouze usazují piliny a
tvoří zatvrdlá místa.
UPOZORNĚNÍ: „Před jakýmkoliv seřizováním nebo
údržbou odpojte stroj od zdroje napětí vytažením zástrčky ze
zásuvky.“
Manipulace s motorem
POZOR: Abyste zabránili poškození motoru, čistěte jej
pravidelněod pilin a prachu (chlazení).
1. Tuto pilu zapojte do sítě230V jištěné pojistkou 16 A a
ochranným vypínačem při nedostatečném proudu.
Špatné jištění může způsobit poškození motoru.
2. Pokud se motor nerozběhne, spínačihned pusťte.
VYTÁHNĚTE ELEKTRICKOU ZÁSTRČKU ZE
ZÁSUVKY.
3. Zkontrolujte volný pohyb pilového kotouče. Pohybuje-li
se kotoučvolně, zkuste znovu nastartovat.
4. Zastaví-li se motor náhle během řezání, ihned uvolněte
spínača stroj odpojte vytažením zástrčky od zdroje
napětí. Pak uvolněte pilový kotoučz řezaného materiálu.
Poté můžete řezání dokončit.
5. Pojistky nebo ochranné spínače mohou pravidelně
reagovat za těchto podmínek:
a. MOTOR JE PŘETĚŽOVÁN. Příliš rychlé
zanořování pilového kotouče do řezaného
materiálu nebo časté zapínání a vypínání pily
mohou vést k přetížení motoru resp. závaděna
převodovce.
b. Výkyvy síťového napětí v rozmezí 10%
normální provoz pily neohrožují. Při silném
zatížení však musí být na svorkách motorové
přípojky napětí uvedené na typovém štítku.
6. Příčinou mnohých problémůs motorem jsou uvolněné
nebo vadné konektory, přetížení, podpětí (může k němu
dojít v důsledku příliš malého průřezu přívodních
kabelů). Vždy zkontrolujte veškerá napojení, hodnotu
napětí a odebíraný proud.
20
This manual suits for next models
1
Table of contents
Languages:
Other Gude Saw manuals

Gude
Gude PBK 500 User manual

Gude
Gude GFO 1801 Wiring diagram

Gude
Gude GRK 250/300 Wiring diagram

Gude
Gude PRS 700 Wiring diagram

Gude
Gude MBS 125 V User manual

Gude
Gude GBS 200 User manual

Gude
Gude USS 20-201-24 User manual

Gude
Gude GWS 500 HM User manual

Gude
Gude GTK 800 Wiring diagram

Gude
Gude KS 55-1300 User manual