USERINSTRUCTIONS
HALLDERG-50
(GB)
WARNING!
Be very careful, especially of your
hands, with sharp knife bladesand
moving parts.
Alwayscarry the machine by the two
handles(A17) on the sidesof the
machine base.
Never put your handsinto the feed
compartment (A4) or in the feed tube
(A2).
Alwaysuse the pusher (A1) during
cutting with the feed tube (A2)
Before cleaning the machine, always
switch it off by moving the speed
control (A15) into the “O” position and
then removing the power plug from the
wall socket alternatively turn off the
mainsswitch.
Alwaysgrip the feedershandle (A3)
when the feed compartment (A4) is
being opened or closed.
The machine may only be repaired and
the machine base (A16) opened by an
authorized service mechanic.
Unpacking.
Check that all the parts are included, that the
machine works and that nothing has been
damaged during shipping. Claims sho uld be
made to the machine supplier within eight days
of delivery.
Installation.
Co nnect the machine to a mains electricity
supply with specification in acco rdance with the
details on the data plate o n the back of the
machine base (A16 ). Place the machine on a
sturdy bench or table 650 - 900 mm high.
Safety check before processing.
Remove the feeder (A5 ), any cutting tools (A6 -
A12) and the ejecto r plate (A13) in accordance
with the instructio ns under the heading “Remo-
ving the feeder”, and then check that the
machine will not start when the speed co ntro l
(A15) is in the “I” po sition.
Place the feeder (A5 ) o n the machine base
(A16 ) with the text “Close O pen” at 5 o’clock
in relatio n to the outlet o f the machine base
(D1 ) and press the feeder clockwise as far as it
will go and is firmly in positio n (D2).
Then check that the machine sto ps when the
feeders handle (A3 ) is raised and re-starts
when the feeders handle is lowered, with the
speed co ntrol in position ”I”.
Set the speed co ntro l to position ”I” and then
lift the feeders handle and check that the shaft
(A14) then stops ro tating within two seco nds.
In the event of any fault o r malfunction, call in a
service mechanic to co rrect the fault before
using the machine.
The feeder (A5).
The feeder is used to gether with a suitable
cutting to ol (A6 - A12 ) fo r slicing, dicing,
shredding, grating o f fruit, vegetables, dry
bread, cheese, nuts and/ o r mushro o ms.
The large feed co mpartment (A4) is used
mainly fo r feeding po tatoes, onions, etc. and
cutting larger foods such as cabbage.
The large feed compartment is also used when
the fo o ds has to be cut/ sliced in a specific
direction, e.g. when slicing to mato es and
lemons.
The feed tube (A2 ) is mainly used in co nnection
with processing elongated foo ds such as
cucumber.
Choice of cutting tools(A7 -A12).
• Standard Slicer (10 mm) Slices firm pro ducts
such as ro ot vegetables. • Crimping Slicer (4 ,5
mm) For ripple slicing o f beetroot, cucumber,
carrot, etc. • Fine Cut Slicer (1 , 1 .5 , 2 , 4 , 6 ,
15 mm) Slices firm and so ft pro ducts such as
ro o t vegetables, onio ns, leeks, cucumber, bell
peppers, to mato es, apples, citrus fruits, bananas
and mushro o ms. Shreds Chinese lettuce and
lettuce. 1 mm for Parmesan-flakes. • Julienne
Cutter (2x2 , 2 .5 x2 .5 , 4 .5 x4.5, 10 x10 mm)
Fo r soups, cucumber, salads, etc.2 x2 mm for
julienne po tato es and carro ts. • Dicing G rid
(10 x10 , 15 x15 mm). Dices in co mbination with
the 10 mm standard slicer. Dices ro o t
vegetables, fruit, po tatoes, cabbage, swedes,
carrots, cucumbers, apples, etc. • Soft Dicing
Set (10 x10 x10 , 12.5 x12 .5 x12.5 mm) Dicing
sets incl. two cutting too ls fo r gentle dicing of
to mato es and other so ft, fragile and/ o r juicy
pro ducts. • Raw Fo od G rater/ Shredder (1 .5 ,
2, 3, 4.5, 6, 8, 10 mm) G rates carrots and
cabbage for raw salad. G rates almonds and
o ther nuts, and dry bread. 4 .5 , 6 and 8 mm
are usual for shredding cheese for pizzas,
gratin, etc. 8 and 10 mm is commonly used for
shredding cabbage/ white cabage. • Fine
G rate r (Fine, Extra Fine) Fine versio n grates
po tatoes for potato pancakes, hard/ dry
cheeses such as Parmesan fo r pasta, dry bread,
ho rseradish. Extra fine version grates black
radish, dry bread.
Removing the feeder (A5).
Turn the feeder anti-clockwise as far as it will go
(C), then lift off the feeder.
Turn the cutting to o l (A6, 7 , 8 , 9 , 11 o r 12)
clockwise and lift itoff.
If you have been using a dicing grid (A10 ) lift it
off.
Lift o ff the ejecto r plate (A13).
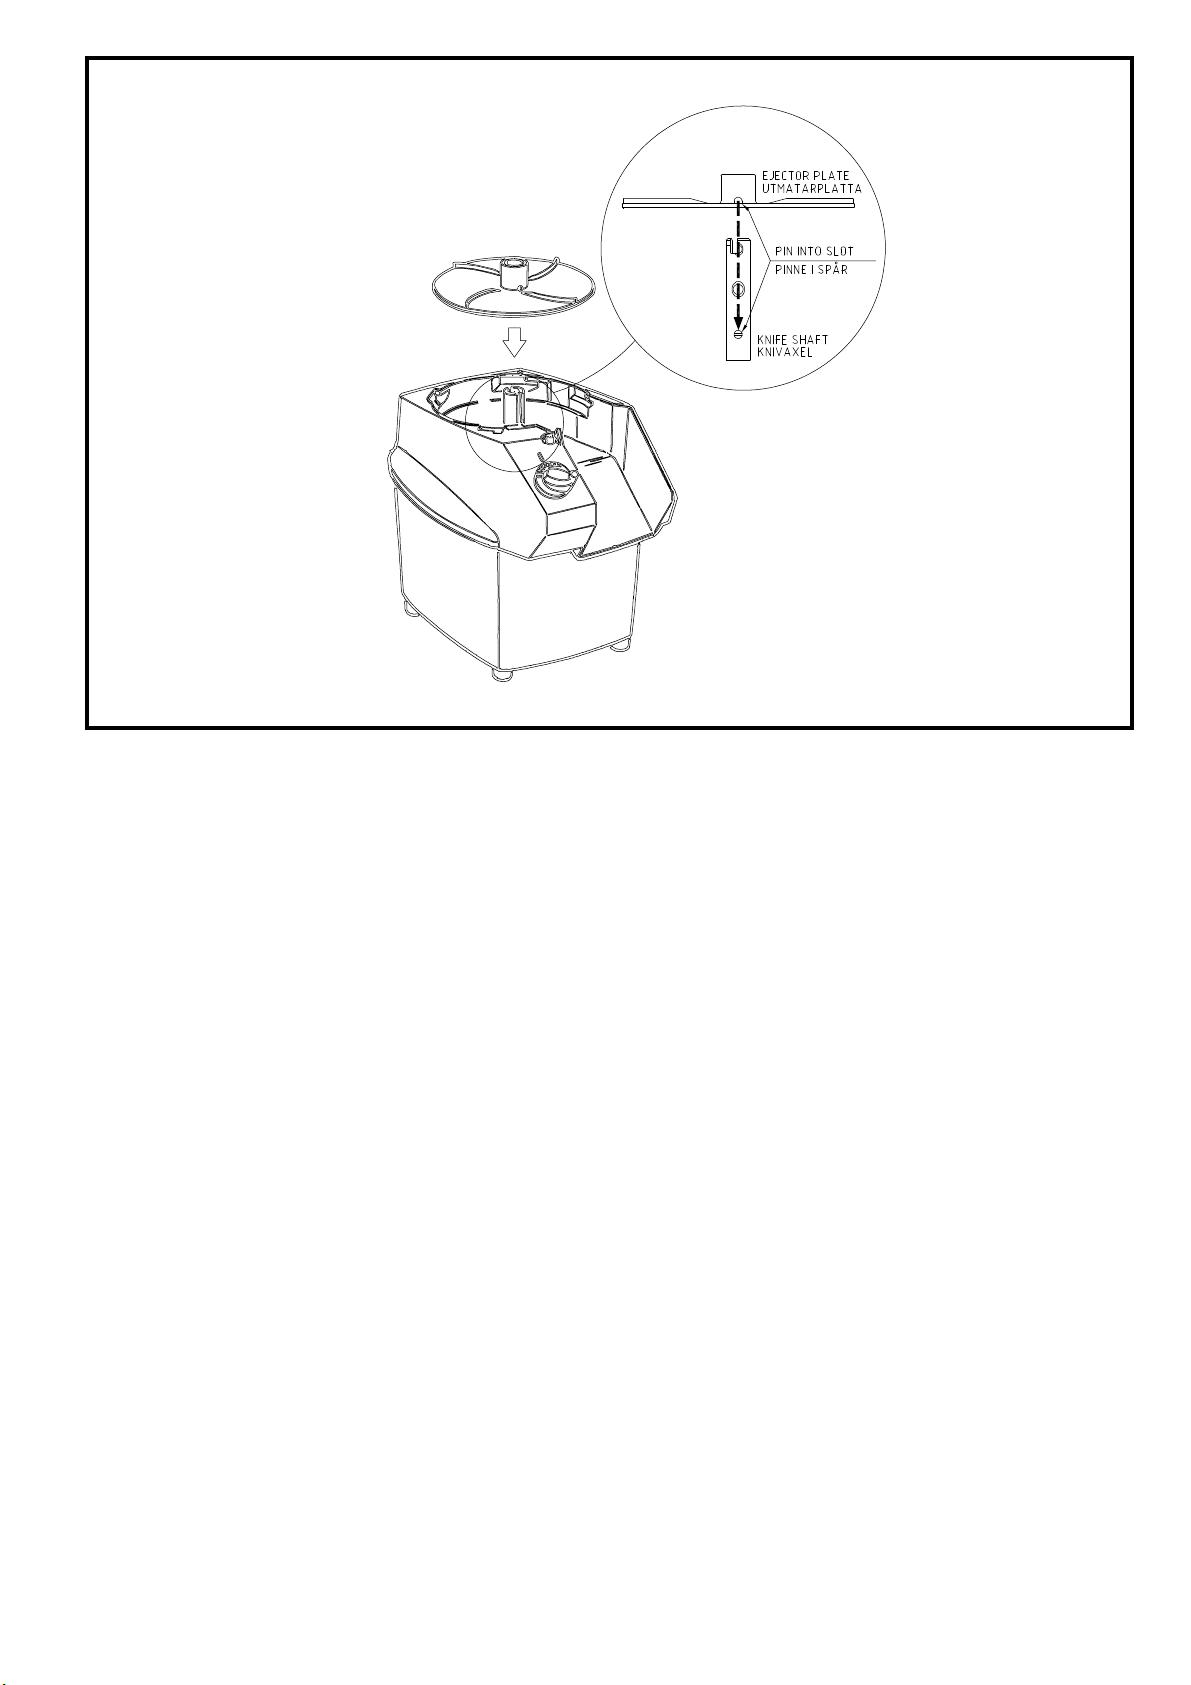
Fitting the feeder (A5).
Place the ejector plate (A13) on the shaft (A14 )
and turn/ press do wn the ejector plate into its
co upling (B1).
During dicing: place the dicing grid (A10 ) with
the sharp edge of the knives upward, so that
the recess in the side o f the dicing grid fits into
the guide grove on the machine base (B2).
Then place the standard slicer so that it dro ps
down into its co upling (B3).
During slicing, shredding and grating: place
only the chosen cutting to o l (A6, 7 , 8 , 9 , 11 or
12) on the shaft and rotate the cutting to o l so
that it drops into its co upling.
Place the feeder (A5) on the machine base
(A16) so that the text “Close O pen” is at 5
o’clock in relation to the o utlet o f the machine
base (D1 ) and turn the feeder clockwise as far
as it will go and it is firmly in po sitio n (D2).
Using the speed control (A15).
W ith the speed co ntrol (A15) in the ”O ” po si-
tio n the machine is switched off. In the ”I” po si-
tio n the machine o perates co ntinuo usly.
Cleaning.
Always clean the machine thoro ughly
immediately after use.
First switch o f the machine by setting the speed
co ntrol (A15) to the “O ” po sitio n and then
remo ve the power supply plug from the wall
socket alternatively turn o ff the mains switch.
Take all remo vable parts o ff of the machine
base (A16 ) and clean and dry them
thoro ughly.
Never wash light metal items in the dishwasher
unless they are marked “diwash”.
If the cutting to o ls are marked "diwash", read
and follo w the special "diwash" user instruction
manual carefully.
Rinse the machine housing fro m above (never
fro m the side) and/ or whipe it with a damp
cloth.
Never use sharp objects, sco uring po wder o r
pads, o r high pressure hoses.
Never leave the cutting tools (A6-A12 ) in a wet
co ndition when they are not being used.
Perform the following checksweekly.
Remove first the feeder (A5), any cutting to o ls
(A6-A12) and the ejector plate (A13).
Turn the speed co ntro l (A15 ) to the “I” po sition
and check that the machine will not start.
Fit the feeder (A5), set the speed co ntro l to the
“I” position and then check that the machine
stops when the feeders handle (A3 ) is raised
and re-starts when the handle is lowered.