Hallde RG-7 User manual

User Instructions
USER INSTRUCTIONS • BRUKSANVISNING
Food Preparation Machines
Made in Sweden
Vegetable Preparation Machine /
Grönsaksskärare RG-7
hallde.com
© AB Hällde Maskiner Art.nr. 13007A

HALLDE • User Instructions
2
1 2
4
5
6
3
A
B
C
D
E
F
G
H
I
J
K

3
HALLDE • User Instructions
BRUKSANVISNING
HÄLLDE RG-7
(SE)
VARNING!
Akta händerna för vassa knivar och rörliga
delar.
Stick aldrig ner händerna i exi - mataren
(6:F).
Stick aldrig in händerna i maskinens utlopp.
Maskinen får endast installeras av en behö-
rig fackman.
Maskinen får endast repareras och maskin-
huset öppnas av en behörig fackman.
Låshylsan (1:A) skall lossas medurs.
Tryck alltid in maskinens röda stopp-
knapp före montering/demontering av
skärverk tyg, matare, etc. även om maskinen
inte är igång.
Denna maskin skall inte användas av
barn eller personer med nedsatt motorik,
kognitiv förmåga eller handikapp som
utgör fara för användaren t.ex. nedsatt
syn eller hörsel, utan uppsikt eller tydliga
instruktioner.
UPPACKNING
Kontrollera att alla detaljer nns med samt
att maskinen fungerar och att ingenting har
skadats under transporten. Anmärkningar
skall anmälas till maskinleverantören inom
åtta dagar.
INSTALLATION
Koppla maskinen till ett el-uttag med för
maskinen korrekta data.
Maskinen bör placeras på en bänk eller ett bord
som är ca 650 mm högt.
Placera verktygshängare (2:A) för skär-
verktygen (3) på väggen nära maskinen för
bekväm och säker användning.
Kontrollera nedanstående tre punkter utan
låshylsan (1:A), skärverktyg (3) och utmataren
(1:B) monterade i maskinen.
Att axeln roterar medurs.
Att maskinen ej går att starta utan eximataren
(6:F) monterad.
Att maskinen stannar när eximatarens matar-
kolv (6:A) svängs åt sidan så att eximatarens
öppning (6:B) blir större än 45 mm.
Vid felfunktion måste felet åtgärdas innan
maskinen tas i bruk.
RÄTT VAL AV SKÄRVERKTYG
SKIVARE (3:A): Skivar hårda och mjuka
grönsaker, frukter, svampar etc. Tärnar i kombi-
nation med rekommenderade Tärnings galler.
FINNITTSKIVARE (3:B): Skivar hårda och
mjuka grönsaker, frukter, svampar etc. Tärnar i
kombination med rekommen derade Tärnings-
galler.
STANDARDSKIVARE (3:C): Skivar hårda
och mjuka grönsaker, frukter, svampar etc.
Tärnar i kombination med rekommen derade
Tärningsgaller.
SOFT SLICER (3:D): Skivar mjuka grönsaker,
frukter, svamp, etc. Används föredragsvis för
tärning av mjuka produkter i kombination med
rekommenderade Tärningsgaller.
RÄFFELSKIVARE (3:E): Skär dekorativa
räfade skivor av rödbetor, gurka, morötter etc.
STRIMLARE (3:F): Skär strimlor av fasta
produkter till soppor, sallader, grytor och deko-
ration etc. Passar för att skära något böjda
Pommes frites.
RÅKOSTRIVARE (3:G): River morötter och
vitkål till råkostsallader. River nötter, mandlar
och torrt bröd. Råkostrivare 6 eller 8 mm
används vanligtvis för att riva ost till pizza samt
till riven vitkål.
FINRIVARE (3:H): River produkter nt, såsom
riven hård/ torr ost, rå potatis till raggmunk och
bröd till ströbröd.
HÅRDOSTRIVARE (3:I): Idealisk för att riva
hårdost såsom parmesan. River något grövre
än ”Finrivare, Extra n”.
FINRIVARE, EXTRA FIN (3:J): River pro duk ter
mycket nt, såsom rättika nfördelat till puré
och potatis till en mos.
TÄRNINGSGALLER (3:K): Skär tärningar i
kombination med en passande typ av skivare.
Tärnar både hårda och mjuka grönsaker,
frukt etc.
MONTERA OCH DEMONTERA
SKÄRVERKTYG
Vid montering, placera utmataren (1:B) på
axeln och vrid/pressa ner utmataren i sin
koppling.
Vid tärning eller lökhackning, placera först
ett passande tärningsgaller i maskinen med
skruvskallen på tärningsgallrets kant i spåret
(1:C) i maskinen.
Vid tärning välj sedan en passande Skivare,
Finsnittskivare, Standard eller Soft Slicer
Placera skivaren på axeln och vrid skivaren
så att den faller ner i sin koppling.
Vid skivning, strimling och rivning, placera
istället endast det valda skärverktyget på axeln
och vrid skärverktyget så att det faller ner i sin
koppling.
Vid skärning med eximataren (6:F), skruva
fast låshylsan (1:A) moturs på skärverktygets
centrumtapp.
Vid demontering, skruva loss låshylsan (1:A)
och avlägsna skärverktygen (3) samt utma-
taren (1:B).
MONTERA OCH DEMONTERA
FLEXIMATAREN
Vid montering, placera eximataren (6:F) med
snäpplåset i läge ”klockan 5” (4:A), sett från
maskinens utlopp.
Vrid därefter eximataren medurs till låst läge
”klockan 6” (4:B).
Vid demontering, böj upp snäpplåset (4:B) lätt
och vrid samtidigt eximataren moturs.
RENGÖRING
Stäng först av maskinen och dra ut stick-
kontakten ur vägguttaget alternativt slå ifrån
arbetsbrytaren.
Rengör maskinen noggrant omedelbart efter
användning.
Alla skärverktyg kan rengöras i diskmaskin.
Om du använt ett tärningsgaller (3:K), låt det
sitta kvar i maskinen och stöt först ut kvarva-
rande tärningar med borsten (2:B).
Avlägsna de lösa delarna och diska samt torka
dem väl.
Torka av maskinen med en fuktig trasa.
Lämna aldrig skärverktygens knivar våta när
de inte används.
Förvara alltid skärverktygen (3) på verktygs-
hängarna (2:A) på väggen.
Använd aldrig vassa föremål eller högtrycks-
spruta.
Duscha aldrig maskinens sidor.
KONTROLLERA VARJE VECKA
Att maskinen stannar när eximatarens matar-
platta (6:A) förs åt sidan så att eximatarens
öppning (6:B) blir större än 45 mm. I annat fall
skall stoppklackens (6:H) inställning justeras av
behörig fackman. Stoppklacken lossas/låses
med nyckeln (6:I).
Dra ut stickkontakten ur vägguttaget alterna-
tivt slå ifrån arbetsbrytaren samt kontrollera
därefter att elkabeln är hel och inte har sprickor.
Om någon av de båda säkerhetsfunktionerna
ej fungerar eller om elkabeln har sprickor, skall
fackman tillkallas för åtgärd innan maskinen
kopplas in på nätet igen.
Att drivremmarna (6:E) är spända. Se under
SPÄNNING AV DRIVREMMARNA.
Att synliga skruvar och bultar är åtdragna.
Att eximatarens kolvaxel (6:G) är ren och
löper lätt.
Att knivar och rivplåtar är hela och har god
skärpa.

HALLDE • User Instructions
4
SPÄNNING AV DRIVREMMARNA
Lossa de fyra gummifötterna som håller
skyddsplåten på maskinens undersida och
avlägsna skyddsplåten.
Lossa de fyra skruvarna (6:C) som håller
motorn.
Lossa låsmuttern (6:D) och spänn remmarna
med spännskruven i låsmutterns mitt, så att
man med normal kraft kan trycka in remmarna
ca 10 mm.
Dra åt låsmuttern och de fyra skruvarna samt
montera skyddsplåten.
FELSÖKNING
FEL: Maskinen startar ej eller stannar under
körning och kan ej återstartas.
ÅTGÄRDER: Kontrollera att stickkontakten
sitter i vägguttaget alternativt ställ arbetsbry-
taren i läge ”I”. Se till att eximataren (6:F) är
korrekt monterad på maskinen. För in exi-
matarens matarplatta (6:A) till eximatarens
centrum. Tryck på startknappen. Kontrollera
att säkringarna i lokalens säkringsskåp är hela
och har rätt ampere-tal. Vänta några minuter
och försök att starta maskinen på nytt. Tillkalla
fackman för åtgärd.
FEL: Låg kapacitet eller dåligt skärresultat.
ÅTGÄRDER: Välj rätt skärverktyg eller kombi-
nation av skärverktyg (3). Montera låshylsan
(1:A). Kontrollera att knivar och rivplåtar är
hela och har god skärpa. Pressa ner varan
löst. Spänn drivremmarna (6:E) enligt instruk-
tionerna under SPÄNNING AV DRIVREM-
MARNA.
FEL: Skärverktyget (3) går ej att ta bort.
ÅTGÄRDER: Använd alltid utmataren (1:B).
Använd en tjock skinnhandske, etc. som inte
skärverktygets knivar kan skära igenom, och
vrid loss skärverktyget medurs.
FEL: Låshylsan (1:A) går ej att ta bort.
ÅTGÄRD: Skruva loss låshylsan medurs med
en tjock skinnhandske.
TEKNISKA DATA
MASKIN: Motor: 1 hastighet, 400 V, 3-fas,
50 Hz, motorskydd inställning 1.6 A.
Transmisson: Remdrift. Säkerhetssystem:
En säkerhetsbrytare. Skyddsklass: IP44.
Vägganslutning: Jordad, 3-fas, 16 A. Säkring
i lokalens säkringsskåp: 10 A, trög. Ljudnivå
LpA (EN31201): < 70 dBA.
VERKTYG: Diameter: 185 mm.
Varvtal: 480 varv/min.
MATERIAL: Maskinhus: Polyuretan. Produkt-
genomlopp: Acetal. Fleximatare: Acetal.
Länksystem: Rostfritt stål. Matarsvamp: Alumi-
niumlegering. Skärverktygens skivor: Rostfritt
stål, aluminium eller acetal. Skärverktygens
knivar: Knivstål av högsta kvalitet.
NETTOVIKTER: Maskin inkl. eximatare: 22 kg.
Skärverktyg: Ca 0.5 kg i genomsnitt.
NORMER: Se försäkran om överensstäm-
melse.
VID ANÄNDNING AV SKIVARE, RÄFFELSKIVARE,
STRIMLARE, ELLER RÅKOSTRIVARE
MONTERA
SKÄRVERKTYG
Låshylsa
Skärverktyg
Utmatare
Knivhus
VID ANVÄNDNING AV TÄRNINGSGALLER
Låshylsa
Skivare
Tärningsgaller
Utmatare
Knivhus

5
HALLDE • User Instructions
USER INSTRUCTIONS
HÄLLDE RG-7
(GB)
CAUTION
Take great care not to injure your hands on
sharp blades and moving parts.
Never put your hands into the exi-feeder
(6:F).
Never put your hands into the outlet of the
machine.
The machine may be installed only by an
authorized specialist.
Only an authorized specialist should be
allowed to repair the machine and open
the machine housing.
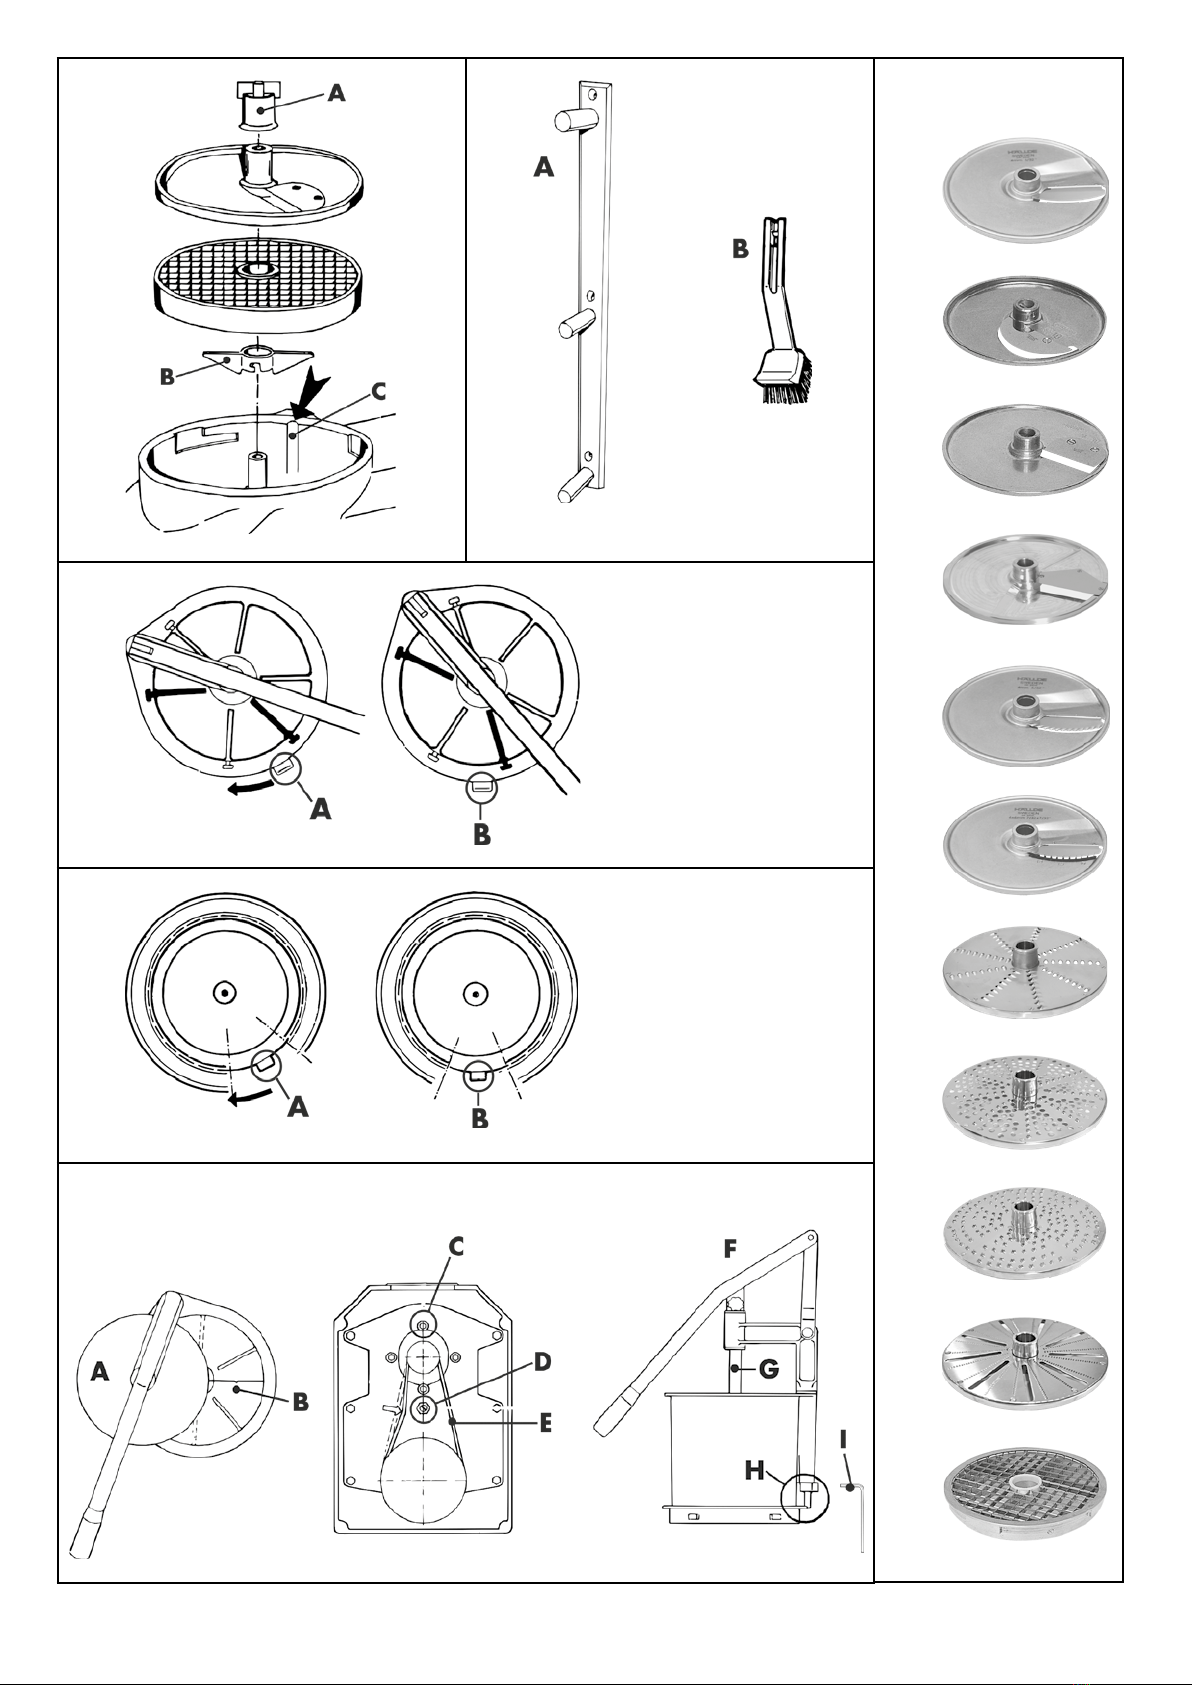
Remove the locking cap (1:A) by turning it
clockwise.
Always press the red stop button of the
machine before tting or removing any
cutting tools, feeder, etc., even if the
machine is not running.
This appliance is not to be operated by
children or persons with reduced physical,
sensory or mental capabilities or persons
lacking experience of such appliances,
unless they are given adequate instruction
or supervision.
UNPACKING
Check that all of the parts have been delivered,
that the machine operates as intended, and
that nothing has been damaged in transit. The
machine supplier should be notied of any
shortcomings within eight days.
INSTALLATION
Connect the machine to an electric power
supply which is suitable for the machine.
The machine should be placed on a countertop
or table which is about 650 mm high.
Locate the hanger (2:A) for the cutting tools
(3) on the wall in the vicinity of the machine
for convenient and safe use.
Check the following three points without
locking cap (1:A), cutting tool (3) and ejector
plate (1:B) tted to the machine.
That the shaft rotates clockwise.
That the machine cannot be started without
the exi-feeder (6:F) tted.
That the machine stops when the feed plunger
(6:A) of the exi-feeder is swung to the side
so that the exi-feeder opening (6:B) is larger
than 45 mm.
If the machine does not perform correctly,
summon a specialist for remedying the fault
before taking the machine into operation.
CHOOSING THE RIGHT
CUTTING TOOLS
SLICER (3:A): Slices hard and soft vege-
tab les, fruits, mushrooms etc. Dices when
combined with a suitable Dicing Grid.
Cut French fries in combination with Potato
Chip Grid.
FINE CUT SLICER (3:B): Slices hard and soft
vegetables, fruits, mushrooms etc. Dices when
combined with a suitable Dicing Grid.
STANDARD SLICER (3:C): Slice hard/
rm products, such as root vegetables etc.
Dice when combined with a suitable Dicing
Grid.
SOFT SLICER (3:D): Slices soft vegetables,
fruits, mushrooms etc. Preferably used when
dicing soft products, in combination with a
suitable Dicing Grid.
CRIMPING SLICER (3:E): Cut decorative
rippled slices of beetroot, cucumber, carrots,
etc.
JULIENNE CUTTER (3:F): Cut julienne of rm
products for soups, salads, stews, decorations
etc. Suitable to cut slightly curved potato chips/
French fries.
GRATER/SHREDDER (3:G): Grates carrots
and cabbage for raw salads. Grates nuts,
almonds and dry bread. Grater 6 or 8 mm is
commonly used for grating cheese for pizza
and when shredding cabbage.
FINE GRATER (3:H): For finely grating
products, from hard/dry cheeses, raw potatoes
for Swedish potato pancakes and bread for
making breadcrumbs.
HARD CHEESE GRATER (3:I): Ideal for grating
hard cheese such as parmesan. Produces
a somewhat coarser grate than the Fine Grater,
Extra ne.
FINE GRATER, EXTRA FINE (3:J): Grates
products very finely, such as black radish
grated for purée and potatoes for mashing.
DICING GRID (3:K): Cut dices in combination
with a suitable type of slicer. Dice both hard and
soft vegetables, fruits etc.
FITTING AND REMOVING
THE CUTTING TOOLS
When tting the tools, place the ejector plate
(1:B) on the shaft and turn/press down the
ejector plate into its coupling.
For dicing or chopping onions, rst place a
suitable dicing grid in the machine with the
screw head on the dicing grid edge in the
groove (1:C) in the machine.
For dicing, then choose a suitable Slicer, Fine
Cut Slicer, Standard Slicer or Soft Slicer and
t the slicer to the shaft and then turn it so that
the slicer drops into its coupling.
For slicing, shredding and grating, t instead
only the selected cutting tool to the shaft and
turn the cutting tool so that it drops into its
coupling.
On cutting with the exi-feeder (6:F), secure
the locking cap (1:A) by turning it anti-clock wise
on the centre shaft of the cutting tool.
To remove, unscrew the locking cap (1:A) by
turning it clockwise and remove the cutting
tool (3) and the ejector plate (1:B).
FITTING AND REMOVING
THE FLEXI-FEEDER
To t the exi-feeder (6:F), place it with the
snap lock at ”5 o’clock” (4:A), viewed from the
machine outlet.
Then turn the exi-feeder clockwise to the
locked position at ”6 o’clock” (4:B).
To remove, bend the snap lock (4:B) up slightly,
at the same time turning the exi-feeder anti-
clockwise.
CLEANING
Switch off the machine and remove the power
supply plug from the socket.
Carefully clean the machine immediately after
use.
All cutting tools can be cleaned in a dishwasher.
If you have used a dicing grid (3:K), leave it
in the machine, and use the brush (2:B) for
pushing out any product remaining in the grid.
Remove the loose parts of the machine, wash
them and dry them thoroughly.
Wipe the machine with a damp cloth.
Always wipe the knives of the cutting tools
dry after use.
Always store the cutting tools (3) on the
hangers (2:A) on the wall.
Never use sharp objects or a high-pressure
spray gun for cleaning.
Never spray water on the sides of the machine.
CHECK EVERY WEEK
Check that the machine stops as soon as the
feed plunger (6:A) of the exi-feeder is moved
to the side so that the exi-feeder opening
(6:B) is larger than 45 mm. If not, the setting
of the stop pad (6:H) must be adjusted by an
authorized specialist. The spanner (6:I) should
be used for releasing/locking the stop pad.
Remove the plug from the power supply socket
or open the isolating switch and then check that
the electric cable is in good condition and is not
cracked on theoutside.
If any of the two safety functions does not
perform as intended or if the electric cable
is cracked, get a specialist to attend to the
machine before connecting it back to the
power supply.
Check that the drive belts (6:E) are tensioned.
See under the heading TENSIONING THE
DRIVE BELTS.

HALLDE • User Instructions
6
Check that all visible screws and bolts are
securely tightened.
Check that the exi-feeder plunger shaft (6:G)
is clean and moves freely.
Check that the knives and shredder plates are
in good condition and are sharp.
TENSIONING THE DRIVE BELTS
Release the four rubber feet that hold the
protective plate against the underside of the
machine and remove the protective plate.
Release the four screws (6:C) retaining the
motor.
Release the locknut (6:D) and use the tensio-
ning screw in the centre of the locknut to tighten
the belts, so that the belts can be pressed in
about 10 mm using normal force.
Tighten the locknut and the four screws, and
t the protective plate.
TROUBLE-SHOOTING
FAULT: The machine cannot be started,or stops
while it is running and cannot be restarted.
REMEDY: Check that the plug is securely
tted into the power supply socket or set the
isolating switch to position ”I”. Make sure that
the exi-feeder (6:F) is correctly tted to the
machine. Move the exi-feeder feed plunger
(6:A) towards the exi-feeder centre. Press
the starter button. Check that the fuses in the
fuse box for the premises have not blown and
that they have the correct rating. Wait for a
few minutes and try to restart the machine.
If the machine still fails to run, call a specialist.
FAULT: Low capacity or poor cutting results.
REMEDY: Make sure that you are using the
correct cutting tool or combination of cuttings
tools (3). Fit the locking cap (1:A). Check that
the knives and shredder plates are in good
condition and are sharp. Press the food down
loosely. Tension the drive belts (6:E) in accor-
dance with the instructions under the heading
TENSIONING THE DRIVE BELTS.
FAULT: The cutting tool (3) cannot be removed.
REMEDY: Always use the ejector plate (1:B).
Use a thick leather glove or the like that the
knives of the cutting tool cannot cut through,
and turn the cutting tool clockwise to release it.
FAULT: The locking cap (1:A) cannot be
removed.
REMEDY: Unscrew the locking cap clockwise
using a thick leather glove.
TECHNICAL SPECIFICATION
MACHINE: 400 V, 3-phase, 50 Hz, with motor
protection set to 1.6 A. Transmission: Belt drive.
Safety system: One safety switch. Degree of
protection: IP44. Power supply socket: 10 A.
Earthed, 3-phase, 16 A. Fuse in fuse box for
the premises: 10 A, slow-blow. Sound level LpA
(EN31201): < 70 dBA.
TOOLS: Diameter: 185 mm. Speed: 480 rpm.
MATERIALS: Machine housing: Polyurethane.
Product passage: Acetal. Flexi-feeder: Acetal.
Linkage system: Stainless steel. Feed plunger:
Aluminium alloy. Cutting tool discs: Stainless
steel, aluminium or acetal. Cutting tool knives:
Knife steel of the highest quality.
NET WEIGHTS: Machine, incl. exi-feeder:
22 kg. Cutting tools: About 0.5 kg on average.
STANDARDS: See declaration of conformity.
WHEN USING SLICER, CRIMPING SLICER,
JULIENNE OR GRATER/SHREDDER
FITTING THE
CUTTING TOOLS
Locking sleeve
Cutting tool
Ejector plate
Knife house
WHEN USING DICING GRID
Locking sleeve
Slicer
Dicing Grid
Ejector plate
Knife house


Other manuals for RG-7
1
Table of contents
Languages:
Other Hallde Kitchen Appliance manuals

Hallde
Hallde RG-200 Installation instructions

Hallde
Hallde RG-50 User manual

Hallde
Hallde CC-32S User manual

Hallde
Hallde RG-200 User manual

Hallde
Hallde RG-50 User manual

Hallde
Hallde RG-100 User manual

Hallde
Hallde RG-350 User manual

Hallde
Hallde VCB-62 User manual

Hallde
Hallde RG-100 User manual

Hallde
Hallde RG-50 User manual
Popular Kitchen Appliance manuals by other brands

Philips
Philips GC558 user manual

HOT ROCKS
HOT ROCKS HR-70-22 user manual

cecotec
cecotec ROCK'NCUT SHURIKEN STEEL instruction manual

Beautiful
Beautiful 5-in-1 Expandable Skillet instruction manual

Gastroback
Gastroback DesIgn Wok Advanced Pro operating instructions

Forno Classico
Forno Classico Colosso 65 Installation and operation manual